My lessons learned from a month and a half with the MK3S and an Open Source MMU2S
Wow. I can't decide if I am more surprised I have had it that long, or that it has only been a month and a half. In that time I have learned a lot of things, and I thought I would pass some of them along. Most of them are covered elsewhere, but I think a few may be unique. Regardless, here it goes:
- The kits are amazingly well thought out, and easy to assemble. I did find myself on a few occasions needing to go back and disassemble to put in square nuts later in the process that I must have missed. If you see a square nut slot, populate it. It will save you a ton of effort later.
- Even building my own MMU2S from scratch, the instructions were amazingly helpful. I tried to purchase it, but...well...Covid. That and impatience. It is well thought out and designed. Most of the issues others have said about it, I have encountered in one way or another, but most are avoidable I have found. I will get into some of them.
- Run the printer without the MMU2S for a while before adding it. There is a learning curve to the printer and software, and the MMU2S introduces a whole new level of complexity. If you haven't run the printer by itself, you may not be able to troubleshoot effectively what is the MMU2S, what is the printer, and what is PEBCAK.
- Do the calibrations. It may work, but you will hit walls if you don't.
- There are parts I strongly recommend upgrading.
https://www.thingiverse.com/thing:3528314
https://www.thingiverse.com/thing:3657251
https://www.thingiverse.com/thing:3418267Each makes a difference in its own way.
- Throw out the buffer, and print a full set of the https://www.prusaprinters.org/prints/10370-gravity-spoolholder-for-mmu2s . They make all the difference in the world.
- Almost every problem I have had with the MMU2s comes down to two things, bad tips and friction. There isn't a ton I have been able to do about bad tips, but friction is something you can fix. PTFE tubes seem slippery, but they aren't slippery enough. Even worse are sharp angles and kinks. Make sure your paths have sufficient radius where necessary, and try to avoid having your filament touch plastic wherever possible.
- Flexible filaments will get stuck and not pull through. First, to get them to work you have to loosen the tension on the print head drivers and the MMU2S drivers, which means there isn't a lot of pull to get it through. Second, they are pretty rubbery, so they have a lot of friction and can't even roll the spool without slipping. I found the best way to run flexible filament like Ninjaflex TPU is to pull out 4 or 5 meters/yards and make sure it is in such a way that it won't tangle. I then check every hour or so and unroll more filament. I was able to get nearly flawless prints this way. It just needs some baby sitting.
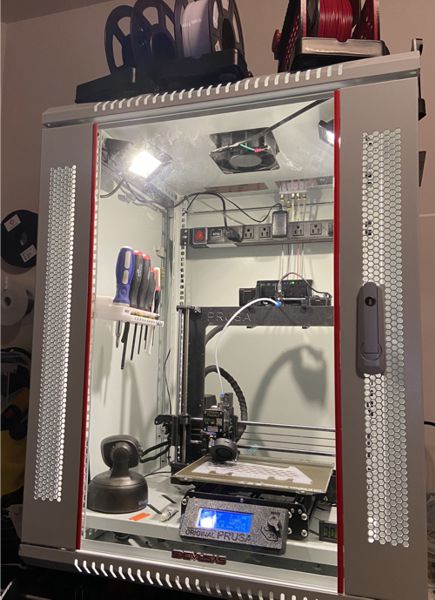
- I am using a Sysrack 15U "wall mount" server rack for my enclosure. It works amazingly well. I have the printer on one shelf, with a camera inside to monitor. I have the filament on the top, and have two high intensity LED lights that add light, but also heat to the enclosure. It is NOT air tight. If I start doing ABS I will need to look at closing the vent holes and activating the included vent fan. I like that the side panels easily snap off for access. It also looks nice in the white.
- First layer calibration is everything. If your first layer doesn't work, no point in continuing the print. There is a balance between jamming the filament into the textured surface of the plate, and getting the head too close so it grabs the print and pulls it off. You want to jam it in as far as you can without it grabbing any parts of the print on the first layer.
- On the textured powder coated spring steel build plate, PETG is a dream. Clean it about every other print with alcohol, and never touch it with your fingers. Don't coat it with anything other than if doing Poly-carbonate, use glue stick. Don't print PLA on it, as prints will warp and detach. Use the smooth plate for that.
- Get some ball hex drivers. they will be your friends.
- Don't be afraid to change nozzle. Just remember that you will need to re-calibrate your Z axis. You may also need to adjust your PINDA depending on the nozzle. I wanted a carbide nozzle to print carbon fiber, but there was only a V8 nozzle available. That made it protrude more, and my PINDA wasn't at the right height for it. You need to calibrate your Z EVERY time you change a print nozzle. This also means new first layer calibrations.
- Make the move to Prusa Slicer. I get it. I spent a lot of time learning Cura, and didn't want to change. The fact is, the optimizations in Prusa Slicer are worth the effort, and you can do everything you would have done in Cura in PS. Bite the bullet.
- Similarly, get a copy of Fusion 360. it is free for personal use. You will learn important skills building and modifying models in that, and you will be happy you did after you grow your hair back from pulling it out in frustration. (pro tip: search how to change the Z axis to up)
- Set a camera up so you can observe your prints. It is nice when you wake up to be able to pull up your overnight print, and stop it when it is birdsnesting. Similarly it helps you get back to sleep when you can watch the methodical back and forth of a print going well.
- I bought all the stuff to hook up a PiZero, and I don't think I will. The flash card is actually pretty convenient, and I don't feel the need to make it more complicated than it already is.
- Quality filament will make your life easier! Look for dimensional accuracy. You also want to see neatly, mechanically wound rolls. Often these are listed as "tangle free". Prusament has spoiled me on this, and now I am becoming a filament snob. Another brand I have liked is Sunlu. I am running it almost exclusively at the moment, though I would love to find an American shop that makes similar quality at a similar price.
- Build your printer yourself. It is invaluable in helping you understand how the thing will work. This in turn helps you troubleshoot, and simplifies your overall user experience. I would really like to see the customer service numbers on pre-built vs kit printers.
- Stay in the ecosystem. I get there are other multi filament options, and you can do all kinds of other things with your printer, but every change you make narrows the scope of people who have a similar setup. Fewer people can help you. As with anything, if you are advanced enough that you are refining subtle issues, then you are probably advanced enough to work through those issues yourself. If not, be very cautious about changes. Even though one of the first things I suggested were changes. They are just good ones 🙂
- PRUSA: Get a presence in the USA! I want to buy Prusament, but I can't justify $50-70 for a roll. Similarly I would like to get parts and things from you, but it just gets too expensive to onsie-twosie anything from you. I know you have some stuff on Amazon, but it is way overpriced compared to the competition. I have a brother-in-law that does US fulfillment. I'll hook you up if you want. JUST GET STUFF IN THE USA so we can support you!
- On the other side, you can get parts on Aliexpress and Ebay. Just be cautious as different vendors are more or less likely to solve problems, and quality is... spotty. If you thought getting a part from the Czech Republic is frustrating, just wait until you try to deal with that from China. It may become more "challenge" and less "project". That said, it did work out for me on my MMU2S unit, though I even bid heavily over retail trying to get an in the box MMU2S on Ebay before I finally bit the bullet.
- Finally, have fun with the printer. Do projects. Fail. It is just filament. Let it relax you. I feel like watching a print build up is much like watching the flames of a campfire, only without the allergies and it is constructive rather than destructive. Therapeutically it is very similar though. Watch your prints come to life and enjoy seeing the process. It is fascinating.
RE: My lessons learned from a month and a half with the MK3S and an Open Source MMU2S
I like a lot of these tips, some of these I've heard before and some I haven't so I'll implement them.
One question, for someone whose got it to work. When friction makes a print fail, is that because the MMU can't get the filament to the extruder?
Two question, have you had an issue where normal filament would go through your hot end fine, but having any amount of tip made it get stuck, as though the tolerances were so tight nothing greater than 1.75mm would get through?
RE: My lessons learned from a month and a half with the MK3S and an Open Source MMU2S
YMMV as mine is a clone MMU2S, though my printer is original. Most of my issues were with the buffer. The PTFE tube would pull in and bind, the screws wouldn't hold it properly or it would hold it too tight, and it would just bind in there. I got rid of the buffer and just let it spool out, and suddenly the problem went away in most cases. The gravity spool holders solved that problem nicely.
My PTFE tube is supposedly 2mm interior, but it appears to be a bit more. I can have pretty good strings in there, and it will push them through with little problem. The only time I really have an issue is occasionally the tip will end up fat enough that it will pull out and back into the MMU2S, but will not feed all the way into the head on the MK3S when it tries to re-feed. Fortunately this is an error that the printer will pause the print, and is recoverable. When this happens, there are two ways to deal with it: First you can just cut the end of the filament and let it do its thing. Another thing I have done (and this worked particularly well with TPU) is pull the tube out of the top of the print head, let the filament load until there are 3 or more inches hanging out of the tube, then I manually insert it in, gradually feeding the PTFE tube until it is able to seat back in. Once it has done that, even multiple filament changes don't seem to be a problem for me.
Oh, and make sure to calibrate your filament sensor on your print head! That was huge. Get it right to the point where it is solidly at zero when empty, but goes to 1 if anything enters the head. That made all the difference in the world. Find it here: . It seems like your machine is working beforehand, but this little calibration adds to the reliability dramatically. It was probably the most dramatic change toward success I made on the machine.
RE: My lessons learned from a month and a half with the MK3S and an Open Source MMU2S
Oh, your first question. It might get to the extruder, but it just binds and stops after two or three layers, and you end up printing air. Drove me nuts until I figured out it was binding.
RE: My lessons learned from a month and a half with the MK3S and an Open Source MMU2S
Shameless plug, here's the updated selector for the newer 3.9.0/R2 parts (required for the blade to stay in place.)
RE: My lessons learned from a month and a half with the MK3S and an Open Source MMU2S
Sorry to bump an old thread but this has been a good read and super helpful to me as I'm piecing together an open source MMU2. I'm planning on using the BOM in this github repo but there aren't any instructions and the parts differ from the Prusa kit. @wonko6x9 did you follow a guide or just kind of figure it out along the way?
RE: My lessons learned from a month and a half with the MK3S and an Open Source MMU2S
I decided to try some of the steps from @wonko6x9
The three upgraded parts mentioned in step 5 includes
https://www.thingiverse.com/thing:3528314 -
https://www.thingiverse.com/thing:3657251 - Prusa MMU2S Rear PTFE Holder
This one I did, and IMMEDIATELY found benefit. This is so good, Prusa should adopt it.
https://www.thingiverse.com/thing:3418267
Horizontal Low Profile Prusa MMU2 Frame Holder
this one I did, and used it for a couple weeks. It is NOT a good idea. Here is the problem. The MMU2s can recover from problems with filament sometimes by cutting a little bit off the end. When that happens, the cut bit will accumulate in the tray in front. using this horizontal frame holder allows those bit to accumulate ANYWHERE in the tray, including directly in the path of the selector, which gets jammed when that happens and is a very big pain to fix. When the MMU is tilted using the stock frame holder, those bits end up in the back of the tray, out of the way of the selector.
I got rid of this "enhancement" once I realized how much trouble it caused me.