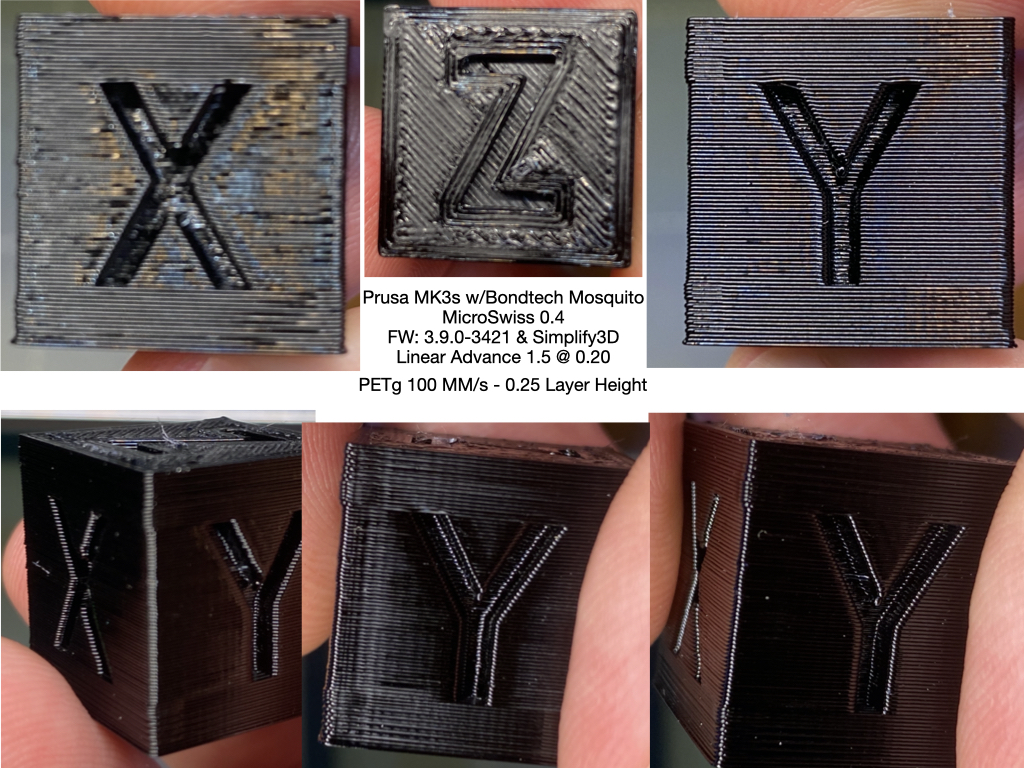
XYZ Calibration Cube (20mm) corner artifacts, MK3s w/Bondtech Mosquito, MicroSwiss 0.4
Greetings,
I've been trying to get some finer details tuned but it seems that I have reached my achievable pinnacle and would appreciate any recommendations to better the final product rendered. Granted, I am happy with the results thus far and have no major concerns, just looking to make it 'more better'.
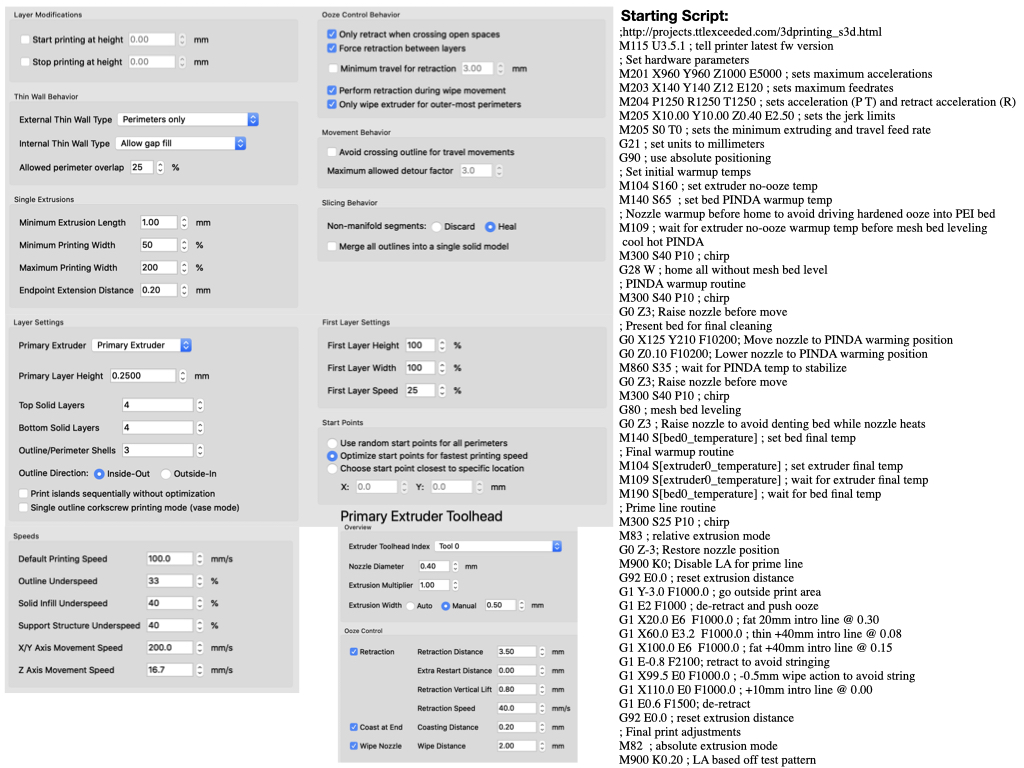
The printer is a MK3s running FW 3.9.0-3421 with a Bondtech Mosquito extruder and a Microswiss 0.4 nozzle. I've attached images of the calibration cube, linear advance results, and Simplify3D settings.
Any pointers or help is much appreciated!
/R

RE: XYZ Calibration Cube (20mm) corner artifacts, MK3s w/Bondtech Mosquito, MicroSwiss 0.4
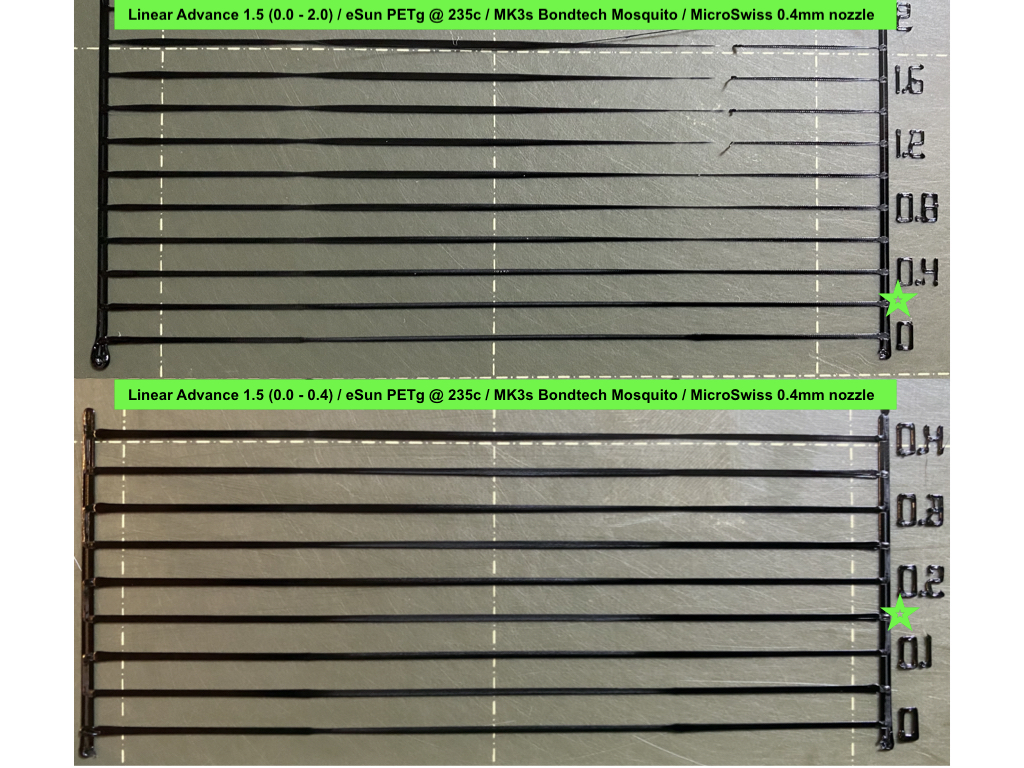
BLUF: Switched LA1.5 to 0.15 and made ~80% improvement.
I made some progress. When I did the initial LA1.5 test pattern it was in the 0.0 to 2.0 default scale. In this scale, 0.2 is the best line. To further refine the findings, I performed the test again but at 0.0 to 0.4 to drill it down to get the best fit. After I inspected the results (along with others) the 0.2 line was the best again so I began using it. The performance was good, but artifacts were presented as noted above. Then as I was troubleshooting and trying to resolve the corner artifacts I change LA1.5 to 0.1, 0.3, and back to 0.2 - and again, 0.2 was the best-observed results. Before leaving my house this morning, I looked at my digital notes with pics and thought that 0.15 on the expanded test looked best - it is funny though because the actual print to eye appeared to show 0.2 as best (3 people), but the pic shows 0.15.
So lesson-learned, when performing half-step troubleshooting with LA1.5 numbers, step at no more than 0.05.
RE: XYZ Calibration Cube (20mm) corner artifacts, MK3s w/Bondtech Mosquito, MicroSwiss 0.4
After some experimentations, an X/Y Jerk value of 8 gave some further easing of artifacts. The latest firmware has 10 predefined and would not let me change the value for either X or Y, funny enough E could... I used the terminal directly to change the value but M503 showed that it would not take in the X or Y axis. Not a big deal, just changed it in the configs, enabled Live-K, and recompiled easily on linux using ./PF-build.sh.
Follows is the best possible S3D FFF profile that I could refine for eSUN Black PETG.
<?xml version="1.0"?>

<profile name="MK3s Bondtech Mosquito  ! ! ! PETG / 100 MMS ! ! !" version="2020-05-29 14:33:53" app="S3D-Software 4.1.2">

  <baseProfile>Prusa Research Original Prusa i3 MK3 (modified)</baseProfile>

  <printMaterial>PET</printMaterial>

  <printQuality>Nozzle: 0.4mm / Layer Height: 0.2mm</printQuality>

  <printExtruders></printExtruders>

  <extruder name="Primary Extruder">

    <toolheadNumber>0</toolheadNumber>

    <diameter>0.4</diameter>

    <autoWidth>0</autoWidth>

    <width>0.5</width>

    <extrusionMultiplier>0.86</extrusionMultiplier>

    <useRetract>1</useRetract>

    <retractionDistance>2</retractionDistance>

    <extraRestartDistance>0</extraRestartDistance>

    <retractionZLift>0.8</retractionZLift>

    <retractionSpeed>2700</retractionSpeed>

    <useCoasting>1</useCoasting>

    <coastingDistance>0.2</coastingDistance>

    <useWipe>0</useWipe>

    <wipeDistance>2</wipeDistance>

  </extruder>

  <primaryExtruder>0</primaryExtruder>

  <layerHeight>0.2</layerHeight>

  <topSolidLayers>4</topSolidLayers>

  <bottomSolidLayers>4</bottomSolidLayers>

  <perimeterOutlines>3</perimeterOutlines>

  <printPerimetersInsideOut>1</printPerimetersInsideOut>

  <startPointOption>2</startPointOption>

  <startPointOriginX>0</startPointOriginX>

  <startPointOriginY>0</startPointOriginY>

  <sequentialIslands>0</sequentialIslands>

  <spiralVaseMode>0</spiralVaseMode>

  <firstLayerHeightPercentage>100</firstLayerHeightPercentage>

  <firstLayerWidthPercentage>100</firstLayerWidthPercentage>

  <firstLayerUnderspeed>0.25</firstLayerUnderspeed>

  <useRaft>0</useRaft>

  <raftExtruder>0</raftExtruder>

  <raftTopLayers>3</raftTopLayers>

  <raftBaseLayers>2</raftBaseLayers>

  <raftOffset>3</raftOffset>

  <raftSeparationDistance>0.14</raftSeparationDistance>

  <raftTopInfill>100</raftTopInfill>

  <aboveRaftSpeedMultiplier>0.3</aboveRaftSpeedMultiplier>

  <useSkirt>1</useSkirt>

  <skirtExtruder>0</skirtExtruder>

  <skirtLayers>1</skirtLayers>

  <skirtOutlines>2</skirtOutlines>

  <skirtOffset>3</skirtOffset>

  <usePrimePillar>0</usePrimePillar>

  <primePillarExtruder>999</primePillarExtruder>

  <primePillarWidth>12</primePillarWidth>

  <primePillarLocation>7</primePillarLocation>

  <primePillarSpeedMultiplier>1</primePillarSpeedMultiplier>

  <useOozeShield>0</useOozeShield>

  <oozeShieldExtruder>999</oozeShieldExtruder>

  <oozeShieldOffset>2</oozeShieldOffset>

  <oozeShieldOutlines>1</oozeShieldOutlines>

  <oozeShieldSidewallShape>1</oozeShieldSidewallShape>

  <oozeShieldSidewallAngle>30</oozeShieldSidewallAngle>

  <oozeShieldSpeedMultiplier>1</oozeShieldSpeedMultiplier>

  <infillExtruder>0</infillExtruder>

  <internalInfillPattern>Wiggle</internalInfillPattern>

  <externalInfillPattern>Rectilinear</externalInfillPattern>

  <infillPercentage>15</infillPercentage>

  <outlineOverlapPercentage>20</outlineOverlapPercentage>

  <infillExtrusionWidthPercentage>100</infillExtrusionWidthPercentage>

  <minInfillLength>3</minInfillLength>

  <infillLayerInterval>1</infillLayerInterval>

  <internalInfillAngles>0</internalInfillAngles>

  <overlapInternalInfillAngles>0</overlapInternalInfillAngles>

  <externalInfillAngles>45,-45</externalInfillAngles>

  <generateSupport>0</generateSupport>

  <supportExtruder>0</supportExtruder>

  <supportInfillPercentage>25</supportInfillPercentage>

  <supportExtraInflation>0</supportExtraInflation>

  <supportBaseLayers>0</supportBaseLayers>

  <denseSupportExtruder>0</denseSupportExtruder>

  <denseSupportLayers>0</denseSupportLayers>

  <denseSupportInfillPercentage>70</denseSupportInfillPercentage>

  <supportLayerInterval>1</supportLayerInterval>

  <supportHorizontalPartOffset>0.3</supportHorizontalPartOffset>

  <supportUpperSeparationLayers>1</supportUpperSeparationLayers>

  <supportLowerSeparationLayers>1</supportLowerSeparationLayers>

  <supportType>0</supportType>

  <supportGridSpacing>4</supportGridSpacing>

  <maxOverhangAngle>45</maxOverhangAngle>

  <supportAngles>0</supportAngles>

  <temperatureController name="Primary Extruder">

    <temperatureNumber>0</temperatureNumber>

    <isHeatedBed>0</isHeatedBed>

    <stabilizeAtStartup>1</stabilizeAtStartup>

    <setpoint layer="1" temperature="235"/>

    <setpoint layer="2" temperature="230"/>

  </temperatureController>

  <temperatureController name="Heated Bed">

    <temperatureNumber>0</temperatureNumber>

    <isHeatedBed>1</isHeatedBed>

    <stabilizeAtStartup>1</stabilizeAtStartup>

    <setpoint layer="1" temperature="80"/>

  </temperatureController>

  <fanSpeed>

    <setpoint layer="1" speed="0"/>

    <setpoint layer="2" speed="50"/>

  </fanSpeed>

  <blipFanToFullPower>1</blipFanToFullPower>

  <adjustSpeedForCooling>1</adjustSpeedForCooling>

  <minSpeedLayerTime>5</minSpeedLayerTime>

  <minCoolingSpeedSlowdown>20</minCoolingSpeedSlowdown>

  <increaseFanForCooling>0</increaseFanForCooling>

  <minFanLayerTime>45</minFanLayerTime>

  <maxCoolingFanSpeed>100</maxCoolingFanSpeed>

  <increaseFanForBridging>1</increaseFanForBridging>

  <bridgingFanSpeed>100</bridgingFanSpeed>

  <use5D>1</use5D>

  <relativeEdistances>0</relativeEdistances>

  <allowEaxisZeroing>1</allowEaxisZeroing>

  <independentExtruderAxes>0</independentExtruderAxes>

  <includeM10123>0</includeM10123>

  <stickySupport>1</stickySupport>

  <applyToolheadOffsets>0</applyToolheadOffsets>

  <gcodeXoffset>0</gcodeXoffset>

  <gcodeYoffset>0</gcodeYoffset>

  <gcodeZoffset>0</gcodeZoffset>

  <overrideMachineDefinition>1</overrideMachineDefinition>

  <machineTypeOverride>0</machineTypeOverride>

  <strokeXoverride>250</strokeXoverride>

  <strokeYoverride>210</strokeYoverride>

  <strokeZoverride>210</strokeZoverride>

  <originOffsetXoverride>0</originOffsetXoverride>

  <originOffsetYoverride>0</originOffsetYoverride>

  <originOffsetZoverride>0</originOffsetZoverride>

  <homeXdirOverride>-1</homeXdirOverride>

  <homeYdirOverride>-1</homeYdirOverride>

  <homeZdirOverride>-1</homeZdirOverride>

  <flipXoverride>1</flipXoverride>

  <flipYoverride>-1</flipYoverride>

  <flipZoverride>1</flipZoverride>

  <toolheadOffsets>0,0|0,0|0,0|0,0|0,0|0,0</toolheadOffsets>

  <overrideFirmwareConfiguration>1</overrideFirmwareConfiguration>

  <firmwareTypeOverride>RepRap (Marlin/Repetier/Sprinter)</firmwareTypeOverride>

  <GPXconfigOverride>r2</GPXconfigOverride>

  <baudRateOverride>115200</baudRateOverride>

  <overridePrinterModels>1</overridePrinterModels>

  <printerModelsOverride></printerModelsOverride>

  <startingGcode>; Last updated 20190324,M115 U3.5.1 ; tell printer latest fw version,; Set hardware parameters,M201 X960 Y960 Z1000 E5000 ; sets maximum accelerations, mm/sec^2,M203 X140 Y140 Z12 E120 ; sets maximum feedrates, mm/sec,M204 P1250 R1250 T1250 ; sets acceleration (P, T) and retract acceleration (R), mm/sec^2,M205 X8.00 Y8.00 Z0.40 E4.50 ; sets the jerk limits, mm/sec,M205 S0 T0 ; sets the minimum extruding and travel feed rate, mm/sec,G21 ; set units to millimeters,G90 ; use absolute positioning,; Set initial warmup temps,M104 S160 ; set extruder no-ooze temp,M140 S65  ; set bed PINDA warmup temp,; Nozzle warmup before home to avoid driving hardened ooze into PEI bed,M109 ; wait for extruder no-ooze warmup temp before mesh bed leveling, cool hot PINDA,M300 S40 P10 ; chirp,G28 W ; home all without mesh bed level,; PINDA warmup routine,M300 S40 P10 ; chirp,G0 Z3; Raise nozzle before move,; Present bed for final cleaning,G0 X125 Y210 F10200; Move nozzle to PINDA warming position,G0 Z0.10 F10200; Lower nozzle to PINDA warming position,M860 S35 ; wait for PINDA temp to stabilize,G0 Z3; Raise nozzle before move,M300 S40 P10 ; chirp,G80 ; mesh bed leveling,G0 Z3 ; Raise nozzle to avoid denting bed while nozzle heats,M140 S[bed0_temperature] ; set bed final temp,; Final warmup routine,M104 S[extruder0_temperature] ; set extruder final temp,M109 S[extruder0_temperature] ; wait for extruder final temp,M190 S[bed0_temperature] ; wait for bed final temp,; Prime line routine,M300 S25 P10 ; chirp,M83 ; relative extrusion mode,G0 Z-3; Restore nozzle position,M900 K0; Disable LA for prime line,G92 E0.0 ; reset extrusion distance,G1 Y-3.0 F1000.0 ; go outside print area,G1 E2 F1000 ; de-retract and push ooze,G1 X20.0 E6  F1000.0 ; fat 20mm intro line @ 0.30,G1 X60.0 E3.2  F1000.0 ; thin +40mm intro line @ 0.08,G1 X100.0 E6  F1000.0 ; fat +40mm intro line @ 0.15,G1 E-0.8 F2100; retract to avoid stringing,G1 X99.5 E0 F1000.0 ; -0.5mm wipe action to avoid string,G1 X110.0 E0 F1000.0 ; +10mm intro line @ 0.00,G1 E0.6 F1500; de-retract,G92 E0.0 ; reset extrusion distance,; Final print adjustments,M82  ; absolute extrusion mode,M900 K0.15 ; LA based off test pattern</startingGcode>

  <layerChangeGcode></layerChangeGcode>

  <retractionGcode></retractionGcode>

  <toolChangeGcode></toolChangeGcode>

  <endingGcode>; Last updated 20190405,G4 ; wait,G92 E0 ; prepare to retract,G1 E-2 F4800; retract quickly to avoid ooze,G1 Z200 ; raise Z,G0 X0 Y200 F10200; present bed,M220 S100 ; reset speed factor to 100%,M221 S100 ; reset extruder factor to 100%,M900 K0 ; reset linear acceleration,M104 S0 ; turn off temperature,M140 S0 ; turn off heatbed,M107 ; turn off fan,M84 ; disable motors,M300 S100 P10 ; chirp</endingGcode>

  <exportFileFormat>gcode</exportFileFormat>

  <celebration>0</celebration>

  <celebrationSong>Take On Me</celebrationSong>

  <postProcessing></postProcessing>

  <defaultSpeed>6000</defaultSpeed>

  <outlineUnderspeed>0.33</outlineUnderspeed>

  <solidInfillUnderspeed>0.4</solidInfillUnderspeed>

  <supportUnderspeed>0.4</supportUnderspeed>

  <rapidXYspeed>8400</rapidXYspeed>

  <rapidZspeed>1002</rapidZspeed>

  <minBridgingArea>50</minBridgingArea>

  <bridgingExtraInflation>0</bridgingExtraInflation>

  <bridgingExtrusionMultiplier>1</bridgingExtrusionMultiplier>

  <bridgingSpeedMultiplier>1</bridgingSpeedMultiplier>

  <useFixedBridgingAngle>0</useFixedBridgingAngle>

  <fixedBridgingAngle>0</fixedBridgingAngle>

  <applyBridgingToPerimeters>0</applyBridgingToPerimeters>

  <filamentDiameters>1.69|1.75|1.75|1.75|1.75|1.75</filamentDiameters>

  <filamentPricesPerKg>25|46|46|46|46|46</filamentPricesPerKg>

  <filamentDensities>1.25|1.25|1.25|1.25|1.25|1.25</filamentDensities>

  <useMinPrintHeight>0</useMinPrintHeight>

  <minPrintHeight>0</minPrintHeight>

  <useMaxPrintHeight>0</useMaxPrintHeight>

  <maxPrintHeight>0</maxPrintHeight>

  <useDiaphragm>0</useDiaphragm>

  <diaphragmLayerInterval>20</diaphragmLayerInterval>

  <robustSlicing>1</robustSlicing>

  <mergeAllIntoSolid>0</mergeAllIntoSolid>

  <onlyRetractWhenCrossingOutline>1</onlyRetractWhenCrossingOutline>

  <retractBetweenLayers>1</retractBetweenLayers>

  <useRetractionMinTravel>0</useRetractionMinTravel>

  <retractionMinTravel>3</retractionMinTravel>

  <retractWhileWiping>1</retractWhileWiping>

  <onlyWipeOutlines>1</onlyWipeOutlines>

  <avoidCrossingOutline>0</avoidCrossingOutline>

  <maxMovementDetourFactor>3</maxMovementDetourFactor>

  <toolChangeRetractionDistance>12</toolChangeRetractionDistance>

  <toolChangeExtraRestartDistance>-0.5</toolChangeExtraRestartDistance>

  <toolChangeRetractionSpeed>600</toolChangeRetractionSpeed>

  <externalThinWallType>0</externalThinWallType>

  <internalThinWallType>2</internalThinWallType>

  <thinWallAllowedOverlapPercentage>25</thinWallAllowedOverlapPercentage>

  <singleExtrusionMinLength>1</singleExtrusionMinLength>

  <singleExtrusionMinPrintingWidthPercentage>50</singleExtrusionMinPrintingWidthPercentage>

  <singleExtrusionMaxPrintingWidthPercentage>200</singleExtrusionMaxPrintingWidthPercentage>

  <singleExtrusionEndpointExtension>0.2</singleExtrusionEndpointExtension>

  <horizontalSizeCompensation>0</horizontalSizeCompensation>

  <autoConfigureMaterial name="PET">

    <temperatureController name="Primary Extruder">

      <temperatureNumber>0</temperatureNumber>

      <isHeatedBed>0</isHeatedBed>

      <stabilizeAtStartup>1</stabilizeAtStartup>

      <setpoint layer="1" temperature="235"/>

      <setpoint layer="2" temperature="230"/>

    </temperatureController>

    <globalBedTemperature>80</globalBedTemperature>

    <globalExtrusionMultiplier>0.86</globalExtrusionMultiplier>

    <fanSpeed>

      <setpoint layer="1" speed="0"/>

      <setpoint layer="2" speed="50"/>

    </fanSpeed>

  </autoConfigureMaterial>

  <autoConfigureQuality name="Nozzle: 0.4mm / Layer Height: 0.2mm">

    <layerHeight>0.2</layerHeight>

    <topSolidLayers>4</topSolidLayers>

    <bottomSolidLayers>4</bottomSolidLayers>

    <skirtLayers>1</skirtLayers>

    <infillPercentage>15</infillPercentage>

    <supportInfillPercentage>25</supportInfillPercentage>

  </autoConfigureQuality>

</profile>
RE: XYZ Calibration Cube (20mm) corner artifacts, MK3s w/Bondtech Mosquito, MicroSwiss 0.4
Note: Depending on the object to be printed, layer start/stop gap/seam can be reduced by unselecting "Force retraction between layers" under the 'Advanced' configuration tab, in the 'Ooze Control Behavior'. Additionally, you can change 'Start Points' under the 'Layer' configuration tab.