SuperPinda Height Spec? First Layer issues with circles and large area objects
What is the specification for SuperPINDA probe height? I'd like to set that with a proper feeler gauge. I thought I had my first layer issues resolved, but not quite. I used the knowledge base article, using 2 ID cards, then added a business card when that height wasn't quite right. Printed a perfect 3DBenchy and thought things were good. When printing the Screw and Nut, I noticed that circles are an issue. The filament (Prusament Azure Blue) is swinging like a gate instead of adhering to the bed. Ran First Layer Calibration again, and again it was perfect. Nice square corners, etc. I noticed during First Level Calibration that I can't reduce the nozzle height less than zero (which might be a feature!).
Taking things methodically, this morning I ran Mesh Level Calibration and it stopped on the second probe interval, and I noticed a slight dimple in the sheet (smooth PEI) but no error on the display. Ran First Layer Calibration again, no issues with Mesh Leveling during that operation or with the calibration run itself. I resliced my project (a tool stand for 3D printing tools) and tried again. The first two attempts I aborted because the layer was getting knocked off. On the third attempt I slowed the printer speed down to 60% and it seems to be working. Once I get the first layer down I'll increase the speed. BTW, I configured it to use a 3mm raft.
I'm a bit worried about the PINDA height and the Mesh Leveling calibration fail. This is my very first 3D printer so I'm learning as I go. I've had some successful prints, including a human knee joint from a CT scan I got from a medical site. It's a gag print for a friend. That used supports and came out great. The base for that was fairly narrow and I used Supports Everywhere. So I'm slightly confused between having success on what I see as complex objects, and then the fail for things that look like they should be easy.
Pinda
I have used this:
https://www.prusaprinters.org/prints/56918-super-pinda-spinda-spinda-height-adjustment-tool
--------------------
Chuck H
3D Printer Review Blog
Good looking tool!
I have used this:
https://www.prusaprinters.org/prints/56918-super-pinda-spinda-spinda-height-adjustment-tool
Thanks for the pointer! Looks like it will be next weekend before I can work with this some more. The print I was doing went off the rails, er, the bed, and I had a big glop of melted PLA all over the nozzle and hot end. I cleaned off the big pieces, but now I have to clean the rest of it. I knew this was going to happen sooner or later. I was really hoping for later! Once I get this cleaned up I'm going to completely reset and recalibrate.
Do you have any advice for the Z-axis adjustment once the PINDA is reset? I noted that during First Layer Calibration I could not lower the nozzle any further than zero. Lowering it using Live Z Adjust during printing seems risky but the feature must be there for a reason.
Thanks again! All advice is welcome!
first layer
Live Z ONLY uses negative numbers, bigger negative numbers, move the nozzle further down
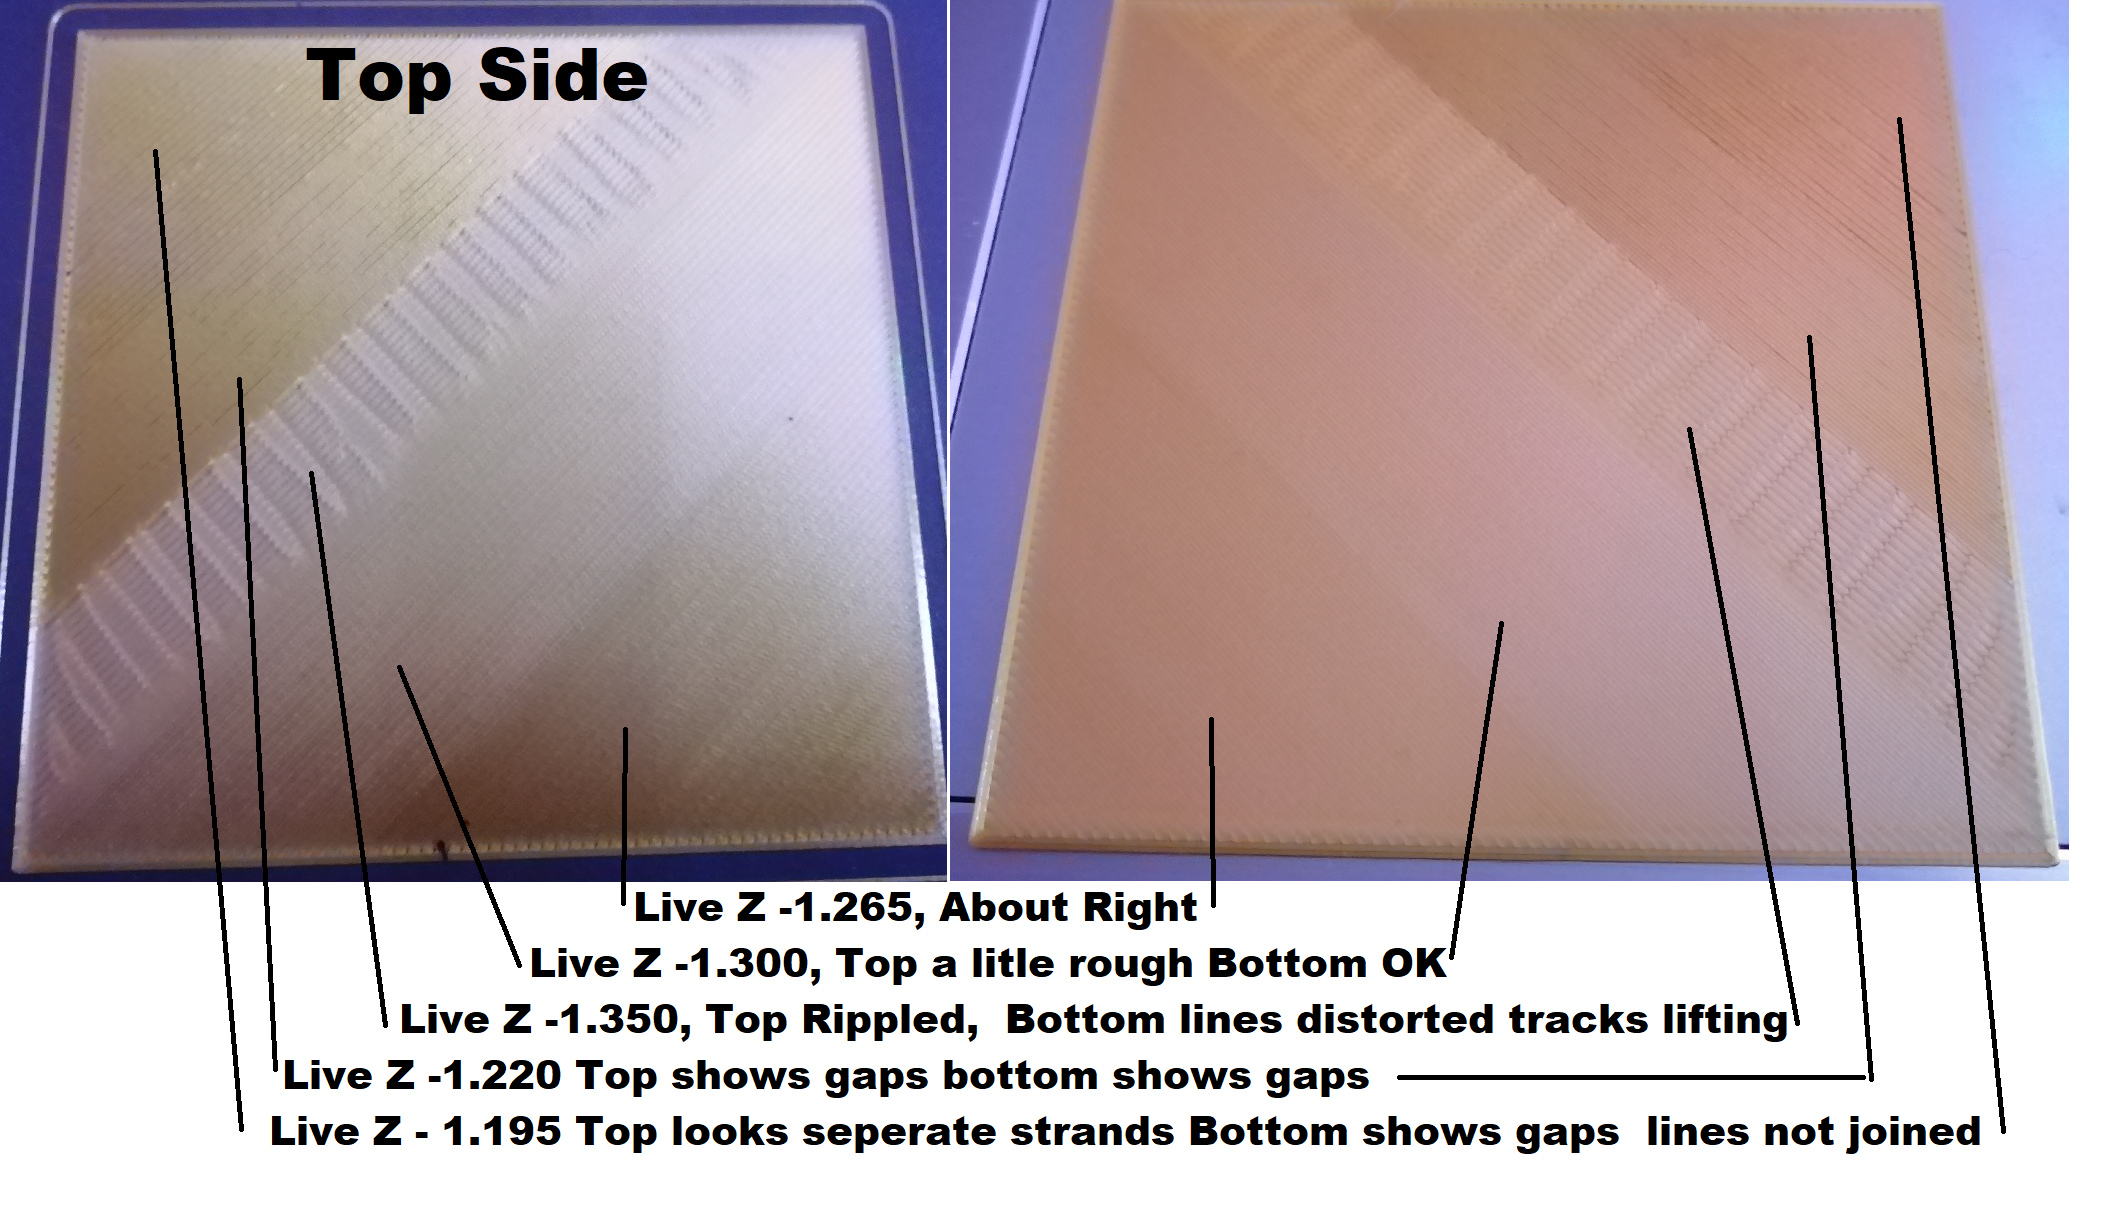
these values are for my printer, yours will probably be different, but the values give an indication of how small changes can make big differences in first layer quality
I try to make safe suggestions,You should understand the context and ensure you are happy that they are safe before attempting to apply my suggestions, what you do, is YOUR responsibility.Location Halifax UK
Live Z Images really helped!
Thanks! I'll play with that this weekend (carefully, of course!) Thanks for the images too! They were quite informative.
Live Z ONLY uses negative numbers, bigger negative numbers, move the nozzle further down
these values are for my printer, yours will probably be different, but the values give an indication of how small changes can make big differences in first layer quality