life adjust Z - my way
hi community
just want to share with you my way of finding the right correction value for the life Z adjustment.
just in case that somebody still tries to get it right with the v2 calibration gcode that came with the kit, which i think is only of limited usability.
💡
find attached a little gcode that should print a 75x75mm surface with 0.2mm height (PLA settings).
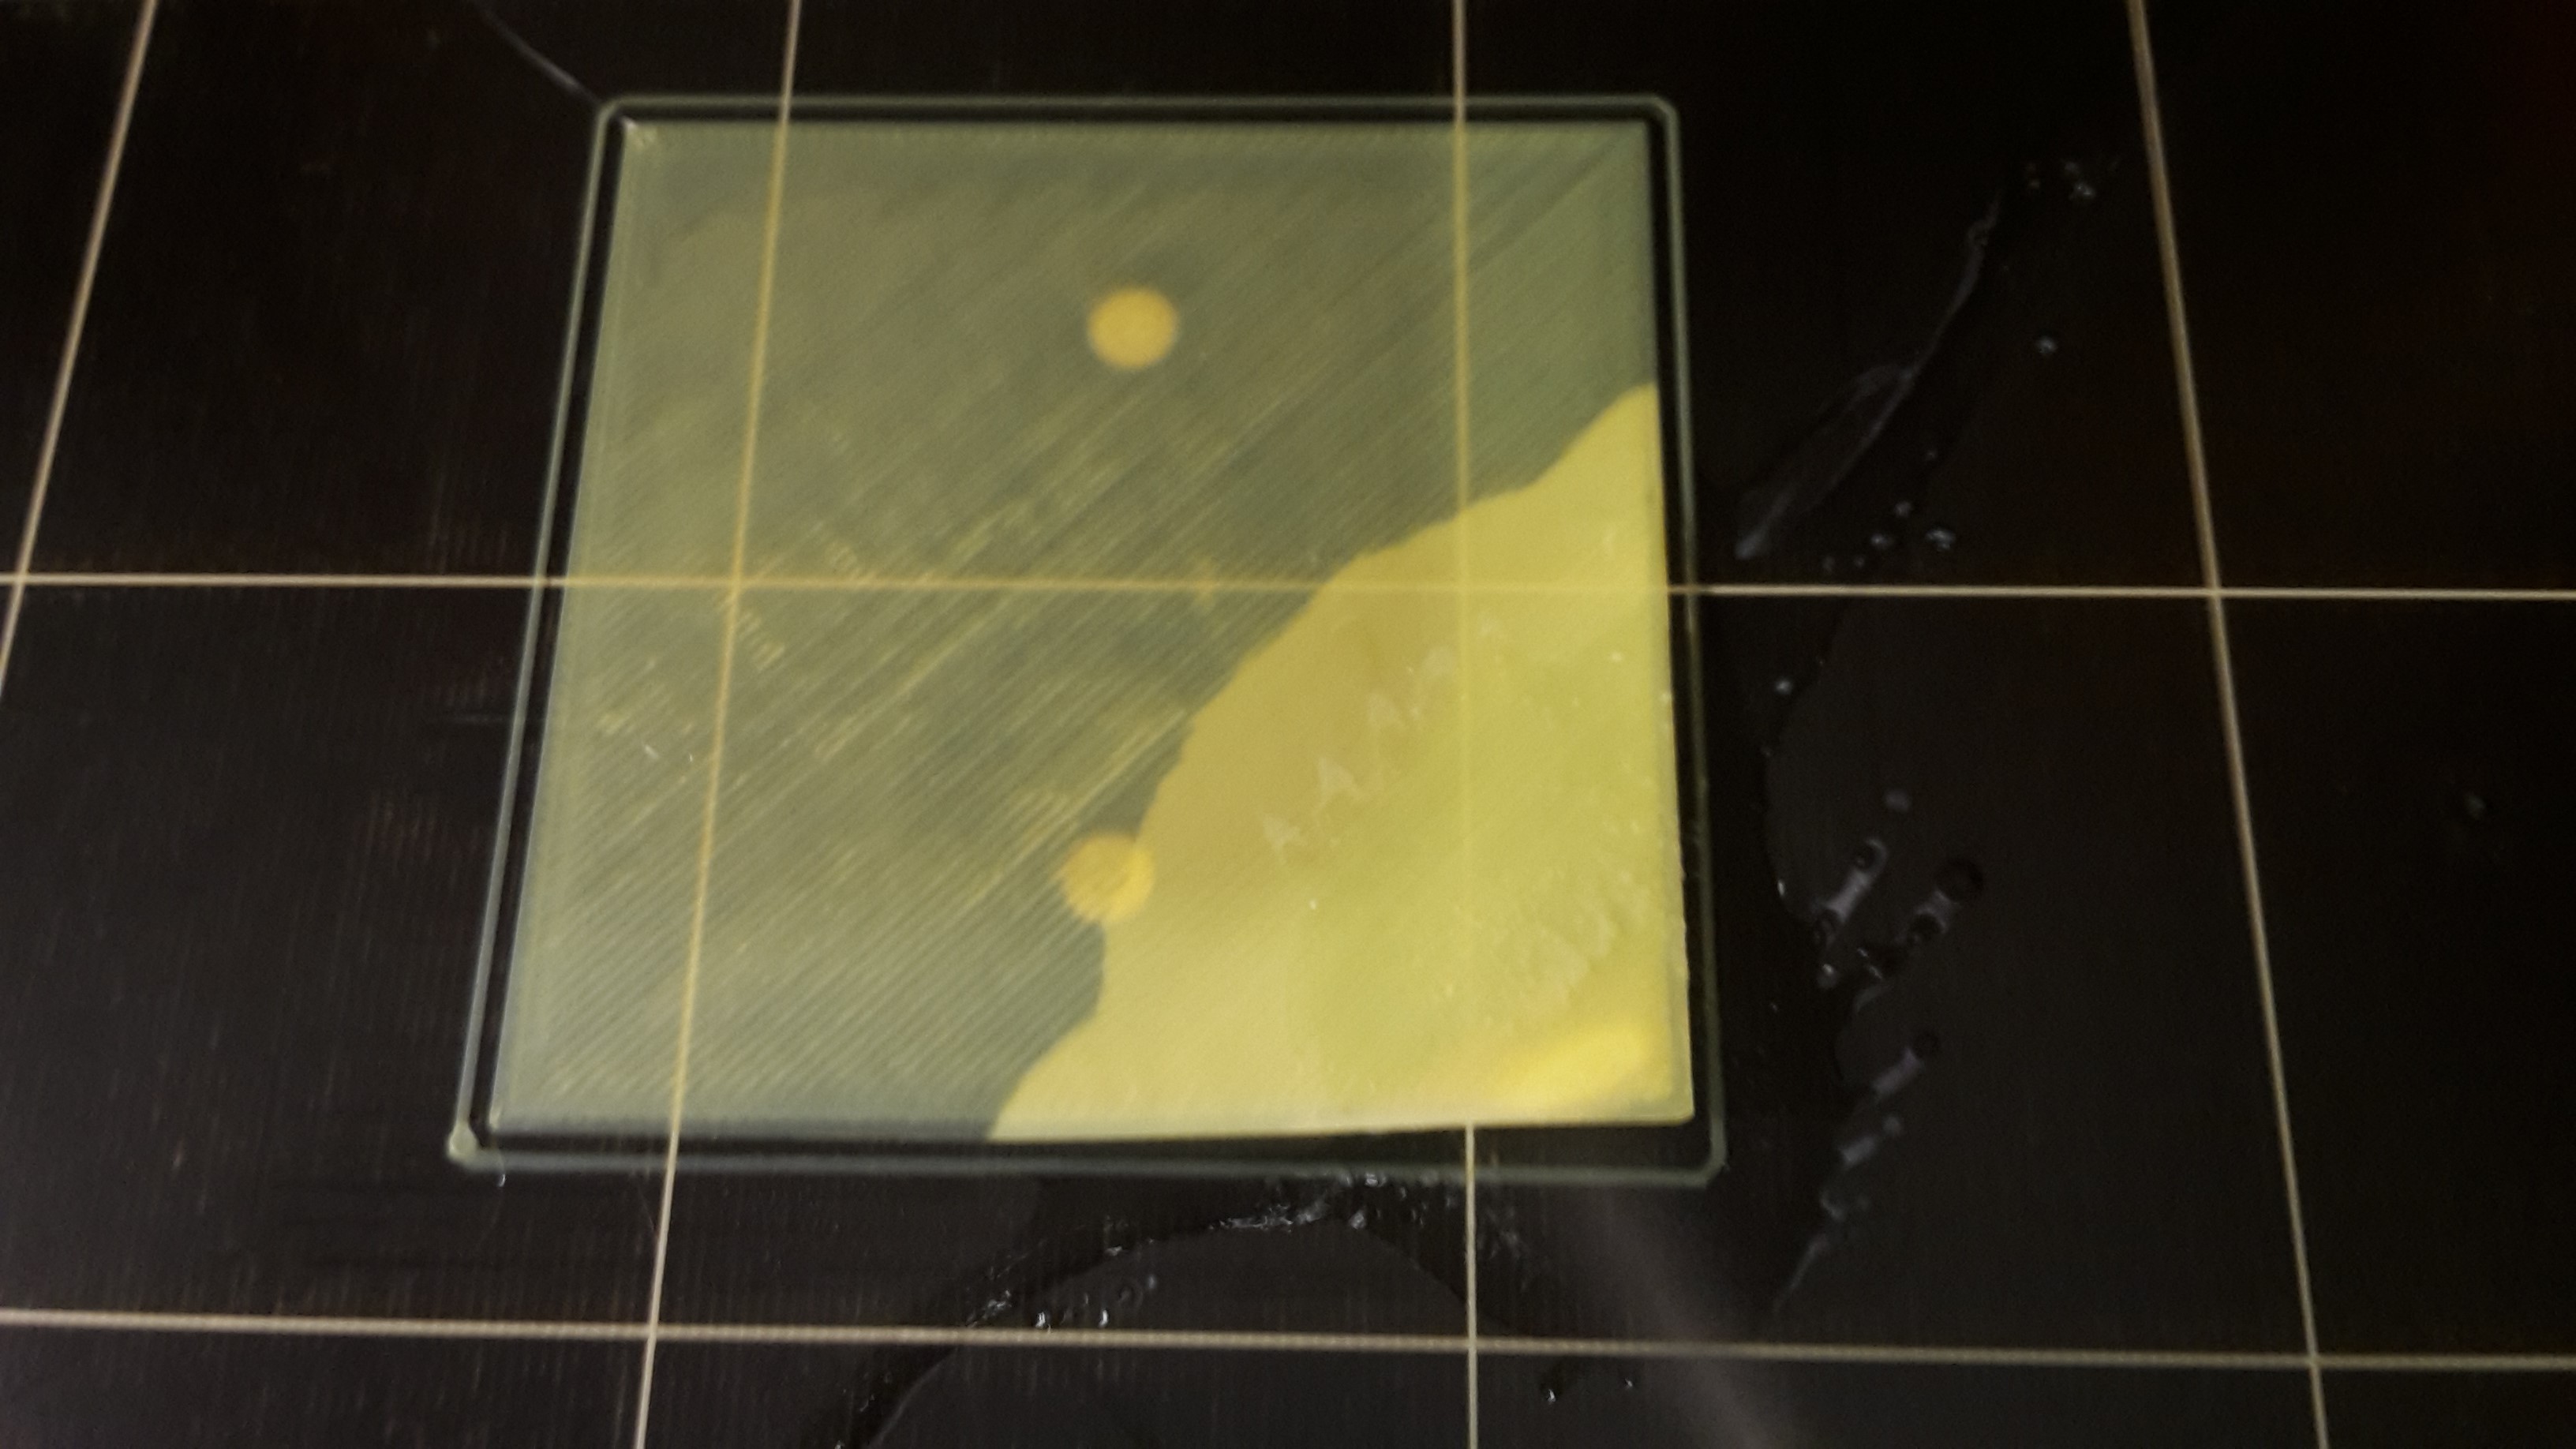
i simply print this file in a bright color (takes about 12 minutes) and change the life Z adjustment level in the middle of the print, when the diagonal of the square is reached.
so a little film is printed. a good idea is to write the settings with an edding at the sheet 😉 .
i repeat the procedure until i get a completely smooth and homogenous surface.
in addition it's a good idea to measure the thickness of the film with a micrometer gauge or a digital vernier calliper ❗
➡ when you look at the attached picture, you can see at first sight, that the right foil (with the -365um and -400um) shows some small gaps, which indicates that you need to squish down the nozzle a little bit more.
furthermore you can see that the -500um setting delivered the best result, and as you can guess: it's thickness was exactly 0.20mm.
anything more to explain ?
update:
just forget to tell you how you can get the film off from the heatbed without damaging it:
just use coolant spray at one edge. the sheet will immediately curl up and you can get it off easy as pie from the printing surface with your spatula.
edit 17th january: just replaced the attached gcode file with one where i added a "G1 Z=10.000 F1800" at the end, just to make sure that the nozzle moves up a little bit more (would remain at 0.2mm after the print).
edit 29th of august: removed the first test sheet (which has been downloaded more than 1000 times) and replaced it by the most recent one (v4).

calibration surfaces for PLA, ABS & PETG (generated with the latest S3D version, lin-advance, G87 and preheat procedure to avoid nozzle dripping (tnx 2 PJR))
S3D_calibration_surfaces_75x75@200um_v6.1
With the advent of the Prusa Mini the files above, proved unsatisfactory,
I add the file below in the hope that Mini users find it useful, the Contents are a .3mf file with the test patch on the build plate, so that you can edit it for new filaments, plus ready made test patches, for PETG, PLA and ABS.
Please let Joan.t know if there are any problems
Best Answer by Jason in Alaska:
This post saved my sanity. For some reason the test prints all worked for me no problem. Layer one actually looked pretty rough, but what did I know? Downloads of GCode tended to print fine, but when I sliced my own models, I was 50% on print success. It wasn't until I tried this test that I realized that I was about 0.25 too high. My skirt failing to stick and stringing should have been a dead giveaway, but I'm still learning.
dem inscheniör is' nix zu schwör...
Re: life adjust Z - my way
Jeff, could you add 2 more examples with the nozzle too close? I think that'd be really helpfull
Re: life adjust Z - my way
Thank you very much Jeff, this came at the perfect time for me. A second stephan.k, pics of too close would be helpful.
Also, what is coolant spray?
Re: life adjust Z - my way
Also what is coolant spray?
💡
cooling spray, or sometimes called ice spray. its used to cool down parts very quick, which is useful if you are searching defective components in electronics....
you can see the effect at the first picture attached here:
Jeff, could you add 2 more examples with the nozzle too close? I think that'd be really helpfull
yes, here we go.
➡
when the life adjust value is too high, the surface gets a little bit rough and dim. you can feel it very good when you fondle over it with your fingers.
at the edge with the -650 & -600 µm, you can even see some little crumbles, small blisters and very fine strings. i stopped here at -650 µm because i won't risk to damage my PEI sheet.
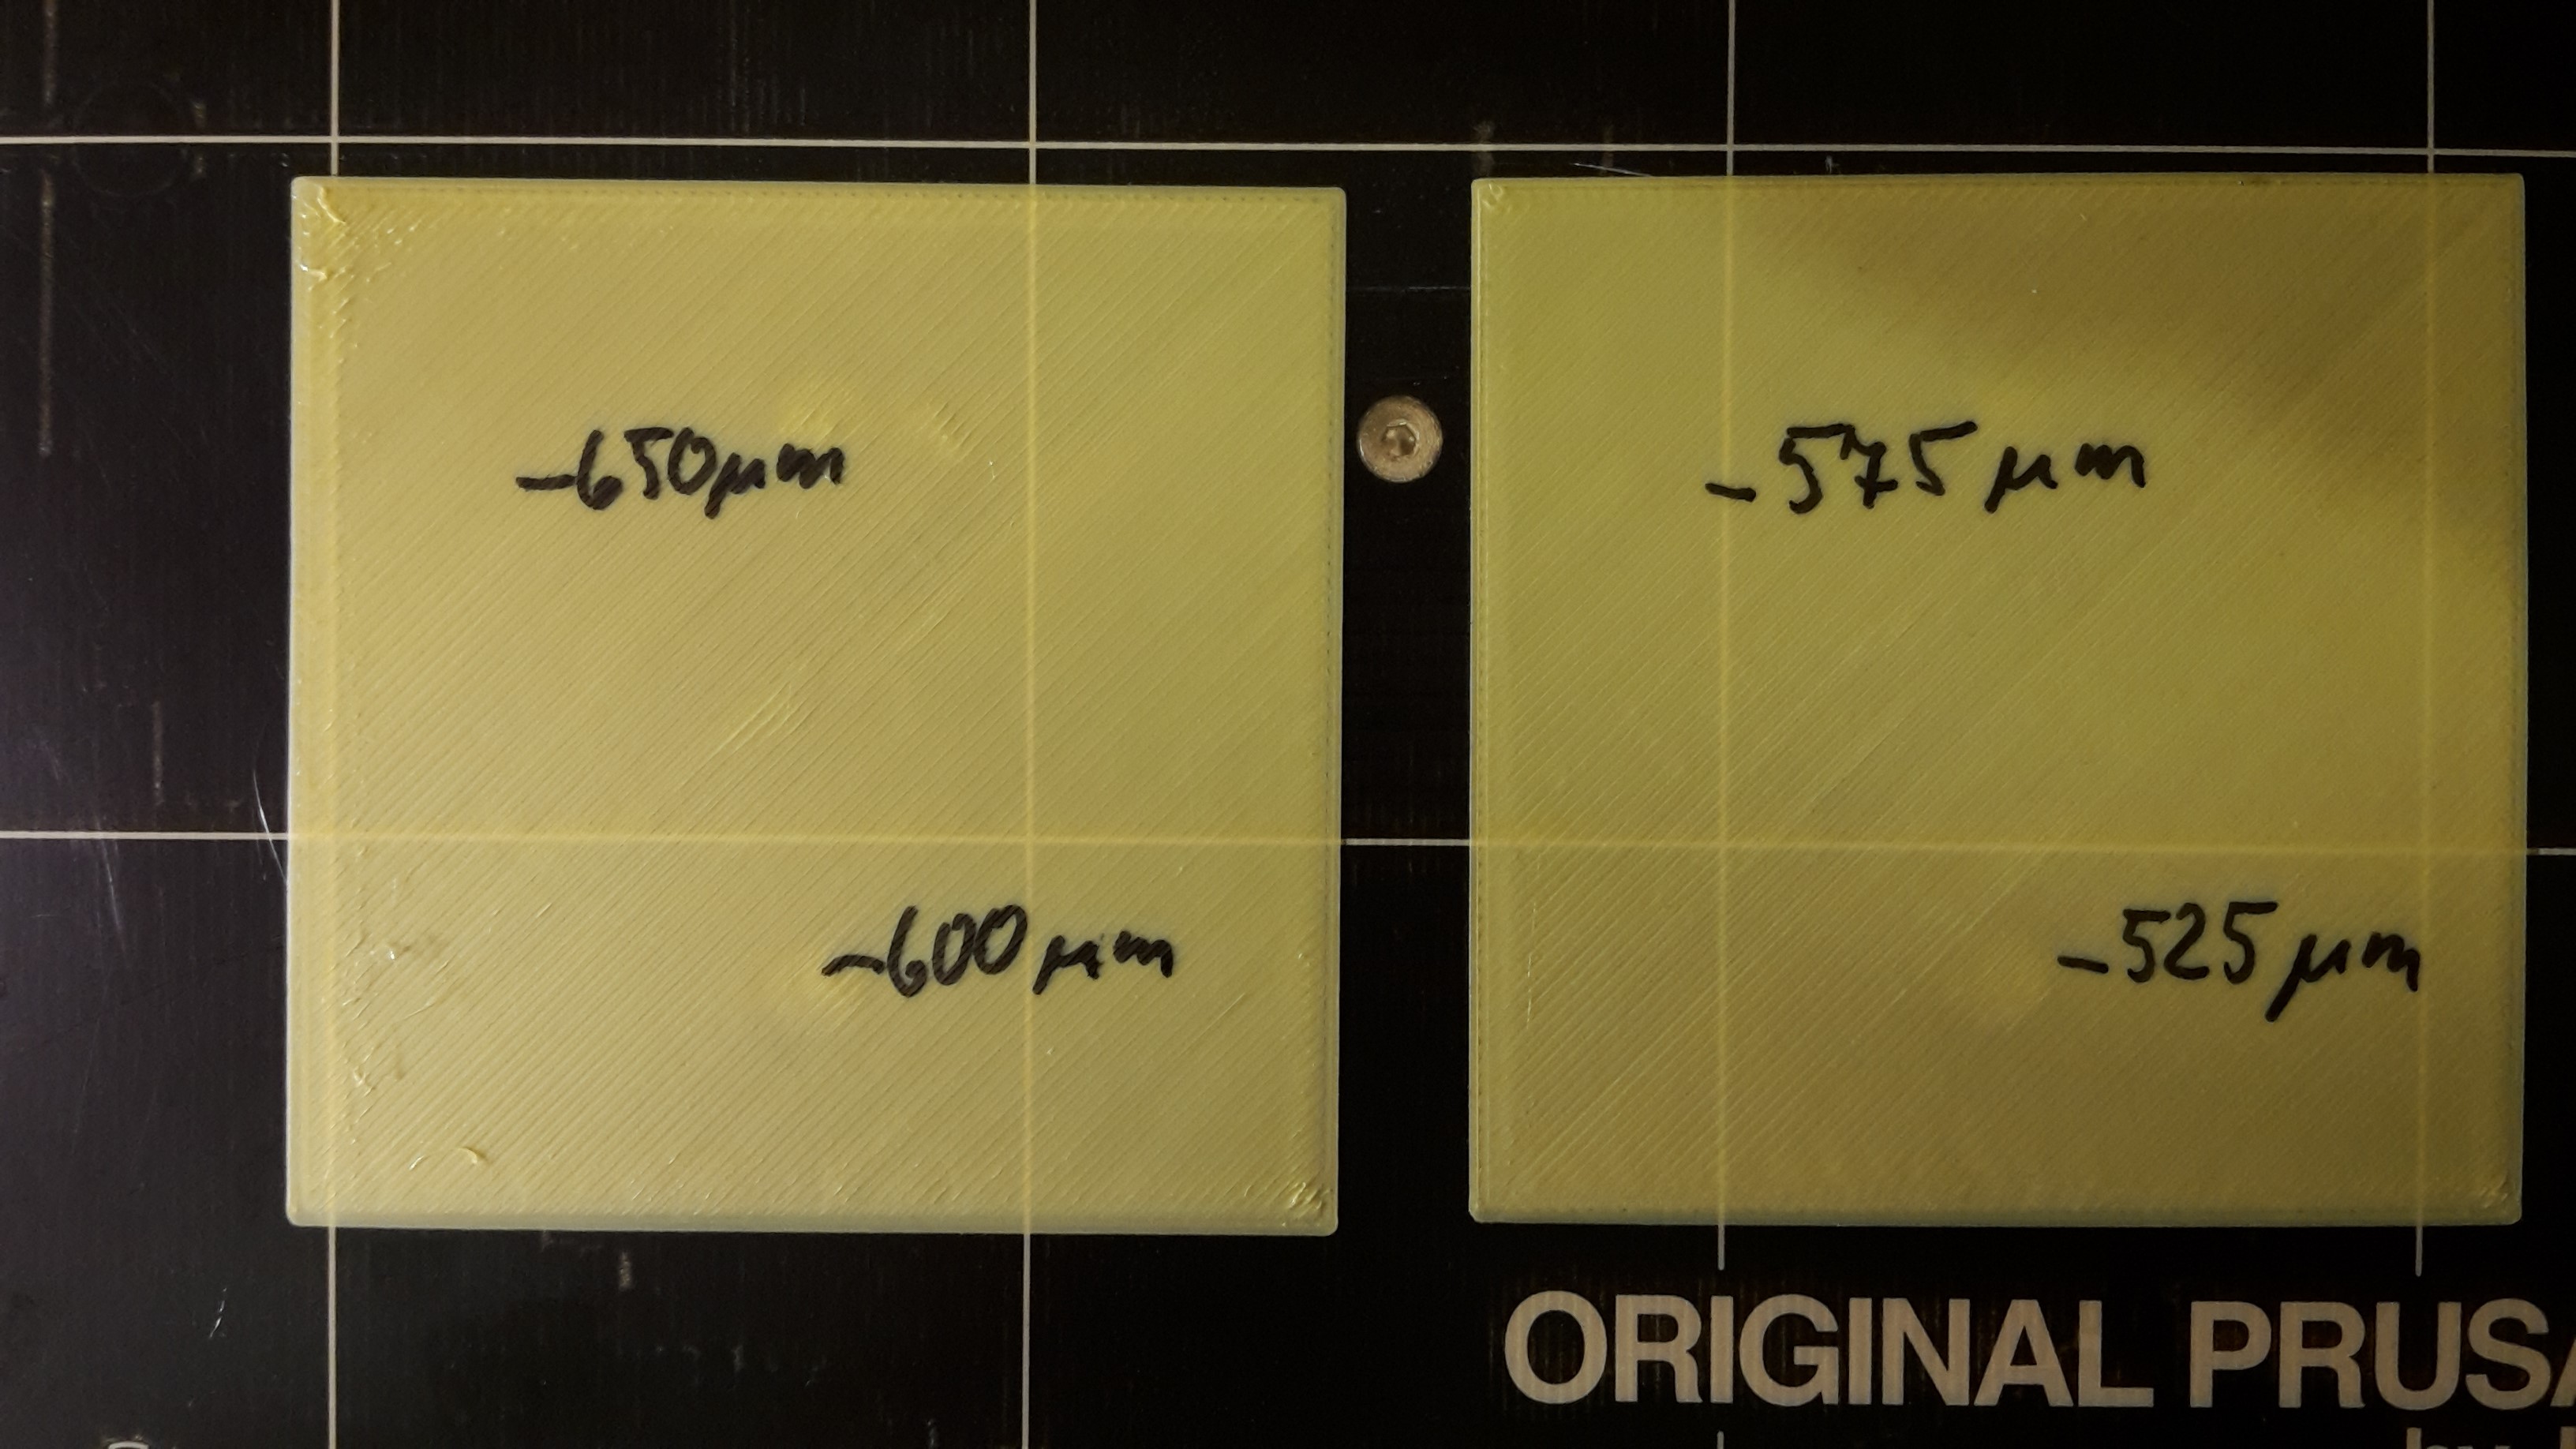
by the way, when you measure the thickness of the foil, it's not thinner than the one with -500 µm as one might expect !
quite contrary it rises up again to 0.23 mm.
from -365 to -450 µm life z adjustment the sheet had a thickness of 0.25 mm.
dem inscheniör is' nix zu schwör...
Re: life adjust Z - my way
I tried to use your gcode.
But the nozzle temp is set to 0??
Re: life adjust Z - my way
hi marcus,
be patient ;-).
i generated the gcode with simplify3d's default settings for printers. they first heat up the print surface and when the bed temperature is reached, the nozzle starts to heat.
i think that they want to avoid over current when both devices start to heat up the same time at full power (not nescessary at our i3/MK2, because the supply has enough power for both).
i'll have a look at it this evening (when i'm home from my office) and correct this behaviour.
update: use this gcode now, it'll start heating up the nozzle and the printbed at the same time.
dem inscheniör is' nix zu schwör...
Re: life adjust Z - my way
Cool, thx for the answer. I'm a newbie.
But I printed the whistle now perfect and my own part is running now smooth. Yeah 😀
Thx
Re: life adjust Z - my way
Just wanted to say that your live z method with your calibration code worked very well for me. Thanks for your post.
Re: life adjust Z - my way
thank you very much for this little tip and the g code, i´m also new and this is absolutely helpful, some optical printed reference points how it should look and how it shouldn´t.
so big thanks for that!
cheers
Re: life adjust Z - my way
thanks for the feedback !
nice to know that it's useful for others too.
😛
by the way: i added some M300's in the middle of the print, so your prusa gives you an acoustic signal when it's time to set the next life z adjustment value. just for your convenience.

😉
dem inscheniör is' nix zu schwör...
Re: life adjust Z - my way
This worked perfectly for me. Thank you for your post...
Re: life adjust Z - my way
jeff, i absolutely love your program, i´ve printed countless amounts of 0.2 mm sheets over the last few days due to various calibration issues 😆 i also made my own version to play around with first layer speed ratios in slicer. but my problem is that the printer starts on the opposite of your program (rear left), so you don´t really see what he is actually doing.
did you set that specific startpoint in simplify3d or is it even possible in slicer?
i don´t want to rewrite the whole g-code by hand 😀
thank you and cheers!
ps.: sorry, this might be slightly off-topic 😐
Re: life adjust Z - my way
did you set that specific startpoint in simplify3d or is it even possible in slicer?
sorry mitch, but i don't. i simply used the default settings of s3d and it worked in the way i liked it.
😐
dem inscheniör is' nix zu schwör...
Re: life adjust Z - my way
I have been using a very similar approach, 0.2mm layer, but a little smaller and slimmer. It works well.
I only use the V2 calibration to get rid of the annoying message that calibration is not complete. It is otherwise useless.
Here is the OpenScad code for Live-z-adjust-cube_1.4.scad:
// Calibration square to be printed before main print object, to allow live-z-adjust.
cube ([75,20,0.2]);
I'll have to get some cooling spray, sound useful.
Re: life adjust Z - my way
This gcode was very helpful. I thought my V2calibration test went well even when I did not have to make any live Z adjustments. That did not seem possible and I thought perhaps there were issues I just could not recognize and did not really understand. After running this calibration I found it produced a nearly flawless sheet about .24 mm thick slightly larger than 75 mm and perfectly square.
Re: life adjust Z - my way
... it produced a nearly flawless sheet about .24 mm thick slightly larger than 75 mm and perfectly square...
maybe you can do some fine adjustment right now.
the thickness of the sheet begins at about 0.27mm when the nozzle is to high. the thickness then drops down to 0.20mm when you've found the right z adjustment value. then it rises again to approx. 0.23mm when the nozzle is too low (then the surface gets somehow dim and rough).
so the challenge is to find the optimum.
🙄
dem inscheniör is' nix zu schwör...
Re: life adjust Z - my way
jeffjordan, thank you for the missing element in my understanding. I have run the gcode several times reducing the thickness to .2 +-.007 across the whole surface. I was/am not sure how much closer I could get. I had not thought about the possibility of the function being parabolic and overshooting the "sweet spot". Thank you for this important information.
EDIT: When I review all of you earlier posts on this topic, you had made the point but it did not register with me until your most recent post. Thanks again for the code and the assistance.
Re: life adjust Z - my way
it's a pleasure to share experience and help.
one can only learn by mistake... but you don't need to make the mistakes yourself.

dem inscheniör is' nix zu schwör...
Re: life adjust Z - my way
These pictures and this code were a Godsend! Thank you very much! I was very frustrated, being new to 3D printing, on the Z-adjustment. This took the mystery away and has set me on the road to productivity. 5 stars! 😀 😀 😀 😀 😀
Re: life adjust Z - my way
Thank you Jeff. I really needed to find this post. Its exactly what I was needing to fine tune my printer. I could always get kinda closish but was struggling with how to get it better.
Chris