Printing two overlapping objects separately - doable in PS?
Not sure if the title really covers the question, but it is quite simple. Sometimes I want to print an object with more than one color with my single extruder printer, but the two objects overlap in height. More specifically, the base objects has a hollow section that I want to print into with a different color. Or I want to print the contents of the hollow section first, and then print the base on top of this.
I am used to Simplify3D, where I can do this easily by simply assigning separate processes to the two objects, and then print them separately, and not moving the build plate between the prints. Proper Z-hop must also be used to avoid that the nozzle crashes into what's already on the build plate.
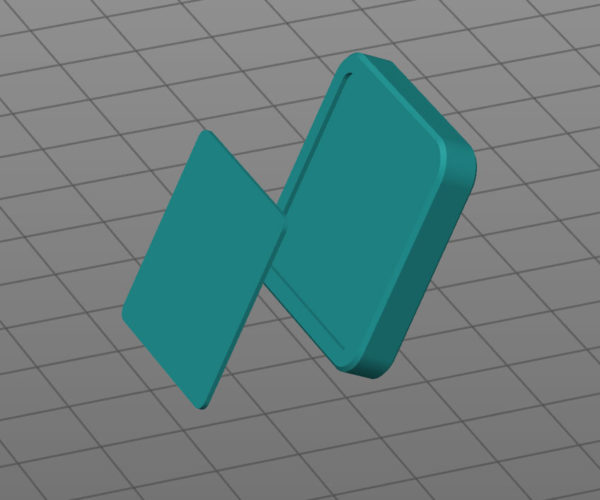
It feels like I should be able to do this also in PrusaSlicer, but the key thing I am unable to achieve is to align the two objects properly without also being forced to print them in one go. So with that said, here's an example:
This is how it looks with the two objects loaded separately into PS, and then just auto-arranged. I can't find any method of properly aligning these together, manually adjusting is not acceptable, since these are exported in their proper locations from CAD.
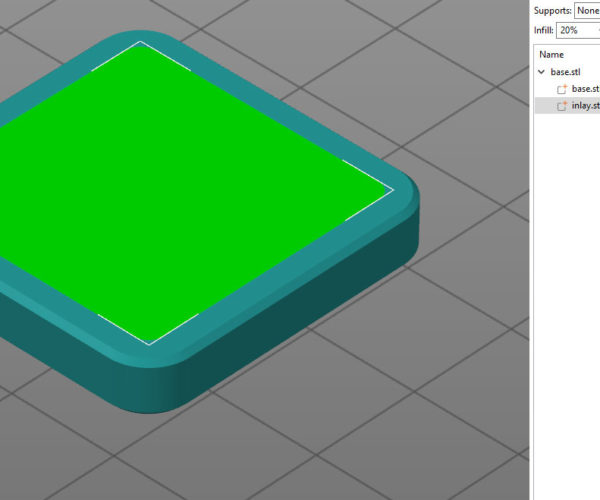
So then I tried the method of loading the base part first, then adding the inlay as a part, and used place on face to lay it flat. This produces exactly what I want, where the inlay is positioned correctly inside the cutout in the base:
However, now there is no way for me to print these separately while keeping their relative positions. I want to print just the base part first, and then the inlay, which then looks like it starts to print in the air (but in reality it is on top of the base, of course).
Is there something I missed here? Is there a workaround I can use?
I have attached the STLs as well, in case anyone wants to play with it.
RE: Printing two overlapping objects separately - doable in PS?
The problem with this technique of printing multiple colors/filaments is the part printed first will be in the way of the mesh bed leveling at the start of the second print. A better way for doing this in PrusaSlicer (assuming your printer supports the M600 filament change gcode) is to:
- Configure PrusaSlicer to as many as extruders as different colors you plan on using in the Printer profile tab. Make sure you have "single extruder MultiMaterial" off so the slicer doesn't think you are using an MMU.
- Also in the Printer profile tab under custom G-Code, use M600 for your tool change G-Code (you may want to make it a conditional so you don't get the tool change code on layer zero, i.e. between the purge line and the start of your print).
- Make sure wipe tower is turned off in the Print profile tab (you won't need it).
- In the parts tree of the Platter interface (in the right-hand column) assign the extruder numbers to the different parts.
- Generate the g-code and start printing it.
- When the printer beeps to change colors, manually change the color and purge the nozzle.
Basically, you are manually doing what the MMU does. This can get tedious manually changing filaments like this, but it is doable. Because of the tedium, for your example print, I would print the full object with the inlay against the bed. That way all the color changes will happen in the first few layers, and once the changes are done you can wander away from your printer to do other things. (If you print with the inlay on the top like you show in your screenshots, you will need to keep a weather ear out for the first color change beep, and then you will be tied to the printer for the manual filament changes on each layer.)
Here is what I described in a .3mf file and the generated G-Code for your perusal: Scratch Pad
See my (limited) designs on:
Printables - https://www.printables.com/@Sembazuru
Thingiverse - https://www.thingiverse.com/Sembazuru/designs
RE: Printing two overlapping objects separately - doable in PS?
I'm past the editing period so I have to add this as an extra comment (instead of editing my message to better integrate this statement with my above text...)
I wrote the above assuming (perhaps incorrectly) that you are using a Prusa printer. AFAIK, the PrusaSlicer also sort of assumes that and forces a work/print flow that is appropriate for a printer that requires an initial bed leveling process that demands access to the entire print surface.
If you are using a printer that doesn't demand an initial bed leveling process that demands access to the entire print surface (like a mesh bed leveling scan), you may want to play with turning off the visibility... Nope... I just checked and individual parts aren't able to be turned off (made invisible/nonprintable). Whole objects can be, but not individual parts of an object.
See my (limited) designs on:
Printables - https://www.printables.com/@Sembazuru
Thingiverse - https://www.thingiverse.com/Sembazuru/designs
RE: Printing two overlapping objects separately - doable in PS?
Thanks for answering. You are right that I am not using a Prusa printer, and I have manual/assisted bed leveling, so it's not a problem that there's already a part on the bed.
It would be OK for me if I could generate a single g-code that would first print the entire base object, and then pause (my printer has that ability, just with a different command than M600) for me to change filament. However, that seems to not be possible either, since I want the print of the inlay to overlap in height with the already printed base (and use Z-hop to ensure the nozzle does not crash into the base print). Printing the inlay first has exactly the same problem.
For the record, this workflow is possible with Simplify3D (I have done it many times), and I had hoped it would be also with PrusaSlicer. All it really takes is a command to align objects without making one part of the other (or allowing to turn on/off printability for parts and subparts that has been aligned this way).
RE: Printing two overlapping objects separately - doable in PS?
I've submitted this as a feature request on Github now, I guess that makes it more likely for the developers to see it. Probably not much hope of getting my wish fulfilled, though. I understand the developers have their main focus on Prusa printers, and with mesh levelling this workflow would not work.
RE: Printing two overlapping objects separately - doable in PS?
is the insert piece 1 layer thick? if so print it as the first layer and PS will print it first then switch to the body filament and finish the part
RE: Printing two overlapping objects separately - doable in PS?
is the insert piece 1 layer thick? if so print it as the first layer and PS will print it first then switch to the body filament and finish the part
No, in this case it is 0.6 mm thick, and preferrably I want to print it in 4 layers (0.15 mm layer height). Someone came up with a workaround for this problem as long as the inlay is printed towards the bed, and the details are unde rthe Github issue I posted, which you can read here if you like:
https://github.com/prusa3d/PrusaSlicer/issues/3068
RE: Printing two overlapping objects separately - doable in PS?
@sembazuru
can you make a video of how to do it because i cant find the setting ect thnx

