How to increase "Wipe Tower" color purges for filament change?
Hi! Just want to start by saying, I Really like Prusa Slicer, it works the best for me of all the slicers I've tried! Thanks!
I'm using Wipe Tower because my printer has 3 filaments and one hotend. I'm getting good prints with Prusa except I'm lacking control on the color change.
When I change from black to white filament, I need the wipe tower to print more white to purge out the black (for example).
When I change the "Width" setting for "Wipe tower", it doesn't really change anything, the area looks still the same, just the shape changes.
Also Prusa seems to care more about one filament than another. I want white to purge more on the wipe tower (but I dont want it to be brim because it will merge and ruin the black base of object). But it prints more black purge which is a waste. Is there a way to control this?
I don't even want a "wipe tower" per say, I want a way to purge the filament before any color change, and also to control how much filament to purge (per filament).
Any advice on how to resolve this would be very helpful.
cheers!
Purging
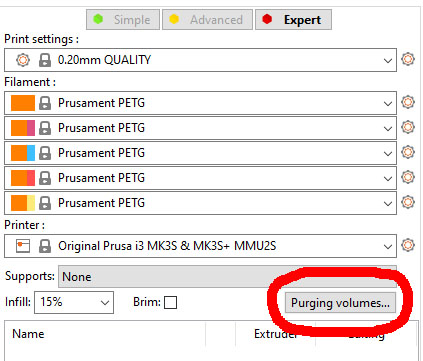
When you have the wipe tower enabled, a button is added for multicolor printing
If you don't want a wipe tower, you can always wipe into infill or a second object.
Or you could go for something like this https://www.bigbrain3d.com/product/retractable-purge-mechanism
Having problems with bed adhesion every morning...
Slicer purge volume settings are confusing
Slicer version 3.3.3
The documentation seems to imply that purge volumes can be adjusted independently for any combination of filament changes, but that doesn't seem to be how it works. For example, if I'm doing a 4 color print with black, green, white and red. If I want to purge 20mm extra white when printing white following the black filament, I increase the white by 20 and it works. But this seems to effect white purges for every other filament change by the same amount. The advanced settings page only allows changing the total purge volume and does indicate how the change effects the purge ratios between the two colors. If you change the total purge volume in the advanced page, you can't go back and view the ratios.
Very confusing.
Am I missing something.?
Purge
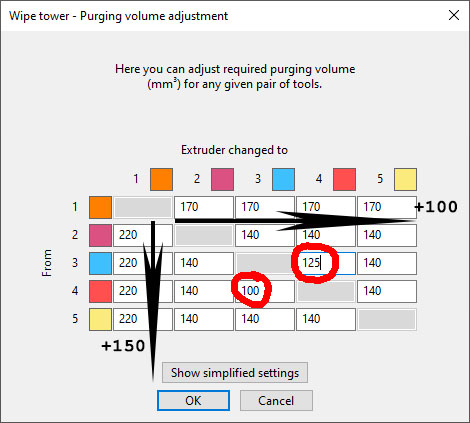
In the advanced settings you can enter a different value when going from filament x to y as opposed to going from y to x.
The starting filaments are shown vertically and the new filaments to switch to are shown horizontally.
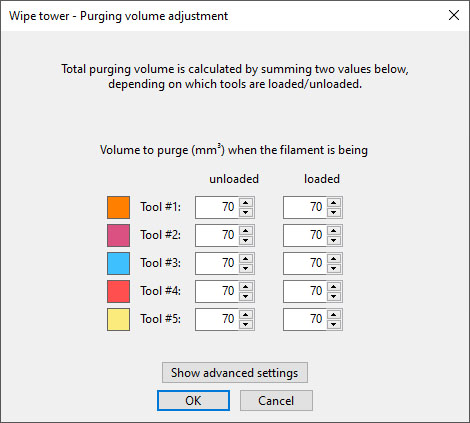
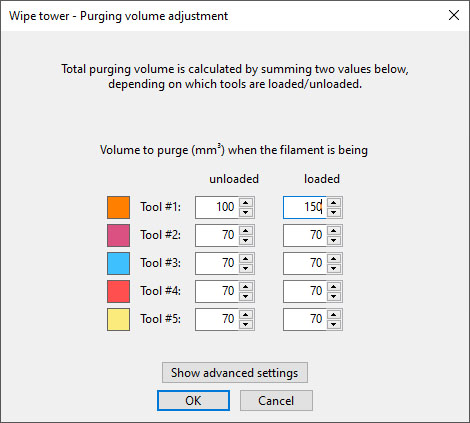
If you change the value in the simplified display for unloaded, that value is added horizontally to all destination filaments for that one source filament. If you change the value in the simplified display for loaded, that value is added vertically to all source filaments of that destination filament.
You are right that you only see the total amount of filament purged in advanced view.
To be able to do what you want you should be able to enter 2 values per cel in the matrix.
Having problems with bed adhesion every morning...
OK, but
Still confused, your example seems opposite to the labeling between the two screens.
In screen one(simplified settings), the captions says "volume to be purged when the filament is being" and the column headings are labeled "unloaded" and "loaded". For tool 1 you entered 100 in the unload column and 150 in the loaded column. To me that would mean that filament 1 would purge 100mm before being unloaded, and 150mm when being loaded. When parsing your screen 2(advanced settings) example, the labeling (at first glance) sees to say the opposite. I trying to not be dense here, but even once I understood your example, I still don't see how I could setup more that 1 set of special purging parameters. And still have the questions about how making changes to a cell in advanced menu effects the individual filament purges.
Specifically, lets say on screen 2 where you change the value in the cell for the change from tool 3 to tool 4 to 125mm. Does that mean that tool 3 will still purge 70mm when unloaded and tool 4 will now only purge 55mm, or does changing it to 125mm proportionally drop the purge volumes for both filaments?
I get the feeling that I'm missing something basic here.
Are we talking about Prusa Slicer?
Thanks for replies!
I am really lost, I don't have a "Purging Volumes" option, even in Expert mode. In fact your screenshots look very different from my software... I'm using "Prusa Slicer 2.3.3" on Linux. Should I be using different software?
The only "purge" related setting I have is "Minimal purge on wipe tower"
I also tried 2.40.alpha3
Second Object
"If you don't want a wipe tower, you can always wipe into infill or a second object."
I did try making cubes for each color, thinking I was clever, but I could not figure out a way to make those cubes print first.
[140] Minimal purge on wipe tower
After experimenting with this setting, it does look like it could solve the problem for me (even if its not perfect)!
Increasing it to large settings increases the size of the Wipe Tower.
I'll try this!
Purge
It does get confusing at first, but actually it is very simple.
Whenever filament 1 is loaded add 150 mm³ (in simplistic display) translates in: no matter which filament you start with (horizontal row), add 150 mm³ when your destination filament is 1 (vertical column).
Yes I'm using PrusaSlicer (on Windows)
I'm not getting what you mean with the coloured cubes.
Having problems with bed adhesion every morning...
Found It
Ok I did find that button!
It wasn't in the standard Settings tabs, but appears on the right.
