odd vertical imperfection - bending outward layer (Prusa CORE One)
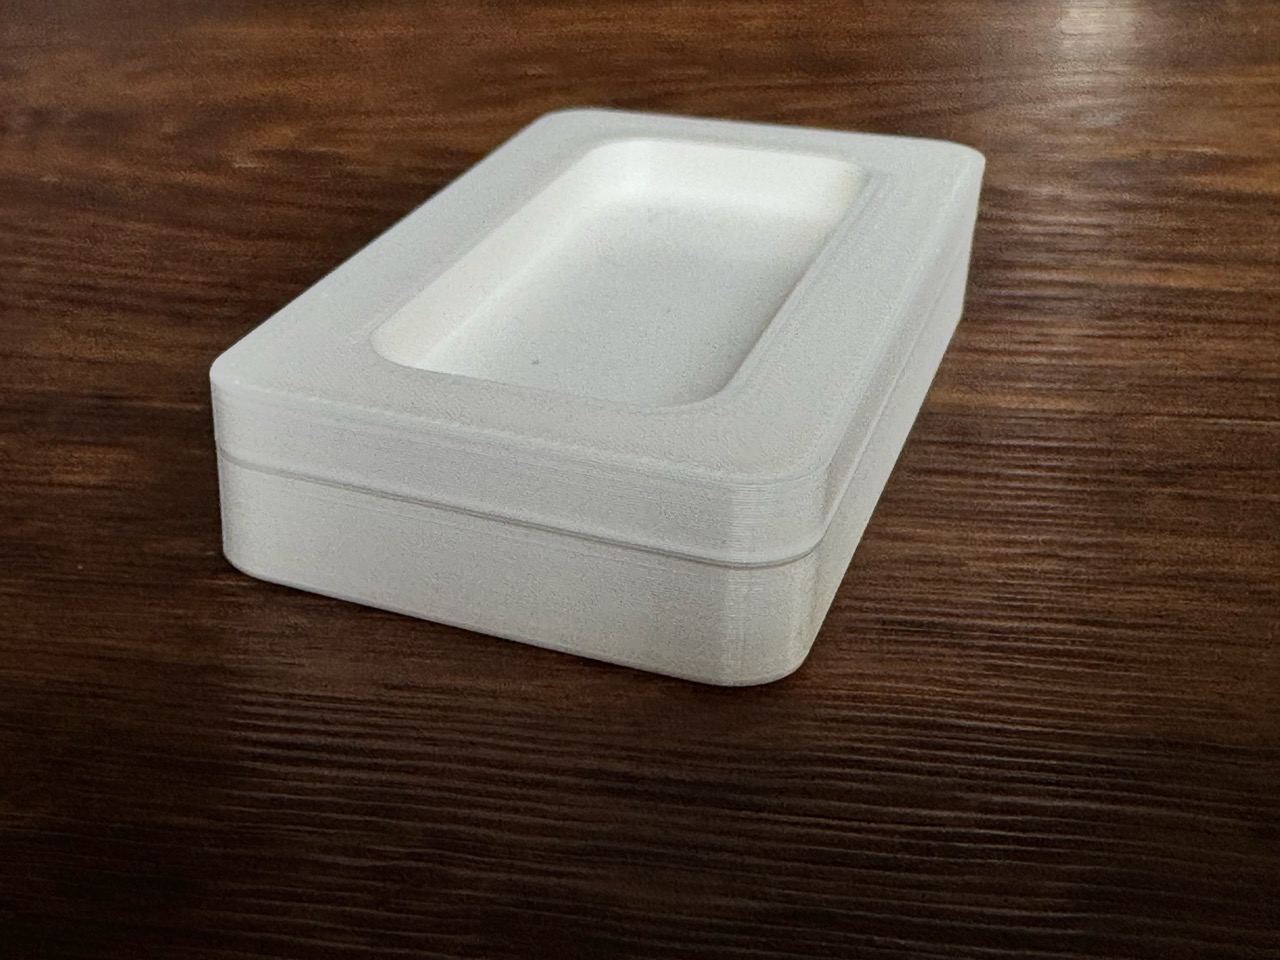
Hey everyone. I have a very challenging problem that I've never had before. This design has a middle bottom a few millimeters above the print bed. See the section view of the design (2 versions):


When I print these on the Prusa CORE One, the print has always an odd vertical imperfection that results in a bending outward layer exactly at the height of that middle bottom (see image below):
Print settings on the CORE One:
- PLA - tried various high quality filaments from well-known brands.
- Standard print settings for 0.2 layer (speed and structural)
- Only modification 3 perimeter (does not make a difference in the result if 2 or 3 perimeter)
- Vent grill and door is open
- PrusaSlicer 2.9.3
Despite several year of experience with FDM and various printers, I couldn't figure out the root cause. I've already tried the following with no difference in the results:
- other filaments
- other printer
- different settings like speed, structural
- change the seam position e.g. to rear
- changed the nozzle of the nextruder
My observation and conclusion so far of the root-cause: this odd imperfection seems to be caused by some stress of this middle bottom in conjunction with the infill perimeter. If I remove this bottom completely then the quality is perfect. Or if I would use concentric infill, that has almost no connection between the bottom and the infill structure. But this infill lacks stability of the part. Strange in addition is the fact that the print result is much better on a Prusa i3 MK3S with much less visible outward / imperfect layer at the bottom height.
Any other ideas or recommendations? You may download the 3mf.file here and print with other settings. Very curious if anyone get better results or has ideas on how to improve.
RE: odd vertical imperfection - bending outward layer (Prusa CORE One)
A bit late to the party, but I just downloaded the 3mf and had a look:
Usually, these "benchy hull line" issues are caused by:
- fan speed changing
- layer time changing
- inaccuracies due to heavy acceleration (look for weird patterns in certain layers etc.)
- speed changing
What I can spot for your 3mf:
- fan speed is different for that area
- layer times is different for that area
- the infill does some very different movements towards the walls for a single layer in that area due to "bridge infill" being used in that layer too.
Solutions:
- print slower (use stealth mode, which lowers max. speeds for everything from 350 mm/s to 160 mm/s and lowers max. acceleration values a lot)
- use rounded edges for the center area (fillet). If you can't due to fitting issues -> use negative fillet => "pipe" + 2x fillet for the edges of the pipe.
- set the min fan speed to 100% for PLA. It's at 85% for the Buddy3D PLA preset
Also, Grid infill sadly isn't great in my experience.. Coming from the mk3s, I wondered what that "brrrlrlrlrlrlrlr" was, while printing infill.
Grid infill is printing into its own lines in a 90° angle, hitting the already laid down filament. Usually it's not an issue, but it can cause issues like skipping belt teeth, building up filament around the nozzle, clogging the nozzle, wearing down the nozzle etc.
If no real stability from the infill is needed -> zig zag.
If a bit of stability is needed but speed is important too -> aligned rectilinear.
If speed isn't that important and you want really good stability -> honeycomb
RE:
Earlier, we've had some long talks about this issue. It is present in nearly every printer when using Prusa Slicer. Other slicers seem to handle the issue better. I'm too lazy to search for that old thread, but it's still out there in the Mk3/Mk4 forums. Images may be gone because of the server changes a while back. But look for BobStro's and "-" comments, too. A few others were part of the discussion and had their theories, too.
But, printing external perimeters first was one easy "improvement" ... reducing infill-flow and/or infill extrusion width was another. And as Raz said, ensuring print head speed is consistent across all layers also helps. Cooling settings can affect print speed. Also, directionality of the head movements...
For early discussions search for 'Buldge' - the misspelling makes them easy to find.
Grid infill is an odd one, I assume it's still a default because it was the first and for a long time the only infill pattern available outside patented slicing and printing software. I generally replace it with cubic as my local default.
Cheerio,
RE: odd vertical imperfection - bending outward layer (Prusa CORE One)
Many thanks for the suggestions. I've found the thread about "Buldge" and from BosStro with all the recommendations. (see here).
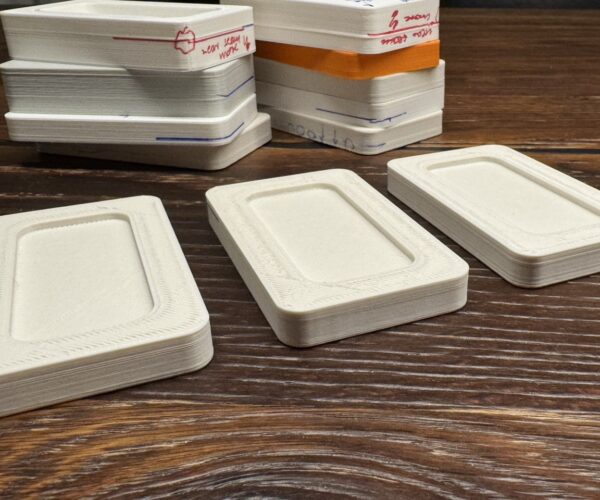
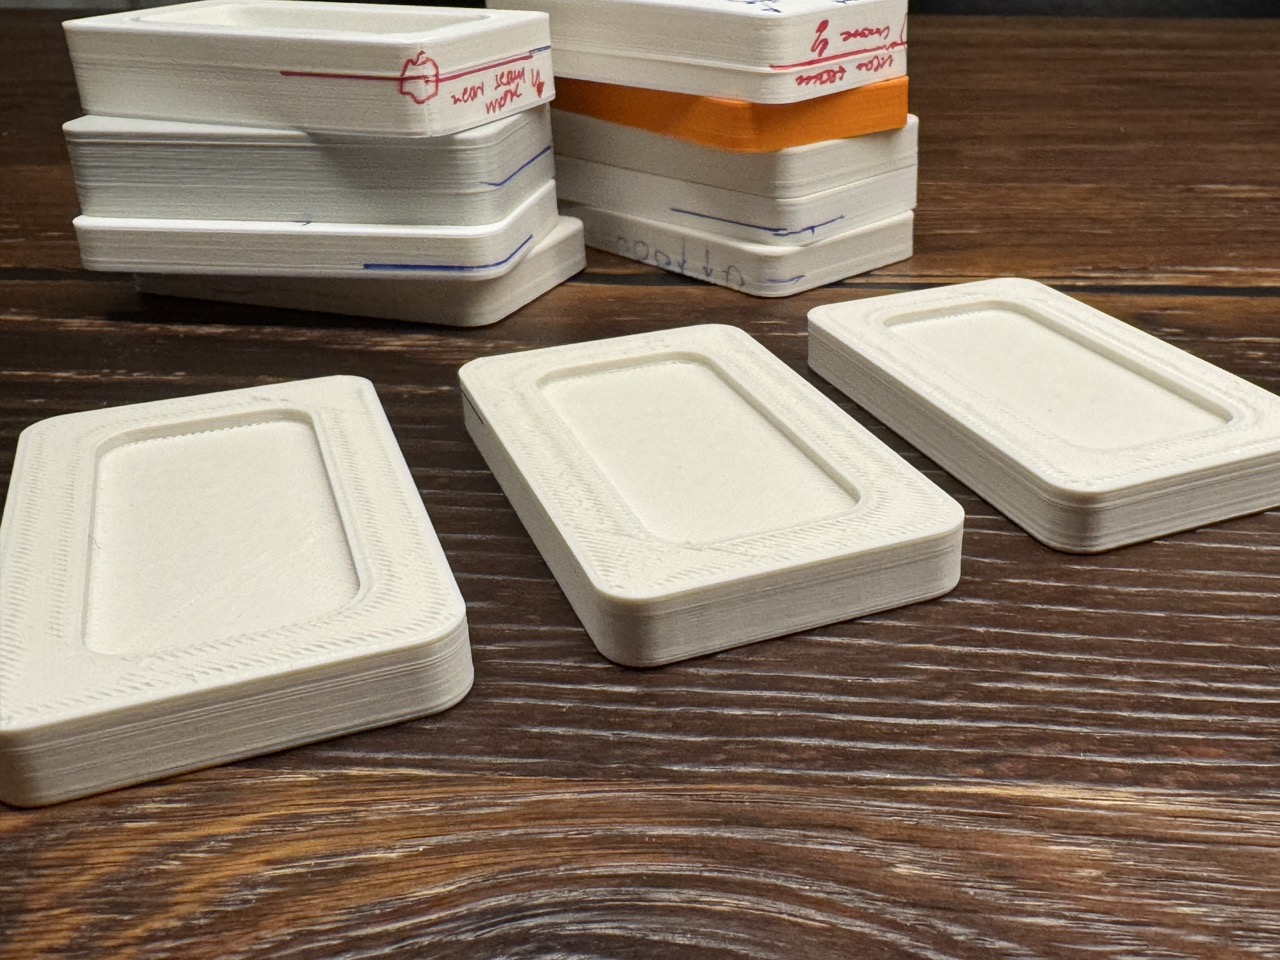
I've tried multiple other tipps. Here my results. All printed with Spectrum PETG, 0.4mm HF Nozzle, 0.2 mm:
- reducing warping: as suggested the less warping the better. In my case closing the door of the CORE One printer improved the result slightly
- reducing speed: reduced speed on the height of the middle bottom where the bulge / line was visible to 80 mm/s > slightly better result (see sample on the right in the attached image)
- external perimeter first setting: improved the result remarkably (see sample in the middle)
- gyroid infill: worked best and improved the result also remarkably; much better than other infills that I had also tested: rectlinear, zigzag, grid (see sample on the left)
RE: odd vertical imperfection - bending outward layer (Prusa CORE One)
Yes, gyroid in this situation is a better choice, especially for controlling warping on this type of geometry. I generally use gyroid as my default infill then switch to rectilinear depending on the type of part (e.g. long flat parts). Also though depends on the type of material. ASA warps less with rectilinear and PC warps less with gyroid.
RE: odd vertical imperfection - bending outward layer (Prusa CORE One)

Here's another approach that involves modifying the original design (for future reference if this isn't appropriate for your needs in this instance).
I added the debossed hex pattern (embossing would work too) to the inside bottom of the box. The first iteration with straight sides and flat floor showed the "benchy hull line" that you see, and also had some corners lifting slightly. The vertical features on the outside of the box (and some mouse ears) took care of the warping, and the hex pattern completely eliminated the bulge at the level of the floor. I should be able to add some before/after photos later today...
Prusa MK4 since Jan 2024, MK4S/MMU3 since Jan 2025, Printables: @MikeB_1505898
RE: odd vertical imperfection - bending outward layer (Prusa CORE One)
In a nutshell the part is shrinking, and it can't shrink as much where you have the continuous beam.
I think your discovering some partial solutions, but printing in a vertical orientation with support or altering the design to not need support when printing vertical is your best bet to not have a line.
Much higher infill and more perimeters can help too.
This highlights designing your part as much for 3D printing as possible.
RE: odd vertical imperfection - bending outward layer (Prusa CORE One)
For early discussions search for 'Buldge' - the misspelling makes them easy to find.
Grid infill is an odd one, I assume it's still a default because it was the first and for a long time the only infill pattern available outside patented slicing and printing software. I generally replace it with cubic as my local default.
Cheerio,
I've been using cubic more recently, especially on large parts to get the weight down.
For smaller parts I almost exclusively use rectalinear, it's fast, doesn't cross and is relatively strong. Generally for stronger parts I always add perimeters vs. higher infill %.
RE:
Here's another approach that involves modifying the original design (for future reference if this isn't appropriate for your needs in this instance).
I added the debossed hex pattern (embossing would work too) to the inside bottom of the box. The first iteration with straight sides and flat floor showed the "benchy hull line" that you see, and also had some corners lifting slightly. The vertical features on the outside of the box (and some mouse ears) took care of the warping, and the hex pattern completely eliminated the bulge at the level of the floor. I should be able to add some before/after photos later today...
To highlight how much of a difference this made, here's the before & after photos - the hex pattern completely eliminates the bulge.
Original box - bulge near the bottom due to the inside floor of the box:

Updated model with debossed hex pattern in the bottom of the box (see rendering above):

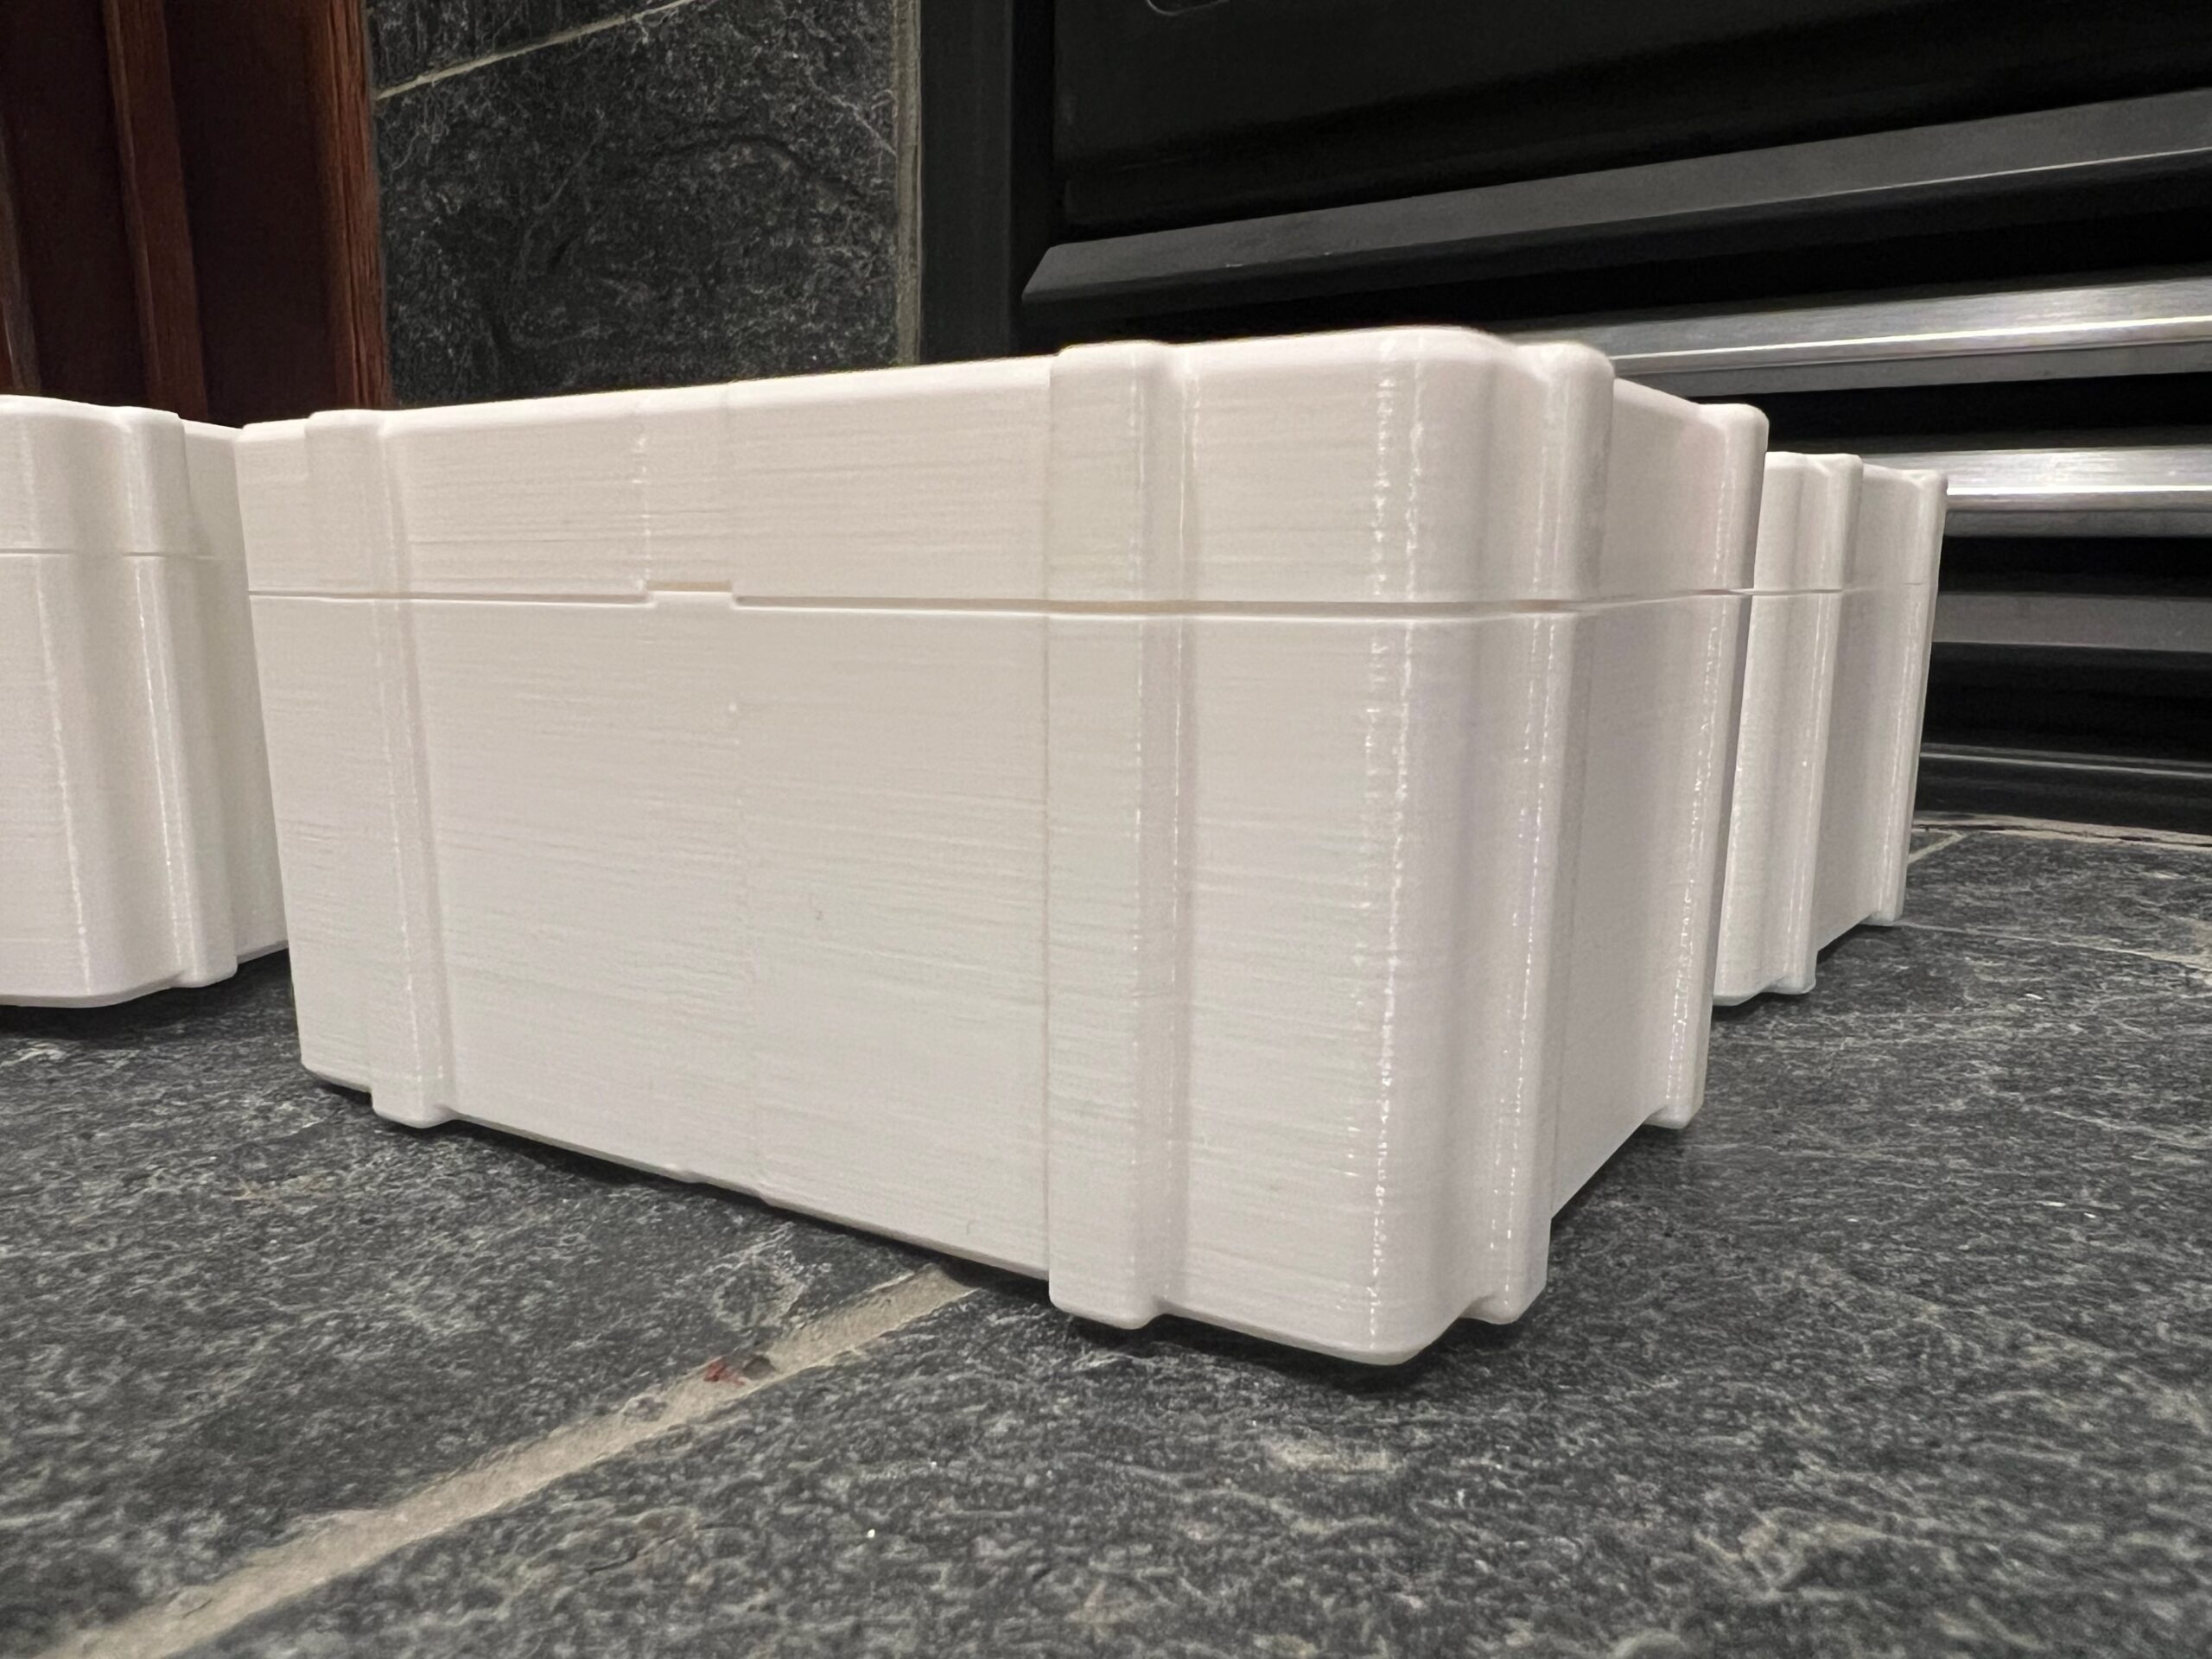
Reinforces what @brian-12 said above about designing for 3D printing. Model is here: https://www.printables.com/model/1137668-penny-drop-game-v2
Prusa MK4 since Jan 2024, MK4S/MMU3 since Jan 2025, Printables: @MikeB_1505898
RE: odd vertical imperfection - bending outward layer (Prusa CORE One)
Hi @mike-b-3. Impressive improvement. Thanks for sharing. What are the steps /settings for such a debossed hex pattern?
Here's another approach that involves modifying the original design (for future reference if this isn't appropriate for your needs in this instance).
I added the debossed hex pattern (embossing would work too) to the inside bottom of the box. The first iteration with straight sides and flat floor showed the "benchy hull line" that you see, and also had some corners lifting slightly. The vertical features on the outside of the box (and some mouse ears) took care of the warping, and the hex pattern completely eliminated the bulge at the level of the floor. I should be able to add some before/after photos later today...
RE: odd vertical imperfection - bending outward layer (Prusa CORE One)
I used a mix of tips from these videos to do the hex pattern:
I made the "valleys" 2mm deep and 2mm across so that there was a complete disconnect between the hex platforms so they couldn't pull on each other.
Hi @mike-b-3. Impressive improvement. Thanks for sharing. What are the steps /settings for such a debossed hex pattern?
Here's another approach that involves modifying the original design (for future reference if this isn't appropriate for your needs in this instance).
I added the debossed hex pattern (embossing would work too) to the inside bottom of the box. The first iteration with straight sides and flat floor showed the "benchy hull line" that you see, and also had some corners lifting slightly. The vertical features on the outside of the box (and some mouse ears) took care of the warping, and the hex pattern completely eliminated the bulge at the level of the floor. I should be able to add some before/after photos later today...
Prusa MK4 since Jan 2024, MK4S/MMU3 since Jan 2025, Printables: @MikeB_1505898