Re: Polycarbonate: Here's how to print it without warping, delamination, or an enclosure, with better-than-ABS results.
I honestly don't know the precise values. I'm perfectly OK with my part blowing into pieces under the pressure. But I figure if you're going to print something and aim for pressurized gasses and high temps, probably best to use the strongest material out there.
Well, to answer your original questions you should be able to print with polycarbonate with the standard printer and no special precautions. You may need to coat the bed with gluestick.
But I'm still nervous about this temperature and pressure stuff. I'm glad you don't mind if the part blows into pieces, because that's a good possibility. Any time someone starts talking about high temperature and pressure you're starting to get into Real Engineering, and hot pressurized gasses are not something to screw around with. At a bare minimum you should find out what the actual design parameters of this thing are. It matter a lot if you're taking about 100C and 2 ATM, or 300C and 10 ATM.
I also hope you're not planning to 3D print a firearm. I know some yahoos claim to have done it and not killed themselves, but in general that strikes me as a quick route to a Darwin Award.
Re: Polycarbonate: Here's how to print it without warping, delamination, or an enclosure, with better-than-ABS results.
I also hope you're not planning to 3D print a firearm. I know some yahoos claim to have done it and not killed themselves, but in general that strikes me as a quick route to a Darwin Award.
Definitely not. I'd put that in the category of building a plane and then flying it (spoiler alert: I don't know how to build a plane).
Well, to answer your original questions you should be able to print with polycarbonate with the standard printer and no special precautions. You may need to coat the bed with gluestick.
Thank you. I've been using the glue stick quite heavily in my prints because a lot of my prints will come off the bed around 60% in and, of course, ruins the print and wastes filament.
So, 100% stock Prusa i3 Mk3 will print Polycarbonate without any additional concerns, just use glue stick and stick to the temps advised. GTK, thank you.
I think I'll order some PC filament right now and take all the safety precautions when I install the part. I'll try to remember to come back and update you guys on how it performs. I have the prototype printed already out of standard PLA so I'm gonna run that first and I'm sure that will end spectacularly.
Re: Polycarbonate: Here's how to print it without warping, delamination, or an enclosure, with better-than-ABS results.
Ok, Polycarbonate obtained. The part that I need to print is a little large, so I practiced on a singular, smaller model. For the most part, this went OK. There was some warping on corners, but the 2nd run I slowed it down a bit manually with the knob and that went well.
Time for the big part, which is actually two parts. Think of the number 8 and that's effectively what I'm trying to print.
For all these tests, I'm using eSUN PC filament (not a huge fan btw)
Round 1: 110° heat bed, 260° nozzle, glue stick used
Result: Narrower (upper part) of the figure 8 popped off the bed in < 20 layers
Round 2: 115° heat bed, 260° nozzle, glue stick used, decided to give the whole thing a 10mm raft thinking "more surface area, more adhesion, less likely to pop off the bed"
Result: Narrower (upper part) of the figure 8 popped off the bed somewhere around layer ~50-60 would be my guess but the wider area of the figure 8 stayed attached and printing continued OK. Some supports were frayed off. This is a multi-day print so at some point overnight, the wider area of the figure 8 became detached as well. Ended up with a big ole mess of tangled up filament in the morning and had to cancel the print.
So one other detail that I should probably mention, I didn't use Slic3r to build the gcode which is probably where everyone's going to say "well, there's your problem!". I'm more used to Simplify3D and, particularly for this part, I like the way S3D builds the supports. What I did do, however, was load Josef's .ini file in to Slic3r and port over as many of the settings as I could in to the S3D process so, in theory, the gcode should be pretty comparable.
So what am I doing wrong? Is it really a matter of using Slic3r over S3D? Do I need to add more glue to the bed before the print? Do I need to lower the bed temperature or nozzle temperature (the spool says to print at 240°-260° so I'm at the max there)? Do I have low-grade filament?
If my rudimentary understanding of physics holds true in 3D printing; as hot items cool, they shrink. This would indicate to me that (since I can't raise the bed temperature) that I should lower the nozzle temperature which would leave a smaller gap between bed and nozzle temp which then leads to less cooling of the first layers....right?
Re: Polycarbonate: Here's how to print it without warping, delamination, or an enclosure, with better-than-ABS results.
So what am I doing wrong? Is it really a matter of using Slic3r over S3D? Do I need to add more glue to the bed before the print? Do I need to lower the bed temperature or nozzle temperature (the spool says to print at 240°-260° so I'm at the max there)? Do I have low-grade filament?
If my rudimentary understanding of physics holds true in 3D printing; as hot items cool, they shrink. This would indicate to me that (since I can't raise the bed temperature) that I should lower the nozzle temperature which would leave a smaller gap between bed and nozzle temp which then leads to less cooling of the first layers....right?
It sounds like the root cause is poor bed adhesion. This has nothing to do with the slicer you use.
Here's a quick checklist of things to try for adhesion problems in general. There's a good chance that one of these tricks will work:
What you're trying to do is use some combination of heat, pressure, and chemical bonding to get the first layer of the print to stick to the print bed enough to stay in place for the duration of the print, but not so well that it becomes permanently fused to the print bed.
Gluestick and hairspray can act as either a bonding agent or a release agent, depending on the bed material and print material you're trying to get to fuse. For example, when printing TPU on PEI you use gluestick as a release agent because the TPU bonds too well to the PEI build plate. But when printing PETG on glass you use gluestick or hairspray as a bonding agent because PETG really does not want to stick to glass.
Polycarbonate is still an unusual print material, so it may take some experimentation to get it right.
Re: Polycarbonate: Here's how to print it without warping, delamination, or an enclosure, with better-than-ABS results.
How about Windex, anyone tried with that?
Thanks
Re: Polycarbonate: Here's how to print it without warping, delamination, or an enclosure, with better-than-ABS results.
Here's a quick checklist of things to try for adhesion problems in general. There's a good chance that one of these tricks will work:
Raise the bed temperature
Put gluestick or hairspray on the bed
Clean the gluestick or hairspray off the bed (and give it a good cleaning with acetone)
Raise the print temperature for the first layer
Slow the print speed for the first layer
Increase the extrusion width for the first layer (this helps smoosh down the plastic to the bed more, at the cost of less print detail on the first layer)
The default bed temp is 110° and the max a Mk3 can do is 115°. Never-the-less, I tried it, the print still pops off
Glue stick I've been using all along, hairspray, no. I did put glue and hairspray on (see the FailNo6 video) and it still popped off. Although with the hairspray, it did hang in there longer so I thought I finally had it, but then I checked the cam and saw my cylinder spinning around the print bed *RAGE*
I've cleaned the bed with Windex, rubbing alcohol, acetone, etc. I've actually gotten the bed to look brand spankin new, alas, no joy.
I've tried a number of variations of first layer temps, none seem to yield any better results than the previous. Basically, the print becomes detached around the same point every time which I'm not sure what to make of
I've slowed the first layer print speed to a literal crawl. Standing there watching it, you can't tell it's moving. The first ~5-10 layers are super slow, then I bump them up about 10% each layer until I get to 50%. You can see this in the timelapses I've attached.
I tried increasing the extrusion width, best I can tell, still no joy.
One thing I haven't tried is to lower the Z axis to the point where the first layer is just above transparent. I've seen this suggested in a number of other videos but I guess that's my next shot. I'm rapidly running out of filament.
[youtube] [/youtube]
[youtube] [/youtube]
Re: Polycarbonate: Here's how to print it without warping, delamination, or an enclosure, with better-than-ABS results.
I have been following this thread - thanks for all the valuable info.
My prints are at the point where they look similar to PLA prints. however I still struggle with bridges drooping. I have increased the fan speed up to 50%. Any other tips of what worked for you?
Re: Polycarbonate: Here's how to print it without warping, delamination, or an enclosure, with better-than-ABS results.
Polycarbonate has long been my favorite filament. I'm an Ultimaker 2+ user and have done some extensive modding to be able to print at 295c, dual extrusion, etc. My machine is fully enclosed and I can push 130c on my over-volted bed pretty easily. All this for Polycarbonate.
I love PC because for most practical purposes, it's like printing metal. It lets me get my build chamber hotter than I could with ABS parts inside.
I stumbled across this post and decided to give it a shot.
Generally my PC prints require a *tiny* bit of post processing. Reaming threads with carbon steel taps, etc...
These settings (0.4mm nozzle, 0.9mm line width, 0.2mm layers) have resulted in the cleanest, strongest, most accurate PC prints I've ever had. I can't break the standard 6x9 nut from the "Nut job" STL with my hands. It's comically strong and definitely results in better layer strength than my old settings. Better layers than PETG, which is going to take some flesh with it because it breaks jaggedly.
You guys are in for some seriously cool shit and should all order some Polycarbonate immediately :D.
Re: Polycarbonate: Here's how to print it without warping, delamination, or an enclosure, with better-than-ABS results.
All of a sudden i couldnt get my PC to stick to the bed.
Tried some Karlssons klister ( celluse disolved in acetone ). It was hard to get a even layer on the bed. But i managed after a while to get somewat even layer.
Started the print. Phuu it seems to stick. When the print was done it was almost impossible to remove the print. And also it is flamable so be carefull.
But of you not able to get the PC to stick. Try Karlssons klister.
Re: Polycarbonate: Here's how to print it without warping, delamination, or an enclosure, with better-than-ABS results.
Metacollin's settings WORKED AWESOMELY!! I created an account just to say so. Used them with my modified Hictop (modified to have an E3D V6 hotend and MK3-ish style extruder assembly) to print an MK3 style fan nozzle in PC. Used his settings except i changed the width of the filament to match what my filament was (1.71), and used my printer settings. Printed using Polymaker PC-Max
I just imported the config ini from his github link, adjusted the filament diameter and number of perimeters, sliced, exported and printed.
I used purple glue stick as well.
I printed another part direct on the PEI and one corner lifted(warped) and the rest of it stuck REALLY hard.. using the gluestick seems to stick the corners better while allowing the part to be pulled off easier when it was done.
Much Thanks.
Re: Polycarbonate: Here's how to print it without warping, delamination, or an enclosure, with better-than-ABS results.
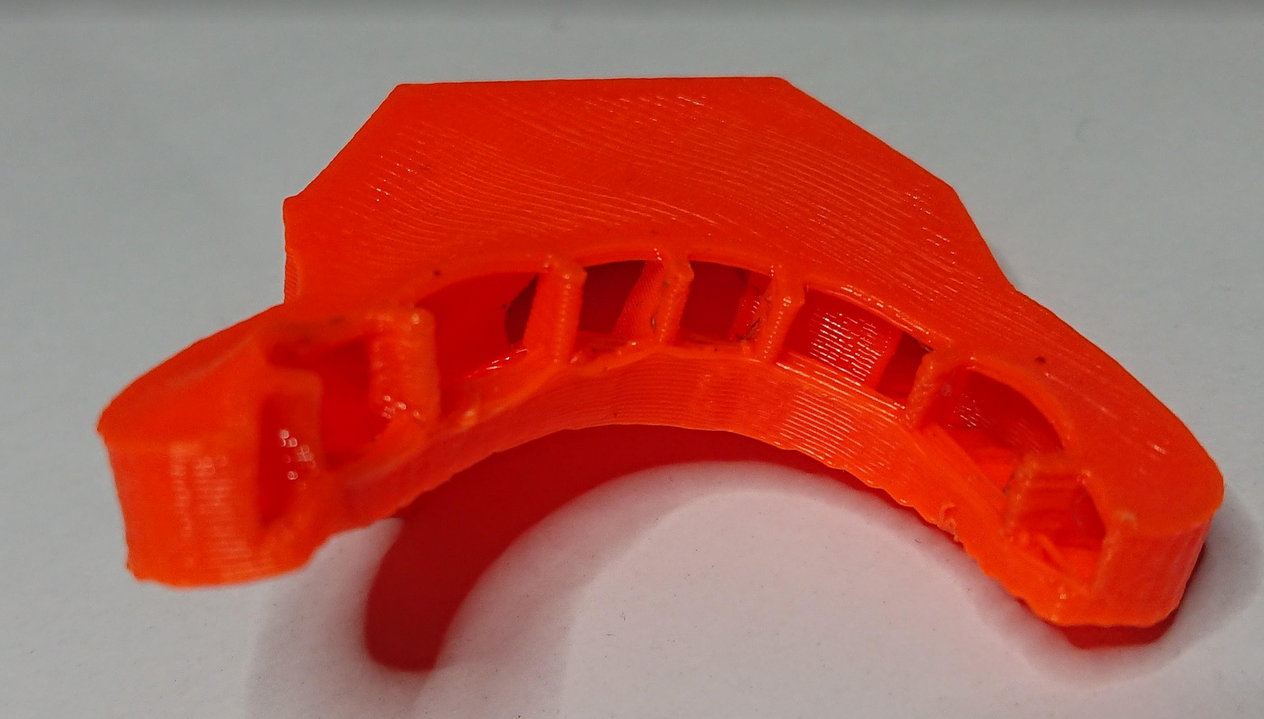
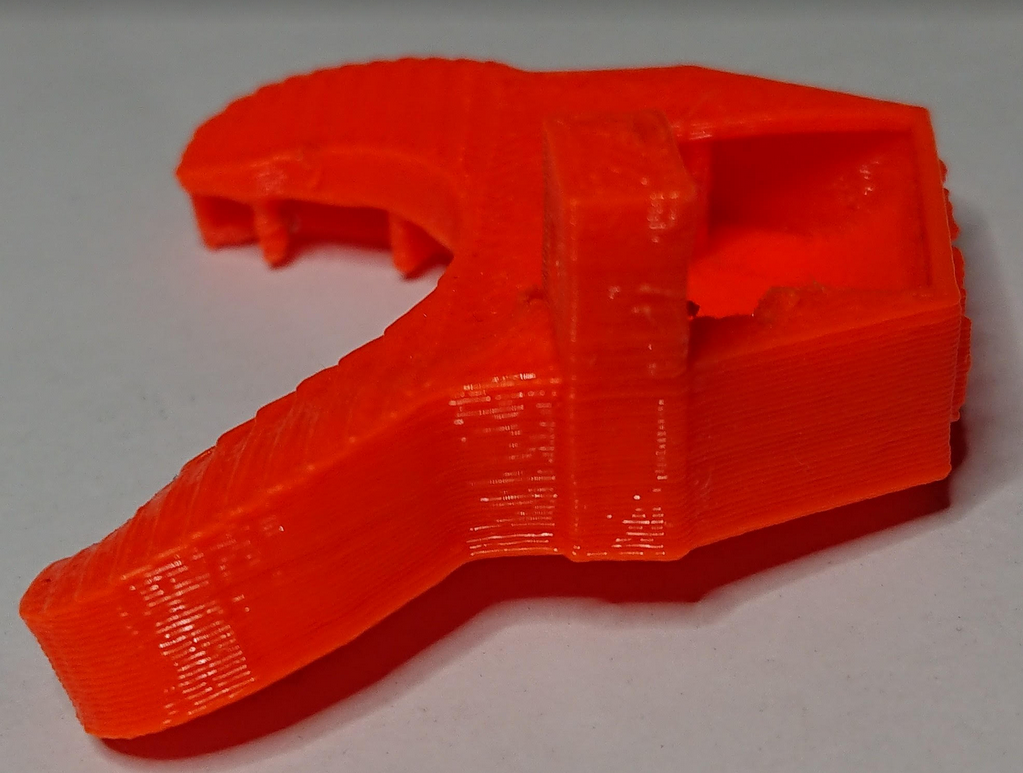
Thank you metacollin. I’m a 3D noob, bought a Mk3 to make structural, load bearing parts.
I printed this router mount for my Shapeoko 3 CNC. 100% infill, all the rest of the settings are yours. It’s a bit bumpy, zits I guess we call them. And some stringing. Dimensionally accurate and 100% useful.
Your settings saved me a lot of frustration I am sure.

Re: Polycarbonate: Here's how to print it without warping, delamination, or an enclosure, with better-than-ABS results.
I created an account to also say thanks.
I used this method using 3DXTECH 3DMAX PC, with 0.4mm nozzle printing 0.8mm wide, 290C nozzle, 110C bed, at 25mm/s. Print came out perfect. The 3DMAX PC, is crazy strong and does not become soft at all in 100C boiling water, it's amazing material that was hard to print but early testing shows this method seems to work. The drawback with 3DMAX PC is the price at $42 for 0.5Kg.
How well does the PRILINE PC hold up to 100C boiling water? Does it become soft? I've tried other PC blends and they start becoming soft in boiling water and don't return back to shape went bent in boiling water.
Re: Polycarbonate: Here's how to print it without warping, delamination, or an enclosure, with better-than-ABS results.
I'm new to this thread, have been printing happily with a i3 MK2S without needing to go to the forum for a while.
Now I'm ready to put the i3 MK3 together and had a look at the forum and found this thread.
I cannot figure this part out:
Why is this print method faster than usual? I don't understand the mechanics of that. If you print a wider than usual extrusion width with the same layer 0.2mm layer height, does the printer not need to make exactly as many layers as if you used 0.2mm layers with normal 0.45mm extrusion width?
Re: Polycarbonate: Here's how to print it without warping, delamination, or an enclosure, with better-than-ABS results.
Number of layers is the same, but each layer prints faster. Imagine drawing two squares on the paper sheet, each 10x10cm (or in, whatever).
Then completely fill one with lines of the very thin pen, and the other with a thick marker.
Which one is faster?
The only difference is the line width, same as with the print settings.
That makes perfect sense, I should have figured it out myself!
Thank you very much.
I'll have to try this out once I have put the new MK3 printer together.
I am not convinced it will work for my purposes, because the objects I print are very prone to warping.
However, some attempts about year ago almost succeeded. I tried to print large surfboard fins using Polymaker PC max but only 2 fins did not tear themselves apart in the process.
The photos shows those fins that survived testing by hanging 94kg on them, and some that did not. The two white ones are made from PC Max. They don't snap off, but they are too floppy and they have warped too much to be usable.
My attempts to print fins with polycarbonate (the real stuff straight) have all failed miserably.
I'll report back if this method of printing extra wide layers is successful.
Another question comes to mind:
What would happen if these extrusion settings are used for PLA or other filaments? If they reduce warping and improve inter-layer adherece for PC, then why not use if for other materials as well?
Re: Polycarbonate: Here's how to print it without warping, delamination, or an enclosure, with better-than-ABS results.
metacollin, thanks for all the trial and error engineering, it certainly help out with my polycarbonate print.
The only thing I cannot get right is bridging. I am printing with some no-name cheapo PC which needed a few more degrees (275 C) for good layer adhesion but all in all prints great until the first bridge. Some strings don´t anchor right and others just break.
I even did some parameter variation testing where i printed a small bridging test model with 32 combinations of bridging print speed and bridging extrusion multiplier. slower speeds and a multiplier around 0.9 seemed to be a little better but all in all i couldn´t even make out a real trend.
So any recommendations are welcome. I really want to make this work because the material is just awesome for structural prints.
Re: Polycarbonate: Here's how to print it without warping, delamination, or an enclosure, with better-than-ABS results.
Has anyone tried printing with this E3D's Spoolworks PC?
https://e3d-online.com/polycarbonate-clear-1-75mm-1kg
PC needs to be printed hot - from 280C-310C, and with a bed temperature of 110C or more.
The first thing I wanted to print was jltx Prusa i3 MK3 - Cooling with a view https://www.thingiverse.com/thing:2740613
As I suspected there could be issues with these insane temps in an enclosure, so after a few testcubes with both these settings and more stock settings... then
.... .. . . Crash! 😮
The stock "nozzle fan" shroud got so soft it drooped down and bent and causing a crash, I see it swinging back and crashing from the camera and ran to press reset..
The next thing i printed without the shroud was the stock "nozzle-fan" stl in PC as it's quick to print and small 😉
I have since then tried to print the "Cooling with a view" but it's impossible to print with these settings as it's 0.15 and has very narrow channels that would not slice at all...
So with more stock settings and 280-290C with bed at 110-120 I get a pretty good print but the top loop for screw get's really bad quality so trying to dial in settings that get's good result for the whole print, a little bit scared to try the recomended "up to 310C"
Re: Polycarbonate: Here's how to print it without warping, delamination, or an enclosure, with better-than-ABS results.
Has anyone tried printing with this E3D's Spoolworks PC?
https://e3d-online.com/polycarbonate-clear-1-75mm-1kg
So with more stock settings and 280-290C with bed at 110-120 I get a pretty good print but the top loop for screw get's really bad quality so trying to dial in settings that get's good result for the whole print, a little bit scared to try the recomended "up to 310C"
That goes a bit beyond what we can reliably do with the mk3, but its just a fan nozzle. I printed hypocycle's nozzle in esun PC at 280/100 with 50% fan just fine.
Nylon PA6
I had hoped that this concept would work well for my nylon warping issues. I tried both .6 and .9 widths but alas it did nothing but cause more warping. The prints still turn out the best at .2 layer height with widths so there is less mass cooling and trying to warp the print. I'm going to buy the cheapest PC I can and see if this does anything to help.
I do actually have a cardboard enclosure which did make a difference... at least for the nylon.
Re: Polycarbonate: Here's how to print it without warping, delamination, or an enclosure, with better-than-ABS results.
I'm super excited to try this out. My PC filament is arriving today!
I'm sort of new to slic3r PE, I use Cura in the office because we've got Ultimakers there -- I loaded the Polycarbonate config file, and the dropdowns say Polycarbonate.ini, Polycarbonate.ini, . . . and I'm wondering what the third should say. It defaulted to a Polycarbonate.ini in the Printer field, but should I change it to my MK3?
This thread seems to bring up lowering the print speed. The config file has it at 65mm/s -- does anyone have any reliable suggestions?