Re: Polycarbonate: Here's how to print it without warping, delamination, or an enclosure, with better-than-ABS results.
Im going to give these settings a shot on my mk3 in the next few days. ill post the results.
Re: Polycarbonate: Here's how to print it without warping, delamination, or an enclosure, with better-than-ABS results.
Alright, since this is the reference article for PC on the internet, I want to share my experience too:
First, thanks to metacollin, his base settings make PC feasable!
NO-NAME vs. PRILINE EXPERIENCE
Turns out PC is not PC, the brand makes ALL the difference. I started out with a no-name brand PC, I suspect its simmilar to the Hobbyking stuff, but who knows. Metacollins settings helped but minimum print temp was >275, and without enclosure I had NO chance to prevent warping even for smaller parts. So I built an enclosure and around 50 to 60°C ambient temperature I was able to print reasonably well. To make it stick, bed temp had to be 130 °C with at least 2-3 thick layers of Elmers glue stick (on glass). Also, bridging was a nightmare, never got it to work at all. On a positive note: the stuff is hard, super tough and machines really nicely.
I used up the roll despite the troubles, so now I ordered the PRILINE PC and WOW, what a difference. 275 °C seems way to hot, 260 °C ideed works. I left the bed at 120 and it does stick very well to Elmers glue stick. I still don´t have a lot of experience with bridging, but it does seem to do better. Due to the lower temperatures it stinks way less too. All in all, thumbs up for Priline, whatever they did, it tamed the PC quite a bit.
CONCLUSION:
So I guess metacollins initial suspicion that it is a modified PC seems right. Either it is just lower molecular weight or they mixed it with another unspecified plastic, so heat resistence and strength might be affected. Someone on amazon suggests that it might be a PC-PBT mix.
Also, despite the extreme extrusion with, layer adhesion seems low. In general, the Priline material seems less tough, it feels brittle. With the old stuff I had real troubles removing a brim without a tool, the Priline PC I can just ripp off.
So, If you need ultimate strength and that ultimate last 5 degrees of heat restistance, the nasty unmodified stuff might be necessary, else stick with the modified Prilines and eSuns (maybe Plymaker if you have the cash..), without a question it is superior to ABS.
Re: Polycarbonate: Here's how to print it without warping, delamination, or an enclosure, with better-than-ABS results.
Metacollin, you son of a gun... these settings work!!!
I increased the temperatures to 295C on the nozzle and 120C on the bed, just because I'm using Rigid Ink Polycarbonate, which is (I think) purer than most PCs. I reduced all the speeds by about 20%, and increased the extrusion multiplier to 1.06, and my first benchy print was beautiful and (nearly) unbreakable, not to mention being way faster than any other benchy I've printed before with any filament ever!
To get it to stick to my MK2S, I tried gluestick straight onto the PEI surface but there was some minor warping. Rafts didn't work too well either, so now I've added a layer of blue masking tape, and some gluestick on top of that, and it works really well!! It's also much easier to remove prints, since I can just peel the tape off and the part comes with it. That also means I can afford to ram the nozzle hard into the bed on the first layer, to get even better adhesion. Win win!
Thanks once again for taking the time to experiment, and then giving a very thorough write-up. We all appreciate it.
Designing, building and flying model aircraft since June 2015
Re: Polycarbonate: Here's how to print it without warping, delamination, or an enclosure, with better-than-ABS results.
Also posting here to say thanks!
Printing PC went from impossible to almost easy...
I'm priting with PC-MAX. Wow its srtong when printed right. 278C seems the right temperature for me. Couple of laters of Elmers works wonders and can reuse it a dozen times with no enclosure.
I'm trying to print light drone frames - with some thin walls so have had to play with some of the extrusion widths to get the thin walls to print - but usually manage to get it to work. E.g. https://www.thingiverse.com/thing:3034375
The trickiness is the extrusion multiplier is so sensitive as you say... so can take quite a few attempts on a new design to get it right...
Re: Polycarbonate: Here's how to print it without warping, delamination, or an enclosure, with better-than-ABS results.
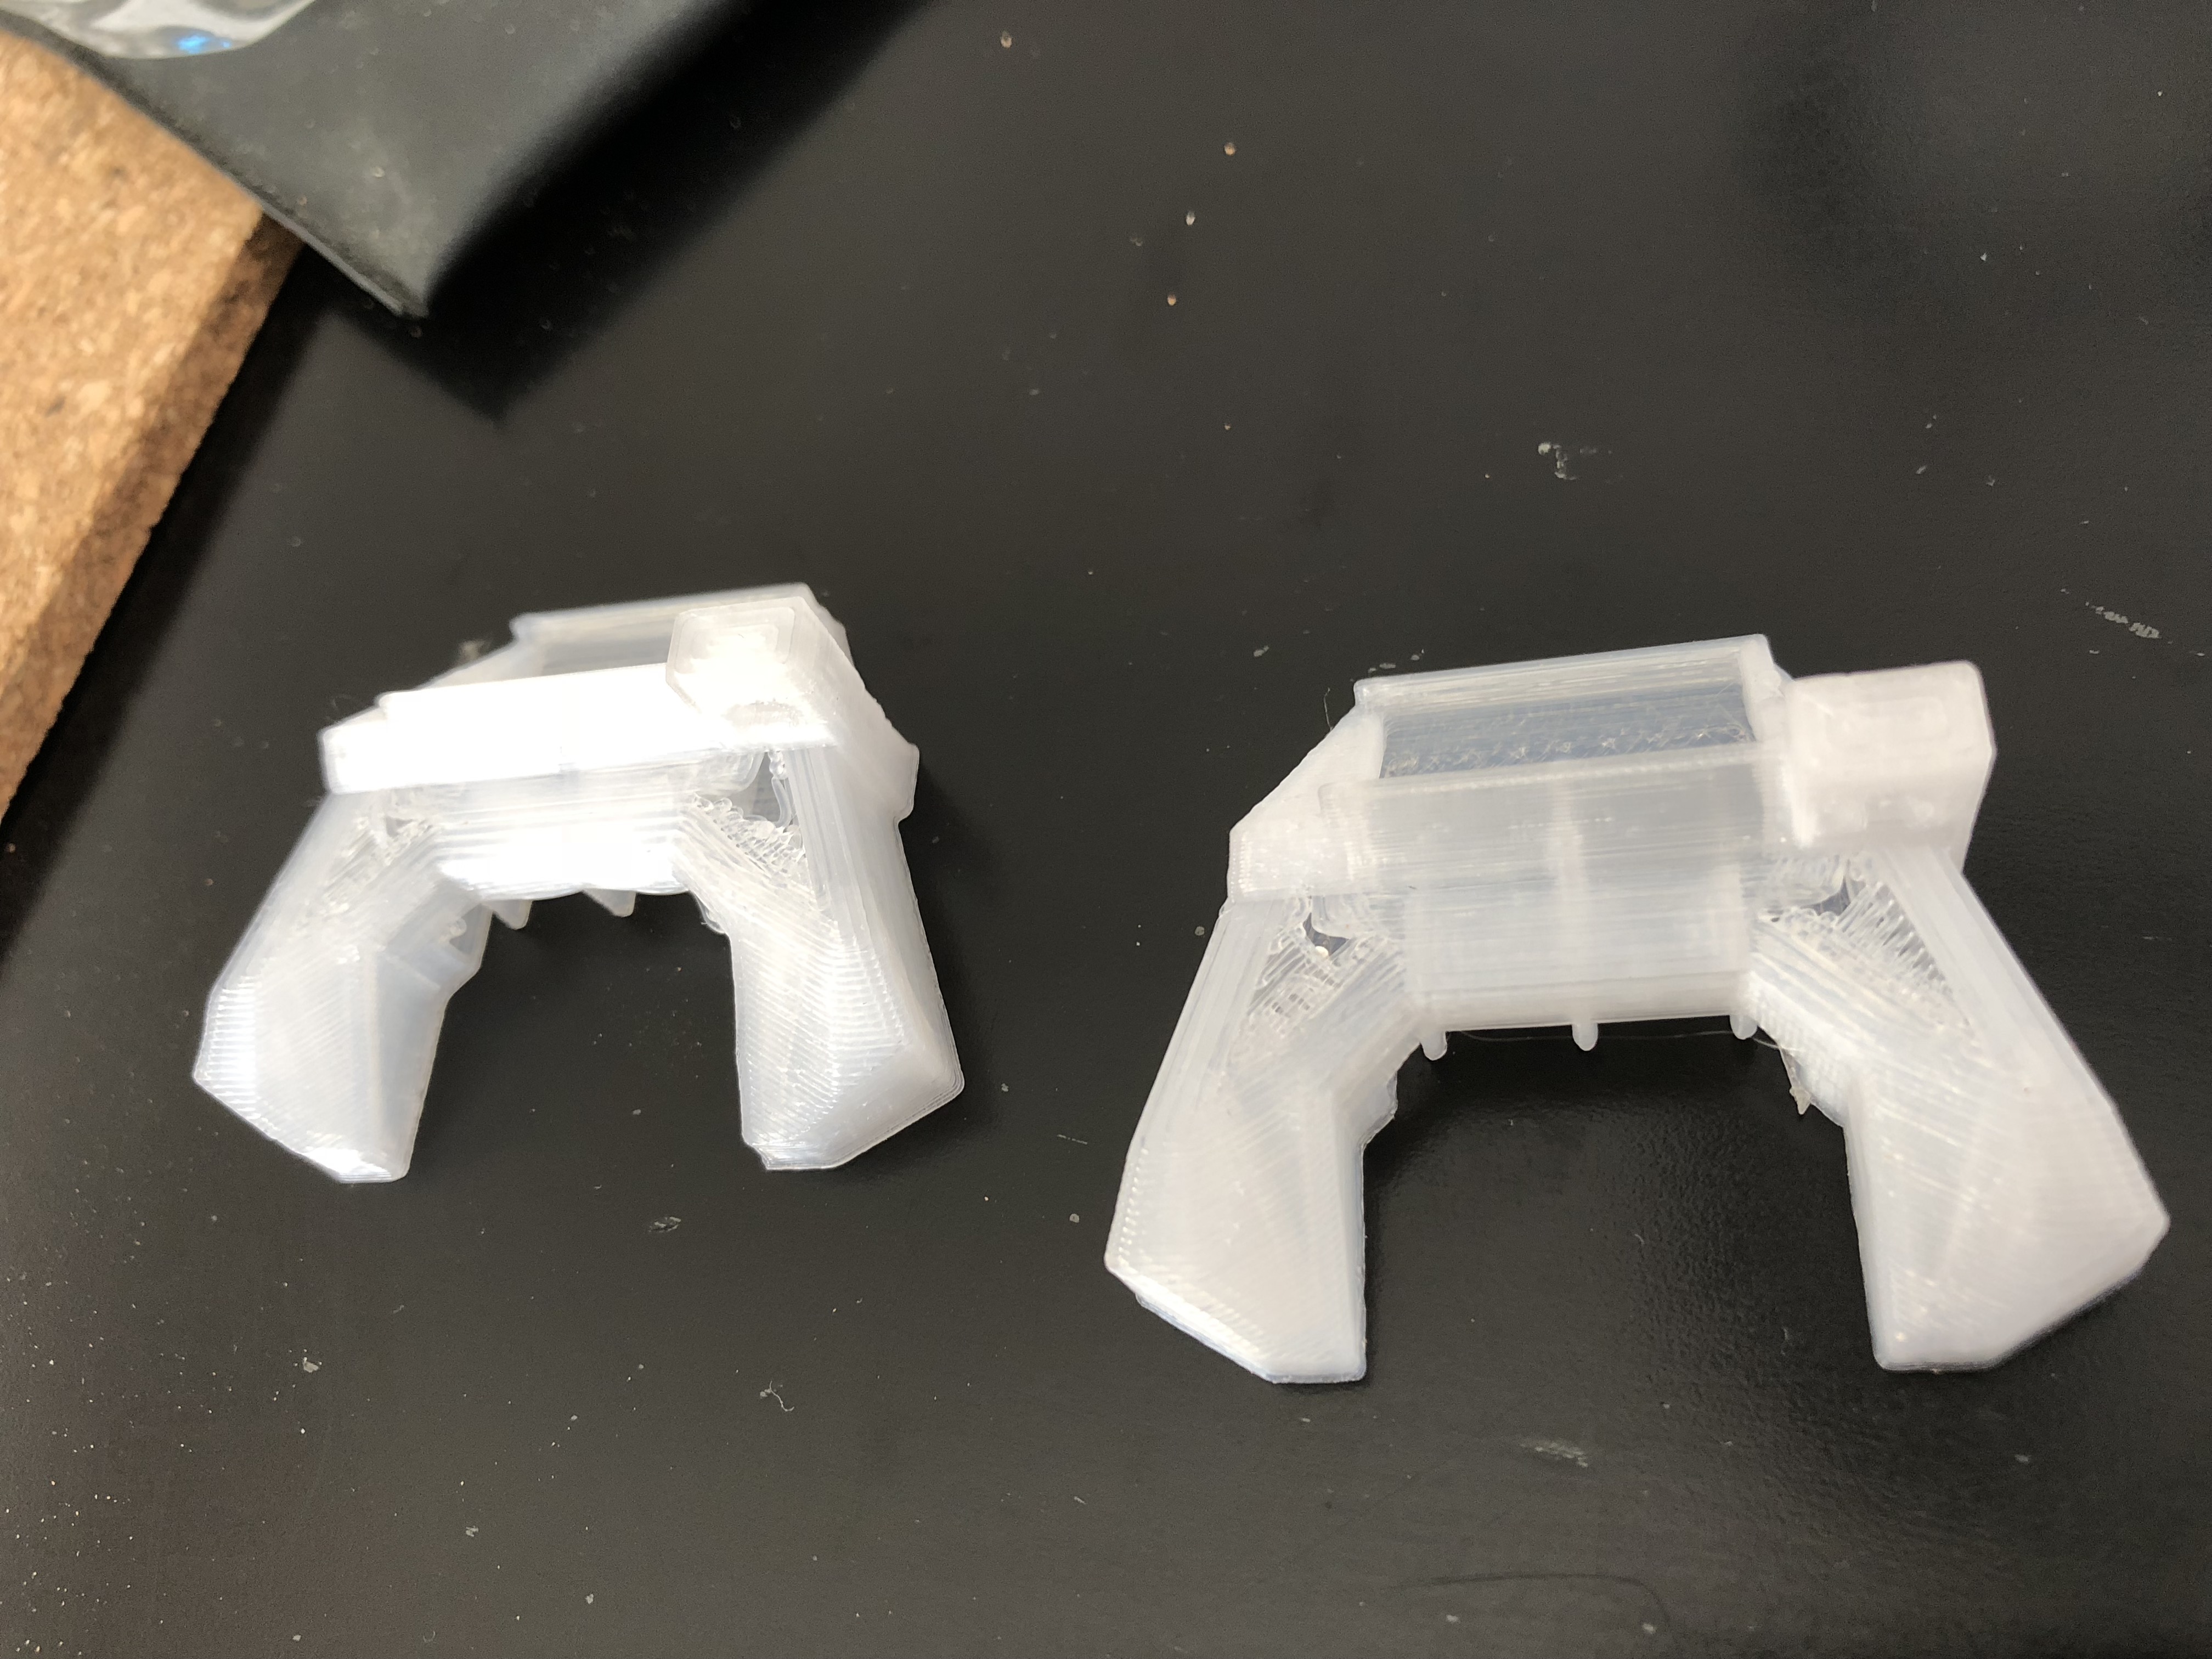
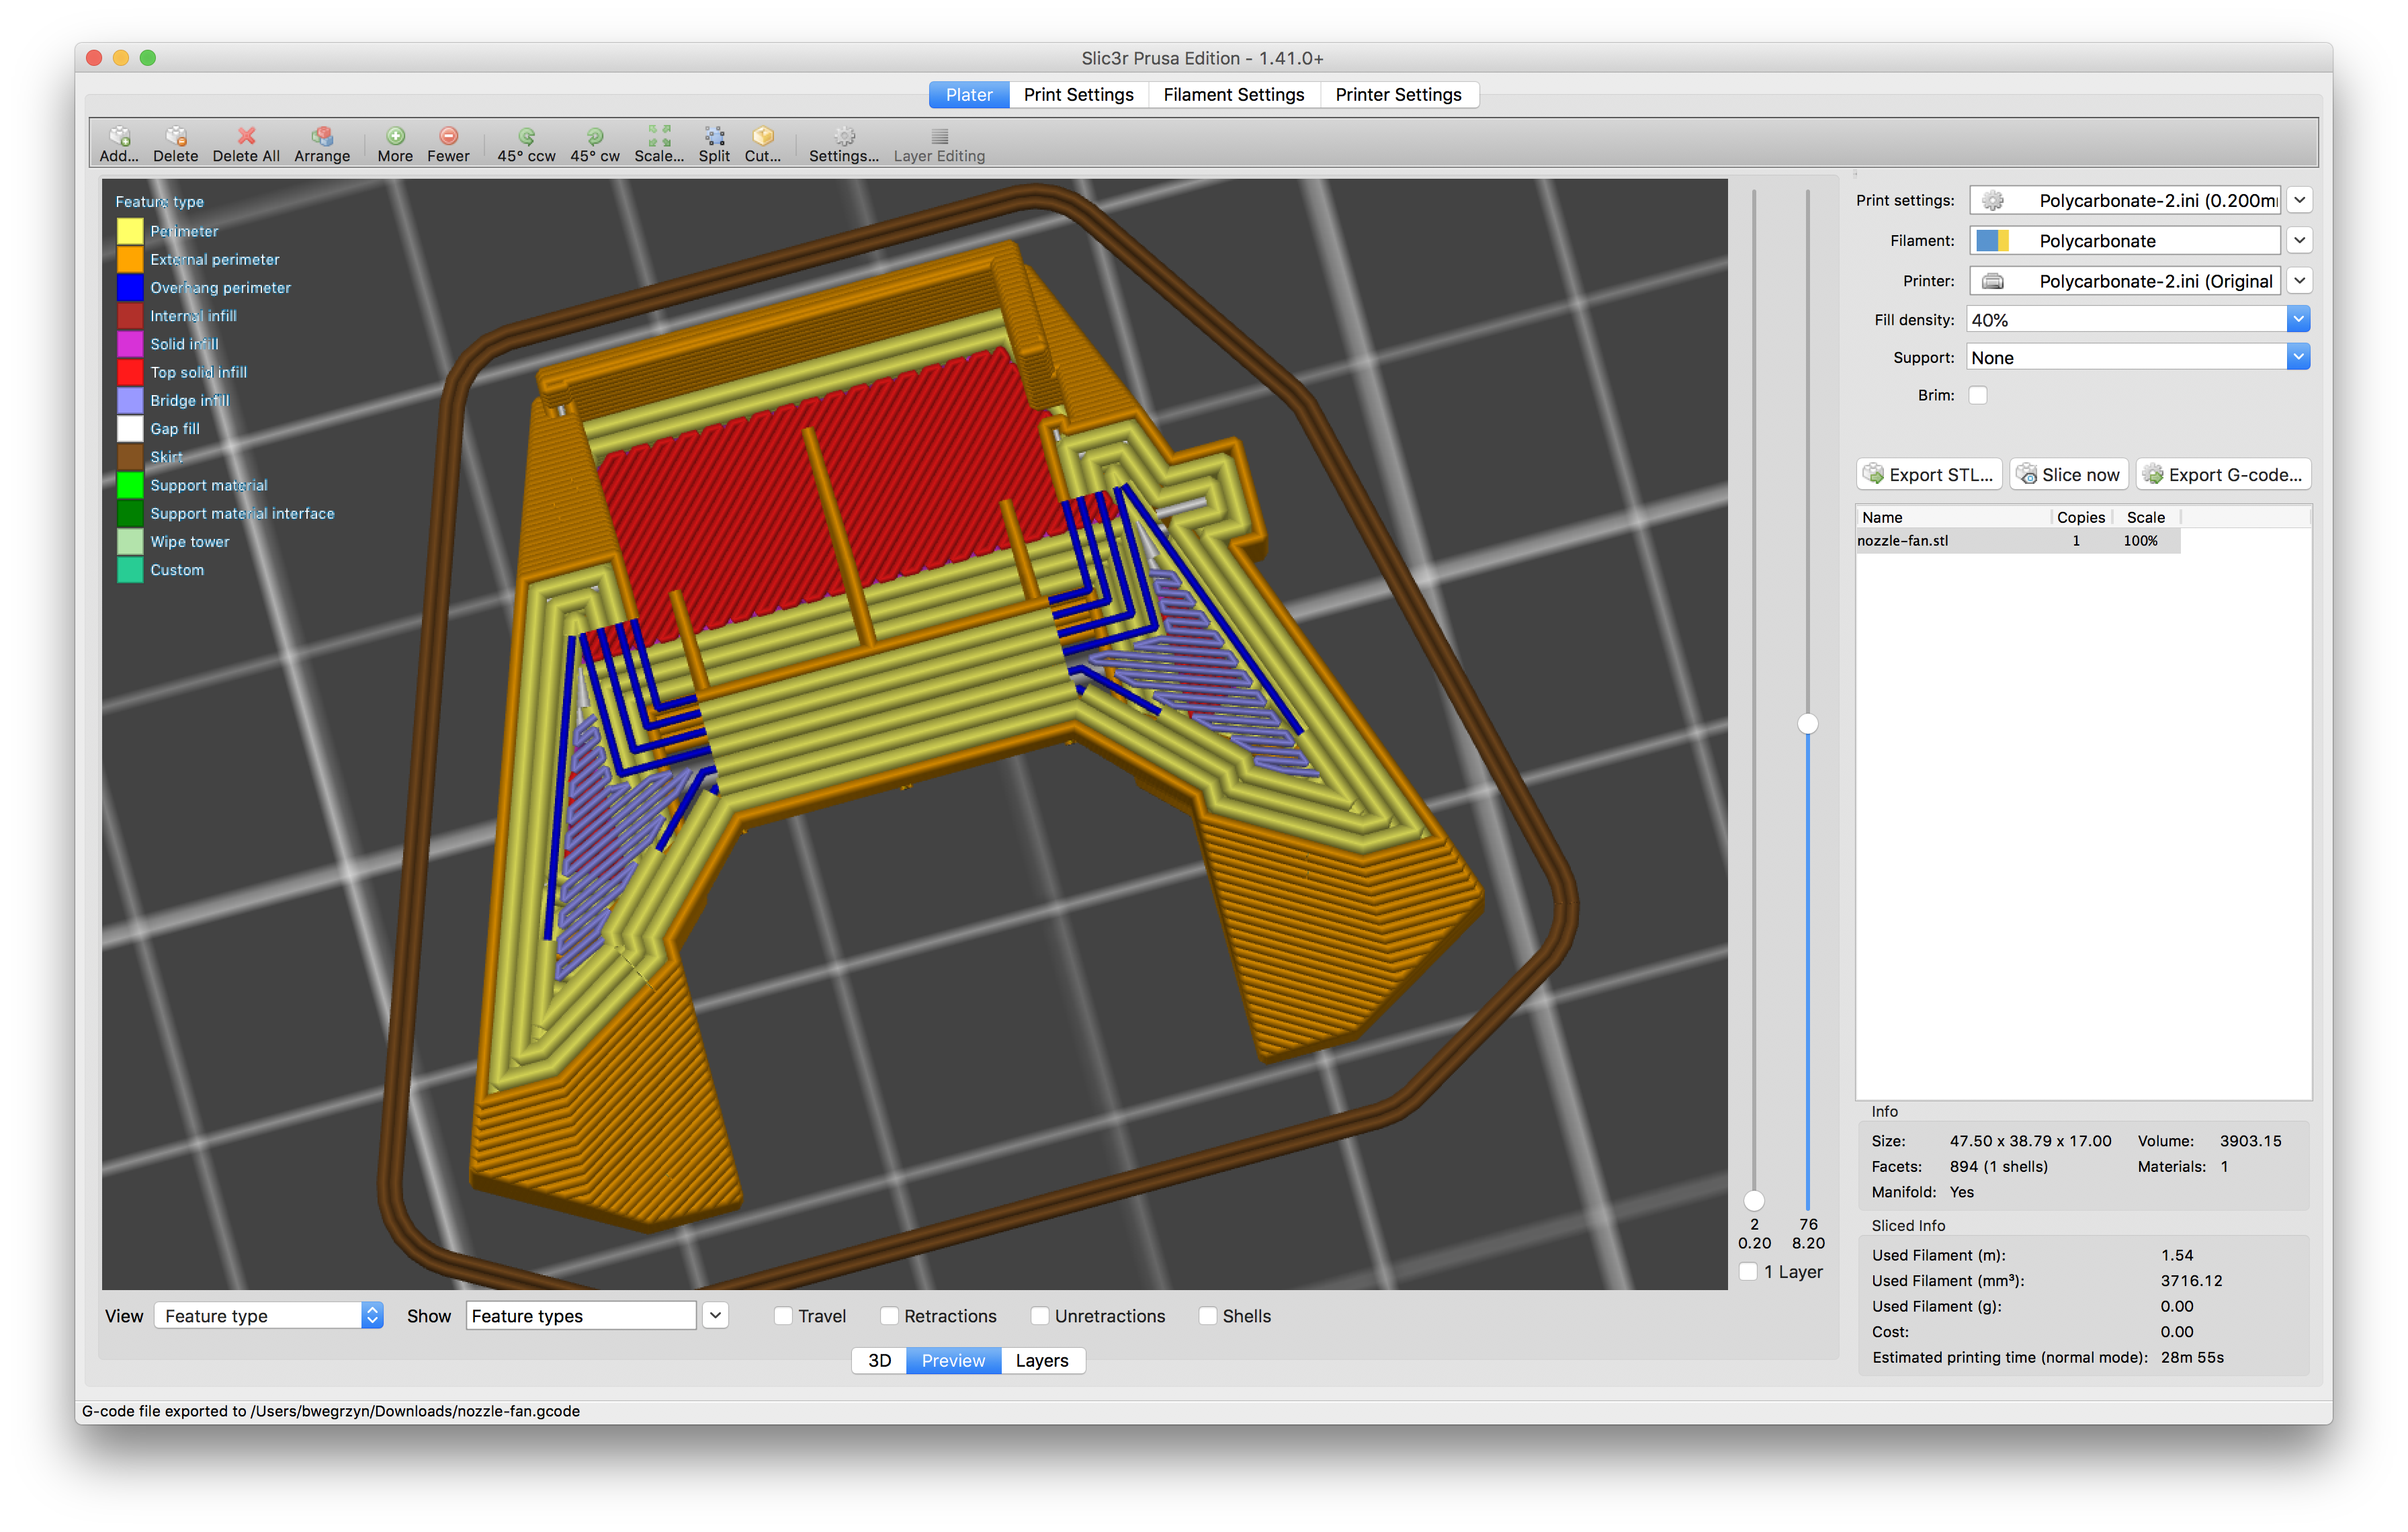
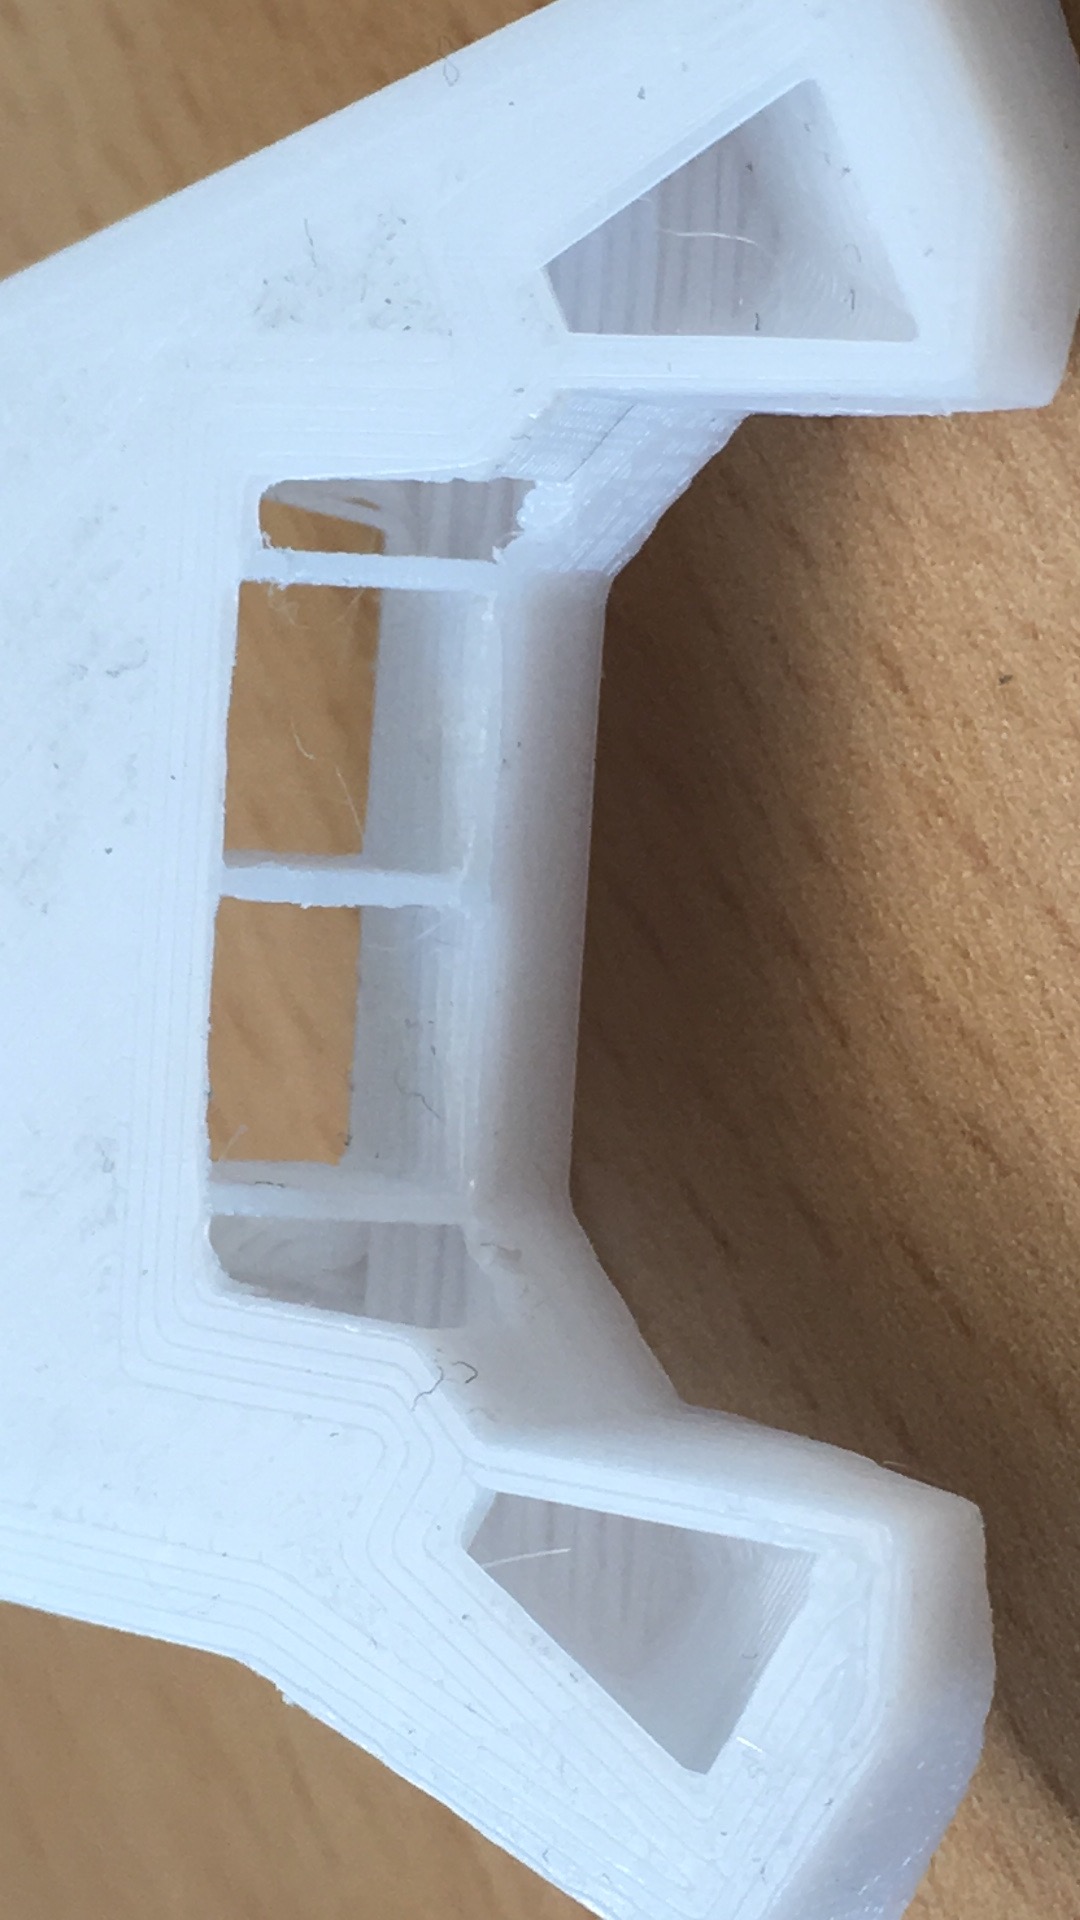
I'm attempting to print the new R3 fan shroud with PC, and it seems to be working OK for the most part with the latest settings posted on GitHub. However, there is one location on the print that I'm having trouble with. As you can see in the pics, the bridges/overhangs in the two corners are just dropping and not connected. I suspect this is a problem with Slic3r as after exporting the gcode, I can see that the thickness of the extrusion in this area is much thinner than the rest of the model. Any ideas on how to fix this? None of the settings I've adjusted under extrusion width seem to make any difference here and I suspect that this is why this part of the print is failing on an otherwise acceptable print.

Re: Polycarbonate: Here's how to print it without warping, delamination, or an enclosure, with better-than-ABS results.
Any ideas on how to fix this? None of the settings I've adjusted under extrusion width seem to make any difference here and I suspect that this is why this part of the print is failing on an otherwise acceptable print.
try using more top layers until it finally starts to fill in. I don't see any way to avoid being messy on this model with that right angle suspended in air. Removing that in the model and making it straight would make it easier.
Re: Polycarbonate: Here's how to print it without warping, delamination, or an enclosure, with better-than-ABS results.
Hey there,
I experienced the same holes and I agree the right angles just droop. They can't even support themselves let alone the next layer above them...
I tried metacollins settings with two filaments so far and with with both Hobbyking PC and Polymaker PC-Max these holes show up while being less prominent with PC-Max.
I printed these as an alternative https://www.thingiverse.com/thing:3009290 as the author offered a only slightly modified version of the R3 fan duct with a thicker top an they printed perfectly. Only "issue" is that the fan shroud holder needs to either be the double-mount one he also offers or his version of the R3 holder (at least I think the extended version of the holder just does that not sure though... I went with the double-mount 🙂 )
FYI I have to further confirm the observations posted in this thread that modified PC's like PC-Max print fabulously well with metacollins settings. The Hobbyking PC on the other hand emptied more than half of my 1kg spool before coming to half decent results... which is to say that I already print in a passive enclosure. I gave up on the cheap Hobbyking PC due to hardware limitations:
a) the PEI sheet lifted significantly under the warping stress even from just benchies...
b) small features either overheated and due to an increase of retractions/time led to heat creep or they had next to no layer adhesion (I believe because they cooled down too fast then, as thin parts like the R3 fan crumbled completely after removal from the bed). Printing multiple parts, slowing down, speeding up, part cooling fan all did not work... I believe even with these settings an actively heated chamber with something like a water cooled extruder would be needed and that's simply not worth it...
Cheers,
DerBierBaron
Re: Polycarbonate: Here's how to print it without warping, delamination, or an enclosure, with better-than-ABS results.
Here my settings for the shroud. I didn't manage to export the plater and settings as AMF, I don't know why. So I joined a config.ini.
My polycarbonate is quite sensible to warping. I print in enclosure.
I printed 2 of the original ones at once (see photo) but I already printed only one older shroud with that settings.
I think the settings discussed in this topic don't fit very well to that part which has thin walls.
The high skirt is nice to permit the layer to cool down before the nozzle pass again. And it is a thermal wall too but I'm not convinced it is efficient for that purpose.
Re: Polycarbonate: Here's how to print it without warping, delamination, or an enclosure, with better-than-ABS results.
I am still completely baffled how you guys are at .9 width and producing anything resembling a workable print. 600, 700, and 800 microns likewise produce horribly underextruded and gap-filled garbage for me with pcmax and epc.
I'm glad its working though.
Re: Polycarbonate: Here's how to print it without warping, delamination, or an enclosure, with better-than-ABS results.
I've tried printing Polymakers PC Max on my MK3 with metacollins settings. I had to increase the bed temps to 110/120 (1. layer/other layer) and I had to increase the extrusion multiplierer significantly. Now it prints perfectly.
I've tested the parts compared to Colorfabbs nGen and XT.
My PC Max parts are about two times as strong as XT parts and four times as strong as nGen parts.
Nice. I have been thinking of buying some PC MAX but heard some bad stories about bed adhesion. Would you mind telling me what you do to get it to stick? gluestick? some other agent? Could you possibly share your settings here?
Thanks alot.
Cheers
Oliver
Re: Polycarbonate: Here's how to print it without warping, delamination, or an enclosure, with better-than-ABS results.
I used the settings from metacollin. I just changed the bed temperature for the 1. Layer to 110 and Layer >1 to 120. Yes PC Max has a tendency to warp. I cleaned the bed with isopropanol before printing. I would say that 90% of my prints are warp free but sometimes I also get warping.
I think I will switch to Colorfabbs PA-Neat and will stop printing with PC if the new PA works as great as Colorfabb promises. It has a even higher glas temperatur of 145°C and is extremely tough (but more expensive than PC)
Re: Polycarbonate: Here's how to print it without warping, delamination, or an enclosure, with better-than-ABS results.
Casn you share PC-max Mk3 settings configuaration please?
many thanks!
Re: Polycarbonate: Here's how to print it without warping, delamination, or an enclosure, with better-than-ABS results.
FYI I have to further confirm the observations posted in this thread that modified PC's like PC-Max print fabulously well with metacollins settings. The Hobbyking PC on the other hand emptied more than half of my 1kg spool before coming to half decent results... which is to say that I already print in a passive enclosure. I gave up on the cheap Hobbyking PC due to hardware limitations:
a) the PEI sheet lifted significantly under the warping stress even from just benchies...
b) small features either overheated and due to an increase of retractions/time led to heat creep or they had next to no layer adhesion (I believe because they cooled down too fast then, as thin parts like the R3 fan crumbled completely after removal from the bed). Printing multiple parts, slowing down, speeding up, part cooling fan all did not work... I believe even with these settings an actively heated chamber with something like a water cooled extruder would be needed and that's simply not worth it...
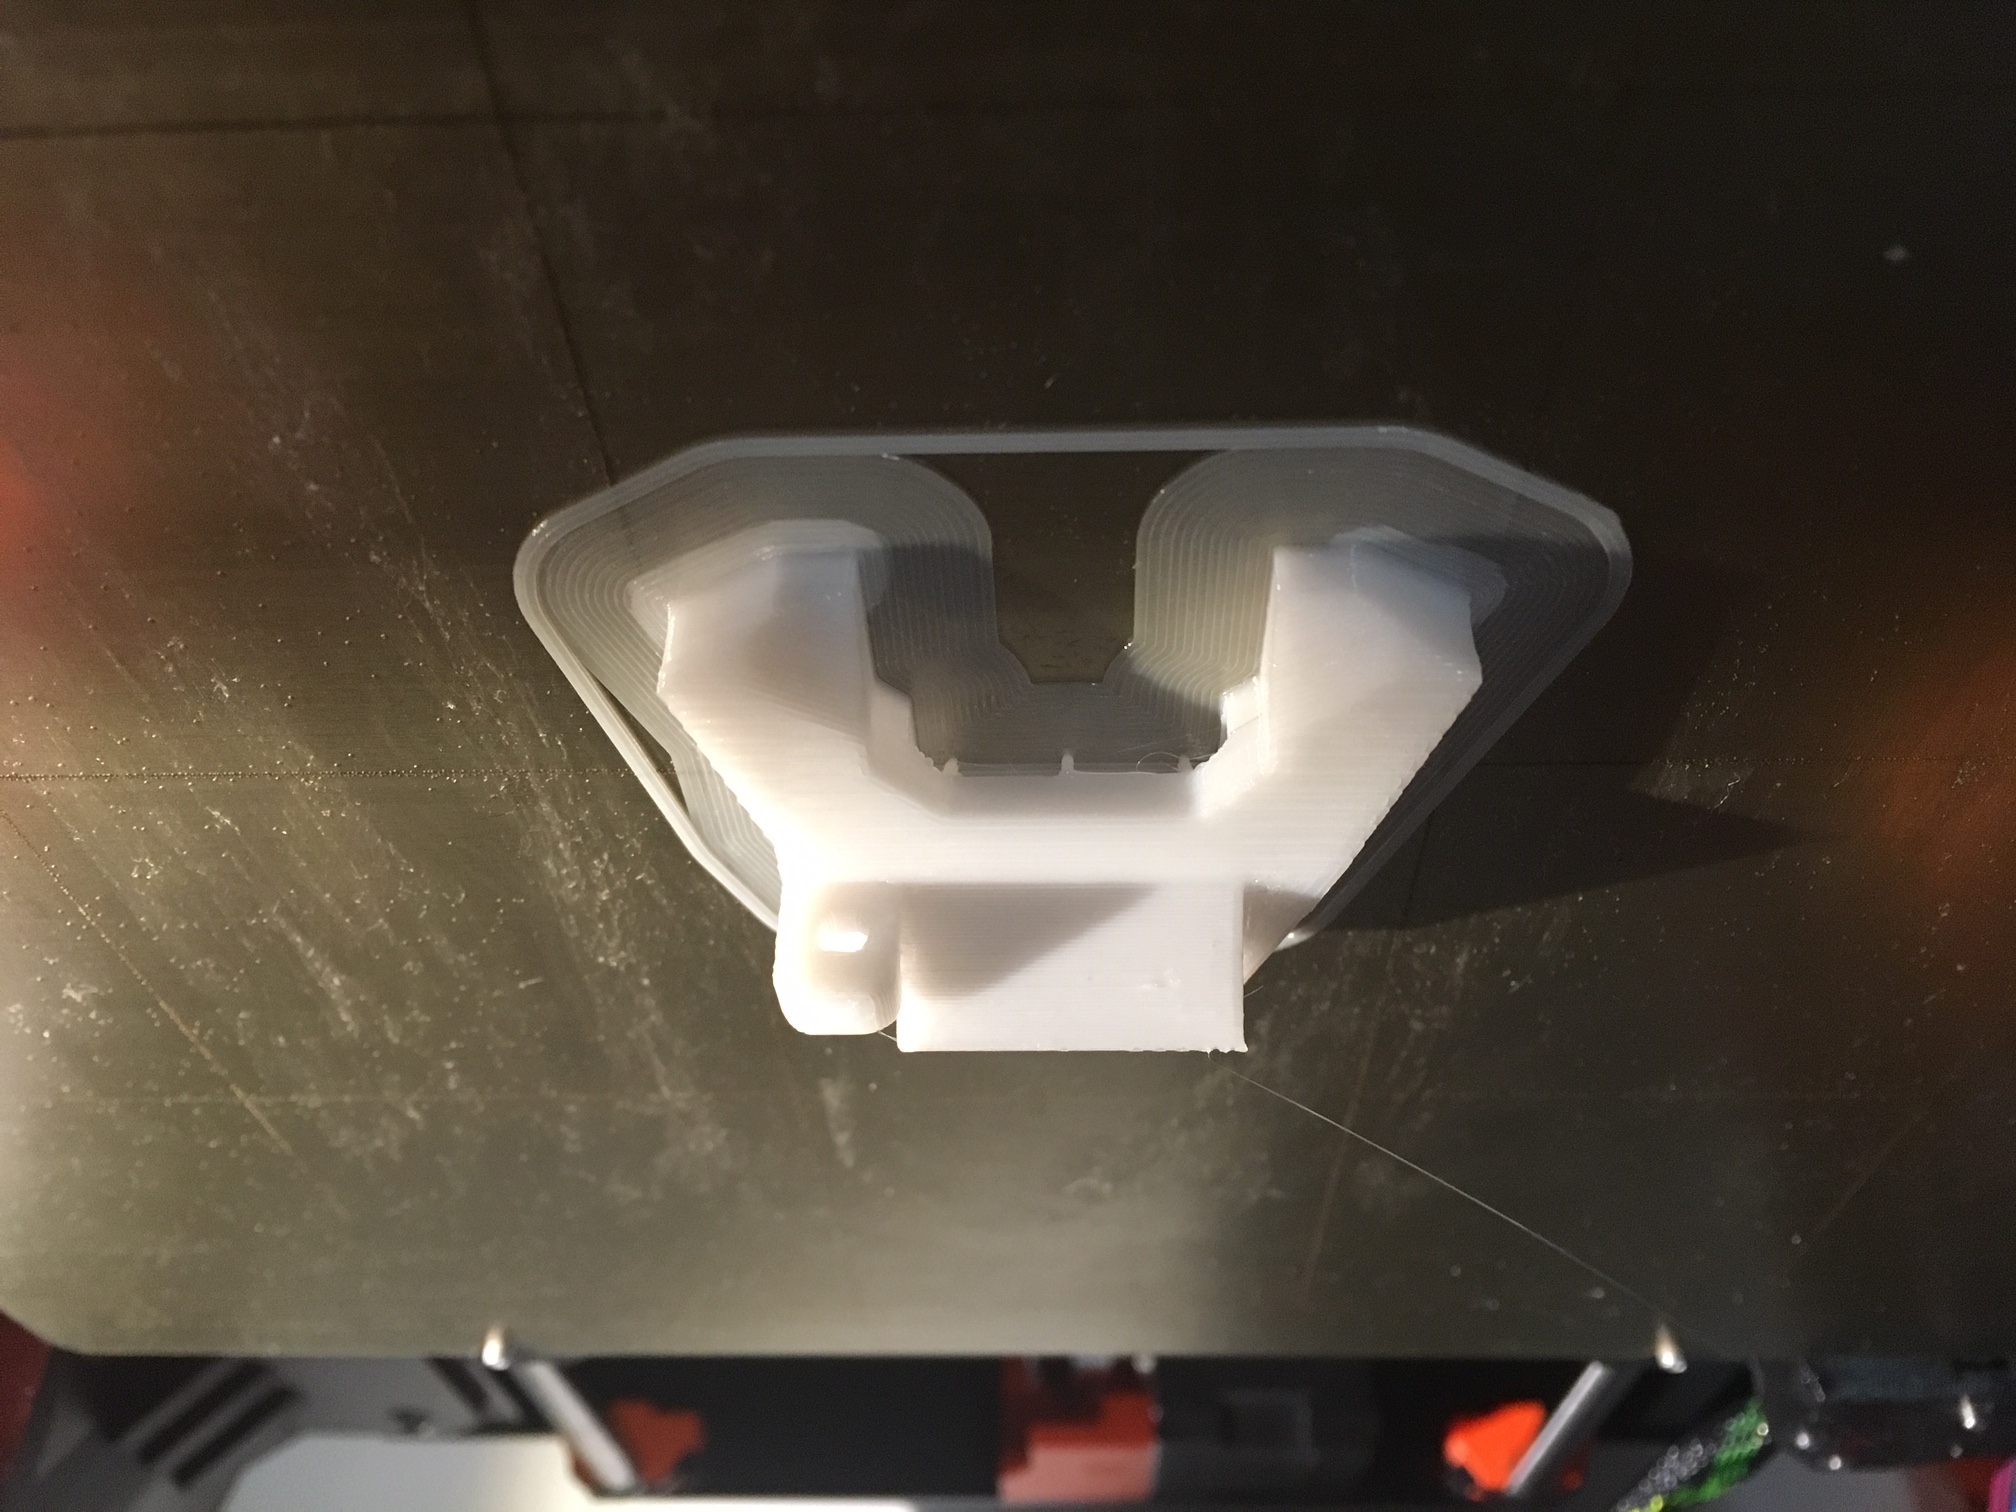
I transferred Metacollins’ settings today to the MK3 configuration, adapted a PC-Max profile for the Hobbyking PC and came up with a slower and tame version of Metacollin’s wide extrusion settings, and was finally able to print the modified R3 shroud successfully!
Printed on MK3 with Lack enclosure, 285 nozzle, 110 bed, slow and with brim.
This stuff warps really bad, and the 8mm brim lifted off the bed but still held the part in place.
My previous attempt had cracked layers, this one, slowed down to a creep, held up fine.
Bridging was actually not bad at all. I feel I have found a decent starting point. This is the first time I deviated from standard settings and after a few tries I am quite happy.
I am sure it will not work with more warping sensitive parts, but for the Nozzle it‘s good.
UPDATE:
Attached the config.ini file for the settings I used.
I ran the print with between 50% and 80% speed setting, but I think 75% should work for the entire print.
the extrusion width was adjusted based on Slic3r previews, the external perimeters had to be kept to 0.45mm, otherwise the extrusion paths had gaps in some of the details.
HEALTH: I watched the print closely, and even with the LACK enclosure I obviously inhaled enough fumes to have an unpleasantly irritated throat and uncomfortabe feeling in my lung. A reminder for staying away from the FDM fumes!
Re: Polycarbonate: Here's how to print it without warping, delamination, or an enclosure, with better-than-ABS results.
Hey everybody,
Just Tested printing with PC-Max.
Amazing Results with one Problem:
I have some gabs between Perimeters. Not realy sure why. I printed a test cube single perimeter and its perfectly spot on 0,6mm.
So no underextrusion issue in general. Bigger top solid Layers are quite perfect as well. Outer Perimeters seem fine or at least way way better.
So its only gabs between inner Perimeters?
Its preety much the Settings from this post. I Increased Infill Perimeter overlap to 13% to get the same overlapp in mm than the 25% for 0,45mm Perimeter gives. But thats the only thing i changed and the gabs are not between infill and perimeter but between the perimeters itself.
Anybody knows whats going on here or what i can change?
Thanks for any suggestions.
And BIIIIIIG Thank you for the initial Post. Theese Settings work cracy well!!
Re: Polycarbonate: Here's how to print it without warping, delamination, or an enclosure, with better-than-ABS results.
Have any of you having good results with the polymaker PC max tried it with the textured powder coated bed sheet?
I have had drooping of my partfan shroud ( I pointed a heat gun at it and bent it back into position but on a tall part by the end of the 8 hour print the drooping caught the print surface and knocked over the model so I need to do something) printing sunlu petg at 240c so I guess I need to make a fan duct shroud out of PC max. I am assuming the orange one in my kit from Prusa is ABS and while I have about a half a kilo of ABS that I was using in my delta using it for this part will I guess mean it is just going to warp again... I suppose I could go down to my machine shop and make one out of aluminum that might not be pretty but would get the job done... I have done a rough sketch of one that is the printed abs for the part of it more than a few mm away from the heater block but the close up to the block parts I would make of metal... it should be made out of stainless steel to restrict heat transfer up to the printed part where it will be connected to the part fan but don’t do a good job of welding SS but I guess I could braze it in an application like this
Re: Polycarbonate: Here's how to print it without warping, delamination, or an enclosure, with better-than-ABS results.
Gaps:
With the original Metacollins settings I had the same issue that there were some big gaps in the layers, on the fan shroud the settings even lead to small gaps in the perimeter itself. When I tried to print the NASA wrench there was at least 0,5mm gap between infill and perimeters at some layers.
This is why I adjusted the extrusion width of Metacollins settings until those gaps and issues did not show anymore in Slic3r preview.
The resulting settings are attached above.
Worked well for the fan shroud, even with the notoriously difficult Hobbyking PC
Thank you very very much. Changed it. Tested it. Works
Re: Polycarbonate: Here's how to print it without warping, delamination, or an enclosure, with better-than-ABS results.
Did any else try this method with Nylon? I saw one post in this thread that concluded it had the opposite effect.
@metacollin, can you give us some insights? I find that printing with esun epa (nylon 6?) is next to impossible. (using a enclosed mk3)
Warping is always an issue and sometime the nylon loops around the extruder. (already made a mod to prevent it but it happend again.)
Edwin
Re: Polycarbonate: Here's how to print it without warping, delamination, or an enclosure, with better-than-ABS results.
Well after a lot of tuning and test prints i trew my first real functional print in a boiling kettle with water: It stayed in shape and i couldnt deform it while it was in the cooking water.
I'll leave it in for an hour or so and see what happens.
This will be a replacement part for a boiler in a machine. It will be exposed to 100 degrees steam/water vapour 24/7.
Until now we've tried using greentec pro, but somehow this "desolves" after a few days. (tomorrow i'll investigate by one of our customers to see what actually happens, but the pictures looked bad)
Anyone else has any suggestions for materials that can handle this? I'm also considering nylon, but thats difficult to print as well. (hopefull metacollin has some way for this as well)
I'm using the lackrack build enclosure.
Modifications i made to these settings on my mk3:
* external perimiter and top solid infill width both on 0.9mm (dont care about details, otherwise bad outer permiter bonding, i just need a strong print)
* temperature 270 degrees (otherwise bad layer bonding)
* after carefully measuring some test walls a few times, i also ended up with a 1.1 multiplier. 0.9 is way of and give too much spacing in solid layers it seems, walls also seemed way too thin. maybe its different for the mk2 you've used?
* cooling: all fans on 20%. higher percentages give bad layer bonding, on for example benchys pipe. still better than other materials, but not as strong as it should be. with 20% its very strong and hard to break.
* fan also 20% for bridges. i didnt test real bridges, but for the benchy it was ok. (lots of people seem to have bridging issues, so i expect those as well with other prints)
* printer settings: i just compared it but concluded that Original Prusa MK3 should be ok.
* perimeters 3, layers top 5 bottom 4. (they were much higher for some reason)
* infil 20%, pattern rect.
* skirt off: it was hard to remove from the PEI bed and not neccesary, print starts clean rightaway.
Prints are extremely strong: Trying to pry appart the layers with a screwdriver even wasnt possible. (just ended up with a hole)
Breaking a 10mmx10mmx150mm rod with above settings, happend so violent i was affraid i cut my hand. 😛
Perhaps more people can experiment and we can make a pullrequest for https://github.com/prusa3d/Slic3r-settings ?
Edwin Eefting