Single wall printing: Tiny holes/bubbles/zits in perimeter when reducing extrusion width
Hello guys,
I´m fighting a strange problem since some days now. I´m currently printing a RC airplane wing with one perimeter / single wall in Prusament PETG at 0.2 mm layer height. If I´m printing it with the standard extrusion width (from now EW) of 0.45 mm everything looks perfectly fine and smooth. But as soon as I reduce the EW even a tiny amount (0.42 mm) a lot of tiny holes / bubbles / zits or whatever you want to call them appear on the perimeter. I really need to reduce EW to get the wing more light.
I did some test cubes (30x30x30mm, 1 perimeter, no infill and top layers) to check which parameter may cause or improve the issue. First of all the extruder is very well calibrated. If I set the EW to any amount, the printer is exactly capable to achieve this value.
Extrusion width: Standard 0.45 mm effect is completely gone, as soon as I lower it it starts and gets worse the lower the value
Temperature: No effect, tried 230, 240, 250
Speed: No effect, already printing at 20 mm/s
Raising extrusion multiplier (from 1 to 1.1): No effect
Retract: Seems to improve the problem a little bit (Prusament PETG preset is 1.4 mm, tried 0.6 mm an it got a little bit better but at no means solves the problem completely)
I found some posts in different forums but the problem was apparently never solved. Below are some pictures. What you see are not the layer seams, I used "nearest" or "aligned" so that they are all in the corner. I hope somebody of you knows what´s going on here.
Max
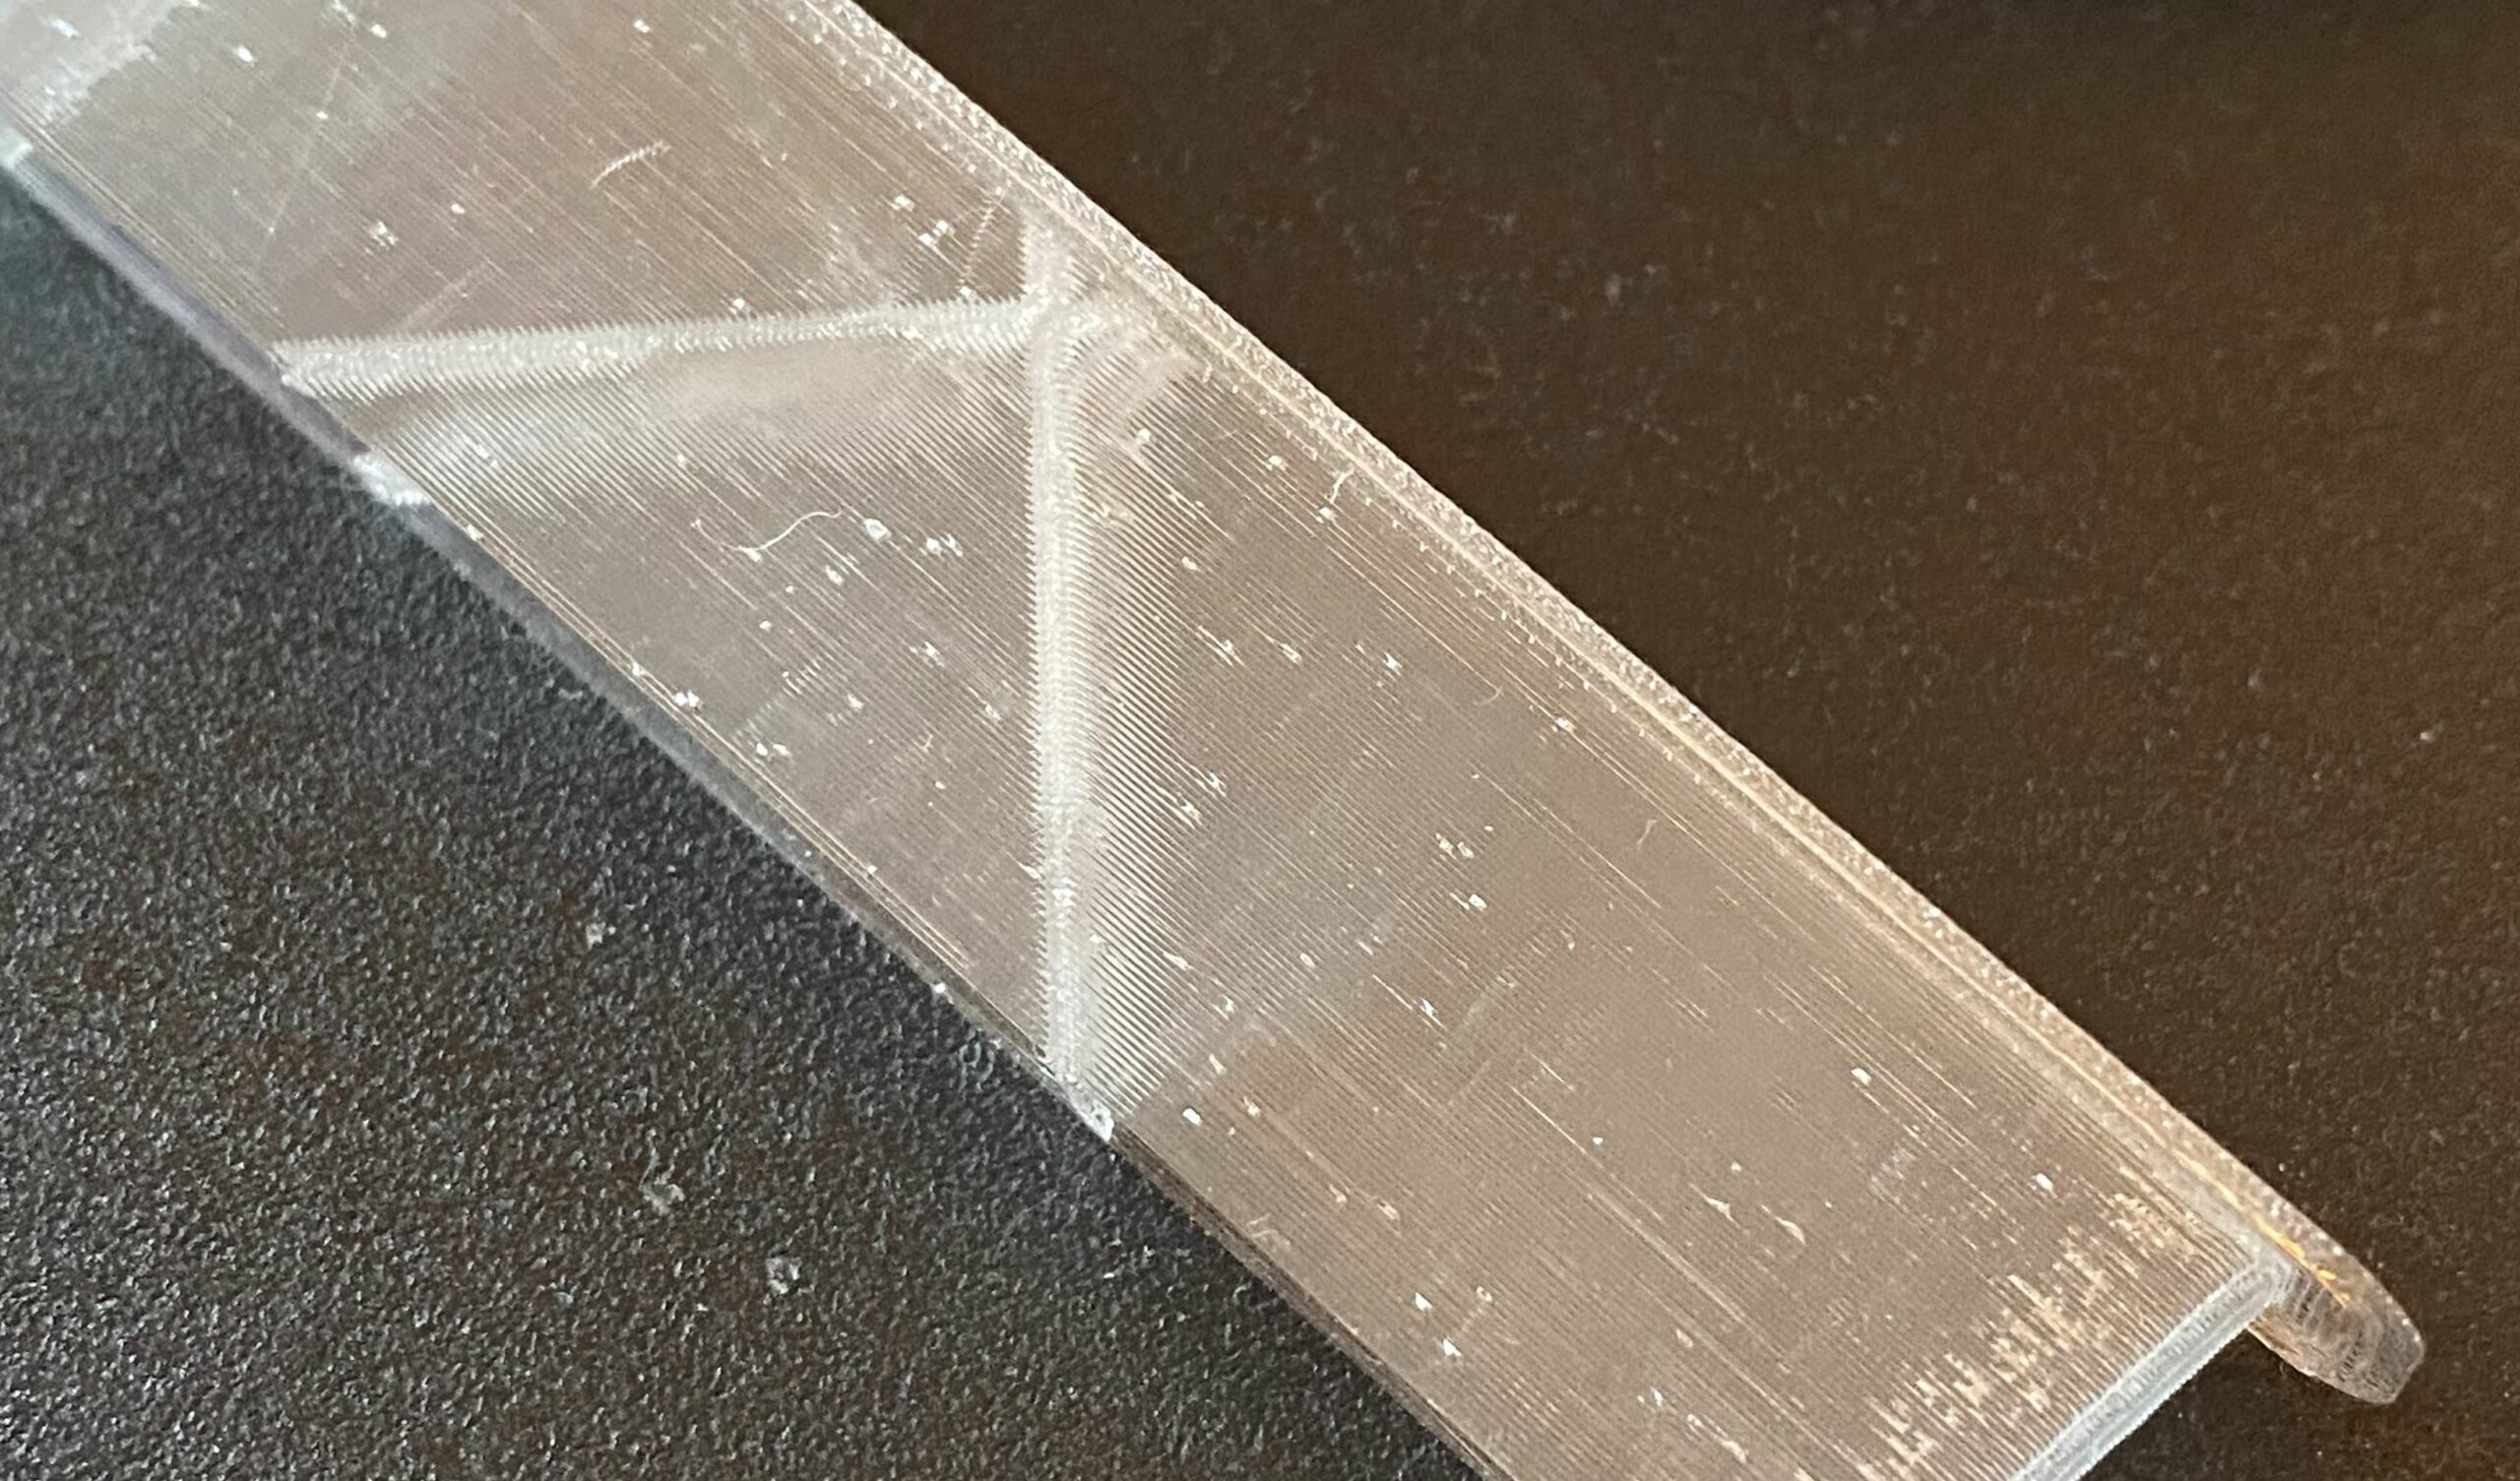
Picture below: Extrusion width 0.42 mm
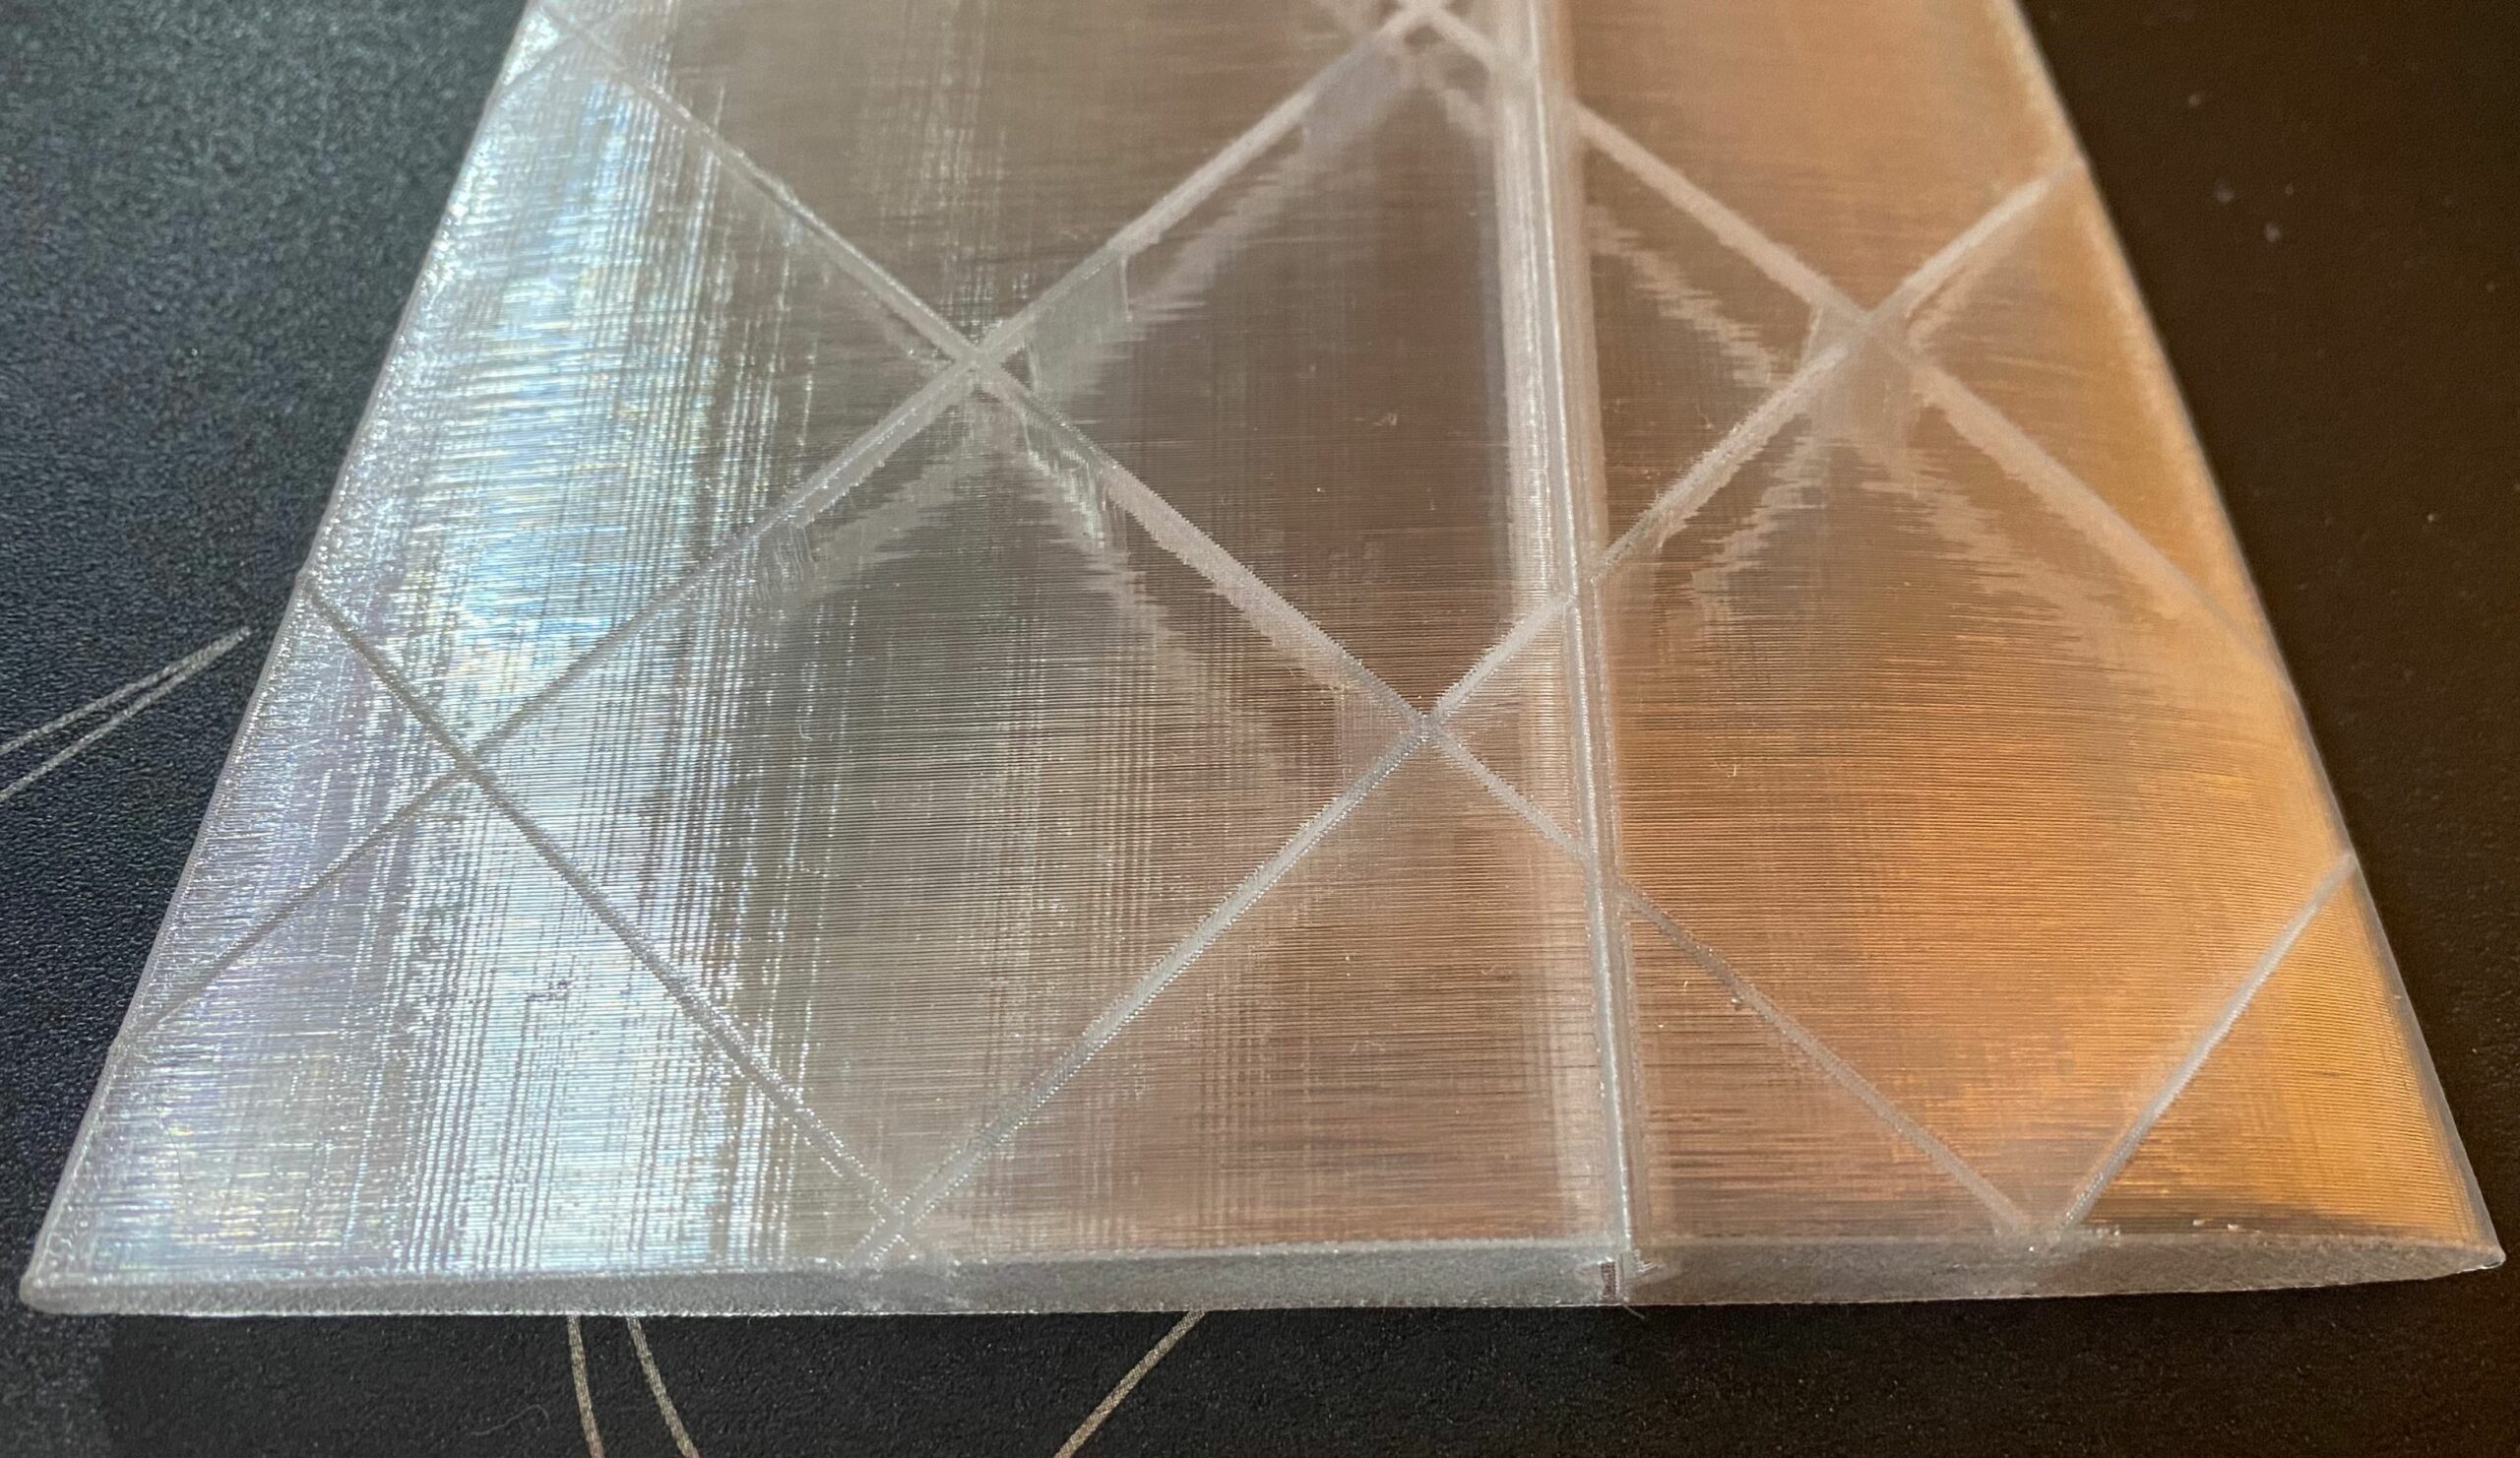
Picture below: Extrusion width 0.45 mm (standard) everything perfect!
Picture below: Extrusion width 0.42 mm
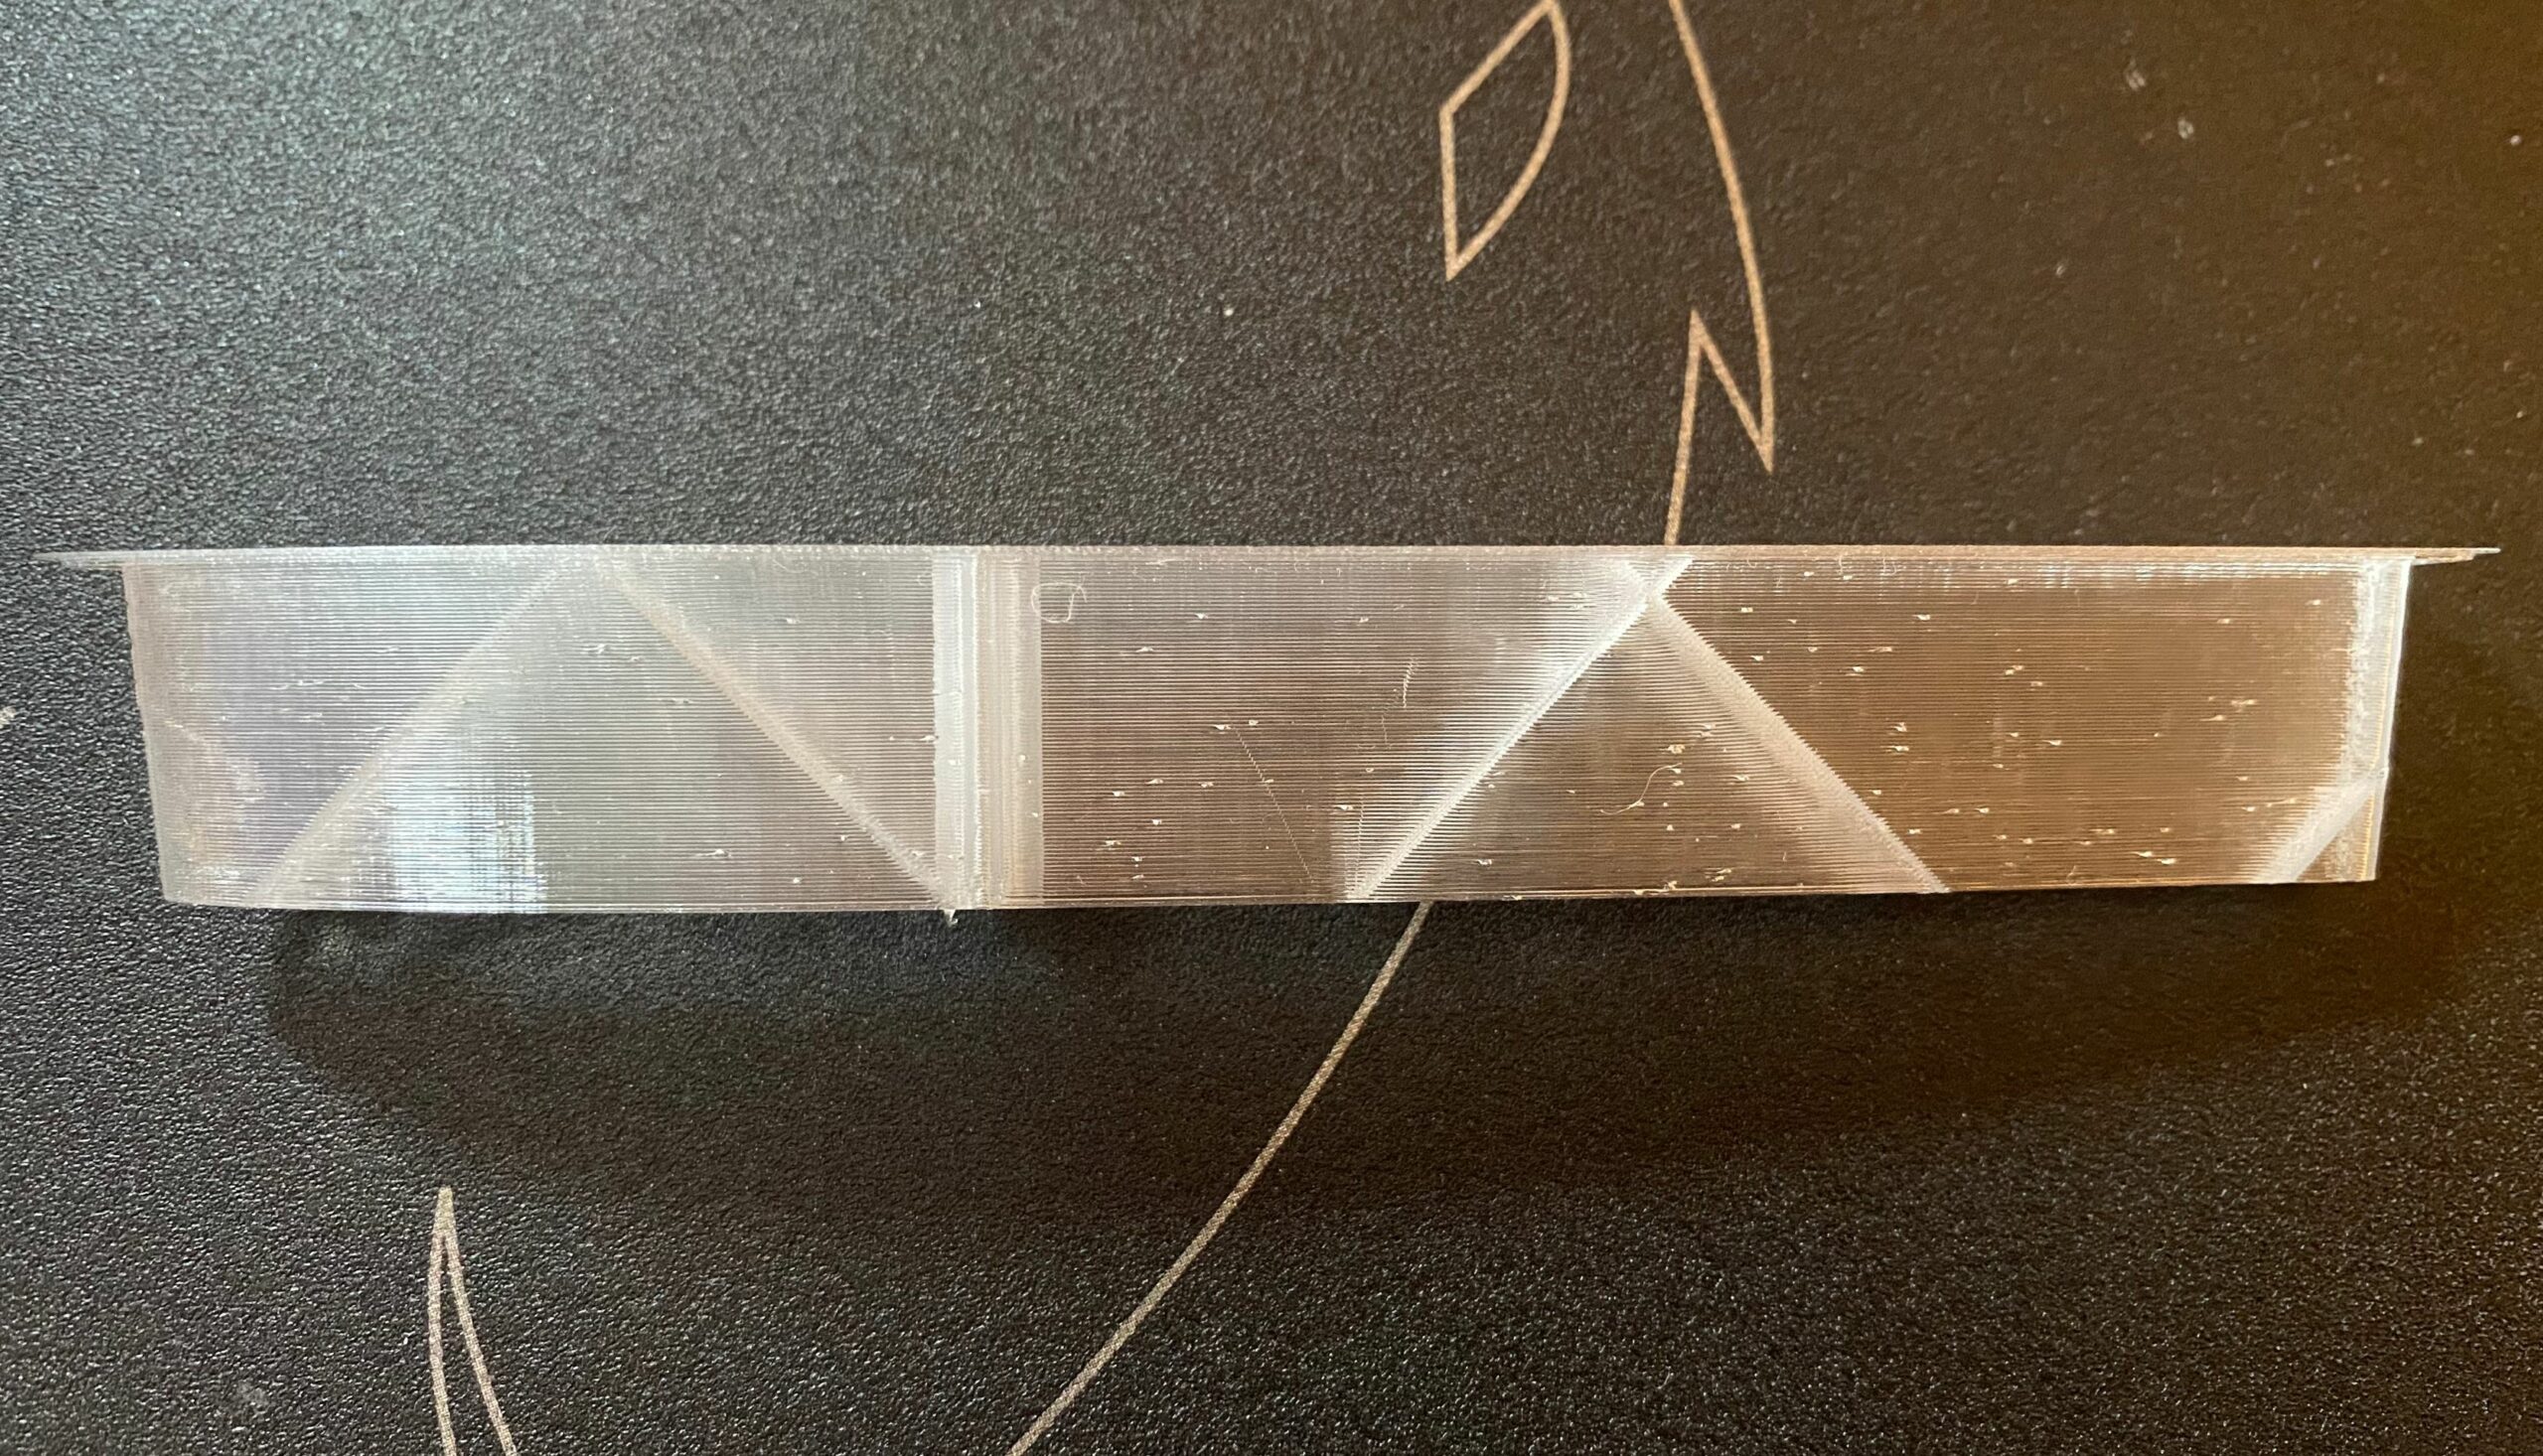
Picture below:
left: EW 0.45mm / retract 0.6 mm
right: EW 0.36mm / retract 1.4 mm

Seams. Align your seams.
If it were me trying to lighten an air plane wing, covering it with a full width of PETG would not be my first choice. I'd print a lattice that I could bond wing paper to (tissue paper, and airplane dope).
What you are seeing sure looks like layer seams set on "nearest" or "random". Align your seams and a lot of the zits will move to one end.
To get a thinner extrusion, go down to a 2.5mm nozzle. Then you won't have to work it below it's engineering tolerances.
Seams are aligned.
Printing a wing completely out of PETG is nothing new and works quite well if you work with single perimeters and the right extrusion width.
As I already said in the first post, layer seams are set to nearest or random. What you see are NOT layer seams.
Switching to a smaller nozzle to get an extrusion width of 0.4mm (from 0.45mm) when using a 0.4mm nozzle seems not to be necessary. But thanks for your reply anyway.
If it were me trying to lighten an air plane wing, covering it with a full width of PETG would not be my first choice. I'd print a lattice that I could bond wing paper to (tissue paper, and airplane dope).
What you are seeing sure looks like layer seams set on "nearest" or "random". Align your seams and a lot of the zits will move to one end.
To get a thinner extrusion, go down to a 2.5mm nozzle. Then you won't have to work it below it's engineering tolerances.
You need to overlap the lines, this is necessary.
You could try print in a lower layer height?
And you can play with overlap %.
And print hotter to get it more sticking to the other layers.
Try Drying the Filament
@maximilliampere
I printed a box, 25x25x25, with Prusament PETG Orange, rotated to get corner at the back. Unfortunately I don't have any transparent PETG at the moment.
All settings is 0,20mm Quality except: 1 Perimeter, No Top Layers, No Bottom Layers, No skirt, No Infill, Rear Seam, and added extrusion width modifiers
Bottom 5mm has Extrusion Width 0,44, then it goes down 0,02 for every 5mm to uppermost 5mm which is 0,36
The top cube is from a spool that has been out from bag a couple of weeks, bottom is from 0,5m filament I dried for a few hours in a food dryer.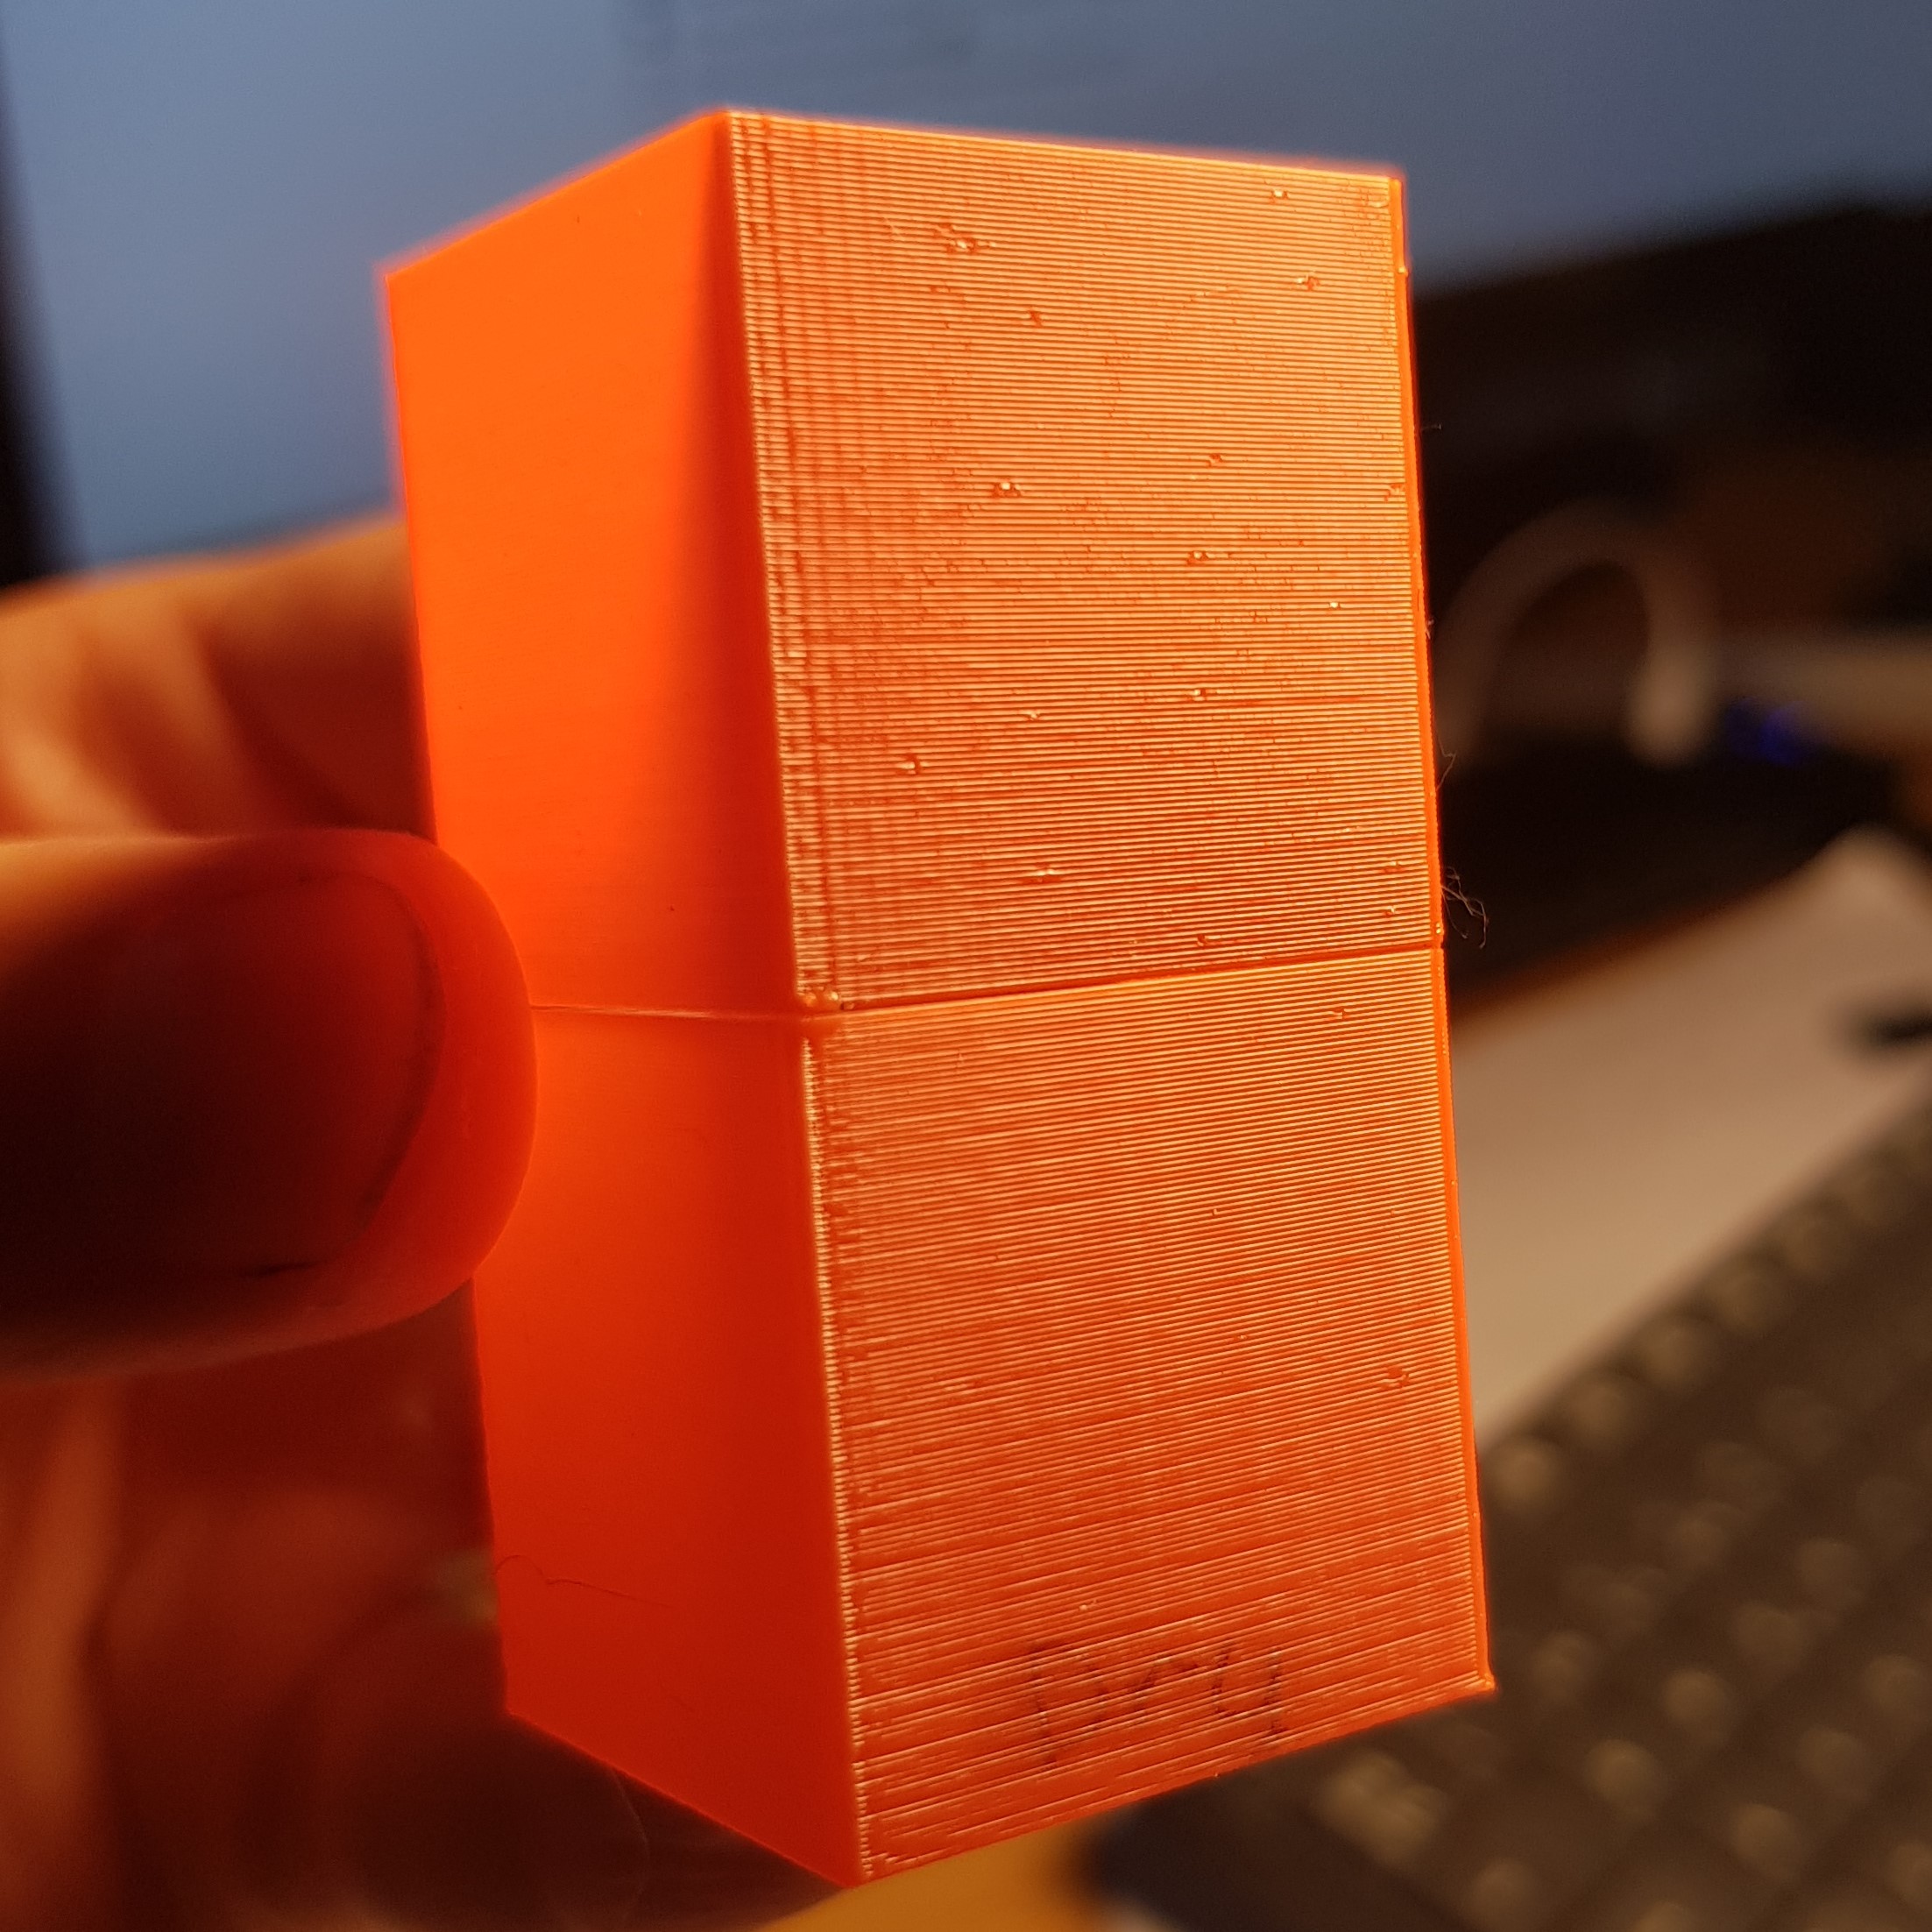
I see a big difference in quality 😀
And maybe the difference had been bigger with more drying time?
I have seen so many pictures and read so many posts about how important it is with dry filament.
Now I KNOW 👍
The file I used for testing
Prusa i3 MK3S+ FW 3.11.0 (kit dec -20), PrusaSlicer 2.6.1+win64, Fusion 360, Windows 10
@maximilliampere
I have had these types of blemishes before, the information provided by @peter-m and @ringarn67 can fix these in some cases.
If you find that those suggestions aren't doing the trick, I would then suggest looking at replacing your nozzle. especially if you know you have been using it for a long time and it could be worn or partially clogged.
A 0.4 nozzle should be able to print your walls no problem down to 0.35, but consider If you do decide to go with nozzle replacement, and you know your going to be printing a lot of thin walls, replacing with a smaller diameter nozzle 0.3 for example. you would have to setup and make a profile for 0.3 nozzle so that's a consideration to.
Good Luck
Swiss_Cheese
The Filament Whisperer
RE: Your suggestions
First of all thanks for your many replies and suggestions!
You need to overlap the lines, this is necessary.
You could try print in a lower layer height?
And you can play with overlap %.
And print hotter to get it more sticking to the other layers.
If you are referring to "infill/perimeters overlap" under print settings - advanced (prusaslicer): The wing I am printing has no infill so I don´t think this will have any effect. The inner structure you can see on the pictures is already in the stl and gets handled as single external perimeter by the slicer.
I could try lowering the layer height but this will even more extend the printing time and I really want to avoid that. But I will try if nothing else does the trick.
Printing hotter is definitely an option! Did only try lower so maybe it helps!
@maximilliampere
I printed a box, 25x25x25, with Prusament PETG Orange, rotated to get corner at the back. Unfortunately I don't have any transparent PETG at the moment.
All settings is 0,20mm Quality except: 1 Perimeter, No Top Layers, No Bottom Layers, No skirt, No Infill, Rear Seam, and added extrusion width modifiersBottom 5mm has Extrusion Width 0,44, then it goes down 0,02 for every 5mm to uppermost 5mm which is 0,36
The top cube is from a spool that has been out from bag a couple of weeks, bottom is from 0,5m filament I dried for a few hours in a food dryer.
I see a big difference in quality 😀
And maybe the difference had been bigger with more drying time?I have seen so many pictures and read so many posts about how important it is with dry filament.
Now I KNOW 👍The file I used for testing
Attachment removed
Oh wow thank you for even trying some test prints for yourself! I did also think about the wet filament problem but the roll of PETG was freshly opened from a new and sealed bag just before I started printing the wing. What also speaks against wet filament is that I have no problems with an extrusion width of 0.45mm. Just when lowering the extrusion width.
I will use your test file with the extrusion width modifiers for my future tests. Didn´t think about using height range modifiers for this and this will help me to get faster results and test different extrusion width settings in one single print. Thank you!
@maximilliampere
I have had these types of blemishes before, the information provided by @peter-m and @ringarn67 can fix these in some cases.
If you find that those suggestions aren't doing the trick, I would then suggest looking at replacing your nozzle. especially if you know you have been using it for a long time and it could be worn or partially clogged.
A 0.4 nozzle should be able to print your walls no problem down to 0.35, but consider If you do decide to go with nozzle replacement, and you know your going to be printing a lot of thin walls, replacing with a smaller diameter nozzle 0.3 for example. you would have to setup and make a profile for 0.3 nozzle so that's a consideration to.
Good Luck
Swiss_Cheese
My nozzle currently has about 7 days of continuous PLA/PETG printing. Should not be a problem right? Thought about a bad nozzle too but this really is the last thing I will try to do. Is there a possibility that the nozzle is a little bit clogged or something? But I do not have any problems with printing besides the one I am refering to here...
Will try your suggestions and keep you updated. Further suggestions are welcome!
Which airplane?
What aircraft are you printing? I am just finishing up an Eclipson C that I’ve printed in LW PLA and the results have been amazing. I will post some pics in the next couple weeks after I finish post production clean up. LW PLA by Colourfab is light, easy to print and sands smooth as glass. I made wheels out of their Varioshore TPU which also printed easily and came out perfectly first time.
@maximilliampere
With only 7 days of use it's very unlikely the nozzle is worn using only normal PLA & PETG. it is possible that it can be clogged, I would suggest at least trying a few cold pulls, its easy to do and may resolve your issue.
Good luck
Swiss_Cheese
The Filament Whisperer