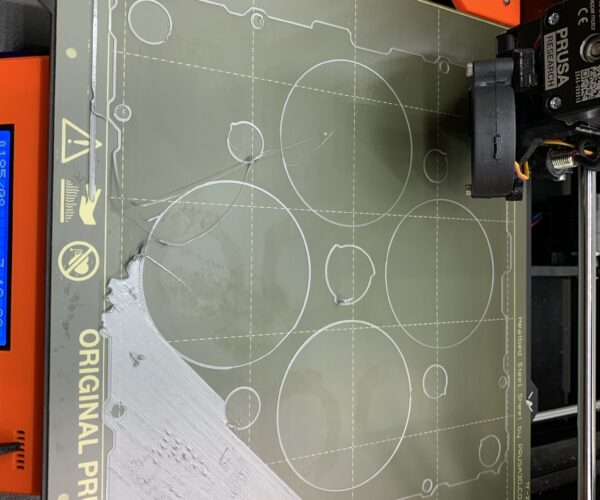
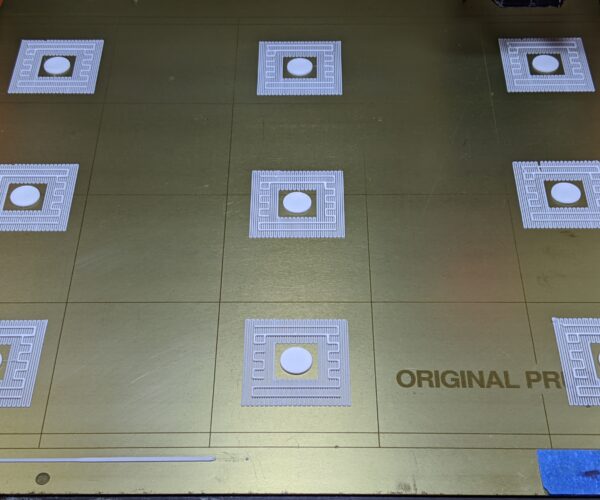
Help identify 1st layer issue
My printer was doing great, then I changed filament and it hasnt worked well since. Things I have tried...
- Changed nozzle
- Changed Filament (on fourth roll all from different manufacturers
- Reduced hot end temp (was 215, now 205)
- Reran First Layer Wizard and even 100 x 100 first layer print
- Resliced File
Any ideas on what the issue may be and how I can solve?
RE: Help identify 1st layer issue
RE: Help identify 1st layer issue
Your sheet is dirty, Clean the sheet, not with IPA but with hot soapy water dry thoroughly with fresh paper towels and reprint.
Enjoy
Swiss_Cheese
P.S. I don't use the soap I rinse mine with an instant hot 100C water that I have at my sink, but the soap will help you desolve the oils on your plate if you don't have one.
The Filament Whisperer
RE: Help identify 1st layer issue
The bed is still dirty ... clean again.
Did you recalibrate your first layer Z after changing the nozzle? It's hard to be certain from that picture but it looks like you are a little too low.
Cheerio,
RE: Help identify 1st layer issue
@james-campbell
I think it is a combination of too dirty and the Z offset is off. Can never be sure until the bed is clean.
--------------------
Chuck H
3D Printer Review Blog
RE: Help identify 1st layer issue
While that certainly helped with sticking (and I thought I was doing a good job with IPA), that doesnt seem to solve it...
I'm going to give you the big info dump here just to get everything in one place...
-
Part warping or lifting along edges.
-
Bumping or knocking noises as the part moves under the nozzle.
-
Uneven vertical surfaces and bulges caused by print lifting and compression of overlying layers.
-
Spaghetti resulting from parts moving during printing.
-
The dreaded "blob of doom" caused by the part lifting and sticking to the nozzle as it extrudes filament.
-
A dirty PEI print surface. Even if you don't think this is the cause, it's always a good idea to make sure your PEI surface is clean before trying any other fixes. If it's a smooth PEI sheet, take it to the kitchen sink and give it a good dunk with Dawn (original formula, no vinegar or hand softener variants) dishwashing soap or your local equivalent (e.g. Fairy in UK). Use a clean paper towel to clean it off, and another to dry it. Avoid using any sponge or cloth that has been in contact with grease. Above all else, avoid touching the PEI print surface. Once it's good and clean, you should be able to use 91%+ isopropyl alcohol between prints, 100% acetone when that fails , and another dunk when acetone fails. Worst-case, use a 3M 7445 ScotchBrite (1200-1500 grit) pad or equivalent on smooth PEI to give it a very light buff, but only infrequently. If you've got a textured powder-coated PEI print surface, the official instructions are to use 91%+ isopropyl alcohol on it only. Rumors persist that some have had good luck getting started with these sheets by giving them a wipe with 100% acetone and a dunk with Dawn. Either way, there's no real warranty on these sheets. YMMV.
-
Incorrect Live-Z. If you have not already done so, try using Jeff Jordan's "Life Adjust" procedure for calibrating your Live-Z setting. It is much easier to use and understand than the onboard routine and much easier to make mid-print adjustments accurately with. In general, start high (less negative) and work lower (more negative) in large increments (e.g. 0.1mm) until the filament starts to stick on its own. When you've got your Live-Z setting adjusted properly, you should be able to gently rub the extruded lines on the PEI surface without dislodging them. Then start lowering (more negative) the level until there are no gaps between layers. You should not be able to peel the lines apart after printing, but the top should be regular.
and miscellaneous other tech projects
He is intelligent, but not experienced. His pattern indicates two dimensional thinking. -- Spock in Star Trek: The Wrath of Khan Unfortunately,…

