ASA detaching from support
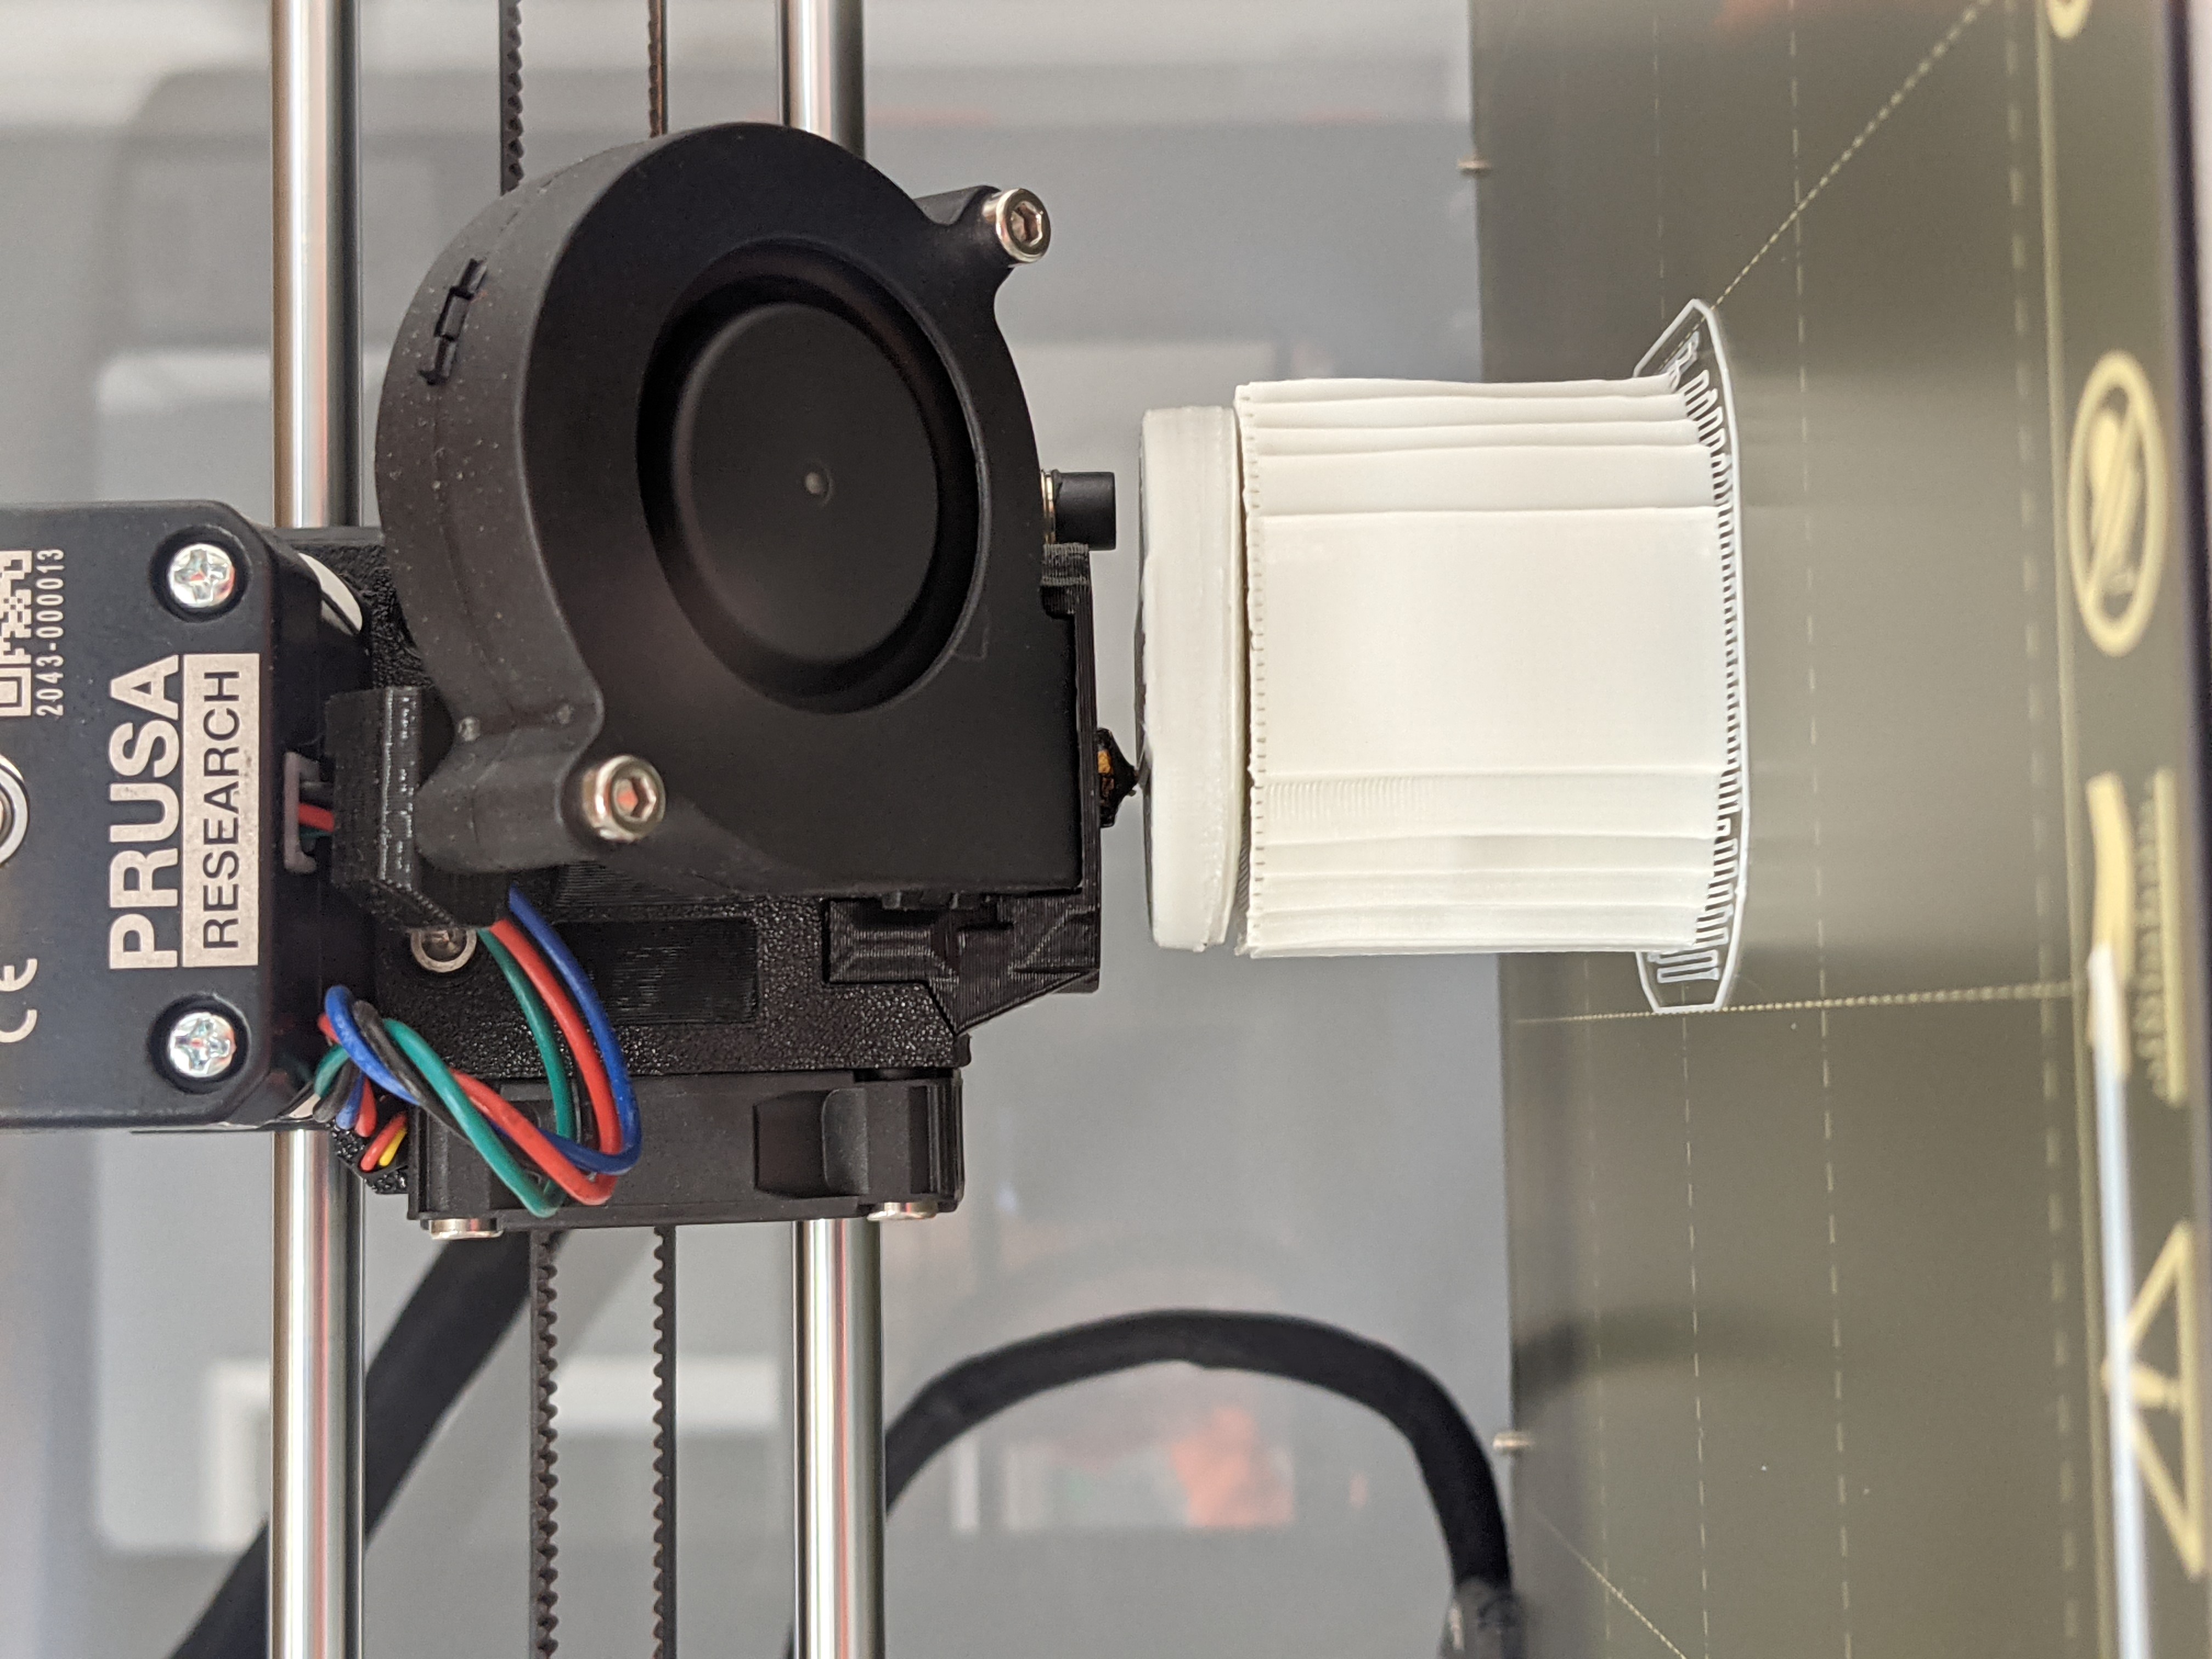
This is my first time attempting to print with ASA. The filament I am using is Paramount 3D ASA, recommended nozzle temp 220-260 C, recommended bed temp 100-110 C. I am printing a round knob, 40mm diameter and 54mm high. The bottom 33mm is a tubular shaft, so I am printing with supports. I have printed this in PLA with no problems.
When I tried printing it in ASA, there were two obvious problems.
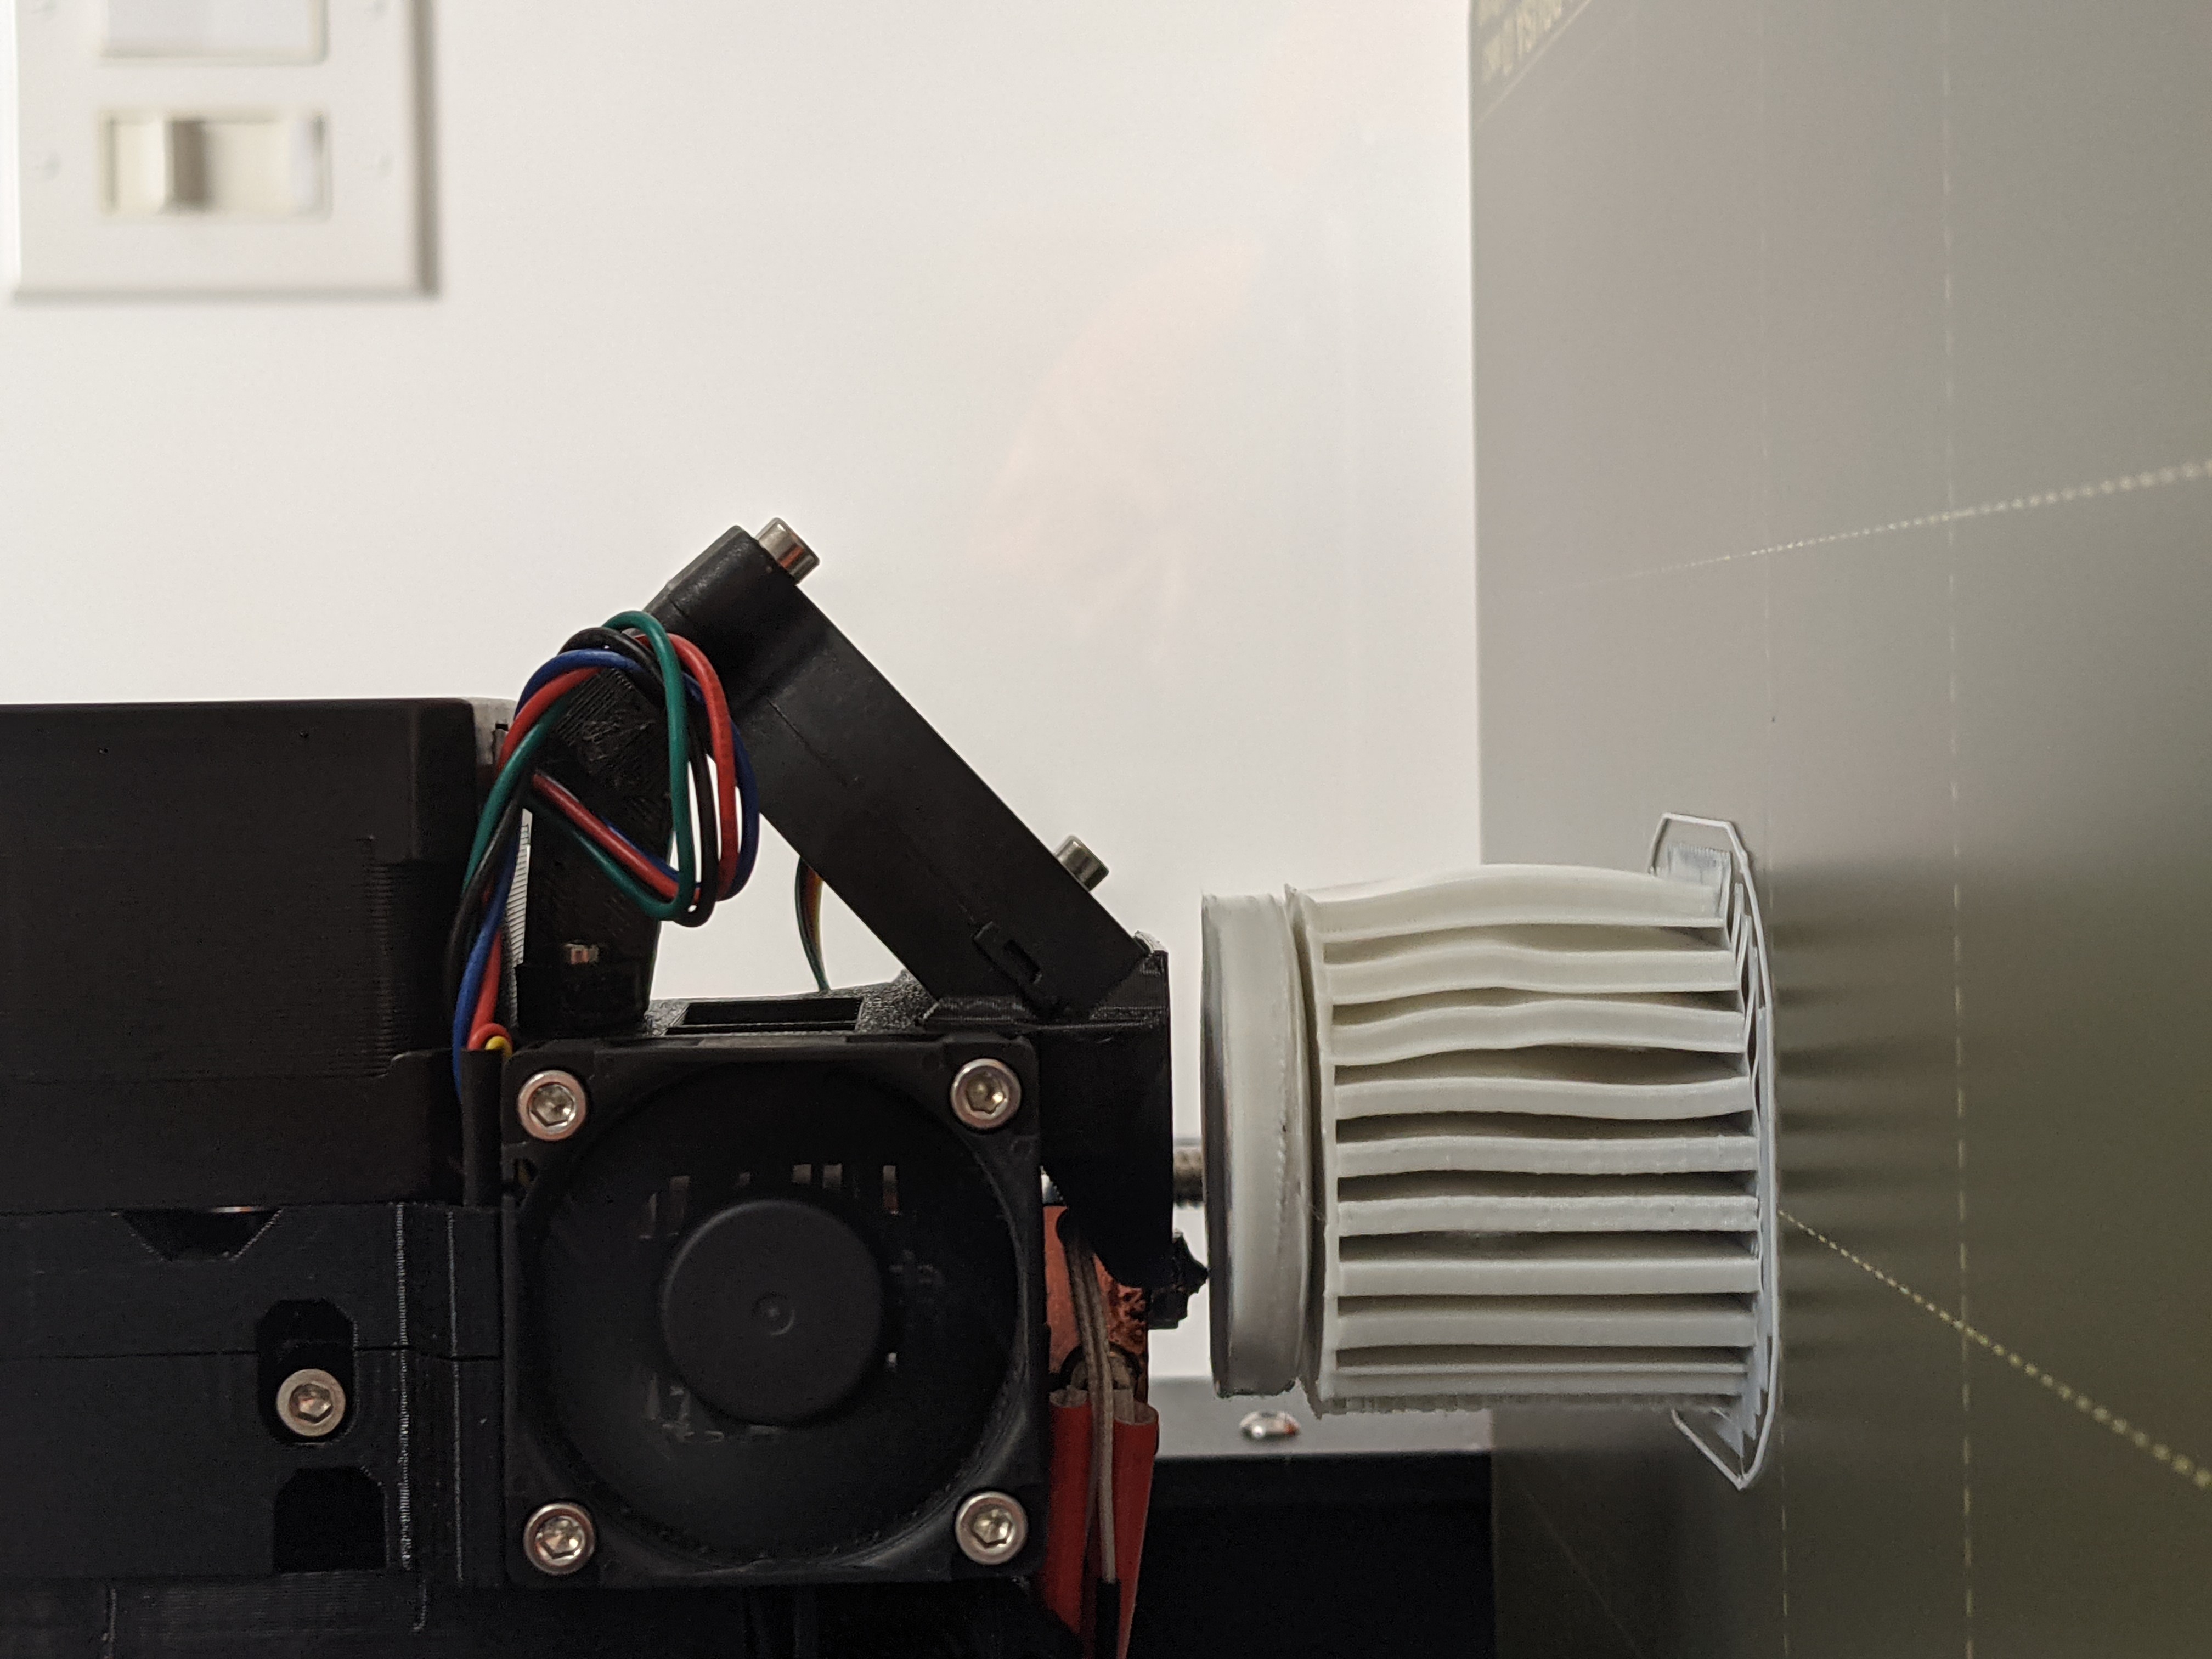
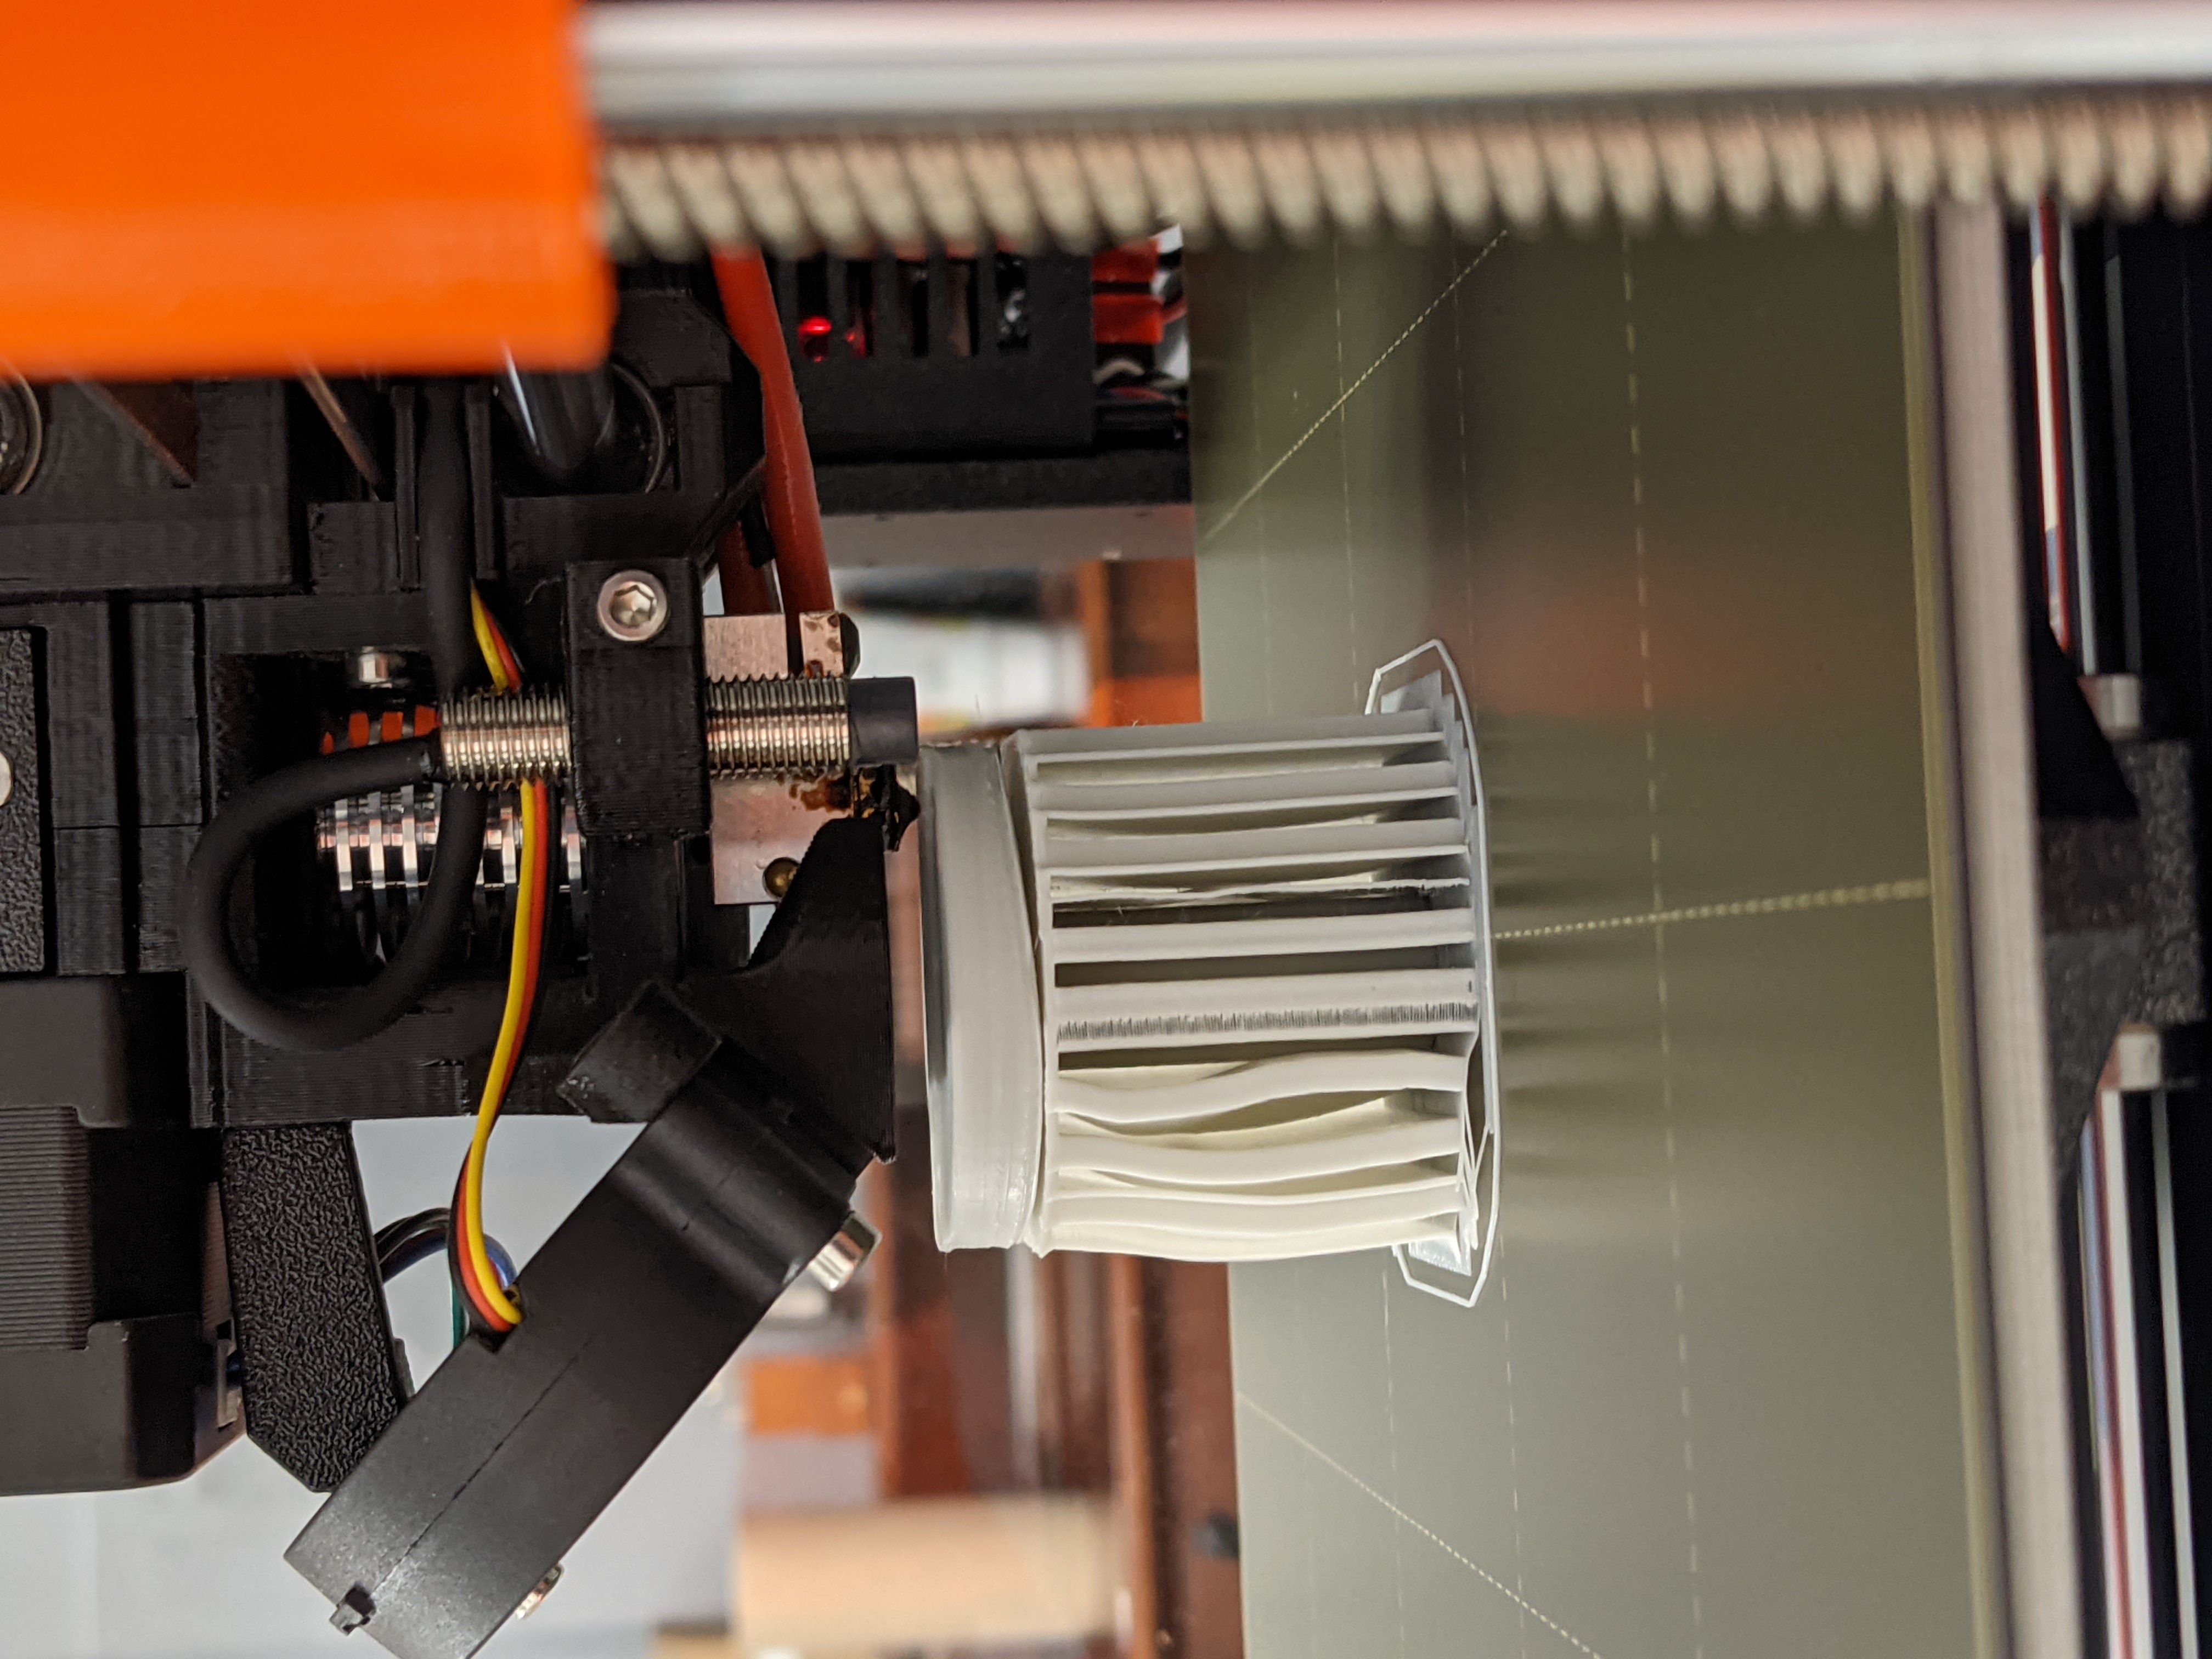
1) Parts of the support lattice warped and pulled away from the bed slightly. By the time the print reached the top face of the support structure, the warpage had settled down so that the top of the support including the support interface is flat.
2) The bottom face of the knob disc curled upward and detached from the support interface layer. As the print progressed, the layers got back into a proper geometry, and the top face of the dial and the handle appear close to perfect.
I printed using the settings for Prusament ASA: 260 C nozzle temperature, 105 C bed for first layer, 110 C bed after that. The printer is in the Prusa LACK v2 enclosure. The temperature inside the enclosure was about 35 C, measured after I noticed the warpage. There is about a 1mm gap at the left and right edges of the plexiglass windows on all sides. The temperature of the room was about 16-18 C. I printed with 0.10mm layer height.
Should I try a lower nozzle temperature?
Should I try to preheat the bed for 1/2 hour with the chamber closed? Is there a way to heat just the bed without heating the nozzle?
Would a thicker layer height help with adhesion to the support interface layer, or reduce the tendency of the bottom layer above the support to curl?
Any other ideas to prevent the overhang from detaching from the support interface?
Here is the 3mf file from Prusaslicer: Weber_Spirit_500_knob
RE: ASA detaching from support
I've only fairly recently started printing with ABS but here's a few thoughts:
Higher layer heights are easier to print, give 0.15 or even better 0.2 quality a try, I found warping/lifting from the bed was much reduced with higher layer heights and decided at this stage 0.1 or lower was a bit optimistic for me with 0.4 nozzle for some small prints. If you are doing acetone smoothing then a prior light sanding of the knob edges would eliminate the need for the lower layer heights.
Definitely worth pre-heating the bed, be better to get the temp up from 16-18 inside the cabinet before starting (perhaps blow some hot air in from hairdryer?) but also preheating helps to get a stable temp across the sheet itself. To do bed only: Settings->Temperature->Bed, it has the same timeout period.
Under "Skirt and brim" add a draft shield, I have a fairly draft free enclosure and it a bit surprisingly makes a difference. The plexiglas gaps sound small but you could put masking tape over them to see if it helps.
Using glue stick aids adhesion, doesn't look like you have on the photo?
Also, I'm guessing there might be some detail on the top of the knob that doesn't print well with it face down?
RE: ASA detaching from support
At the suggestion of the filament manufacturer, I printed a temperature calibration tower. In truth, I printed the first tier of a tower at 260 C, which started to peel from the base sheet immediately and then popped loose as it reached the top of the tier. Then I printed another one starting at 250 C. That one also started to peel, but later, and completed tiers through 220 C. It looks like 220-240 are likely to produce acceptable results, with 235 or 240 giving the best balance of detail and layer adhesion. My print temperature for the original print of the knob seems to have been way off. I did not realize there was such variability among ASA filament brands!
I figured out how to manually preheat, as you described. I also found a bit of information about how to use custom gcode for the startup sequence to possibly allow a bed preheat period before heating up the hotend.
I did not know that about the glue stick. I have not tried it yet. My understanding was that it could be used to decrease adhesion for PETG on the smooth PEI base sheet. I cleaned the PEI sheet with acetone instead of IPA before printing the last temperature calibration tower, and that may have helped. I also may play with the first layer calibration some more. The first layer on both of the temperature towers had a little more separation between traces at the end that started to peel compared to the rest of the underside.
The knob has a ridge/grip running across the middle, and there's a small bump on top of that as an index mark. The first time I printed it in PLA, I tried upside-down. But due to the required supports, the face came out unacceptably rough.
I will try printing the knob with the hotend at 240 C tomorrow, with adaptive layer height, and see how it goes.
RE: ASA detaching from support
I just use dish soap and hot water on my sheet and it works well, occasional acetone if OK but I think too much can damage the sheet after a while.
Gluestick increases adhesion for ASA/ABS but also acts as a release agent, seems to do opposite things at once. I only use it or ABS and haven't tried without glue as I was worried about sheet damage at removal.
I'm using a Slicer profile for temperatures which work out fine with one lot of ABS but I've another brand to try so may have to go down that path, you could always try increasing the bed temperature a little for first layer too.
Let us know how you get on, good luck.
RE: ASA detaching from support
I think the glue stick helps adhesion. I tried printing the knob at 240 without glue stick, and a piece of the first support layer (support raft?) flaked off while the second support layer was printing! I started over and applied glue stick, and the first layer stuck well until late in the print. The support lattice warped again, mostly on the front left but also on the front right. Unfortunately again the bottom of the dial separated from the support interface layer. But only on the left side initially. It was clearly peeled up after the 2nd floor layer of the back of the dial, and it got worse for several more layers. Eventually it looked like the back of the dial had separated from the support interface all the way around, but it was flat on the right side and only curled up on the left side.
At the end of the print, the shaft was stuck so well to the steel sheet that I broke the shaft between two layers pulling it off. Next time I will use warm water to soften the glue. I'm not sure if that also means I have inter-layer adhesion problems. It did not seem like I was putting that much force to remove the knob when the shaft broke.
Maybe my next move is to turn off the nozzle fan? That's what is generally suggested for PETG prints to improve layer adhesion.
I'm not sure how to address the left side curling issue. The nozzle fan blows from the front, so that doesn't seem likely to cause the left/right asymmetry. The extruder cooling fan blows through the extruder block from left to right, and while it is clearly not blowing air at the printed part, the air that it pulls in may be dragging the air around it in a general left to right motion. I can imagine making a shield to block the path that air would take, but I don't want the shield to hang below the nozzle or stick out to the left enough to touch the Z-drive screw or the frame. I expect that turning off the extruder cooling fan would not be good for the health of the extruder.
RE: ASA detaching from support
Sounds like you are making some progress.
Make sure you allow the finished print to slowly cool to nearly room temperature before trying to remove, it will take a short while but best done with the enclosure closed. If flexing the sheet isn't enough to break it free then I've read that putting the sheet in the freezer helps. Perhaps the glue stick was a bit lacking in a spot or two, I usually put it on lightly in one direction and then repeat at 90 degree angle to make sure good even coverage.
It does sound like your bit of warping has given you poor inter layer adhesion and hence why the print broke.
It doesn't necessarily mean that the print is colder where it peels, I have a heat bulb in the corner of my enclosure to warm it up and find it best to switch it off as if lifts at the corner towards it if I leave it on while printing making temperature range uneven.
Its a relatively top heavy print with small footprint as the supports aren't solid layers so I'd add a brim. I've found this greatly helps to stop lifting on even small low prints.
You shouldn't need to mess with altering the fan shroud, the draft shield on the print should sort that part out. Not sure about altering the fan settings, I find the default slicer ones pretty good.
Post your 3mf file in a zip file so others can have a look at your best efforts and make further suggestions.
RE: ASA detaching from support
There is definitely a draft produced by the extruder cooling fan. Filament dangling from the nozzle flutters in the breeze. I think that is why the bottom of the dial curled up only on that side.
I modified the bottom of the dial, recessing most of it by 3mm, leaving a 3mm skirt hanging down (this will also make rain water more likely to drip of the rim instead of running across the underside and dripping down the shaft to the valve). There should be less initial stress while the rim height is built up to resist that stress. I also designed a custom support with a stronger connection to the bottom of the dial. It's a cylinder that extends straight down from the edge of the dial with perforations where it meets the dial.
I just printed a test with the new style support, including just below the perforations up to the solid part of the dial. I also placed a 3-perimeter full-height skirt around the knob (I was paranoid about the thickness, since the automatically generated 1-perimeter supports buckled so badly -- I will experiment with thickness of the skirt later). No curling or peeling. Now the full object is printing.
RE: ASA detaching from support
Success! With the tall skirt and custom support, the part printed with no distortions, including the skirt and the support. Now I can experiment with making those thinner, and trying variable layer thickness, finer layer thickness, etc. There is a "benchy bulge" where the hand grip meets the top of the dial, but only in the front. I think that may be blamed on the nozzle fan, and perhaps I can reduce it by extending the draft skirt all the way up instead of just to the flat top of the dial.
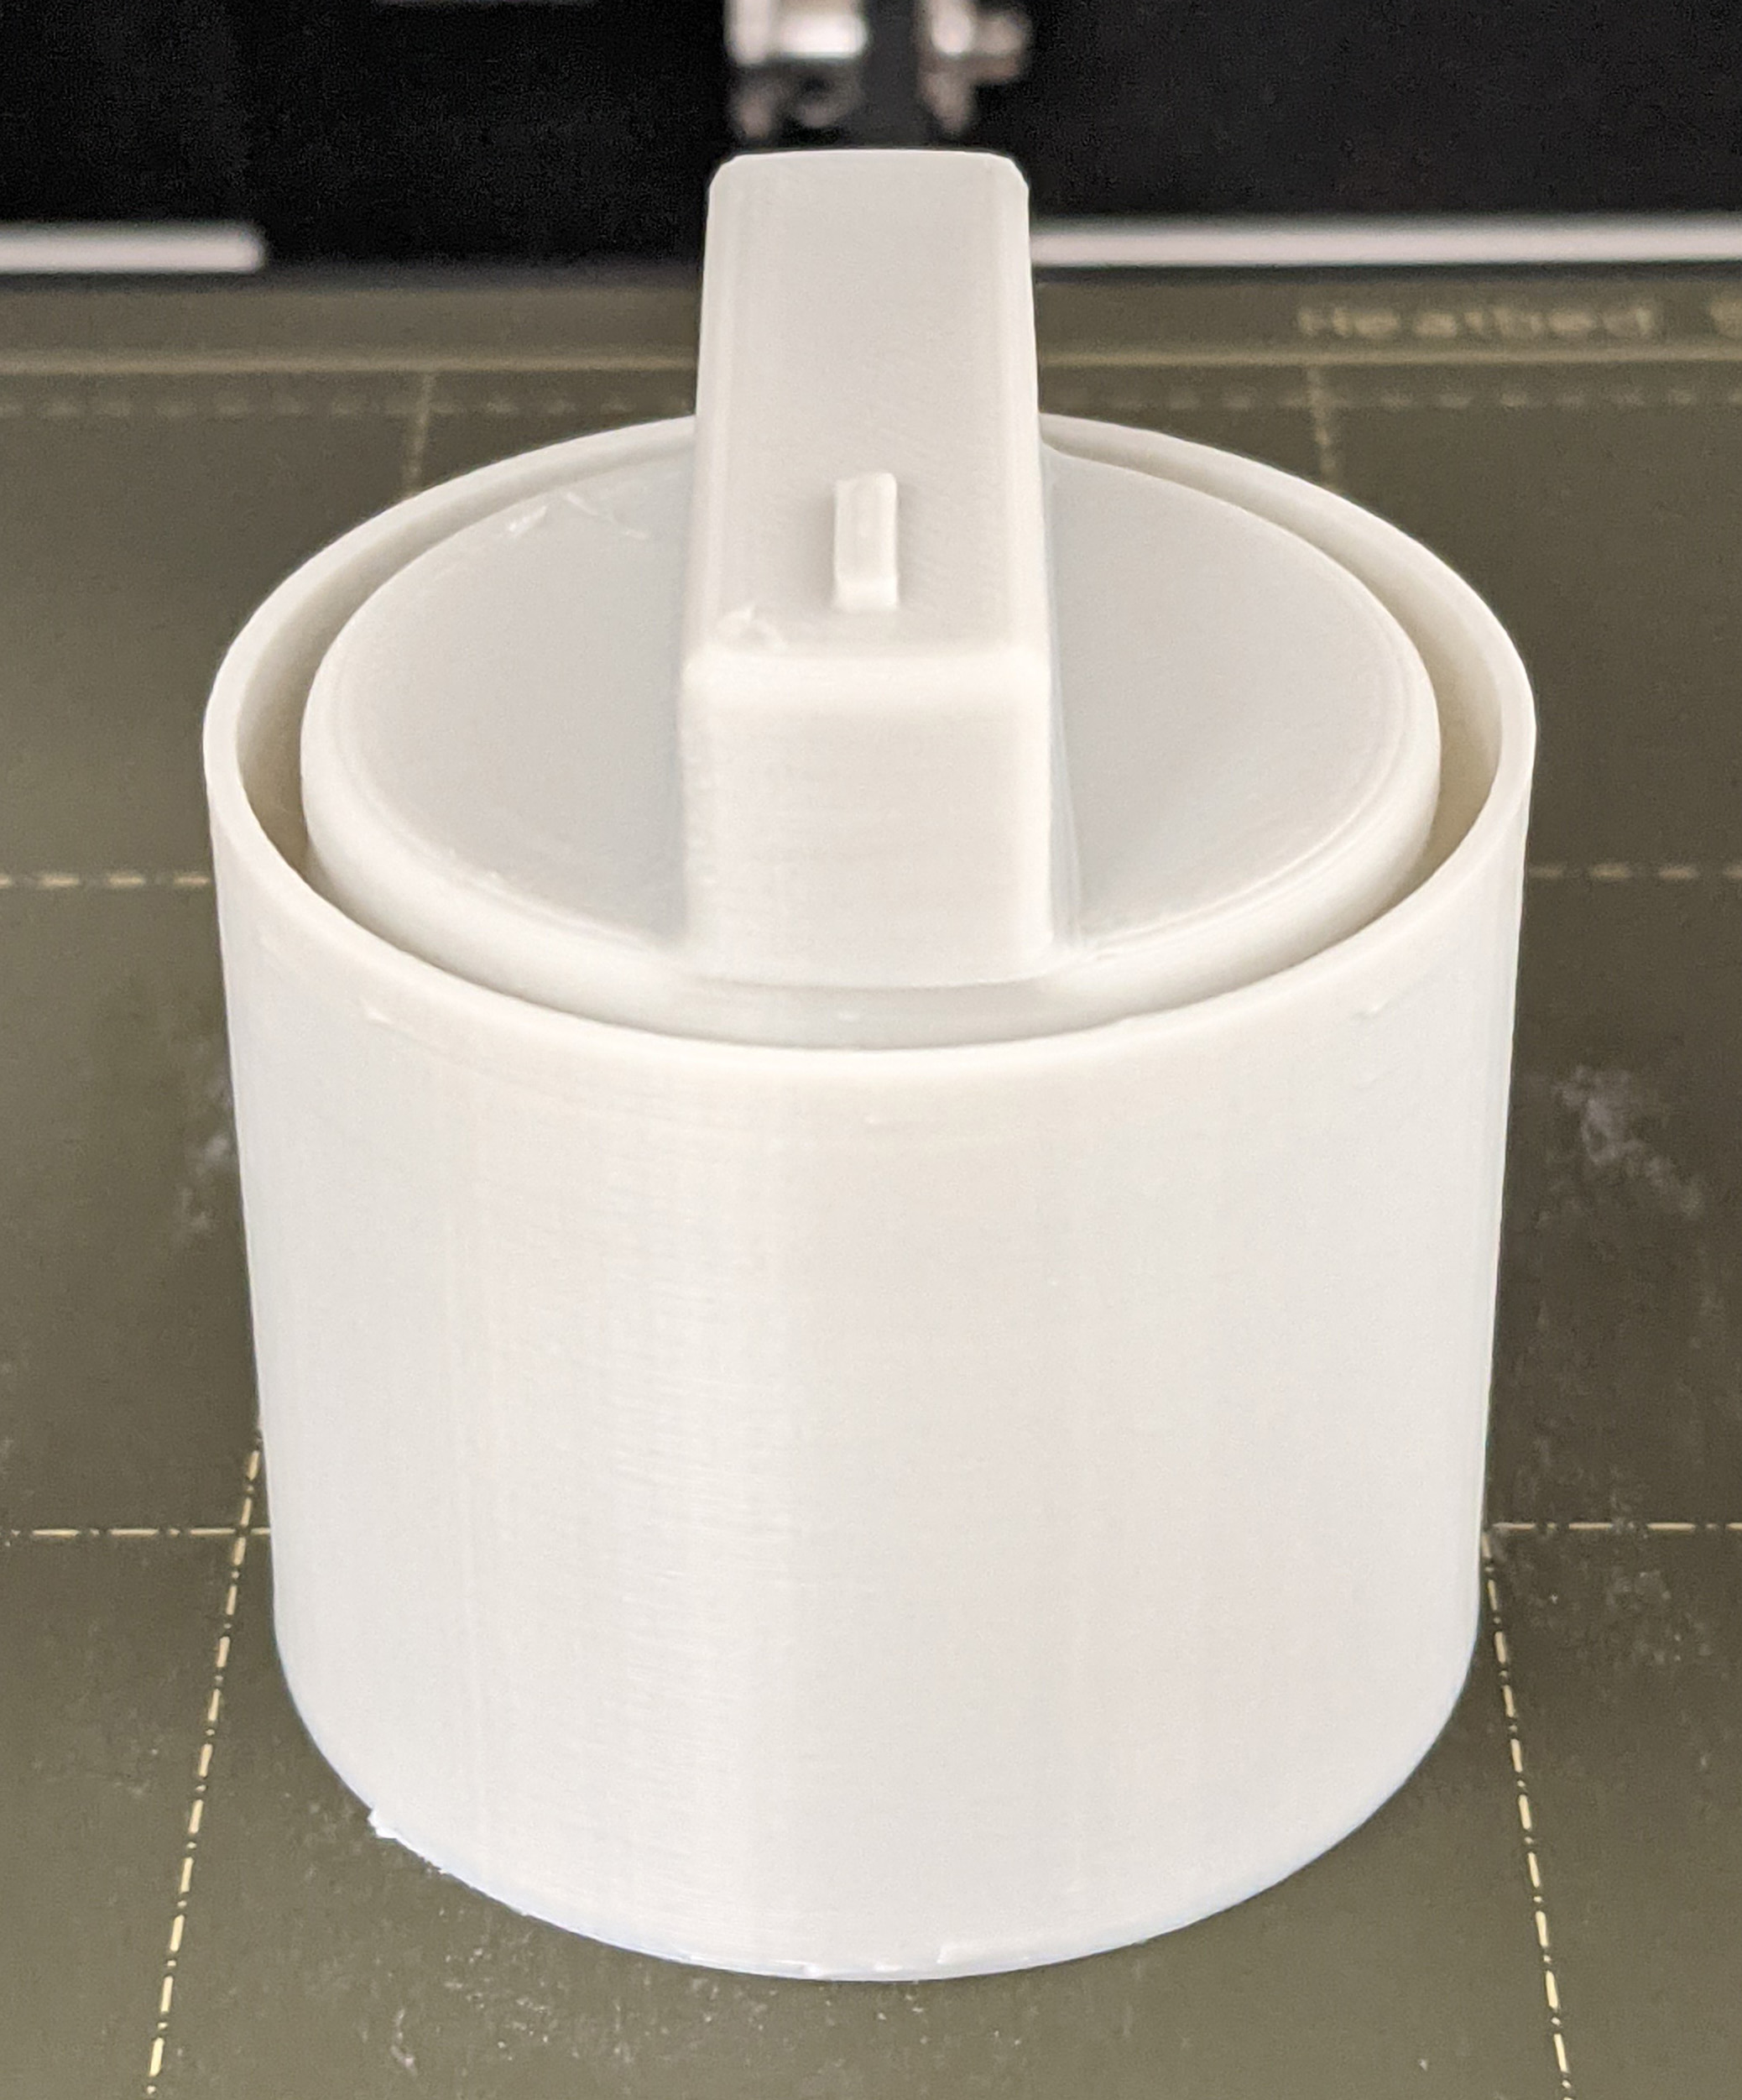
3mf file with custom support and high skirt: Supported_knob_V4-0.4