Globs Galore
I am pretty sure I have made a glob of every geometry possible. I am completely out of ideas on how to fix it.
I did have z-offset problems but I fixed that. Now it prints clean, benchy's come out great, but when I try to print something with a bigger single layer, it has random globs sticking up that eventually catch and pull the print off the bed.
I've had my MK3S+ for a little over a month, it printed great when I first got it, but then I started having issues randomly (the z-offset problems mentioned before that took forever to find). I'm sure its my inexperience, but please help. I'm so frustrated over this.
Best Answer by FoxRun3D:
Absolute numbers for live Z mean nothing as it all depends how your hotend is assembled. But ideally, a good Live Z should be somewhere around -1.00. A Live Z in the -1 range simply gives you enough wiggle room up and down, to adjust for different sheets and filaments. If you get close to -2.0 I would reposition the PINDA higher. This gadget may help you get into the proper range: https://www.printables.com/model/57192
I use this calibration strip https://www.printables.com/model/105404 for fine-tuning in steps of -0.020 or even -0.010. The larger format makes it easier to read the results, compared to the in-built wizard, plus you can try up to 8 different Live Z settings in one print. It's a variation of this method https://forum.prusa3d.com/forum/original-prusa-i3-mk3s-mk3-assembly-and-first-prints-troubleshooting/life-adjust-z-my-way/
Also, any change to the hotend may require readjusting Live Z (including something as simple as a nozzle change). Textured and satin sheets are thinner than smooth sheets and require lower (more negative) Live Z. Even within one type (e.g. smooth) two sheets may differ in enough in thickness due to manufacturing tolerances to warrant different Live Z.
RE: Globs Galore
It's difficult to tell from only that description. If you will attach some photos, hopefully some of us can jump in and give you an idea of what may be happening.
RE: Globs Galore
I'll gather another failure to demonstrate. The big thing I'm trying to print is the honeycomb wall organizer. But I keep getting little tags sticking up as it prints. I'll kill it mid print to show, what I believe, the problem is.
RE: Globs Galore
Live Z off, or dirty sheet. Sheet needs to be hospital clean. Soap, hot water, dry, no fingerprints. Zero fingerprints. IPA is not enough.
Once, and it doesn’t take much, a print comes loose then you will get globs galore as the print slides along with the head.
Don’t trust forum advice.
RE: Globs Galore
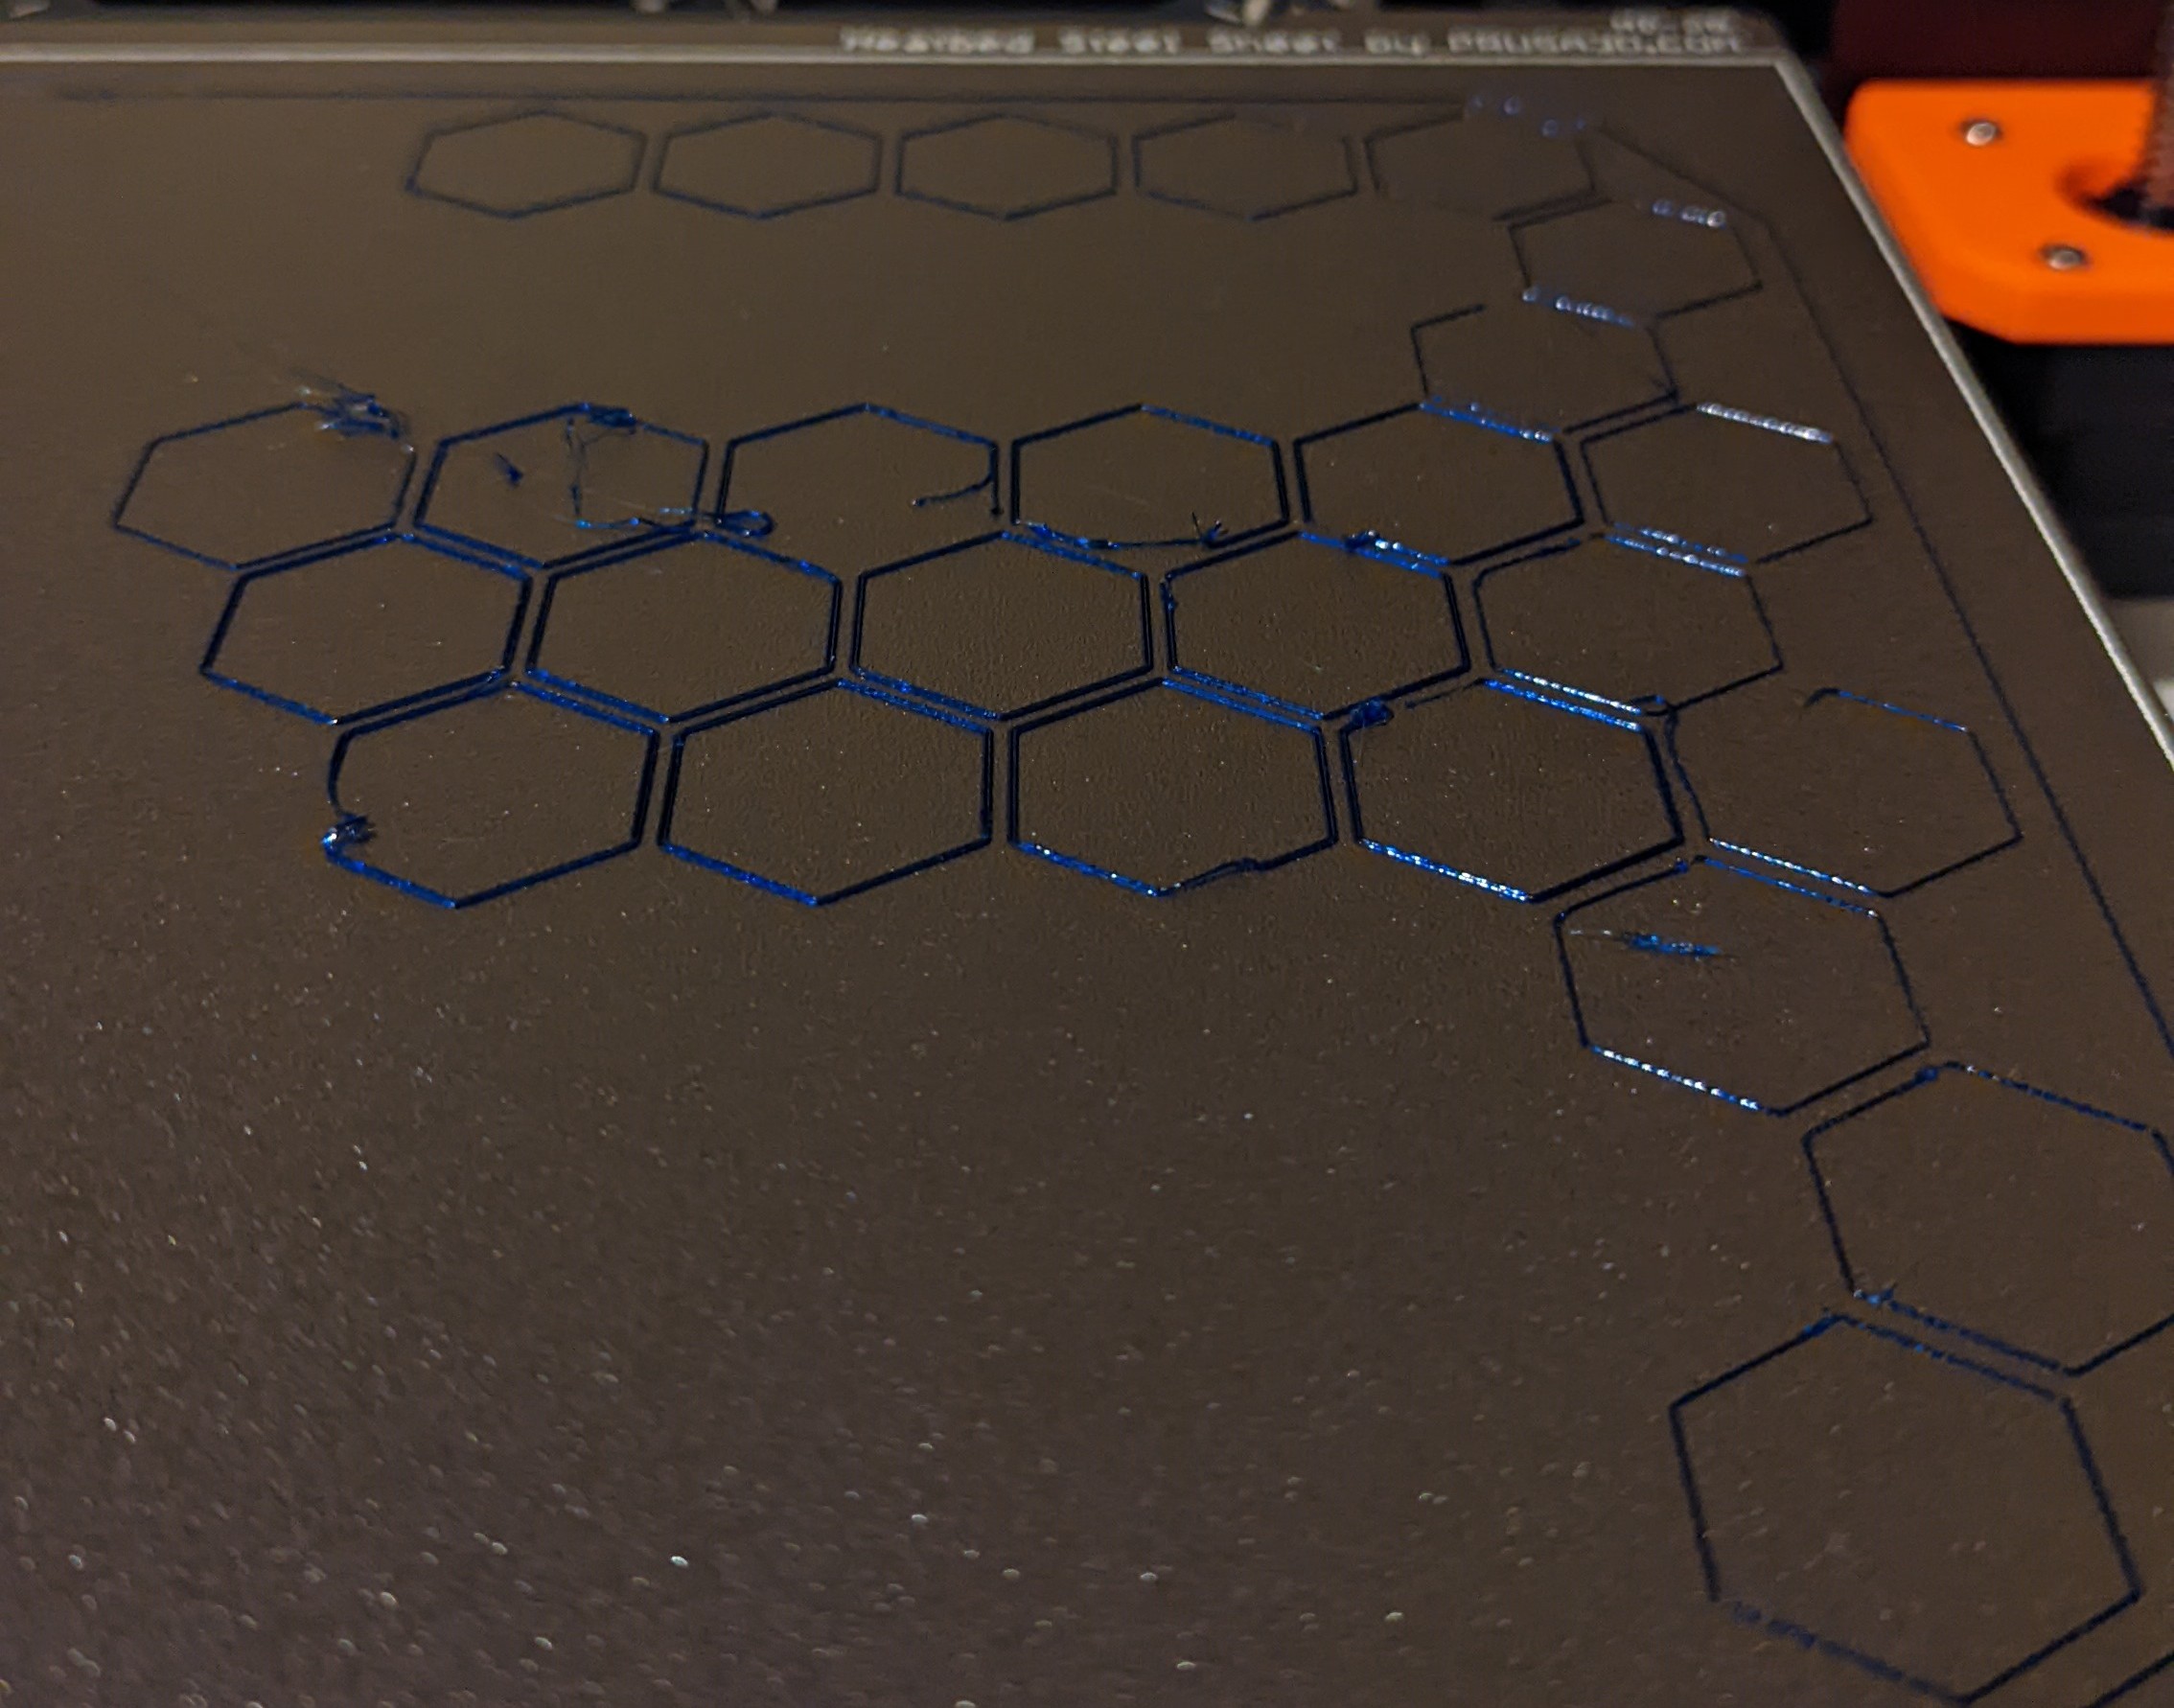
This is a good example of the tags and trash that get left behind and eventually picked up by the nozzle and pulls the print loose and makes a globbed mess.
RE: Globs Galore
Sorry to disappoint you mate, but I don't think you've fixed your z-adjustment, still looks pretty high to me.
Standard procedure is clean your bed with fragrance free dish soap and lots of HOT water, dry with clean paper towels, keep your greasy fingers away from the surface and do a decent z-calibration. This the way most people recommend:
Oh, and in case you haven't changed it switch the mesh bed levelling to 7x7 instead of the 3x3.
That should get you started nicely, and if there are few hours of time in your budget dry your filament. But do yourself a favour and don't buy any overpriced "super-special-3d-printing-approved-kickstarter-rip-off" filament dryer, go for a standard food dehydrator.

I got this one for 120NZD at the local hardware chain, fits up to 6 spools of filament and makes really yummy dried apples 😉
hth
Hansjoerg
RE: Globs Galore
Ok well that's encouraging. How can you tell from so far away that it is too high? And from that post you shared, I'm currently set at -1.650. Should I just keep doing the z-offset lower until my calipers measure the film to .200 mm? Is that the correct way to do z-offset?
RE: Globs Galore
Absolute numbers for live Z mean nothing as it all depends how your hotend is assembled. But ideally, a good Live Z should be somewhere around -1.00. A Live Z in the -1 range simply gives you enough wiggle room up and down, to adjust for different sheets and filaments. If you get close to -2.0 I would reposition the PINDA higher. This gadget may help you get into the proper range: https://www.printables.com/model/57192
I use this calibration strip https://www.printables.com/model/105404 for fine-tuning in steps of -0.020 or even -0.010. The larger format makes it easier to read the results, compared to the in-built wizard, plus you can try up to 8 different Live Z settings in one print. It's a variation of this method https://forum.prusa3d.com/forum/original-prusa-i3-mk3s-mk3-assembly-and-first-prints-troubleshooting/life-adjust-z-my-way/
Also, any change to the hotend may require readjusting Live Z (including something as simple as a nozzle change). Textured and satin sheets are thinner than smooth sheets and require lower (more negative) Live Z. Even within one type (e.g. smooth) two sheets may differ in enough in thickness due to manufacturing tolerances to warrant different Live Z.
Formerly known on this forum as @fuchsr -- https://foxrun3d.com/
RE: Globs Galore
That absolutely was the core of the problem. My adhesion is way better. I'm doing my third of those strips. But how do I know when it's good and when to stop? Like I'm going slow but eventually isn't there a danger of crushing my nozzle into the print bed and having to buy more? (I have spare spring steel sheets but the concern is there)
RE: Globs Galore
if you follow the 'Life Adjust 'Z' My Way' process, using any reasonably large based model (Any first layer should do... )
you can look at the print, as it progresses, and decide whether you need to raise or lower the nozzle for the first layer... (AND ONLY the first layer)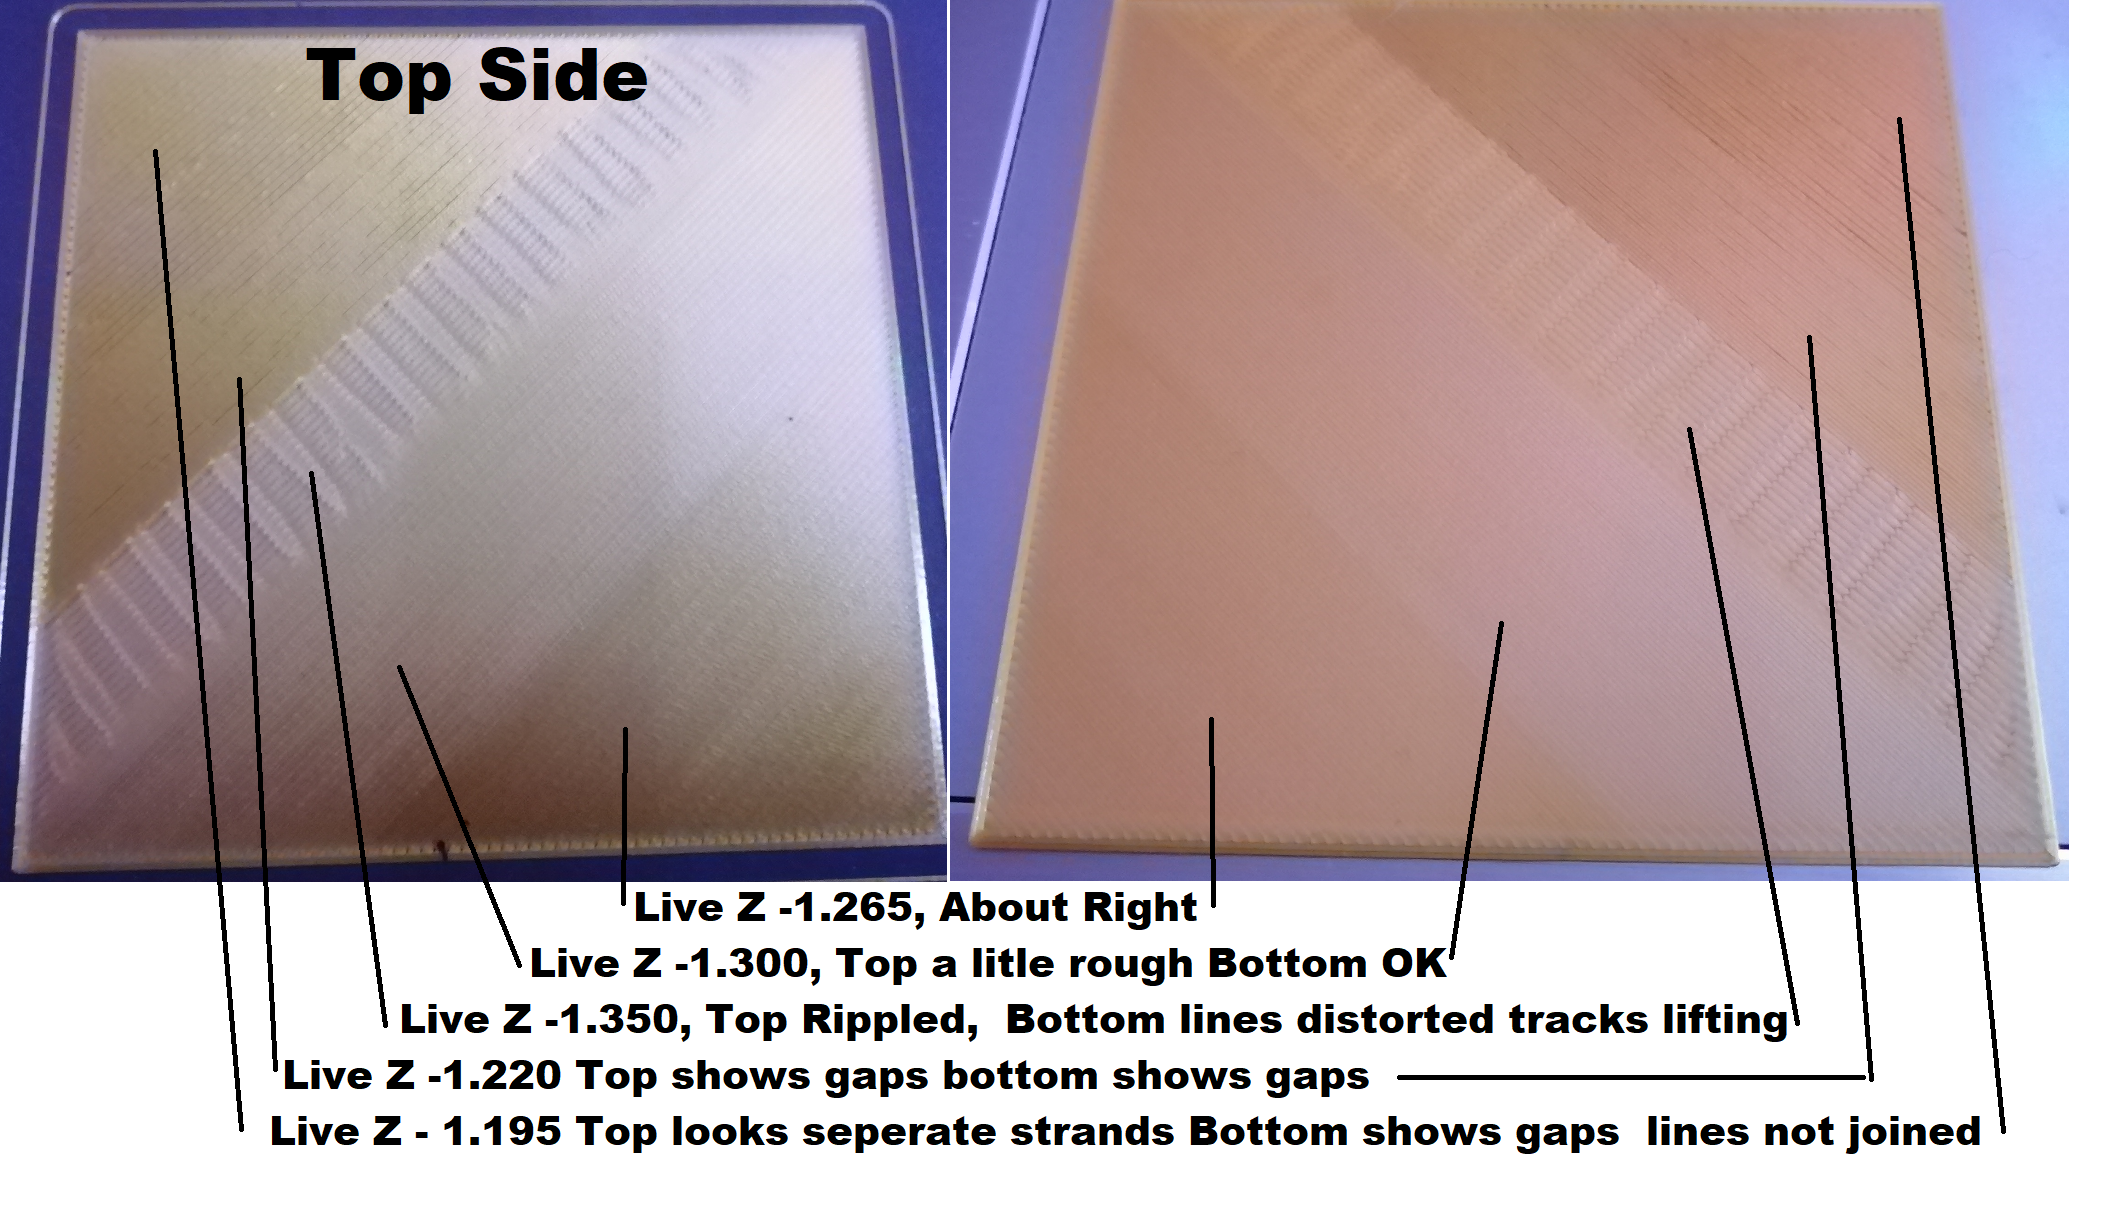
as you can see from image above the appearance of the print, if the filament strands are well defined, then Live Z is too high, (Too Small a negative number)
If the surface is rough, and / or rippled like the sand on a beach as the tide goes out, then live Z is too low (Too Large a negative number)
If the strands are nicely merged into a single sheet that is smooth on the top and the bottom, then you are just about right with your Live Z value!
as far as damaging your build plate, there SHOULD, be little chance of doing that, if you follow the 'Life Adjust Z My way, process.
Assuming the PINDA or SPINDA is properly setup, the starting point of Live Z - 0.000mm will be safely too high. from there if you adjust Live Z carefully, you should see the print, go from dragging around behind the nozzle, to round strings, barely adhering to the build plate, then it will start to become slightly flattened on the top and bottom but the strands will still be separate... because you are still too high...
if you continue lowering live z as the first layer prints, the strands will begin to merge into a single sheet, you are now approaching the correct live z value.
At this point, if you look at the underside of the print, you will still see tiny crevices between the strands... (this confirms that you still have to go a bit further down! you are approaching maximum adhesion!)
If the underside of the print shows the strands have merged into a solid sheet, and the top of the print is still smooth, your Live Z is just about perfect. (this is the point of maximum adhesion.)
IF you continue going lower from this setting, the top of the print will initially become rough, as the nozzle begins ploughing through the surface of the print,
IF you continue further down again, the underside will start to show gaps between the filament as it starts to get squeezed into too small a space and it starts to lift off the build plate (going any further down will loose even more adhesion)
If you go lower, the new strands of filament will push the old filament out of the way, causing the old filament to ripple... and on the underside of the print, you will see larger gaps... you are now entering the land of almost certain mega blobs...
you would still need to go even further down to risk damaging your nozzle or build plate...
regards Joan
I try to make safe suggestions,You should understand the context and ensure you are happy that they are safe before attempting to apply my suggestions, what you do, is YOUR responsibility.Location Halifax UK
RE: Globs Galore
I think I reached that point with the tiger striped texture that is shown in that picture. Time for more adjustment. Thank you guys so much.
RE:
Joan described it well.
For a brand new calibration I use the built in first layer calibration to go down in steps of -0.1 until i get a good first layer without anything dragging.
(Okay, in reality know that my good live z is going to be around -1 if the nozzle is the right distance from the Pinda, so in my first pass I quickly spin the dial up from 0 to say -0.8 while the nozzle is laying down the zigzag part of the first layer pattern, until I get good corners).
Then I switch to the calibration strip to fine tune it.
Usually most people don't go low enough for fear of ramming the nozzle into the ground but if you follow the approach Joan and I outlined, there's very little chance of that.
Formerly known on this forum as @fuchsr -- https://foxrun3d.com/
RE: Globs Galore
The stupid answer to your question how I could see that your z was too high would be: That's obvious, everybody can see that...
But I always hated this type of answer 🙂

So I rather share what gave it away to me. I'm sure there were more subtle hints (see "everybody sees that") that are more difficult to describe. Don't despair it takes a while and many a square meter of first layer calibration prints to get it done more quickly. And what has been said above about individual calibrations for individual sheets is absolutely correct. Sometimes you might need to adjust a bit between different filaments and even between different batches of the same filament. But you will get there eventually. I always watch the first layer going down and sometimes correct z on the fly.
Another thing that has not yet been mentioned and you might want to consider is changing your start g-code to a version that gives the bed and the PINDA time to warm up properly. There are many versions floating around the forum, the one bobstro published a few years ago works quite well for me. If you start a print while everything is still coldish even very small movements during warm up can be a significant portion of the tuning attempts (remember we're fine tuning in steps of 10 micrometers or less).
Enough lecturing for today, happy printing!
Hansjoerg