Unable to print the Prusa logo plate cleanly
Hi all,
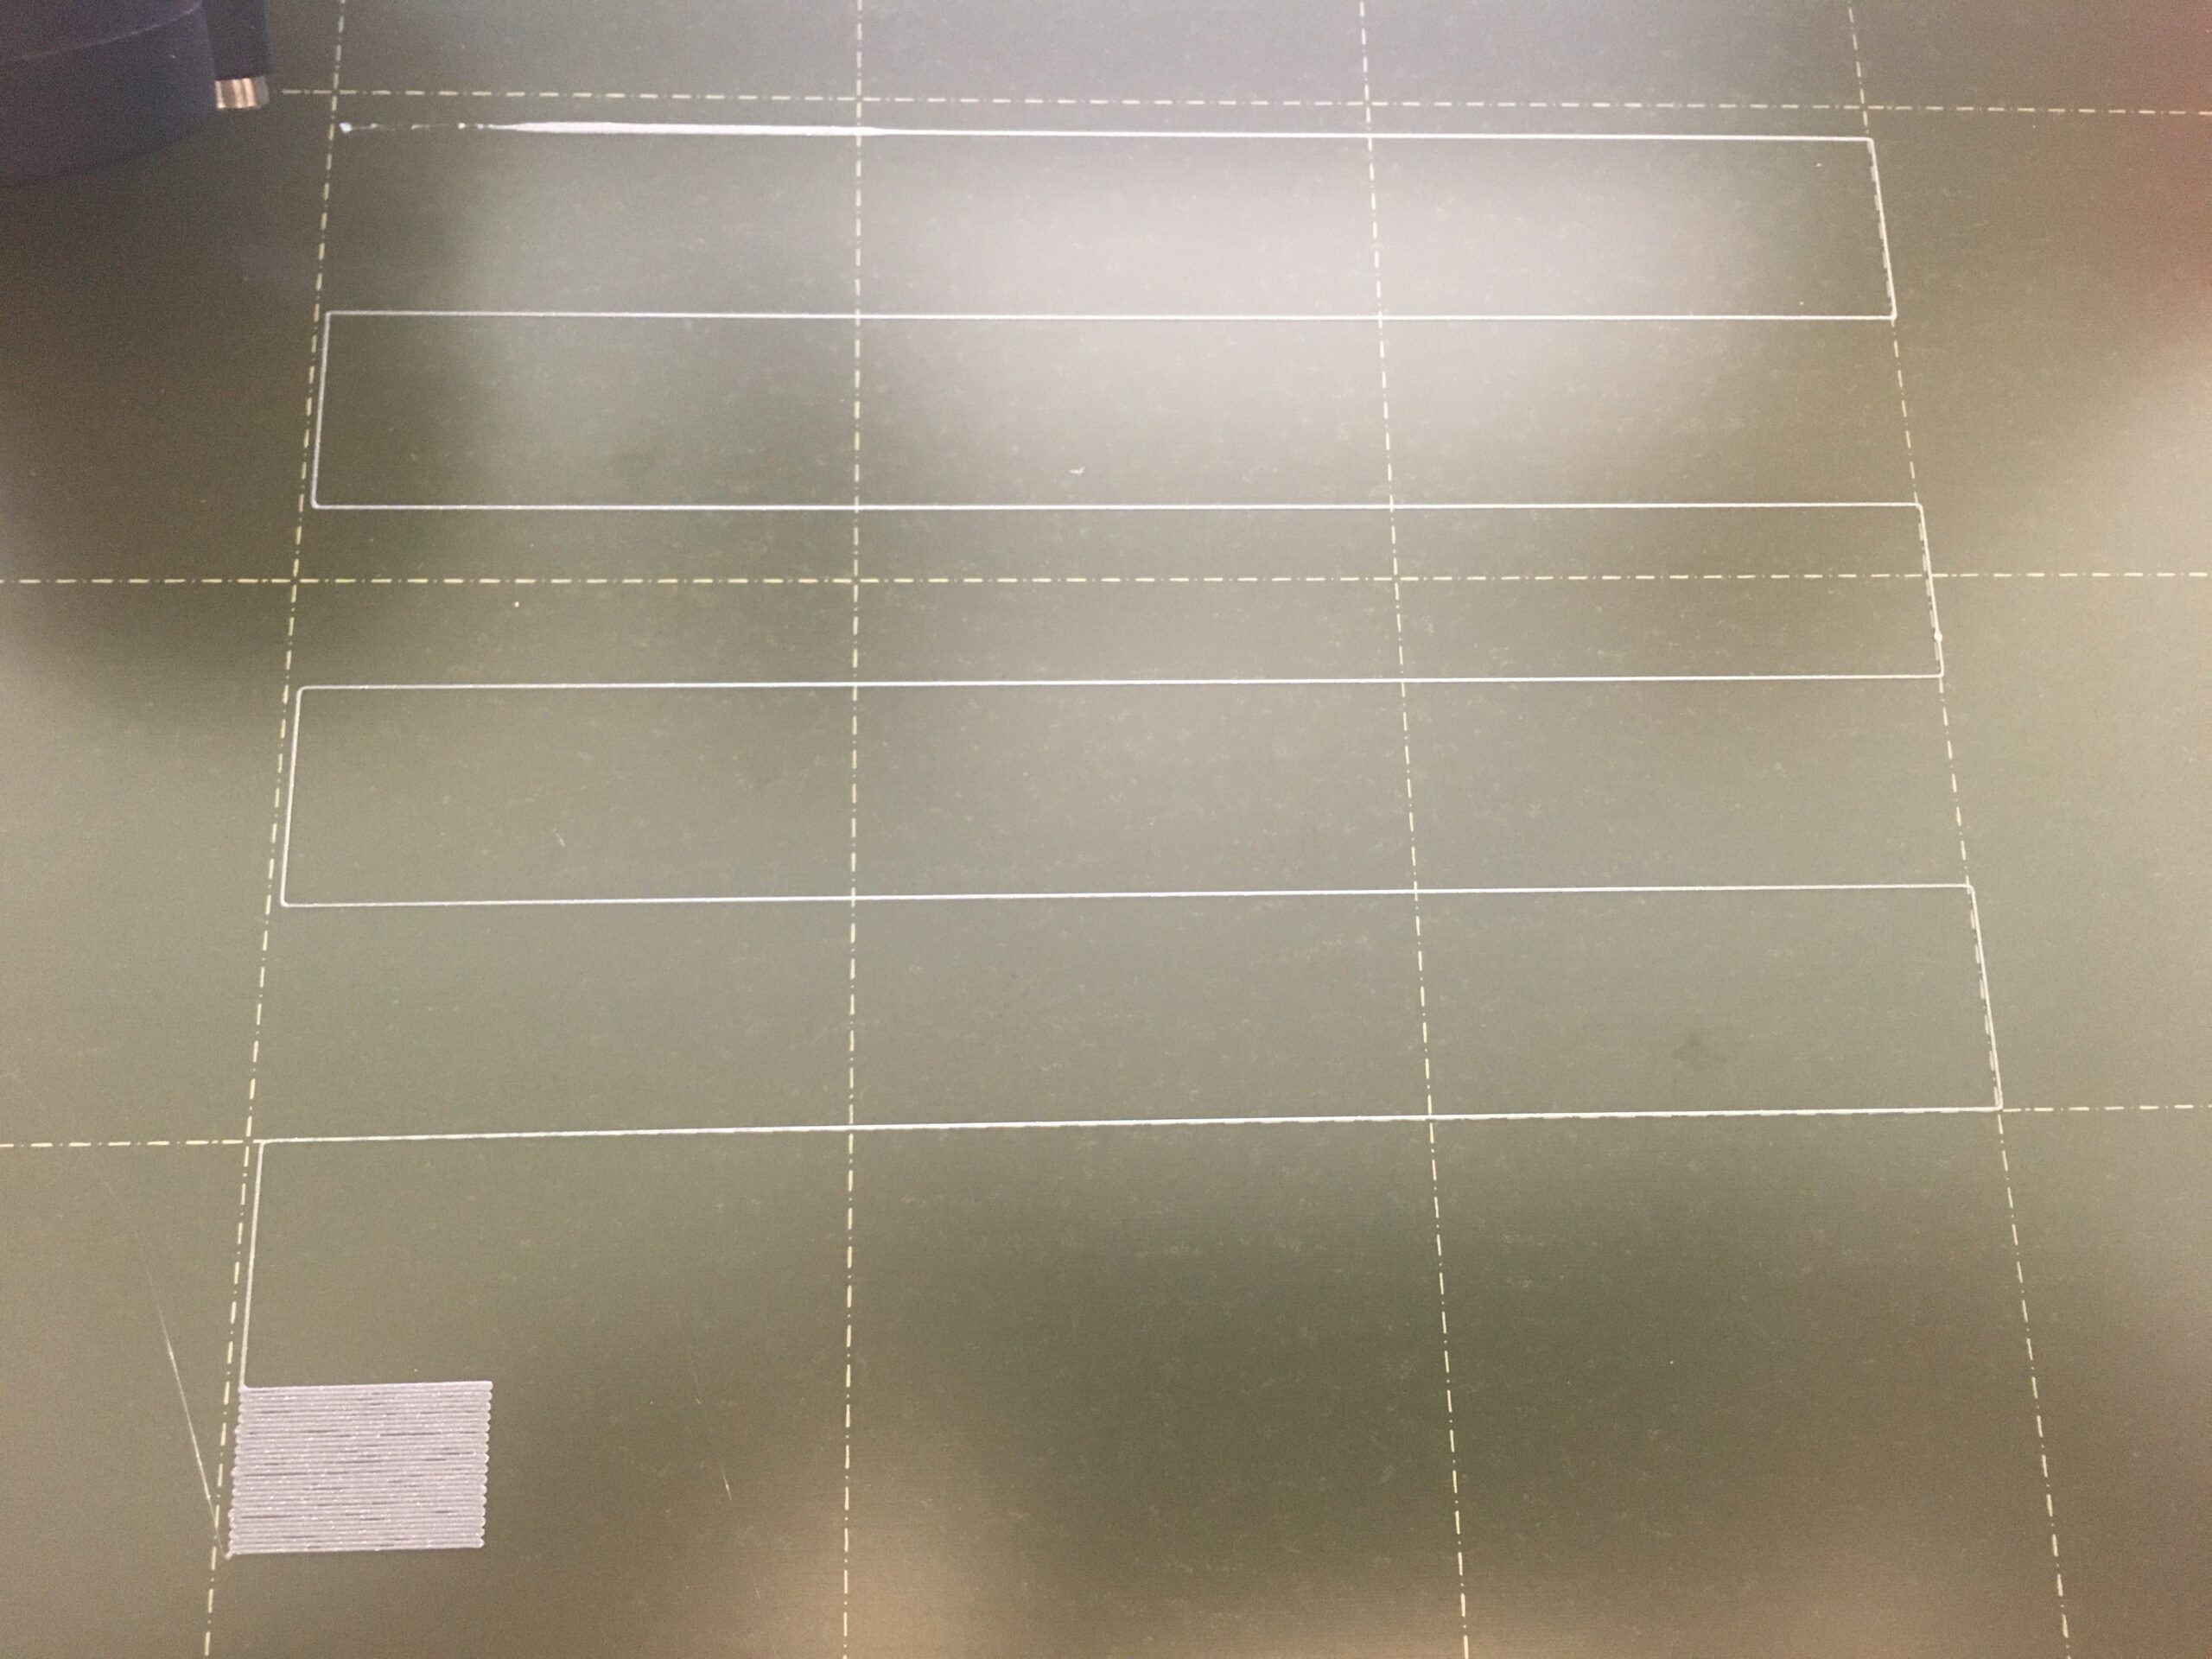
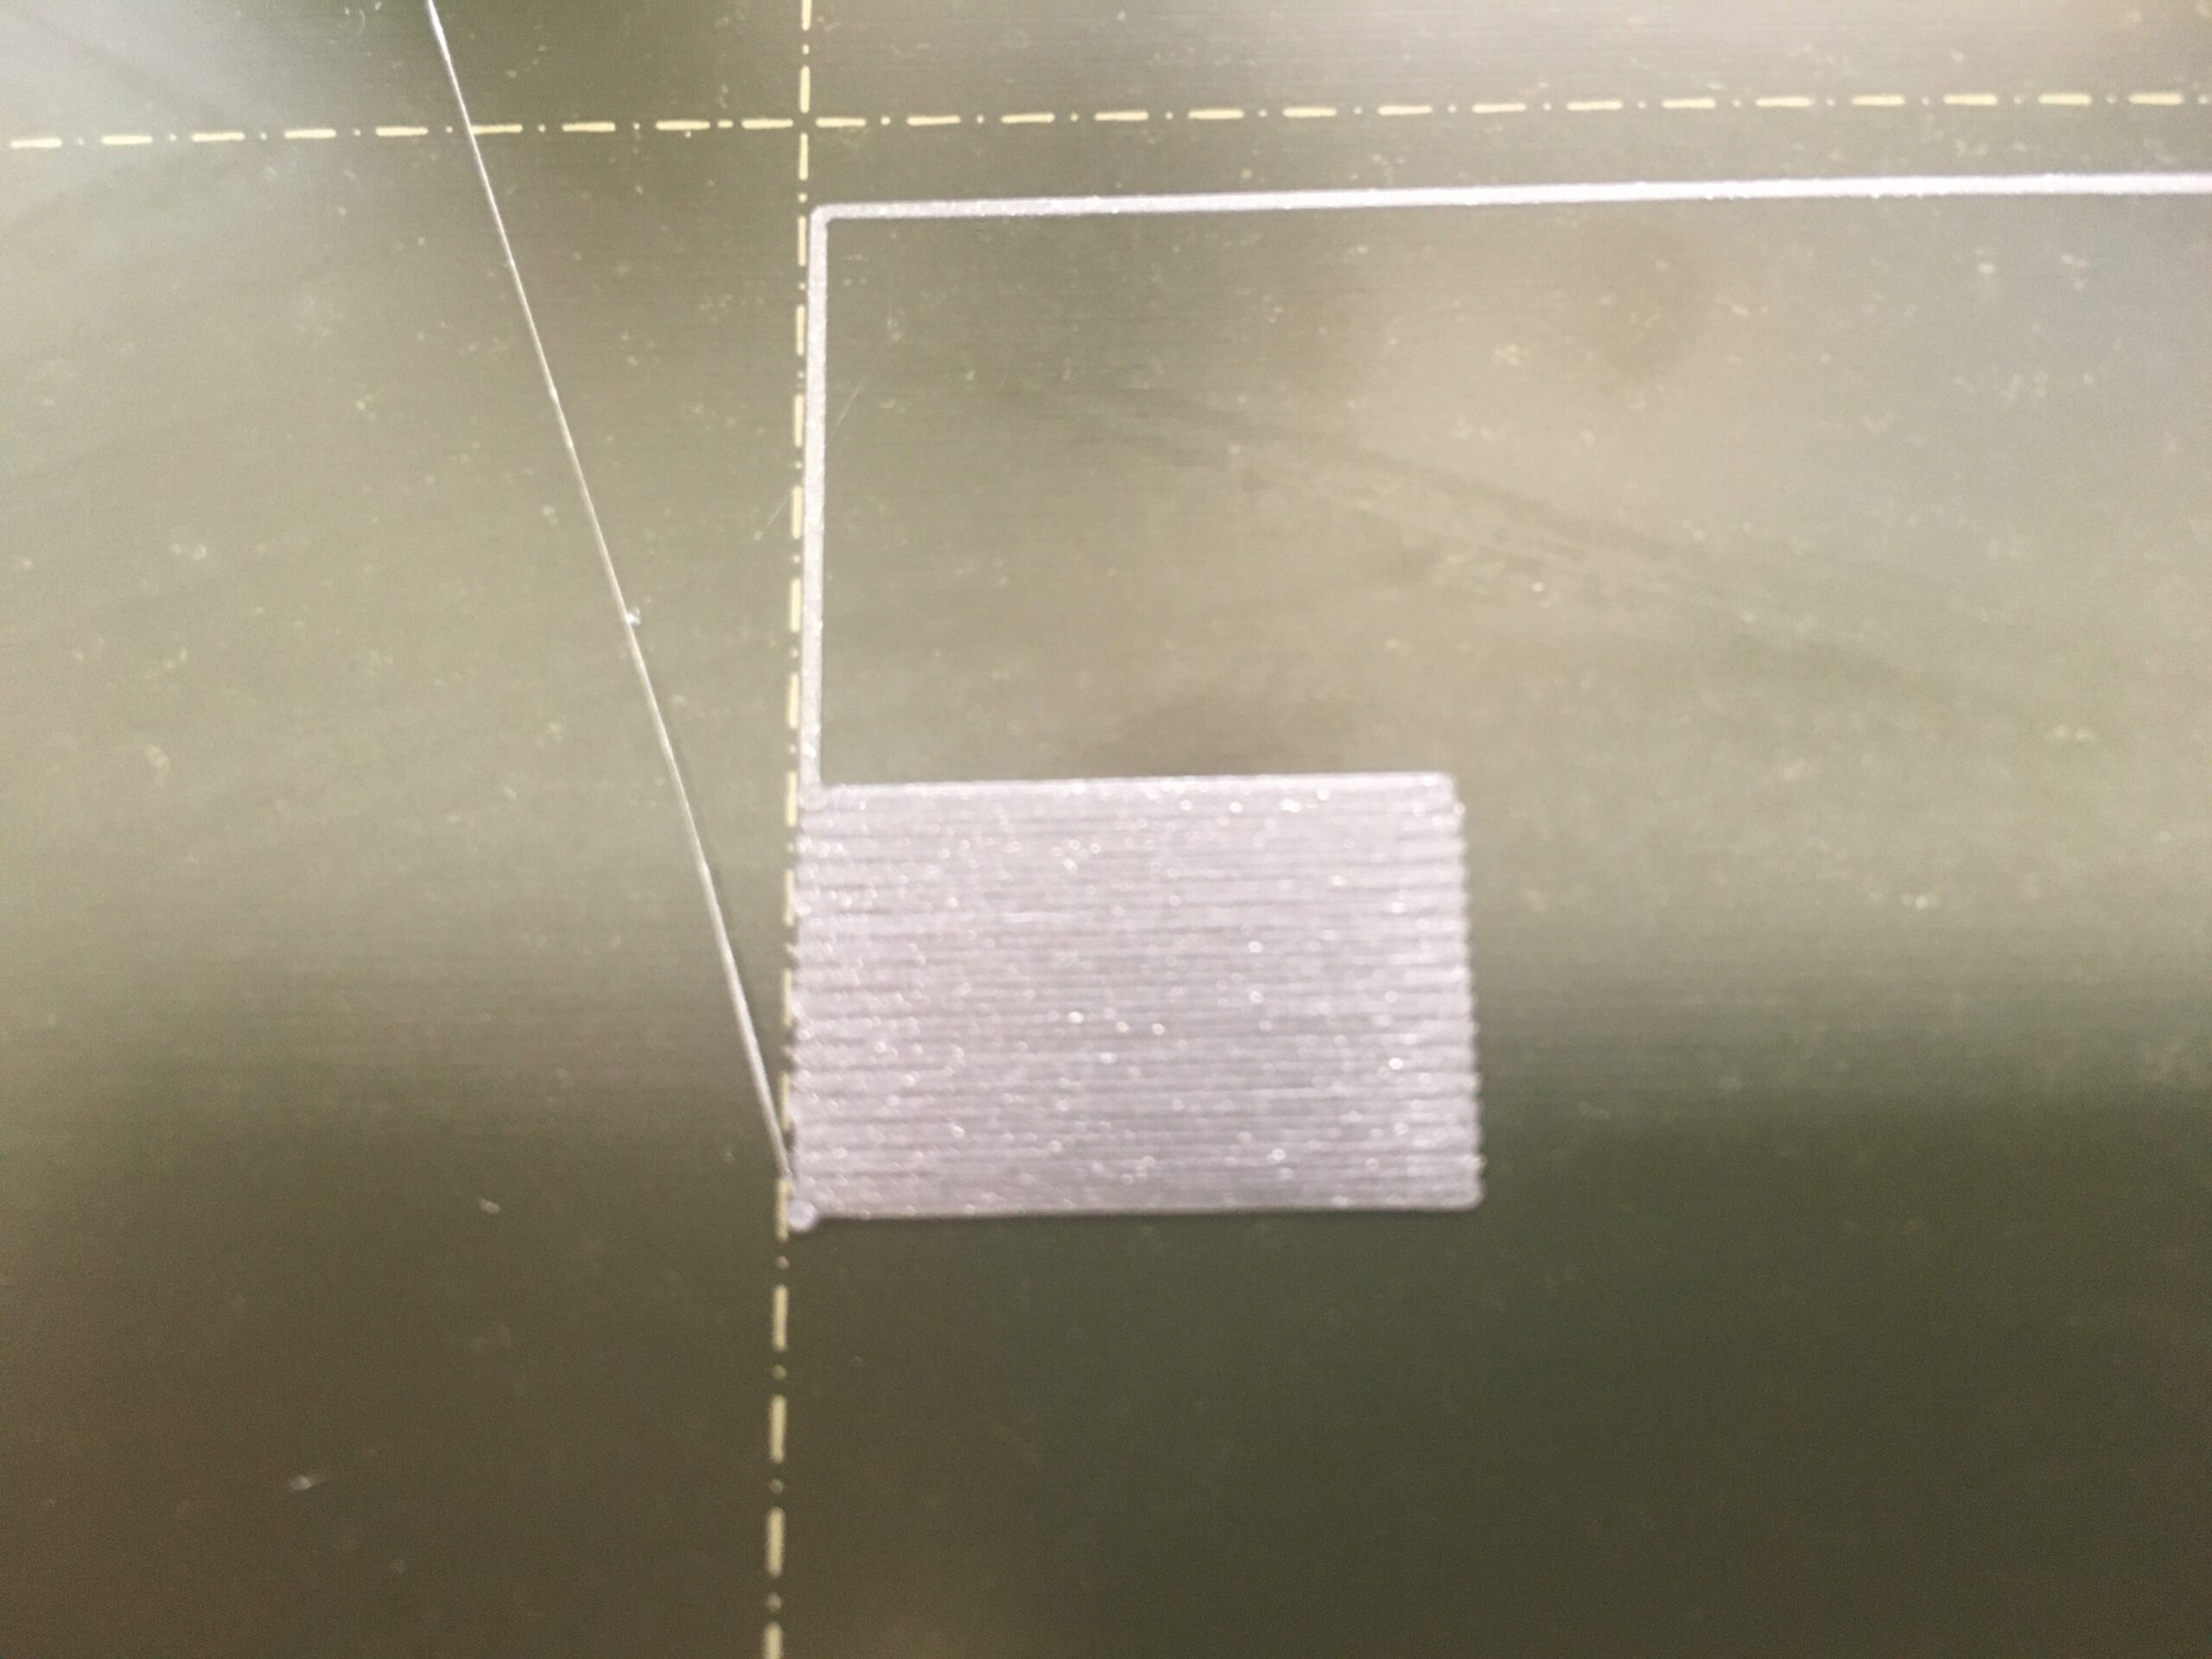
I hope someone in the community can help me. I am completely new to 3D printing. I bought the original PRUSA i# MK3S+ kit, followed the instructions carefully on how to build it, ran through the selftest according to the 3D Printing Handbook successfully and tried to print the Prusa logo (chapter 6.3.10.1). The lines laid down in the first layer is not even in some spots and in succeeding layers the printer does not completely fill in the rectangle. I've tried moving the SuperPINDA sensor to approximately 0.5mm above the nozzle tip. I've tried dialing the Live Adjust Z to be just 50 above where the nozzle just catches the sheet of paper. I've even decreased the speed 50%. However, the Prusa logo plate still doesn't print cleanly. Does anyone have a suggestion of how to fix this problem? Thanks.
RE: Unable to print the Prusa logo plate cleanly
Check your belt tension. Looks similar to what I saw there.
Also getting z "squished" enough can take more adjustment closer to the bed than you think. Do calibration and inspect the little cube created at the end for a good, um, "squish"
Your print sheet is visibly dirty, a common cause of adhesion issues.
Your first layer Z configuration looks suspect - please run the calibration again and show us the resulting print *on the print sheet*
Cheerio,
RE: Unable to print the Prusa logo plate cleanly
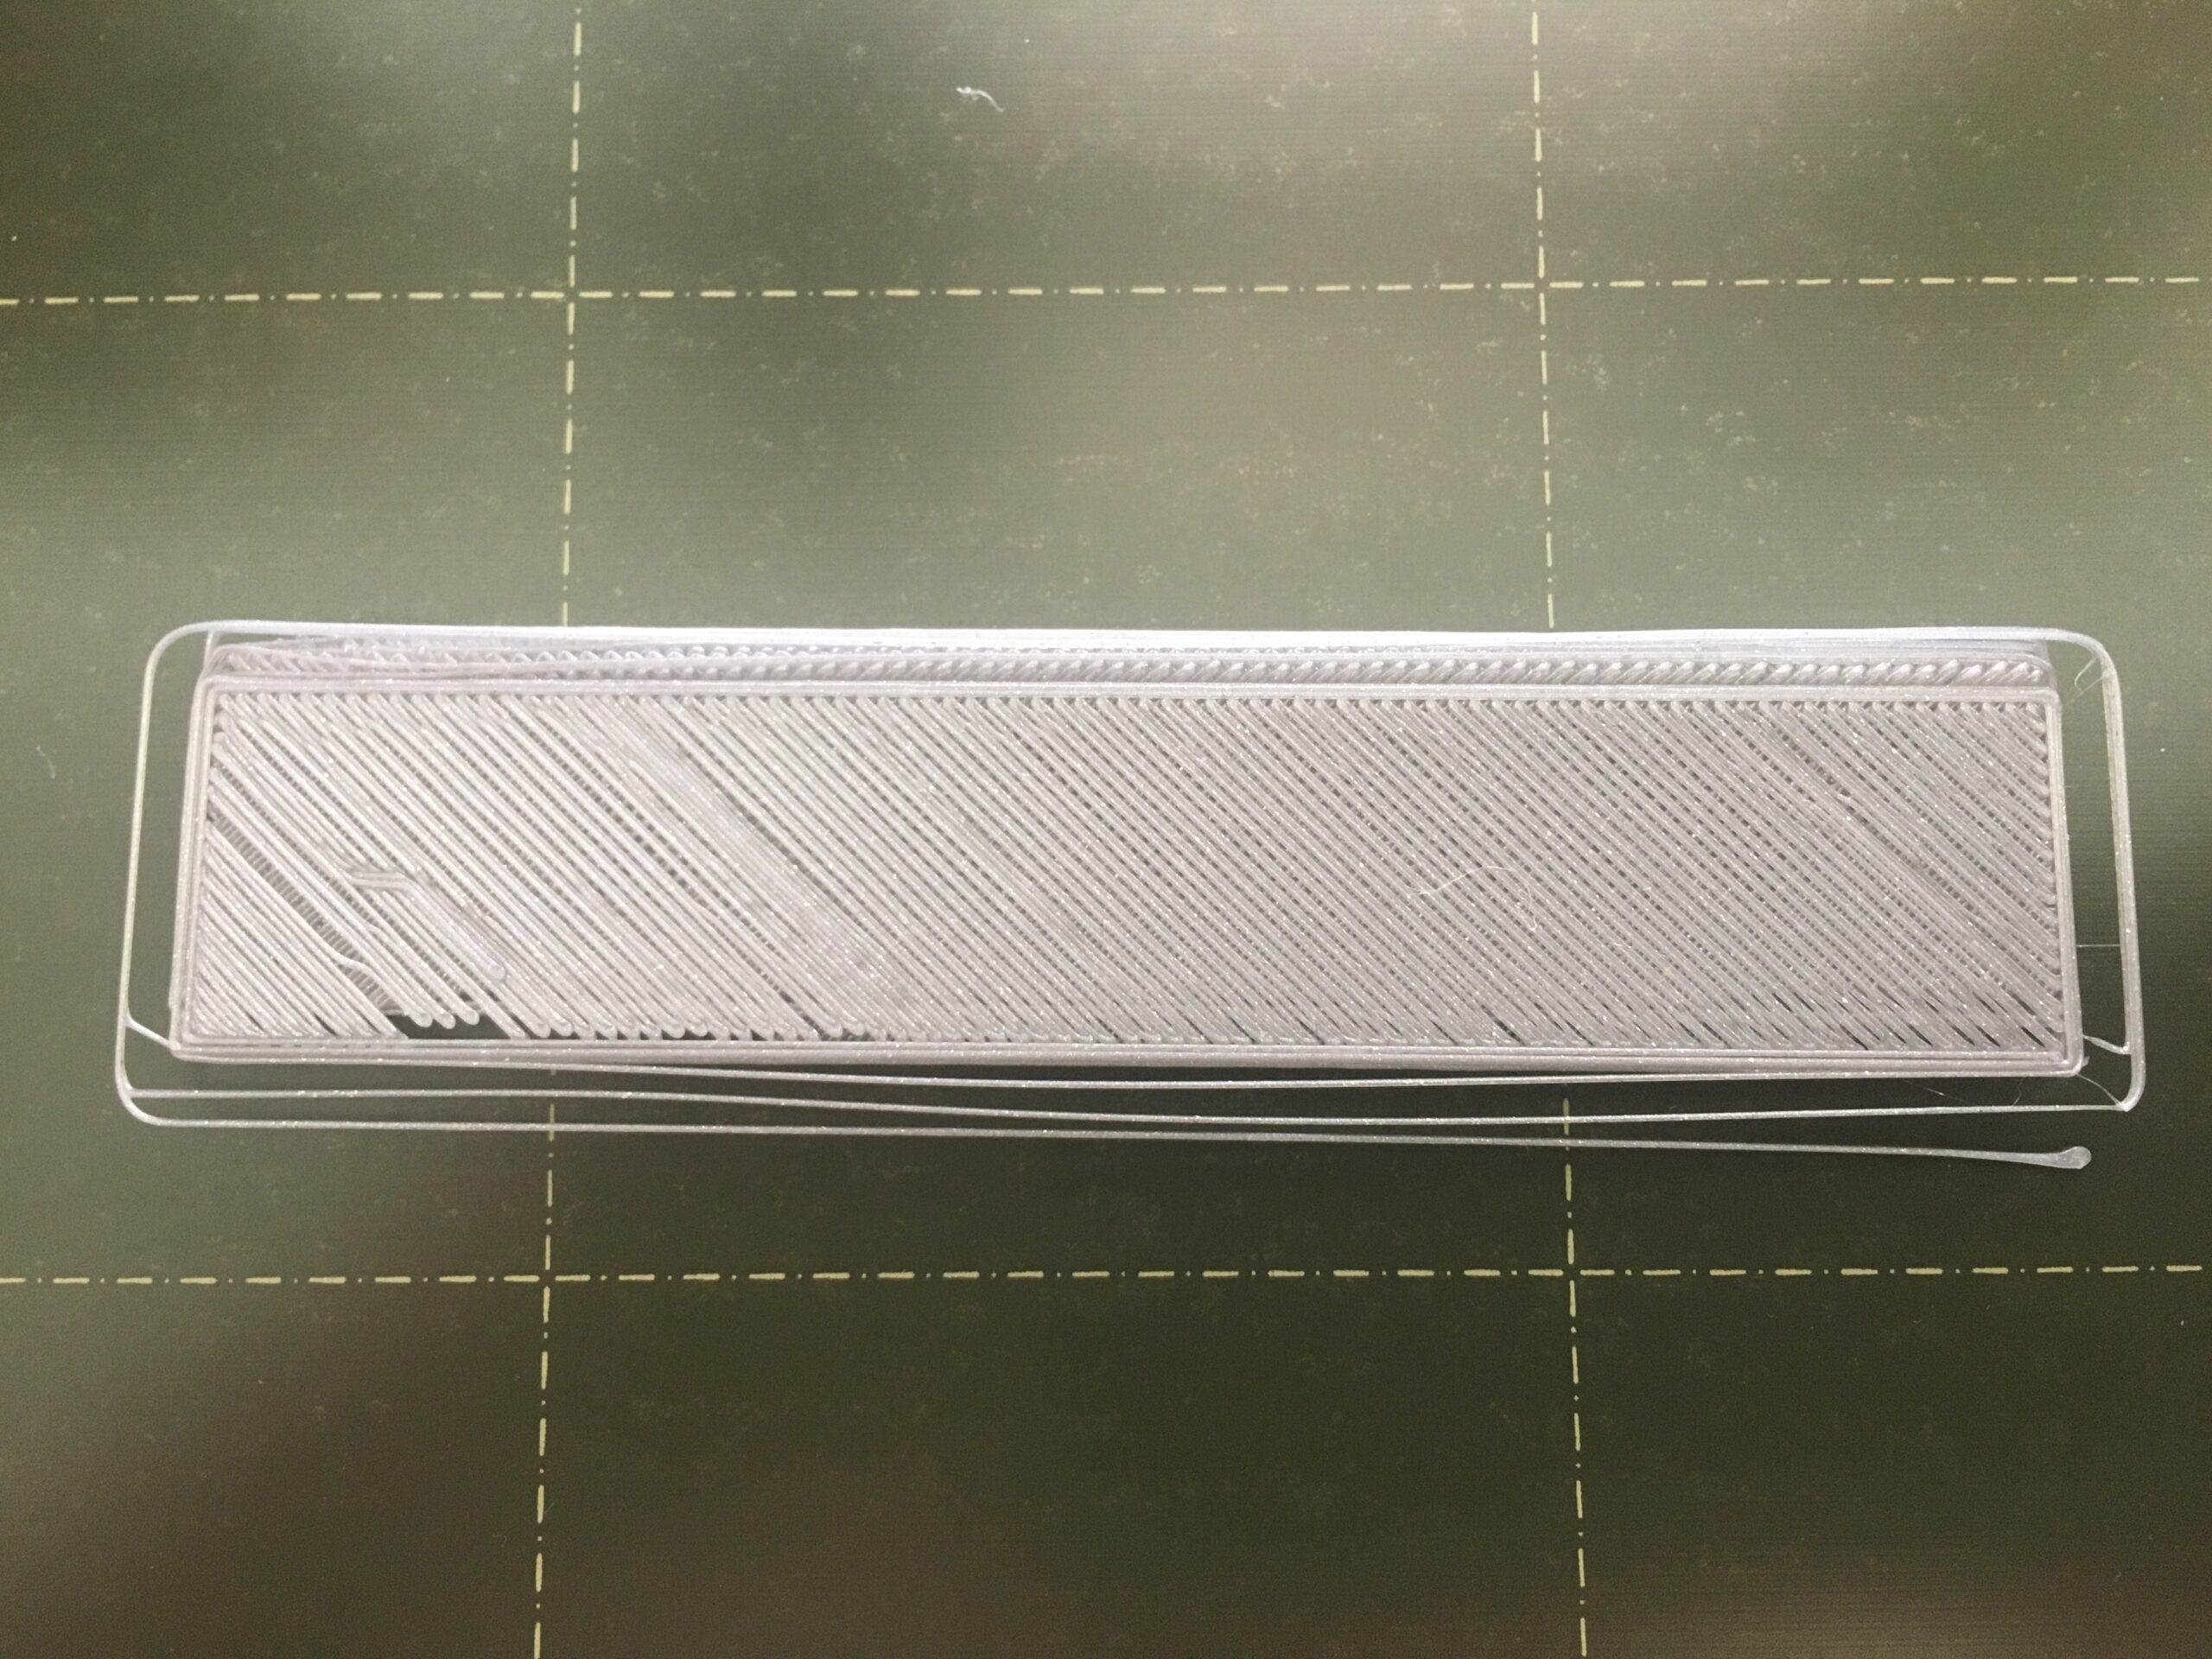
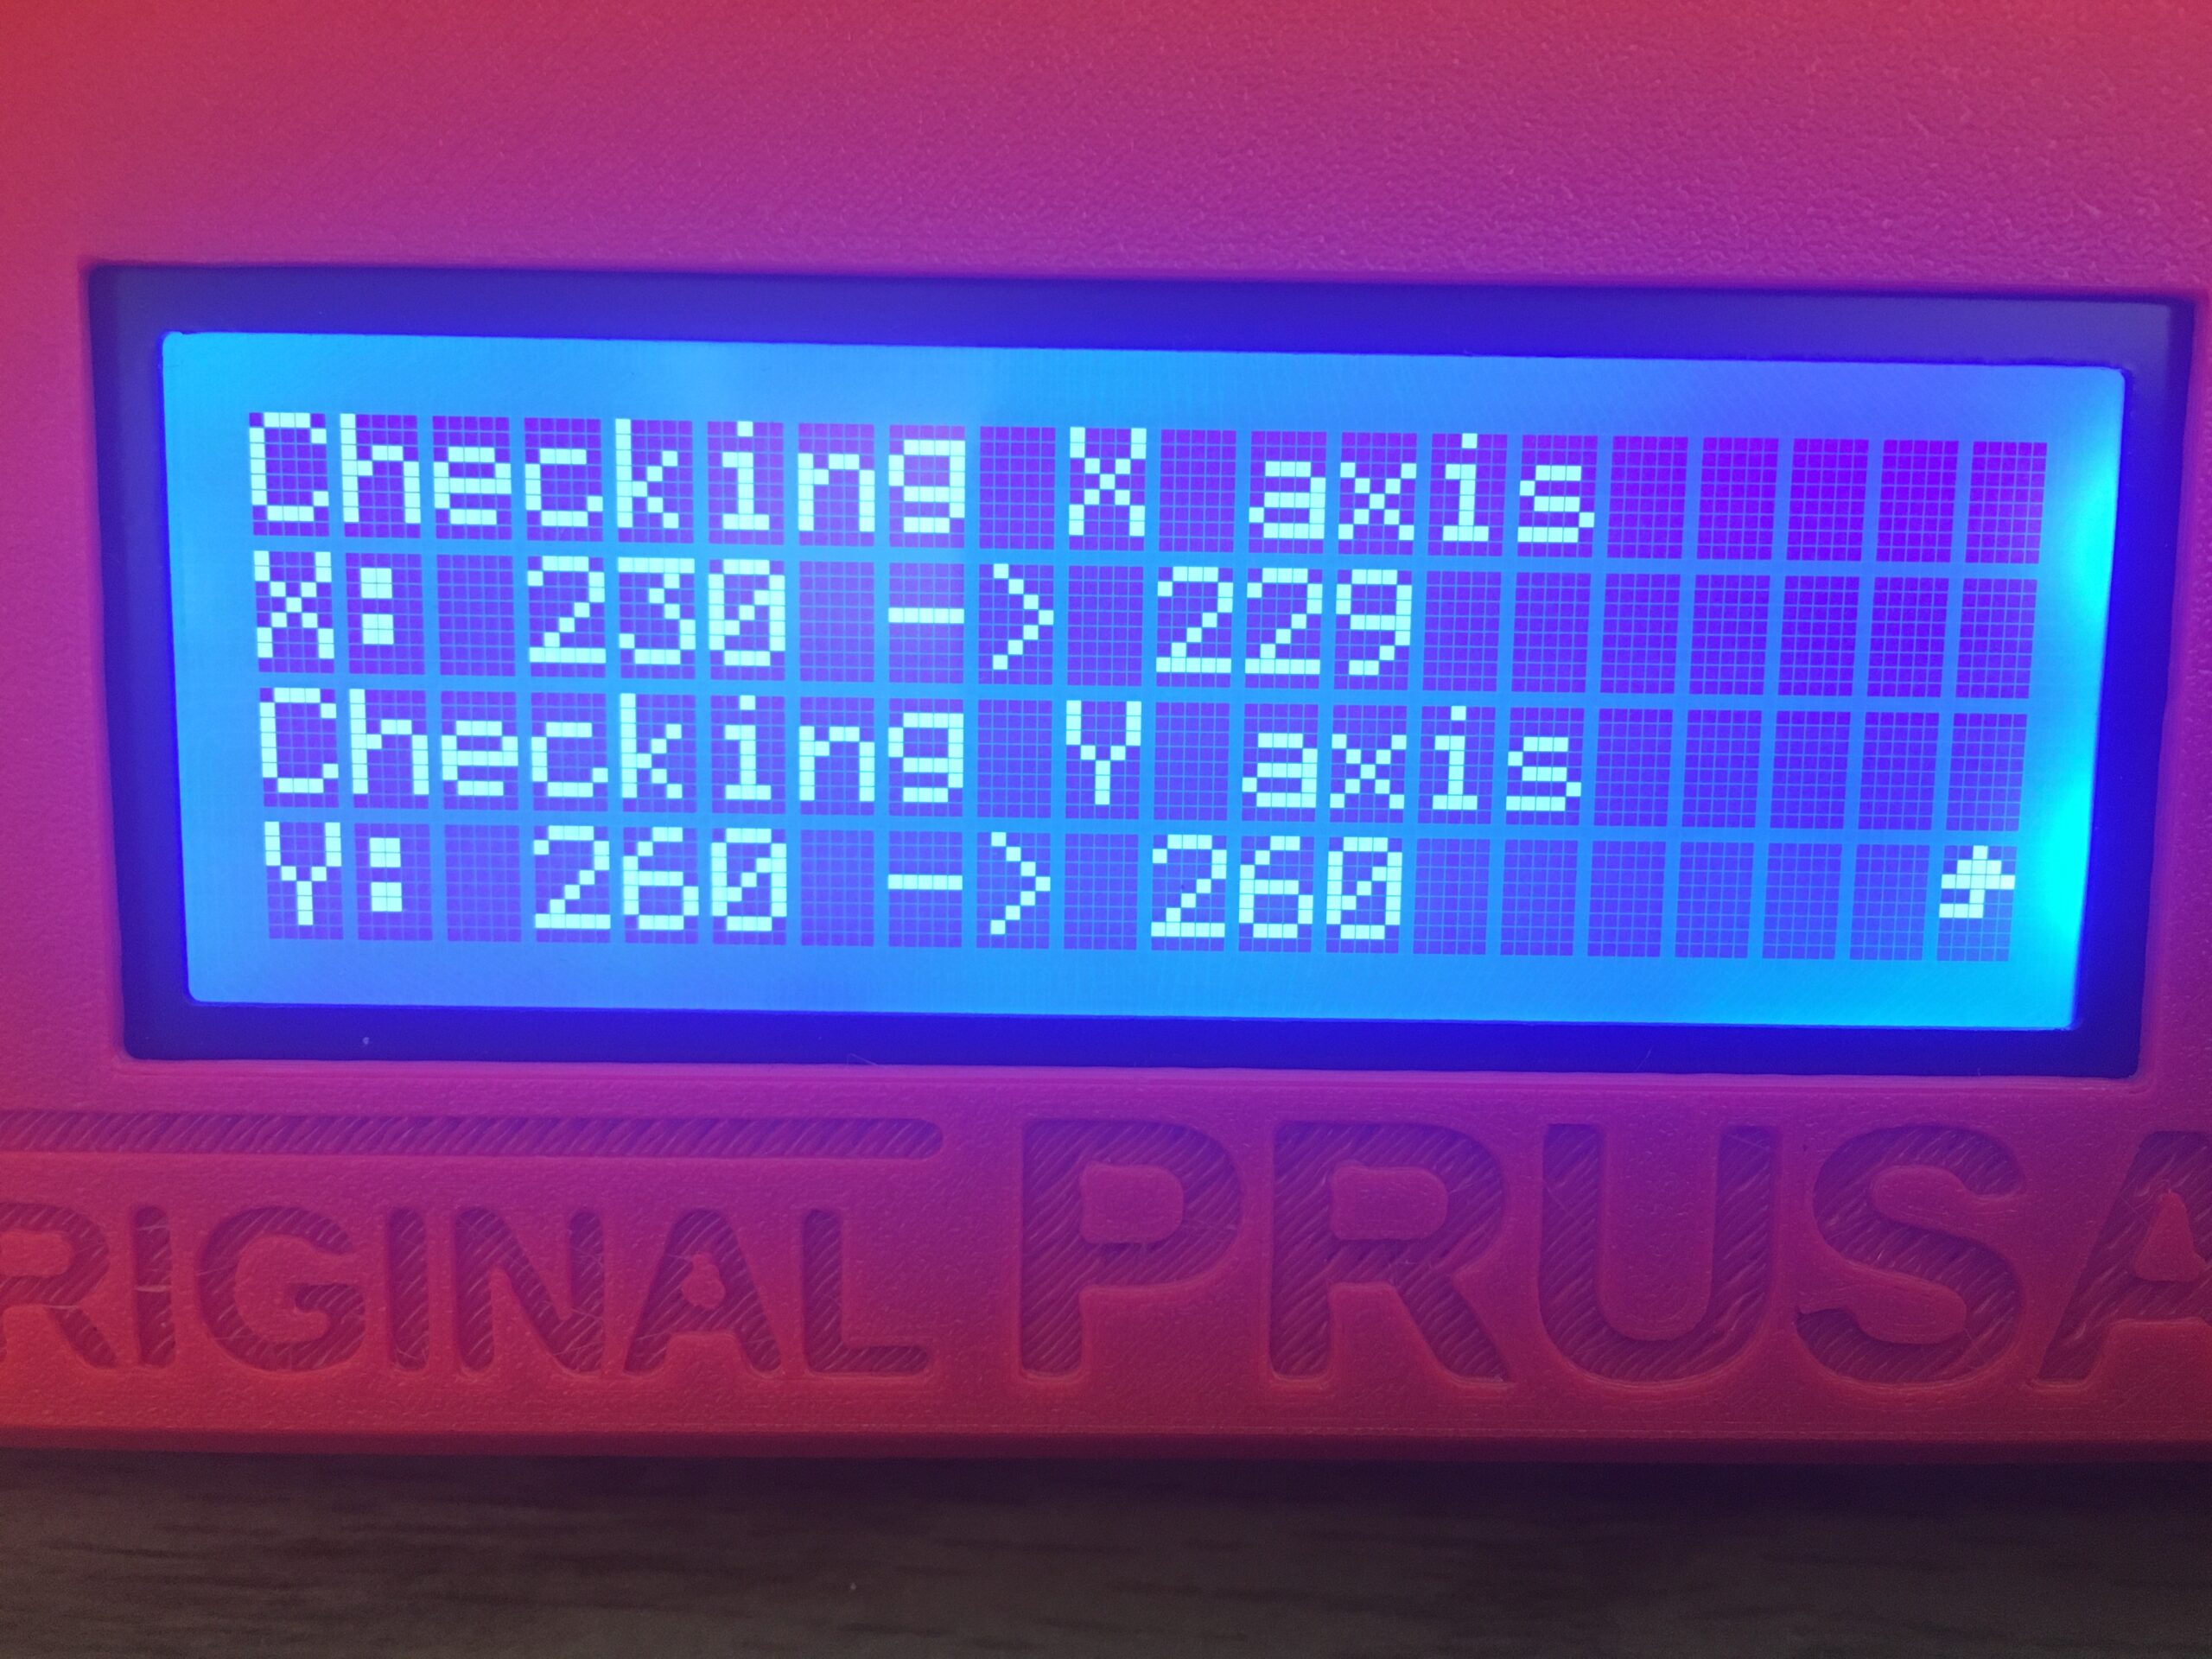
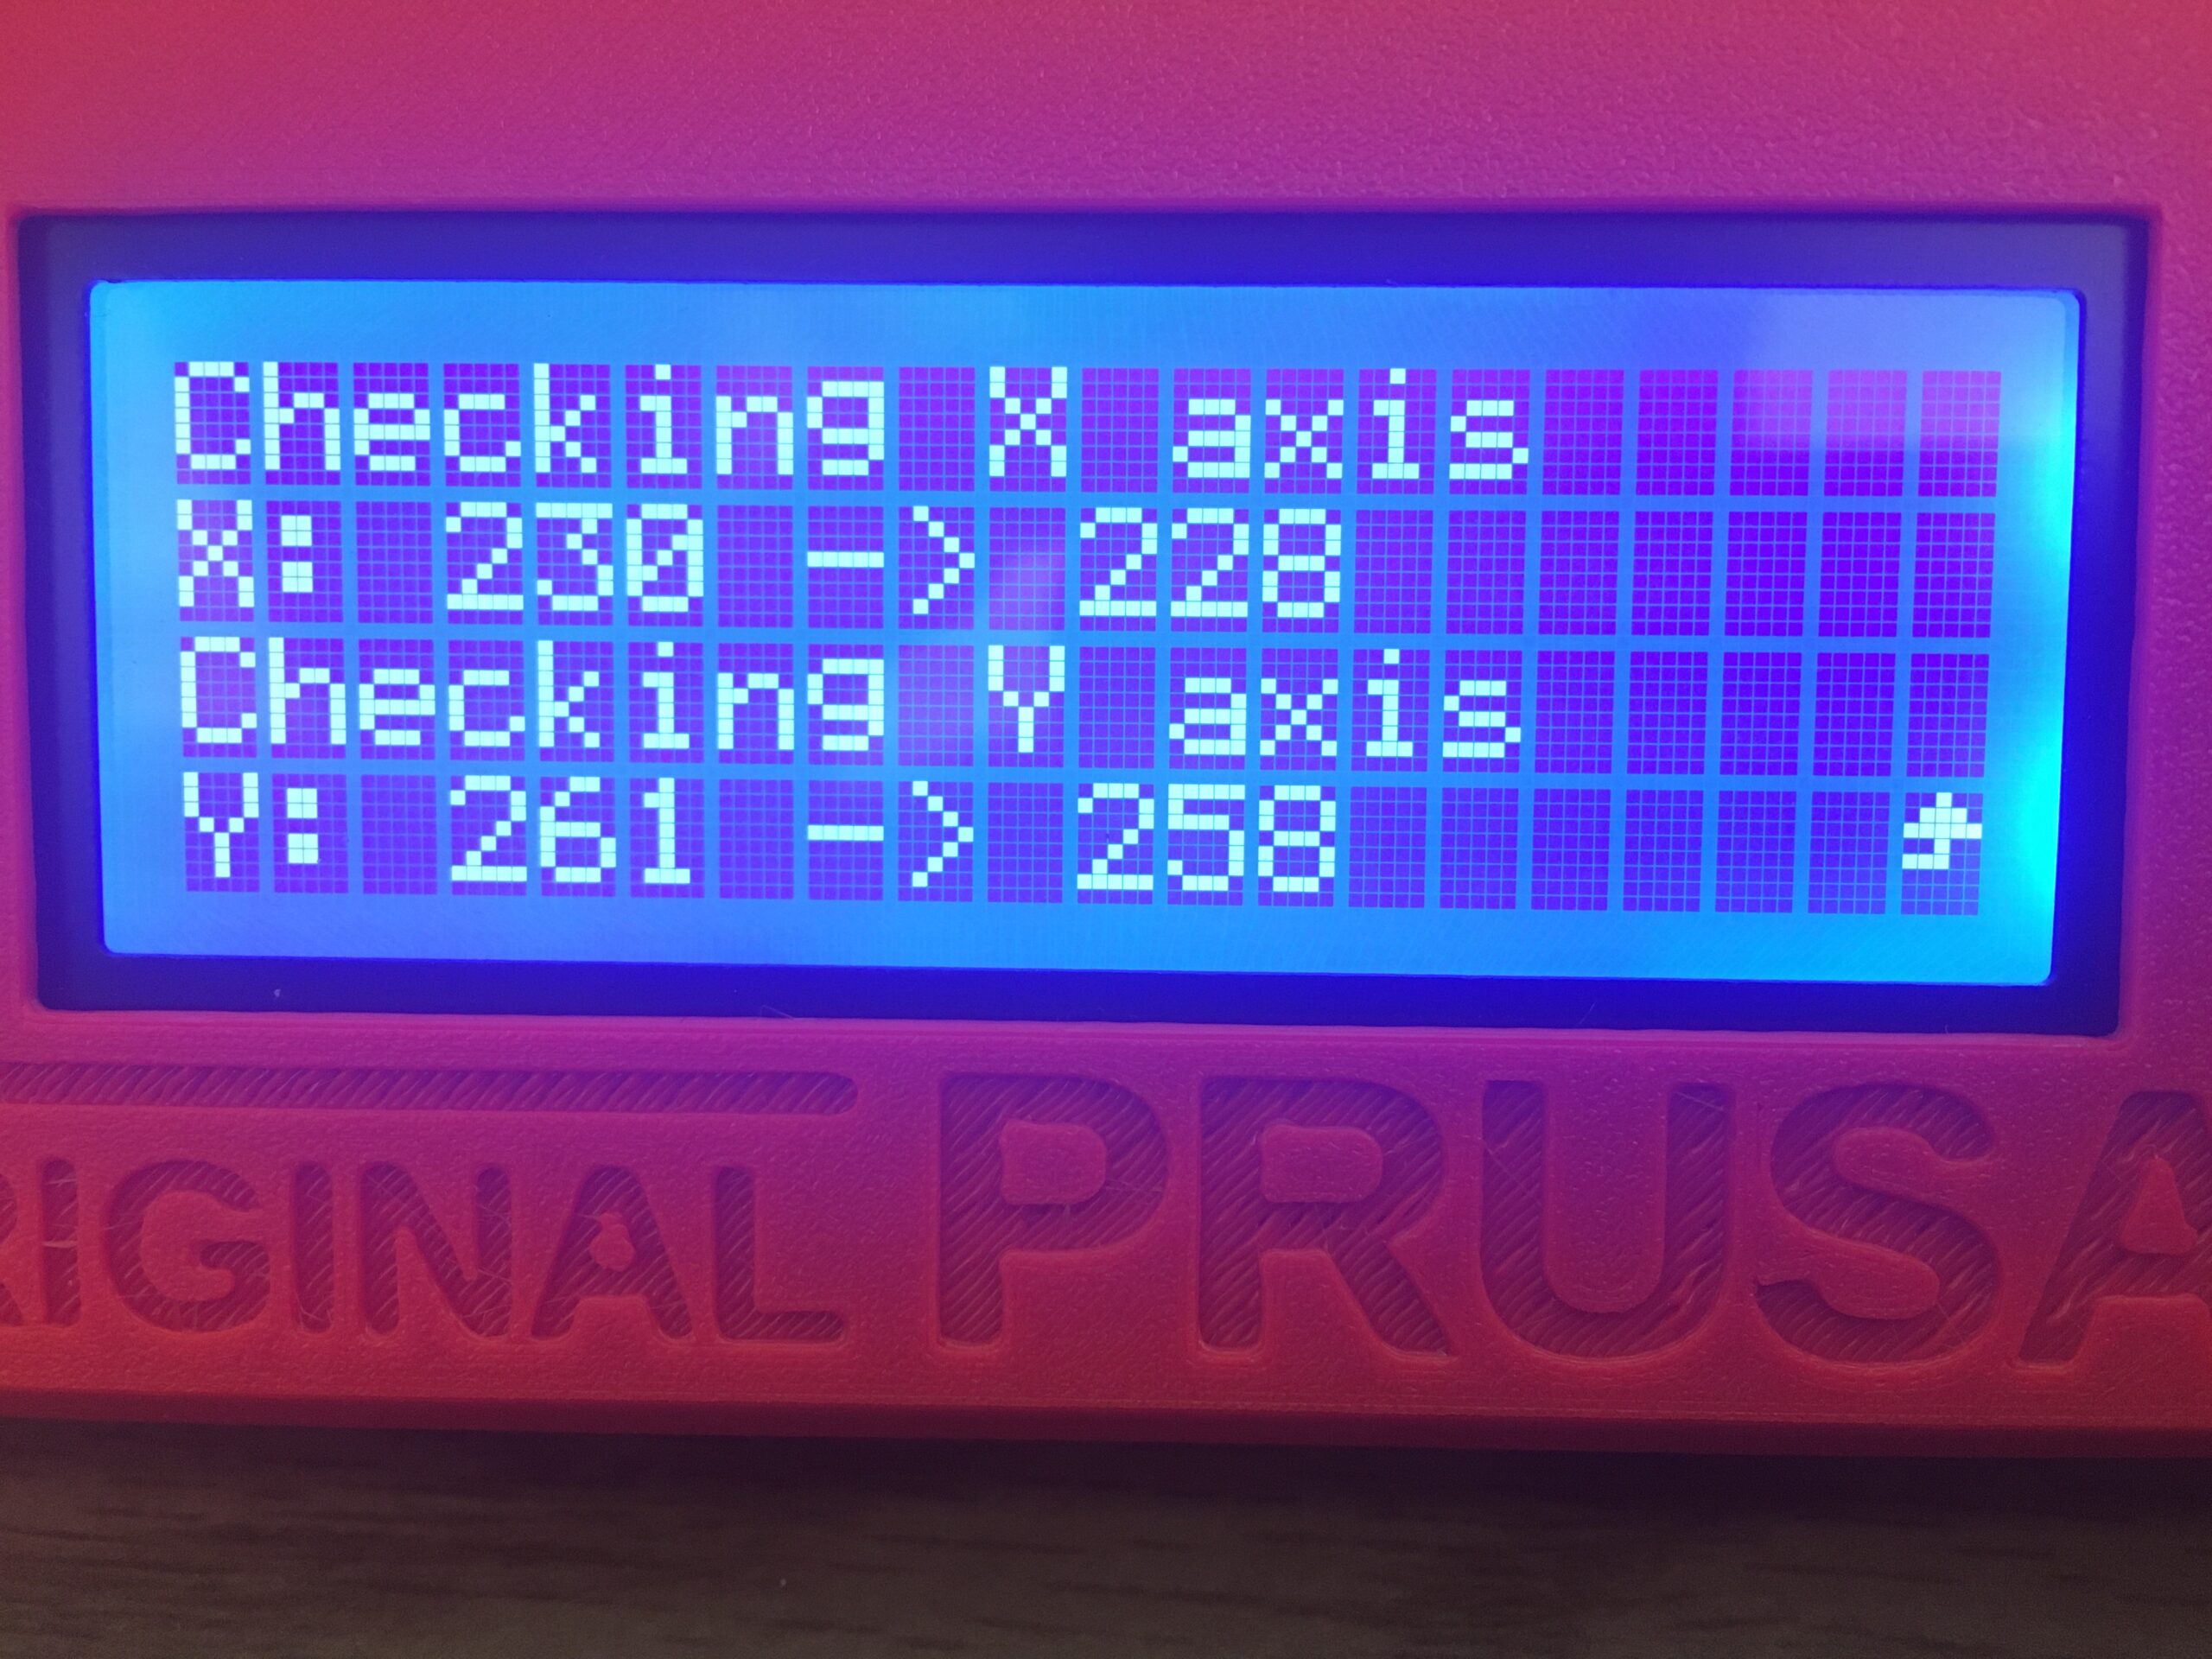
I use 70% isopropyl alcohol pad to wipe down the PEI sheet just before printing. This morning, I did a selftest again and found it ok. I then did a belt test twice, but don't know how to read the results. I'm assuming the left set of X and Y are the ideal tension numbers and the right set is the actual? Or is it high/low tension values? I then did a First Layer Calibration with the result below.
RE:
There are still visible deposits on your build-sheet. Clean the sheet with dishwashing detergent (Dawn/Fairy) and plenty of HOT water, rinse well and dry with a fresh paper towel. Handle by the edges only.
Your first layer Z should be lower, more squish. At the end of the calibration you are aiming to print a single layer *sheet*. It should be possible to peel it off in one and fold it without the threads seperating. If it breaks into lines it is too high, not squished enough. If it is a single sheet but with wavy lines or drag marks on it you are too low.
The belt tension figure is a measure of the resistance felt by the stepper when moving the axis. On a correctly set up machine this does equate, roughly, to belt tension but other things can affect mechanical resistance.
For each axis:
First, with the power off, move the axis by hand; is is smooth? Does the resistance stay the same over the whole range?
Clean and lubricate the smooth rods, check they are not damaged/scratched. Check the idler pulley is not clogged, out of line, or damaged (loosen the belt and try turning it with your fingertip, is it smooth?)
With the belt loose try turning the stepper motor by hand; is it smooth?
Retighten the belt until it just begins to make a low musical note when plucked...
If the printer works, make your next print this:
https://www.prusaprinters.org/prints/46639-tension-meter-for-the-gt2-belts-of-i3-mk3s-or-prus
It MUST be printed in Prusament PETG or the spring tension will be wrong.
Let us know how you get on.
Cheerio,
RE: Unable to print the Prusa logo plate cleanly
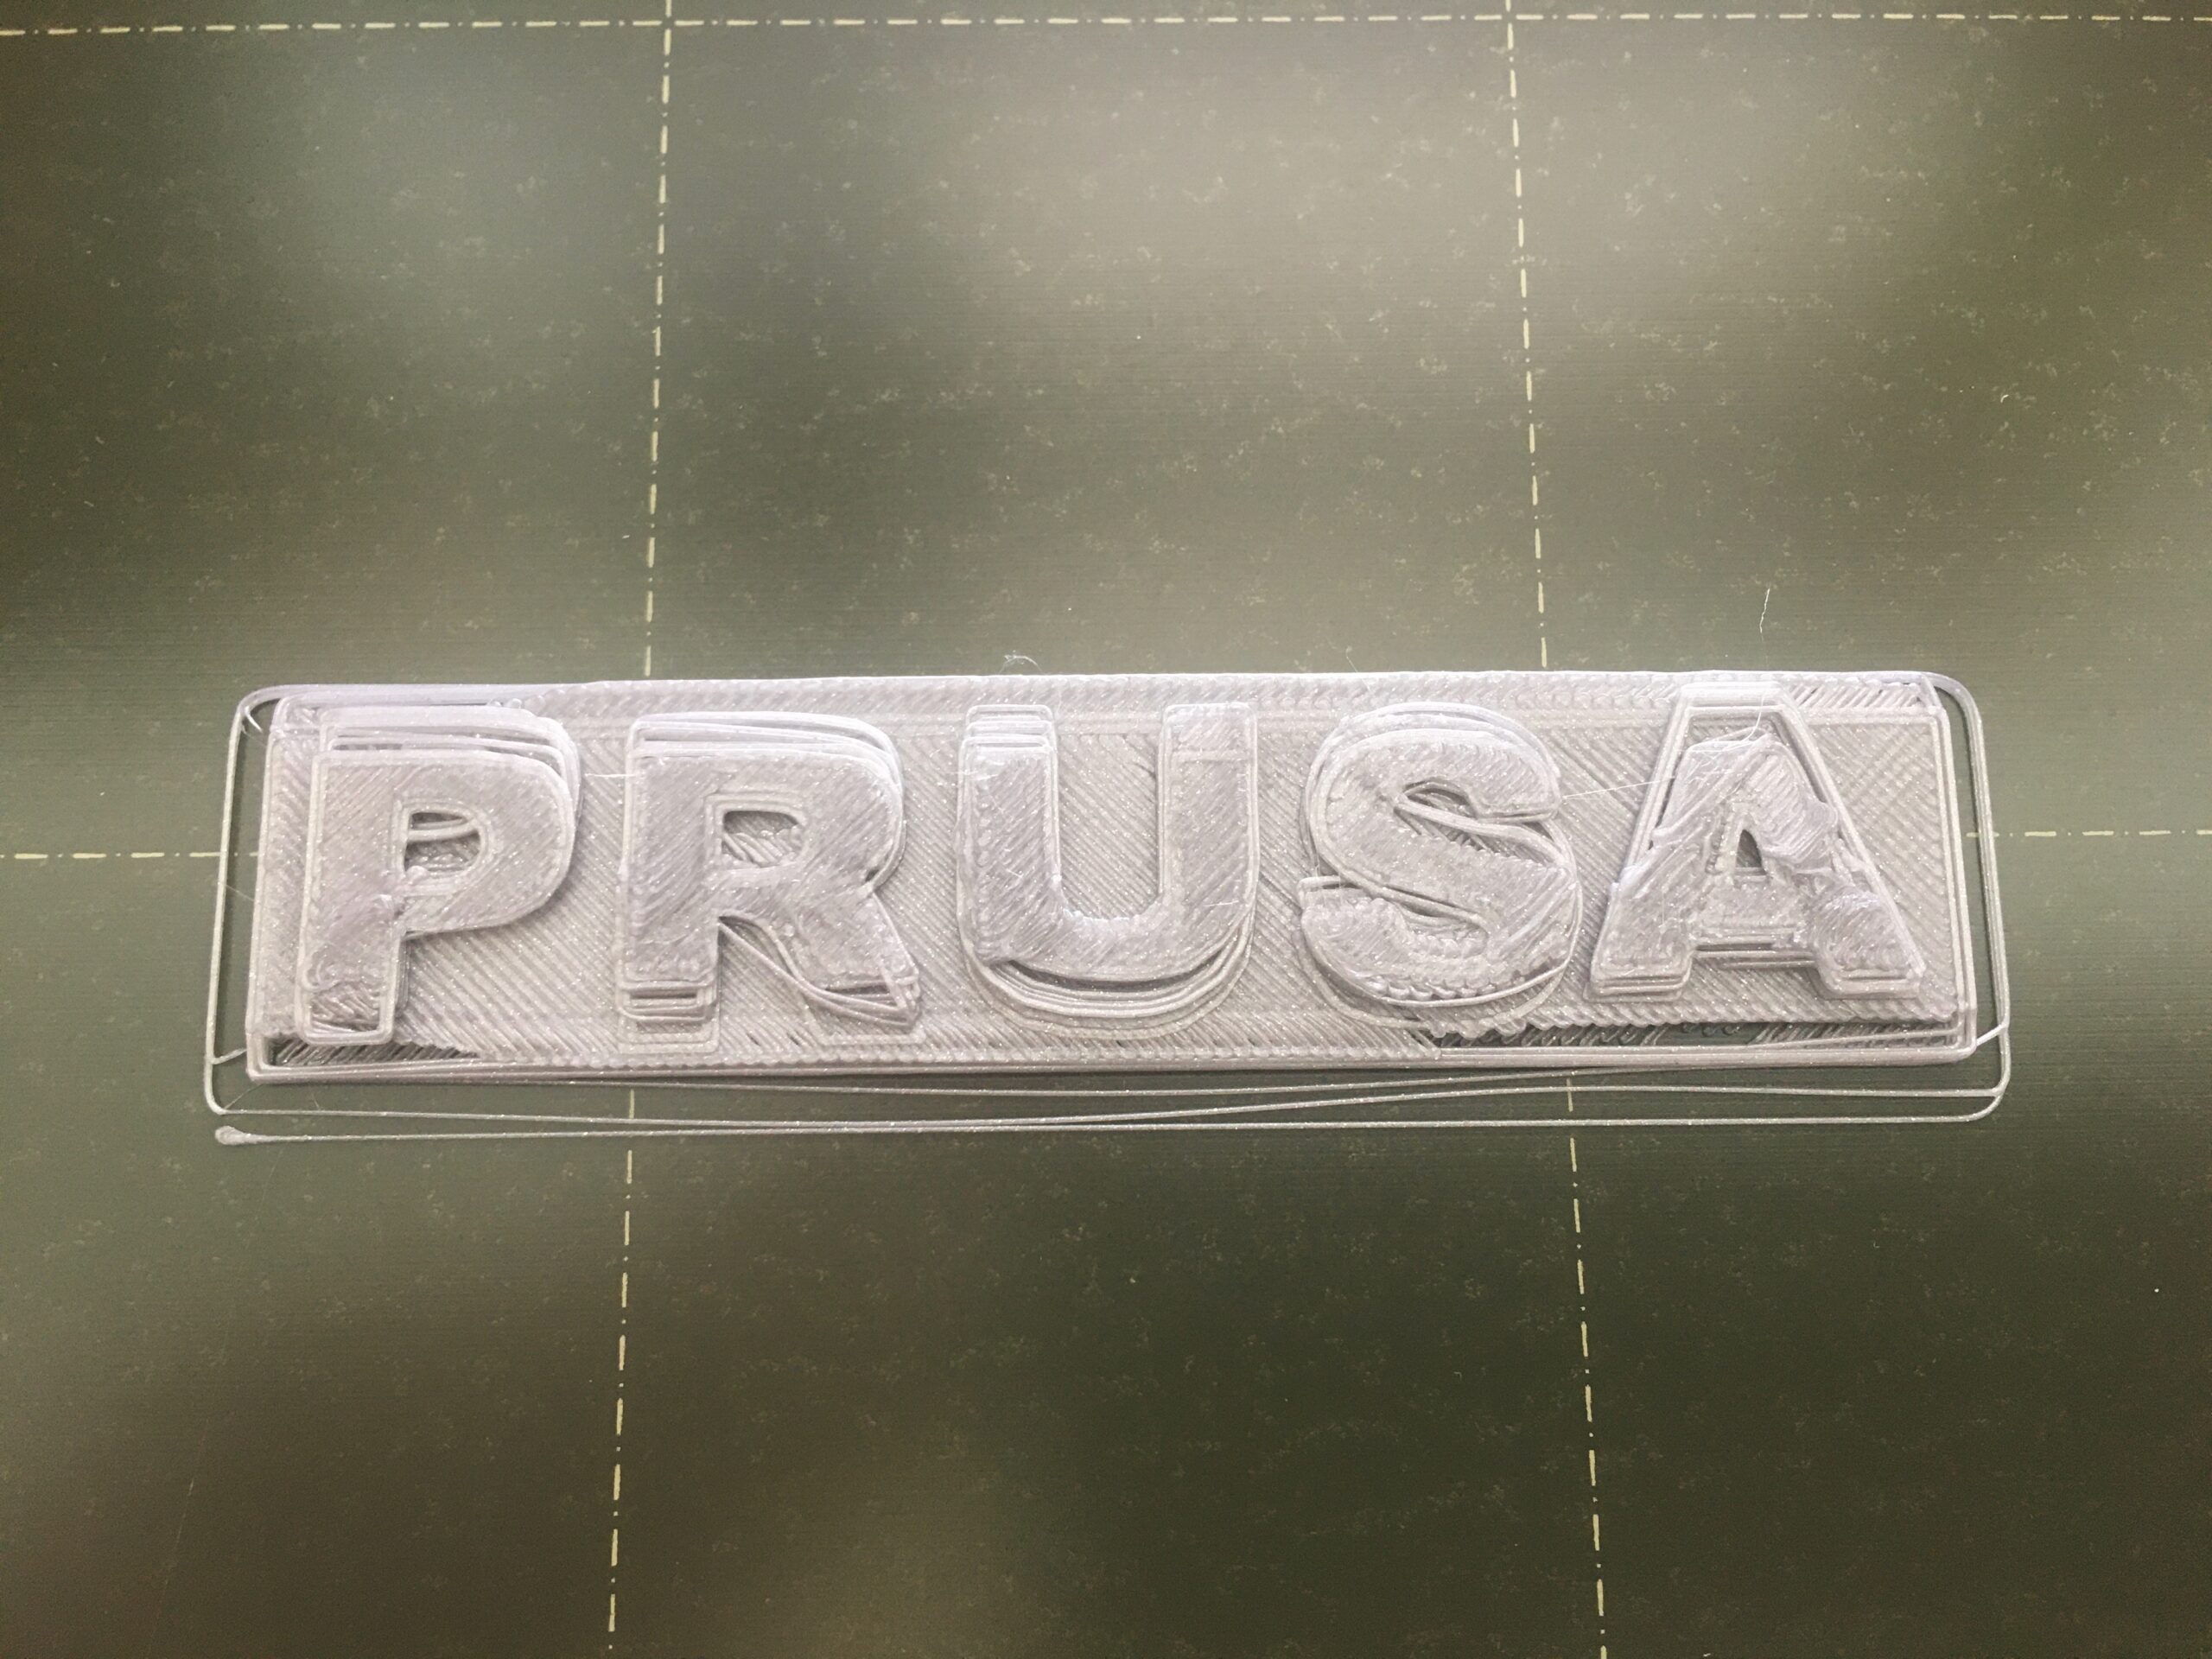
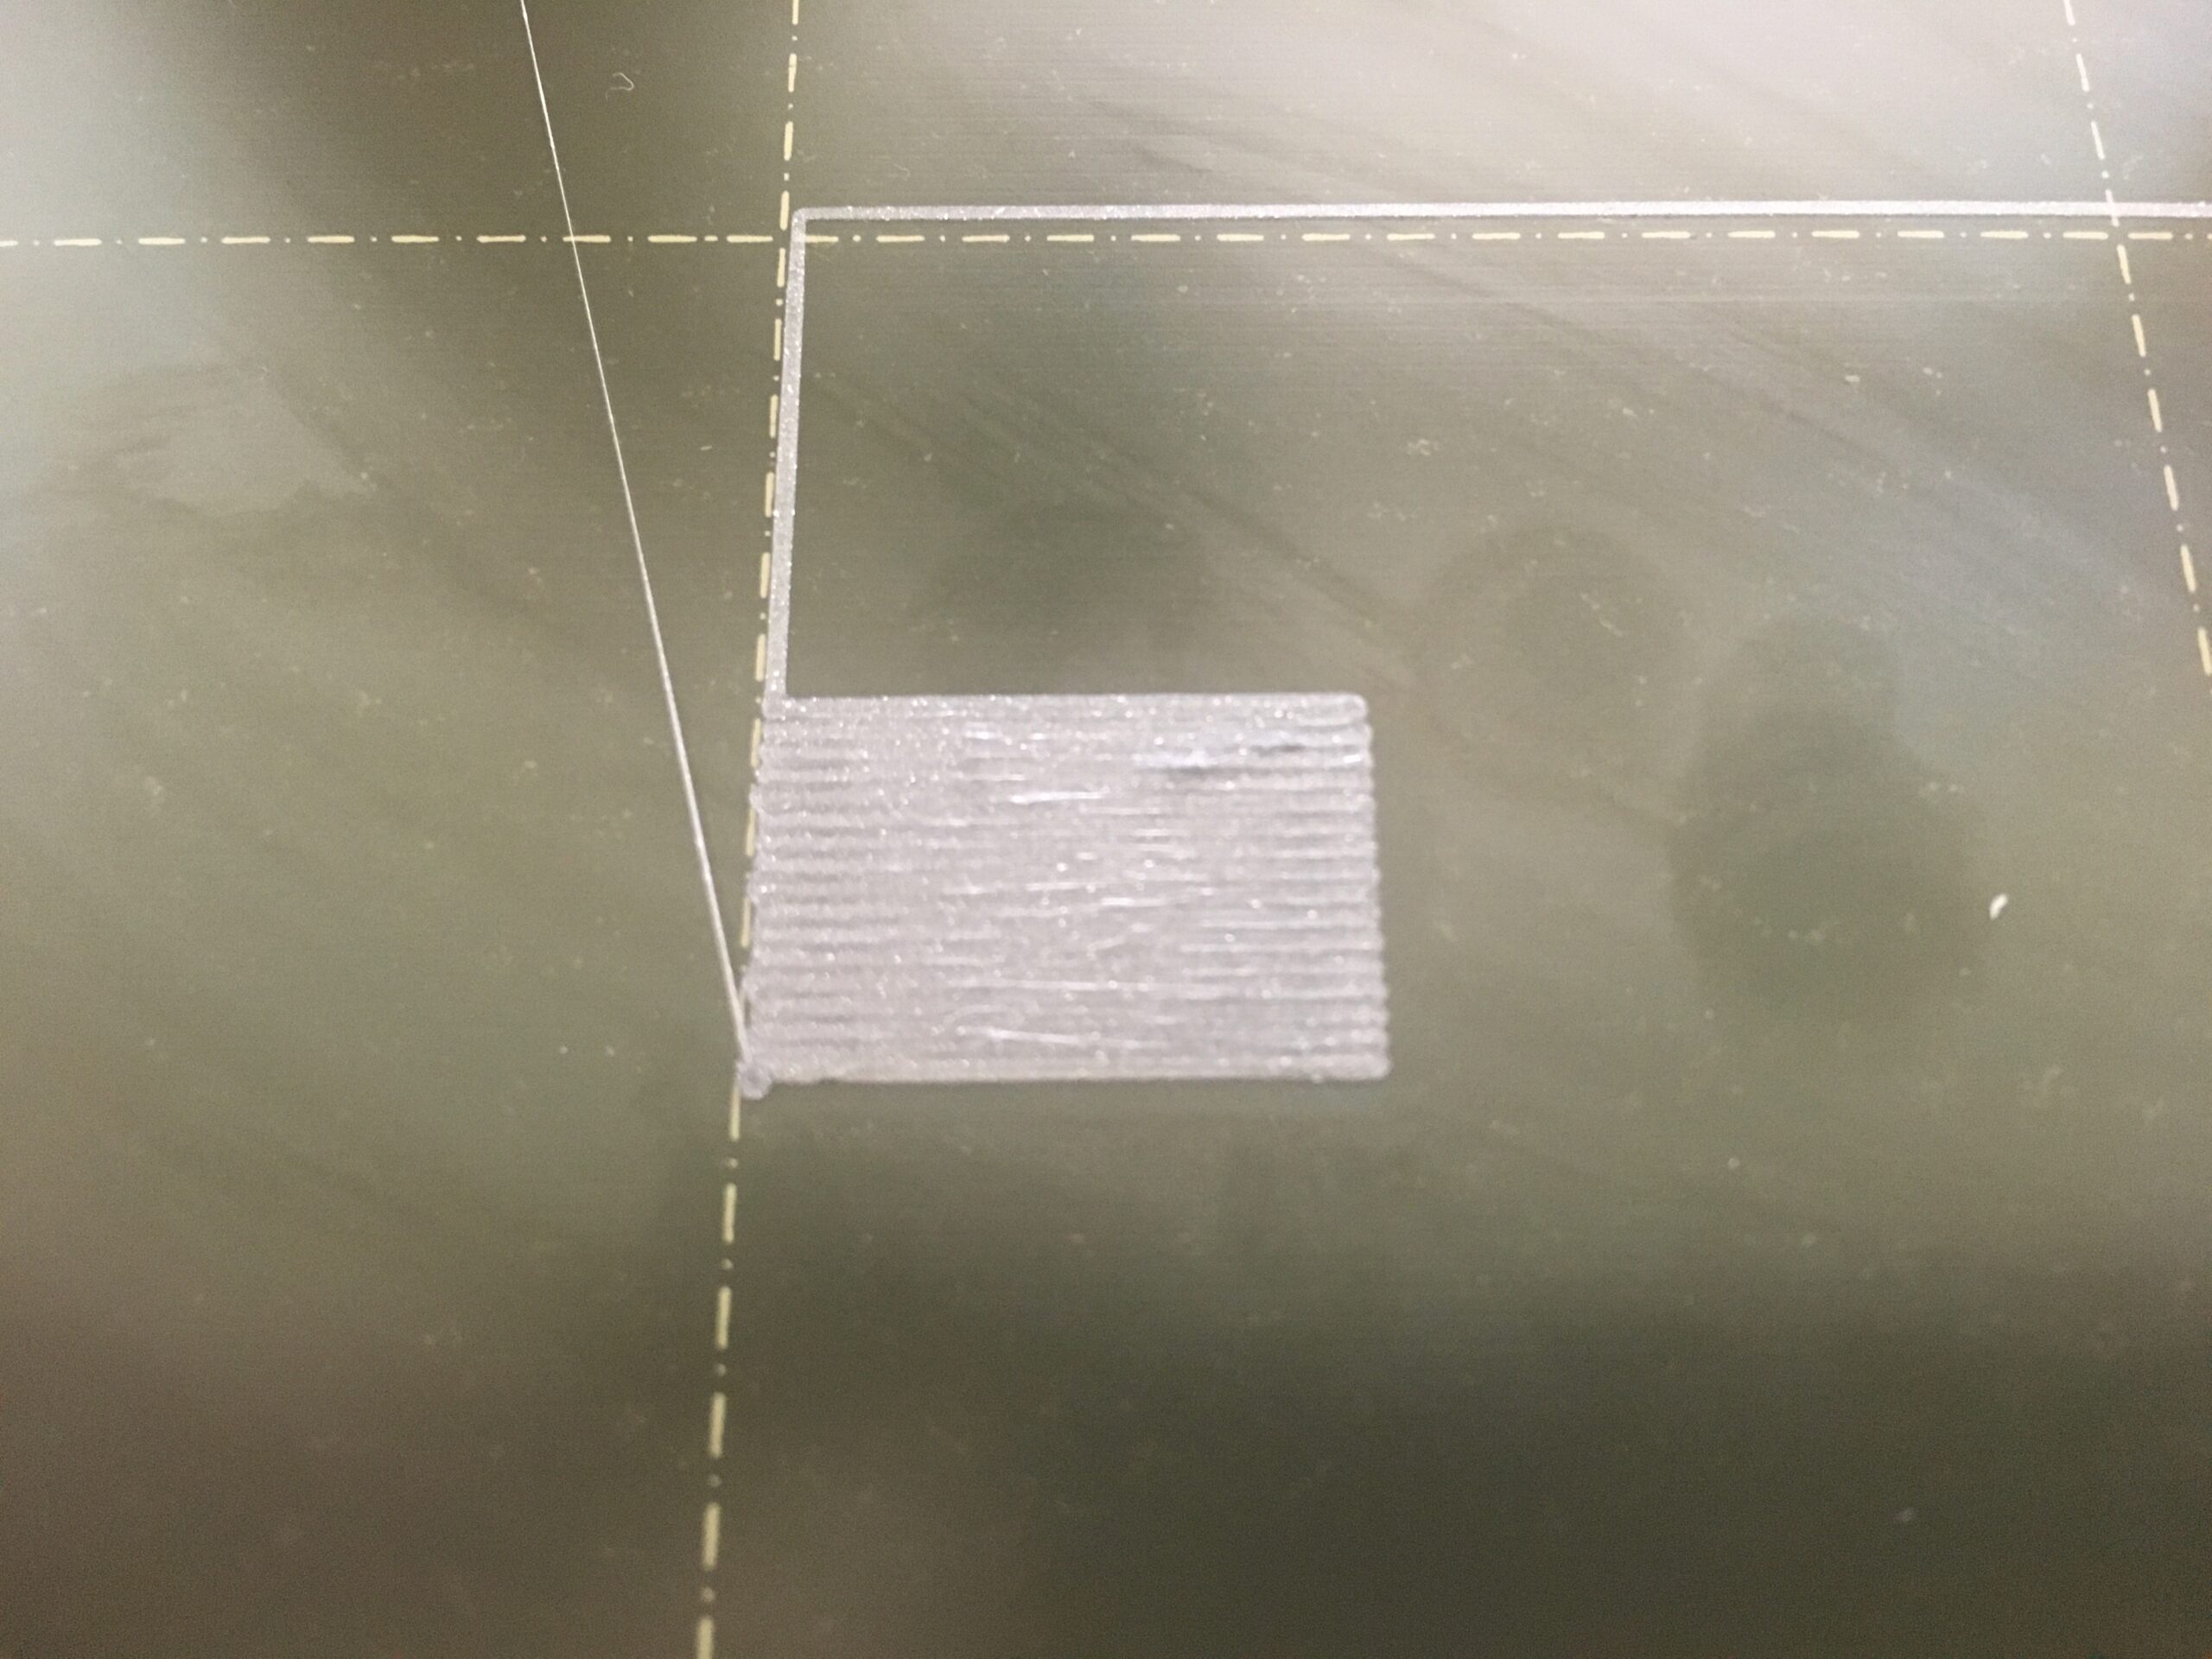
Thank you for your comments though I'm still having trouble creating a clean print. Using the figure to estimate the best first layer calibration ( https://help.prusa3d.com/article/first-layer-calibration-i3_112364), I was able to adjust the Z to get as close as I can to what the the photo showed as "just right" on a smooth sheet. Although it's not as clean as the photo on the web, the first layer seems to be much cleaner than previously. The logo plate adhered to the build sheet very well and the layers of the flat part of the logo look consistent. However, when the printer tries to print the raised lettering, it seems to suddenly go askew. Is it because it's too far from the heated build plate so it doesn't adhere to the PLA well?
I will purchase Dawn dishwashing detergent over the weekend but after the first layer is put down, adherence to the build plate should no longer be an issue. Unfortunately, I need the printer to work to build the tension meter, a classic chicken-or-egg first conundrum. Prusa should include one in every kit they sell as it seems very handy. Plus I'll need to order PETG as I only have the PLA that came with the kit.
RE: Unable to print the Prusa logo plate cleanly
Adhesion is always an issue. If your print warps or separates from the build plate on any layer above the first one, you have a problem.
It almost looks like your z height is too negative based on the calibration flag, but it’s hard (for me) to say conclusively.
It’s obvious that your build plate is very dirty which will cause you no end of problems. You need to give that sheet a good cleaning to get good prints.
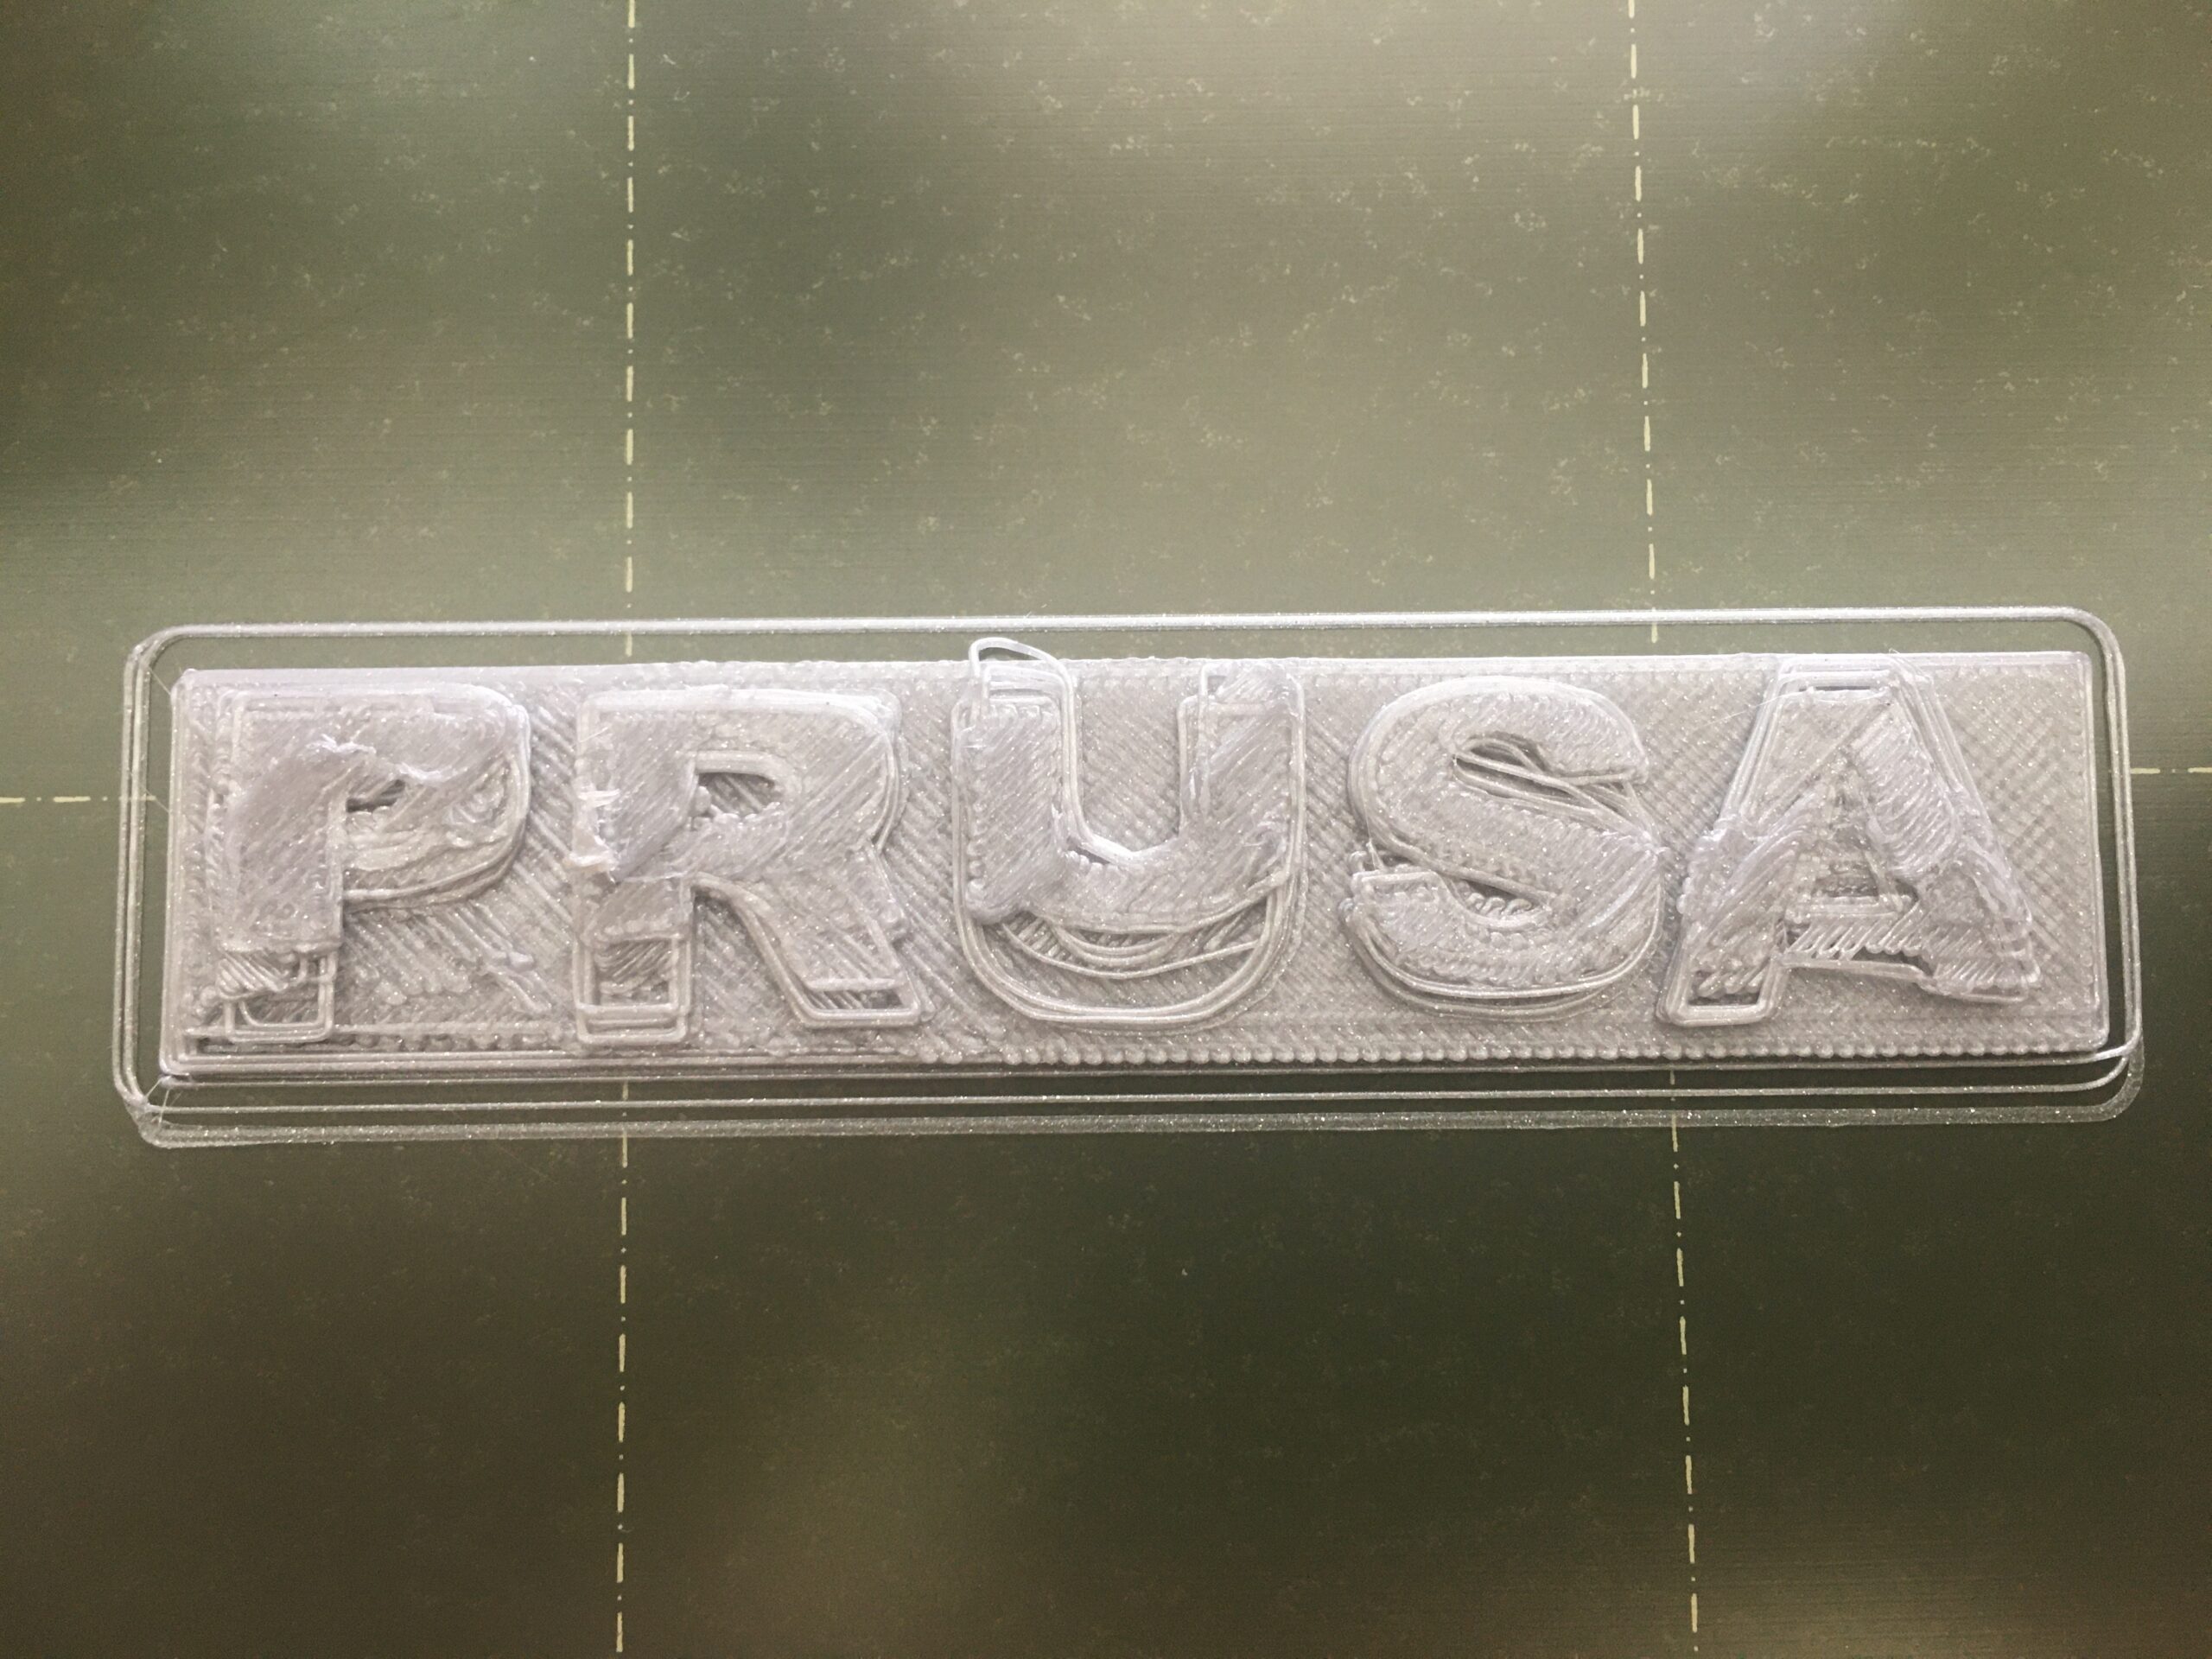
The print of the logo you posted almost looks like it was knocked loose from the bed at some point in the print and the layers that continued to print are ‘all over the place’ as a result. That or your belt tensions are way off or a grub screw is loose on one of your motor shafts causing significant shifting.
I would suggest you download and print the calibration squares from the ‘lift adjust z - my way’ thread by user @jeffjordan which can be found here:
Printing the calibration square will allow you to see more clearly if your z height is correct or if it needs further adjustments.
Have patience! You’ll get there!
The first layer Z calibration looks to be on the low side of OK but the build plate is so dirty that the edge adhesion is failing ...
I suspect you have issues with your Y axis, the two most likely causes are loose or wrongly placed grub screws in the drive pulley (double check with build manual) or a too loose belt.
Cheerio,
RE: Unable to print the Prusa logo plate cleanly
You might have something wrong with your x-axis. I don't recall where I read it but when you do the belt test the numbers should be over 255 and closer to 270-275 if possible.
When I built mine I had a low number on the y-axis due to the belt rubbing on the motor pulley and centering the belt on the pulley fixed it.
RE: Unable to print the Prusa logo plate cleanly
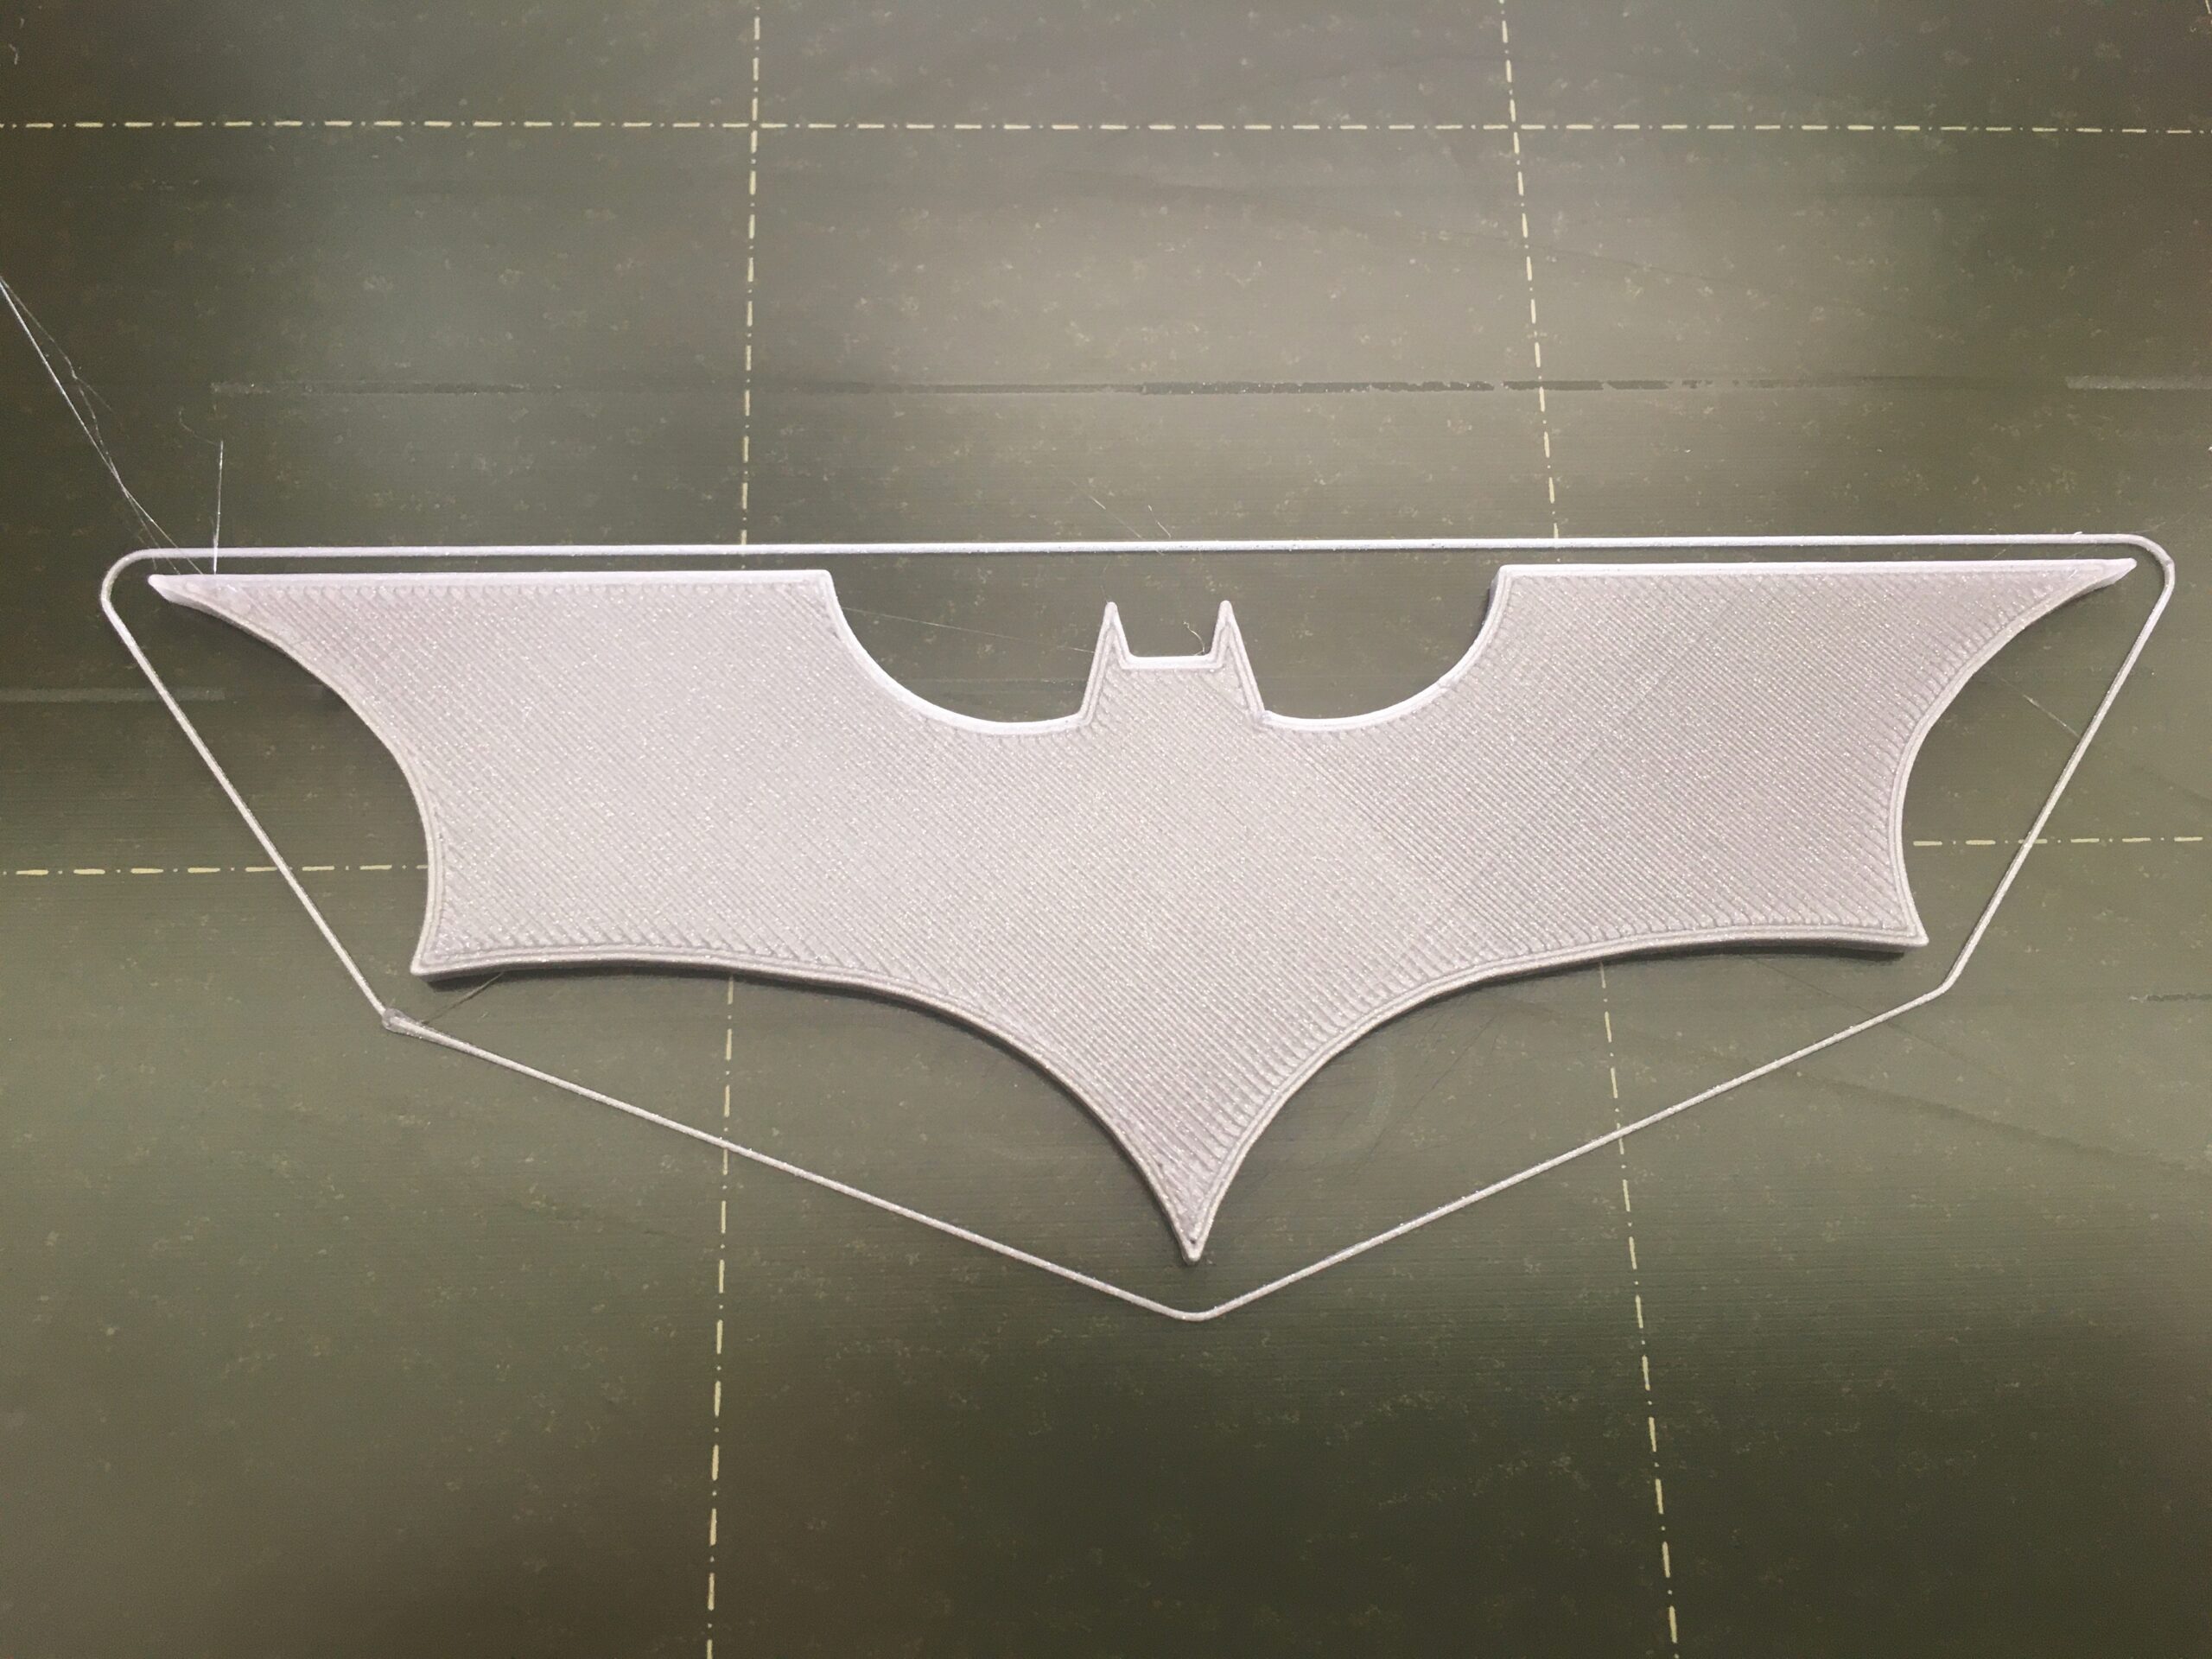
Success! Thank you all for your helpful comments. Here's my journey: I got tired of printing the Prusa logo plate and decided to try printing the Batman logo as it seemed to be simpler. However, I aborted the print after a few lines because I could see that there was alignment problems.

I figured it wasn't a problem with adhesion as when it came time to remove the build, it was fully adhering to the plate (and sometimes difficult to remove it like the first layer calibration). I checked the belts and they were still tight (I want to very much print out the tension meter) as I could thrum a note with my finger across it. However, I noticed that the Y belt pulley was right up against the Y motor, which when I put together the kit, I didn't place it that way. It must have loosened over time as I continued to test print. This time I made sure that the pulley had a gap from the motor and tightened hard on the two screws. I did a Calibrate XYZ and then a First Layer Calibration.
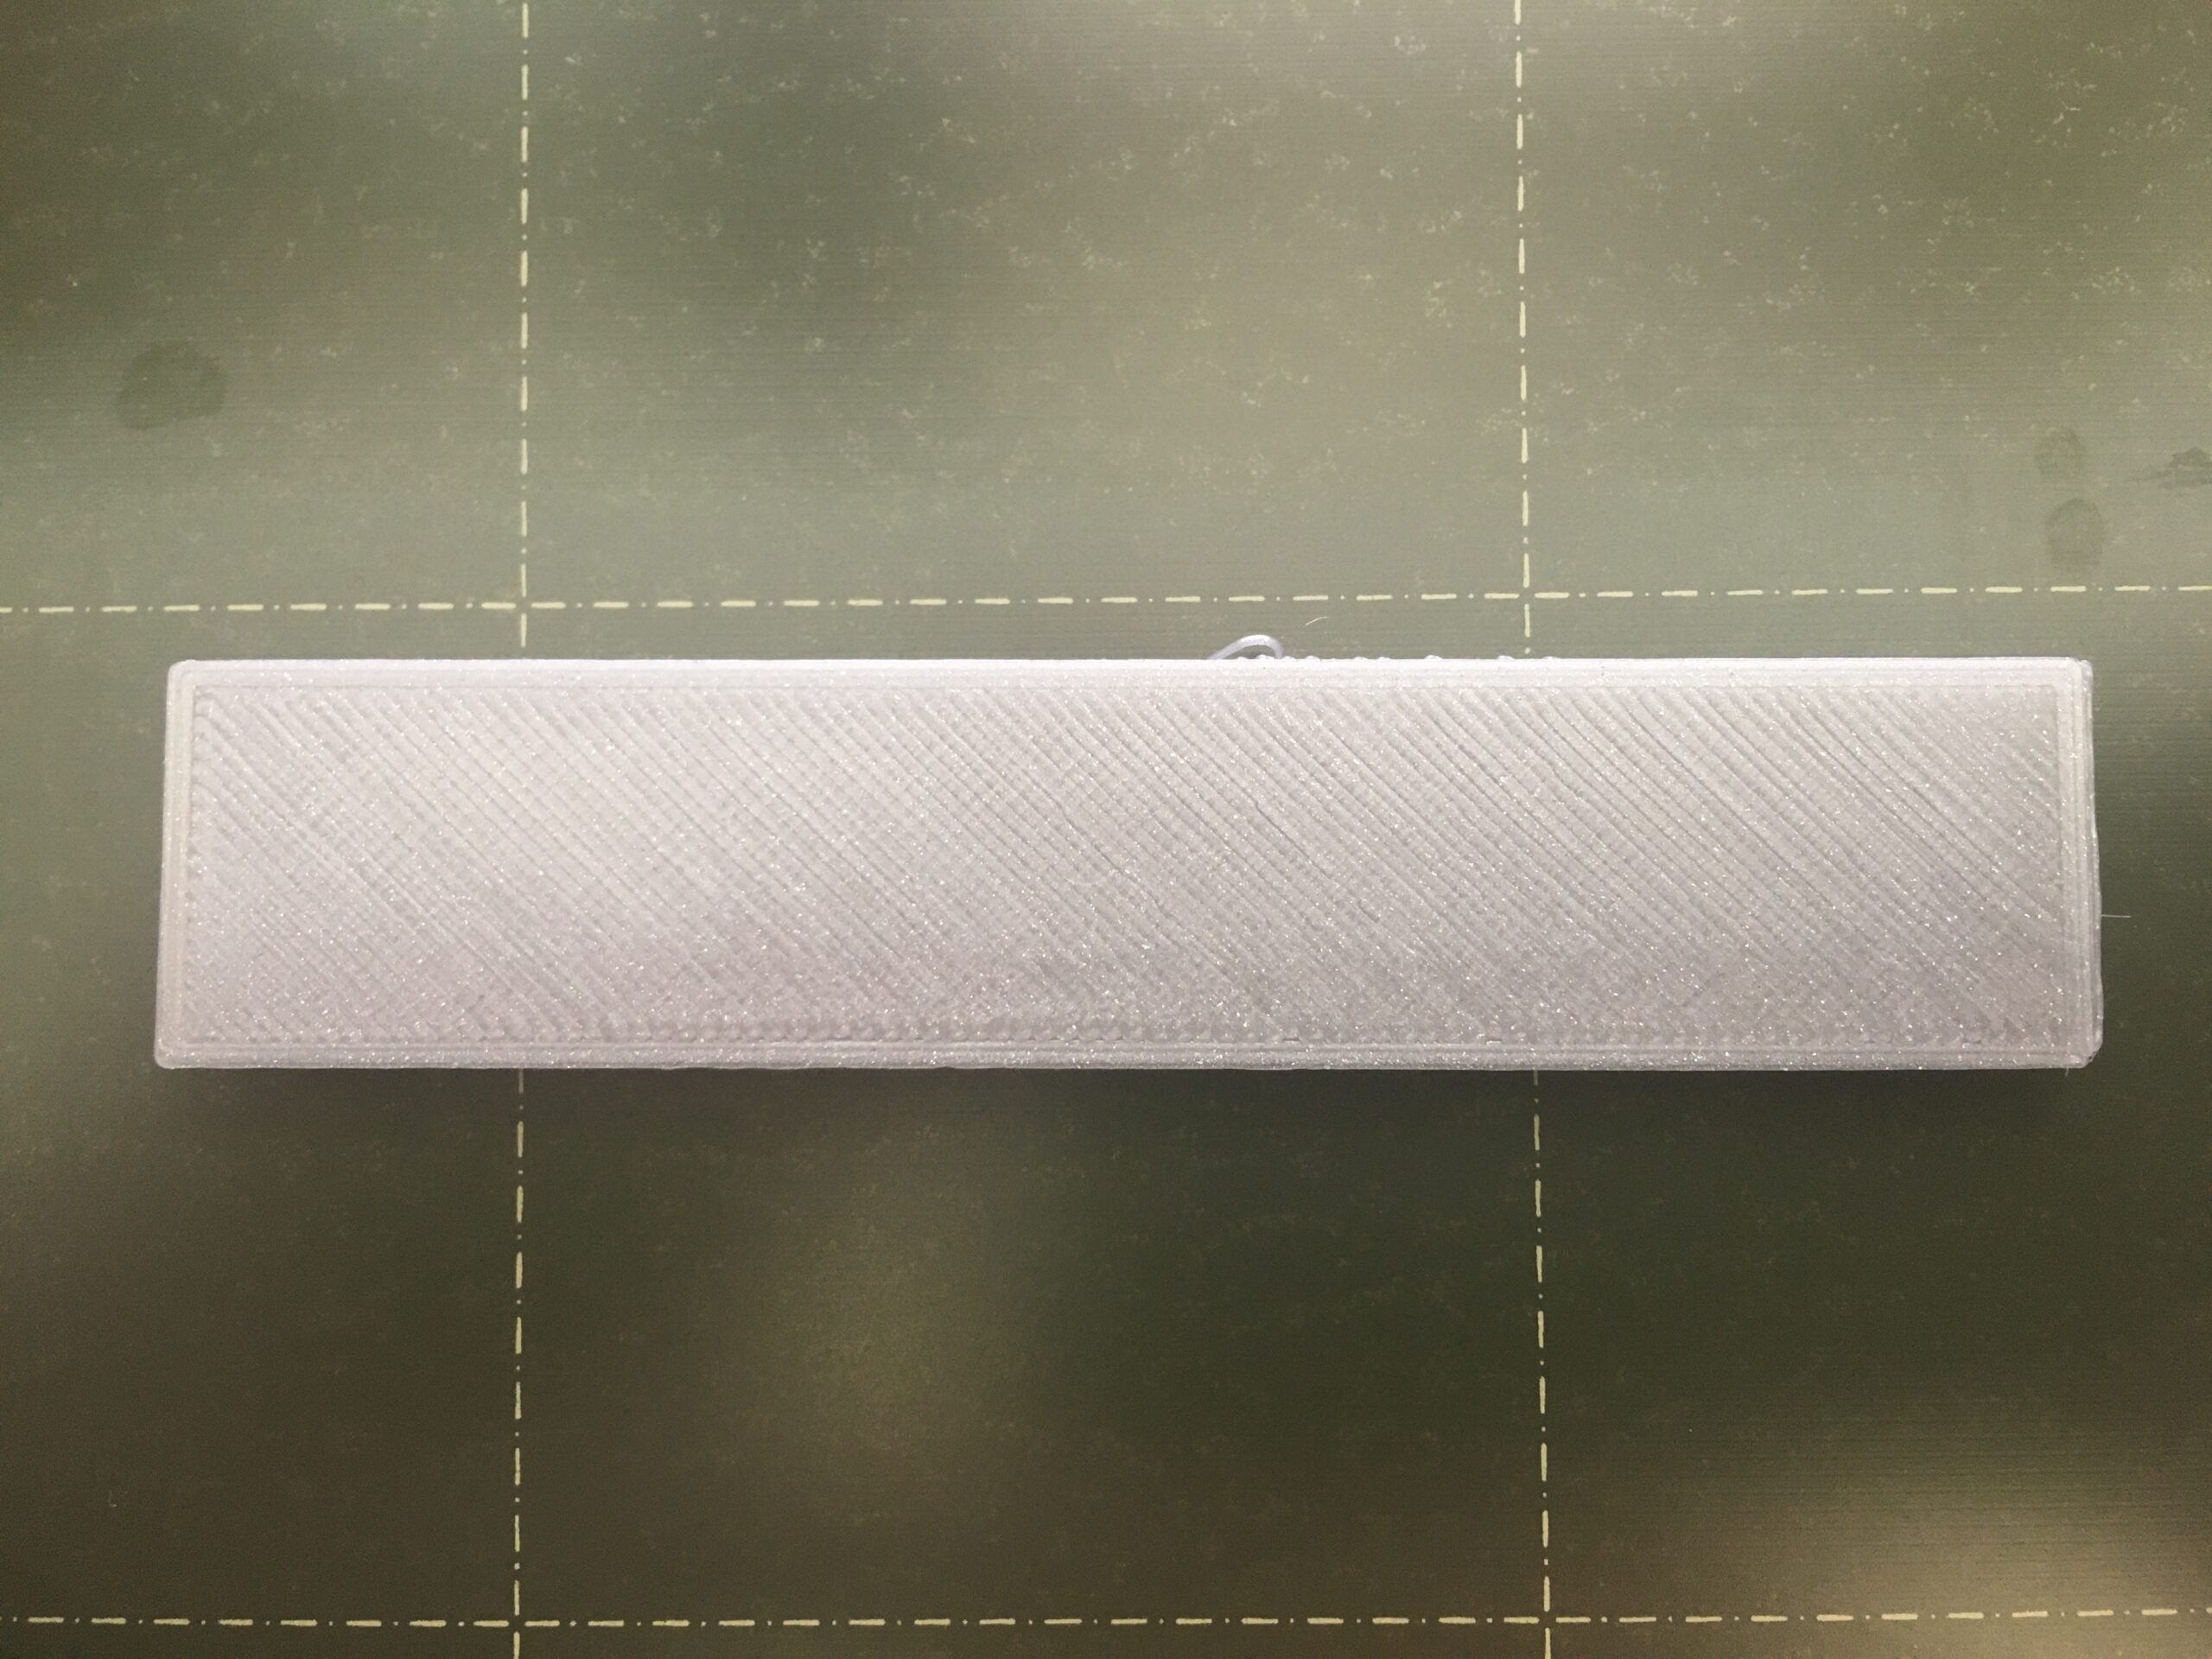
I then printed the Batman logo which was perfect!
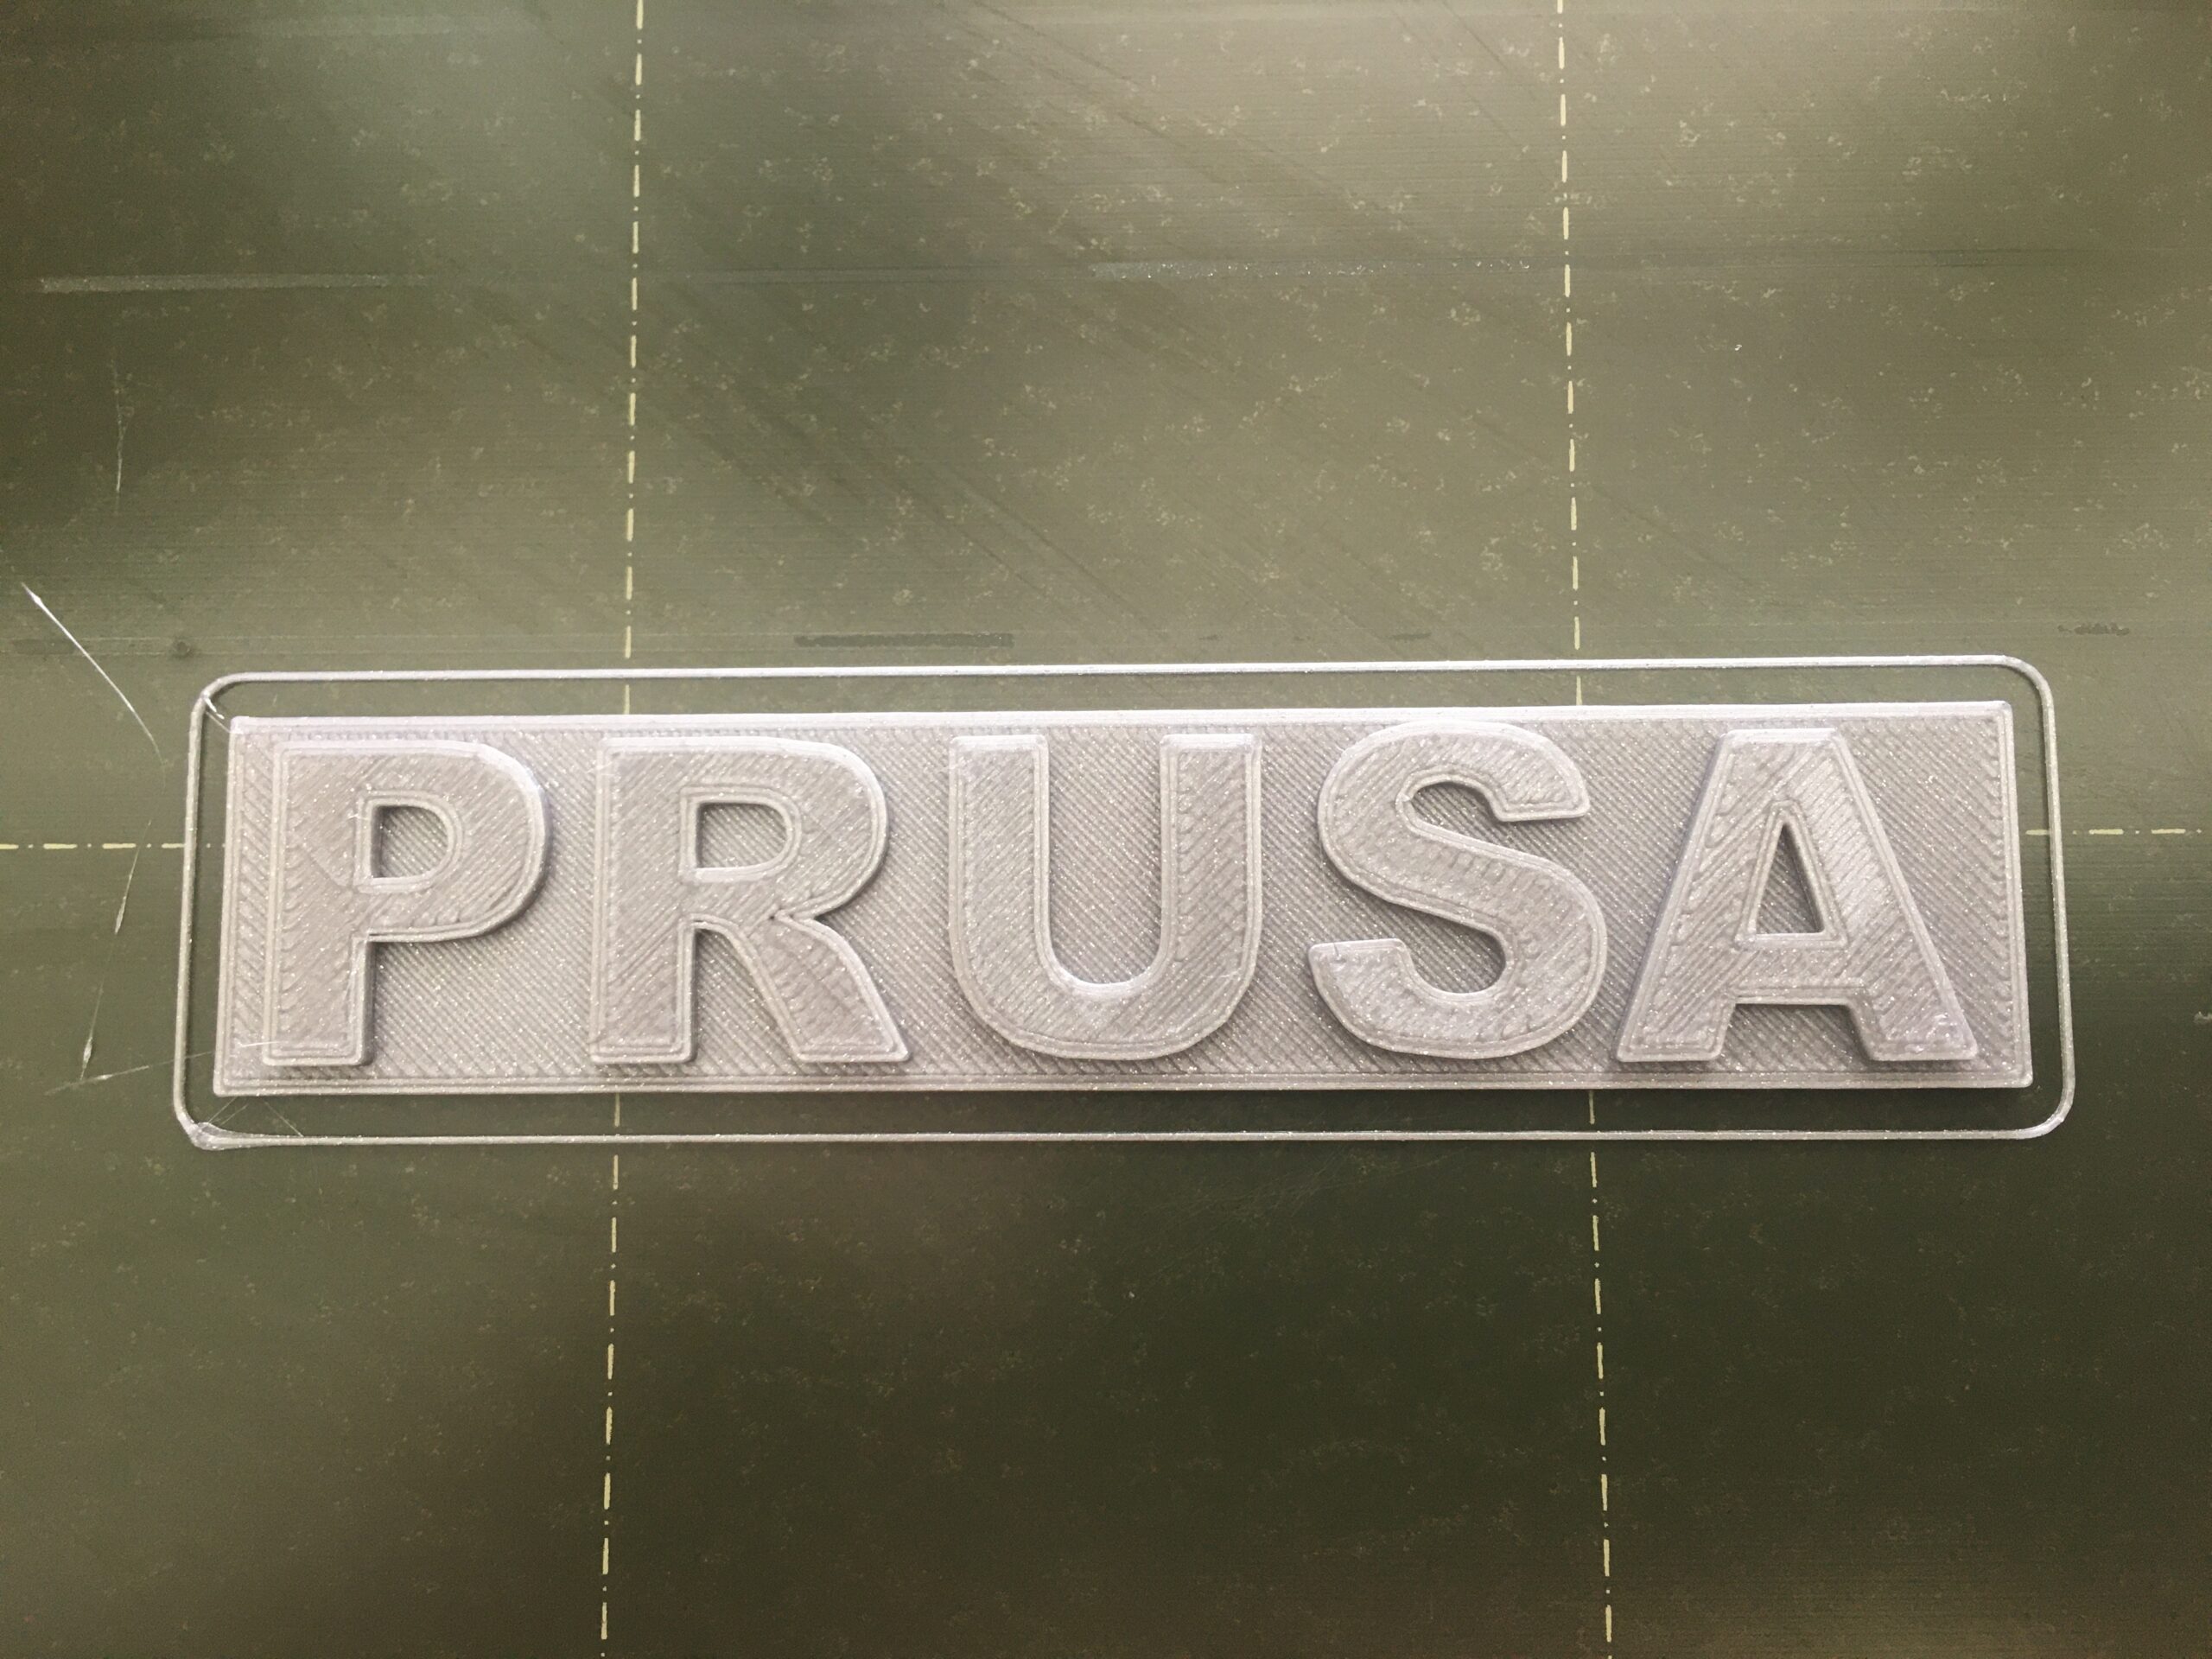
Printing the Prusa Logo was perfect too!
Now the only gripe I have is that after doing a Calibrate XYZ, when I do the First Layer Calibration, the nozzle is so high that I have to crank the Z down to -1.800 just to get a good print. I'm not sure why that is. I tried moving the SuperPINDA Sensor as low as I can without being even with the nozzle. I used the Live Z to bring the nozzle to be in contact with the bed then loosen the screw for the sensor and dropped it down to the bed and raised it ever so slightly up before locking it in place, but after doing the Calibrate XYZ, the default is so high off the bed. Also, sometimes when I turn off the machine and come to it the next day, I have to redo the First Layer Calibration as the line coming out may be too squished and I need to realign the first layer.
Thank you all! You guys are great!
RE:
Great to see you making such progress! It is indeed a learning curve.
It may seem counterintuitive but, you need to raise the super pinda not lower it to get your z offset calibration adjusted correctly. You movie the pinda up to move the nozzle down, (increased offset) closer to the print bed. As long as you don’t get too far away and then you run the risk of your nozzle making contact with the bed.
When your z offset is adjusted beyond -1.8, it becomes very unreliable. I’ve read where some folks say it’s unreliable beyond -1.1 but that hasn’t been my experience. My machine runs anywhere from -1.585 to -1.6 and change depending on which sheet and material I’m using. I will run a quick Jeff Jordan calibration square now and then just to insure I’m dialed in properly. But your machine will have totally different numbers from mine or anyone else’s.
Go back to the pre-flight and start over by setting the super pinda height with the zip tie. Do the XYZ calibration and start from scratch with a sheet of paper to see if you can get into a better range for the pinda height and z offset. FWIW, after loosening the pinda retaining screw I have to push a small screwdriver tip into the pinda clamp to open it enough to move the probe up a full thread without having to spin it in the holder.
https://help.prusa3d.com/guide/9-preflight-check_36224
I hope my explanation makes some sense. I know I’m not describing this as clearly as I’d hoped I could. But as I said before, have patience and you’ll get there. You’re already well on your way.
Cheers!
RE: Unable to print the Prusa logo plate cleanly
Which direction do I adjust the numbers to raise or lower the nozzle? For example, if Mine is at -1.880 and I want to bring it closer to the bed which direction would that be? I dont understand why they just wouldnt simply put "up" & "down" along with a number...but thats another subject..
Thanks for the help.
RE: Unable to print the Prusa logo plate cleanly
Adjusting live Z, towards -2.00mm moves the nozzle downwards towards the build plate
Adjusting live Z, towards 0.0 mm is moving the nozzle away from the build plate
regards Joan
I try to make safe suggestions,You should understand the context and ensure you are happy that they are safe before attempting to apply my suggestions, what you do, is YOUR responsibility.Location Halifax UK
RE: Unable to print the Prusa logo plate cleanly
If you have -1.8880 and you want to bring the nozzle down, go more negative, -1.9, for example.
Mk3S+,SL1S
RE: Unable to print the Prusa logo plate cleanly
<sigh> I should have left the SuperPinda sensor height alone and just be happy I could print, but my desire to want the best setup possible made the situation much worse. I unscrewed the sensor clip so I could move it up, tightened it and found it too high, unscrewed the clip, moved the sensor lower, tightened the clip and repeated this process. Unfortunately, this repeated process was too much for the hole that held the square nut in the extruder body. The screw jammed in the nut and didn't want to turn. When I put too much pressure trying to tighten or loosen the screw from the nut, the hole holding the nut gave way and no longer held the nut immobile so now the nut is freely rotating every time I rotate the screw and I can't tighten or loosen the screw anymore. I'll have to purchase a new extruder body, take apart the setup, replace the part and put everything back together again.
RE: Unable to print the Prusa logo plate cleanly
Yeah, sometimes we are our own worst enemy.
You might be able to jamb the nut with a very small screwdriver or pinch it with a pliers to allow you to loosen and tighten the pinda holder so you can get back to a printable setting.
You might also find someone close to you willing to print you a new part instead of having to order one, assuming you can’t get the pinda adjusted right as it is.
Good luck!
RE: Unable to print the Prusa logo plate cleanly
It doesn't look like the end of the world. It's most likely spinning because the nut is cross-thread to the screw. I would try sticking a needle nose into the nut slot to prevent it from turning. Once you dis-engage and remove the screw, check it with the nut removed to see if the two mate properly. If not, dig into your spare parts bag and find replacements and re-insert into body. Again, you can prevent the nut from spinning by jamming the needle nose or a hex wrench into it while tightening the screw. FYI, the screw only needs to be snug, not nose-bleed tight.
If this still doesn't work, you might be able to tie-wrap the housing around the PINDA if it is wobbling. If it is still somewhat firm, that would be enough to re-calibrate your live-z and print a new body yourself.