Struggling with nozzle 'dragging' across printed parts + adhesion
I've got a new i3 MK3s+ kit I assembled last week, coming from a modified Creality Ender 3 which has been incredibly reliable for all kinds of PLA prints
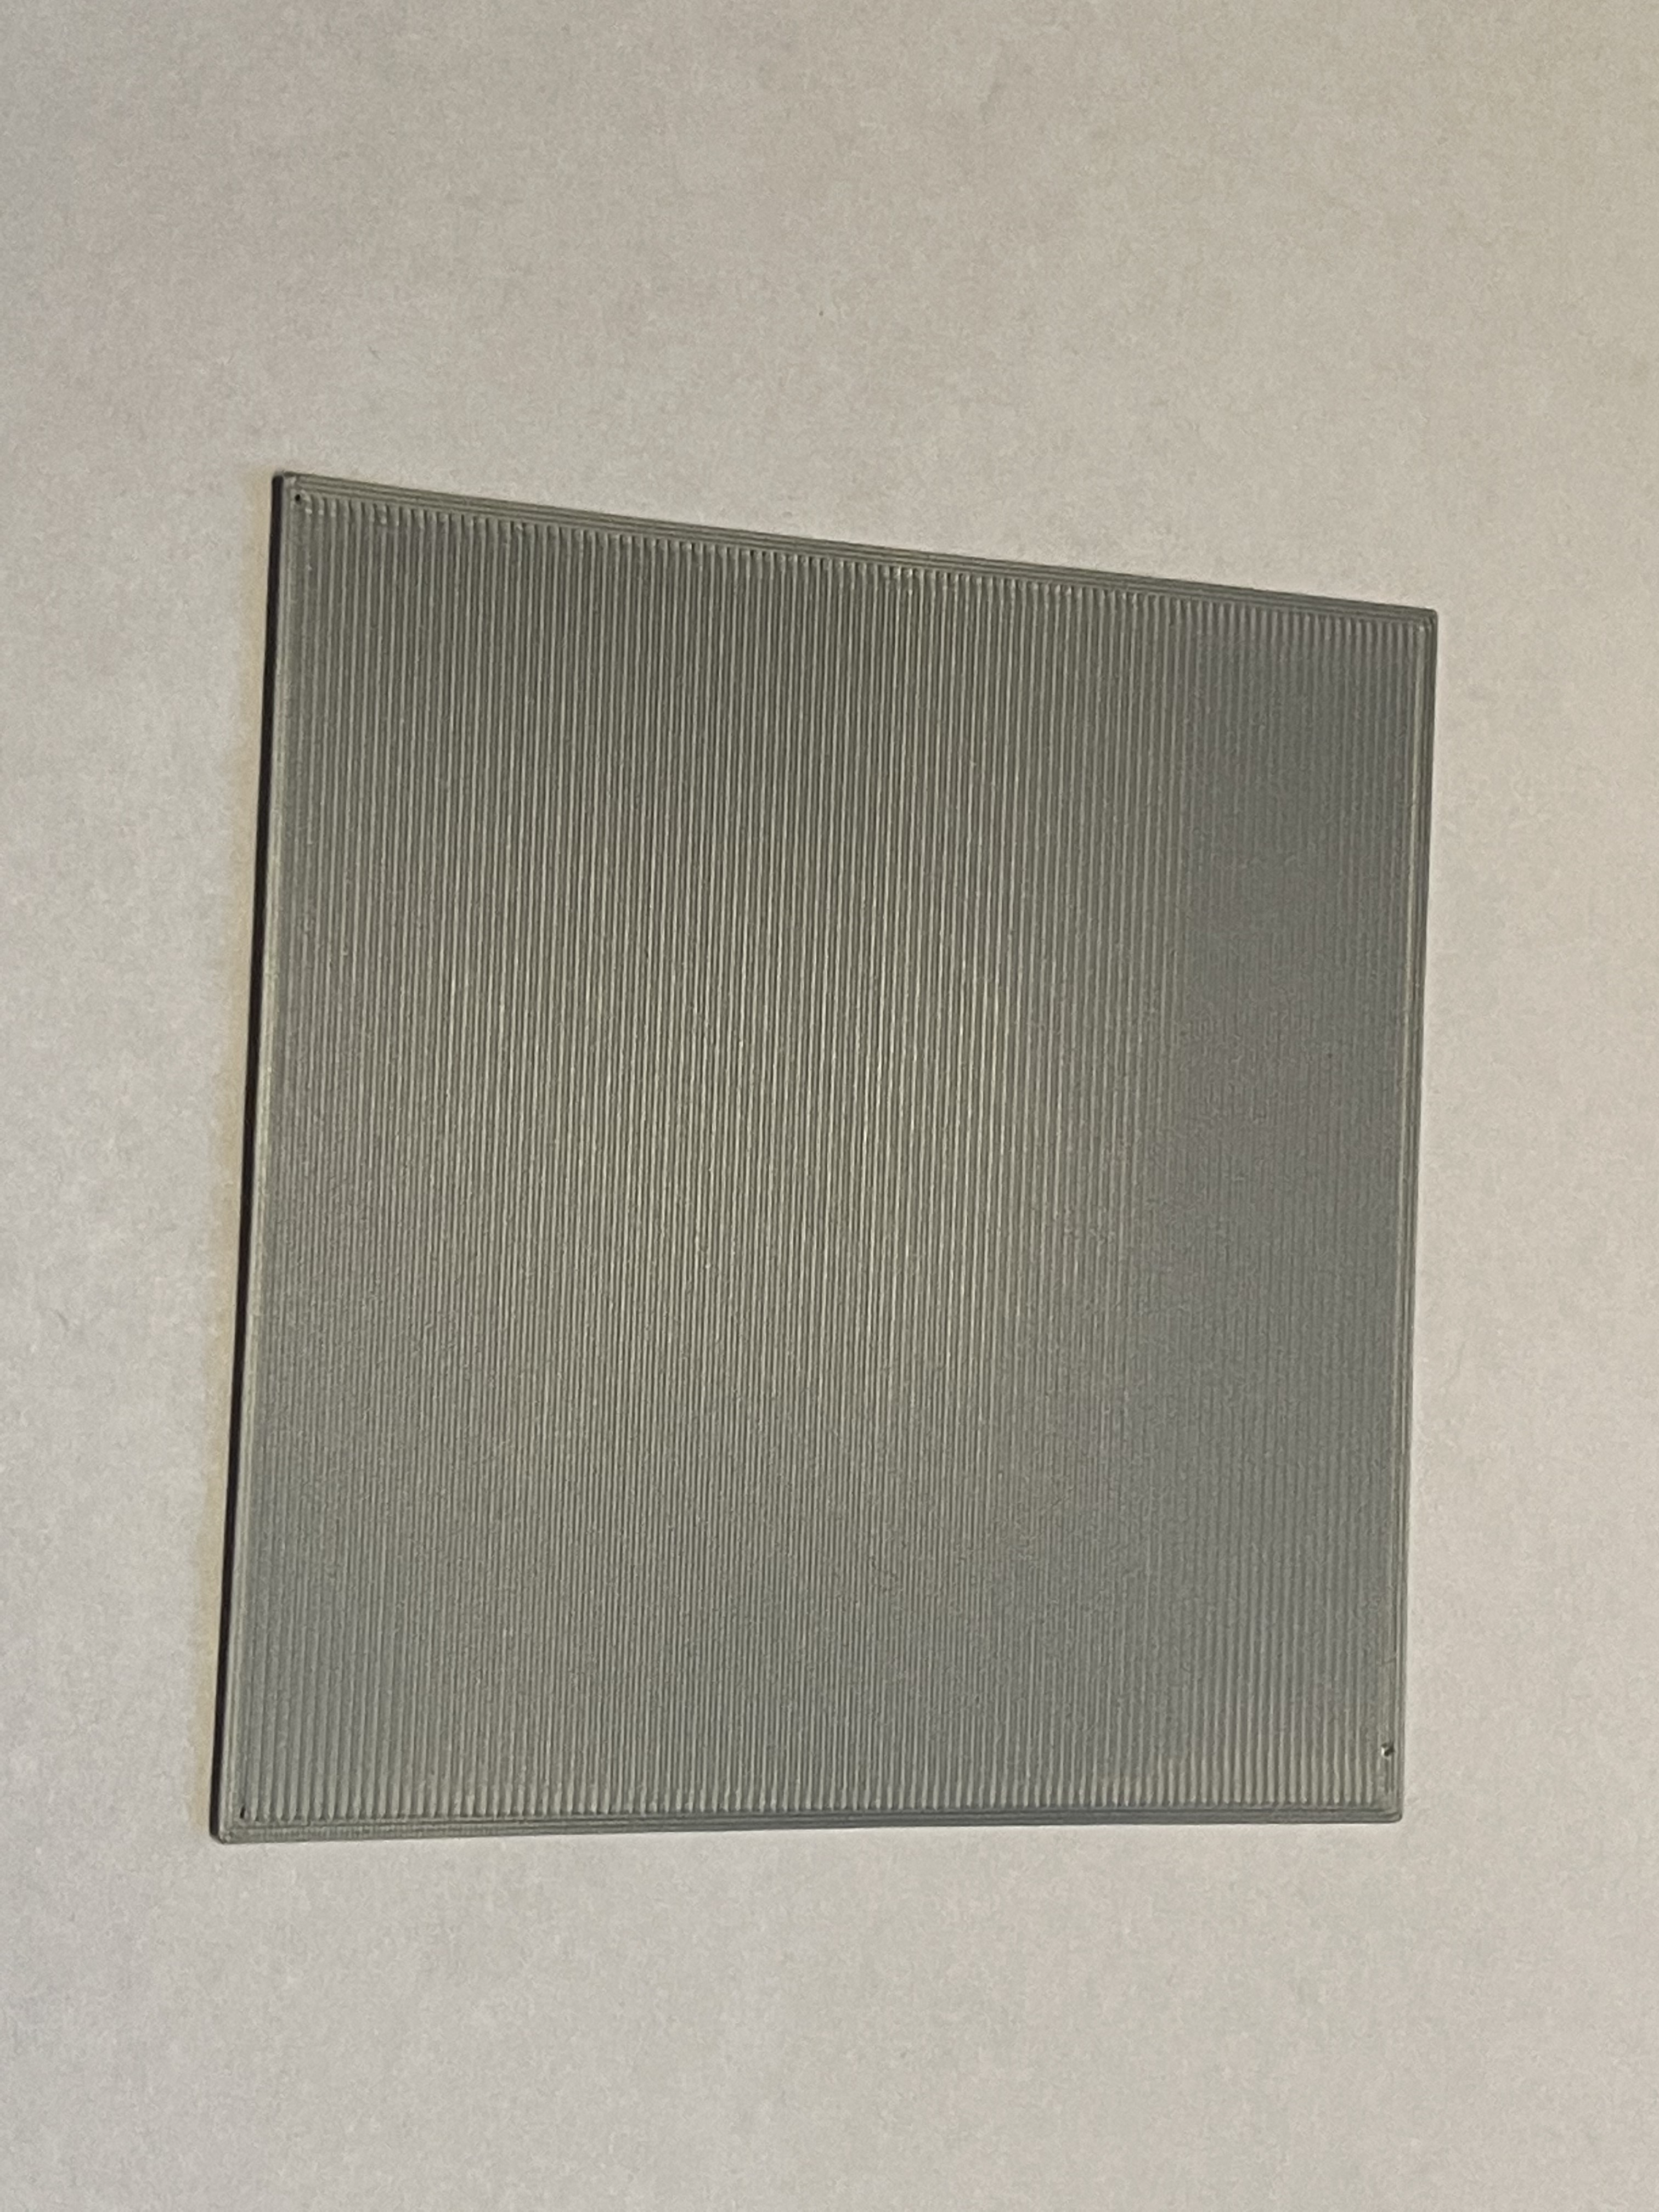
Printing gray PLA that came with the kit so far. Tried a few different temp settings, but mostly settled on 215/215 and 70/60 for temps. I think I have the calibration and Live Z adjustment pretty well dialed in, as seen in this first layer test picture
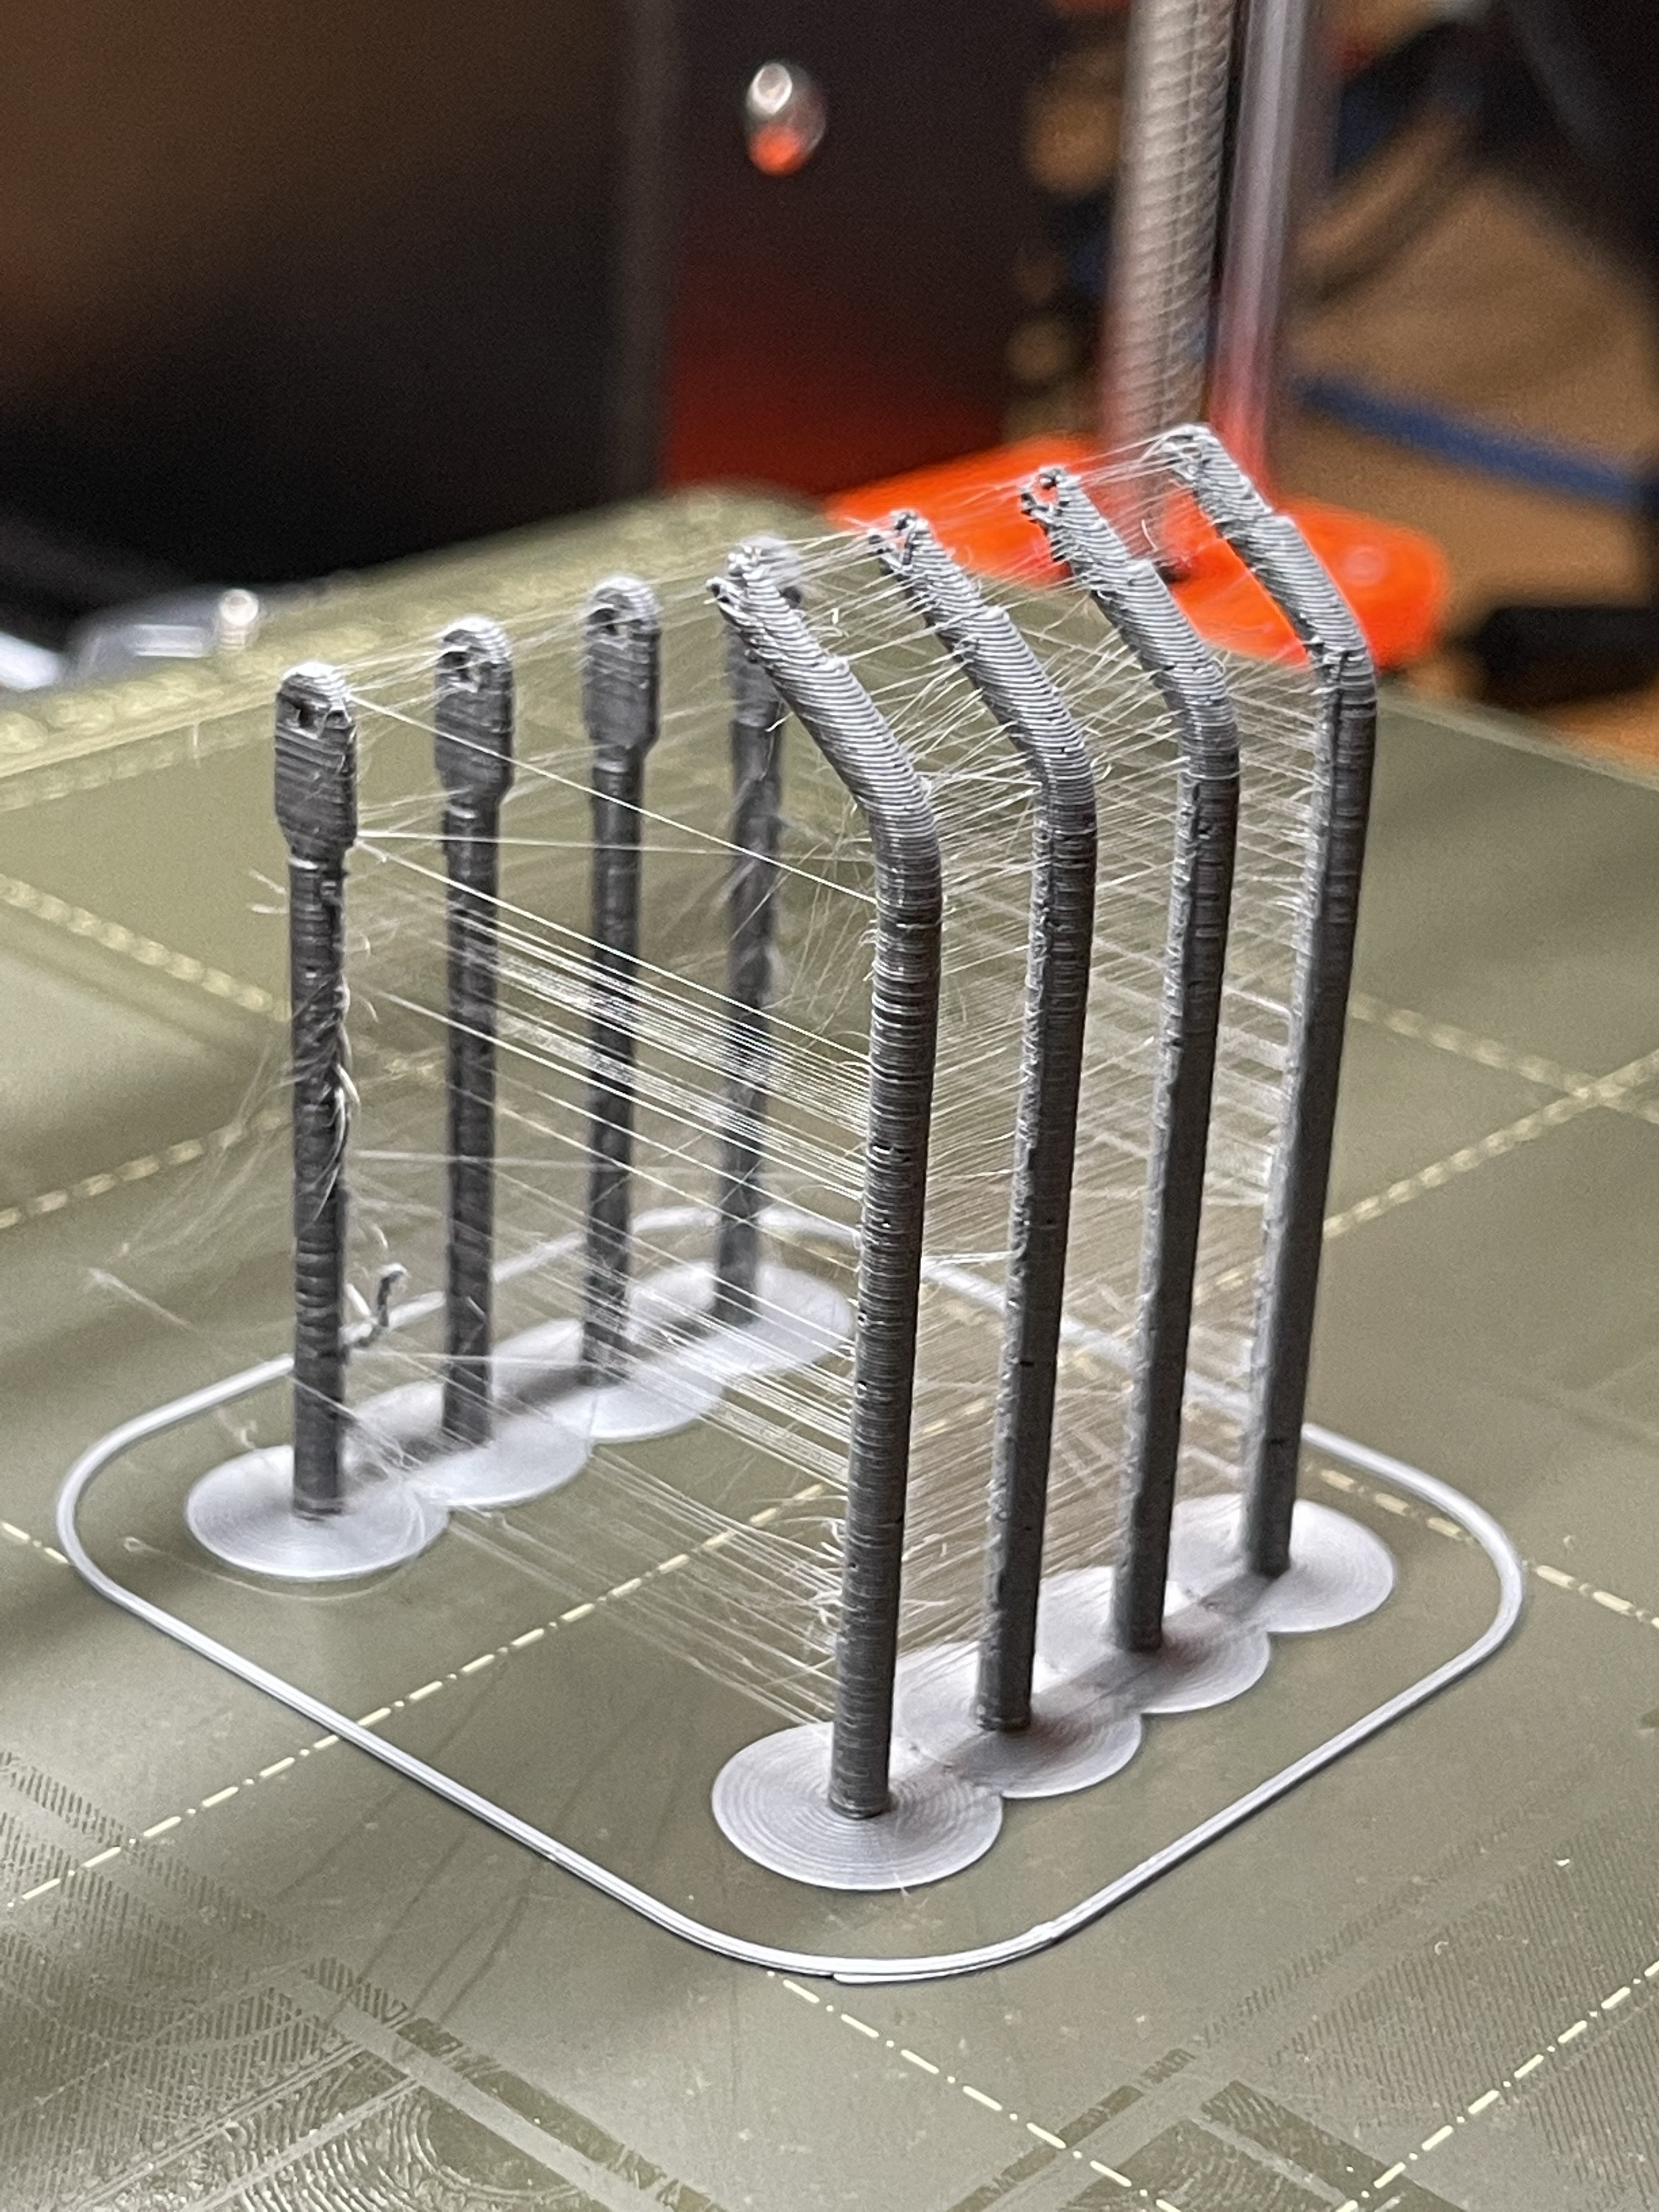
But I have a problem with printing skinnier parts that I can't quite identify. Best way I can describe it is that it seems like the nozzle is dragging on the printed parts too much and either dislodging them from the print bed, or causing them to 'lean' as they're printed onto which ruins the print.
These are printing at .15 quality profile.
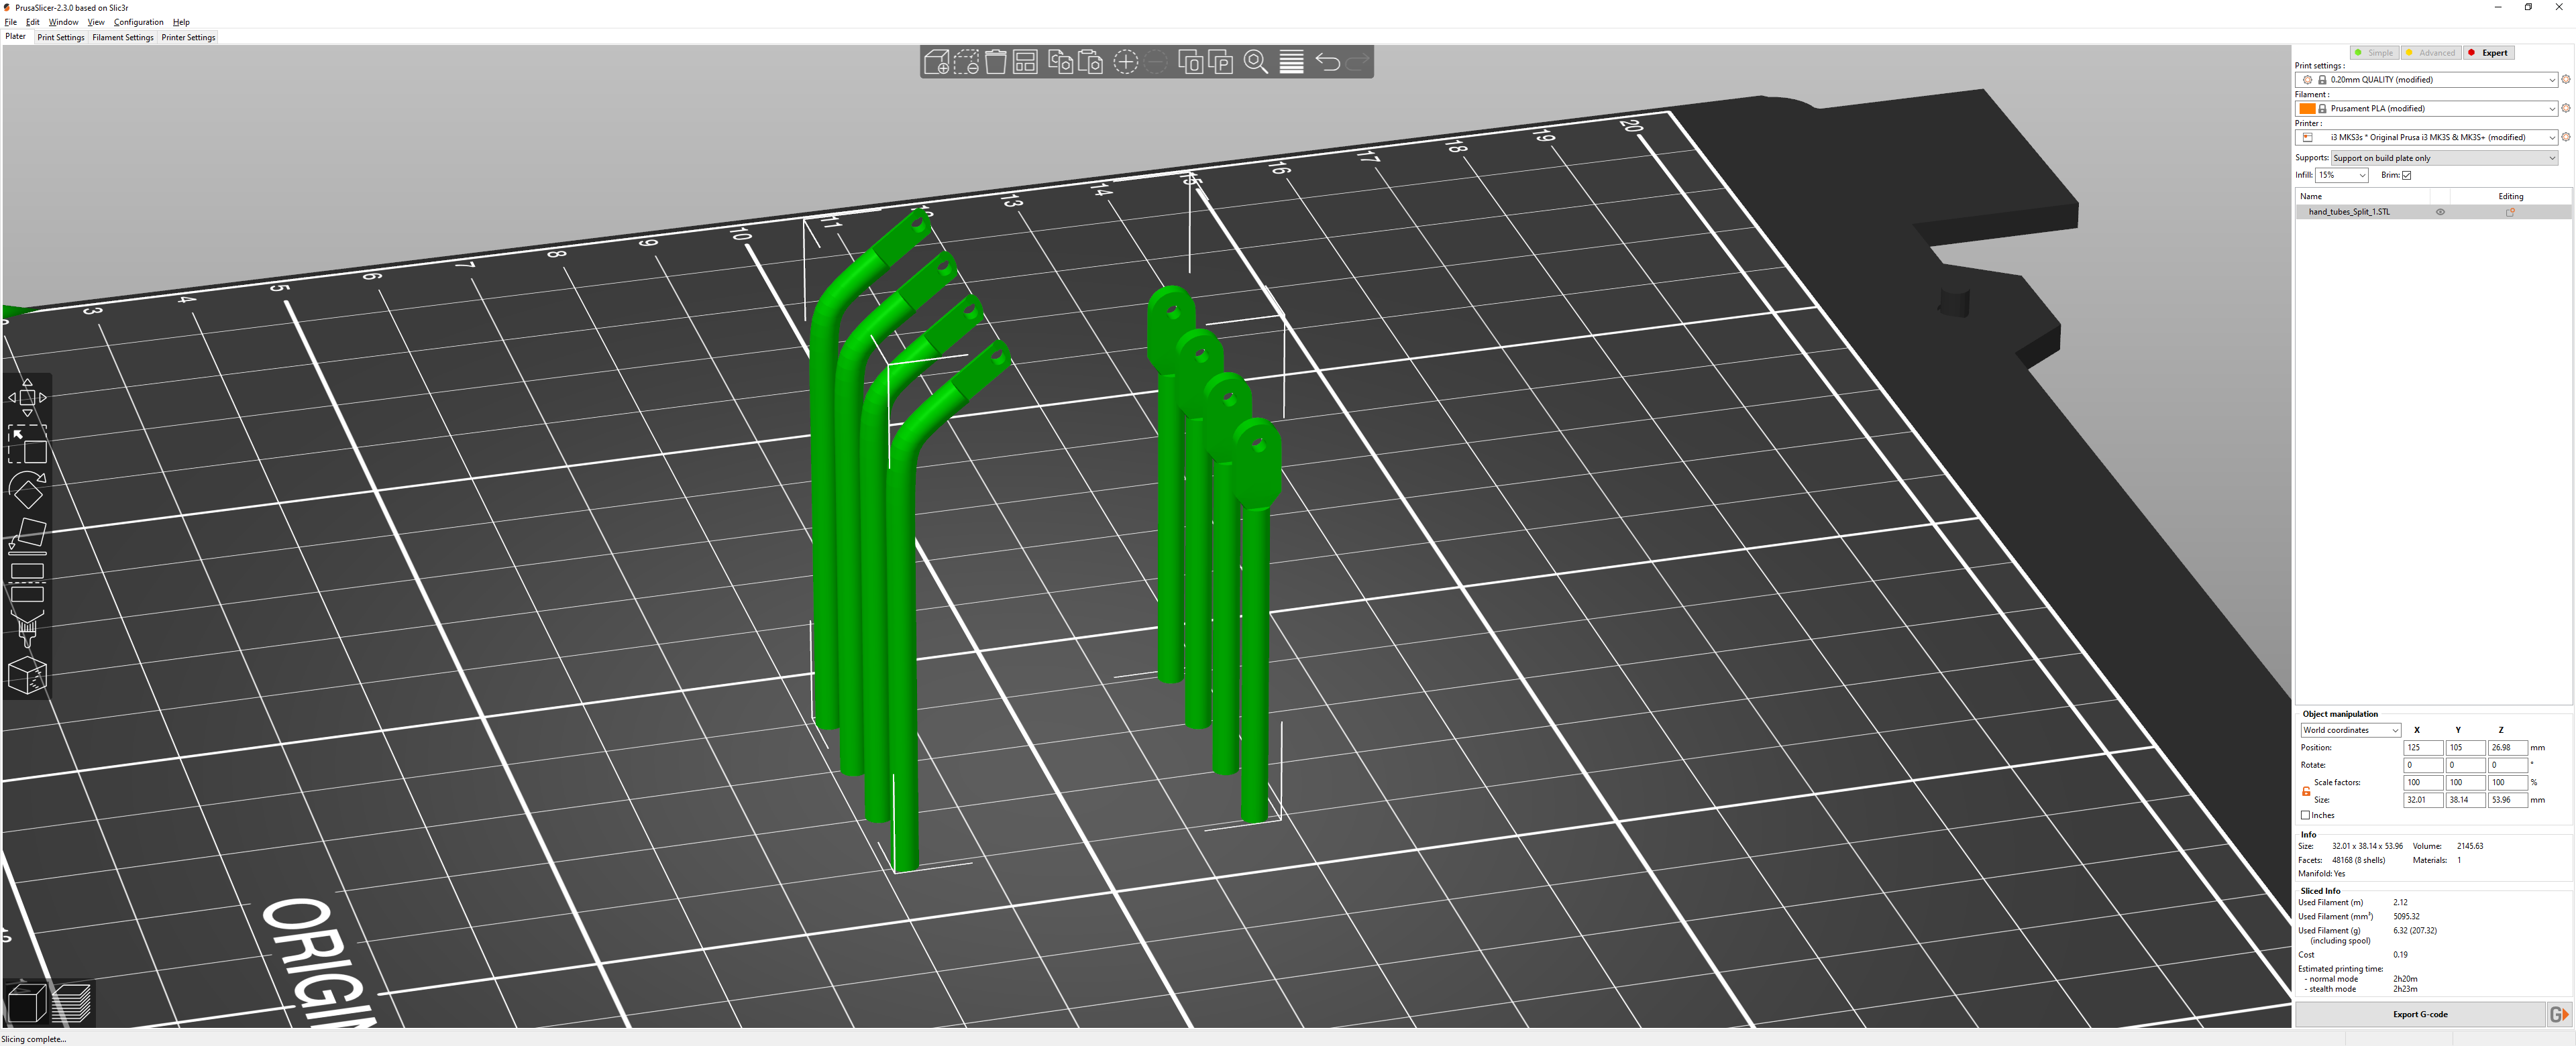
While attempting to print This part I kept having prints fail as they got taller. To combat stringing, I had Z-Hop disabled and the prints were failing early. I went back to stock settings and added a brim which was not attaching to the print. I disabled elephants foot compensation, and set extrusion width for first layer to .45 instead of .42, and this allowed me to complete the print with only one of the 8 pieces failing (due to slight detachment) but with the brim actually attaching to the pieces now.
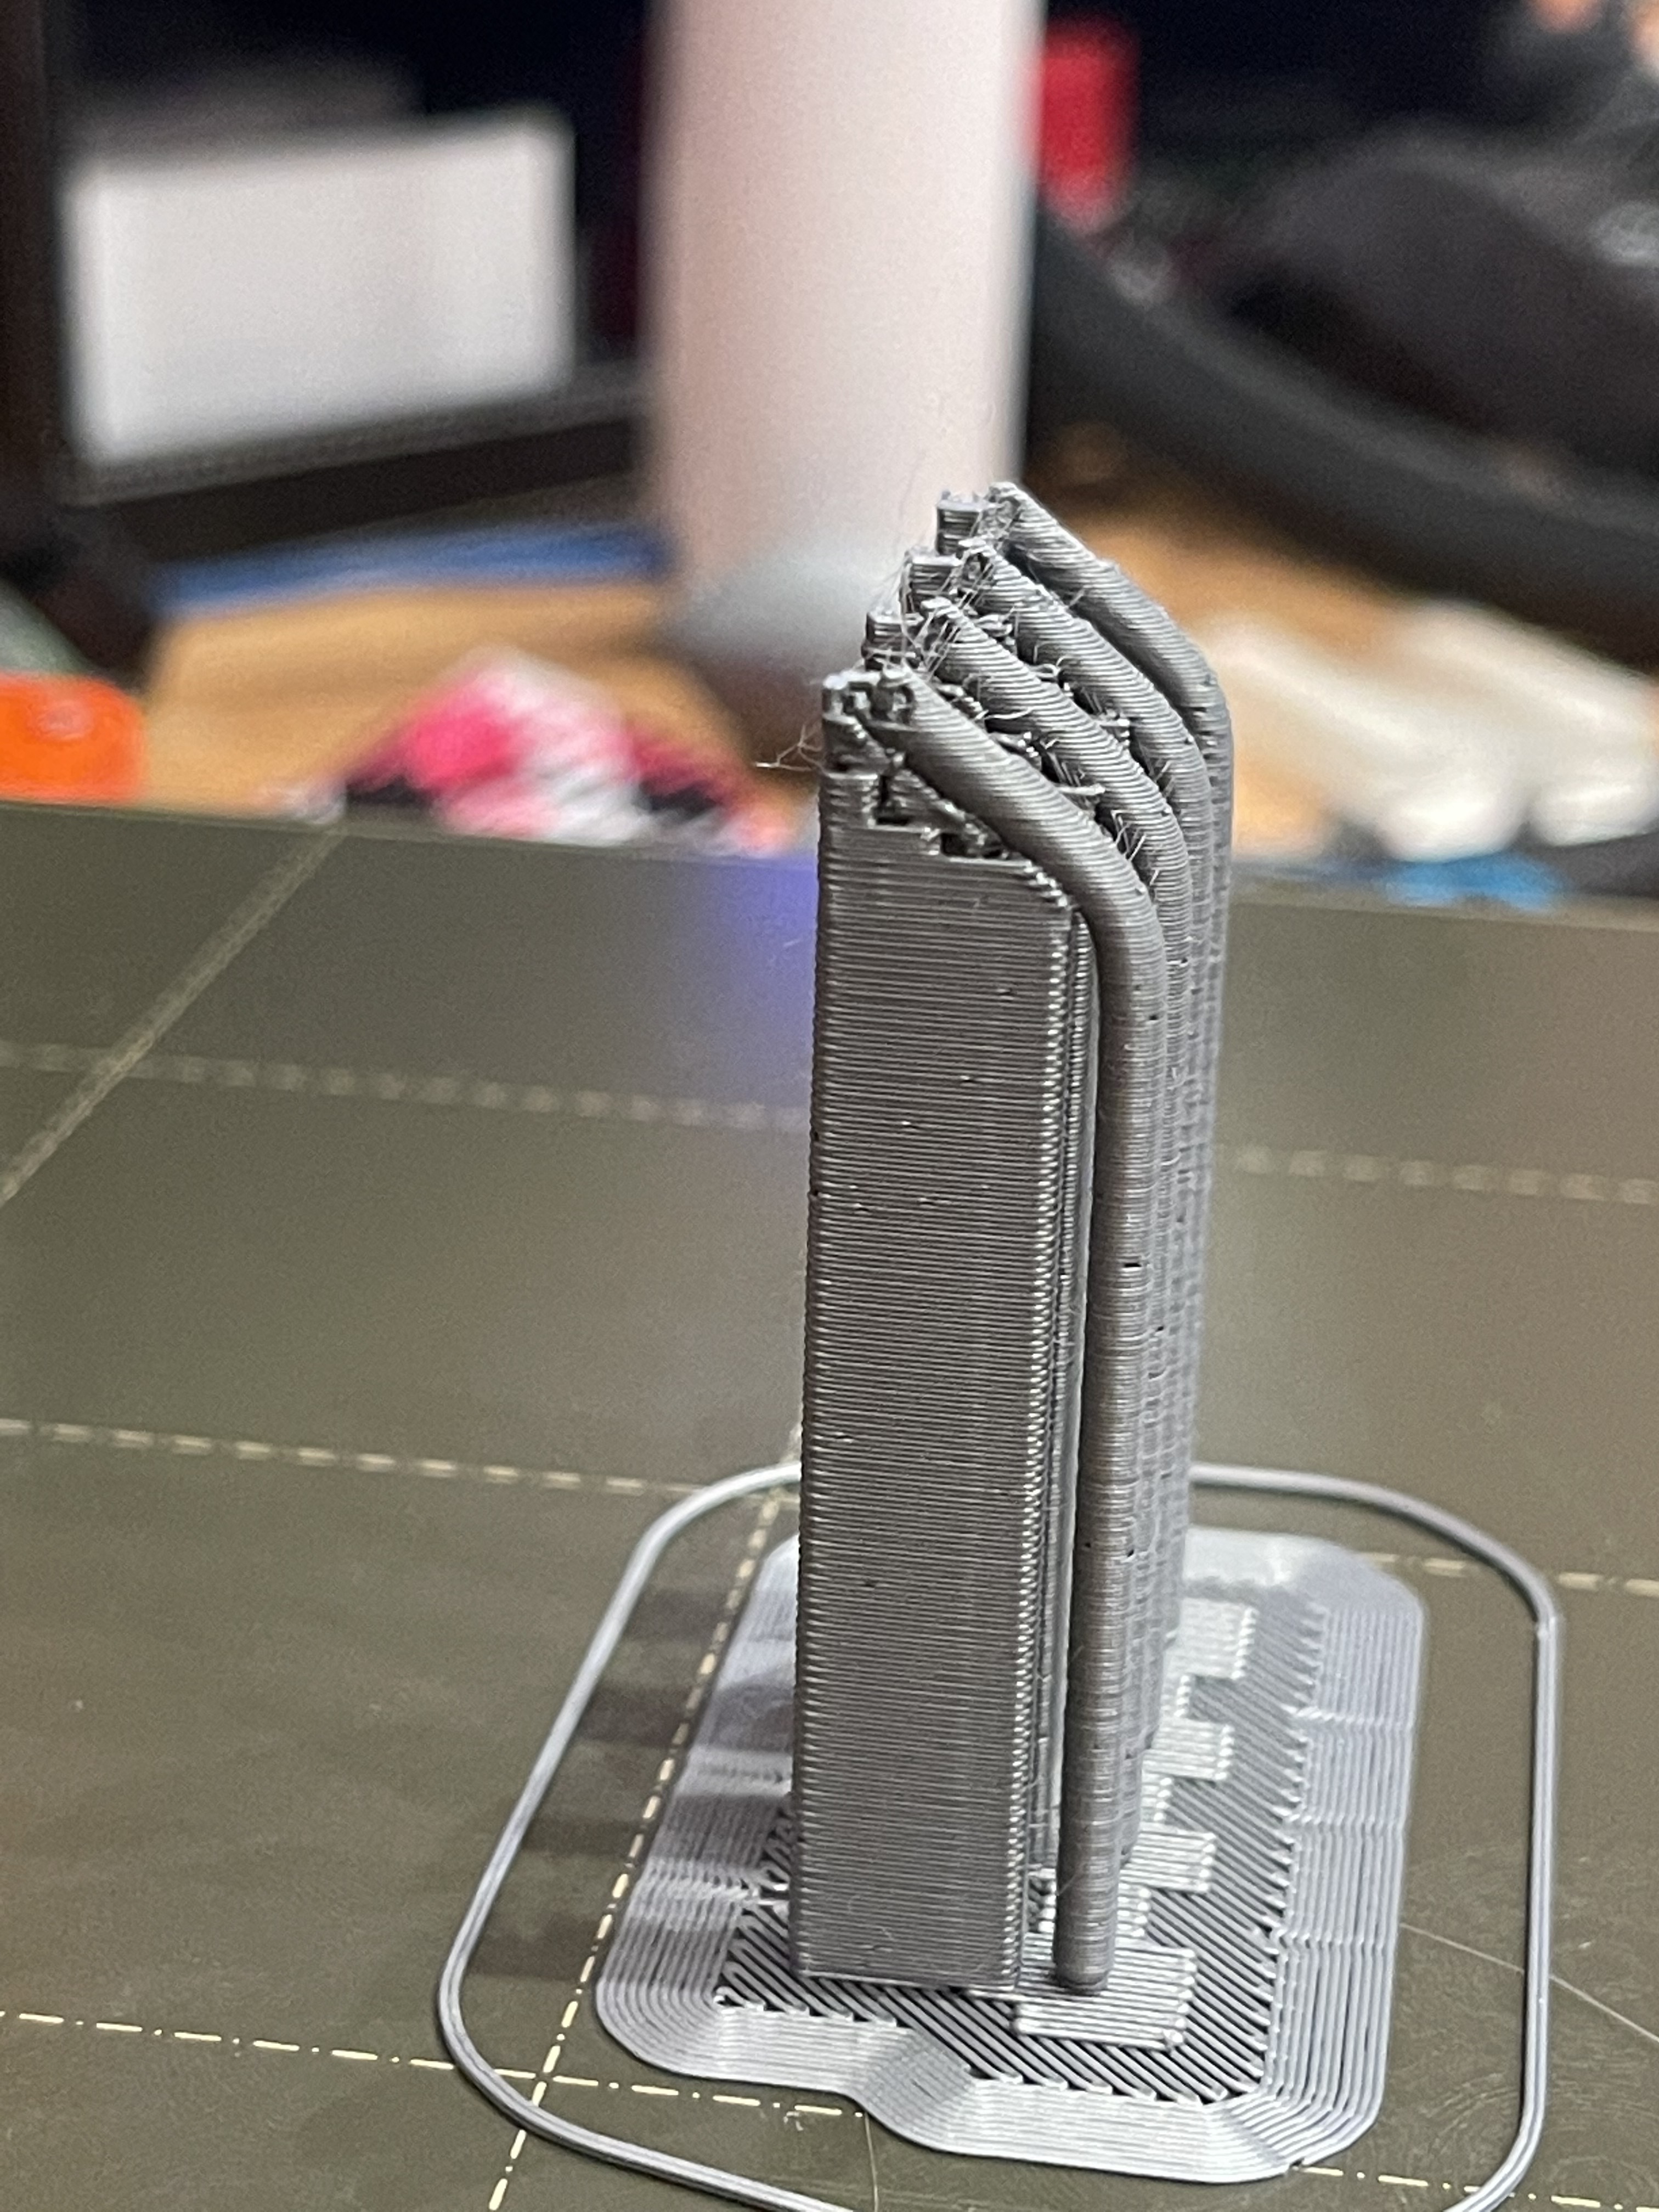
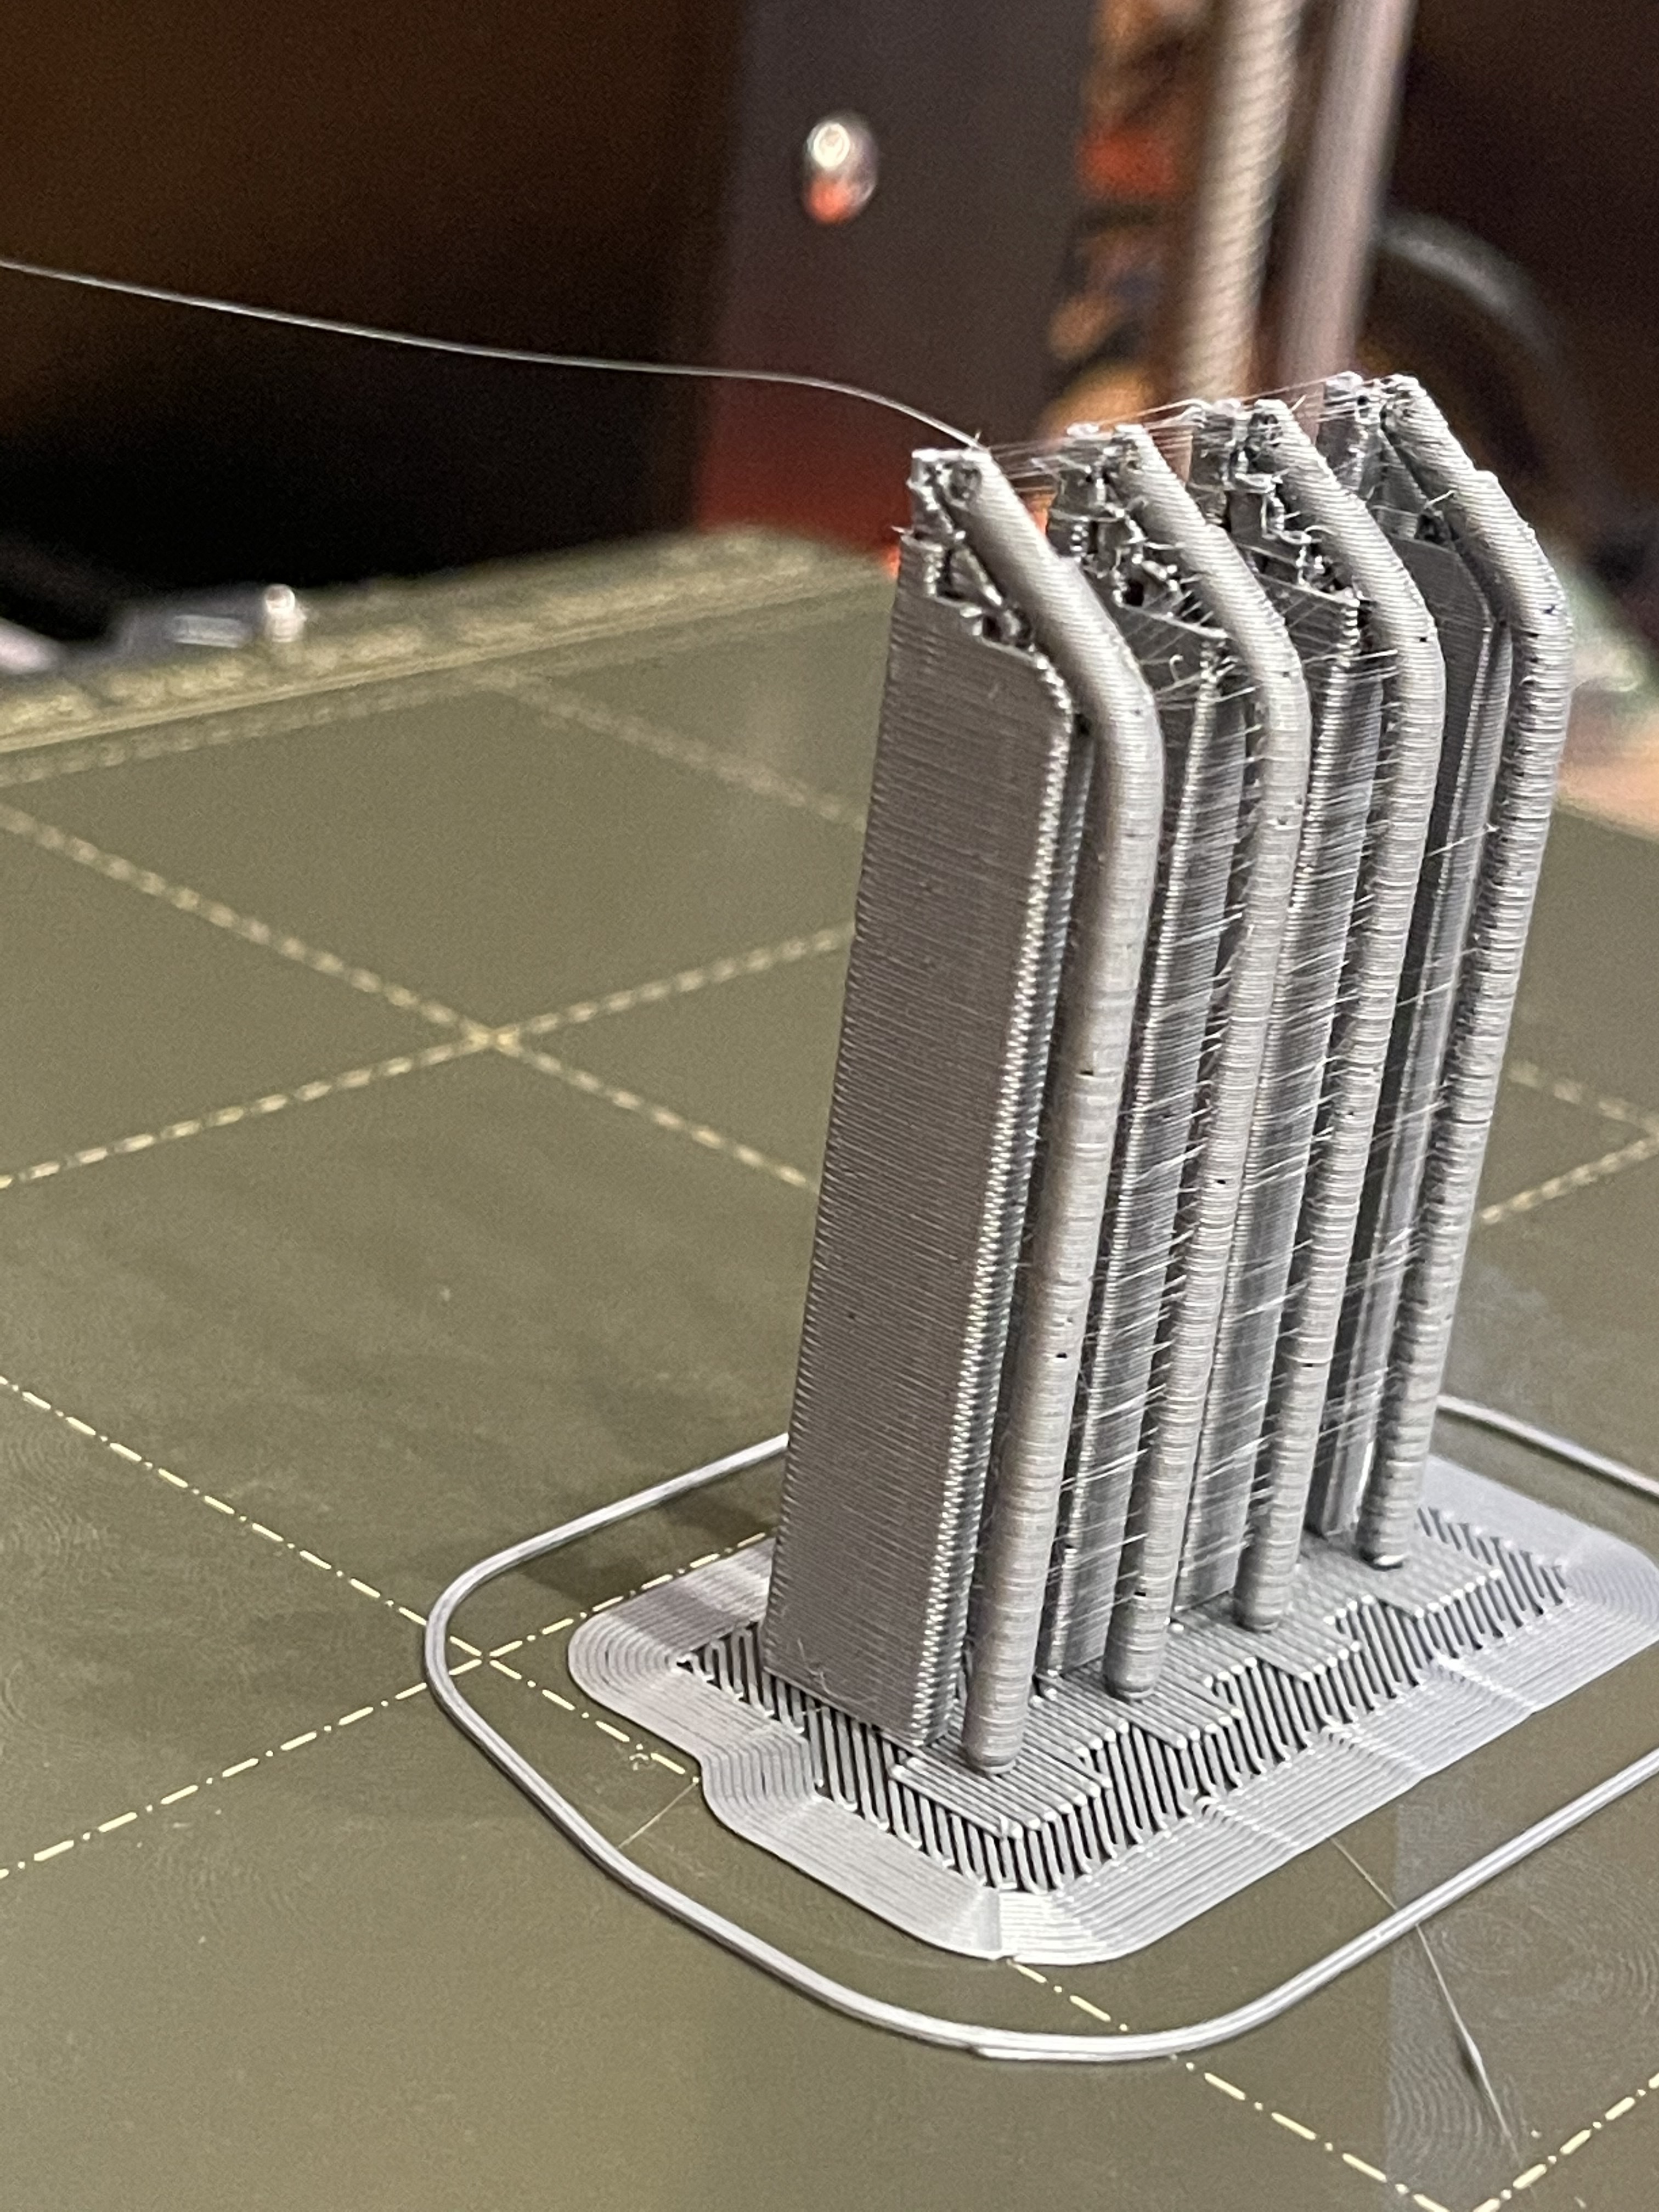
When I try to print this part, as it gets towards the higher layers there is more and more wobble of the printed parts as the nozzle moves across the surface, leading to the garbage you see below
I'm not sure about best course of action to troubleshoot this next.
I'm not sure if the actual nozzle is dragging across the part, or if its filament oozing that is causing it. Retraction settings are currently default, and obviously is leading towards lots of stringing as pictured. I thought it might be an adhesion problem initially, but the problem persisted even after cleaning the PEI sheet with 91% IPA, then giving it a thorough wash with some dawn and warm water and drying with a clean paper towel.
I think the layer time is probably also causing some issues with filament not cooling down, but that is a secondary issue. I have it set to slow speed to 15mm/s if layer time is under 15s. Is it best to slow down speed further, or to add an object to the bed some distance from the other objects to introduce longer travel?
By comparison, on my Ender 3 I could print these parts with PLA using no brim or supports and they came out fine. I was using a glass bed with hairspray and it was incredibly reliable.
RE: Struggling with nozzle 'dragging' across printed parts + adhesion
I got a video of what I see happening during prints. You can see the pieces moving slightly while filament is being extruded onto them, which causes more and more issues the higher up it gets.
RE: Struggling with nozzle 'dragging' across printed parts + adhesion
It is very difficult to see your first layer from that photo.
I would suspect the issue you are getting are with the first layer, the Grey Prusament PLA should print perfectly with pretty much stock settings. The only time I have had to change settings are for Supports, and to add a brim or mouse ears for a problem print.
215/210 with 60/60 bed temp is what I print that PLA at, and it prints perfectly with no stringing.
Run through this adjustment, I came from an ender 3 as well and there is a huge difference and a bit of a learning curve on the first layer with a MK3, Run through Jeffs adjustment above, and also have a look at Joans Photo on PG 40 of this, it illustrates very well what you are looking for,
I would rerun the first layer adjust, and drop the temps to 215/210 and 60/60
Tank you very much!
RE: Struggling with nozzle 'dragging' across printed parts + adhesion
Also probably a good idea to slow that print down a little until you get it printing well, after its running perfectly you can try it a bit faster (use the dial and turn it down to 50% to start with)
Finally enable 7x7 mesh bed levelling before you adjust the first layer, I use this with 5 reads at each point and it works very well.
Tank you very much!
RE: Struggling with nozzle 'dragging' across printed parts + adhesion
Imo, that first layer is barely sticking to the bed - you should not see any ridges between the lines.
But that isn't your issue with the tiny sticks. Given the scale in that picture they look to be an attempt to print a 2mm thick stick. It goes pretty well up until the bend - but then you can see you are trying to extrude over air - a classic bridging problem. There are some settings you should consider to get a better outcome. The knocking off the print is because your bottom layers are dodgy.
Settings:
Stringing - lower your temps for the filament you are using, stringing is probably caused by temps. Dial it in with a temp tower calibrated for your printer.
Bridging:
Add extra perimeters if needed [x]
Detect bridging perimeters [x]
Bridge speed - I'm thinking 25
Bridge fan speed --> 80
Curious - why the empty parts in the background - there's only a brim, but no part. It's a huge brim too - see how they are ovelapping? That's going to leave goo on your print head - which may be what starts your stringing. Cut that down to 3mm or space the parts farther apart.
RE: Struggling with nozzle 'dragging' across printed parts + adhesion
@dan-rogers
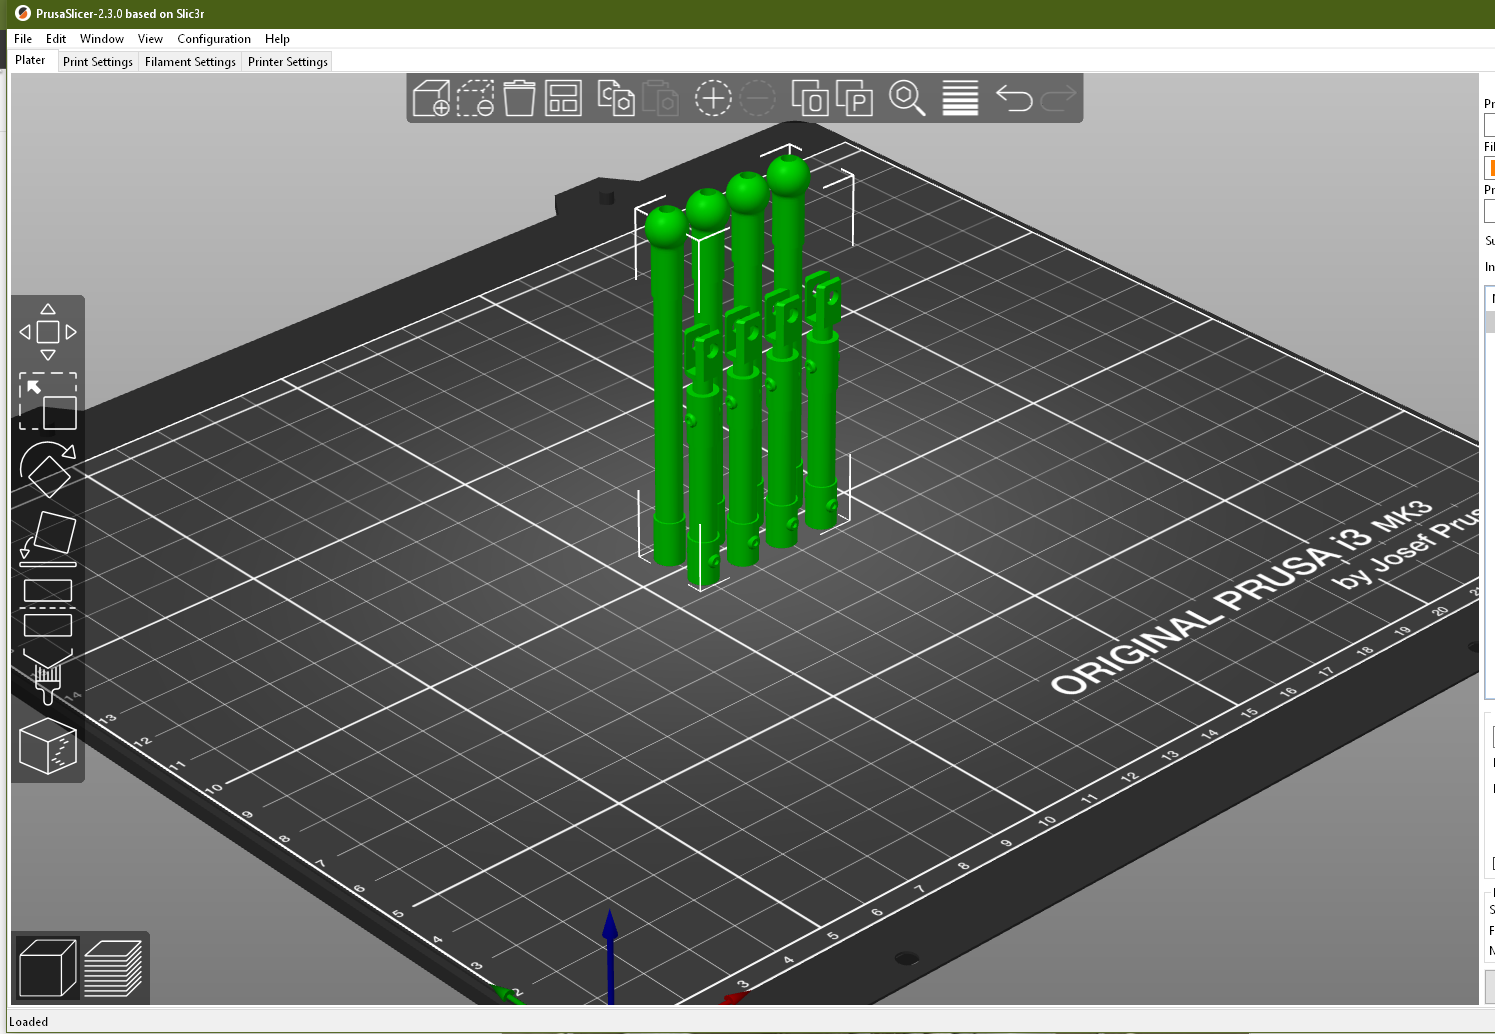
Dan, had a quick look at the file, and looks totally different to the photo.
The tubes are hollow with a ball on the end, look pretty straightforward to print.
Even the other parts with the extrusions out the side, these are tapered, and don't look too bad to print, seems to have been designed to print without the need for supports.
Don't really see any extreme overhangs, although I am certainly not an expert 😉
Tank you very much!
RE: Struggling with nozzle 'dragging' across printed parts + adhesion
It is very difficult to see your first layer from that photo.
I would suspect the issue you are getting are with the first layer, the Grey Prusament PLA should print perfectly with pretty much stock settings. The only time I have had to change settings are for Supports, and to add a brim or mouse ears for a problem print.
215/210 with 60/60 bed temp is what I print that PLA at, and it prints perfectly with no stringing.
Run through this adjustment, I came from an ender 3 as well and there is a huge difference and a bit of a learning curve on the first layer with a MK3, Run through Jeffs adjustment above, and also have a look at Joans Photo on PG 40 of this, it illustrates very well what you are looking for,
I would rerun the first layer adjust, and drop the temps to 215/210 and 60/60
Thanks for the reply. I already ran through the life adjust Z thread and process, which is one of the pictures included in my first comment in this thread. I'm getting a perfect square with all lines connected, no ridges (except very faint if I used the back of my fingernail) or marring, no light showing through, and a perfect .20mm thickness when I measure 5 or 6 points with my calipers.
So I don't think it is a first layer problem caused by Z height, but I agree that most of my issues are being caused by first layer/adhesion. I'm actually using aquanet now (as I did on my Ender 3 + glass) and getting better results, which is both frustrating and encouraging. Once I'm confident I have all my settings dialed in I'll probably try a thorough wash with dawn and a light buff with a kitchen sponge like Joan recommends and see if I'm still having adhesion issues.
RE: Struggling with nozzle 'dragging' across printed parts + adhesion
Your first layer looks ... borderline, probably good enough for small prints but not quite squished enough for torture tests.
Cheerio,
RE: Struggling with nozzle 'dragging' across printed parts + adhesion
Imo, that first layer is barely sticking to the bed - you should not see any ridges between the lines.
But that isn't your issue with the tiny sticks. Given the scale in that picture they look to be an attempt to print a 2mm thick stick. It goes pretty well up until the bend - but then you can see you are trying to extrude over air - a classic bridging problem. There are some settings you should consider to get a better outcome. The knocking off the print is because your bottom layers are dodgy.
Settings:
Stringing - lower your temps for the filament you are using, stringing is probably caused by temps. Dial it in with a temp tower calibrated for your printer.
Bridging:
Add extra perimeters if needed [x]
Detect bridging perimeters [x]
Bridge speed - I'm thinking 25
Bridge fan speed --> 80
Curious - why the empty parts in the background - there's only a brim, but no part. It's a huge brim too - see how they are ovelapping? That's going to leave goo on your print head - which may be what starts your stringing. Cut that down to 3mm or space the parts farther apart.
I'm concerned about the density/adhesion of the brim as well. I don't feel like I'm getting sufficient flow when I print a brim, but any kind of normal first layer test model I print comes out perfectly flat with no gaps or ridges.
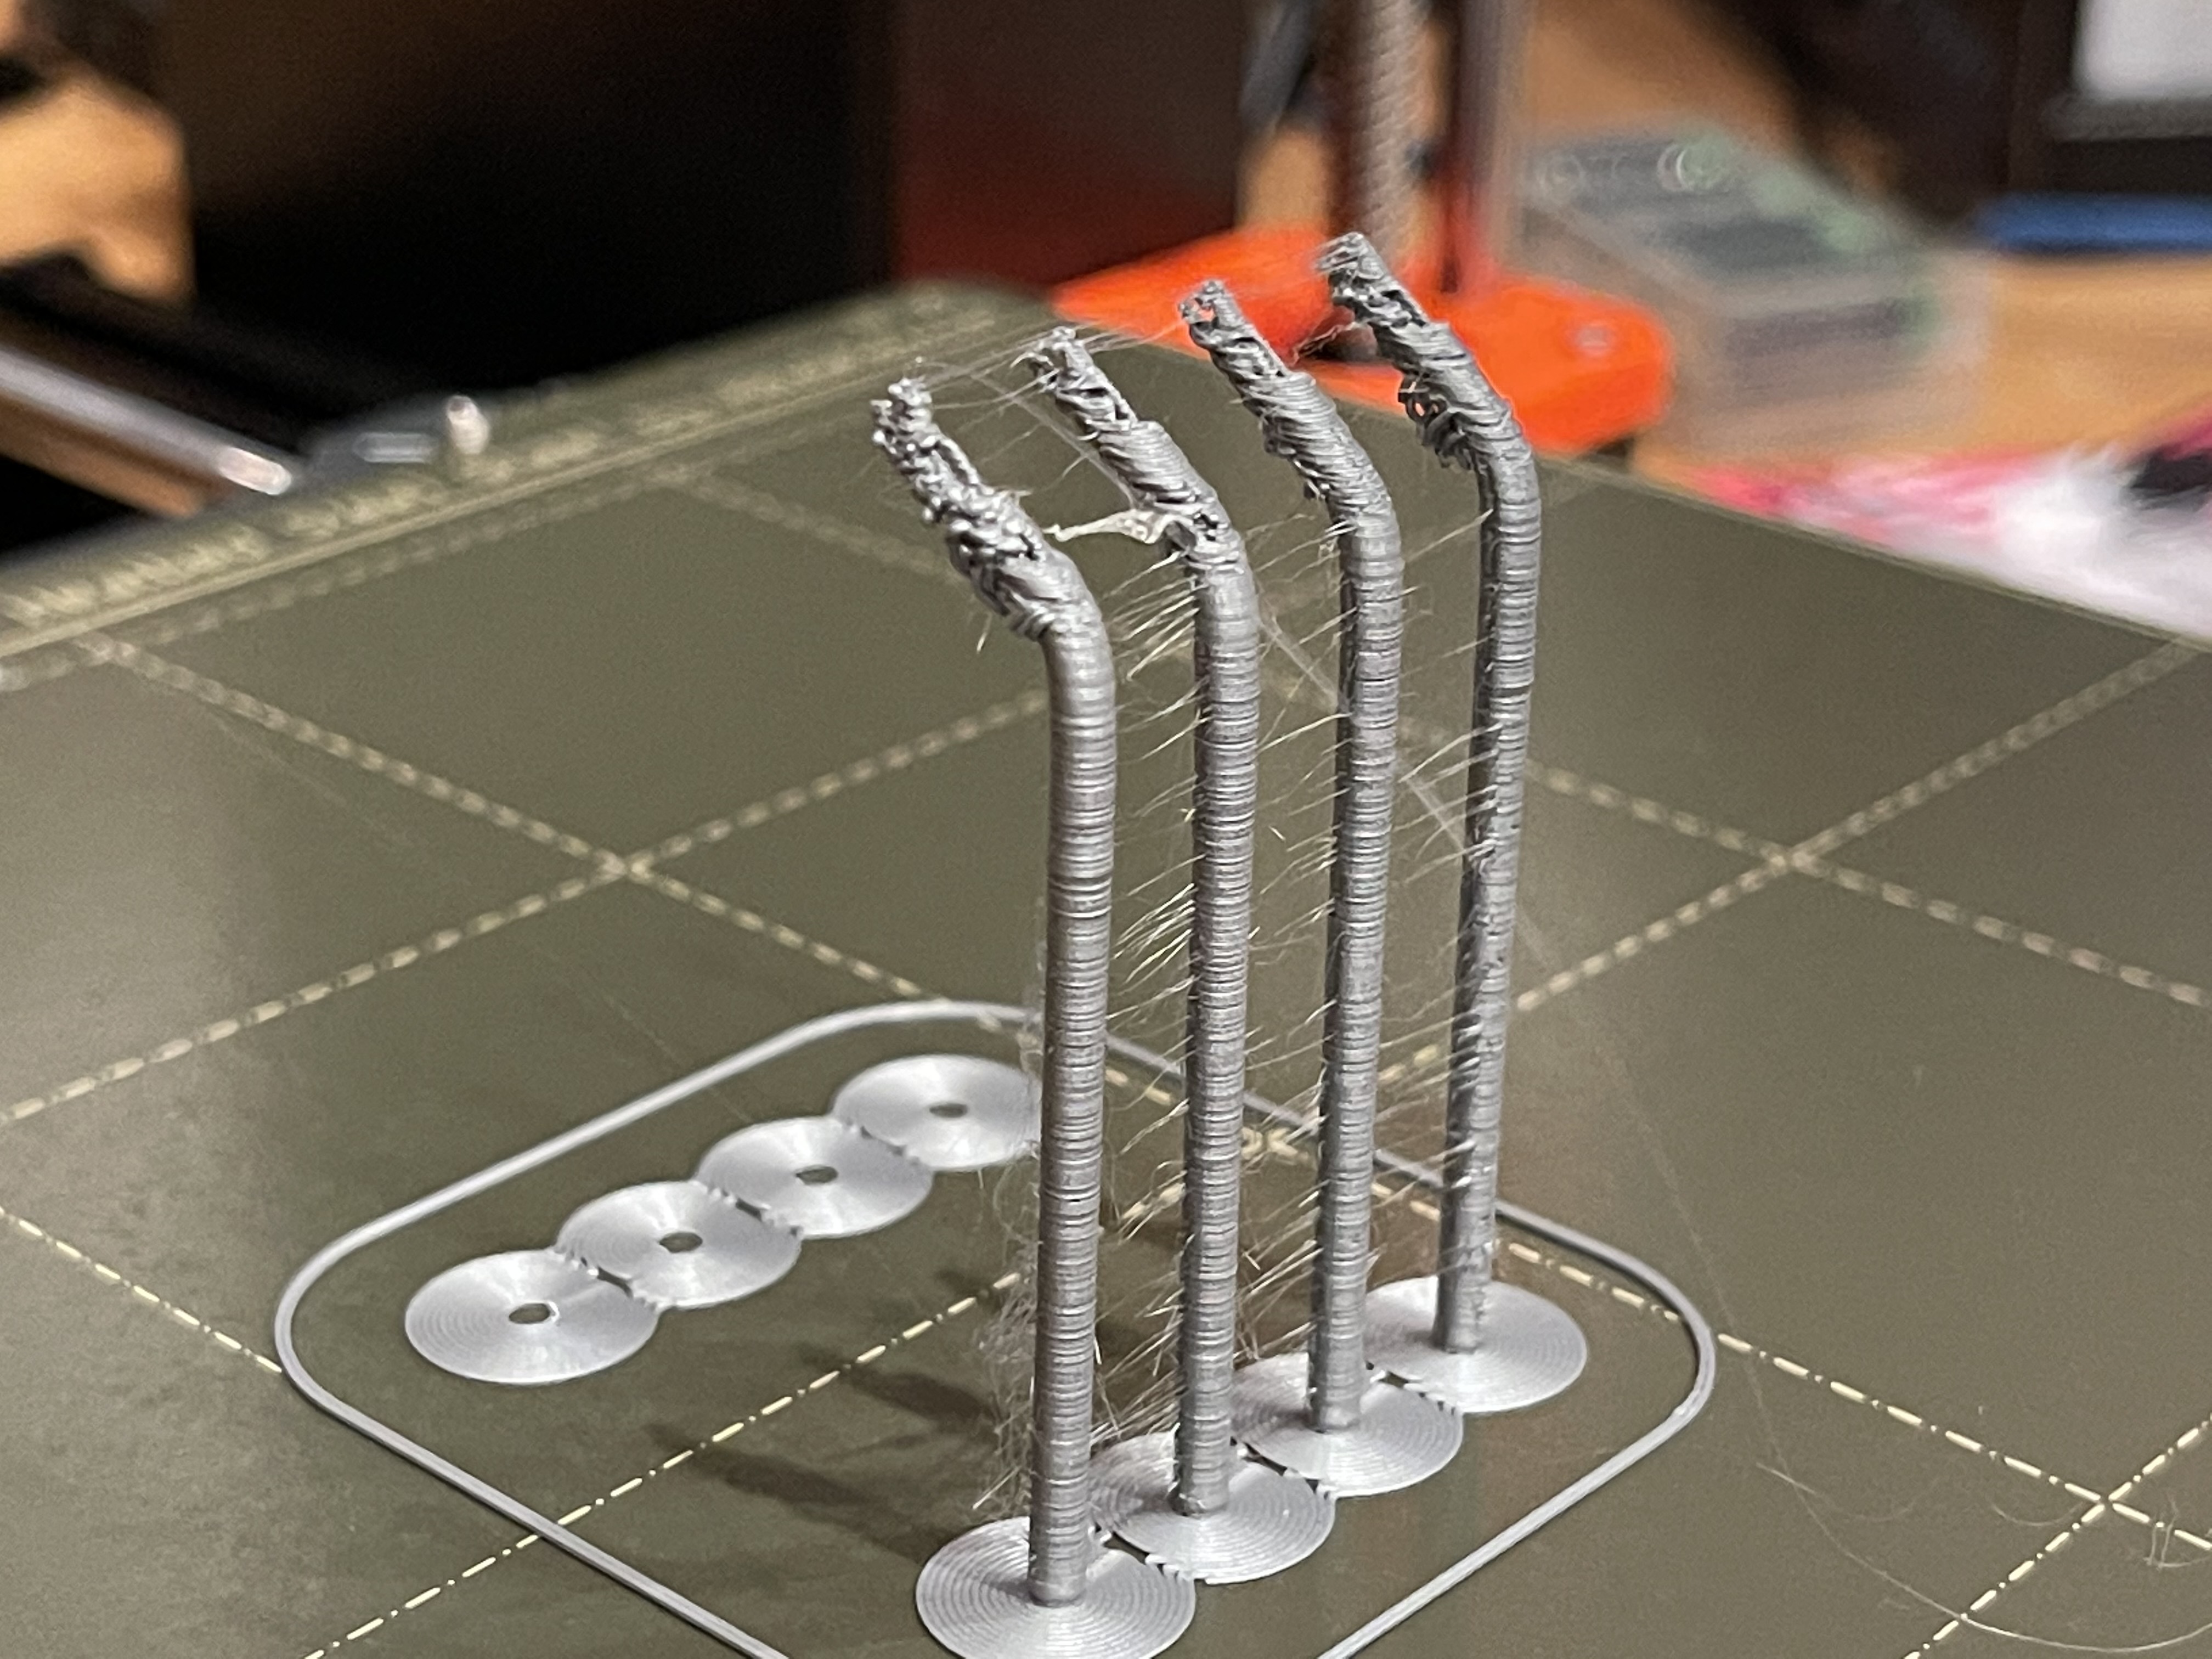
Correct the sticks are approximately 2.6mm, and the overhang angle is around 50 degrees or so. The extra brim was used for the rest of the model. When I took the picture, I had already removed the 4 other sticks (with no overhang) that printed correctly, before I realized I should ask for help with the problem area.
Bridging speed is set to 30, and bridging fan speed 100%. I have detect bridging perimeters enabled, but will enable Extra perimeters.
I've actually been having better luck printing this filament at 210/195, which is surprising to me
Posted by: @Clarmrrsn
Dan, had a quick look at the file, and looks totally different to the photo.
Yeah I'm an idiot and linked the wrong file. Here's what the model actually looks like.
RE: Struggling with nozzle 'dragging' across printed parts + adhesion
In related news, I was actually able to get a successful print of this last night with supports and a raft.
I'm still seeing the same gaps in the brim though, so maybe I should continue troubleshooting first layer flow
RE: Struggling with nozzle 'dragging' across printed parts + adhesion
Your first layer looks ... borderline, probably good enough for small prints but not quite squished enough for torture tests.
Cheerio,
Yeah you're definitely right. I'm trying some other non-test prints and not seeing as smooth of a first layer as I'd like. Live Z is at -1.9 now so I think i'll readjust the PINDA and go through a full Z calibration again to make sure it's right
RE: Struggling with nozzle 'dragging' across printed parts + adhesion
@brendan
don't forget to reduce live Z before re adjusting your pinda. otherwise you may scratch your build plate!
regards Joan
I try to make safe suggestions,You should understand the context and ensure you are happy that they are safe before attempting to apply my suggestions, what you do, is YOUR responsibility.Location Halifax UK
RE: Struggling with nozzle 'dragging' across printed parts + adhesion
@brendan
don't forget to reduce live Z before re adjusting your pinda. otherwise you may scratch your build plate!
regards Joan
Great tip, thanks Joan! That would have ruined my day 😀
RE: Struggling with nozzle 'dragging' across printed parts + adhesion
skinny little sticks are difficult. They will have barely any strength. I think you are at the limit of what can be printed, diameter and free standing wise. That first layer is still quite round on the very first layer (ignore the interface - it's supposed to look that way) . The brim should be a flat plane with almost no discerning separation. I don't see you getting ANY squish in these shots, and I'm happy if you feel that's a good print. It can be WAY better.
Some tweaking in the slicer might help - extrusion width. I designed a similar part - with a 3mm tube on the end of a thin flat (trout rudder) with a hole down the middle. The first few prints I got something like what you have plus a flat rudder. By changing extrusion width I was able to get a good rudder.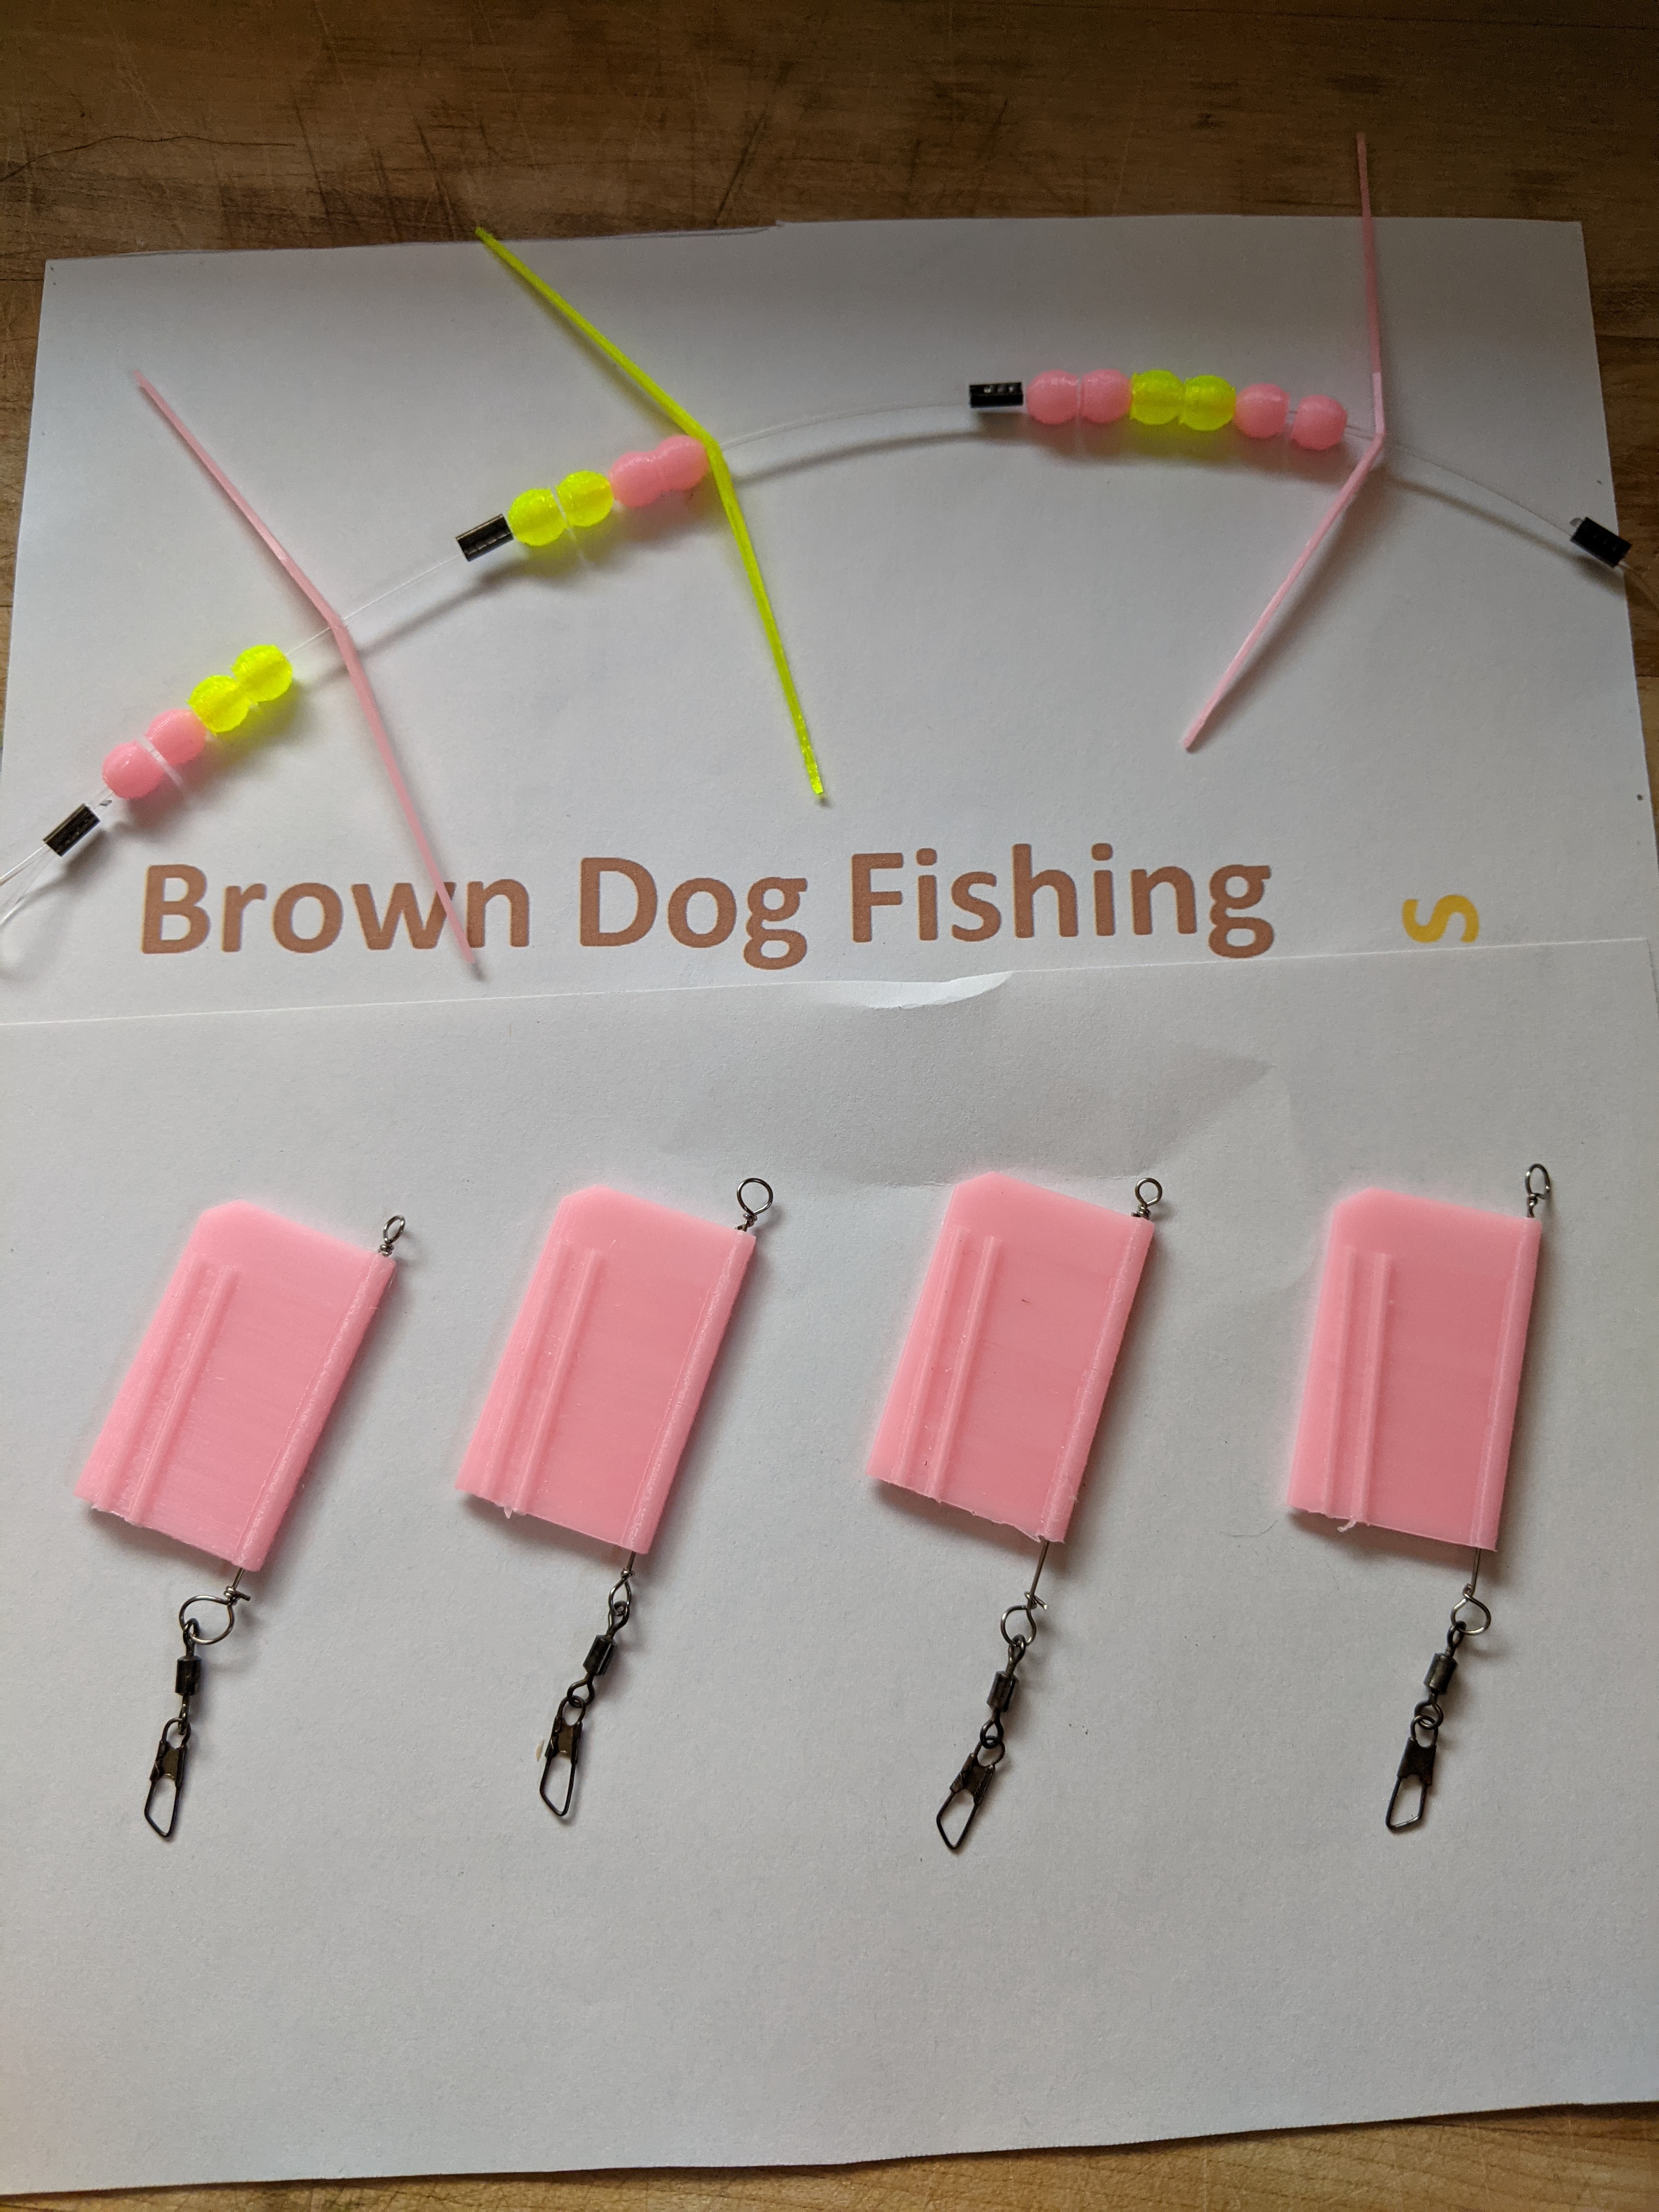 These are VERY thin and the diameter of where the wire goes thru is 3mm
RE: Struggling with nozzle 'dragging' across printed parts + adhesion
skinny little sticks are difficult. They will have barely any strength. I think you are at the limit of what can be printed, diameter and free standing wise. That first layer is still quite round on the very first layer (ignore the interface - it's supposed to look that way) . The brim should be a flat plane with almost no discerning separation. I don't see you getting ANY squish in these shots, and I'm happy if you feel that's a good print. It can be WAY better.
Some tweaking in the slicer might help - extrusion width. I designed a similar part - with a 3mm tube on the end of a thin flat (trout rudder) with a hole down the middle. The first few prints I got something like what you have plus a flat rudder. By changing extrusion width I was able to get a good rudder.
These are VERY thin and the diameter of where the wire goes thru is 3mm
I increased from default extrusion width on first layer of .42mm up to .45mm when the brim was not sticking to the objects. Have you gone higher?
RE: Struggling with nozzle 'dragging' across printed parts + adhesion
Is there a reason why Flow (Tune-->Flow on printer) is set to 95 by default? Should this be 100?
Does this line in Start G-Code override it for first layer?
M221 S{if layer_height<0.075}100{else}95{endif}
RE: Struggling with nozzle 'dragging' across printed parts + adhesion
Yes it should be 100, there was a post somewhere about this, thats probably not helping.
My Mk3s+ was the same when new, I forgot I had this and changed to 100 when I noticed.
Tank you very much!
RE: Struggling with nozzle 'dragging' across printed parts + adhesion
Remember and redo your first layer after changing this.
Tank you very much!
RE: Struggling with nozzle 'dragging' across printed parts + adhesion
So predictably, you guys were all right the whole time. It was primarily a first layer/adhesion issue, likely caused by a combination of both flow being set to default 95, and printing too high due to a poorly set Live Z setting.
I adjusted my PINDA up slightly and did a full XYZ calibration + first layer calibration, then did the Life Adjust Z, My Way until I got an actual good first layer, not just what I thought was a good layer the last time. Went through 6 or 7 tries with smaller adjustments each time until I achieved nirvana.
Brim is now solid without gaps, and the printed part sticks to it properly and has much better stability. Printed this at .2mm at 50% speed.
Still having horrible horrible stringing, but at least I'm approaching a usable part instead of the slop I had before.