Starting with PETG and headaches
Hello,
I have already tried printing with PETG in the past and it was such a mess I went back to PLA (and could not complain about it for most of my needs).
However -beyond willing to overcome a challenge ;-)- I have designed a pool vacuum adapter which definitely requires PETG mechanical properties.
So, I changed the bed to textured, applied a layer of kores glue, loaded the prusament PETG and performed a first layer calibration for a check... boom !
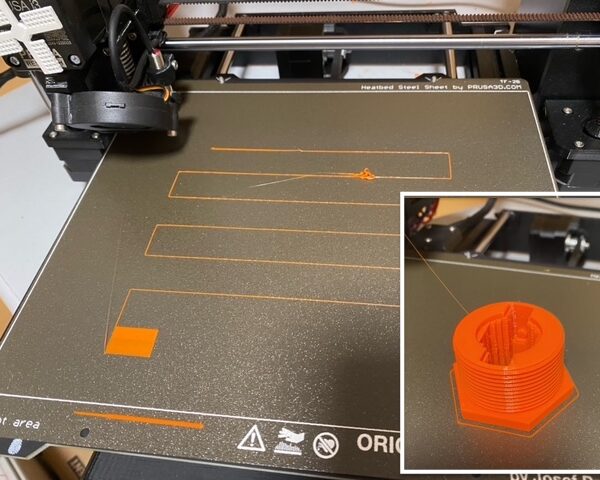
Result enclosed as pictures, PETG doesn't seem to stick well even though I went down to 0.000 adjustement for Z, can't get any lower !
Did I missed something ? Please help...
Best regards from Paris / Mike
You'll notice as well the strange shape of first few cm of melted filament ?
Best Answer by blauzahn:
Salut,
your nozzle is way too high. On the textured plate you have to go substantially lower and squeeze the filament also into the "valleys". If it only touches the "peaks" then the surface is too small to get enough adhesion.
When performing z-live adjustment you can either restart from 0 and turn the knob quickly right from the start until the filament lines form square angles. You can also continue from the previously stored z-live.
Positive z uniformly points upwards -- for the nominal axis value as well as its offset. On more recent firmware you can store the z-live for several plates because the different plates need different z-live. The difference between the smooth PEI and textured plate is roughly 0.4mm.
I stopped cleaning with IPA or alcohol at all. They spread grease only but do not flush it away from the plate. Please clean the bed with plain dish washer detergent (the cheap one without additives) and flush ist with plenty of warm water holding it below a water typ (robinet). Dry it by waggling and dry the last drops and edges with a clean, fresh paper towel. Please do not use a rag. Afterwards never touch the plate with your fingers. I pick up finished parts with a paper towel in each hand. The skirt often can be pushed away with the part. If not I push it with a grater for ceran-board (plaque vitrocéramique). That way I do not have to clean the plate for many dozen prints at all.
Do not use glue. Do not use the smooth PEI plate for PETG.
see also: youtube video by prusa, help.prusa3d .. premiere-couche, forum life-adjust-z-my-way,, prusa3d.com/fr/materials
Salutations
Mathias
RE: Starting with PETG and headaches
Using PETG for a number of items. Smooth Plate, No glue or plate treatment other than making sure the plate is cleaned with IPA prior to each print. From your pix and your description of Z, the extruded PETG is not sticking. There is a hint to the problem where you say "...I went down to 0.000 adjustement for Z, can't get any lower !" The Z First Layer calibration is critical. It is not intuitive, actually the larger the magnitude of the negative value, the closer the nozzle is to the plate. So..... at 0.000 the nozzle is high above the plate... while at -1.700 (for example) the nozzle is close to the plate. As you get closer to -2.000 (closest) ... i.e. -1.7, -1.8... -2.0 the First Layer Calibration will likely crash and you know you are too close. Suggest trying something like -1.5 and try again. If better stick obtained, try -1.6 then -1.65 etc incrementally moving the nozzle closer to the plate each time until you get a good First Layer Adhesion. Then try a real print. If it pulls up on the first layer, stop the print, increase the magnitude of the Z - value (bigger number) slightly and try again. My rule of thumb is if the print has stuck thru the first layers until Z= 3.00 or so, you should have a good run for the rest of the print.
@kps is right. You've been dialling the wrong way....
You shouldn't need *any* gluestick with the textured print sheet.
Gluestick *is* useful when printing PETG on the smooth sheet but you are using far too much. A single wipe with glue, then spread it with a wet paper towel and you are about right.
Cheerio,
RE:
Salut,
your nozzle is way too high. On the textured plate you have to go substantially lower and squeeze the filament also into the "valleys". If it only touches the "peaks" then the surface is too small to get enough adhesion.
When performing z-live adjustment you can either restart from 0 and turn the knob quickly right from the start until the filament lines form square angles. You can also continue from the previously stored z-live.
Positive z uniformly points upwards -- for the nominal axis value as well as its offset. On more recent firmware you can store the z-live for several plates because the different plates need different z-live. The difference between the smooth PEI and textured plate is roughly 0.4mm.
I stopped cleaning with IPA or alcohol at all. They spread grease only but do not flush it away from the plate. Please clean the bed with plain dish washer detergent (the cheap one without additives) and flush ist with plenty of warm water holding it below a water typ (robinet). Dry it by waggling and dry the last drops and edges with a clean, fresh paper towel. Please do not use a rag. Afterwards never touch the plate with your fingers. I pick up finished parts with a paper towel in each hand. The skirt often can be pushed away with the part. If not I push it with a grater for ceran-board (plaque vitrocéramique). That way I do not have to clean the plate for many dozen prints at all.
Do not use glue. Do not use the smooth PEI plate for PETG.
see also: youtube video by prusa, help.prusa3d .. premiere-couche, forum life-adjust-z-my-way,, prusa3d.com/fr/materials
Salutations
Mathias
RE: Starting with PETG and headaches
Hello Guys,
Thanks for reacting so quickly !
Some feedback after applying your comprehensive advises (for which I do thank you @KPS / @Diem and @blauzahn).
After good cleaning of textured sheet, performed a new 1st layer calibration (adhesion was already way better just having cleaned the glue).
I went through a 2nd layer calibration to get better adhesion (- 1.2 gave a good "plain" surface at the end of calibration).
The only minor flaw I still have is melted PETG going out of nozzle between heating and print start resulting in few drops.
I couldn't resist and just launched a printing, went smoothly to the end and absolutely no problem to get the finished piece from sheet.
So "merci beaucoup" for your reactivity.
Best / Mike
RE:
The only minor flaw I still have is melted PETG going out of nozzle between heating and print start resulting in few drops.
Go to this thread. Pay particular attention to all of the posts by a guy named Bobstro. Visit his website. Implement his starting g-code in place of the default starting g-code in your slicer. It will change your life.
It's not a total cure but it's a vast improvement.
RE: Starting with PETG and headaches
One hint I might offer, since I see that you are using the textured build plate, is to 'tune' the Z calibration just to the point that the 'brush strokes' on the square section just disappear into the textured pattern on the underside. That seems to be the sweet spot for prints done on those textured plates.
Another thing you might do after you have the internal Z calibration dialed in is to first, change the bed leveling on the print start-up from 3x3 probing to 7x7 probing, and then use any of various 3x3 one-layer test prints to further refine the calibration by checking and, if needed, correcting for any front/rear and/or left/right differences.


