Bed adhesion problem with the Prusa Silver PLA that comes with the 3S+
I've used three other types of filament (two PLA and a PETG from different manufacturers) with few to no issues and decided to try the Prusa Silver PLA (*not* Prusament Galaxy Silver) that comes with the machine.
Using the Prusa PLA settings it does not adhere very well on the first layer - either to the bed or to adjacent extruded lines.
Its printing at 215/60 stock settings
So far I've
1. Raised temps. Up to 70 on the bed and 230 on the extruder.
2. Increased extrusion rate - some indication that extrusions were getting slightly stretched
Any suggestions of what else to try? Remember - this is not the Galaxy Silver Prusament I'm talking about.
RE: Bed adhesion problem with the Prusa Silver PLA that comes with the 3S+
The silver that just came with my 3S+ kit worked great.. Can you send a good picture of a Z calibration print?.. maybe there are some clues there.. You should not need 70F on the bed.. 60/220 should be fine. I'm guessing your Z is too high and for some reason the other two PLA have better adhesion. PETG will stick to your smooth sheet like crazy.. so if you weren't using anything on your smooth sheet and it released okay.. then your Z is likely too high.. Don't print PETG on your smooth sheet with a proper Z unless you use glue stick or some other barrier, like Windex. It may bond so well you'll ruin your PEI smooth sheet.
RE: Bed adhesion problem with the Prusa Silver PLA that comes with the 3S+
Welcome to the forum!
I agree with @crab that a pic will come handy. Anyway, how did you clean the bed between prints?
Cheers
Chris
I try to give answers to the best of my ability, but I am not a 3D printing pro by any means, and anything you do you do at your own risk. BTW: I have no food for…
RE:
I've found that most of my adhesion issues (PLA) are due to the build plate not being clean. I regularly clean all my build plates with Dawn dish soap. Gets all the scummy human finger oils off the plate.
- Layout clean paper towels to lay the clean plates on
- Wash your hands first in hot water with Dawn dish soap.
- Wash the build plates with Dawn soap, being sure to rinse them well and hold them on the edges only.
- Lay the build plates on the paper towels in between each.
- Pick them up and carry them using paper towels.
- Dry them with paper towels while not touching them (hold them with a paper towel).
- Put them back on the Prusa Printer and watch you perfectly print.
This is my methodology. So far, it works pretty darn well. Except when I'm lazy and don't clean them. If you're careful and don't touch the build plates (except on the edges), I can do 4 to 5 builds without a wash. Perfect adherence every time!
Note: if your build plate is trashed (scratch all to hell, chipped, broken, chewed by the dog), I would recommend buying another. I always buy an extra when buying a printer. My 2 cents..
.
Take my advice and live for a long, long time. Because the maddest thing a man can do in this life is to let himself die. : Miguel de Cervantes Saavedra, Don Quixote ---- Transport Unfriendly…
RE: Bed adhesion problem with the Prusa Silver PLA that comes with the 3S+
I consider that silver-gray filament which comes as a sample with our machines to be kind of the gold standard WRT how a PLA filament should and will perform on a properly-tuned MK3S series machine. I believe this is the same stuff that is sold by FilamentPM and is noted on their site that it comes from the Czech Republic. I've replenished my supply from the US FilamentPM site.
I use this filament as the standard when I re-do the first layer calibration after a nozzle change or any other procedure. I've found that if the calibration is done successfully with this filament, both the internal one-square and zig-zag and the more rigorous 3x3 print, it will work well with about any PLA using the 'Generic PLA' settings of both PrusaSlicer and Cura.
I've used the 'Prusa PLA', the 'Generic PLA', and the 'PrusaMENT PLA' settings with this filament with very close to equal results. (When I got the kit, I assumed the included filament was PrusaMENT and used those settings with it until I found out it was actually Prusa-Non-Ment filament.) IIRC, the only difference between those three profiles is a 5 degree difference for the latter.
If I had your particular issue, here is the way I would proceed.
1. Change the bed leveling from 3x3 to 7x7 if you have not done so already. This means that the start-up of each print will take longer, but the less than a minute that it adds will pay for itself by avoiding just one time-wasting failed print!
2. Be sure that your build plate is Really Most Sincerely Clean! (The Holy Man of My Religion says that it matters not HOW you clean it, but the fact that it IS free of all contamination, crud, dirt, oils, etc.)
3. Be sure that your Prusa sample filament is dry. If there's any question about this, dry it. It won't hurt it.
4. Do an internal Z calibration and pay close attention to the shape of the bead on the zig-zag lines, the corners of the zig-zag lines, and the degree of 'squish' on the single square. The profile of the bead should have an oval shape and the corners of the zig-zag should be clean and square. If the filament 'pulls' sideways when doing a corner, it probably means that the Z is too high, the plate is not Really Most Sincerely Clean (tm) or both.
5. When the internal calibration is dialed in, do one of those 3x3 test prints (from the prints section or elsewhere) and make any needed adjustments to the front/rear and/or left/right Z settings if needed.
When this is done, do any of various test prints, such as the 20x20x20 calibration cube, the Tree Frog, etc., and critically examine it. You probably don't want to do a Benchy at this time, as that's more of a torture test than a sanity check.
If your test print is good, you should be good to do just about any PLA print with any standard PLA filament without changing any parameters from the standard profile.
RE: Bed adhesion problem with the Prusa Silver PLA that comes with the 3S+
I also have this problem with the Prusa Silver PLA. From what I've seen, there is a significant amount of shrinkage that almost always curls up the edges and eventually causes the print to come free of the bed. Like OP, I printed with the stock "Prusa PLA" settings of 215/60.
I've printed the exact same G-code with many other brands of PLA, including Prusament, and each of them came out perfectly. Printing with the silver PLA usually resulted in failure, sometimes after 6-7 hours of printing. The first layer is clearly stuck down well, but after several hours it will begin to curl up from the edges like other types of plastic do.
I do have the 7x7 bed leveling grid set up as well. I'll see if I can dig out a sample from the PLA waste bin and post a pic.
The only failures I've ever had due to bed adhesion with this printer were when using the silver PLA it came with and printing something with a large surface area touching the build plate.
RE: Bed adhesion problem with the Prusa Silver PLA that comes with the 3S+
Thank you all for your help. I believe I have fixed the issue - bad first layer calibration. It seems to be printing just fine now.
I started a print then stopped it during the first layer, lowered the nozzle down to '0', then got in there with some feeler gauges to get it down to 0.2mm. Restarted the print and was able to fine-tune it from there.
For the 1st layer calibration process they really should allow you to use this process more easily rather than making you stop in-progress prints to tune Z.
RE:
It sounds like you aren't aware that you can do a "live" tuning of the Z calibration. Print the model that has 9 squares with a one layer height.. and as they print, press and hold the LCD button.. The Z layer is shown and you can then turn the LCD button to lower/raise the Z layer as it is printing.. I find having one of those ultra-bright small flashlights and a 3x set of glasses allows me to see how flat that first layer is.. once you get a bit of experience, it only takes a minute to tune your Z this way. No need for feeler gauge. There is a model that you can use to set the initial binder height.. to an optimum value and after that.. you just do a live Z tune to dial it in. I have found that after about 100 hours, your Z might wander.. not sure why.. but I've had to tweak my Z a few times in 3 months.
Thank you all for your help. I believe I have fixed the issue - bad first layer calibration. It seems to be printing just fine now.
I started a print then stopped it during the first layer, lowered the nozzle down to '0', then got in there with some feeler gauges to get it down to 0.2mm. Restarted the print and was able to fine-tune it from there.
For the 1st layer calibration process they really should allow you to use this process more easily rather than making you stop in-progress prints to tune Z.
your Z might wander.. not sure why
As your nozzle wears with use the Z offset changes gradually, that's why there's no fixed value for the first layer Z calibration.
Cheerio,
RE: Bed adhesion problem with the Prusa Silver PLA that comes with the 3S+
It sounds like you aren't aware that you can do a "live" tuning of the Z calibration. Print the model that has 9 squares with a one layer height.. and as they print, press and hold the LCD button.. The Z layer is shown and you can then turn the LCD button to lower/raise the Z layer as it is printing.. I find having one of those ultra-bright small flashlights and a 3x set of glasses allows me to see how flat that first layer is.. once you get a bit of experience, it only takes a minute to tune your Z this way. No need for feeler gauge. There is a model that you can use to set the initial binder height.. to an optimum value and after that.. you just do a live Z tune to dial it in. I have found that after about 100 hours, your Z might wander.. not sure why.. but I've had to tweak my Z a few times in 3 months.
Thank you all for your help. I believe I have fixed the issue - bad first layer calibration. It seems to be printing just fine now.
I started a print then stopped it during the first layer, lowered the nozzle down to '0', then got in there with some feeler gauges to get it down to 0.2mm. Restarted the print and was able to fine-tune it from there.
For the 1st layer calibration process they really should allow you to use this process more easily rather than making you stop in-progress prints to tune Z.
Ok - I used the Live Z tuning to fine tune the print. That's how you do it. Like . . .
What I didn't know is how close the nozzle needs to be - I was just guessing with Live Z and some not very good pictures. Looking up some more information online I found the recommended distance range. With *that* information I was then able to actually tune it properly. With that information and the feeler gauge I was able to confidently get it to the distance it was supposed to be.
Like, the calibration pattern doesn't do you any good if you don't know what the first layer is supposed to look like.
RE: Bed adhesion problem with the Prusa Silver PLA that comes with the 3S+
Ahhh.. thanks!! .. had forgotten the wear in brass..
your Z might wander.. not sure why
As your nozzle wears with use the Z offset changes gradually, that's why there's no fixed value for the first layer Z calibration.
Cheerio,
RE: Bed adhesion problem with the Prusa Silver PLA that comes with the 3S+
Ok - I used the Live Z tuning to fine tune the print. That's how you do it. Like . . .
What I didn't know is how close the nozzle needs to be - I was just guessing with Live Z and some not very good pictures. Looking up some more information online I found the recommended distance range. With *that* information I was then able to actually tune it properly. With that information and the feeler gauge I was able to confidently get it to the distance it was supposed to be.
Like, the calibration pattern doesn't do you any good if you don't know what the first layer is supposed to look like.
You shouldn’t need a feeler gauge for this and, there is no ‘target’ Z height number that will be the same for every printer. The number will vary with build tolerances and lots of other things.
I suggest you read through the first few posts in this thread and download the print files included at the bottom of the first post. This is what saved my sanity when I first started 3D printing and I had no idea what a first layer print should look like:
Good luck!
RE: Bed adhesion problem with the Prusa Silver PLA that comes with the 3S+
I know there isn't a target number and that it will vary between printers - even of the same model.
But getting it into that range *and then tuning* it made it exceptionally easy to get to the right offset compared to running the First Layer Calibration test (the test the manual tells you to run) and then trying to tune it in from there when you might be starting out at a milimeter or more high.
RE: Bed adhesion problem with the Prusa Silver PLA that comes with the 3S+
So, running the built-in Z level calibration is a quick way to get into the general range where you’re actually getting some ‘squish’ out of the nozzle and begin to stick to the bed.
As the long horizontal lines are laid down you quickly spin the rotary knob counter-clockwise until the rounded corners start to square off. Once you fell like you’re getting close, let the print finish and see what the ‘flag’ at the end looks like. If you’re still way high, run it again and slowly dial the Z lower until you get solid lines, sharp 90* corners, and a flag that you can’t break between your fingers.
When you get to this point, try running the ‘Life adjust Z - my way’ calibration square to fine tune your final Z value. There’s a beep at the halfway point to prompt you to dial a second value for comparison, but I will chang it 4-5 times during a single run, writing down each value as I go. When I think I’ve identified the best Z height, I run another square all at that one value. Rinse & repeat as required.
I’ll randomly run a coupon with whatever material I’m using just to confirm my settings are still solid and make adjustments as needed.
But it sounds like you got it. Enjoy!
RE: Bed adhesion problem with the Prusa Silver PLA that comes with the 3S+
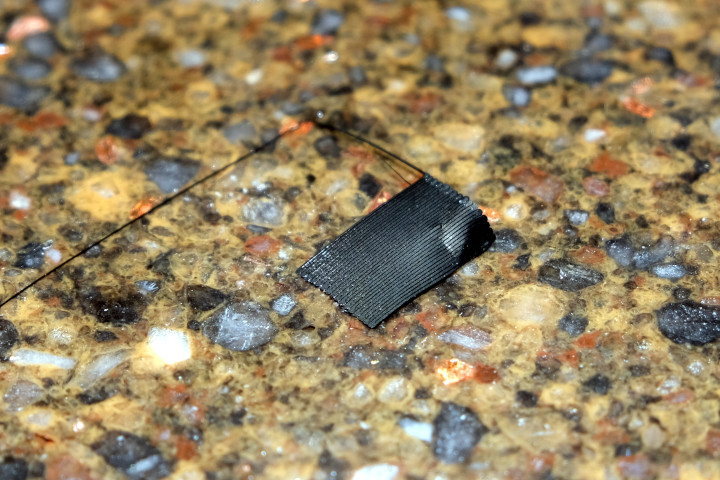
Here is a shot of what the underside of that 'flag' looks like when it's getting close to being dialed in. Notice that the bottom surface of the beads are flat but not so much as to be squished together.
The zig-zag lines should have a nice oval shape when viewed in cross-section (look closely, use a loupe or magnifying glass if needed) and the corners of the pattern should be square and show no tendency to pull when the extruder does a 90 degree change in path.