PLA not working, PETG working fine
Hello Prusa forum.
I got a cheap 3D printer 6 - 7 years ago, and it had a lot of problems, so I was thinking buy the better solution, that you don't have to work with, just enjoy. So got the mark3+, ready to print version.
Got some PLA and PETG from Prusa at the same time. Standard PLA from Prusa, and PETG Prusament. I had a lot of problems with the printer not working, at the start. Everyone said, use PLA easiest to work with, so I did. However, the print never worked and had a dialog with Prusa support, just nothing to got me anywhere. So before I packed the printer away, I tried the PETG. It worked nearly flawlessly.
I mainly use it to print dnd figures, but with PETG I got it to print almost to the edge of the bed size pieces.
Got an image, from the left a cheap chinese 3d printer, orange PETG, and the right Prusa PLA: Imgur: The magic of the Internet
Is there something wrong with my machine, settings or are Prusa PLA just not that great?
I tried the 3dbrency, and almost all of the demo models from the SD card, nothing works with PLA.
No problems but stringiness, and sometimes ekstra materiale drops from long prints from the PETG.
A confused new Prusa user.
Best Answer by JoanTabb:
Good afternoon Jesper
looking at the bottoms of your models,
the Live Z setting is not correct,
I suggest that you start off by washing the build plate with HOT Water and a little dish soap, rubbing firmly with a new kitchen sponge
then rinse well with clean hot water, Dry with plain paper towels and then handle by the edges of the buildplate. at this stage do not use anything else on the build plate, no IPA, No Hair Spray, No Glue stick... nothing but clean PEI Surface
Then I suggest you confirm that 7x7 mesh bed levelling is set active in the LCD Menu, (this tests 49 points on the build plate, instead of the normal 9 points)
Then I suggestt hat you use the "Life Adjust 'Z' My Way" process to adjust your first layer squish.
https://forum.prusa3d.com/forum/original-prusa-i3-mk3s-mk3-assembly-and-first-prints-troubleshooting/life-adjust-z-my-way/
there are three test files in the zipfile at the bottom of the first post use the PLA version
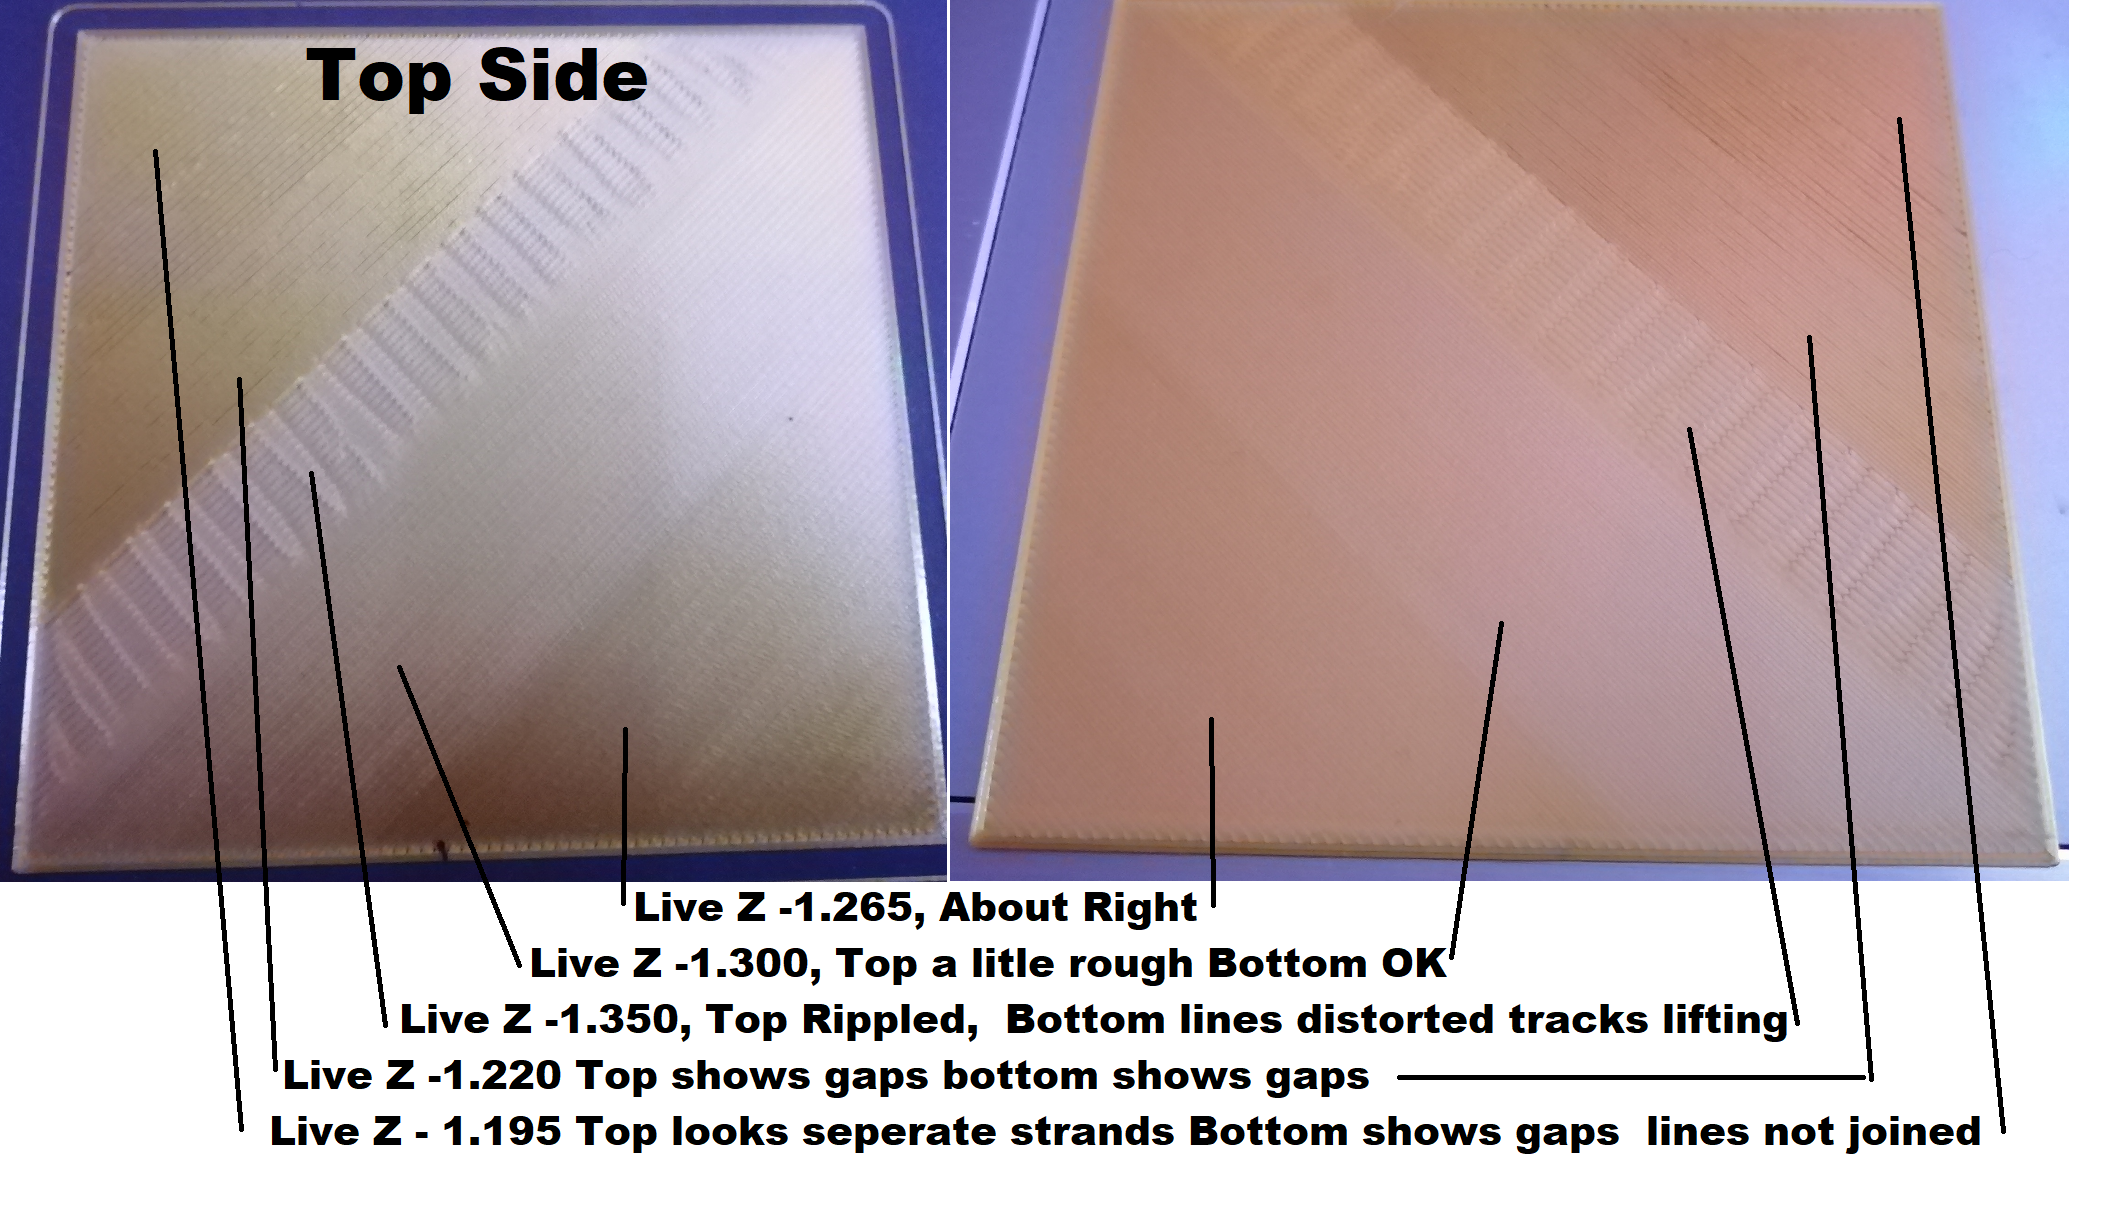
In the picture below, you can see various textures, caused by different ammounts of squish. the actual numeric values are unique to my printer with that particular build pate but you can see how relatively small changes in value, cause significant changes in surface quality
with a clean build plate and a good level of squish, your prints will adhere well to the build plate.
Note, the test square should adhere well to your build plate, and when you remove the patch, it should come off in one continuous sheet,
RE: PLA not working, PETG working fine
Hi Jesper,
could you please show pictures of the bottom of the grey pieces?
and a picture of the printer build plate that you are using?
regards Joan
I try to make safe suggestions,You should understand the context and ensure you are happy that they are safe before attempting to apply my suggestions, what you do, is YOUR responsibility.Location Halifax UK
RE: PLA not working, PETG working fine
@joantabb
Thank you for replying.
I haven't changed anything since receiving the printer, so it is just the normal build plate.
I have updated the imgur folder with bottom pictures and build plate: Imgur: The magic of the Internet
RE: PLA not working, PETG working fine
Good afternoon Jesper
looking at the bottoms of your models,
the Live Z setting is not correct,
I suggest that you start off by washing the build plate with HOT Water and a little dish soap, rubbing firmly with a new kitchen sponge
then rinse well with clean hot water, Dry with plain paper towels and then handle by the edges of the buildplate. at this stage do not use anything else on the build plate, no IPA, No Hair Spray, No Glue stick... nothing but clean PEI Surface
Then I suggest you confirm that 7x7 mesh bed levelling is set active in the LCD Menu, (this tests 49 points on the build plate, instead of the normal 9 points)
Then I suggestt hat you use the "Life Adjust 'Z' My Way" process to adjust your first layer squish.
https://forum.prusa3d.com/forum/original-prusa-i3-mk3s-mk3-assembly-and-first-prints-troubleshooting/life-adjust-z-my-way/
there are three test files in the zipfile at the bottom of the first post use the PLA version
In the picture below, you can see various textures, caused by different ammounts of squish. the actual numeric values are unique to my printer with that particular build pate but you can see how relatively small changes in value, cause significant changes in surface quality
with a clean build plate and a good level of squish, your prints will adhere well to the build plate.
Note, the test square should adhere well to your build plate, and when you remove the patch, it should come off in one continuous sheet,
I try to make safe suggestions,You should understand the context and ensure you are happy that they are safe before attempting to apply my suggestions, what you do, is YOUR responsibility.Location Halifax UK
RE: PLA not working, PETG working fine
Again thank you for the help.
I will try it when the printer is finished with the current job.
My current offset is -1,4, done with the tool provided by Prusa. (Can't see the numbers when its printing)
I have uploaded two pictures of the current job, where the bottom already printed. (PETG)
I believe it looks close to your picture of the right bottom, or maybe "A little rough"? Always find it so hard to compare pictures, with live prints.