RE: life adjust Z - my way
Hi,
A big thank you for this thread! I downloaded and ran the calibration programs and discovered I was a close, but a bit too thin for PLA and PET-G. It only took a couple of runs to get right both sheets at .2mm. Then I discovered my extrusion rate was a bit too thin. A quick bump by 10% up in flow, and I'm getting an excellent first layers.
Now, I just need to work on dimensional accuracy in my printed models. Those aren't real stable yet. Are there any tutorials I can read or watch on the subject?
P.S. I love the title of the thread. I would have probably passed over it had it not been for "Life adjust z"!
RE: life adjust Z - my way
@joantabb
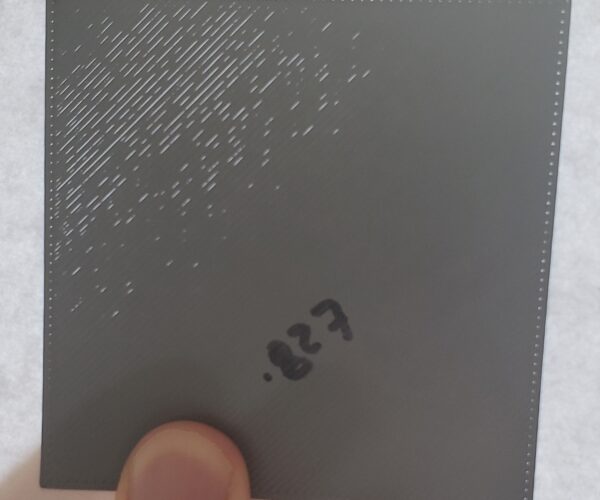
Hi! Switched it up to 7x7 and also bumped the z from 3 to 5. Here's a single square result. Those are gaps in the upper left. The rest of it looks somewhat improved though! What's the best way to address something like that?
Hi,
I had the same issue myself. When I got to .2mm in thickness, I saw that I was getting strand separation like you. I decided the easiest thing to do was to go to Tune and scroll down to Flow and increase your extrusion flow a bit. Then test a new square. Adjust until you get a good fill and weld and still keep that .2mm thickness.
RE: life adjust Z - my way
I am having a similar issue. The thinnest layer that I can get is .24mm and that is with voids at the end of most of the diagonals. I bumped the flow by 15% and that solved about 60% of the voids, but the thickness went to .26. I am stumped.
Drinking alcohol can cause memory loss. Or worse, memory loss!
RE: life adjust Z - my way
@dalee1002000
I think Life Adjust was a spelling mistake, in the first place. but it has certainly attracted attention over the years!
regards Joan
I try to make safe suggestions,You should understand the context and ensure you are happy that they are safe before attempting to apply my suggestions, what you do, is YOUR responsibility.Location Halifax UK
RE: life adjust Z - my way
@joantabb
Hi! Switched it up to 7x7 and also bumped the z from 3 to 5. Here's a single square result. Those are gaps in the upper left. The rest of it looks somewhat improved though! What's the best way to address something like that?
Hi,
I had the same issue myself. When I got to .2mm in thickness, I saw that I was getting strand separation like you. I decided the easiest thing to do was to go to Tune and scroll down to Flow and increase your extrusion flow a bit. Then test a new square. Adjust until you get a good fill and weld and still keep that .2mm thickness.
Boosting the flow for the first layer is likely to give problems with over extrusion Higher in the model.
have you checked your Raw filament dimensions? if these are undersize you should change the filament Diameter value in the filament settings tab. (Measure at several points along a reasonable sample of filament measuring twice, at 90 degrees to each other at each point, as filament is often not round. )
regards Joan
I try to make safe suggestions,You should understand the context and ensure you are happy that they are safe before attempting to apply my suggestions, what you do, is YOUR responsibility.Location Halifax UK
RE: life adjust Z - my way
I am having a similar issue. The thinnest layer that I can get is .24mm and that is with voids at the end of most of the diagonals. I bumped the flow by 15% and that solved about 60% of the voids, but the thickness went to .26. I am stumped.
Have you re levelled your X axis recently?
drive the Z axis tot he top, reset the printer and then raise the Z axis again, until both sides of the X axis stall against the Z axis top braces,
then autohome, and re run, Life adjust Z, My way... Increasing the flow on the printer to correct first layer issues, is a poor solution....
Once the centre of the build plate is adjusted with Live Z... you can try adjusting the outer areas of the heatbed with 'Bed level correction'.
some people use 'the Nyloc Nut Method', to improve bed levelling,
I have five Prusa's and haven't had to do that myself, yet!
regards Joan
I try to make safe suggestions,You should understand the context and ensure you are happy that they are safe before attempting to apply my suggestions, what you do, is YOUR responsibility.Location Halifax UK
RE: life adjust Z - my way
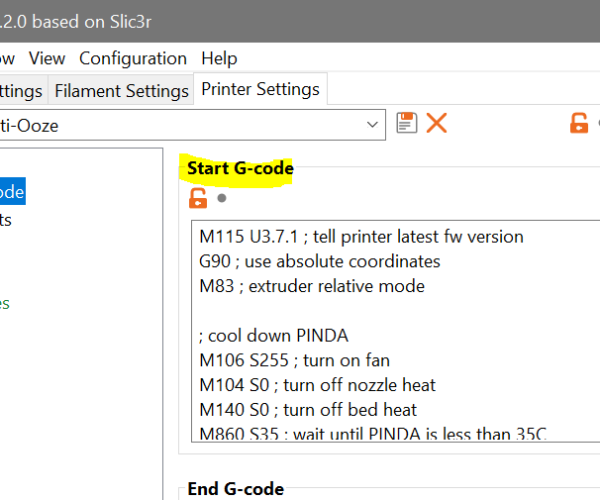
what is the gcode you used at the beginning. its not standard for a prusa. ie. how did you get it to heat to a cooler temp so the plastic doesnt drip out of the nozzle during the mesh bed leveling and the heat fully after the leveling
RE: life adjust Z - my way
Jeff Jordan, created the files in Simplify3d...
there is no magic, all of the commands are in the Gcode.
You could integrate the commands into your Prusa Start Gcode in Prusa Slicer, if you wished!
regards Joan
I try to make safe suggestions,You should understand the context and ensure you are happy that they are safe before attempting to apply my suggestions, what you do, is YOUR responsibility.Location Halifax UK
RE: life adjust Z - my way
An example of custom g-code ...
M115 U3.7.1 ; tell printer latest fw version
G90 ; use absolute coordinates
M83 ; extruder relative mode

; cool down PINDA
M106 S255 ; turn on fan
M104 S0 ; turn off nozzle heat
M140 S0 ; turn off bed heat
M860 S35 ; wait until PINDA is less than 35C
M106 S0 ; turn off fan

; preheat nozzle to a low temp, get plastic mushy before driving into the bed with G28
M140 S[first_layer_bed_temperature] ; set bed temp
M109 S175 ; wait for extruder temp
M190 S[first_layer_bed_temperature] ; set & wait for bed temp
G28 W ; home all without mesh bed level

; soak PINDA then level
G0 X50 Y50 Z1 F3000; this is a good PINDA heating position
M860 S37.5 ; wait until PINDA is >= 35C in winter, 37.5C spring/fall, 40C summer
G80 N7 R5; mesh bed leveling

; heat to extrude temp
G0 X0 Y-3.0 Z10 F3000; this is a good nozzle heating position
M109 S[first_layer_temperature] ; set & wait extruder temp

; purge
G1 Y-3.0 Z0.20 F1000.0 ; go outside print area
G92 E0.0
G1 X1.0 Y-1.0 E0.5 F500.0 ; scribble 1
G1 X1.0 Y-3.0 E0.5 F500.0 ; scribble 1
G1 X2.0 Y-1.0 E0.5 F500.0 ; scribble 2
G1 X2.0 Y-3.0 E0.5 F500.0 ; scribble 2
G1 X3.0 Y-1.0 E0.5 F500.0 ; scribble 3
G1 X3.0 Y-3.0 E0.5 F500.0 ; scribble 3
G1 X60.0 E9.0 F1000.0 ; intro line
G1 X100.0 E12.0 F1200.0 ; intro line
G1 X97.0 F2000.0 ; wipe left
G1 X105.0 F3000.0 ; wipe right
G92 E0.0

M221 S{if layer_height<0.075}100{else}95{endif}

; end Printer Start gcode
RE: life adjust Z - my way
Have you re levelled your X axis recently?
drive the Z axis tot he top, reset the printer and then raise the Z axis again, until both sides of the X axis stall against the Z axis top braces,
then autohome, and re run, Life adjust Z, My way... Increasing the flow on the printer to correct first layer issues, is a poor solution....Once the centre of the build plate is adjusted with Live Z... you can try adjusting the outer areas of the heatbed with 'Bed level correction'.
some people use 'the Nyloc Nut Method', to improve bed levelling,
I have five Prusa's and haven't had to do that myself, yet!regards Joan
Joan
I have leveled the X axis by raising the Z to the top on both sides. I have then let the initial calibration routine run through. Mesh is set to 7x7 and R is 5.
I have set the live adjust to get the thinnest pattern, but that is still closer to .3 than it is to .2. I realize that the live adjust number is different for each printer / PINDA setting. Right now, -1.975 is what I am using. Should I adjust the PINDA and if so, up? or down?. I think down. On my printer, the hole that the PINDA goes in is too tight to move the sensor easily. I back the screw way off, and then have to spread the flanges out with a small flat screwdriver. I still have to use considerable force (I am afraid of breaking something) to move the sensor.
This is my first printer and my first experiences with it, so I appreciate any guidance offered.
BTW, I will have to look up the "nyloc method"
TIA
Dave
Drinking alcohol can cause memory loss. Or worse, memory loss!
RE: life adjust Z - my way
@sledjunk
Down definitely. You are near the maximum sensing range of the pinda which is approx 2mm. If you have slack in the cable you can turn it like a screw and the threaded exterior will make it go down.
RE: life adjust Z - my way
@neophyl
Thanks. I don't really want to twist the thin wires for fear they will break. I'll try to adjust the probe today.
Drinking alcohol can cause memory loss. Or worse, memory loss!
RE: life adjust Z - my way
@tim-m30
How/where do you add that customer g-code to prusaslicer? In advanced mode under Printer Settings? If so, assuming in the start G-code section?
RE: life adjust Z - my way
I’m a real newbie. Just set and started yesterday. When you speak of Gcode And changing it versus what comes with the printer...I’m lost. I need to know how to do this. I’ve tried several different first prints that were sent on the data stick sent with the kit. So far I am 0/6. I need help to ensure the PLA sticks and that the models work. Thanks.
RE: life adjust Z - my way
You should not need to change any gcode for test prints.
If you are having trouble getting the test prints to stick to the print bed, there are several discussions about that here on the forum, just look around. If you need help, be very very specific as to what's happening and include photos of your failed prints if you can.
RE: life adjust Z - my way
@ddelgado
Hi,
temporarily forget about editing Gcode.
In most instances the beginner can get good results with the sample gcode off the SD Card, and later with Gcode created by Prusa Slicer, using the pre formatted profiles...
there are however a few things that have to 'be right' before success can be expected... ~
As you are a Newbie, let's assume, you either have a factory built, or self built kit mk3S printer. that was perfectly assembled by Prusa or yourself/friends...
there are a couple of things I would suggest that you do, straight away.
1, reach for the tube of grease that should have come with your printer and do a bit of Maintenance... (It MAY not be necessary at this time, but it's unlikely to do any harm, whilst it may well prevent problems now, or in the near future... (Wash your hands afterwards to ensure you don't contaminate anything with grease)
so smear a thin film of grease on your X, Y and Z smooth rods, and work your X and Y axis across the grease a couple of times to re distribute it.
https://help.prusa3d.com/en/article/i3-printers-regular-maintenance_2072#rods-and-bearings
2, Make sure your build plate is absolutely clean...
I wash mine (Really well)with hot water and dish soap, rinse well with hot water and dry with Paper towels
then handle the build plate by the edges to prevent finger prints.
put the build plate back on the printer making sure that there is nothing between the heatbed and the build plate.
3, use the LCD control knob to select 'Settings - Mesh bed leveling - Mesh' and choose 7x7, in preference to 3x3.
7x7 Mesh Bed Leveling tests 49 points on the build plate, 3x3 MBL only tests 9 points...
4, go to the following link
https://forum.prusa3d.com/forum/original-prusa-i3-mk3s-mk3-assembly-and-first-prints-troubleshooting/life-adjust-z-my-way/
and download the zip file with version 6.1 profiles, that you will find at the bottom of the first post, on the first page.
Unzip the files and copy them onto your SD Card (Don't forget to 'Eject' your SD card properly, in the computer software, before physically removing the SD Card...
once you have done this, move the SD card to the printer, inserting it face downwards in the SD Card slot.
and turn your printer on. and select 'Preheat > PLA' on the LCD Menu.
I am going to assume that you have successfully loaded your Silver Grey Prusa filament. If not, please do so now
If you can't get to the nozzle with a tissue, Press and Hold, the LCD Control knob until you see 'Z: ' on the LCD screen, the chances are that where ever the extruder is, the display will initially show 'Z: 0.00' turn the knob until the extruder raises to about 100mm. actual value is not critical.
when the heater temperature stabilises at 215C take a tissue, fold it a couple of times, and carefully wipe the nozzle clean, being careful not to burn your fingers on the hoe components around the nozzle area
now go to Print from SD card, select the Life adjust Z PLA test pattern, and start it printing...
there is plenty of info in the Life Adjust 'Z My Way thread, to describe what you need to do, to get a good first layer...
you may have to try a couple of times, clearing the filament off the build plate between tests... before you get a good first layer...
Once you have your good first layer, it's time to print... 😀
5, clear the good first layer print off the build plate, and then select Print from SD Card, select a test model (say the Prusa Logo, or the Batarang. then sit back, cross your fingers and watch in awe, as you get your first good print...
if you get bored, or have problems, here is some light reading for you...
https://www.prusa3d.com/new-user-guides/
https://help.prusa3d.com/en/tag/mk3s/print-quality-troubleshooting_225
https://www.prusa3d.com/ebook-basics-of-3d-printing-with-josef-prusa/
https://help.prusa3d.com/en/category/material-guide_220
I wish you good luck, and happy printing.
regards Joan
I try to make safe suggestions,You should understand the context and ensure you are happy that they are safe before attempting to apply my suggestions, what you do, is YOUR responsibility.Location Halifax UK
RE: life adjust Z - my way
Thanks so much for this tool. Now, how do I actually change the Z-adjustment? I noticed it did beep in the middle of the print, which is when I should make the change.
RE: life adjust Z - my way
this video is a bit slow, and features a Prusa 13 mk3S with Bear upgrade... (all aluminium frame and some different plastics...)
It's a bit slow, but may help!
Joan
I try to make safe suggestions,You should understand the context and ensure you are happy that they are safe before attempting to apply my suggestions, what you do, is YOUR responsibility.Location Halifax UK


