Bad adhesion printbed
Hello,
My second 3D printer, the Pruse i3 MK3S+ assembled en it was a joy to do.
My first was an Ultimate Original from 2013 so it was time to change.
My first prints were ok but I'm not satisfied with the adhesion of the printbed.
I do have the spring sheet with smooth double-sided PEI and spring sheet with doubled-sided powder-coated but both have a very disappointing and bad adhesion.
I clean the sheet with Isopropanol and the PEI also with aceton (not the powder-coated, that one only with Isopropanol). Josef Prusa also said that in his video to promote the printer.
I tried also the gluestick that comes with the printer and also tried hairspray (with my first printer the hairspray worked extemely good on heated glass, exceptionally good actually).
I have tried to heat the printebed to 60 or 65 degreees but both cases very bad adhesion.
I print with PLA and use the grey one that comes with the printer.
I tried the following object, the triangel is 135 x 60 mm and by point 1 and point 2 it is warping because of the bad adhesion.
Forget the weird protrusions (near point 1 and 2, I forgot to use supports).
What is shown in the picture worked ok at first, because I forgot the suport I broke off the print but the next print I tried went bad.
The first layers doesn't stick to well to the heatbed so after more attempts I seek a solotion here.
I hope that someone can tell me to increase the adhesion so I can print the object in the picture (it is for a makita battery charger).
The printer works just fine so if the adhesion is fine then I'm happy.
Btw, I have calibrated the bed and I'm satisfied with the calibration and the result.
RE: Bad adhesion printbed
Maybe I'm just lucky, but I've never had trouble getting prints to stick.
I would say just be sure your sheet is clean and your calibration is good. If it's too high it might not stick as well.
RE: Bad adhesion printbed
Clean both beds with dish soap , is a lot better.
Powder coated bed, use this for petg, only clean and use petg. PLA does not stick good on powder coated bed, bed temperature 10 higher, first layer a little lower then normal, use a big brim attach to model, use glue stick. Big flat models in general use a big brim and glue stick.
Pei sheet, clean with dish soap, then pla should work. also use a big brim with warping, and use glue stick.
Important for printing is to learn:
1. Clean the bed. Dish soap, this the best cleaning method.
2. First layer calibration needs to be 100%, put time in this, is very important for the printing you want to do, search on this forum and youtube how to get first layer to the highest level.
Both setting are needed to get sticking to the bed to the highest level.
RE: Bad adhesion printbed
@peter-m-3
Powder-coated stick perfectly with PLA for me. PETG sticks too much.
--------------------
Chuck H
3D Printer Review Blog
RE: Bad adhesion printbed
Hello again,
I found the solution, thanks to jeffjordan test plate, see also: https://forum.prusa3d.com/forum/original-prusa-i3-mk3s-mk3-assembly-and-first-prints-troubleshooting/life-adjust-z-my-way/
I found out that my Z-calibration was not good enough. On the eye I thought it was perfect but when I measured the thickness of the testplate it was more than 0.3 mm!
I will explain what I did.
First print the test that jeffjordan made, I print in PLA. I made a slight adjustment for the tempetures. I print on 225° and the bed is 70°.
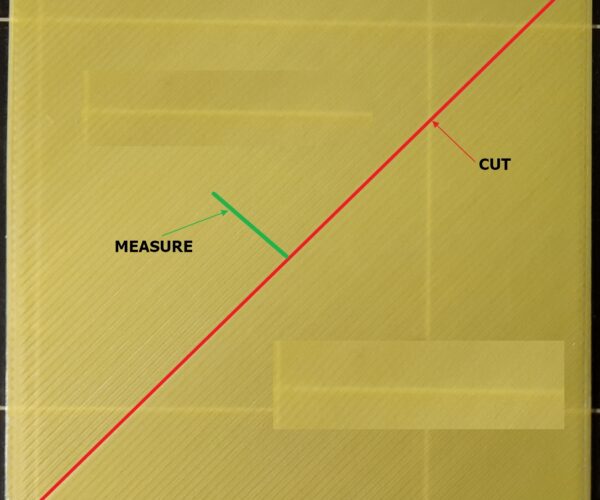
Then I cut the printed first layer in half, see red line in the picture:
Then measure the tickness over the green line in the middle.
It have not to be exact 0.2 mm but close to it. I needed to adjust the Z-calibration from -0.730 to -0.900 to get a good print.
I measured with a normal caliper (I don't have a micrometer gauge or a digital caliper) and measured 0.21 a 0.22 more or less.
Another indication the the tickness is good is when you feel the bottom of the print, it needs to be smooth and solid. The printed lines must not separate from eachother and you may not feel it. On the top of the print you may feel every single printed line but not on the bottom.
After this calibration I printed then above object en used also a raft of 8 mm and the print was perfect.
The adhesion tot the printbed was also a lot better.

