PETG - "tail" after each line
Hi all,
Still a beginner so sometimes might ask if I don't fully get a certain terminology.
I'm trying to make a few print on my new pre-assembled Mini (arrived Monday) with Prusament PETG for the lack enclosure. Two days ago I was relatively successful, but forgot to put a small layer on the PEI Smooth Sheet so had a few small bubbles on one side.
After that, I've had to readjust some parts on the Mini under guidance of support and some things I read online. Most noteworthy:
- Adjusted the heatbreak because it was sticking out too much (i.e. too low), indeed there was a minor clog in the tube when I looked at if from above through the hotend after my first few prints. Now the heatbreak is at a good height and the hot-end PTFE tube is mounted under pressure as per instruction (it stuck out a little when bolting down).
- Adjusted the pulley and gear of the filament extruder because of excessive clicking noise when changing Z positions.
- Lubricated the rods + bearings again and increase tension slightly on Y-belt because I was having some grinding noises (this was guided by Support Chat).
So after that I've did a few PLA prints which work generally fine. I still have some oozing and curling to the nozzle of the filament when preheating before the print and cooling-down after the print. But if I understand correctly that is normal?
Today I wanted to continue with my Lack Enclosure parts and swapped back to PETG. I've used a Glue stick to put a layer of on the PEI Sheet for protection. However, I'm having trouble to get a cosistent first layer. There is some stringing, but mainly, at the end of each "line" when the printer moves to a next section, it created a small "tail" of filament. E.g. dragging it slightly up. Causing in the end filament to stick to the nozzle as well and creating more issues down the line of course:


Trying to print on 0.02mm with default Prusament PETG profile. I've only lowered the first layer speeds slightly to 15 mm/s because first time printing with PETG this helped tremendously.
I've both tried lowering the Z Adjust and highering it, but I'm hardly seeing any improvement. Maybe a more experienced eye can point me in the right direction?
Thanks!
Rob
Kind regards and happy printing! Rob
RE: PETG - "tail" after each line
From the pictures it seems the nozzle is dragging in the filament so live z should be higher. PETG doesn’t like to be squished. Also I assume you mean 0.2 mm profile.
Formerly known on this forum as @fuchsr -- https://foxrun3d.com/
RE: PETG - "tail" after each line
Hi @fuchsr, thanks very much for your reply. Yes I meant 0.2 mm, small typo, but I was not able to edit the topic anymore after I posted somehow?
I've highered the live Z again and got it almost perfect (sorry for the warping, I already threw it away before I noticed the actual print is still messig up):

If I go a little higher, the result looks like this:

But as soon as I start the intended Lack Enclosure print again, I get this now even worse:


This is what I'm trying to print: https://www.prusaprinters.org/prints/4567-lack-enclosure-extra-table-connector/files
Sliced it for Prusa Mini (SPEED) with Prusament PETG on 0.2mm with 10% GYROID infill and some supports. Adjusted the first layer speed to 15 mm/s and movement speed between sections to 130 mm/s.
Kind regards and happy printing! Rob
RE: PETG - "tail" after each line
Your parameters look perfectly fine.
The first picture looks pretty good (warping aside). Second one is clearly too high (gaps between strands of filament). I’d go back to the Live Z setting of the first picture. Actually, regarding Live Z, I suggest you use this method, which is vastly superior to the built-in approach. I modify it by varying the Live Z probably more like 4 times over the course of one square, not just twice.
One thing that struck me was that your steel sheet needs some serious cleaning, which may well be the reason for lack of adhesion. There’s a ton of “shadows” of previous prints on it, plus what looks like fingerprints. I would take it to the sink, rinse it first with hot water.
Yes, Prusa doesn’t recommend hot water but EVERYONE on this forum does it… It may rust eventually but your sheet will be way beyond usable by the time it rusts.
Then use dish washing detergent (most folks here love Dawn but any fragrance-free detergent will do the job) and a Scotch Brite pad or similar to give it a good scrub and get rid of the crud. Thoroughly rinse it with hot water, several times. Dry with a paper towel. Don’t touch the print surface with your fingers. Before printing, wipe the sheet with 91+% isopropyl alcohol (IPA).
Actually, I just realized (and I should have noted earlier), you’re using the smooth sheet with PETG. While it’s certainly possible to print PETG on the smooth sheet (I have done it many times), it’s a bit trickier than on the textured sheet. Take a look at these two articles:
https://help.prusa3d.com/en/article/flexible-steel-sheets-guidepost_2195/#filaments
https://help.prusa3d.com/en/article/petg_2059
For PETG, don’t use IPA to wipe the sheet. Instead, wipe it with Windex and then apply a thin layer of glue stick (which I think you said you did).
I am confident you’ll be fine with a clean sheet and proper Live Z.
If nothing works, my next two ideas are a) try an agent like Layerneer Bed Weld, which I occasionally use (mostly for large squarish objects that like to warp at the edges)(but that’s more of a kludge than a solution), and b) get a textured sheet. I prefer the BCZAMD gold textured sheet over the Prusa sheet as it works great with any filament I’ve thrown at it.
-r
Formerly known on this forum as @fuchsr -- https://foxrun3d.com/
RE: PETG - "tail" after each line
Thanks again for your good instructions!
Yes the bed looks dirty, but that is basically because of the glue layer. After those calibration squares I've tried the print again once or twice which is on a different part of the bed. Instead of having to clean all the glue of first and reapply, after every failed attempt 😛
Actually the bed was squeaky clean before I put the glue on. I'm printing PLA now on the same bed (after cleaning) which works perfect.
Those failed attempt were btw with the Live Z settings of the "good" square. Somehow it is every time on the end of the line it drags some PETG up. I'll have a look at the other method to see if I can fine-tune even more. What I did understand is that PLA and PETG needs slightly different Z live values right?
I've a Satin Textured Sheet from Prusa on the way indeed, but thanks for the tip didn't know there were alternatives!
So to you it really seems a problem with the sticking on the bed? Not with the extrusion?
Kind regards and happy printing! Rob
RE: PETG - "tail" after each line
Yes, PLA likes to be squished a bit, PETG doesn’t, so — in theory — PETG would require a slightly less negative Z. I say in theory because in my hands I hardly ever have to adjust Z when I switch between PLA and PETG, which I do all the time.
Hard to diagnose remotely but my money is on adhesion. Especially because you’re not seeing any issues with PLA. Can’t hurt to do a cold pull but if there was anything affecting extrusion I’d think it would affect PLA as well or more (because of lower print temperature).
And you’re using the standard Prusament PETG profile so bed and hot end temperature should be correct, so we can exclude that as an issue.
And the outside of the nozzle and the hot end need to be squeaky clean as PETG likes to stick to itself, so every little bit of filament stuck to the nozzle and hot end may pull the filament up.
Formerly known on this forum as @fuchsr -- https://foxrun3d.com/
RE: PETG - "tail" after each line
Ok so I've fiddled a bit more with the Z Live following the method you linked to. I did this with PLA for now to rule out adhesion problems.
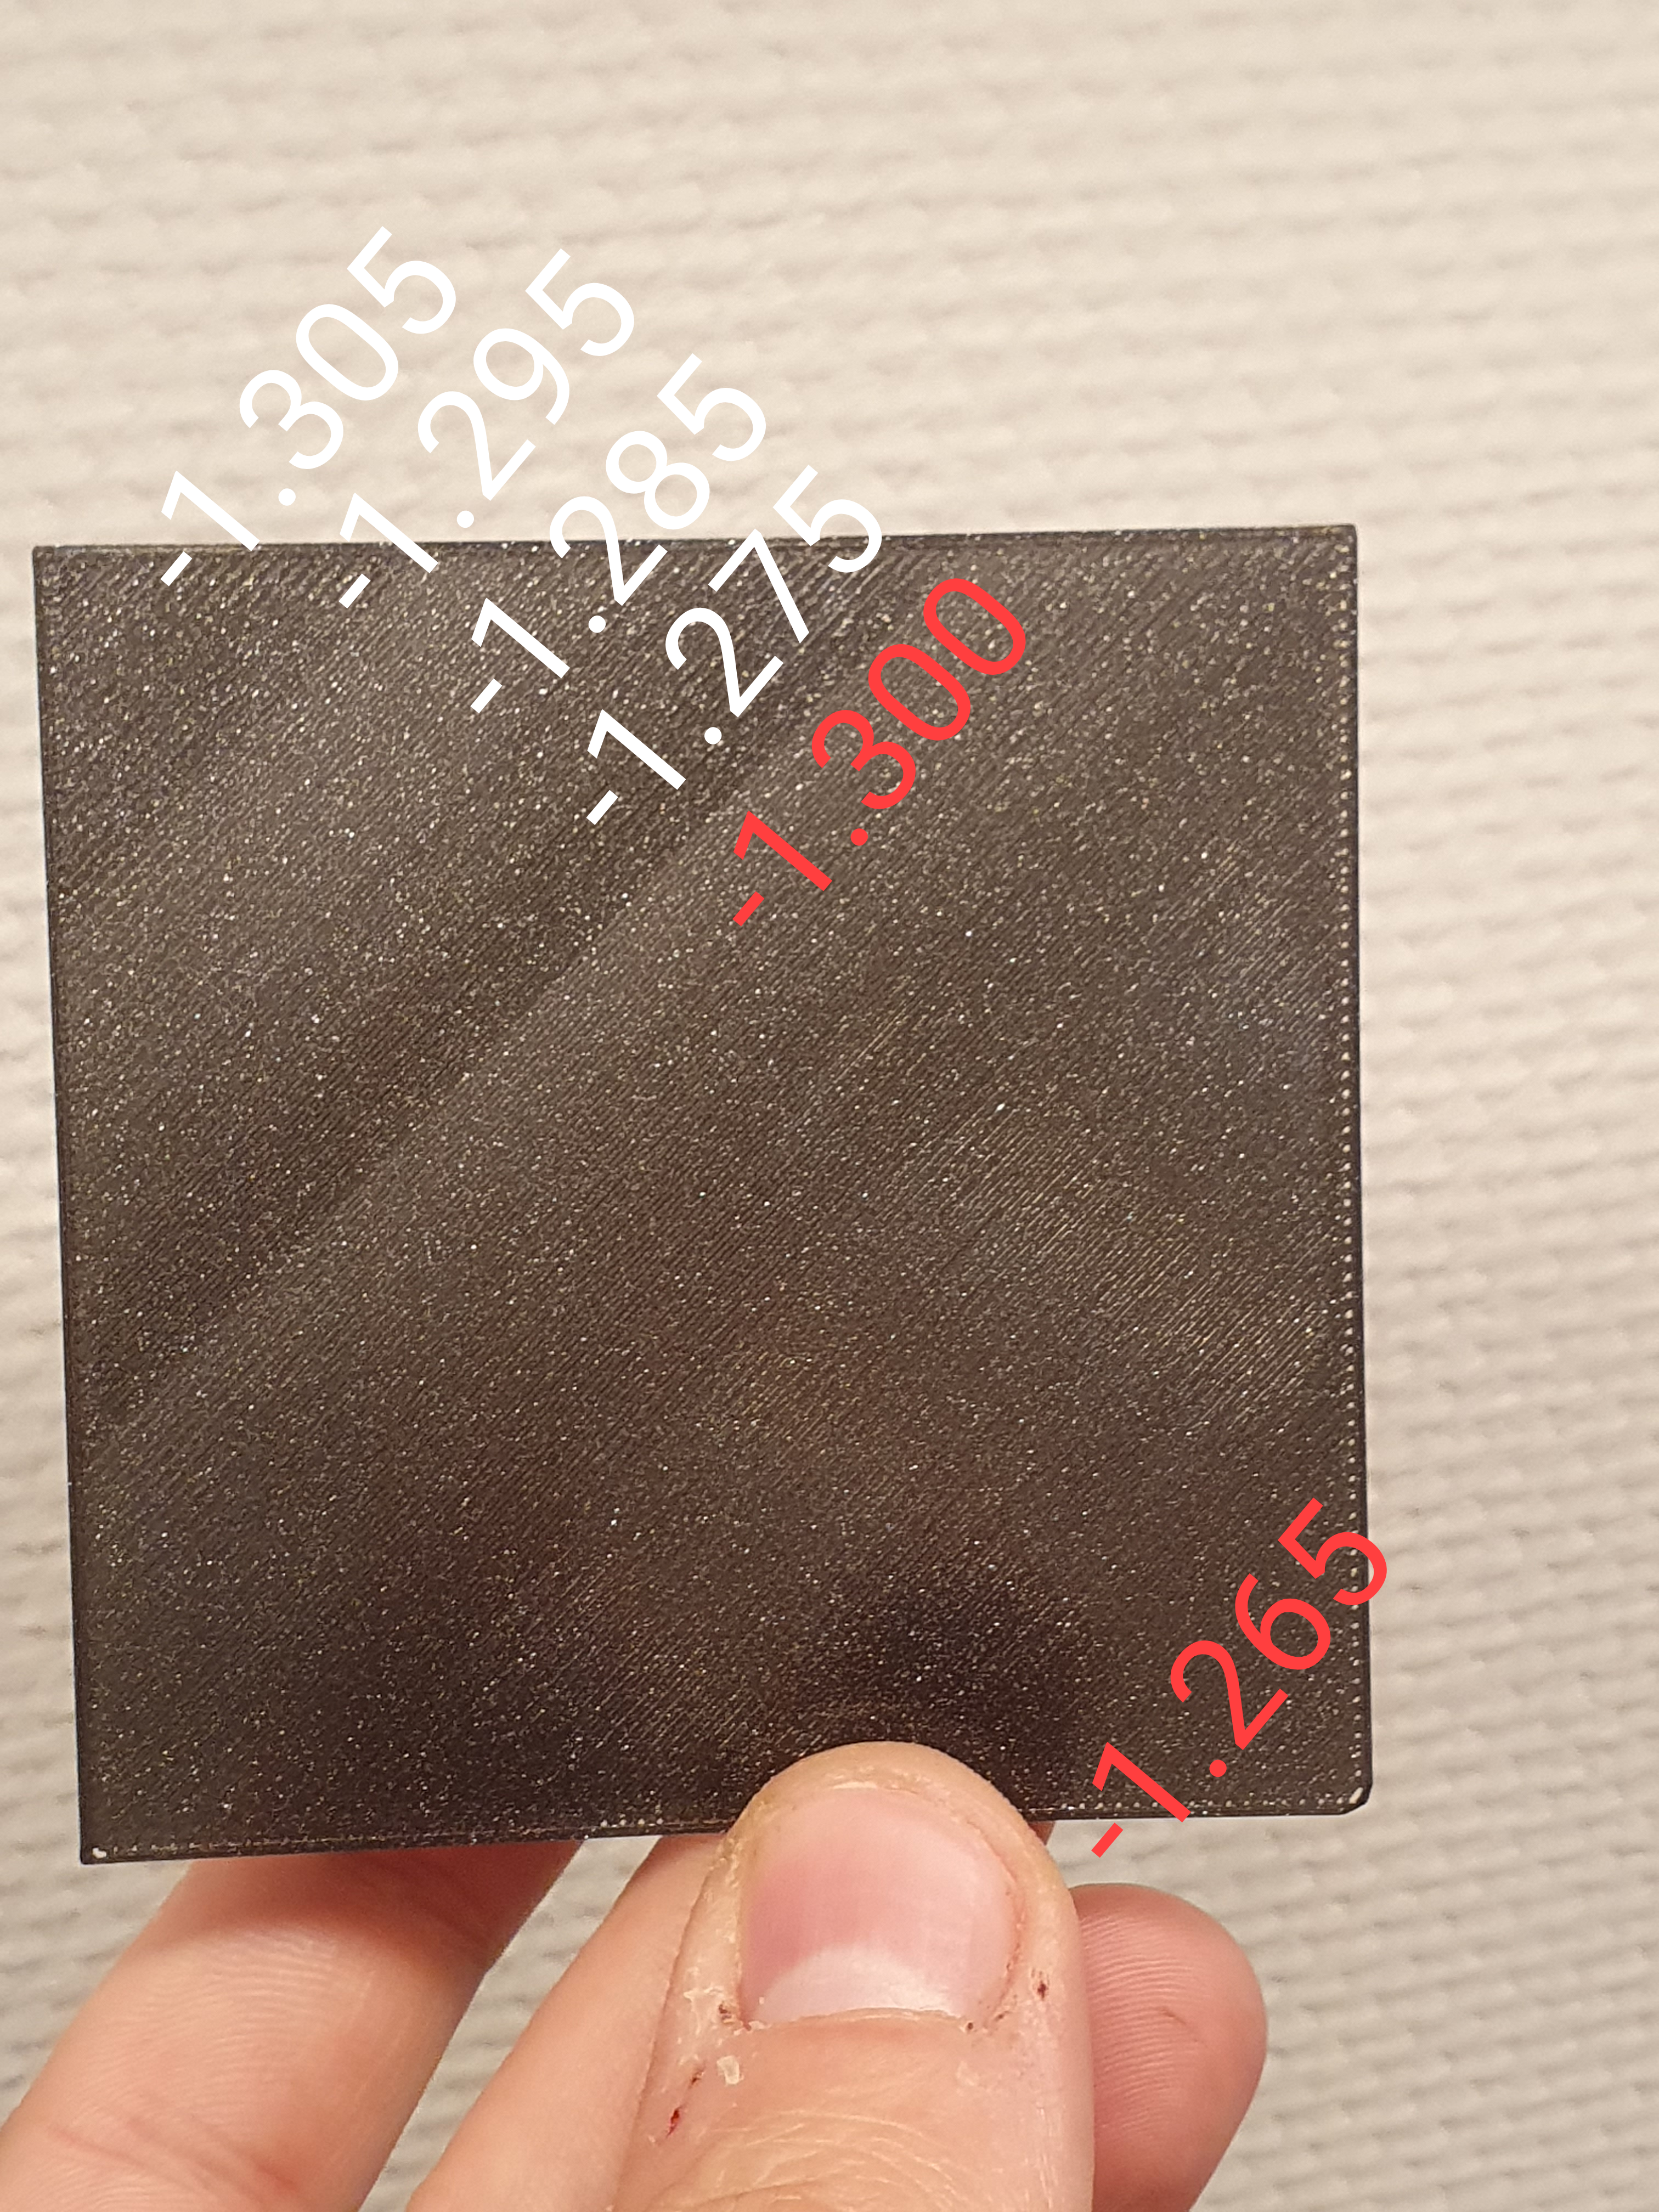
Turns out it was still too high and I think (thought read on :p) I nailed it down. I went slowly from - 1.265 to - 1.300 and the last went back to - 1.275 and make some quick hops to create some more contrast:
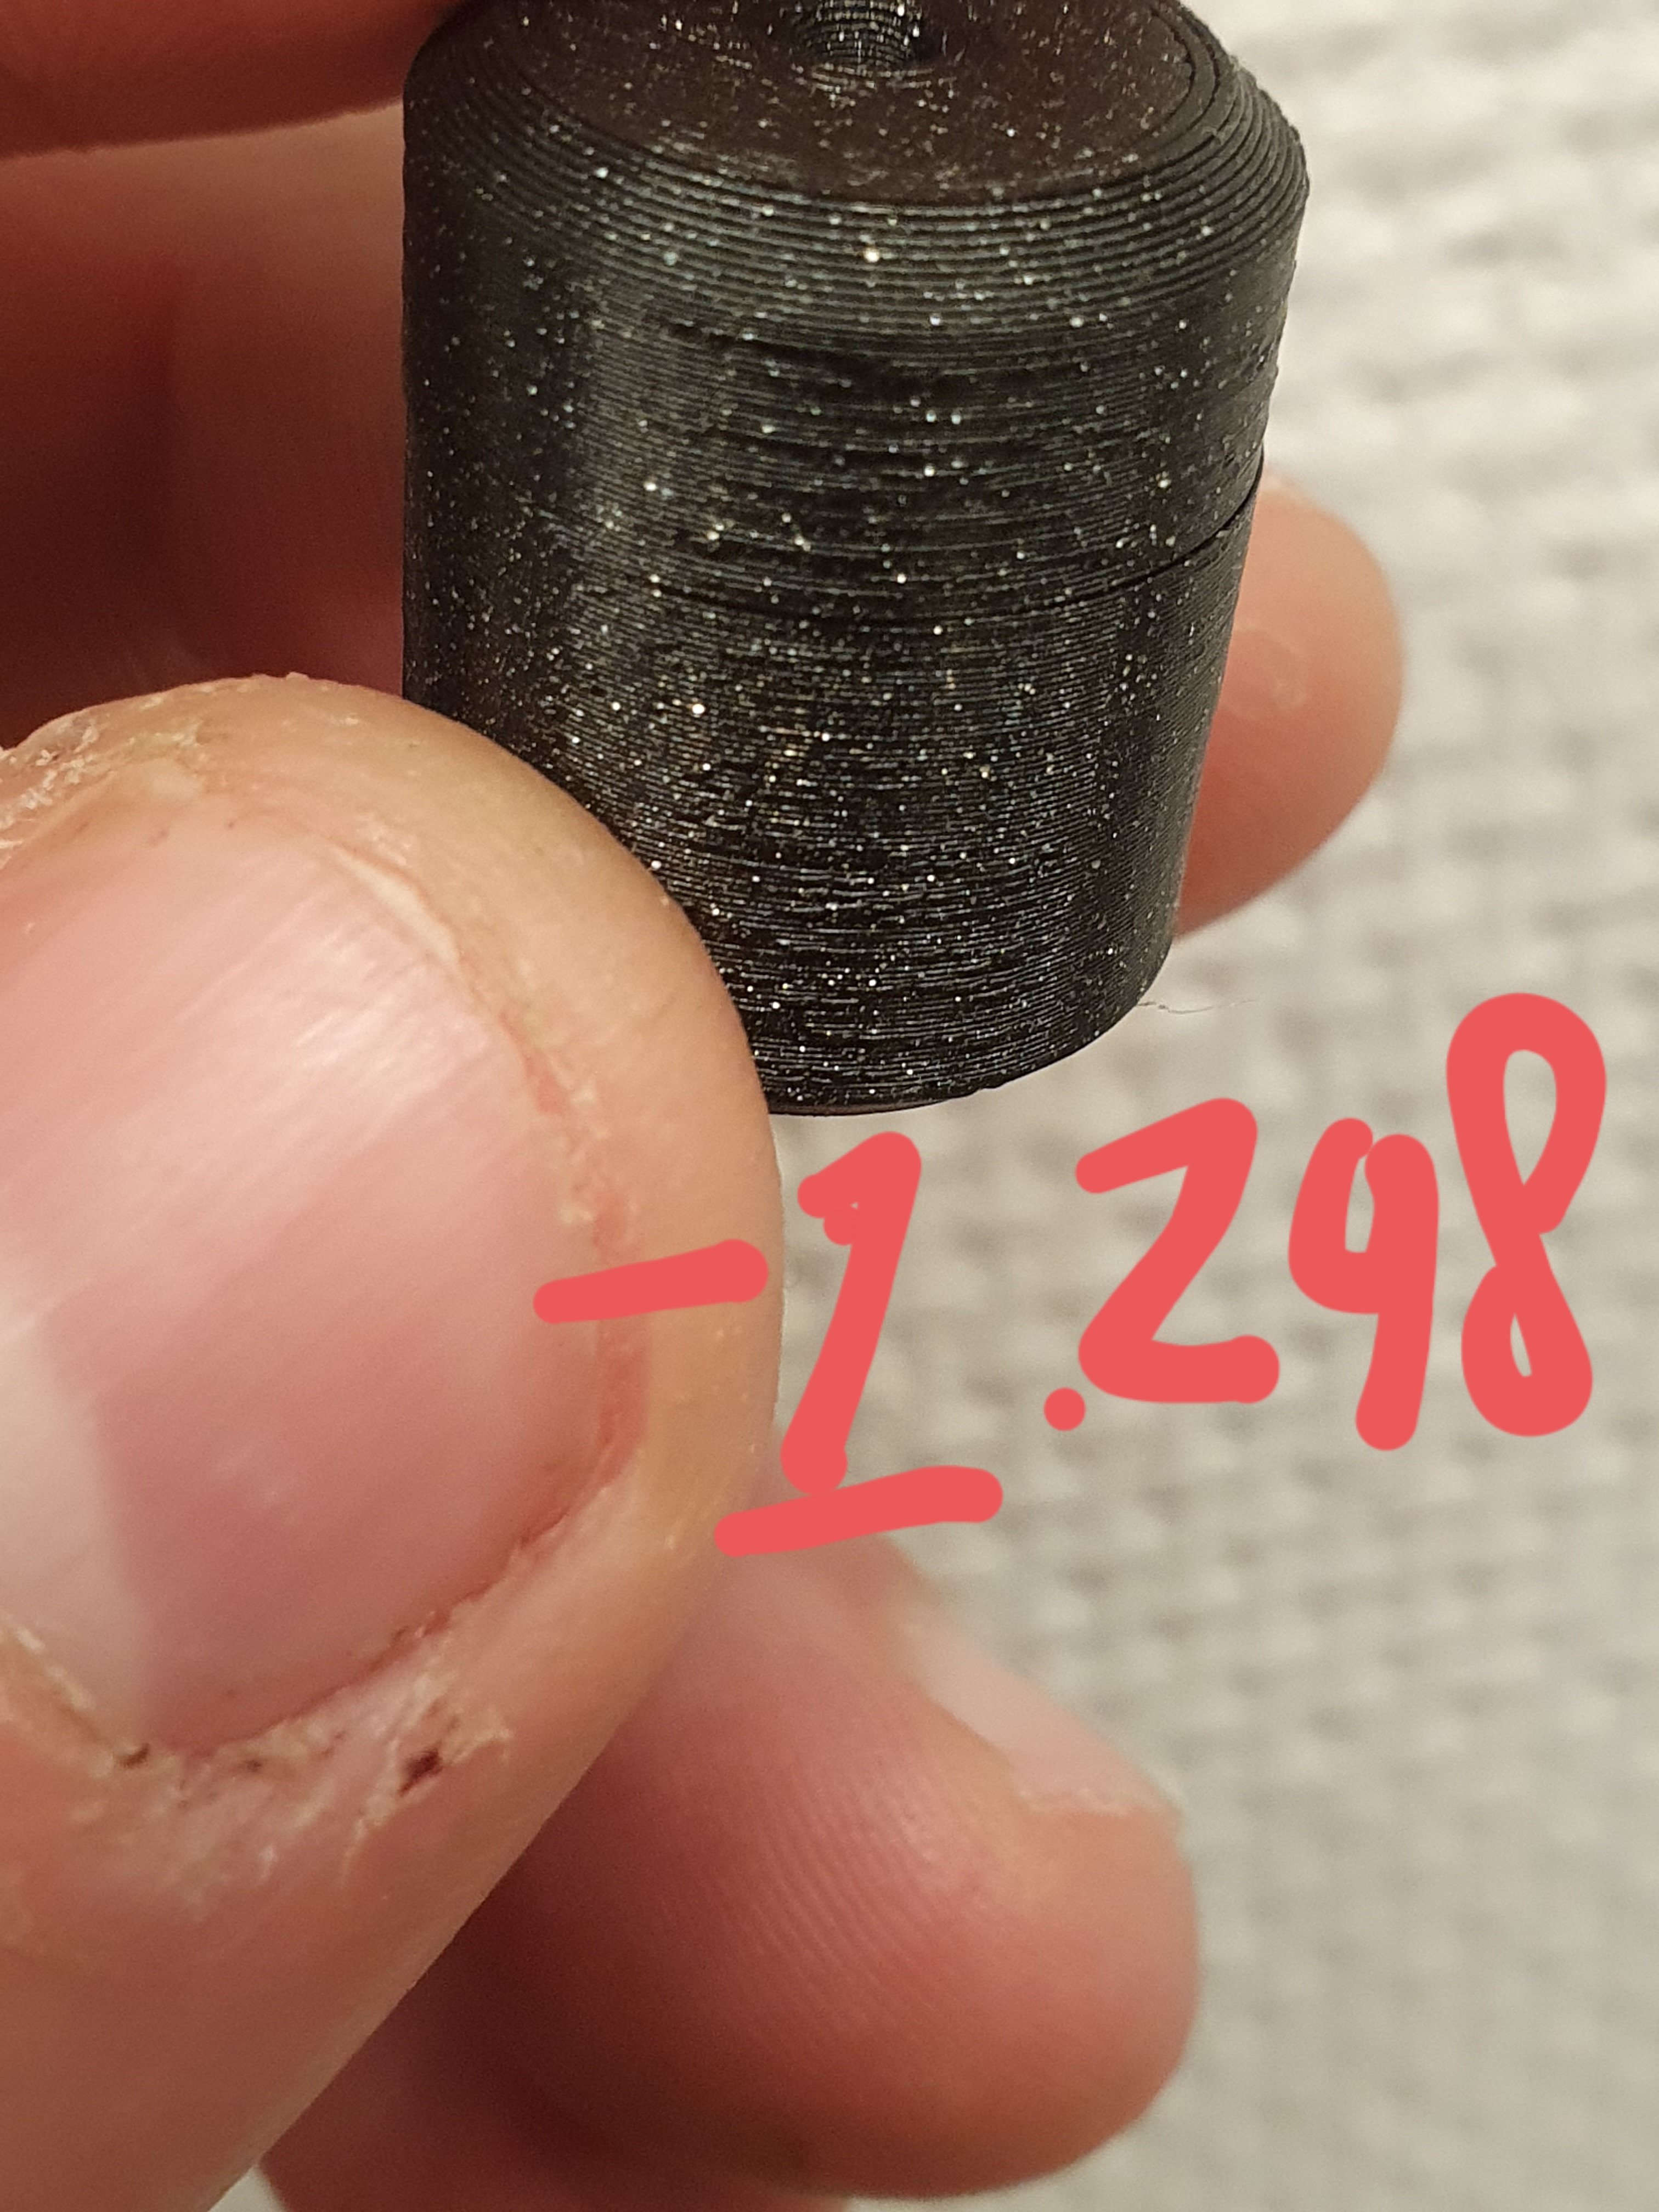
Then I did a small test print which was still on my list (filament filter) with 0.15mm layer height, again in PLA and Z Live on - 1.298.
Print went well but I noticed small "pits"/roughness on one side of the print in each layer:

So now I'm doubting if I went overboard or not with the Z Live or this is another issue? I did the same print slightly higher Z Live -1.292, but still seems to give same effect:

So one step forward and one step back at the moment :p Any thoughts?
Kind regards and happy printing! Rob
RE: PETG - "tail" after each line
Yeah, that's why we love 3D printing... There's always something new...
The Live Z looks good now, as far as I can see from the pictures. Now the pits -- I *think* I know what you mean but I'm not sure. Very peculiar that it should only happen on one side of the model. It's not a layer shift, and if it were some obstruction in the filament path I would expect to find artifacts randomly anywhere. Same goes for wrong temperature, which was my first thought, but then defects shouldn't be localized. What happens when you rotate it by say 180 degrees? Do the pits rotate as well (in which case I'd suspect there's something with the model) or do they stay? Could it be the Z seam? I'm not sure from the pictures. You can test by using the paint Z-seam function in the latest Prusaslicer. On a cylindrical object like that, you can't avoid dimples caused by the Z-seam.
Beyond that I'm plainly out of ideas...
Formerly known on this forum as @fuchsr -- https://foxrun3d.com/
RE: PETG - "tail" after each line
So we are one step further again (but as you said always something new). I managed to print the PETG overnight reasonably well. Apparently the glue was causing the adhesion issues... without glue it worked quite well on the smooth sheet even (and got it off without damage).
However, I've noticed a couple of things:
1. Z Live Height, is this a sign of still too low, or too high in the case for PETG?


First layer looked fine to me when priniting started initially, but see left photo for first layer.
2. Squaring issue? All the parts (printed 4 of the same) have an issue like this on some of the sides, where it's not square but slighlty bulging.

3. Again some "relievo" or not smooth parts in the layers, hope you can see from this picture. You see some very smooth lines and then some more sandpaper like lines.

As always input is very welcome, it learns me alot! 😀
Kind regards and happy printing! Rob
RE: PETG - "tail" after each line
Looks like some nice progress.
The first layer looks decent. Hard to gauge from a distance how much more potential for improvement there is. Why there’s some stringing on one of them, I don’t know.
Sane for the final models. One sideline observation. I don’t think you need supports for the screw holes. Without them, the top of the hole may sag a bit but should still be functional.
Squareness. That could be warping. May be caused by drafts, an enclosure might help. Or try printing slower. It actually reminds me that when I printed Lack components (albeit on an Mk3S) I had to dial speed down to 30% of usual to get good resulted. Why I don’t know and I never bothered to find out.
The uneven outside. Now that feels like a different story. My first guess would be belt issues. There’s a tool on prusaprinters.org that is very useful: https://www.prusaprinters.org/prints/46639-tension-meter-for-the-gt2-belts-of-i3-mk3s-or-prus
Could be belt tension or bearings. Check out the Prusa knowledge base for those topics. And lubricate the rods.
Or could be the extruder tension, which could be too high or low. I think there’s general agreement that the mini extruder is subpar. It works but seems sensitive to correct tension of the idler screw. Could be too low, so the filament slips or too high and it binds. I’ve replaced mine with the Trianglelabs clone of the Bondtech dual drive extruder. I found it to be less sensitive So you may want to try loosen or tighten the idler screw a bit to see if that makes a difference.
Formerly known on this forum as @fuchsr -- https://foxrun3d.com/
RE: PETG - "tail" after each line
@fuchsr
Thanks again for all the tips!
I've printed the belt tension meter and my Y-Belt was a bit too loose. So tightened that up 🙂 Yesterday did another part of the lack enclosure and I feel I'm getting somewhere. Print looks relatively clean with some minor black spots (PETG is sooo sticky), so silicons socks are on order.
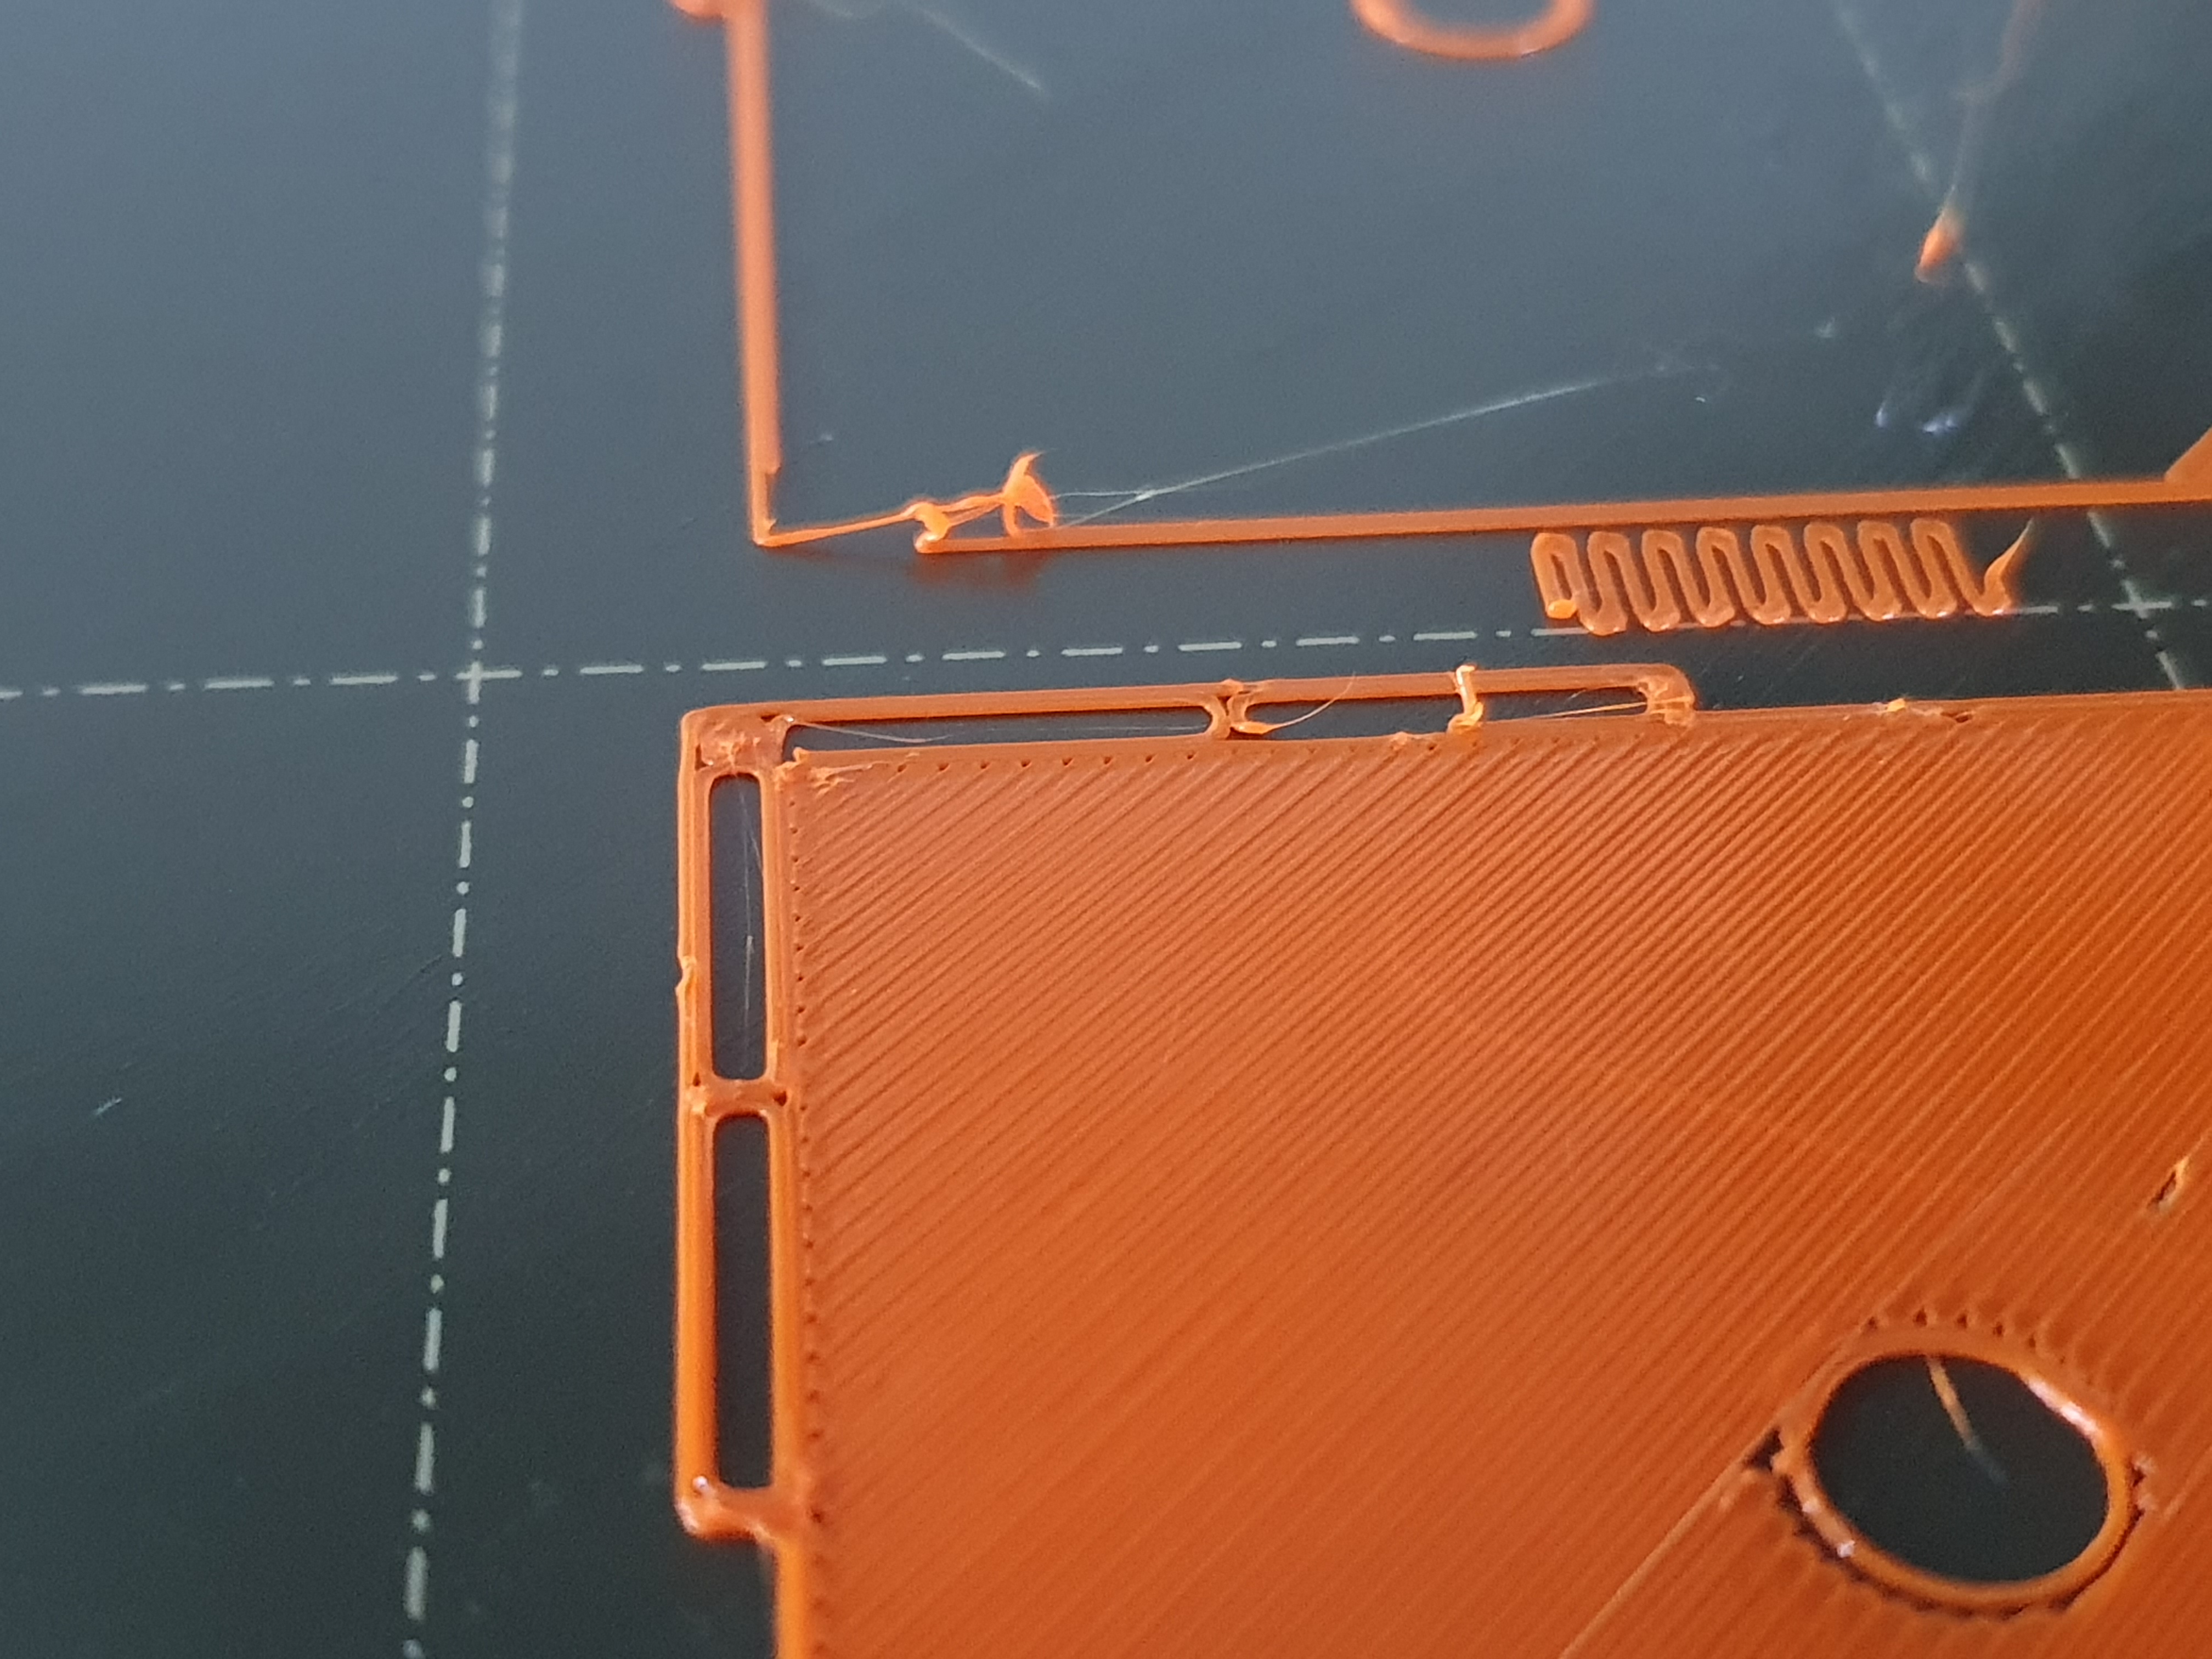
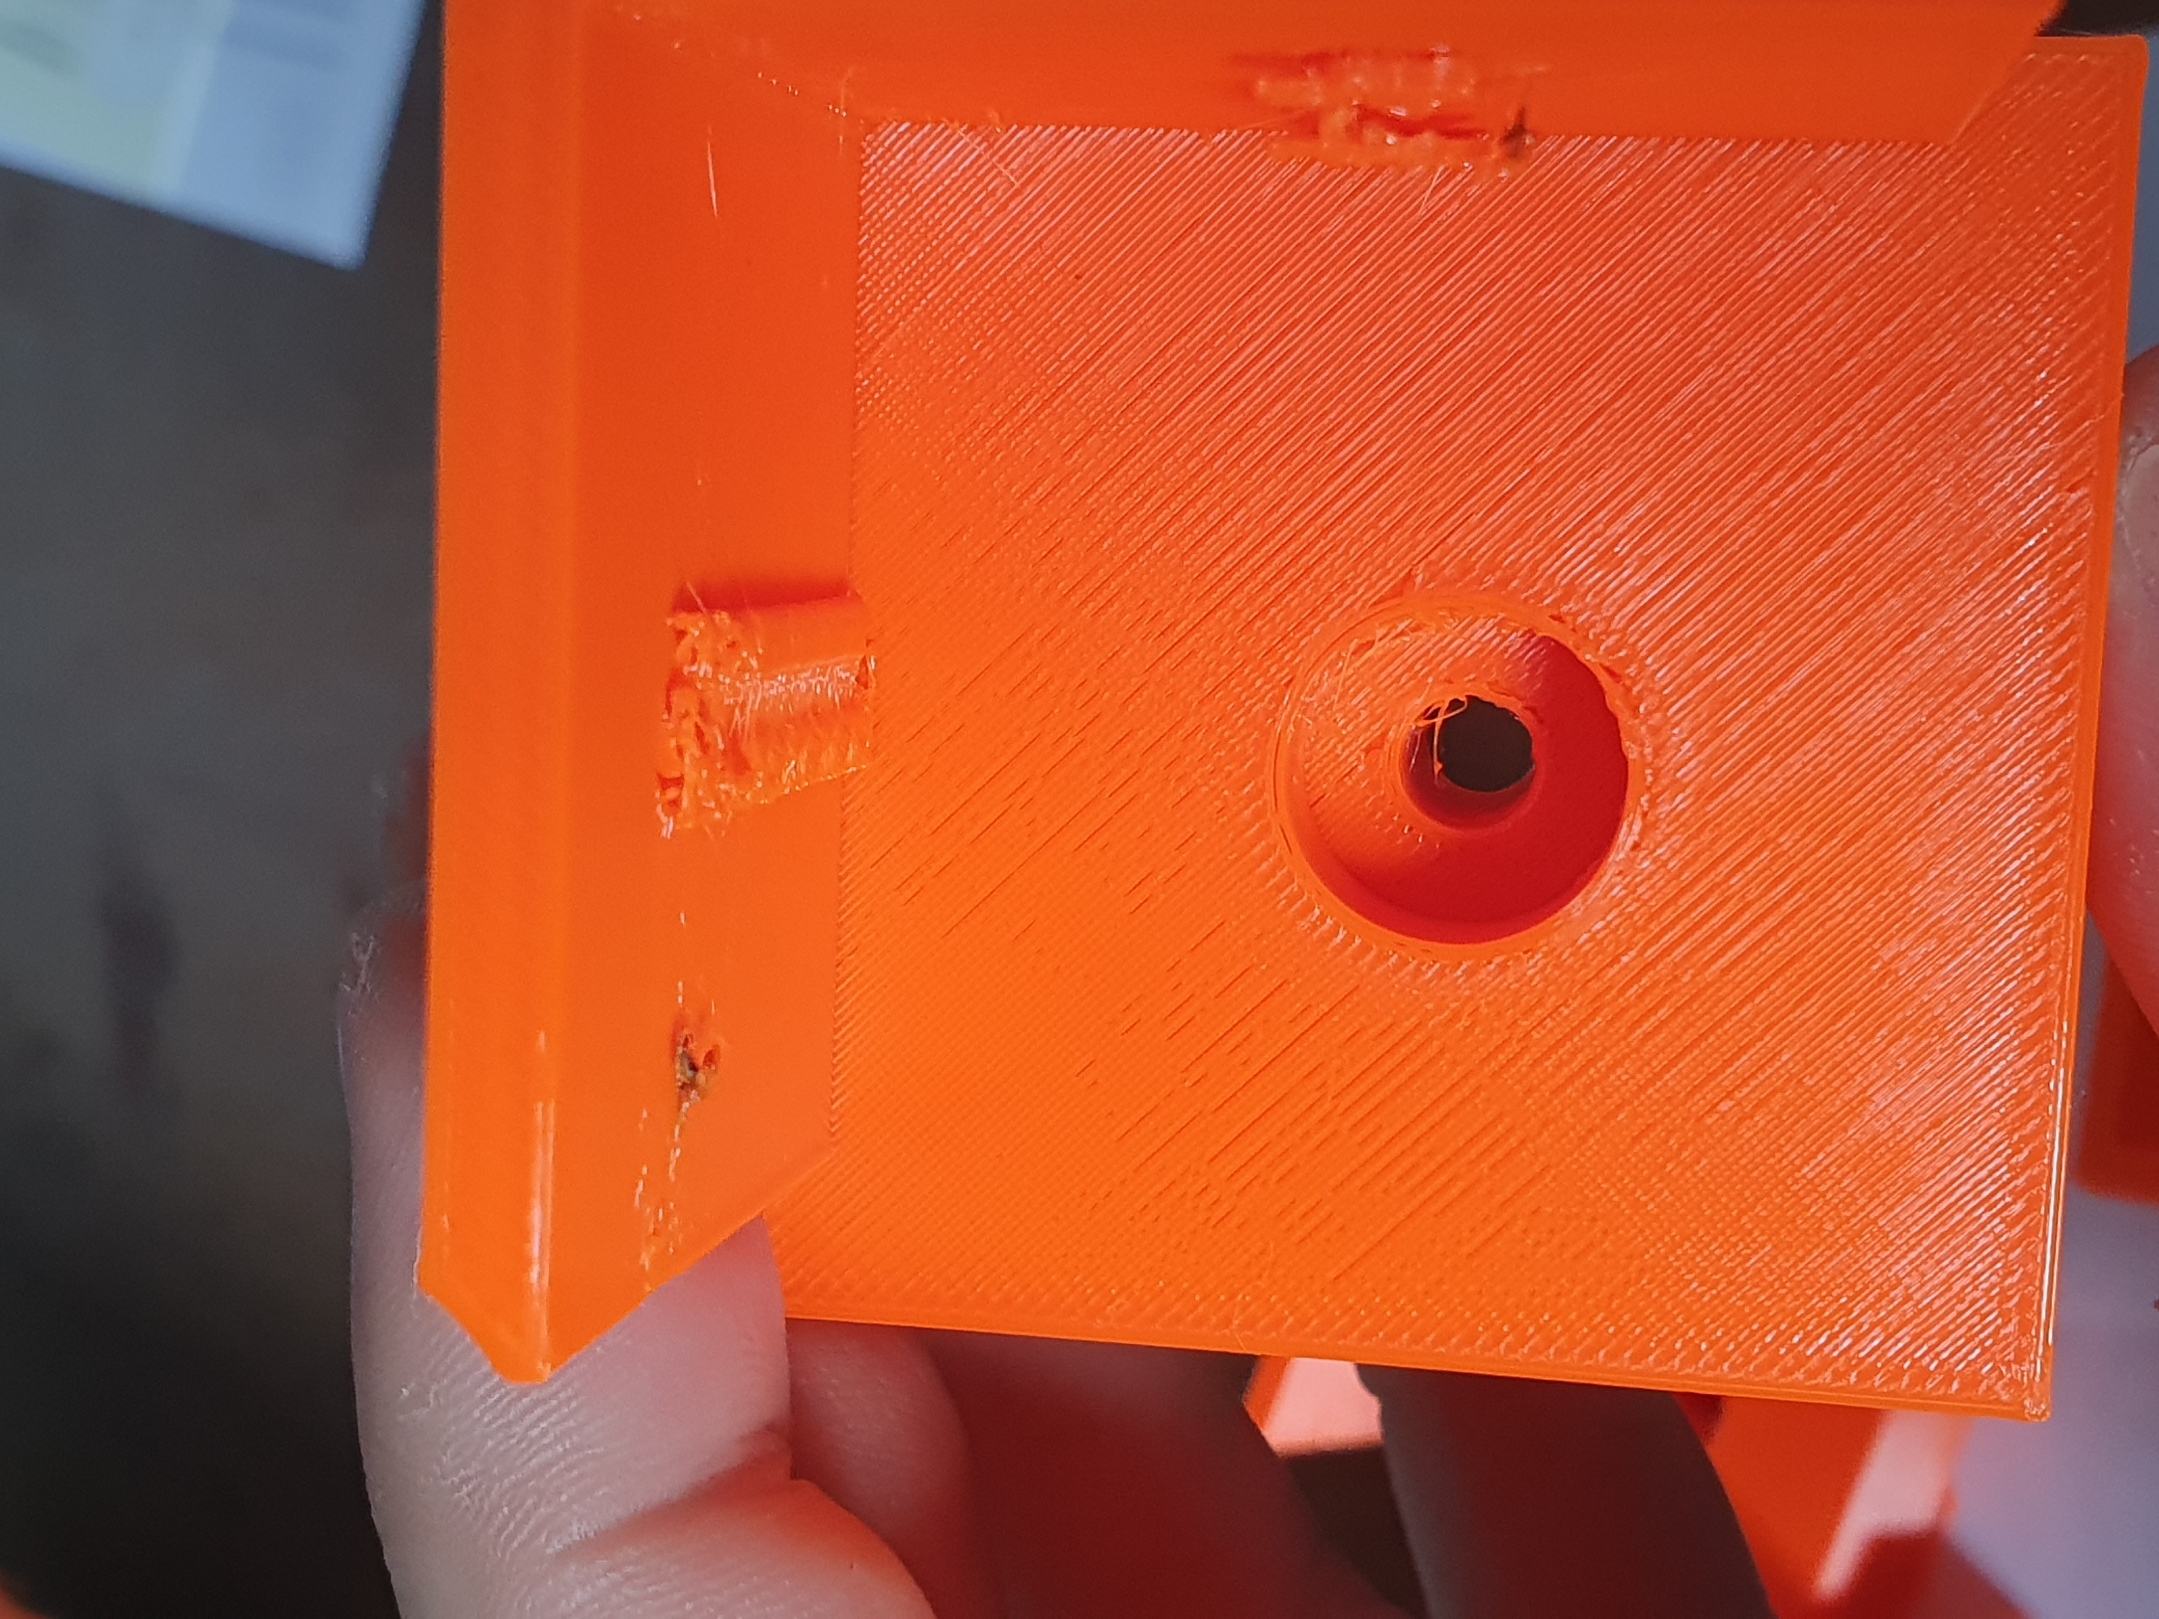
Now I 'm trying to print some shims as per this print: https://www.prusaprinters.org/prints/4926-prusa-lack-enclosure-levelling-feet
But the Mini does have some issues still with the first layer, especially the short movements between the holes it needs to make. The print started from the front left looking at the picture, so that part looks good, but as soon as it needs to make the short movements, things start to stick to the nozzle:

I've tried higher Z live slightly (so less negative), but does not seem to make much of a difference. Should I take any other approach, or is this just the way things are with a print like this?
Kind regards and happy printing! Rob
RE: PETG - "tail" after each line
Maybe back off live z a bit more.
Also, you may want to print a tenp tower such as this. https://www.prusaprinters.org/prints/39810-improved-all-in-one-temperature-and-bridging-tower, to make sure you’re working at the optimal temperature. Even though today’s filament usually works fine across a wide range of temperatures.
And lastly, you may want to take a look at this article by @bobstro https://projects.ttlexceeded.com/3dprinting_techniques_calibrating_filament.html and check your extrusion multiplier. Not something I don’t feel I need to do often, it in this persnickety case it may be worth a try.
Beyond that, I’m beginning to run out of ideas...
Formerly known on this forum as @fuchsr -- https://foxrun3d.com/
RE: PETG - "tail" after each line
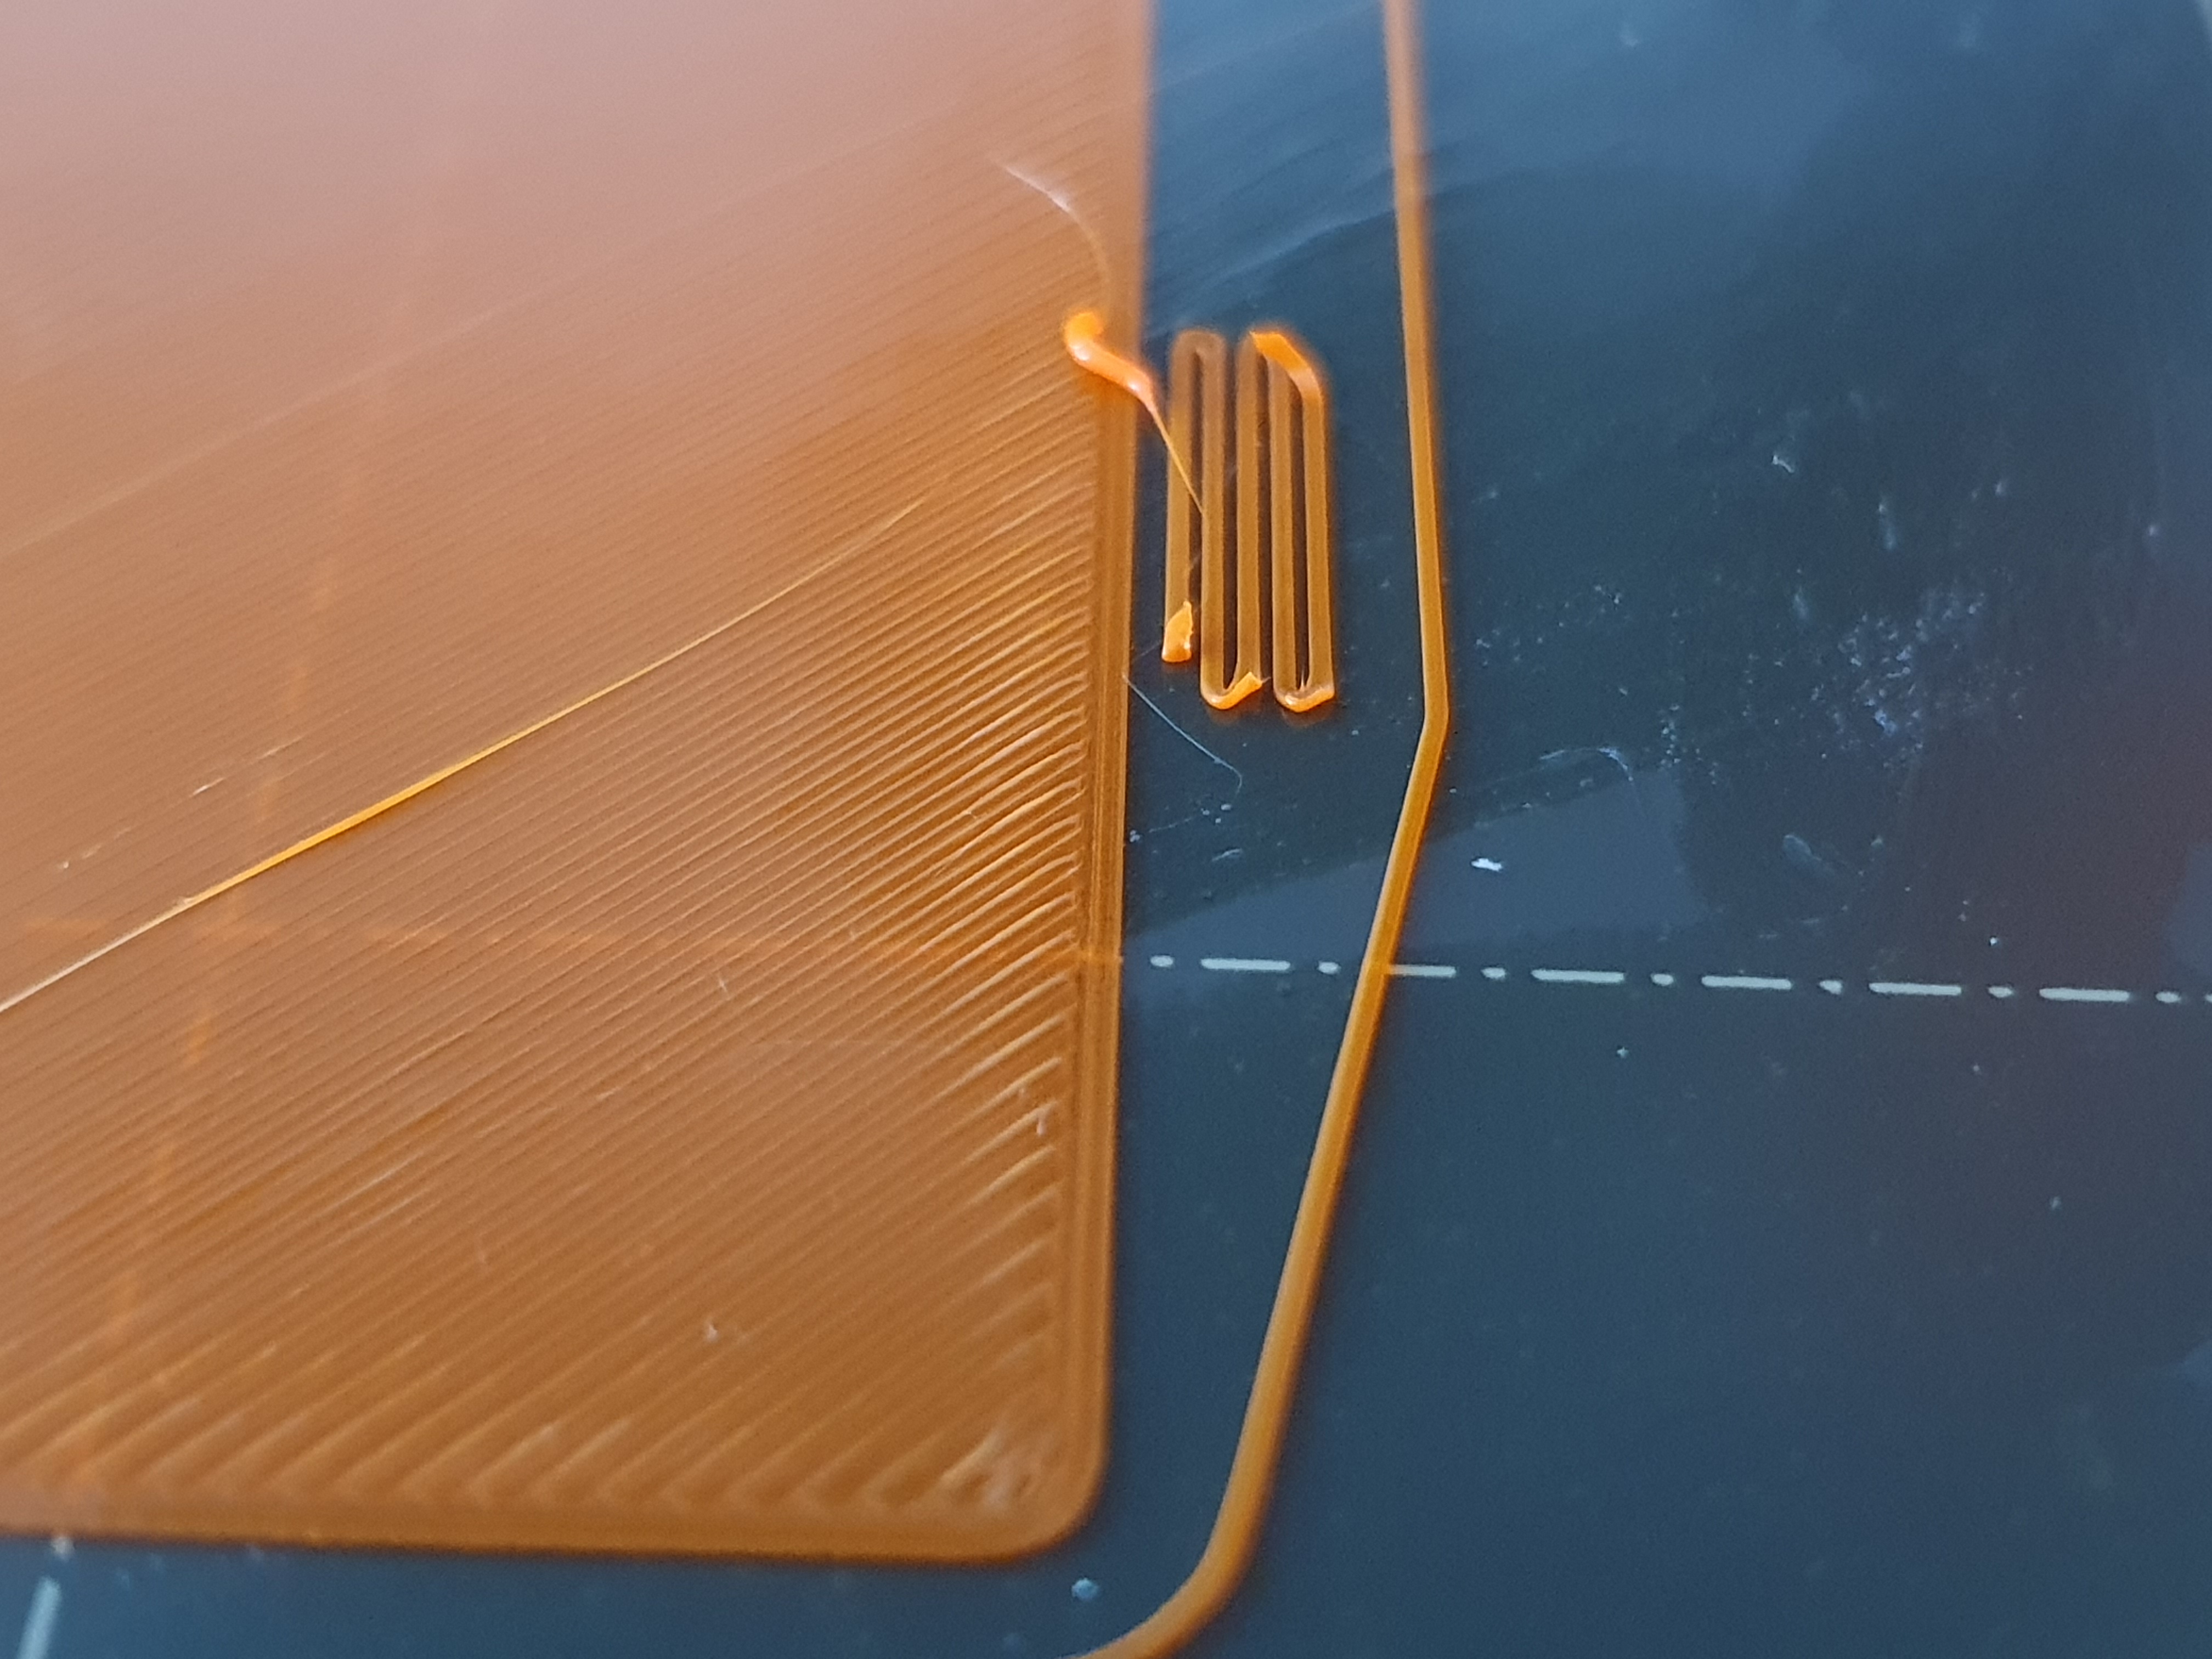
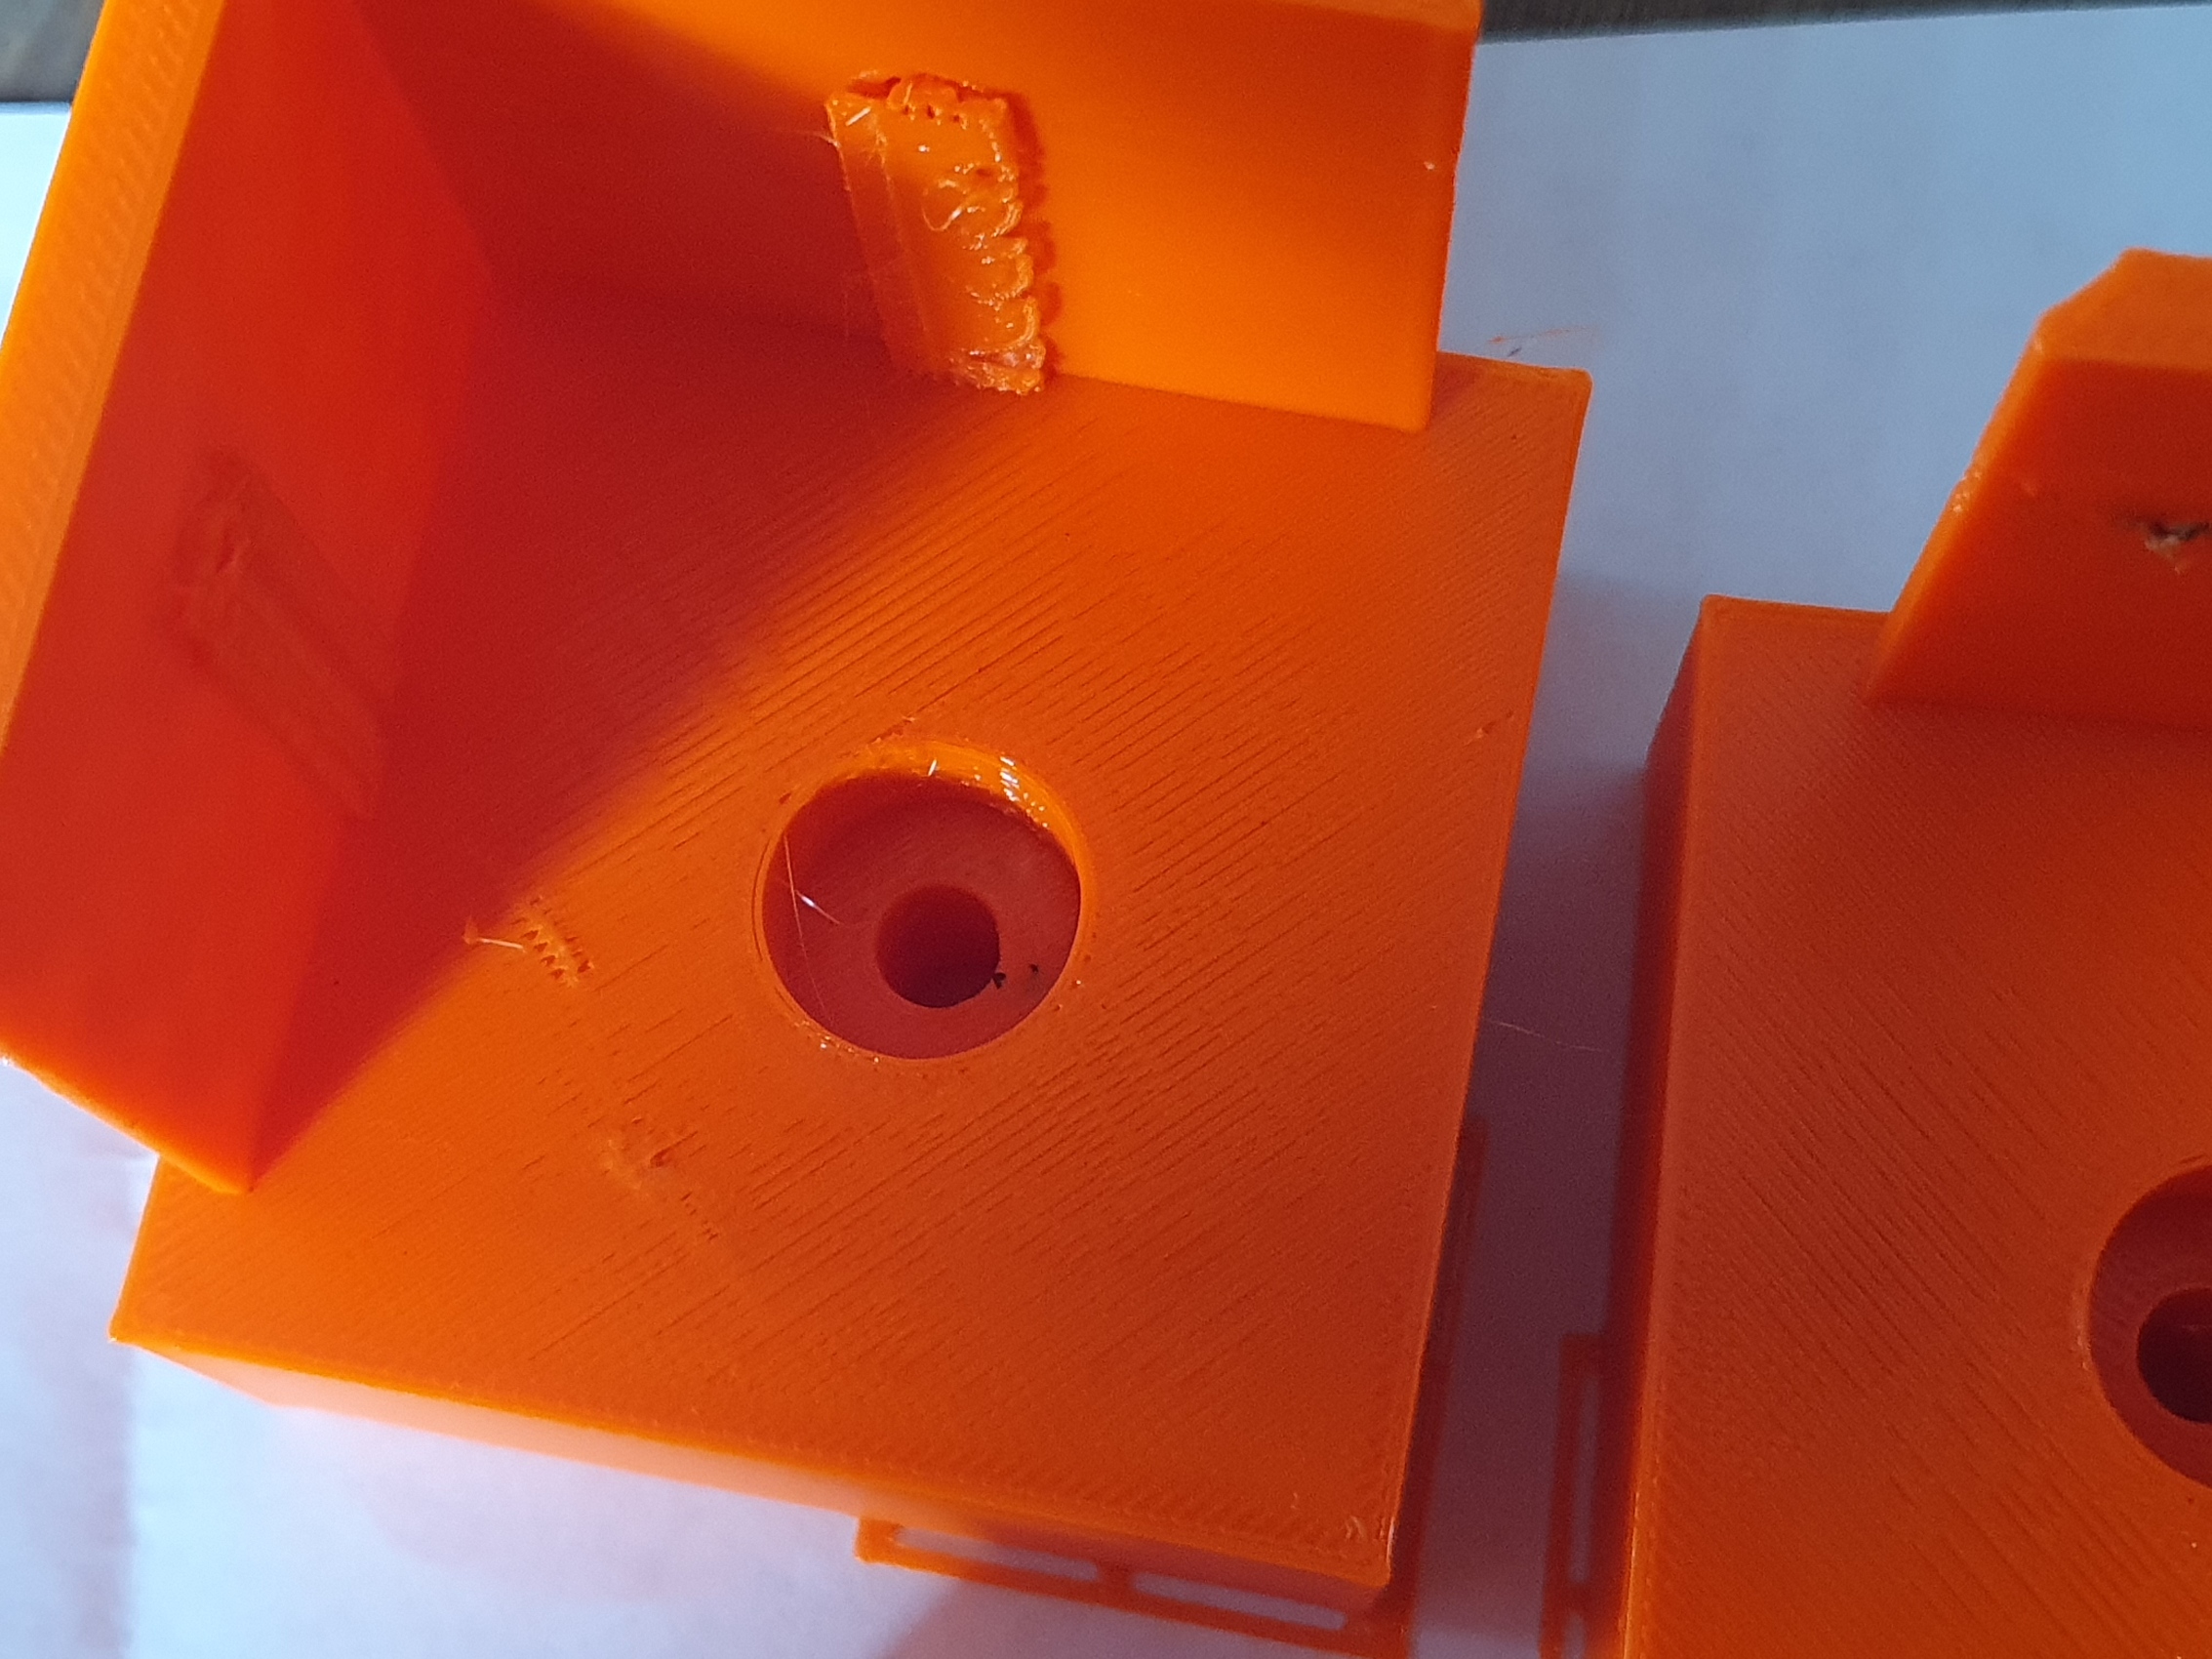
I'm using Prusament PETG, so the default profiles in Prusaslicer. Theoretically speaking that should rule out temp and extrusion multiplier issues right, at least being this severe? 🙂
Big areas look perfect in the first layers now (see picute below which was my last calibration), so it's only these very short small movements that prove to be an issue.

I'll read up on the second link you provided, some very interesting info there, thanks!
Kind regards and happy printing! Rob
RE: PETG - "tail" after each line
This one looks indeed perfect!
Formerly known on this forum as @fuchsr -- https://foxrun3d.com/