first layer problems
So, I'm at my wits end and totally out of ideas, except for the trashcan. This probably reads like an unhinged rant, sorry.
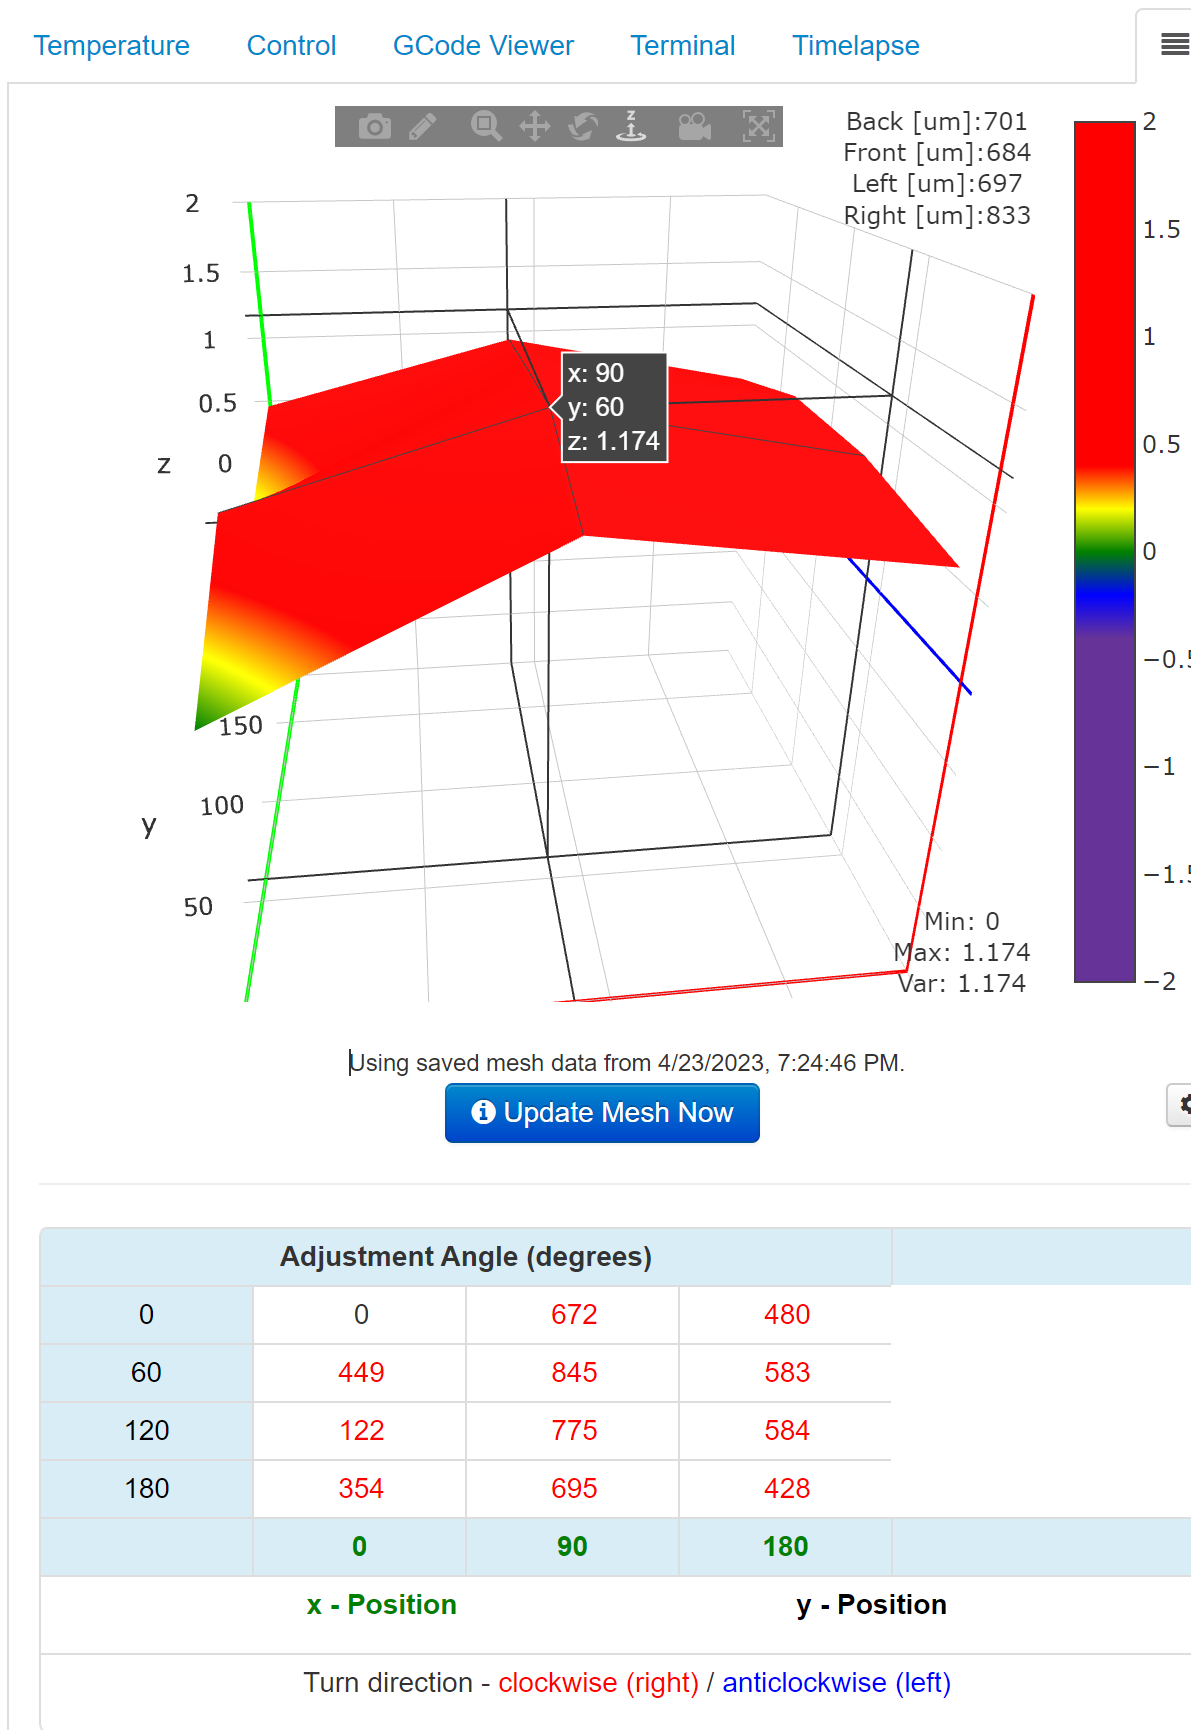
As you can see, octoprint is reporting a horrifically unlevel bed.
This is with no mods to the printer except a hardened nozzle and a different x-axis carriage. no silicon bed level mod (though I've tried it) and a Super pinda.
What I can't explain is that... well, the bed is as close to actually flat as I can measure. Like, using a machinists rule, square, and calipers, the x-axis is square to within about 0.2 mm, if that. The bed appears as level as I can detect.
But this thing is acting like it's a ski slope. Which is impossible, unless there's an error somehow. But, I can't figure out how there could be. I even tried going back to the old Minda Probe -same results.
I tried different sheets. Smooth PEI and Satin - same result.
I tried the silicon bed level mod, and while I can make improvements and changes, I can't fix it. I've gotten to the point where it's reporting no more adjustments are needed, but it's still printing as though it's like this. Heck I had it installed for a couple of years and things were fine besides minor adjustments now and then. Things went haywire when I got the bright idea to change out the x-axis carriage to get a better cooling duct.
I tried applying strips of masking tape to the underside of the steel sheet. It seemed to be helping! Then after a while I realized the masking tape in some areas was around 3 or so mm thick. Well, that can't be right, can it?
I even took the heatbed off and ground down the tops of the u-bolts holding the y-axis bearings, thinking they were interfering, but I hadn't noticed before because it'd had an x-axis skew which I'd now corrected.
OH and during all this I've had a belt break (x-axis. No idea how.) and a clog so bad that even a torch couldn't clear it from the nozzle and I had to replace it.
It's as though there's a corrupt memory somewhere, or something in the firmware maybe? which is stock and on the latest, 4.4.1. I've reflashed the firmware, I've gone back to older versions, tried it there, and upgraded back up. I've factory reset the printer twice. I swear it's getting back data from the probe somehow, but that wouldn't happen with two different probes, right? So, what, the main board? Is that fried somehow? Well, how could that have happened? I never touch it, though I suppose it's possible some dust, maybe even metal dust, got in, though how I can't imagine. And, besides the first layer, everything else is going fine! So how could it be a bad board?
I don't even know what pictures or video would be useful, but I'm happy to provide any. I have been fighting this for weeks and I'm just completely clueless. I don't know anyone local to help either.
RE: first layer problems
...Well, I think I may have an answer.
See, I was still able to use the left hand side, about 30 percent of the bed. So, I was. And then, mid print, the entirely printer stopped. No error, or fans spinning up high, just, total freeze. Reset button didn't even work. Now, when I turn it off and back on, no fans spin up and the screen is solid white and nothing else.
If anyone would care to ... shoot me, feel free.
RE: first layer problems
With luck you have only blown a fuse - if you're snapping belts the motors must be under extreme pressure and consequent loads. The odd mapping might due to load stressing too...
Log into your Eshop account, navigate to Company, click Contact Us and 24/7 live Chat is one of the options. This is the quickest route to Prusa support.
Cheerio,
RE: first layer problems
I actually did talk to them, though more briefly, once the white screen thing happened. They suggested I check the trapezoidal nut, which I will, just in case. But then while sitting idle the printer locked up again, and even after unplugging and replugging won't come back on beyond the white screen, so ... yea.
The belt was weird - I noticed some loose fibers leading up to it, like days or weeks earlier, didn't realize that's what it was at the time. Like it was fraying from the edge? Then one day I just see this weird stretched-out section about a CM long while the printer isn't moving and when I touched it, it just pulls apart like nothing.
Fuses appear fine though.
I have ordered a new board, cause clearly stuff is crazy somehow.
RE: first layer problems
I'm with diem. Too me this sounds more like some serious issue with the belts rather than an electronics problem. I'd get new belts and reassemble the x and y axis. And the trapezoidal nuts, that's a good guess too. They are easy to overtighten but need some wiggle room.
Formerly known on this forum as @fuchsr -- https://foxrun3d.com/
Do go back to Prusa, this sounds like some sort of dynamic stressing and messing with it is risking further damage - 'though it might just be a misalignment or poor lubrication; Prusa know far more about their product than I ever will and should be able to guide you safely.
Refer them to this thread as an introduction.
Cheerio,
RE: first layer problems
Referring them to this thread is a good idea actually. Don't know why I didn't think of it.
The trapezoidal nut I've never touched, so it's how it was from factory. The belt thing may easily have been my fault somehow. The belt, x-axis carriage, and x-axis endstop have all been replaced at this stage. And it's not even really tight. Barely twangs.
Like I said, it's not even booting now. So, yea. fun times.
Thanks for the replies though, been helpful.
RE: first layer problems
Well, I got the new mainboard in, ordered from printed solid. Install seems to have gone fine.
But the first layer problems somehow remain.
When I installed the brand new mainboard, the bed was on the standoffs it comes with. It was showing in octoprint similarly to the above image, very high in the middle and right, while low on the left. Built-in first layer calibration printed better than with the old mainboard, but still without sticking at all on the right.
It's like the readings are reversed? the left side will always be ok, or too low If I lower the live z. But the center and right never get filament sticking. It's like the nozzle is adjusting the opposite of what it should - raising when it should lower.
After seeing it wasn't level, I went back to the silicon bed level mod and installed it again. Things seemed to improve! I actually got the left side to read as HIGHER than the right, at one point, even. Progress!
So, I ran through that, using octoprint to get the mesh bed level readings from the superpinda.
https://github.com/bbbenji/PMSBLM#installationsetup-procedure
I definitely made progress:

Now, according to the bed level mod procedure, this is flat to within 0.03 mm.
Notice the min and max values:
min: -0.207
max: 0.426
var: 0.633
Clearly, very, very not flat.
But nothing I can do fixes it. using the old Minda probe that came with the printer, changing the mainboard for a new one, using the standoffs that came with it or the silicon mod. Satin sheet or smooth PEI sheet.
Absolutely nothing I can do gives me a level bed anymore.
RE: first layer problems
Ok, well I've made progress, in that the weird lumps are no longer an issue. However. The below octoprint pictures show what the bed is apparently reading as to the pinda. Note the spike in the front right - that's a razorblade I placed on the bed so I could be absolutely sure of where that spot was. So, that's the front right, without question.
Confirming front right:

Real Octoprint bedvisualizer: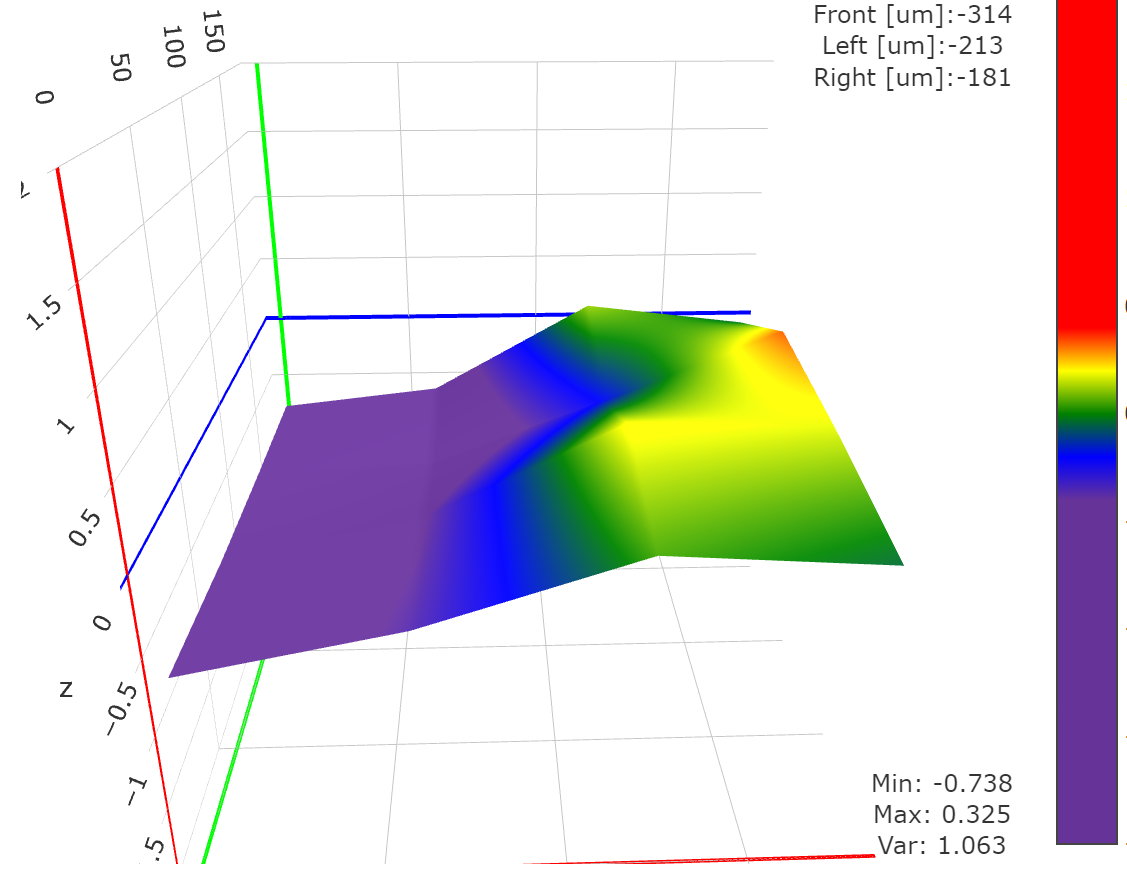
See how it's showing the left as super low? well, look at this pic of first layer calibration.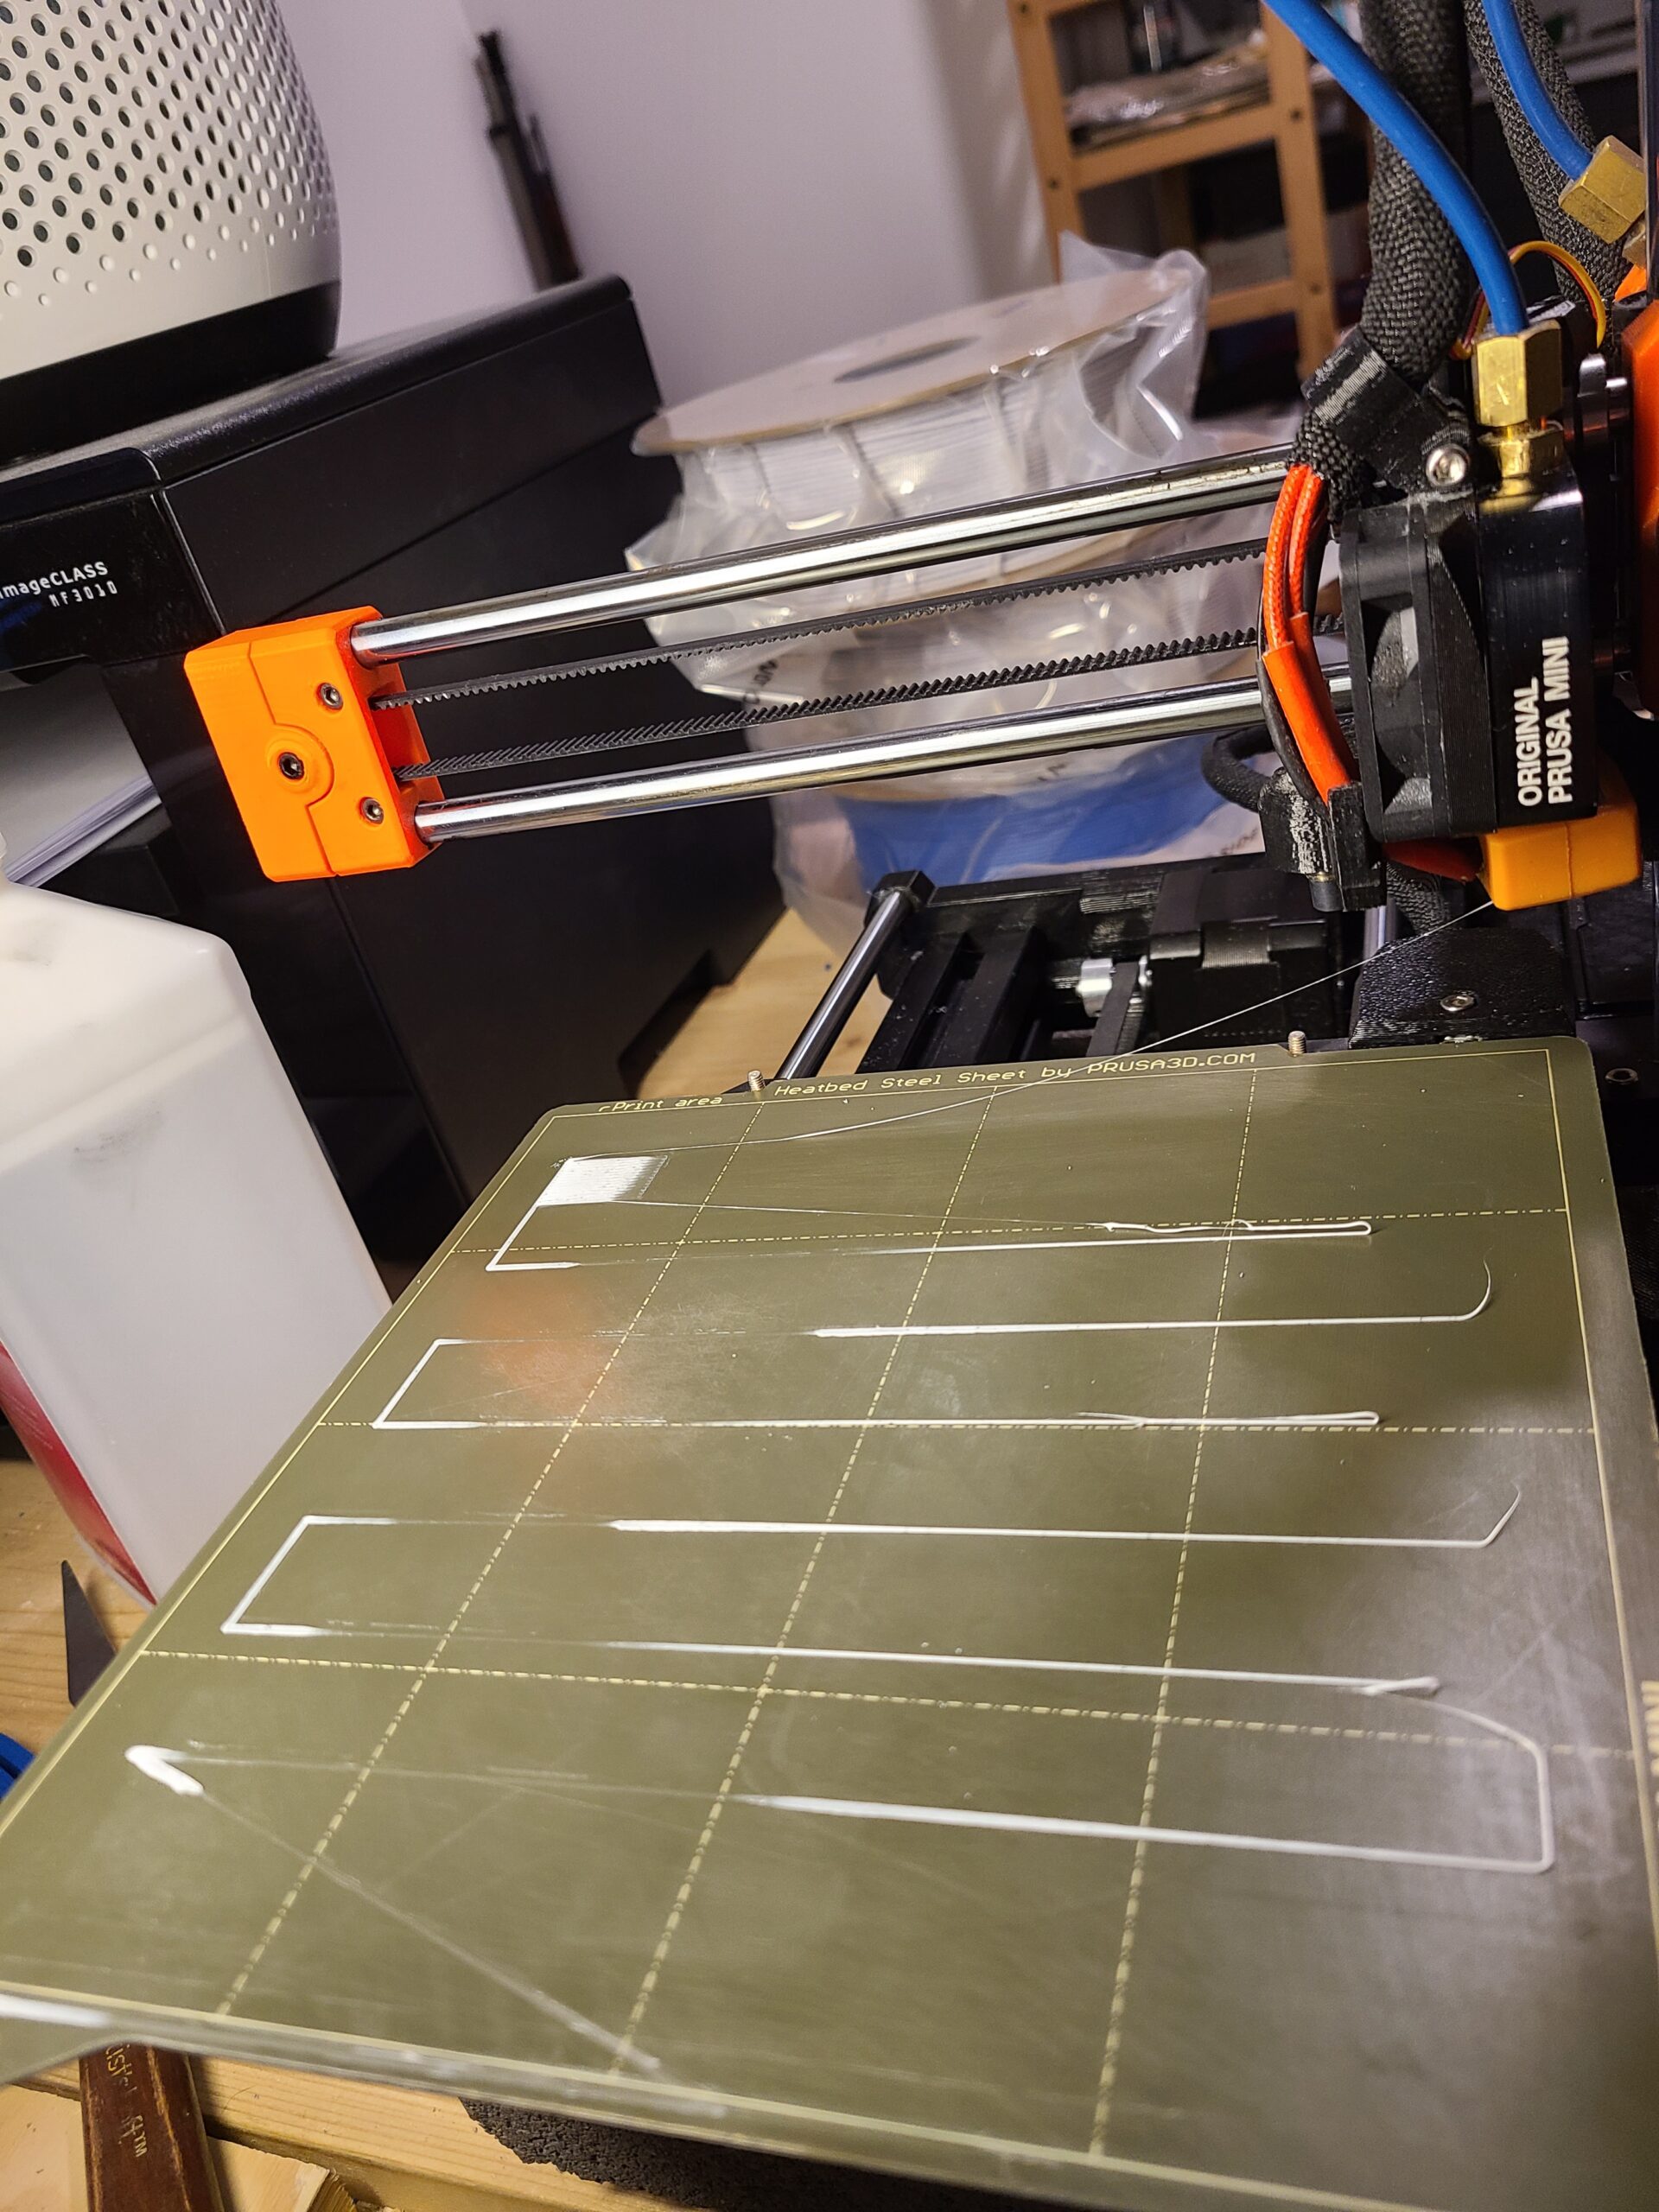
The nozzle is dipping so low as it moves left it's pressing into the PEI and not even able to extrude. Meanwhile, the right prints like it's too high.
Variations of this have been plaguing me since the beginning of the problems something like a month or more ago. I cannot figure it out, even with a minda probe instead of the superpinda, and even after replacing the entire mainboard.
What the heck is going on!?
RE:
You are not addressing the issue. Stop messing with the bed and the electronics and deal with whatever is causing the uneven stresses. If the bed remains out of kilter afterwards we can look into it then.
If you must do something before contacting Prusa, start here:
https://help.prusa3d.com/en/article/regular-maintenance-mini_133222
Cheerio,
RE: first layer problems
I would recommend firts get the Mini to original state - stock spacers, x-carriage (This is with no mods to the printer except a hardened nozzle and a different x-axis carriage... Things went haywire when I got the bright idea to change out the x-axis carriage to get a better cooling duct.) and using Pronterface with https://bbbenji.github.io/PMSBLM/ instead of octoprint. Also checking belt tensions and complete maintenace.
Also try to lower down the nozzle to nearly touch the plate and move with it from left to right, If you see realy 1 mm difference as your visualizer shows.
When you get it work than I would start with other mods.
RE: first layer problems
I'll track down the original parts and return to stock.
RE: first layer problems
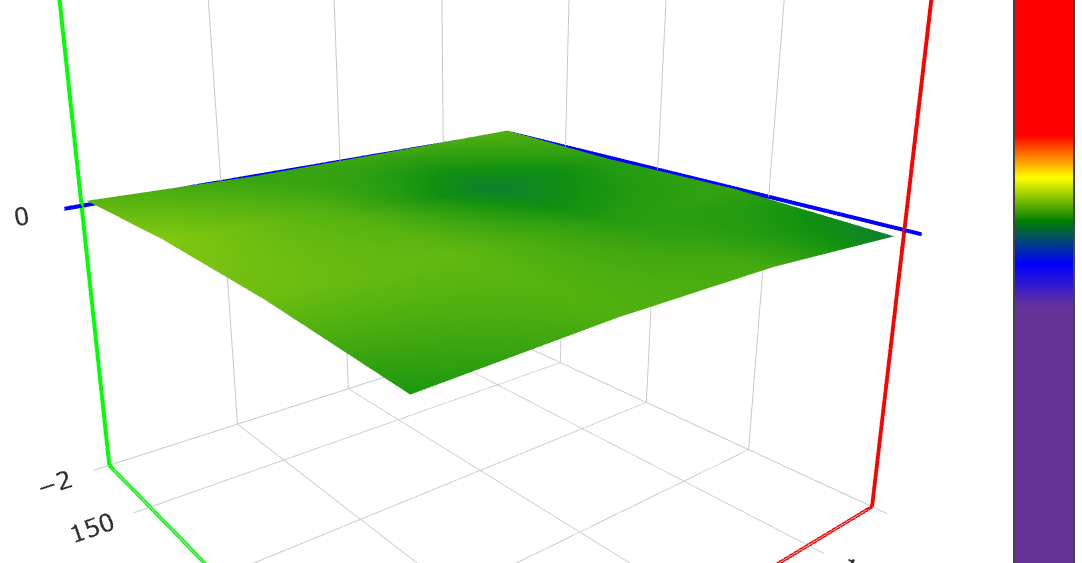
Got it. not 100% perfect but dang close.
Ended up returning to stock bed supports and from there loosening the screws connecting the z axis to the y. Much experimentation later, I found my scrapper inserted here gave this result.
Gonna order some brass shim stock and get it in there. My calipers show the thickness I need is about 0.01 inch.
No other adjustments I tried to square the x-axis did the job, job this seems to have. Don't know why but I'll take it.


RE: first layer problems
This adjustment can be done entirely without shims.
How to do the XZ correction is described here .
RE: first layer problems
All of which I tried, multiple times, to no avail.
It may be they in my move driving across country that plate at the bottom of the z tower got ever so slightly bent?
Eh I'll mess with it more in the morning. Maybe order a replacement part instead.
RE: first layer problems
Got the shims (were cheap and quick to get so why not?) and that lead to... discovering the probe is apparently losing it's connection.
RE: first layer problems
Confirmed with chat support. Bad probe. I'd bet when I changed the x-carriage I messed the cables causing an intermittent failure, and somehow missed it the previous times I checked.
I'm very annoyed now.
RE: first layer problems
For future info sake: the problem was x-axis bearings. they were loose, causing the printhead to tilt a small amount and cause the layer issues and spikes and valleys seen in the bedvisualizer of octoprint. These were bearings I bought from squishworx that were supposedly super good. Replacing them fixed it.
New users: Learn from this.
Don't make any modifications until you have the stock printer running well.
Then IF you make changes and run into trouble at least mention ALL the stock parts that you have replaced when you ask for assistance.
Don't blindly follow every every dubious diagnostic video on Youtube - those guys are influencers, not engineers.
But do at least check through the advice given by experienced users on the forum - @fuchsr made a suggestion that would have isolated this way back near the top of the thread.
Cheerio,
RE: first layer problems
Problem is I forgot I changed them!
But yea, returning to stock was of course excellent advice and would have isolated the issue and saved me a chunk of money, too.