4.3.0 Firmware for Original Prusa MINI/MINI+ Final released.
Summary
- New graphics for Live adjust Z
- Added support for PVB material
- QR Error codes
- Print sheet profiles
- New fan management
- Improved selftest and wizard
- First layer calibration updated
- Improved filament change process
- Sound notification changes
- Improved localization management
- GUI and WUI (Web User Interface) refactoring
- Prusa Connect Local upgraded
- PID disabled during heater test
- Bug fixes
This is the final release of the firmware. This changelog is a summary of the previous releases (RC1 & RC2) with a few additional changes introduced in this release. Compared to the previous stable release 4.2.1 there are major changes to the code, user interface, new features, and multiple improvements across the entire firmware.
- Over 600 commits to the firmware
- 250 pull requests (4 from the community members)
We would like to thank users @ftrofin, @JeffersGlass, @cpinamtz and @carlin57 for their contribution to this release
New graphics for Live adjust Z
Adjusting the distance between the nozzle and the surface of the sheet is a crucial part of the calibration as it affects the quality of the first layer. In the past, it was difficult to further improve the process due to the screen limitation, but thanks to the color display on the MINI/MINI+ the system is now able to display more important information and make the calibration process easier.
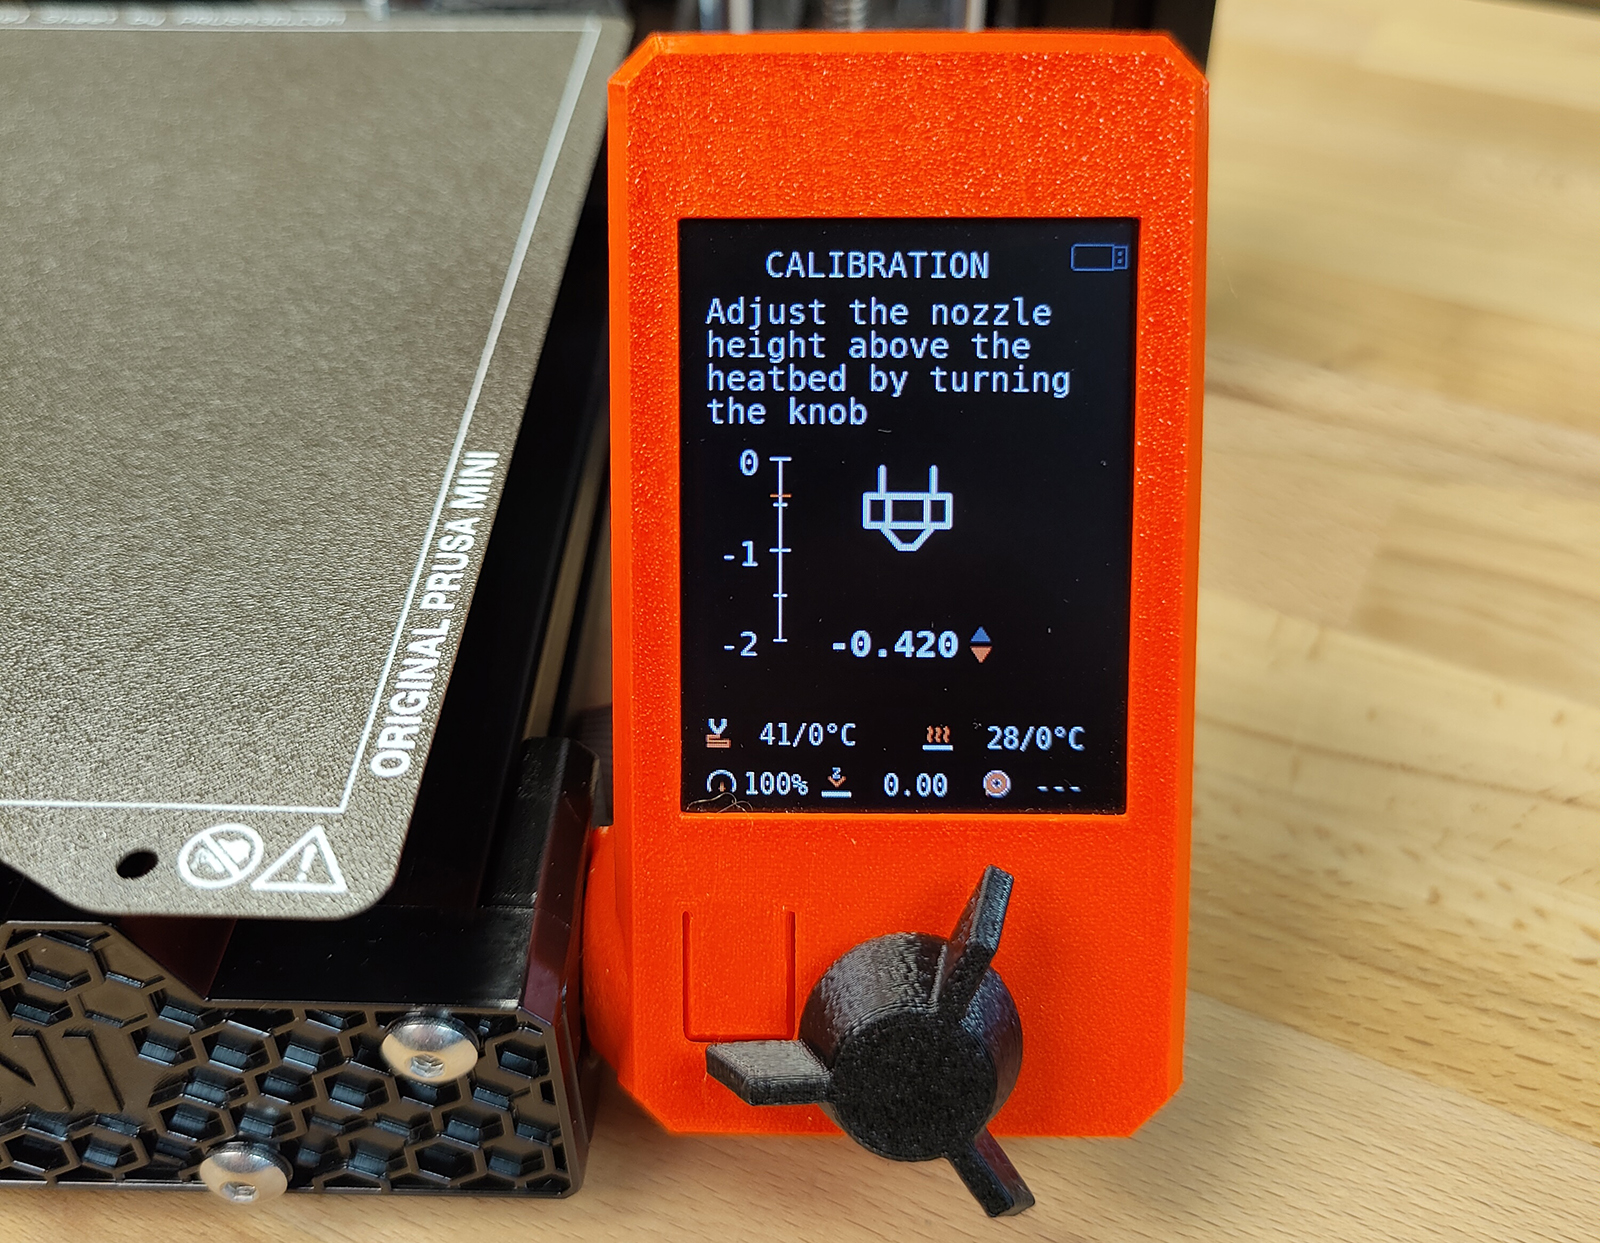
The entire screen is now redesigned. On the left side, there is a scale of the vertical Z-axis with a range of 0 to -2 mm. The orange bar represents the currently set value. In the middle of the screen, there is a graphical representation of the nozzle, which moves up and down based on the input from the knob. Below the graphical representation, there is the exact Z-axis value of the nozzle and the arrows are showing to the user, whether the nozzle is moving up or down.
Added support for PVB material
In January 2021, we have introduced the latest addition to our Prusament family of filaments. PVB is great for printing design models because the material is very easy to post-process with isopropyl alcohol (IPA). Read more about PVB in this blog article.

The PVB is now integrated into the printer's menu and you can select it while preheating the printer or loading/unloading the filament. Default and recommended temperatures are 215 °C for the hotend and 75 °C for the heatbed.
QR Error codes
We always strive to improve the user experience and the QR Error codes are the next evolution step. Until now, if the printer experienced an error, a short description was displayed on the screen and the user had to open either the Handbook or search the Prusa knowledgebase for a solution.
With this firmware release, the printer will display more information: the name of the error followed by a brief description and a QR code. Take your phone, scan the code, and get immediately redirected to an article, which will in detail explain, what happened to your printer and how to fix the problem.
Each error code comes with a short URL containing a code. This is useful in case you can't scan the QR code. Open help.prusa3d.com, type in the error code (e.g. #12201), or use the displayed short link, and get access to the required article. Moreover, all the articles are translated into seven languages.

How is each code created? Let's use error #12201 again as an example. The code consists of five numbers with the following pattern: XXYZZ.
- XX -> ID of the printer based on the USB PID (for MINI/MINI+ it is “12”)
- Y -> the category of the error (2 is used for the temperature errors category)
- ZZ -> specific error code (01 is used for the heatbed heating failure)
More information about the types of printers, categories, and a full list of the error codes can be found in the following GitHub repository.
The URL link embedded in the QR code may contain an optional “device hash” (this can be enabled/disabled in the Settings). Including this information enables us to check, whether you are running the latest version of firmware and if not, we will inform you at the top of the article. The information provided in the URL is stored in our database to help us better understand, which errors are the most common and how many errors each printer experienced.
Example of the URL in the QR code: https://help.prusa3d.com/en/12201/OI6HB7H6/410
- en -> a language of the landing page with the article
- 12201 -> the unique error code sequence
- OI6HB7H6 -> device hash
- 410 -> firmware version in your 3D printer
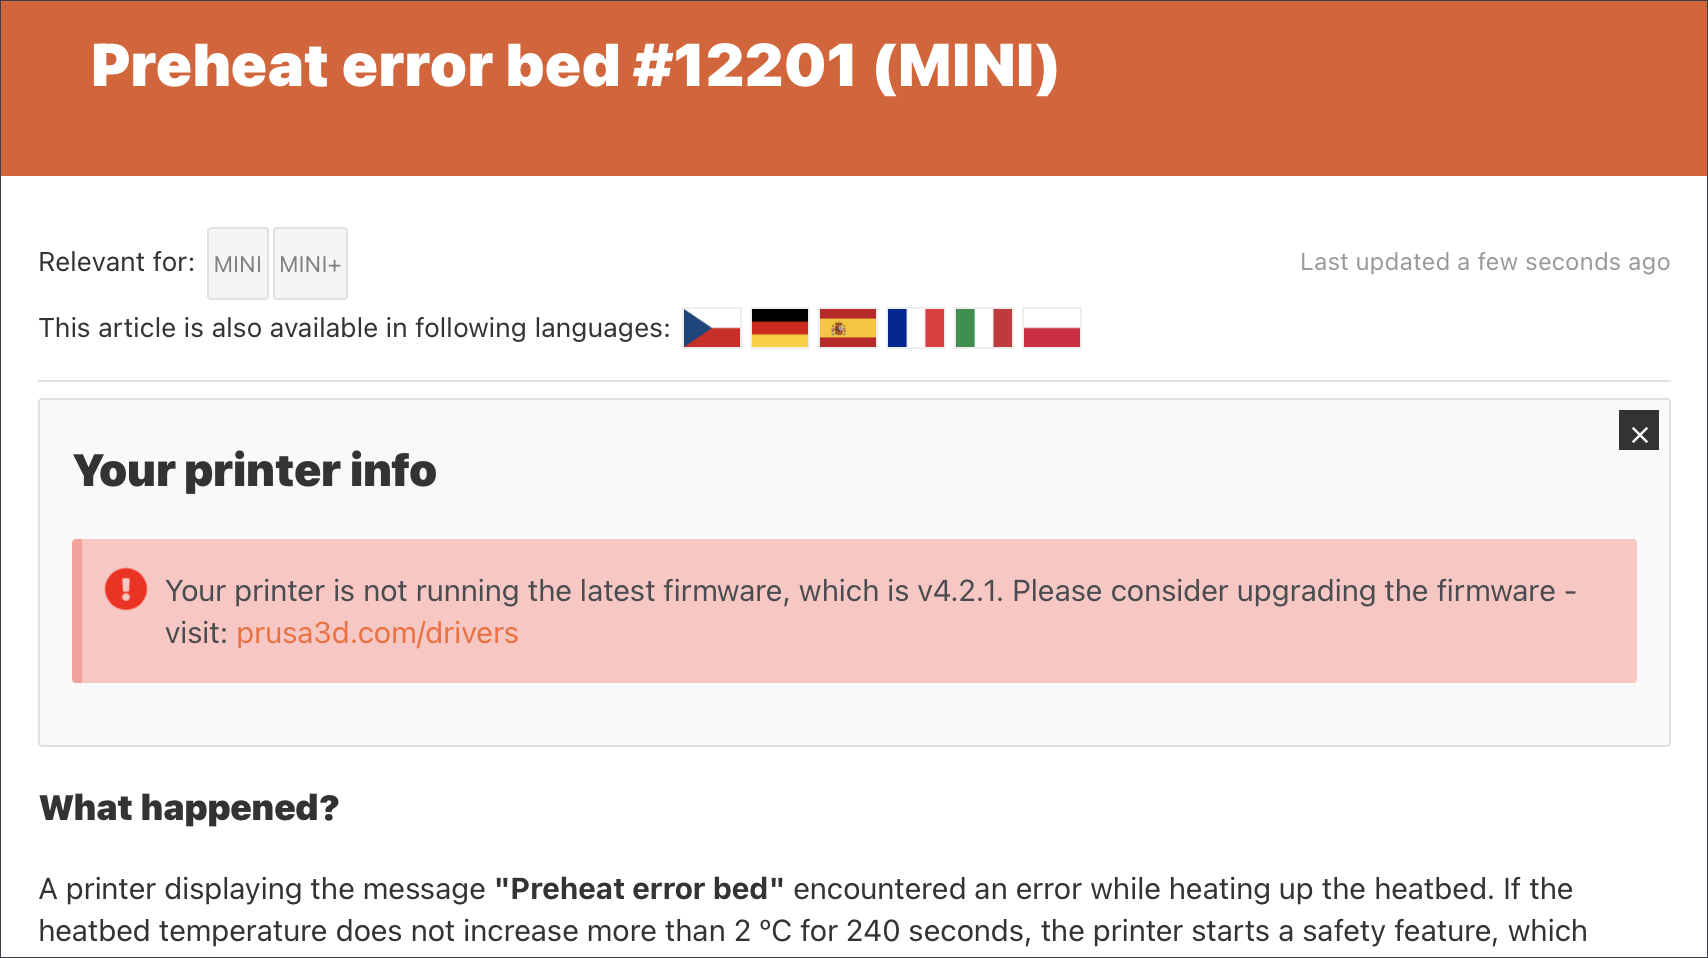
An example of the error page with the printer running outdated firmware
The device hash cannot be used to recover anything sensitive like a serial number and isn’t used for anything else than the QR codes feature therefore there are absolutely no security concerns. This feature is turned ON by default. In case you don't want to use this enhanced feature, you can switch it off in the printer's menu by setting the “Device hash in QR” to OFF.
Once you turn it off, the QR code URL will contain only the following: https://help.prusa3d.com/en/12201/
Print sheet profiles
Just like the MK3S+, the MINI and MINI+ also have a magnetic heatbed, which holds a steel print sheet. However, due to the different thicknesses of various sheets (textured vs smooth PEI), each sheet requires individual First layer calibration. Starting with this release, we are adding a useful new feature, which will store the settings for up to 8 sheets. You can then easily switch between the sheets (profiles) and the printer will load the stored values.
There is a new section of the settings menu called “HW Setup”, which will allow you to individually “calibrate” each sheet and some other parameters (see below). To set up the individual sheet profiles, please head to the Settings -> HW Setup -> Steel Sheets
With each sheet profile, you can perform the following actions:
- Select -> confirms the selection of the sheet, which will then become the default
- First layer calibration -> takes you through the first layer calibration process. This calibration must be performed with each sheet you plan to use
- Reset -> sets the values back to the factory defaults
As soon as two or more profiles are configured, you will be able to quick-toggle between them directly from the Settings menu and the currently selected print sheet is also displayed on the main menu screen between the speed and selected material. Steel sheets without calibration are not displayed in the quick-toggle menu item. When upgrading the firmware to version 4.3.0, the existing Z offset value from First Layer Calibration is copied to the first steel sheet. This does not apply to the downgrading process and the printer’s Z-height offset must be recalibrated.
Compared to the MK3S+ implementation, this firmware does not currently support renaming the sheet profiles to a custom name. We will bring this feature in one of the upcoming releases - if you have any requests regarding this feature, let us know.
New fan management
Improved RPM measurement for PWM-enabled fans
A new unique method was implemented to provide improved measurements and adjustments of the cooling fans’ RPM. This method enables to precisely control fans with 3 wires (power supply, ground, tachometer signal) even when the PWM (Pulse Width Modulation) is applied. In some scenarios, the PWM prevents the electronics from obtaining exact RPM data - this is now solved.
To explain this function a little further, the firmware is not using the standard method, where the fan was spun up to its maximum speed for a certain time period, to measure the RPM. The new method is more sophisticated, measuring the leading and trailing edges of the tachometer signal while the PWM is at value 1 (tachometer signal is not affected). The following formula is then applied:

Once the measurement is finished, the amount of impulses of the tachometer signal is converted to the RPM. A more detailed description of this algorithm will be available at our knowledge base site.
States of the fan
Keeping the fan spinning in lower RPM requires a small value of the PWM compared to the PWM needed to spin the fan up. The fan speed regulation is therefore split into multiple phases to ensure reliable performance in the entire RPM range. To spin the fan up, the printer is using phase “Start”, which is setting PWM temporarily at 100 % until the max speed and then sets the required RPM by lowering the value of the PWM.
Setting the RPM manually
The RPM of the fan is adjusted using a PWM factor, which can be changed in LCD Menu -> Settings->Temperature->Print Fan. In the current release, due to a historical reason (MK3) the firmware is displaying the direct PWM value (0-255), in the future release, this will be changed to the more user-friendly range of 0-100 %. The speed of the print fan can be also set using a G-code command M106 Sxxx, where the xxx is a value in the range 1-255.
To stop the print fan completely, there are multiple ways, the user can set the PWM to 0 or start a Cooldown procedure (LCD Menu -> Preheat -> Cooldown). Advanced users can again use the G-code command, this time M107.
Displaying current RPM
Information about the current speed of the fan (RPM) can be found in LCD Menu -> Info -> System info. Firmware is displaying RPM for both print fan and hotend fan.
Improved selftest and Wizard
The code running the Wizard was completely rewritten including the First layer calibration. The following features were added:
- Selftest of X, Y, Z axes
- Selftest of heating up
- Selftest of fans
After the selftest is finished a final confirmation screen is displayed. If any part of the printer failed to meet the testing criteria, the printer displays overall results to quickly evaluate what went wrong.
Selftest of X, Y, Z axes
The test of all axes is a part of the Selftest (LCD Menu -> Calibration -> Selftest) and can be also run independently Calibration ->Test XYZ-Axis. To evaluate each axis, the printer is utilizing the Trinamic Drivers TMC 2209, specifically the function Stallguard, which works as a virtual endstop.
The test is run on each axis in both directions at multiple speeds while reading the Stallguard values:
- X, Y-axis -> 50, 60, 75 and 100 mm/s
- Z-axis -> 20 mm/s
Together the printer runs 18 measurements (16 for X, Y and 2 for Z). As soon as the test is finished, the printer compares the measured length of each axis compared to the minimal length stored in the firmware.
- Xmin = 178 mm
- Ymin = 179 mm
- Zmin = 181 mm
Heating selftest
Just like the axes test, the heating selftest is also part of the Wizard and can be launched separately through LCD Menu -> Calibration -> Test heaters. The heating selftest is separated into two phases:
-
Starting temperature stabilization
In this phase, the temperatures of both the nozzle and the heatbed are set to 40 °C. The printer waits until the target temperature is reached. The selftest works together with the heating control module. It sets a target temperature and once the temperature is reached and the module sends the confirmation, the selftest evaluates, whether the time required was within the limits. The time for the nozzle and the heatbed to reach 40 °C may be different. -
Heating phase
Once the 40 °C heating test is completed, the target temperature for the nozzle and the heatbed is set to 290 °C and 110 °C respectively. These temperatures are outside the working range of the MINI on purpose to ensure that the printer will always run the heaters at full 100 % during the entire run of the test. Once the target temperatures are set and the heating process begins, two timers are started. The nozzle timer is set to 42 seconds and the heatbed timer is set to 60 seconds. Once the time runs out, the firmware evaluates the temperatures. The nozzle should be between 130 and 190 °C, while the heatbed should be between 50 °C and 65 °C. If the temperatures are within the required range, the test is considered successful. In the opposite case, the test is considered unsuccessful and user assistance is needed.
Note: Please, always run this test with a steel print sheet on the heatbed, otherwise, the heatbed might warm up too quickly and result in a failed test.
Fan selftest with RPM monitoring
The fan test is part of the Wizard and can be also launched through Calibration -> Test Fans. As described in the previous chapters, the functionality of the test has been significantly improved. The RC1 release contained a table with suggested RPM limits, however, exact values are still under investigation and will be set in a future release.
First layer calibration updated (no longer bound to GUI)
Thanks to the GUI and WUI refactoring (see below), the First layer calibration process is no longer bound to GUI. In older versions, the entire calibration logic (movements, waiting, heating) was generated in the GUI, which in turn controlled a Marlin thread through a set of G-codes. Now, the instructions are executed in a Marlin thread directly and the GUI receives notifications about the changes. This will allow the implementation of First layer calibration for different nozzle diameters and to change the calibration object shape in the future.
First layer calibration can be also called using G26 G-Code.
Improved filament change process
Firmware 4.3.0 features an improved filament change process - e.g. during a multicolor print (known as ColorPrint). Previously, when the printer paused for manual filament change, there was no option to recover from an unsuccessful filament unload. With FW 4.3.0, the user is asked after a filament unload, whether the process finishes successfully (“Was the filament unload successful?”). In case the user selects “NO”, the on-screen message suggests to open the idler and remove the filament manually. Once the issue is fixed, a new strand of filament can be loaded and the print continues.
Sound notification changes
- Added support for sounds playing in loop, which are stopped only by a user action
- Added a new sound for the change filament process - WaitingSound
- The volume now goes up to 11! (It is one louder)
Improved localization management
Firmware 4.3.0 brings an important change to how the localization files are implemented. Compared to the old method, the new process allows to process a .po file during the firmware build process. The related unit tests went through a similar upgrade, allowing them to check the results independently.
The process of implementing and testing a new translation is now simplified significantly. When you edit texts in a .po file, you can then just build the firmware and load the .BBF file into your 3D printer. We recommend to run unit tests after building the FW to check the generated localization files.
GUI and WUI (Web User Interface) refactoring
We made major changes in the code for better optimization and future-proofing. The goal of the refactoring was to:
- Implement a more secure class and API hierarchy to increase the effectiveness of future development.
- Migrate the printer control logic from the GUI to Marlin-API. This change will allow users to control many features of the printer (e.g. Wizard) through the web-based user interface. These features will be implemented in future firmware releases.
- Improve the layout of various screens for a better user experience and easier navigation.
- Fix bugs
The refactoring of the Web User Interface brings improved handling of the INI file used for LAN configuration.
Compared to the old version:
- Every item in the INI file (type, address, mask,...) is optional and the printer can read the data even if some of the items are missing.
- If any of the items in the INI file contain an incorrect IP address, the item is ignored.
- Only uppercase letters are allowed for the “type” item (e.g. type=STATIC or type=DHCP). An item containing lowercase letters is ignored.
Examples:
-
Static IP configuration
[lan_ip4]
type=STATIC
hostname=X (hostname, 20 characters maximum, set by the user)
address=X.X.X.X (static IP address, set by the user)
mask=X.X.X.X (netmask, set by the user)
gateway=X.X.X.X (default gateway, set by the user) -
Dynamic IP address configuration (IP provided by DHCP)
[lan_ip4]
type=DHCP
hostname=X (hostname, 20 characters maximum, set by the user)
Improved text formatting
Part of the GUI refactoring is also better formatting of the displayed text. In case the text spans across multiple rows it is now centered horizontally.
Improved system dialogues
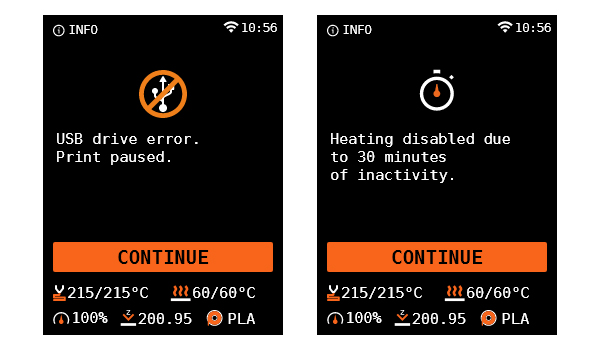
Selected system dialogues were updated to improve clarity. In this release, new screens are introduced:
- USB drive error is detected during the print
- Heating is disabled after 30 minutes of inactivity
Prusa Connect Local upgraded
Prusa Connect Local has a separate language settings feature and the configuration remains saved even after a web page reload. To change the Prusa Connect interface language, connect your MINI/MINI+ to the local area network and enter its IP address into your web browser. In the top right corner, use the drop-down menu to pick the language of your choice. If you reload the page, the language setting remains saved.
PID disabled during heater test
While testing the hotend and heatbed heaters, the system now temporarily disables the PID regulating feature and uses full available power. This results in a faster heat-up, effectively shortening the test duration.
Bug Fixes:
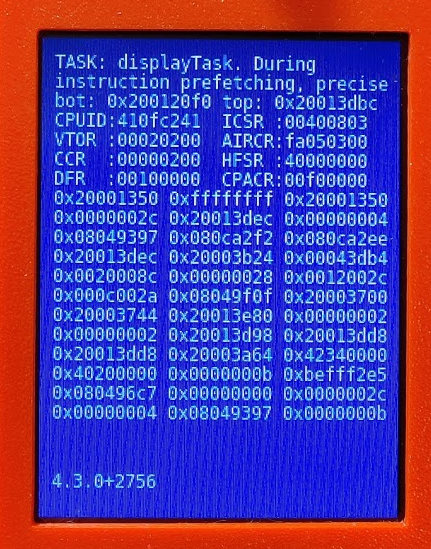
- BSOD when displaying filenames with special characters -> filenames containing special characters were either incorrectly displayed or caused a BSOD. This is now fixed - incorrect characters are replaced with an asterisk. However, we recommend NOT TO USE special characters at all
- BSOD after a watchdog reset -> After the printer was restarted due to a watchdog reset, an incorrect BSOD flag could cause another BSOD to be shown. This is now fixed, the printer first restarts to ensure that all the running processes (e.g. heating) are canceled and the system is at safe state. Once the restart is finished the error message is displayed.
- Stop button behavior during MBL fixed -> If you selected the STOP button during the Mesh Bed Leveling routine at the start of the print, the print head parked, however, then it continued to finish the MBL and proceeded with printing. In this firmware version, the print head will finish MBL and park (the print is then stopped).
- M851 ignored in G-Code -> Setting the initial Z-offset for print sheets of different thickness using a G-code is not implemented. Instead, the new “Sheet profiles” function enables users to configure various print sheets and switch between the profiles quickly
- Some translated Prusa Connect Local messages were displayed with a longer delay, this is now fixed (response is faster).
- The final parking position of the print head (X-coordinate) was united for the First layer calibration and a finished print.
- In some scenarios, the testers were able to invoke a “watchdog reset”, but instead of displaying the red screen, the system showed a blue BSOD screen. There was an internal issue with the procedure “calling” for incorrect GUI function. This is now fixed.
- In case of damage to the thermistor (short circuit) on the hotend or heatbed, the system could end up in an endless loop of Maxtemp error screens. This scenario is now fixed and after the first reset, the system displays an error message and waits for user interaction.
- In case the print was paused, sometimes the printer incorrectly displayed a message with a safety timer being activated. This is now fixed and the message is not displayed in this scenario.
DOWNLOAD:
https://www.prusa3d.com/drivers/#driver-mini
Shane (AKA FromPrusa)
RE: 4.3.0 Firmware for Original Prusa MINI/MINI+ Final released.
Installed and works. Thank you DEVs for the hard work.
--------------------
Chuck H
3D Printer Review Blog
RE: 4.3.0 Firmware for Original Prusa MINI/MINI+ Final released.
Excellent update! I just did the update, went to put a new spool on the printer, and got a BSOD! The BSOD occurred as soon as the printer finished the ejecting process and was about to prompt me if I needed to retry.
RE: 4.3.0 Firmware for Original Prusa MINI/MINI+ Final released.
While the printer is mostly working fine, I also wanted to chime in that I recieved several BSODs in a row that look similar to the above; They happened quite quickly one after another after another.
I also got a M112 EMERGENCY STOP error just after that with a message "null".
I am using OctoPrint, and it's annoyingly aggressive (it reconnects repeatedly despite me trying to stop that from happening).
RE: 4.3.0 Firmware for Original Prusa MINI/MINI+ Final released.
I have only gotten the BSOD when going into the version check.
--------------------
Chuck H
3D Printer Review Blog
RE: 4.3.0 Firmware for Original Prusa MINI/MINI+ Final released.
@cwbullet
I wasn't doing anything other than possibly physically touching the printer. I thought it might be loose cables or something like that, but I couldn't repeat it easily.
At this point I would need to see a lot more problems to justify downgrading for sure.
Overall I've had a wonderful experience with the Prusa MINI+.
RE: 4.3.0 Firmware for Original Prusa MINI/MINI+ Final released.
@technogeeky
That is odd.
--------------------
Chuck H
3D Printer Review Blog
RE: 4.3.0 Firmware for Original Prusa MINI/MINI+ Final released.
Prusa connect seems to never load in my browser, tried Safari and Firefox, firefox after some time I get a black page. Safari does not even get that far. I can ping the Mini OK so I know its alive
It nearly needs work
----------------------------------------------------------------------------------------------------------------------------
Prusa Mini+ (Ordered Dec 19,2020 - Arrived Feb 21,2021) stated clicking Mar 2nd / MP Select Mini V2
RE: 4.3.0 Firmware for Original Prusa MINI/MINI+ Final released.
Hello !
I just built my prusa mini+ and installed the supplier firmware (4.3.4). I don't see the satin sheet (from what I understand, I would need to do a factory reset).
But I don't see the "New graphics for Live adjust Z" (which was supposed to be here from version 4.3.0). Do you think I need to do a factory reset for this one to appear too ?
Thanks a lot!
Sébastien