Bed leveling
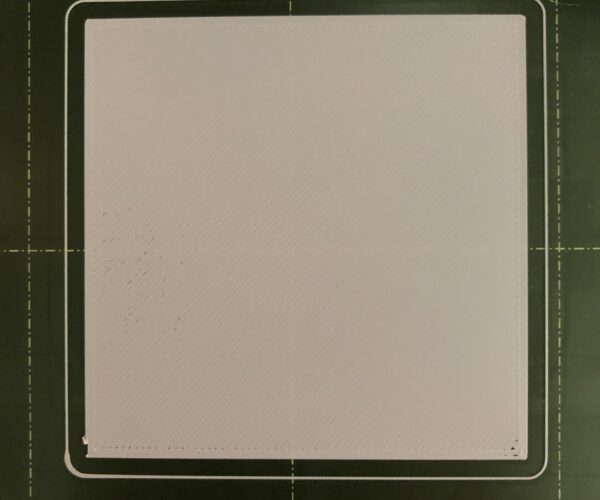
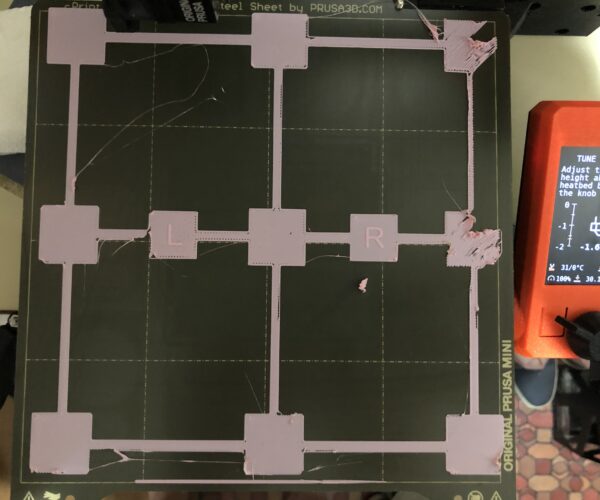
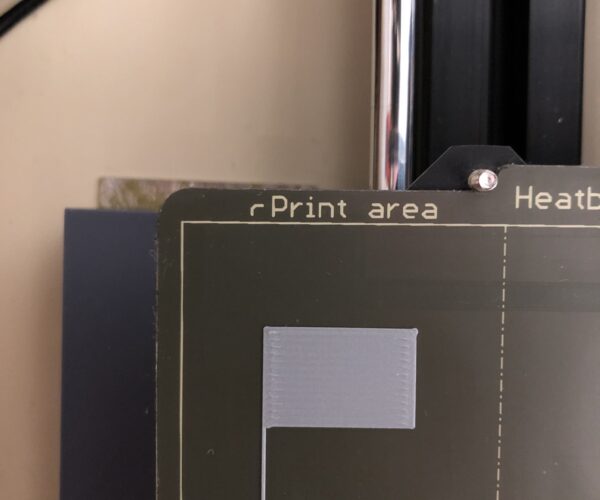
My Prusa mini+ has recently been having trouble printing the 1st layer correctly.The two pictures were printed with the same settings.The 75x75 square seems to print well, but you can see the bed through at the slightly left center.The 3x3 calibration prusa mini_0.2mm_PLA_MINI_19m looks really bad.The auto-leveling of Super PINDA does not work?Also, the filament used has already been dried with a hair dryer.I am not sure what more I can do. Please advise.
RE: Bed leveling
When I adjusted the height of Super PINDA again referring to My Method For Setting First Layer Z Height. (coolgrey5) , it was considerably improved. However, the printing quality from the center right to the back right is still bad.
If it cannot be solved by auto-leveling, I think it is necessary to correct the distortion and inclination of the bed itself, but there seems to be no means to adjust it. I feel that there are many people in this situation.
RE: Bed leveling
You do not need to mechanically correct the bed, it's good enough and mesh bed leveling (which actually does not level anything, it just compensates for an uneven bed surface) will take care of the rest for you. Believe me, there is too much fuzz made about getting the bed level by different means, you do not need that. All you need is a really clean bed surface (lots of soap or lots of IPA or both) that you do not touch after cleaning and a good first layer calibration. Use the build in and documented method to achieve that and forget about "z-adjust my way" or "first layer calibration the other way".
The results will be reproducible and your prints will be fine. Don't do anything in the direction of measuring first layers and calculating offsets and so on, it is very difficult to measure precise enough to make those methods work, and beside that, the primary goal of the first layer is good adhesion not being exactly 0.2 mm (or whatever your value is). As long as your life does not depend on your prints being within a few microns precise in height: forget about it.
Regarding your feeling not being the only one having these problems: We've all been there, getting the first layer dialed in is a hurdle everybody owning a 3d printer needs to take. It's difficult to judge the first layer in the beginning but you will get there. Play with it, look what changes if you go lower or higher, compare with the pictures from the documentation. The key is to know and see how it needs to be. The build in method is sufficient to calibrate your printer, different methods work as well, but you need to learn those too, so why not use the build in one? After learning how it has to look you will look back and wonder how that ever could have been a problem in the first place...
If at first you don't succeed, skydiving is not for you.
Find out why this is pinned in the general section!
RE: Bed leveling
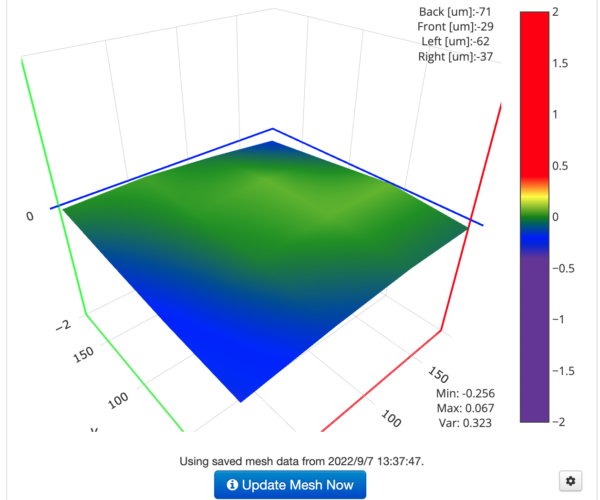
PS: The fact, that you have the visualization of your bed's shape in octoprint shows that your Super PINDA works as intended.
If at first you don't succeed, skydiving is not for you.
Find out why this is pinned in the general section!
RE: Bed leveling
Thank you for your advice! Back to basics, I tried the official Squaring , Height adjustment of Super PINDA and First Layer Calibration.
The print quality of the 1st layer has improved a lot, but I couldn't print the left back well.I want to print many parts at one time using the whole bed, but I couldn't print well with this.
I've tried many times, but it doesn't seem to work any better.
RE: Bed leveling
Also, the filament used has already been dried with a hair dryer
That's cute but not how you get dampness out of your filament. No controlled temperature, and you'd have to hold the hair dryer for hours. You'll need a real dry box, or at least convert a food dehydrator.
Formerly known on this forum as @fuchsr -- https://foxrun3d.com/
RE: Bed leveling
Oh, I'm sorry. DeepL automatically translated it like that 😆 . Actually, it was dried at 55 ° C for 6 hours using a filament dryer.Also, the filament I used when I posted here yesterday was a dry filament that was just opened.
RE:
You do not need to mechanically correct the bed, it's good enough and mesh bed leveling (which actually does not level anything, it just compensates for an uneven bed surface) will take care of the rest for you. Believe me, there is too much fuzz made about getting the bed level by different means, you do not need that. All you need is a really clean bed surface (lots of soap or lots of IPA or both) that you do not touch after cleaning and a good first layer calibration. Use the build in and documented method to achieve that and forget about "z-adjust my way" or "first layer calibration the other way".
The results will be reproducible and your prints will be fine. Don't do anything in the direction of measuring first layers and calculating offsets and so on, it is very difficult to measure precise enough to make those methods work, and beside that, the primary goal of the first layer is good adhesion not being exactly 0.2 mm (or whatever your value is). As long as your life does not depend on your prints being within a few microns precise in height: forget about it.
Regarding your feeling not being the only one having these problems: We've all been there, getting the first layer dialed in is a hurdle everybody owning a 3d printer needs to take. It's difficult to judge the first layer in the beginning but you will get there. Play with it, look what changes if you go lower or higher, compare with the pictures from the documentation. The key is to know and see how it needs to be. The build in method is sufficient to calibrate your printer, different methods work as well, but you need to learn those too, so why not use the build in one? After learning how it has to look you will look back and wonder how that ever could have been a problem in the first place...
This is simply not true. I was not able to print anything larger than ~3cm before I did the silicon mod. Though I assumed that the printer would somehow make use of what the sensor tells it about the surface, the nozzle was simply too high in one spot and then scratched the surface elsewhere. Note that I have made sure the sensor is at the correct height three times and I've gone through the squaring procedure multiple times as well.
RE: Bed leveling
This is simply not true. I was not able to print anything larger than ~3cm before I did the silicon mod. Though I assumed that the printer would somehow make use of what the sensor tells it about the surface, the nozzle was simply too high in one spot and then scratched the surface elsewhere. Note that I have made sure the sensor is at the correct height three times and I've gone through the squaring procedure multiple times as well.
But it is true my friend. There are literally thousands of Prusa MK3 printers without any mods for be levelling out there printing stuff bigger than 3cm.
If at first you don't succeed, skydiving is not for you.
Find out why this is pinned in the general section!
RE: Bed leveling
the nozzle was simply too high in one spot and then scratched the surface elsewhere.
To see such profound differences for me speaks to a skewed assembly. Maybe the silicon mod fixed it, or taking the print bed apart for the mod did. But I'm with @robin, something like the silicon mod should not be necessary for most users.
Formerly known on this forum as @fuchsr -- https://foxrun3d.com/
RE: Bed leveling
I was under the impression that this is about mini+.
RE: Bed leveling
Yes, my friend has "same" mini+ and he never experienced any issues. But I'm not convinced it's about assembly. I've rechecked multiple times and @robin is saying the sensor should pick up the unevenness and the printer should adjust for that accordingly. Mine just doesn't seem to be doing that.
RE: Bed leveling
Oh, I'm sorry. DeepL automatically translated it like that 😆 . Actually, it was dried at 55 ° C for 6 hours using a filament dryer.Also, the filament I used when I posted here yesterday was a dry filament that was just opened.
One thing I have learned, just because you just opened a new package of filament, don't assume it's dry. I opened one myself the other day that was factory sealed and I had to dry it. Granted I had it over a year, and kept it in a relatively stable environment, you never know how long it was sitting in any particular warehouse and what those conditions are.
Mini+MK3S+XL 5 Tool
RE:
Yes, my friend has "same" mini+ and he never experienced any issues. But I'm not convinced it's about assembly. I've rechecked multiple times and @robin is saying the sensor should pick up the unevenness and the printer should adjust for that accordingly. Mine just doesn't seem to be doing that.
Yes, that's what mesh bed leveling is about, compensate for unevenness of your build plate. It's not supposed to correct for incorrectly assembled axis.
Your axis must be reasonable close to being 90 degrees to each other. If you home your printer the nozzle should stop a bit more than 1mm above the bed (sometimes referred to as z-offset). In this position you should be able to manually move the extruder and bed to any x/y position without the distance between nozzle and bed changing more than fraction of that distance let alone touch/scratch the bed, if it does your axis are not assembled correctly (or bend).
Since the installation of the silicon mod solved your problem, I'd guess that by installing it you also fixed your original problem without realizing that. The fact that your friend's (and a lot of others) mini works without the mod proofs that the mod is not required for successful printing...
If at first you don't succeed, skydiving is not for you.
Find out why this is pinned in the general section!
RE: Bed leveling
I found that MK3 has a Bed Level Correction feature. This seems to be able to correct slight differences in Level that could not be corrected by mesh bed leveling. I don't see this feature in the mini.
