Simple nozzle camera borescope holder for Prusa MINI+
Last weekend I got my Prusa MINI+ as birthday present, mostly because the Ender-5 3D printer of younger son that I used the last months will move with him to his University city.
I made first experiments, and today installed Octopi on a Raspberry Pi3A+ with a v1 camera and led ring (not connected yet):
https://twitter.com/HermannSW/status/1494239494089945089
I had the idea to install a 2nd camera for getting a close view of nozzle, searched this forum and found a solution in Prusa i3 MK3 forum:
"Re: Has anyone mounted a borescope to the extruder carriage?"
https://forum.prusa3d.com/forum/original-prusa-i3-mk3s-mk3-user-mods-octoprint-enclosures-nozzles/has-anyone-mounted-a-borescope-to-the-extruder-carriage/#post-86292
Animation from small part of Michael's video, scaled to 25% size without audio:
The holder there was connected to a cable that does not exist on Prusa MINI+.
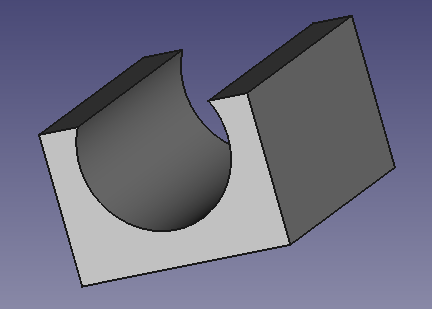
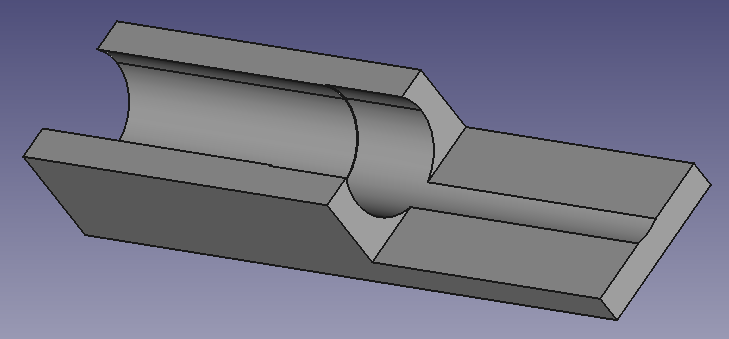
So I came up with a simple 1st version of MINI+ borescope holder in freecad:
I recorded a first video using VLC player and uploaded to youtube, auto bed leveling from nozzle camera:
(video was captured in dark room, only borescope lighted the scene)
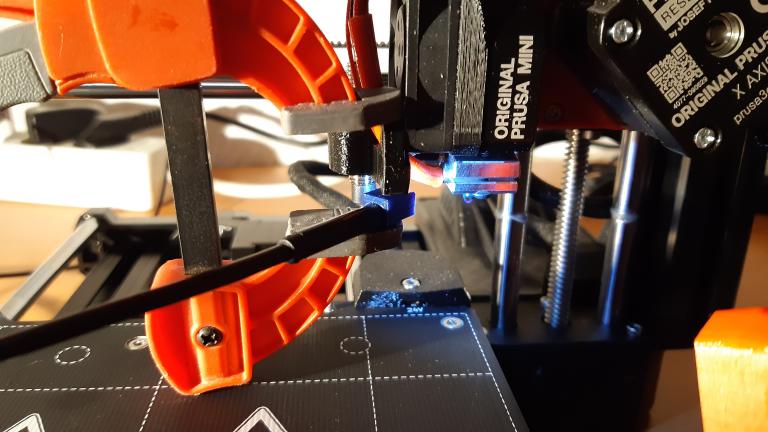
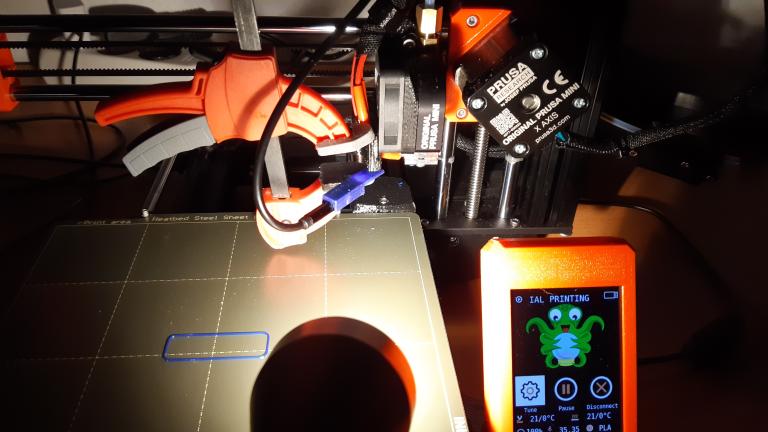
I did place borescope camera into holder and viewed video stream in VLC on smartphone.
Then I did put a bit superglue on top of holder, brought holder in correct position video controlled and fixated with screw clamp:
I fixated borescope cable with cable ties on the big extruder carriage cable: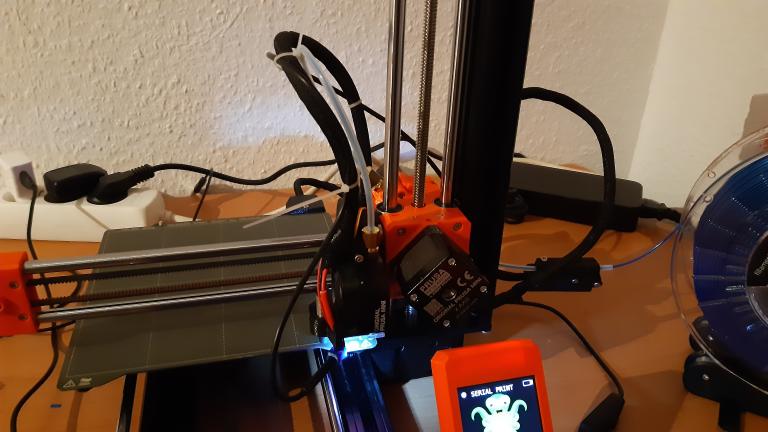
I did connect borescope to Octopi Pi3A+.
Since its only USB port was used to connect to Prusa MINI+ already, I inserted a small USB port hub to connect both.
I had problems to use mjpg-streamer for borescope USB camera on Octopi, so I installed gstreamer and used this command to stream:
gst-launch-1.0 v4l2src ! videoconvert ! video/x-h264,width=1280,height=720,framerate=30/1 ! h264parse config-interval=1 ! matroskamux streamable=true ! tcpserversink host=::0 port=9000 sync=false sync-method=2
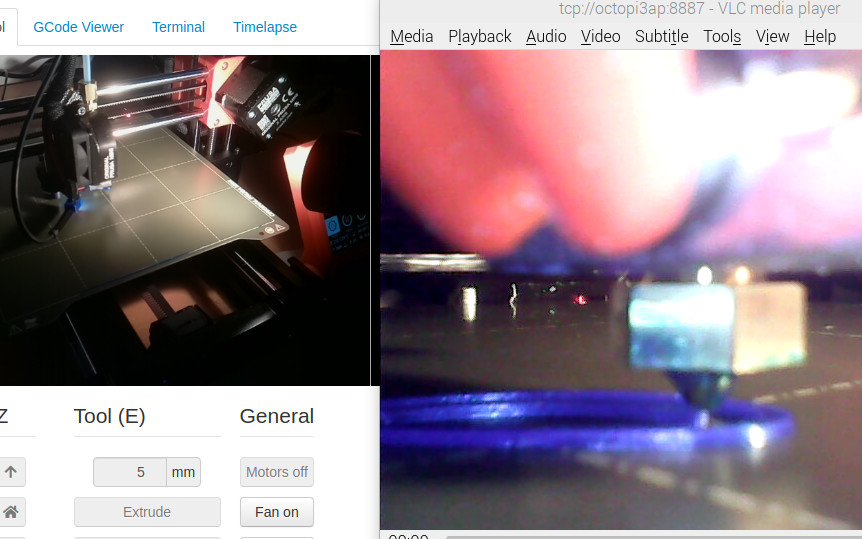
On Pi400 I opened "tcp://octopi3ap:8887" in VLC to view stream, enabled advanced options and captured video shown above.
P.S:
This is not the first time that a small 3Dprinted part was really useful, here is motors to motor controller connection:
"Re: Tiny MicroPython robots (the PCB IS the robot platform)"
https://forum.micropython.org/viewtopic.php?f=5&t=11454#p63160
RE:
I have to correct the gstreamer command line, the posted one "does something other" on port 9000.
Today I recorded another video of a small part short 3Dprint without auto bed leveling phase (1:04min), with this command:
gst-launch-1.0 v4l2src ! videorate ! video/x-raw,framerate=30/1 ! videoconvert ! jpegenc ! multipartmux ! tcpserversink name=out-sink host=0.0.0.0 port=8887
The small part was a quarter of 10mm radius, 0.6mm thick and high ring.
I did print without brim, but because part was so small, skirt (3 layers high) is more than real part (4 layers high):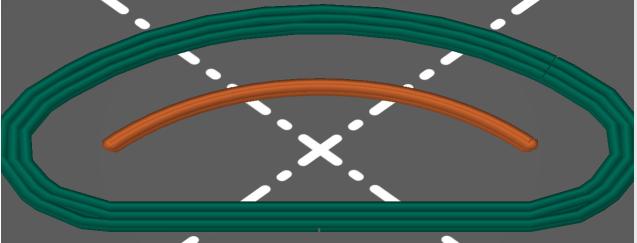
3Dprint completes at 1:04min, next 44 seconds document after end output of filament. There is premature filament output as well, before and during initial side line gets printed. That causes unwanted very thin thread to big screw above nozzle, which disappears only at end of initial side line print (24 seconds):
This is the 2nd video I took for printing that part, and both times I recorded premature and after end filament output. I assume that is normal, or can/should I change something?
Last, but not least, screenshot of both camera views (in Octoprint/VLC).
Fun fact, both cameras are doing a race, at one point in time one camera is ahead of the other, then it is behind in showing the scene. This change of positions does not end:
RE: Simple nozzle camera borescope holder for Prusa MINI+
@moderator, can you please change the youtube video URL:
RE: Simple nozzle camera borescope holder for Prusa MINI+
I have moved the URL to the post above I hope that is OK Herman, regards Joan
I try to make safe suggestions,You should understand the context and ensure you are happy that they are safe before attempting to apply my suggestions, what you do, is YOUR responsibility.Location Halifax UK
RE: Simple nozzle camera borescope holder for Prusa MINI+
I played with borescope camera, and in order to get nozzle into focus, camera needs to get 1cm more distant.
I measured diameter at led front as 5.7mm as before, this time diameter of remainder of camera as 5.5mm.
In order to make it more tight, v2 borescope holder used 5.5mm and 5.4mm diameter freecad subtractive cyclinders.
The part used for superglueing to extruder carriage I made nearly flat.
The underside of borescope camera is 7mm below extruder carriage, but 1mm above nozzle height.
Freecad: https://stamm-wilbrandt.de/en/pmh2.FCStd
STL: https://stamm-wilbrandt.de/en/pmh2-Body.stl
Prusa MINI+: https://stamm-wilbrandt.de/en/forum/pmh2-Body_0.15mm_PLA_MINI_10m.gcode
The old borescope holder was easily removed with pliers.
Fixation of new borescope holder with superglue is done with screw clamp ...
... under video control; screenshot of smartphone VLC player view:
After removal of screw clamp and final turn of camera for horizontal frame I recorded another auto bed leveling video — much nicer with nozzle in focus:
RE: Simple nozzle camera borescope holder for Prusa MINI+
Wow, I saw on thingiverse overhang test thingies, and created my own small 70° overhang test with freecad polar pattern feature: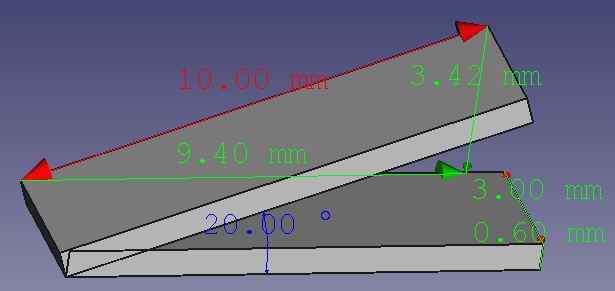
I was not sure what to exxpect — definitely did not think this would be 3Dprinted without any issues.
I uploaded the interesting "3Dprinting into the air" part, starting with last base layer, nice:
RE:
Last night I tried same overhang test, but with helix pattern, for "3Dprinting into the air" a "stairway to heaven".
It worked, but the result was not that nice.
(inner hole diameter is 10mm, so I chose cos(70°)*π*10mm=10.75mm as pitch for freecad helix)
Today I realized that I accidentially used default 15% infill, not a good choice for this kind of print.
Today I did with 100% infill, and that "stairway to heaven" (with tiny 0.15mm steps, right) looks nice: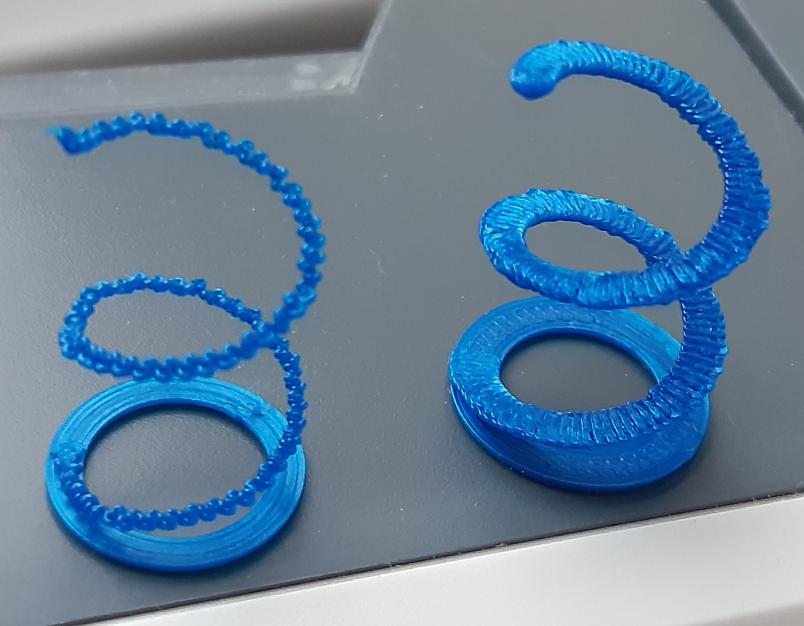
Again I uploaded the interesting "3Dprinting into the air" part, starting with last base layer.
If you watch the video you will notice during 3Dprinting the whole stairway already printed looks wiggly.
This in not true!
What you see in video does not match reality, and is caused by rolling shutter effect of borescope camera (640x480@30fps):
RE:
I have to correct the gstreamer command line, the posted one "does something other" on port 9000.
Today I recorded another video of a small part short 3Dprint without auto bed leveling phase (1:04min), with this command:gst-launch-1.0 v4l2src ! videorate ! video/x-raw,framerate=30/1 ! videoconvert ! jpegenc ! multipartmux ! tcpserversink name=out-sink host=0.0.0.0 port=8887
I searched a bit and found good instructions on how to setup mjpg-streamer for streaming both cameras.
That posting handled especially the case of a Raspberry camera and a USB camera, which is exactly my use case:
https://hatoum.com/blog/2020/5/27/install-both-a-raspberry-pi-camera-and-a-usb-camera-on-octopi-017
I only had to fix two small issues, that got resolved by statements in trouble shooting sections:
- my borescope USB2.0 camera has no serialNumber;
removing serial entry worked - webcamd2 service did not start (init_VideoIn failed);
I powered my Pi3A+ down, switched USB cables in mini USB hub and powered again
After this both cameras get streamed to http://127.0.0.1:8080/webcam/?action=stream and http://127.0.0.1:8081/webcam2/?action=stream .
Next I wanted being able to switch control view camera in OctoPrint, and found that "MultiCam" plugin is exactly for that.
After installing I configured two new cameras with the URLs described. Reason I did not want to use "default" camera is, that Raspberrry v1 camera frames are 640x480, but MultiCam did not allow to switch aspect ratio from 16:9 to 4:3 for default. Now I can just click on "RaspberrySceneCam" or "BorescopeNozzleCam" (bottom right), really nice!
I had installed "WS281x LED Status" plugin as well and with no print activity, the default seems to be green flashes. I did record short animation demonstrating switching from scene cam to nozzle cam and back. Flashing light can be seen easily with scene camera, but you can see the flashing with nozzle camera as well on wall behind 3Dprinter (middle left). I scaled this animation to 50% size to keep animated .gif size under control: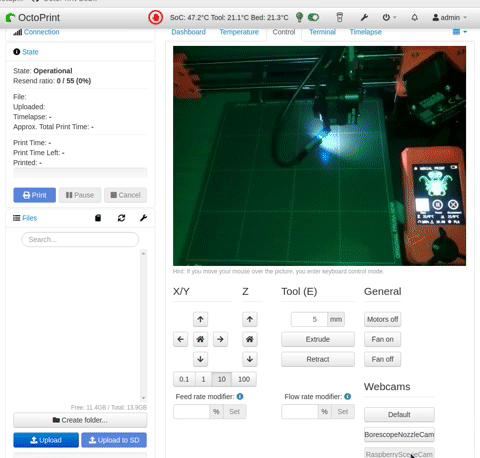
RE: Simple nozzle camera borescope holder for Prusa MINI+
I learned how to capture nozzle camera stream with just wget:
wget http://octopi3ap:8081/?action=stream
mjpeg_streamer is like a webserver, can serve stream to many clients.
I verified this by extracting X-Timestamp timestamps of raw HTTP stream in two shells:
https://twitter.com/HermannSW/status/1502029513357725699 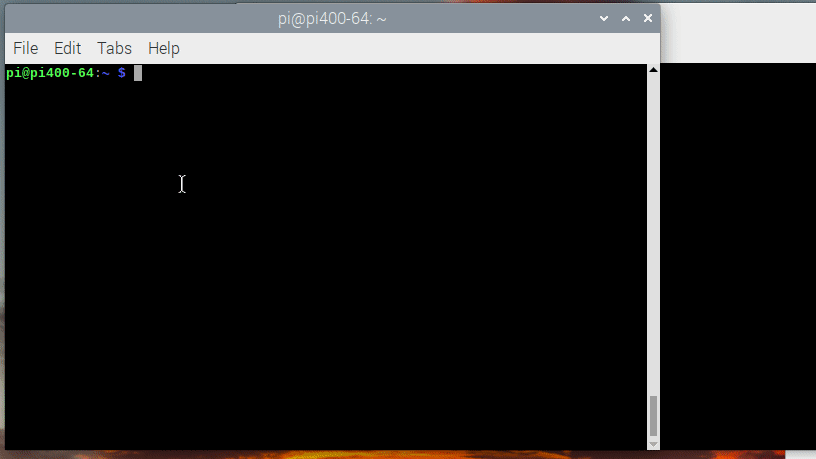
I enhanced the technique and created bash script mjpeg_fps:
https://gist.github.com/Hermann-SW/a4c3f5780666962ad6b37e3076d14aec
pi@pi400-64:~ $ shellcheck -o all mjpeg_fps
pi@pi400-64:~ $
pi@pi400-64:~ $ ./mjpeg_fps octopi3ap 8081
 min/ avg/ max
6.2/12.5/12.5
Lossless conversion of mjpeg stream to .mp4 video is described here, but that is veeeeery slooooow:
https://superuser.com/a/1041096
I use conversion described here:
https://stackoverflow.com/a/52398424
Problem with that is that ffmpeg generates framerate 25fps video, since mjpeg stream does not contain timestamps besides in HTTP headers. But my 640x480 borescope nozzle camera captures with 12.5fps as shown above. That is the reason why generated .mp4 plays double speed compared to original:
https://forum.prusa3d.com/forum/english-forum-awesome-prints-hall-of-fame/hall-of-shame/paged/2/#post-591535
The modified command with setting framerate determined with mjpeg_fps avg value (in parallel to real capture) is this:
ffmpeg -r 12.5 -i index.html\?action\=stream -pix_fmt yuv420p -b:v 4000k -c:v libx264 dest3.mp4
Result of uploading dest3.mp4 to youtube is video playing with 12.5fps:
RE: Simple nozzle camera borescope holder for Prusa MINI+
Just learned that mjpeg_fps tool is more valuable than I thought.
Just started a recording and started mjpeg_fps in parallel with same borescope nozzle camera as last night.
But today camera does provide higher framerate than 12.5fps:
pi@pi400-64:~ $ ./mjpeg_fps octopi3ap 8081
 min/ avg/ max
13.9/14.3/14.7
RE:
Published on printables.com:
https://www.printables.com/model/158670-nozzle-camera-borescope-holder-for-prusa-mini
Nice fine detail video from:
https://forum.prusa3d.com/forum/english-forum-awesome-prints-hall-of-fame/3dprinted-ball-from-two-halves-and-screw/#post-597133
RE: Simple nozzle camera borescope holder for Prusa MINI+
I used borescope holder for long time.
Once camera got loose while 3Dprint active, I temporarily fixated camera at top cable to complete print without issues.
Later I superglued camera into fixed position (only to avoid tilted nozzle view over time).
Today I noticed borescope camera view being out of focus, and not centered anymore.
Reason is deformation of borescope holer:
I am just printing with PETG, and since PETG needs higher temperature than PLA, I will 3Dprint holder with PETG in hope that it can better handle the continuing heat of borescope camera leds ...