Speed control in Prusaslicer
We can adjust speed during printing but I'm wondering if we could have that type of control in the slicer. Ideally we could specify the speed as a percentage like we can set during printing. It would really be nice if we could vary that at layer heights so we may want 100% for the first few layers then maybe something like 150% for the bulk of the print then pull back to 100% near the top. This would make it easy for repeated prints like the COVID face shields. You experiment with the speed at the printer until you find a setting that you're comfortable with. Then go back to the slicer, set that speed, re-slice your model and export the gcode. Now you get the advantage of a simple speed change without having to make it manually at the printer.
I know we can manage print speeds for various parts of the print but this would be much easier and probably less error prone since we're only changing one setting. I'm assuming this would be implemented as a custom gcode command that tells the controller to set the speed to a percentage value and not by modifying the speed of the individual movements in the generated gcode. That way we can be sure to see the same result setting the speed in the slicer as we do when we make the adjustment at the printer.
Any thoughts on this? Is this a good enhancement for us to request?
RE: Speed control in Prusaslicer
Hi
You can put custom GCODE before layer change in the printer settings which set the feedrate, the command is M220 S<percent>.
For example :
feedrate=100% on the first 5 layers, 150% from layer 6 to 50, 100% from layer 51 to 98
;Feedrate mod by layer
[layer_z]
{if layer_z <= 5}M220 S100
{elsif layer_z <= 50}M220 S150
{elsif layer_z <= 98}M220 S100
{endif}
RE: Speed control in Prusaslicer
With Plicer v2.2.0+ I've started using the layer-based custom gcode instead of lengthy if..else conditionals in the custom gcode. It is easier for me to visualize exactly where on my models the custom gcode is applied.
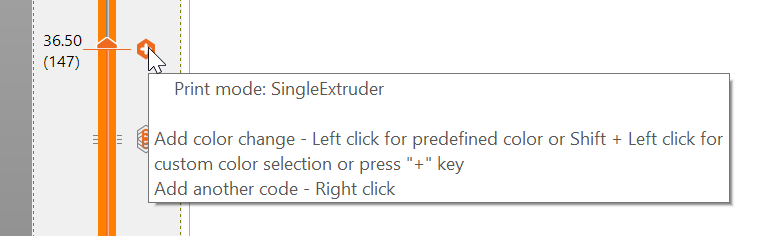
In the preview, select the layer that you want, and right-click the plus:
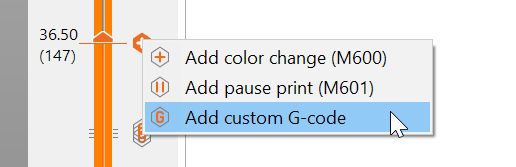
Select the gcode from the contextual menu after the right click
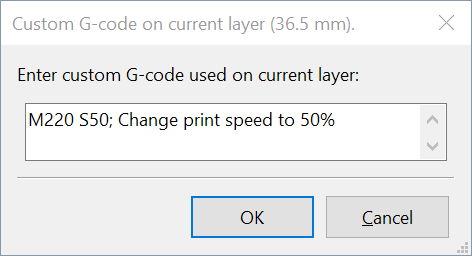
Enter the gcode you want (you can enter multiple lines of gcode if you want)
Once done, you can see what code was added on the layer slider:
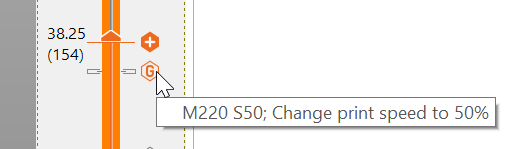
If you want to change or delete the code, select the layer and right-click the X and choose what you need from the contextual menu.
My advice is to make sure you remember to add the comment like I did above so 1 year later (or in my case 1 day later) you can be reminded of what that M22o code means, and why you put it there.
See my (limited) designs on:
Printables - https://www.printables.com/@Sembazuru
Thingiverse - https://www.thingiverse.com/Sembazuru/designs
RE: Speed control in Prusaslicer
I feel like I'm missing something. I've change the speed rate at different heights (getting faster every 5mm in height), yet when I slice the file, it doesn't get even one second faster in the print time and shows the same coloring when I activate the Speed viewer
;BEFORE_LAYER_CHANGE
G92 E0.0
;[layer_z]
{if layer_z == 6.05}M220 S50{endif};
{if layer_z == 12.05}M220 S60{endif};
{if layer_z == 18.05}M220 S70{endif};
{if layer_z == 24.05}M220 S80{endif};
RE: Speed control in Prusaslicer
The M220 Sx is a firmware speed multiplier and is applied at runtime - just like turning the knob on the printer under print. It will not show up in PrusaSlicer speed view or be reflected in estimated print times.
When printing the remaining estimated print time will be corrected/recalculated after each M220 Sx in the gcode.
Have a look at my models on Printables.com 😉
RE: Speed control in Prusaslicer
@area51
Ok. Glad to know I'm in the right path.
I'm printing at 40mm/s. Do my values change it to the respective speeds or is it a percentage from what I have set or a machine default?
RE: Speed control in Prusaslicer
-
Ah! I get it now. If I set M220 S50. That means 50% of my base speed which is 40mm/s. So what I really need to set is M220 S125 and that will end up being 50mm/s
RE: Speed control in Prusaslicer
Hi Portalfpv,
that is the sort of idea, but it is not an exact science.
the firmware has acceleration limits and maximum speed limits. which will cloud the issue.
when you are close to the original values speed changes on a large model can be roughly equated as above, but as you get further from 100% the change will be less because the maximums kick in... and on a small model the acceleration rates will crimp the speed available
regards Joan
I try to make safe suggestions,You should understand the context and ensure you are happy that they are safe before attempting to apply my suggestions, what you do, is YOUR responsibility.Location Halifax UK
RE: Speed control in Prusaslicer
With Plicer v2.2.0+ I've started using the layer-based custom gcode instead of lengthy if..else conditionals in the custom gcode. It is easier for me to visualize exactly where on my models the custom gcode is applied.
In the preview, select the layer that you want, and right-click the plus:
Select the gcode from the contextual menu after the right click
Enter the gcode you want (you can enter multiple lines of gcode if you want)
Once done, you can see what code was added on the layer slider:
If you want to change or delete the code, select the layer and right-click the X and choose what you need from the contextual menu.
My advice is to make sure you remember to add the comment like I did above so 1 year later (or in my case 1 day later) you can be reminded of what that M22o code means, and why you put it there.
RE: Speed control in Prusaslicer
The g-code M220 is in effect until it is changed. Normally this would be from the place you inserted it and to the end of the print.
Sometimes I have found that PrusaSlicer also inserts speed overrides (M220) into the generated g-code. One place is when it has filament change in multi-color prints (wipe tower). If you want to make sure there is not any unwanted extra M220, just generate g-code to a file and use a text editor to search for M220 - there should only be the ones you inserted.
Have a look at my models on Printables.com 😉
RE: Speed control in Prusaslicer
@area51
Thanks so much for your clarification
RE: Speed control in Prusaslicer
I feel like I'm missing something. I've change the speed rate at different heights (getting faster every 5mm in height), yet when I slice the file, it doesn't get even one second faster in the print time and shows the same coloring when I activate the Speed viewer
;BEFORE_LAYER_CHANGE
G92 E0.0
;[layer_z]
{if layer_z == 6.05}M220 S50{endif};
{if layer_z == 12.05}M220 S60{endif};
{if layer_z == 18.05}M220 S70{endif};
{if layer_z == 24.05}M220 S80{endif};
I just noticed this. Be aware that those commands will only be inserted if layer_z is EXACTLY the specified value. If you change layer heights, there's a good chance these will be skipped. If you want to try this, use <= or >= to specify ranges.
RE: Speed control in Prusaslicer
Is this M220 gcode still applied to next print ? I added gcode M220 S25 in layer #59 and it's already done but when I initiate next print, my printer become very slow until I reboot it and all back to normal again.
RE: Speed control in Prusaslicer
M220 works just like the speed override on the physical printer. Depending on firmware in the printer the setting will be in effect until changed or the next power on/off.
The default when generation g-code to the Prusa Printers is a M220 in the start of the g-code, this will reset the previous set M220 (for 0.4 mm nozzle the code is M220 S95).
Have a look at my models on Printables.com 😉
RE: Speed control in Prusaslicer
I was pointed to this thread from the discord server from some very helpful mods and I thought I would share what I ended up using for solving my problem in case it helps someone down the road.
My issue is that despite having tried all the other suggestions I have heard (dry your filament, wipe with ipa or windex, clean the bed with soap+water) I cannot get PETG to stick consistently. In the first layer issues wiki it is recommended to slow the speed down to about 75% for the first 3 layers but doing this manually is a bit of a bear so I decided to add some custom gcode into the before layer change block to do it for me:
;BEFORE_LAYER_CHANGE
G92 E0.0
;[layer_z]

M220 S{if layer_num <=3}70{else}100{endif} ; Slow down for first 3 layers
RE: Speed control in Prusaslicer
Nice code. You could also use the "first layer speed" setting - it applies to all moves on 1st layer independently of their nature
RE: Speed control in Prusaslicer
Is there any way how I can speed control and change the color of the print at the same time?
I am printing these spotify tags and i need to change the color for the waves but the issue is the speed in which the printer is printing the first few waves don't stick well. So I wondered if there is any way to reduce the print speed to 50 % after the color change.
RE: Speed control in Prusaslicer
For sure you can, I have no idea what your model looks like or how you have it setup, but you have full control over all the speeds in PrusaSlicer.
Based on the description you gave I would suggest trying a Height rang modifier just before or after your color change and add the settings to adjust the speed to it from the menu, you will need to be in "Expert" mode to gain access to the full range of menu's for the Height range modifier.
Regards
Swiss_Cheese
The Filament Whisperer
RE: Speed control in Prusaslicer
Thank you Swiss_Cheese I use a Prusa MINI +, and I have the slicer in Expert mode.
I even used the Height Range modifier for Ironing. I have attached the image below. Is there any way two Height range modifiers or any other way. Because as far as I tried it only allows me to either choose the M600 fialment change or the Custom G-code option to enter the M220 Speed change.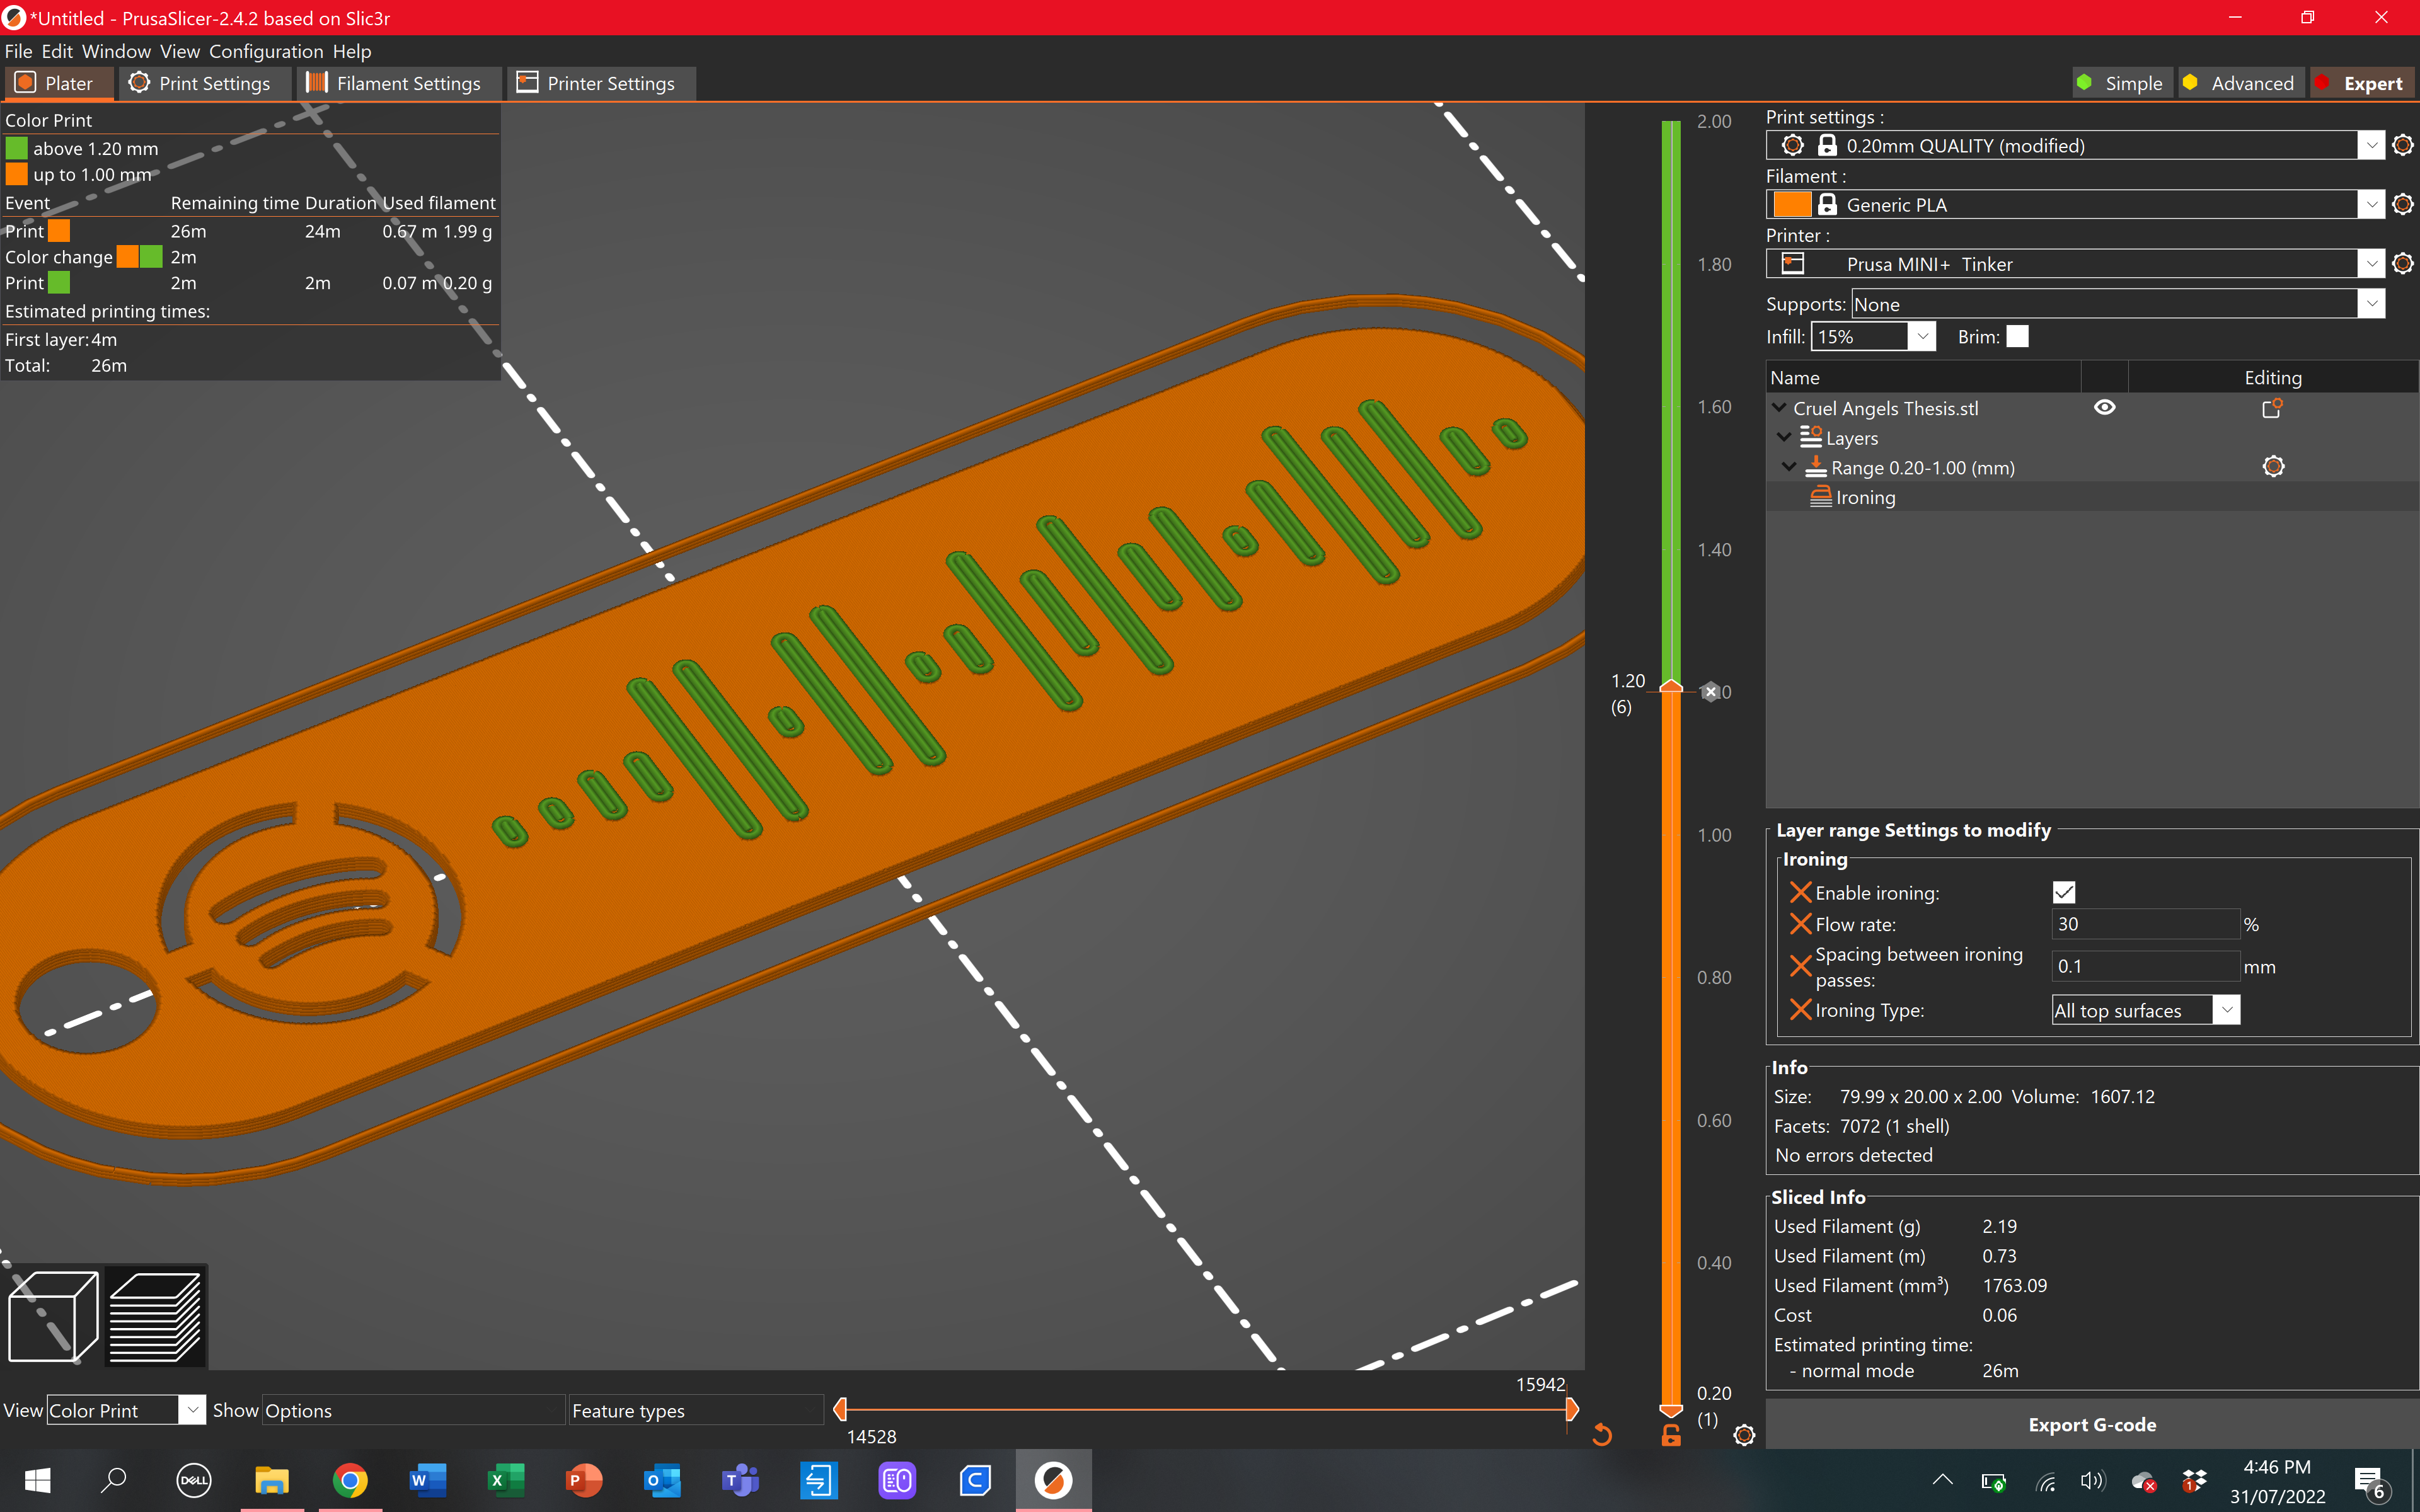
Add both as custom G-code,
M600
M220 S50
Or, do as @swiss_cheese meant, change color in "Height Bar", and change speed with "Height range Modifier" the sane way you did with "Ironing"
Also, remember to reset M220 after printing.
I have added "M220 S100 ; Reset speed to 100%" in my custom End G-code
Or you can simply reset/restart your printer
Prusa i3 MK3S+ FW 3.11.0 (kit dec -20), PrusaSlicer 2.6.1+win64, Fusion 360, Windows 10