Print not "printing" at seam of box, leaving a gap in the print.
Does anyone know what causes this ripping effect in my print?

I have made a small box project which holds batteries and a TP4056 board to power some fairy lights. I am making them with "disposable" vape batteries and fairy lights that have been recovered from the bin, so I don't want to spend too long printing or use too much filament. The fairy lights are wrapped around the box so they protect it when not in use, so the box doesn't need to be very strong.
I am using a 0.6mm nozzle but I am finding that many of the boxes have this "tearing" effect at the seam. In many cases, there is a gap at every layer of the print, making the box extremely weak in this area. I have tried a fillet but this seems to make the problem worse.
I read that arachne could be responsible for this but it still happens with arachne off and detect thin walls on.
Does anyone have any ideas about how I could tune my design or tune my printer to fix this problem? I am looking at this as a learning exercise initially, so I would like to avoid reducing the nozzle size or increasing wall thickness as these would both increase the print time significantly.
I am using a MK3S+ from 2021 and I have seen this problem with prusament and generic PLA.
Thank you for any suggestions you have.
RE: Print not "printing" at seam of box, leaving a gap in the print.
Let me guess, you are printing multiple boxes at the same time ? Its most likely filament leaking from the 0.6 nozzle during travels between islands.
There are some threads about this effect both on the forum here and also a github issue regarding it. There seem to be many contributing factors, like filament linear advance settings etc. It also seems to be more prevalent on the mini with its bowden setup but it does appear on other printers. The jury is out on if its a slicer issue or a combination of things. The github issue if you want to read it and try any of the suggestions is located here https://github.com/prusa3d/PrusaSlicer/issues/11914
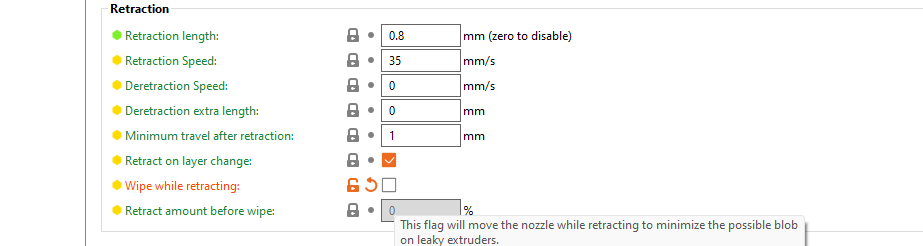
I'd start with experimenting with your retraction settings for the 0.6 nozzle. With the Mk3 don't go more than 2mm.
RE: Print not "printing" at seam of box, leaving a gap in the print.
The problem also occurs when printing only one box. I believe that the printing of the perimeter starts and finishes at this point. Here is another I just printed, and a .3mf project saved from prusaslicer. Currently the retraction length is just 0.8mm. Do you think I should set it to something like 0.2mm? I don't mind about stringing, this is a functional print.


RE: Print not "printing" at seam of box, leaving a gap in the print.
A question, are you seam setting aligned or random?
RE: Print not "printing" at seam of box, leaving a gap in the print.
No project made it through. You have to zip files like that to attach them here.
RE: Print not "printing" at seam of box, leaving a gap in the print.
Seam is aligned. Thanks for the tip about files, here is a 3MF and gcode, what do you think
RE: Print not "printing" at seam of box, leaving a gap in the print.
Thanks for attaching the project file. Looking at the slice preview and turning on show travels I think your issue is a couple of things, that wall is a single perimeter, the gap is at your layer start point. However to get to that start point its travelling diagonally across from the furthest corner so in effect a long travel resulting in the missing filament on the next layer start. Single perimeter wall with travels are sometimes (often) problematic. If you aren't already doing so, start making use of the slice preview and turning on some of the extra visualisation options like show seams and travel. You can rapidly spot where the problem areas lines up. It's also good practice and can save you a lot of time and filament in wasted prints in general 🙂
I'd thicken up that single perimeter wall just on general principles and re-slice to see what effect that has on the path planning.
I played around with the seam position setting but even with Nearest it still has a long travel to get back to the start point due to planning around that single wall perimeter so I don't think that will help in this case.
I wouldn't normally recommend this but you could also experiment with Printer Settings>Extruder>Retraction>Deretraction extra length. That will push out a bit of extra filament after the retraction. Something like 0.1-0.2mm. The problem is that can cause bulges/too much material on other areas. So its one of those problematic settings.
I suspect that making that wall a bit thicker to give 2 perimeters will be the best route.
RE: Print not "printing" at seam of box, leaving a gap in the print.
I tried printing with a random seam and there was no improvement at all but stringing did get worse.
Interestingly, the problem isn't occurring where all the deretractions are occurring but in another corner, highlighted in this photo.

I have attached the GCode and 3MF file.
After this I tried increasing the wall thickness from 0.68mm to 1.2mm, which of course means two perimeters are required. This has solved the problem and increased filament use from 20.6 g to 21.6 g, increasing print time from 50m to 51m. So, thanks for making me try that, I guess I had just pushed the optimisation too far without thinking.
I greatly appreciate your taking the time to teach me and share your experience here.
RE:

In case anyone else has this problem, I still get it on my 0.6mm nozzle with a 1.0mm thick wall (done in 2 layers). From examining the extruder path, it appears to happen at the start of each layer, not the end as I previously thought.
I think it is the same problem that others are having with benchy prints here and general prints here.
RE: Print not "printing" at seam of box, leaving a gap in the print.
Yeah, its not fully primed with material when its gets to the start of your new layer. That's what the previously mentioned extra length on restart was for. The bigger the nozzle the more this happens as bigger nozzles are generally 'leakier'.
RE:
Yeah, its not fully primed with material when its gets to the start of your new layer. That's what the previously mentioned extra length on restart was for. The bigger the nozzle the more this happens as bigger nozzles are generally 'leakier'.
I didn't realise `extra length on restart` would apply to me as I only have a single tool (MK3S+) and the description says "When the extruder is compensated after changing tool, the extruder will push this amount of additional filament." I was also reticent because I saw 2mm+ of gaps on each layer and the other user said that 0.1mm `extra length on restart` ruined their model.
However, I have tried 0.05mm extra length on restart and it helped, 0.1mm seems to have fixed the problem completely. I'll update if I have any more problems but how can I suggest that the description for this variable is updated? I suggest changing the tooltip to:
"When the retraction is compensated after changing tool or changing layer, the extruder will push "
"this additional amount of filament. This parameter is useful for closing up gaps on seams."
"Typical values around 0.05mm"
RE: Print not "printing" at seam of box, leaving a gap in the print.
Sorry, ignore me 🙂 The setting that is now called 'Deretraction Extra Length' used to be called Extra Length On restart. Funnily enough it STILL is called that in Super Slicer and Orca Slicer so its easy to get confused if you use multiple slicers like me. Not sure why the renamed it in PS
In fact if its helping you by setting it I too am surprised as the tooltip would indicate its applicable to multi extruder setups.
Indeed, I think it was just a fluke from other settings I changed (sequential print and faster perimeter speeds), because the problem is back even with "Extra length on restart" at 0.2mm.
I guess I just don't understand how it only seems to be happening on these sharp corners with "narrow" walls. There are some 3mm posts (cylindrical) in this model which have no apparent problems on the seams.
I made a little test STL to iterate faster. Deretraction extra length values of 0.5mm and 1.0mm haven't made any difference to the problem at all.
(De)Retraction speed had no effect.
Seam gap distance set to -5% (instead of +15% default) also had no impact whatsoever.

RE:
Is this a bug in prusaslicer?
I'm still trying to get to the bottom of this. Is it possible that my slicer is ignoring my "deretraction extra length"? From the attached GCode file, with retraction set to 0.3mm and deretraction set to 0.1mm or even an outrageous 5mm, the deretraction is still exactly 0.3mm. I don't have any retraction overrides set in the filament overrides section, but they don't change anything either.

Excuse the poor photo, but here is the results with my notes.

If I disable "wipe while retracting" then the deretraction extra length is honored. I will try this next (without deretraction extra length)
RE:
So, disabling "wipe while retracting" has solved the problem completely.
In the GCode for my previous post, I noticed that the feed rate during the wipe is 8640mm/min or 144mm/s, which is a LOT faster than the alleged retraction speed:
Could a bug in the implementation of wiping be responsible for this , with the extremely fast retraction speed (and blocking of de-retraction extra length) being the root cause?
RE:
So, after a lot of getting my head around the GCode, my post above was wrong. The feed rate is set to 144mm/s but because the amount of extrusion requested from the extruder in each GCode movement is very low, the time taken to move that distance (even at 144mm/s) ensures that the filament isn't extruded faster than the set limit (default 35mm/s).
However, this seems to be too fast for me. By setting it to 6mm/s I got much better results, and this is observed even when wipe is enabled.


So there is a small bug in prusaslicer (ignoring the deretraction distance when wipe is enabled) but it wasn't the root cause of the problem.
RE: Print not "printing" at seam of box, leaving a gap in the print.
Does anyone know what causes this ripping effect in my print?
I have made a small box project which holds batteries and a TP4056 board to power some fairy lights. I am making them with "disposable" vape batteries and fairy lights that have been recovered from the bin, so I don't want to spend too long printing or use too much filament. The fairy lights are wrapped around the box so they protect it when not in use, so the box doesn't need to be very strong.
I am using a 0.6mm nozzle but I am finding that many of the boxes have this "tearing" effect at the seam. In many cases, there is a gap at every layer of the print, making the box extremely weak in this area. I have tried a fillet but this seems to make the problem worse.
I read that arachne could be responsible for this but it still happens with arachne off and detect thin walls on.
Does anyone have any ideas about how I could tune my design or tune my printer to fix this problem? I am looking at this as a learning exercise initially, so I would like to avoid reducing the nozzle size or increasing wall thickness as these would both increase the print time significantly.
I am using a MK3S+ from 2021 and I have seen this problem with prusament and generic PLA.
Thank you for any suggestions you have.
I can fix that seam issue for you in just a few attempts. I’ve got a method that works, but I’ll need a few key details from your setup first. Once I have those, I’ll tell you exactly what to adjust and by how much.I can’t just throw out random slicer tweaks — it doesn’t work like that. Your printer needs to be set up right before those slicer settings can do their job properly. If you’re up for it, i need you to send some info about your setup info and I will be able to sort it for you (the funny thing is my method works at it best when using pusaslicer. So thats a good start)
RE: Print not "printing" at seam of box, leaving a gap in the print.
Sure, what details do you need?
I've pretty much fixed it, by disabling the "wipe while retracting" feature. I can see the same problem on my new MK4S printer if I leave wipe enabled.
I think this causes filament to be pulled out of the nozzle, meaning there is an under-extrusion for the next line. I have ended up setting retraction speed to 11mm/s for PETG on the MK4S
RE: Print not "printing" at seam of box, leaving a gap in the print.
In the end, I think this has all been caused by pressure advance, or rather PETG not getting enough of it.
I messed around for HOURS, probably exceeding 30 or 40 trying to figure this out.
My understanding is that when the printer is extruding slowly, it needs a little planning to make sure that there is enough pressure at the start of a line and not too much pressure at the end of a line. When running the printer very quickly, this pressure builds up quickly and barely gets a chance to drop, which clearly causes oozing without retractions.
When things get slowed down, such as for small layers and fine details, the printer needs to plan much more and use the "Pressure Advance" feature in the firmware. This pretty much solves the problem and reduces stringing a lot. The number needed is usually between 0.000 for extreme speed and 0.150 for very slow prints, but it varies with filament viscosity (temperature), speed, acceleration and volumetric flow rate.
However, I think that prusa firmware (maybe all marlin?) isn't managing this correctly for retractions, and if retraction flow rate and acceleration are significantly different from the normal printing moves, the pressure advance can ruin the print as it doesn't build enough pressure for the start of a new line after a retraction.
As you can see from this thread, there are a dozen possible wild gooses to chase in solving this, and some of them (worn nozzles are bigger than expected, so are more prone to oozing) ARE the solution for some people, which makes it even more confusing.
I was eventually getting mostly good results with orcaslicer's adaptive PA settings, but still had some problems occasionally. I now think those cases were small, fast layers which were slowed to compensate for cooling, and therefore set with unusual retraction settings. I guess PETG complicated things a bit, too.
Not 100% sure on this but for anyone else with the same problem, Pressure Advance tuning helped a lot.
On a slow speed test model (somewhere I was struggling before) I managed to get much better results after increasing deretraction speed significantly from 11mm/s to 40mm/s.
RE: Print not "printing" at seam of box, leaving a gap in the print.
I made a little spreadsheet to calculate the average volumetric flow on a MK4S with standard 2500mm/s/s extruder acceleration and 0.6mm retraction length. Any retraction speed over 10mm/s has a volumetric flow over 20, which is way outside the range you would print PETG with. 20mm/s retraction speed is targeting a volumetric flow of 48 cubic mm/s!
But this is without a tiny 0.40mm nozzle restricting things, and 2400mm/s/s doesn't have the same impact on pressure as changing xy acceleration from 1000 to 3000, so how important is it really? I'm not sure!
Or maybe it's the other way around, and pressure advance has a strong effect on effective retraction lengths and speeds. Not sure about this, my test gcode file shows that stringing doesn't change much when printing upwards with the pressure advance changing every layer.
How much is this the cause of my bed adhesion problems with PETG after any retraction on the first layer? I wish I knew!