Poor slicing of wide overhangs?
I just printed a simple bridge and overhang test and the bridge was able to print at least 50mm straight bridges on my Mk3S. Amazing!
The overhang test failed completely on the final 90 degree part.
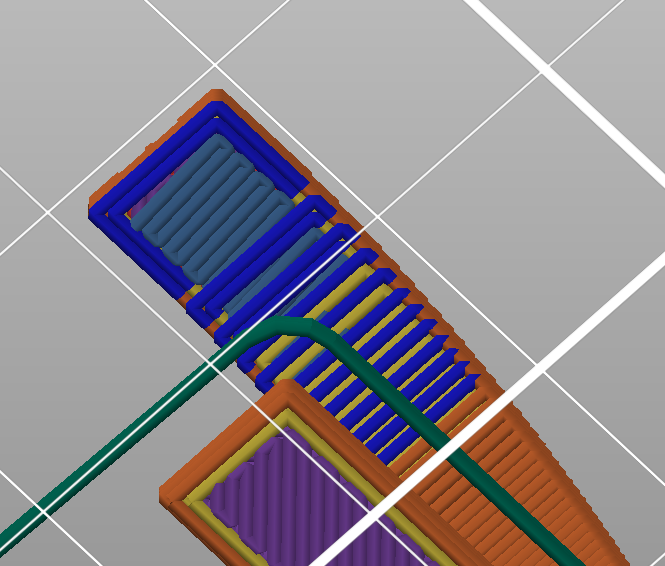
I was watching the printer and noticed that it tried to make the entire rectangular overhang area in one perimeter move. The printer printed straight out, like a bridge, but then tried to make a corner "in the air", which failed completely as there was nothing to support the change of direction.
Is there a setting to make overhangs like this print smarter? Maybe just print line by line sideways, instead of trying to print straight out along the perimeter.
In the slice image below the perimeter is what failed (and caused the rest to fail as well). I'm thinking that if the slicer had made the entire overhang part like the light blue infill it might have worked better.
RE: Poor slicing of wide overhangs?
The point is you can't print those areas without support. Those overhang tests are for you to see where it fails on your printer so that you can adjust the support settings to kick in at those angles if you use automatic supports (which if you print for long you wont use if you have any sense). They are not designed to succeed at printing without supports.
RE: Poor slicing of wide overhangs?
Just to understand your wording @neophyl "which if you print for long you wont use if you have any sense".. as I am new to all this. You are saying to NOT use automatic supports? I ask as I just learned about the "draw" tool.. which seems pretty slick that I just select some spots and draw circle/lines and then slice and supports show up. I like that.
Just not sure how to properly set up the supports so they are not hard to break off. I seen some 3d prints where the supports seem to be like whicker almost (in how the pattern shows up) so you can easily identify them and remove them. My supports seem to be darn hard and I have to get in with pliers and usually break my printed piece.. especially on smaller parts.
RE: Poor slicing of wide overhangs?
If by 'draw' you mean the paint on supports tool then yes. Basically the automatic supports tend to leave you with an over abundance of them. Far more that you actually need.
Back in the 'old days' when it was Slic3erPE the best way to control supports was by extensive use of support blockers. Best is a loose term though as the old modifier system was a pain in the rear to use.
Since the paint on supports became an option then those combined with the 'For enforcers only' option on the dropdown is the way to go. Haven't used a blocker since. After all if you are defining where you want support then you don't need to block.
The following 'works for me', there are many ways to achieve the same ends but all I can pass on is what I use.
First off, change the support type to snug (available since 2.4). I don't know why grid is still the default but I haven't found a single instance (yet) where snug wasn't a better choice.
After that the single setting that effects how hard supports are to remove is the Top Contact z distance. 0.2 is what I use for PLA and 0.25 for petg on most models. 0.3 sometimes with petg but that depends on the petg brand and the model. Some filaments are 'stickier' and you have to adjust for that.
For models that are mainly up/down with parts coming out at right angles that need support then bumping up the XY separation between object and support to 70-80% is usually a good idea to give a bit more clearance between the part and its support. However for parts that slope upwards at an angle then leaving it at 50% is better. That's because the geometry results in the support being further away on those sloping parts anyway.
Top Interface layers is the next setting I routinely have different from defaults. The drop down options are 0-3 but you can actually type any value you like in there. I have mine set to 4.
The reasoning can be a bit counter intuitive but what happens when you have less layers is that as you try and peel the interface away from the part is that it breaks up. This leads to lots of small bits being stuck that you then have to spend time scraping away. Tedious.
By increasing the layer count of the interface they bond together as a more cohesive whole. It means that it will tend to peel off as one section much easier. Less time and clean up is a win in my book. I make sure bottom interface layers are off though if I do have support that rests on the model.
Next up is Pattern Spacing, this is usually set at 2mm. That's fine for most things actually but for smaller models then going down to 1.5 or 1mm can work better. For larger flat areas that need support you can increase that though, I go up to 5mm sometimes though 3mm is more common for me. The extra layers in the top interface will bridge that no problem.
As for actually defining the areas with the paint on enforcer, well that just take a bit of practice to get used to how the tool works and all the options for it. The highlight overhang by angle is handy to see just what areas are overhanging most. Even if I don't use the enforce button, it visually gives a good idea of where needs painting. Of course if the angle selection is ok then just click enforce and you are good to go.
Do your best guess and click slice and see what you get. Then go back and adjust as needed.
You want to avoid having tall thin areas of support that might fail, for those its best to enlarge the supported area slightly if needed. You can also change the extrusion width for supports. By default they are 0.35mm on a prusa profile for a 0.4mm nozzle. You can up the thickness if you are getting supports that collapse while printing. Generally that's not needed though.
The more you use the paint on option the easier it becomes and you will rapidly not even think about using automatic any more. A human can make much better decisions than the current algorithm. Often less support is needed than you think too 🙂
One other thing that is often overlooked is object orientation. Sometime changing how the object is oriented can massively impact just how much support is needed. There are a few threads with some examples of that around.
Also remember that the forum is a great resource for learning. Posting up a zipped project file (3mf) with a model and asking how would people print this. You will get replies with modified projects that you can examine and see how support painting has been done, or the object oriented etc. I'm always looking for new tips and tricks, as I don't think you can ever stop learning.
When removing support, its best if the force is directly away from the surface, so don't push support sideways , pull it directly away. Bit like with velcro 🙂
Buy a cheap set of dental picks. Nothing better for really detailed models with small nooks and crannies when you need to wiggle some support loose. Can't remember who passed on that advice originally but they have certainly been worth the £8 spent on them.