"Manual" multicolor
Hey everyone, hope you all doing well.
So, I just designed my screwdriver + bit holder and I want to print it with two colors (although one is only 2 layers of text). But I have no idea how to achieve it, as using the height "split" would print everything on the layer the same color, but I want to print just the text. And using MMU (or dual extruders in general), which I don't have probably wouldn't work the way I want.
So to my question. Is it possible to change the color of individual parts, or somehow set a color for only a part of a layer or do I seriously need MMU for it?
Thanks for any suggestions and have a nice day.
RE: "Manual" multicolor
You can change color, using the color change in PrusaSlicer - but it will be the that layer and the rest of the model or to the next color change command (M600). Doing individual models/parts you need MMU.
Have a look at my models on Printables.com 😉
RE: "Manual" multicolor
Welcome to the group Stratos...
the model you have chosen is available as either separate STL's for the Box and the Letters, and as a combined model including both...
the easy way to do this, is using the colour change by layer option
add the combined model to your slicer plater view, and action filament changes at the appropriate layers!
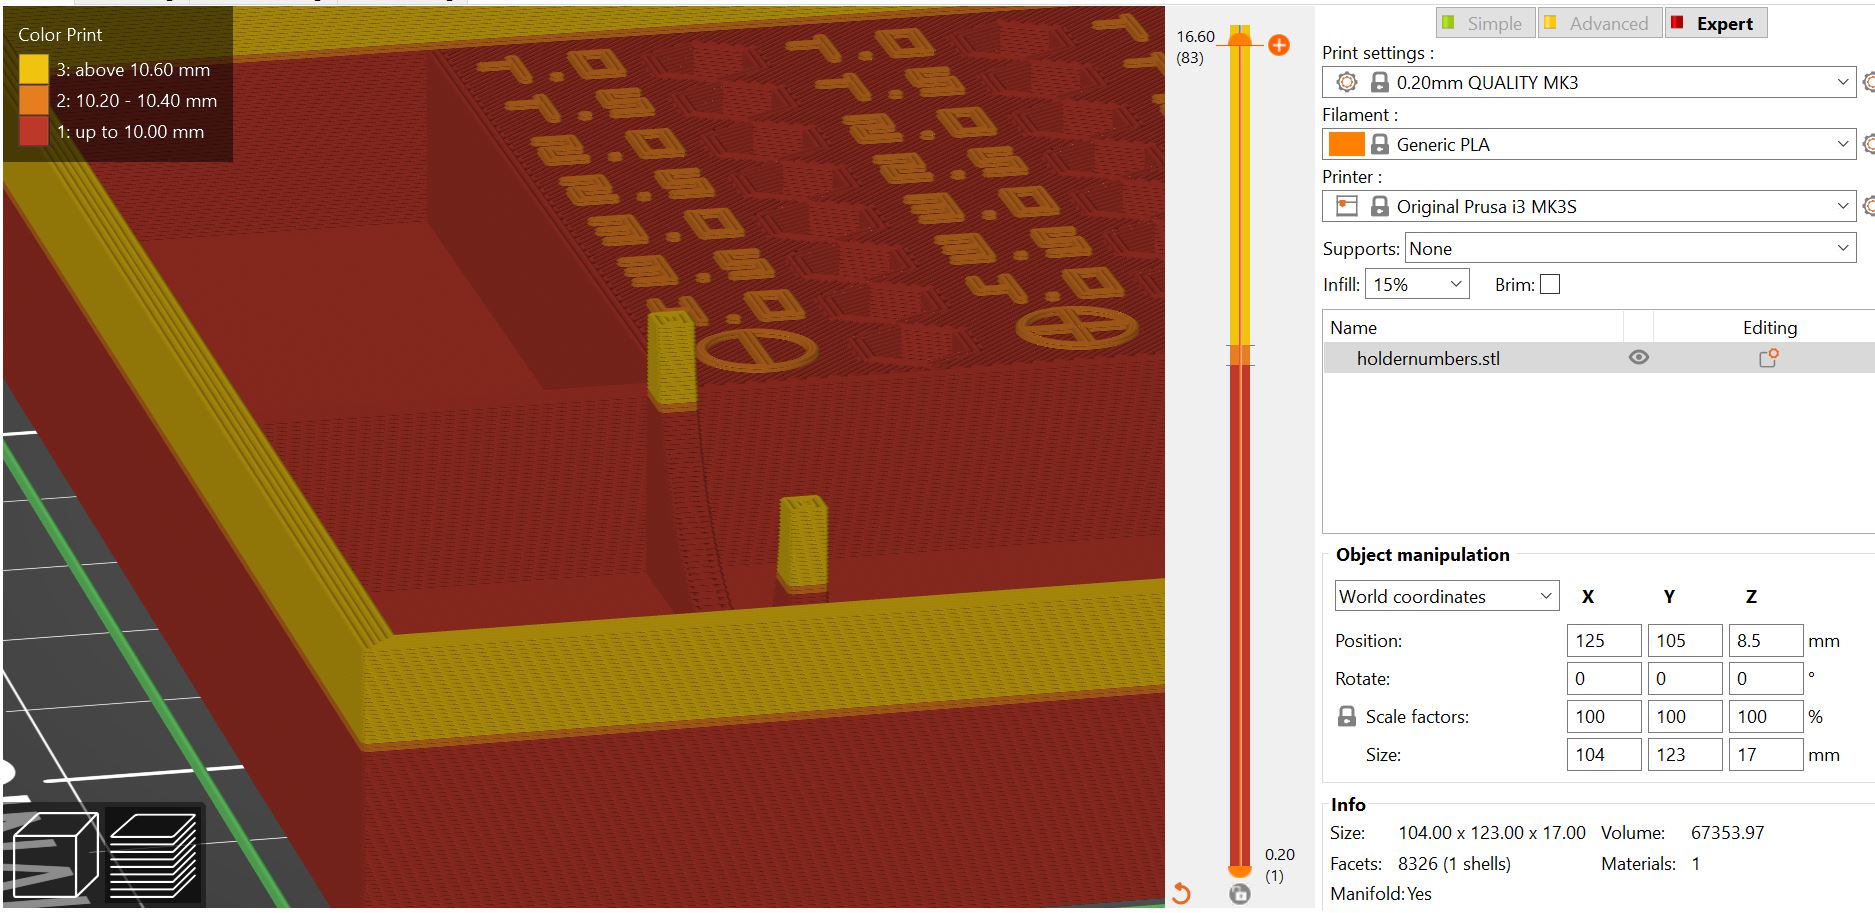
here the bottom layers could be one colour Shown RED in the default colour scheme,
the layers containing the text could be another colour, shown Orange in the default colour scheme
and the remaining layers could be the same as the first colour, shown as Yellow, on the default colour scheme...
filament change process as below... BUT not only are the text a different colour, but all items on the same layer also have a GO Faster stripe! of the letter colour
a more complex way, is to use your normal slicer version, I will use the Mk3S version, as I guess that is what you have!
Make sure that you are in Advanced Mode, or Expert mode
1, go to the 'Printer settings>General' tab, and increase the number of extruders to '2'
2, go to the 'Printer settings>Custom Gcode' tab, and open the Tool Change Gcode box... and type in M600
3, go to the 'Print settings>Multiple Extruders' tab and in the Wipe Tower section, deselect wipe tower enable
4, in plater view, Either...
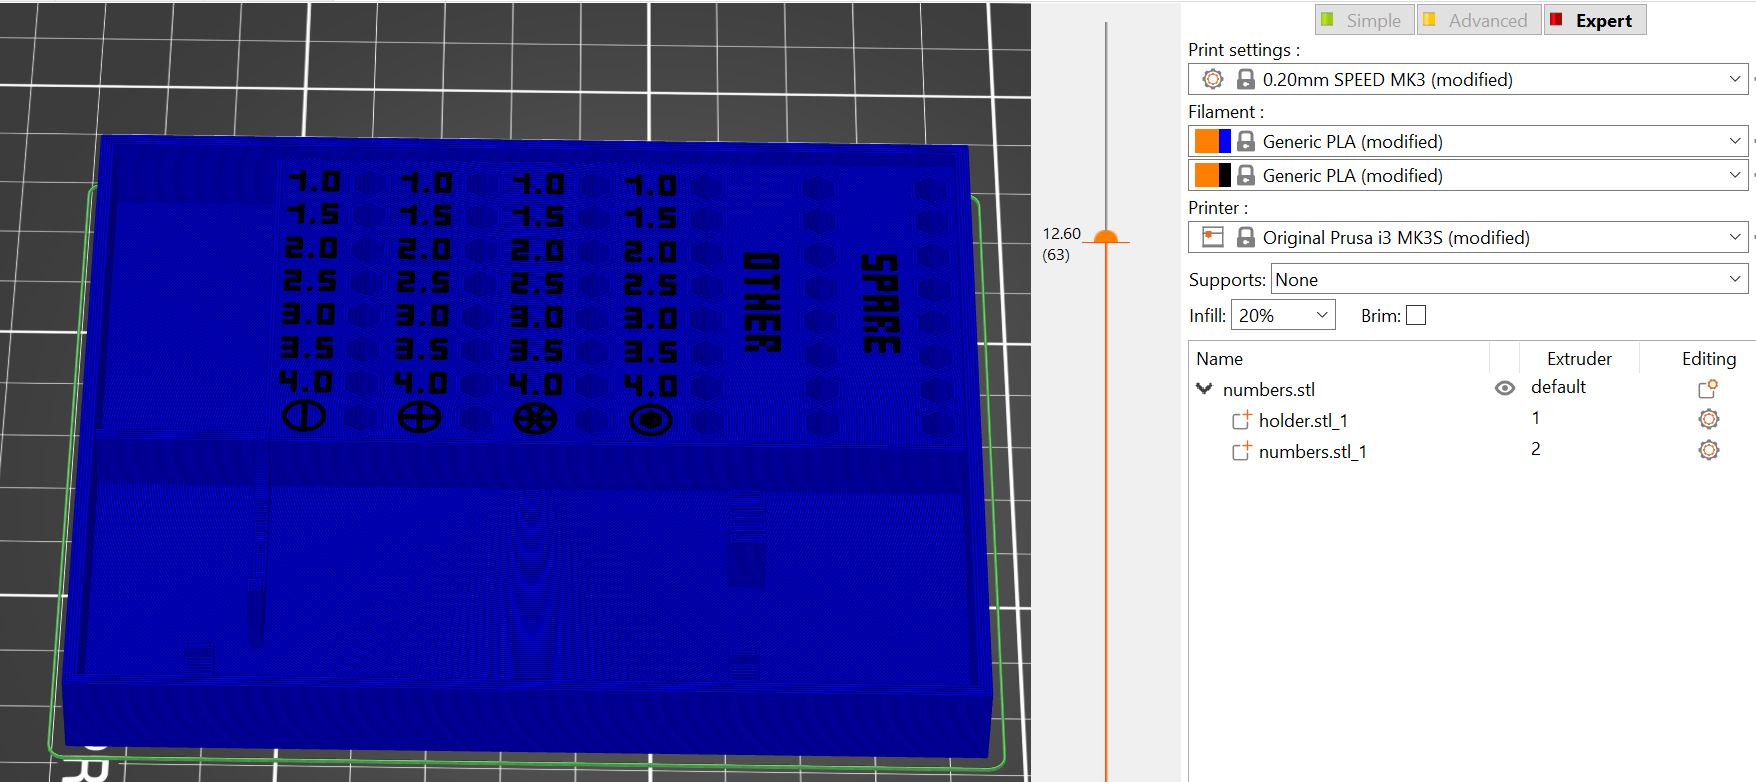
4a, Add both the 'Numbers' and the 'Holder' STL's at the same time, you will be asked if this is a multi material model, select Yes, or
4b Add the Holder Stl, then right click on the holder image and select Add Part > Load, and select the numbers STL and load that.
both options will import the two STL's in the correct relationship
5, on the right hand window select indicative colours to represent your preferred colourscheme then make sure that extruder 1 is allocated for one STL ( I have used it for Blue, for the main holder section) and extruder 2 is allocated to the numbers STL
then slice the model and you should get something like this!
save the Gcode to SD card, transfer to printer, ensure you have appropriate filament loaded for the holder, and start your print
the printer should pint all of the Holder up to the layer where the colour change is due to occur, the printer should print all of the blue items on that layer, then it should request a colour change, the extruder will come to the right hand side, and y axis will go back, LCD Module will bleep, and invite you to push the knob and remove the blue filament, it will then check that the filament has been taken out, and following the LCD Prompts, invite you to insert and load the Black filament... follow the lcd prompts. there will be a wormcast of waste filament that should change from Blue to Black...
Resist the temptation to remove the waste
when the wormcast colour is Black, grip the wormcast with pliers or tweezers, or if brave, your fingers!
DO NOT PULL IT OFF, just hold it, and answer to say that the colour is clear!
the extruder will move back to the model and start printing, as it goes back to printing, the extruder will expell a little more filament, which will remain attached to the wormcast that you are holding. and pull off the extruder....
Now you can throw away the waste
the printer will complete that layer and it should rise to the next layer and complete the numbers, then request a filament change,
same process as above!
reload Blue, catch the waste and let the model complete....
there should be a zipfile attached at the bottom, with a 3MF file set up as per my example for you to look at! and try if you wish!
I try to make safe suggestions,You should understand the context and ensure you are happy that they are safe before attempting to apply my suggestions, what you do, is YOUR responsibility.Location Halifax UK
RE: "Manual" multicolor
@joantabb
Yes, that's exactly what I want. I will try it tomorrow. Thank you for now 🙂
RE: "Manual" multicolor
@stratos
Good Luck!
Joan
I try to make safe suggestions,You should understand the context and ensure you are happy that they are safe before attempting to apply my suggestions, what you do, is YOUR responsibility.Location Halifax UK
RE: "Manual" multicolor
@joantabb
Worked like a charm, thanks 😊
RE: "Manual" multicolor
Excellent,
do you think you will be able to re create the process?
another possibility, with a single model, is to use modifiers, to allocate different colours to different parts of a model, using the virtual multiple extruder option...
regards Joan
I try to make safe suggestions,You should understand the context and ensure you are happy that they are safe before attempting to apply my suggestions, what you do, is YOUR responsibility.Location Halifax UK
RE: "Manual" multicolor
@joantabb
Wow Joan! That is some next-level 3d printing. I wouldn't have thought of a "virtual MMU"... Now I'm going to go invent a reason to try it.
All your filament are belong to us!
RE: "Manual" multicolor
@joantabb
Wow Joan! That is some next-level 3d printing. I wouldn't have thought of a "virtual MMU"... Now I'm going to go invent a reason to try it.
Correction... That would be Virtual Dual-Extruders... not Virtual MMU... Still... Awesome!
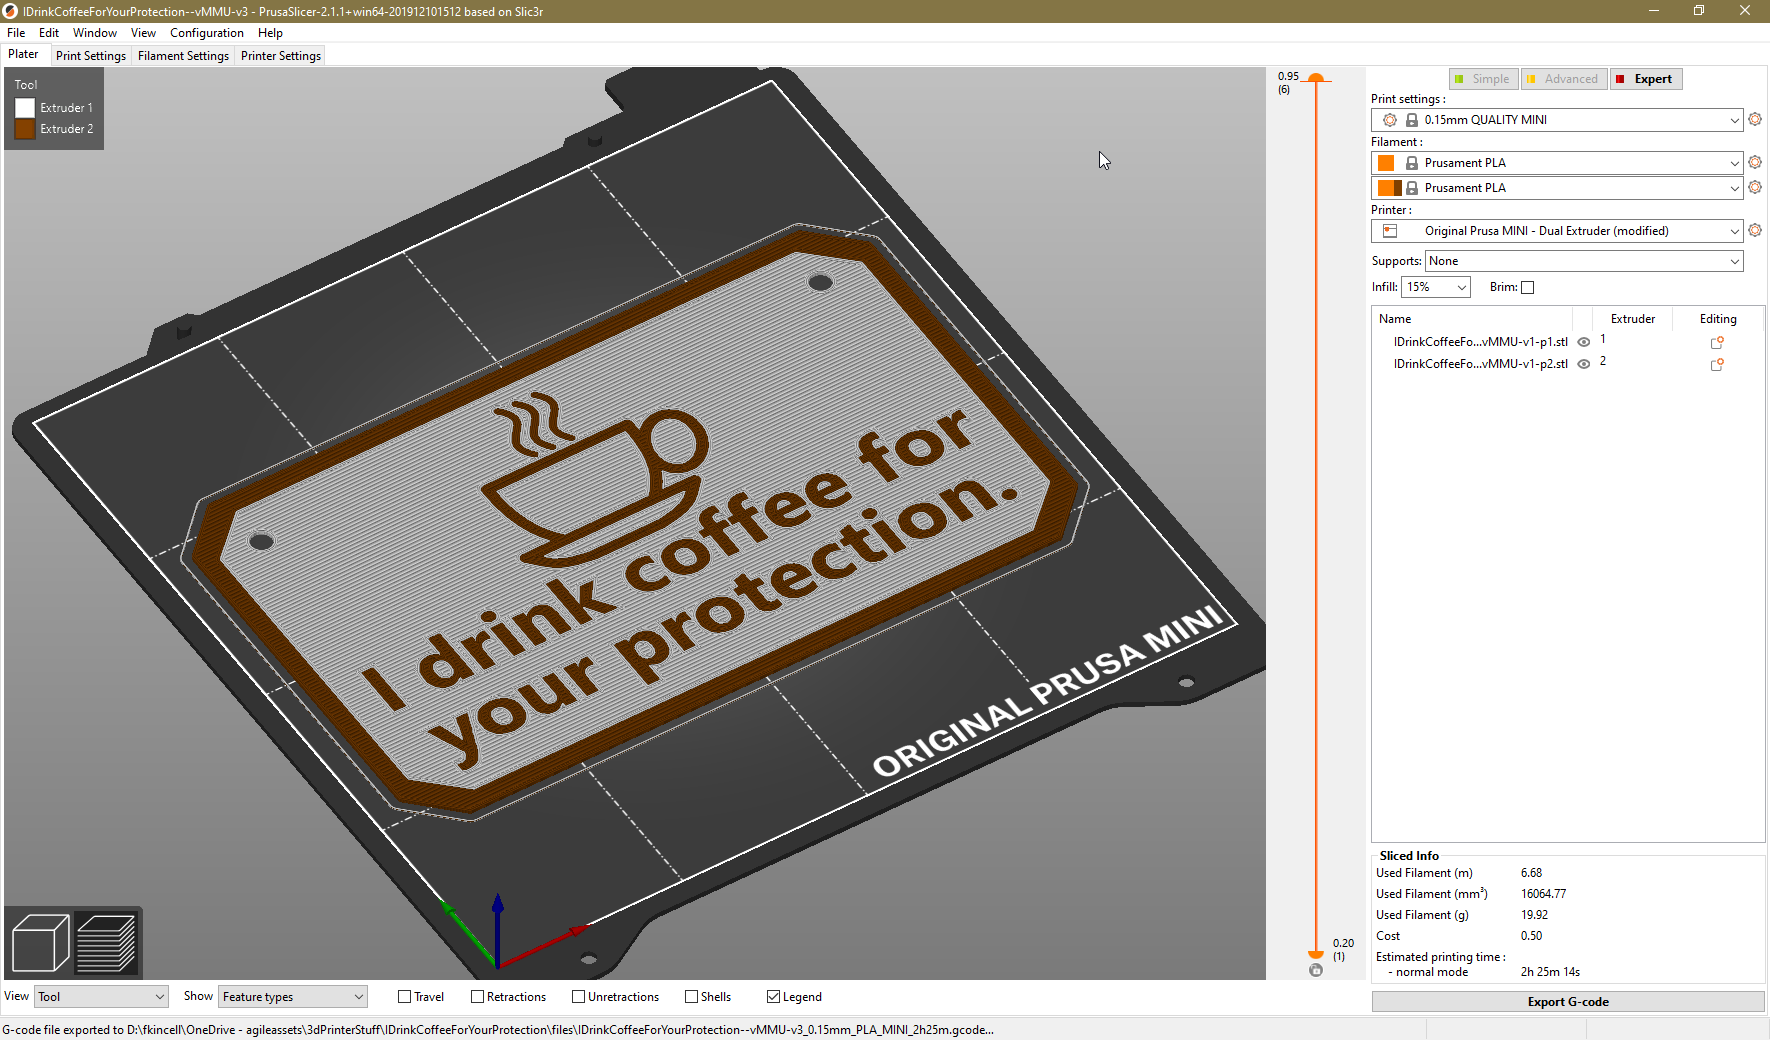
I've create a dual-extruder version of my Prusa Mini with a virtual 2nd extruder. And I've made a small placard in 3DBuilder to test it.
I'll let you know how it comes out in a few days. (I have a queue of things I want to print with this new printer.)

All your filament are belong to us!
RE: "Manual" multicolor
**WARNING: THIS IS EXPERIMENTAL**
**USE AT YOUR OWN RISK UNTIL I TEST IT**
Just in-case anyone is feeling crazy and wants to experiment...
Here are the files.. https://drive.google.com/file/d/1rv6xVJwOniX9yd5CMkUN-NhNNyqR4r3m/view?usp=sharing
**WARNING: THIS IS EXPERIMENTAL**
**USE AT YOUR OWN RISK UNTIL I TEST IT**
All your filament are belong to us!
RE: "Manual" multicolor
You can also do that in reverse - when we take the sign " I drink coffee ..." as an example you turn it around - so the brown letters are directly on the print surface. You print 2 layers of brown material (each 0,2 mm high). Then change material but leave the print result untouched (do not move it !!!) to white. Then start printing again on layer 0 (directly on printer bed) with white. So you have to have two STL´s - 1. with only the brown letters (max. 2 layers high) and 2. with white surrounding (has the first 2 layers where later on the letters will be as free space).
It is a little more complex, but the adventage is to have a nice looking surface (depending on your printbed - smooth or textured surface, both are possible).
Best regards, Clemens
Mini, i3 MK2.5S, i3 MK4, CClone (Eigenbau)
RE: "Manual" multicolor
@joantabb
Hi,
I have question described in this part
''
Resist the temptation to remove the waste
when the wormcast colour is Black, grip the wormcast with pliers or tweezers, or if brave, your fingers!
DO NOT PULL IT OFF, just hold it, and answer to say that the colour is clear!
the extruder will move back to the model and start printing, as it goes back to printing, the extruder will expell a little more filament, which will remain attached to the wormcast that you are holding. and pull off the extruder....
Now you can throw away the waste''
Question is: Why is extruder expelling a little more filament after I confirm that color is clear? Wouldn't it be simpler to remove filament just after purge while extruder body is not moving?
RE: "Manual" multicolor
@clemens-m
RE: "Manual" multicolor
This makes a difference. I am surprised. Sometimes comments help us solve problems. Frankincell's work surprised me. Recently I wanted to sleep, and here is this post. I feel more cheerful.
RE: "Manual" multicolor
@joantabb
Hi there,
I am really thankfull that your wrote this instruction. But it will not run! (please help?)
I wanted to run a normal print for instances a XYZ calibration block (as a small test). I wanted to print this block in 2 colours. But the printer does not recognize the M600 command.
A bit more info: I have recently bought an Ender 3 (second hand) from a person who made severall changes (Motherboard/ Bulls-eye fan guard/ BL-touch) and he assured me that this printer is capable to do a print in multi colour with M600. So I installed the Prusa software 2.2.0 and I also installed the .ini file that the seller gave me. So all his changes applied in my Prusa Slicer and i made a simple print (the Benchy in 1 colour) and it printed it really nice.
The next day i wanted to print a sign in 2 colours. So i started Prusa and loaded the .STL and i made changes at the layers. Background is white and the letters are suppose to be black. I checked the G-code in Notepad++ and the M600 was written down in the G-code (only M600, nothing else -> No layers/ No Temp/ No retraction info/ nothing else) see the image

So i gave the printer the command to print this thing and the printer started the print and after 2 hours and 10 minutes the print was done! Sadly in 1 colour and the printers didn't gave me any beep or sound to change the colour..
A Friend of mine has also an Ender 3 and he works with Cura. He created a STL (same image) with M600 command at layer... I used the STL and the printer doesnt seem to notice the M600 command and just printed in one colour..
I am really running out of options because all the forums are telling me do this and do that.. But i really havent got a clue what to do because the other people are allready masters at C++ and have a technical background (i am not, i have to learn it myself). Please help me out ?
RE: "Manual" multicolor
@marko-s4
Hi Marko,
I have no idea why the printer expells the extra dribble.... it just does, other manufacturers printers using Marlin, report the same functionality...
some folk say it's necessary to pressurize the extruder after the load... I dont know any better
I just found a way to deal with it
regards Joan
I try to make safe suggestions,You should understand the context and ensure you are happy that they are safe before attempting to apply my suggestions, what you do, is YOUR responsibility.Location Halifax UK
RE: "Manual" multicolor
@theo-kwartje
Hi Theo,
I honestly don't know the answer to this?
how did you edit the G code?
I use Notepad++
I understand that some other text editors mess the file up.
One of the common errors is to use a lower case 'm' instead of a capital 'M' but this is not the case here.
can you make a tiny test model to save filament while testing?
regards
Joan
I try to make safe suggestions,You should understand the context and ensure you are happy that they are safe before attempting to apply my suggestions, what you do, is YOUR responsibility.Location Halifax UK
RE: "Manual" multicolor
@joantabb
Buenas noches, tengo una duda respecto a la altura que debe levantar la boquilla cuando se imprime la parte negra o la azul, dependiendo que imprime primero, es decir, para que el hotend no termine chocando con la pieza.
Espero haberme expresado correctamente, espero su pronta respuesta. Saludos cordiales.
Atte Marcos.
RE: "Manual" multicolor
@marcospasotti
Supongo que si a Prusaslicer le dices que es un objeto multimaterial, al imprimir el segundo color "esquiva" el primero para no chocar...
In English: I suppose that if you tell Prusslicer that this is a multimaterial object, it will know where has it printed the first colour and avoids hitting it.
RE: "Manual" multicolor
@joantabb
If you set "number of extruders=2" ,why the printer stops and asks to change the filament? It should just print with extruder 1, and do nothing with extruder 2 (that really doesn't exist).