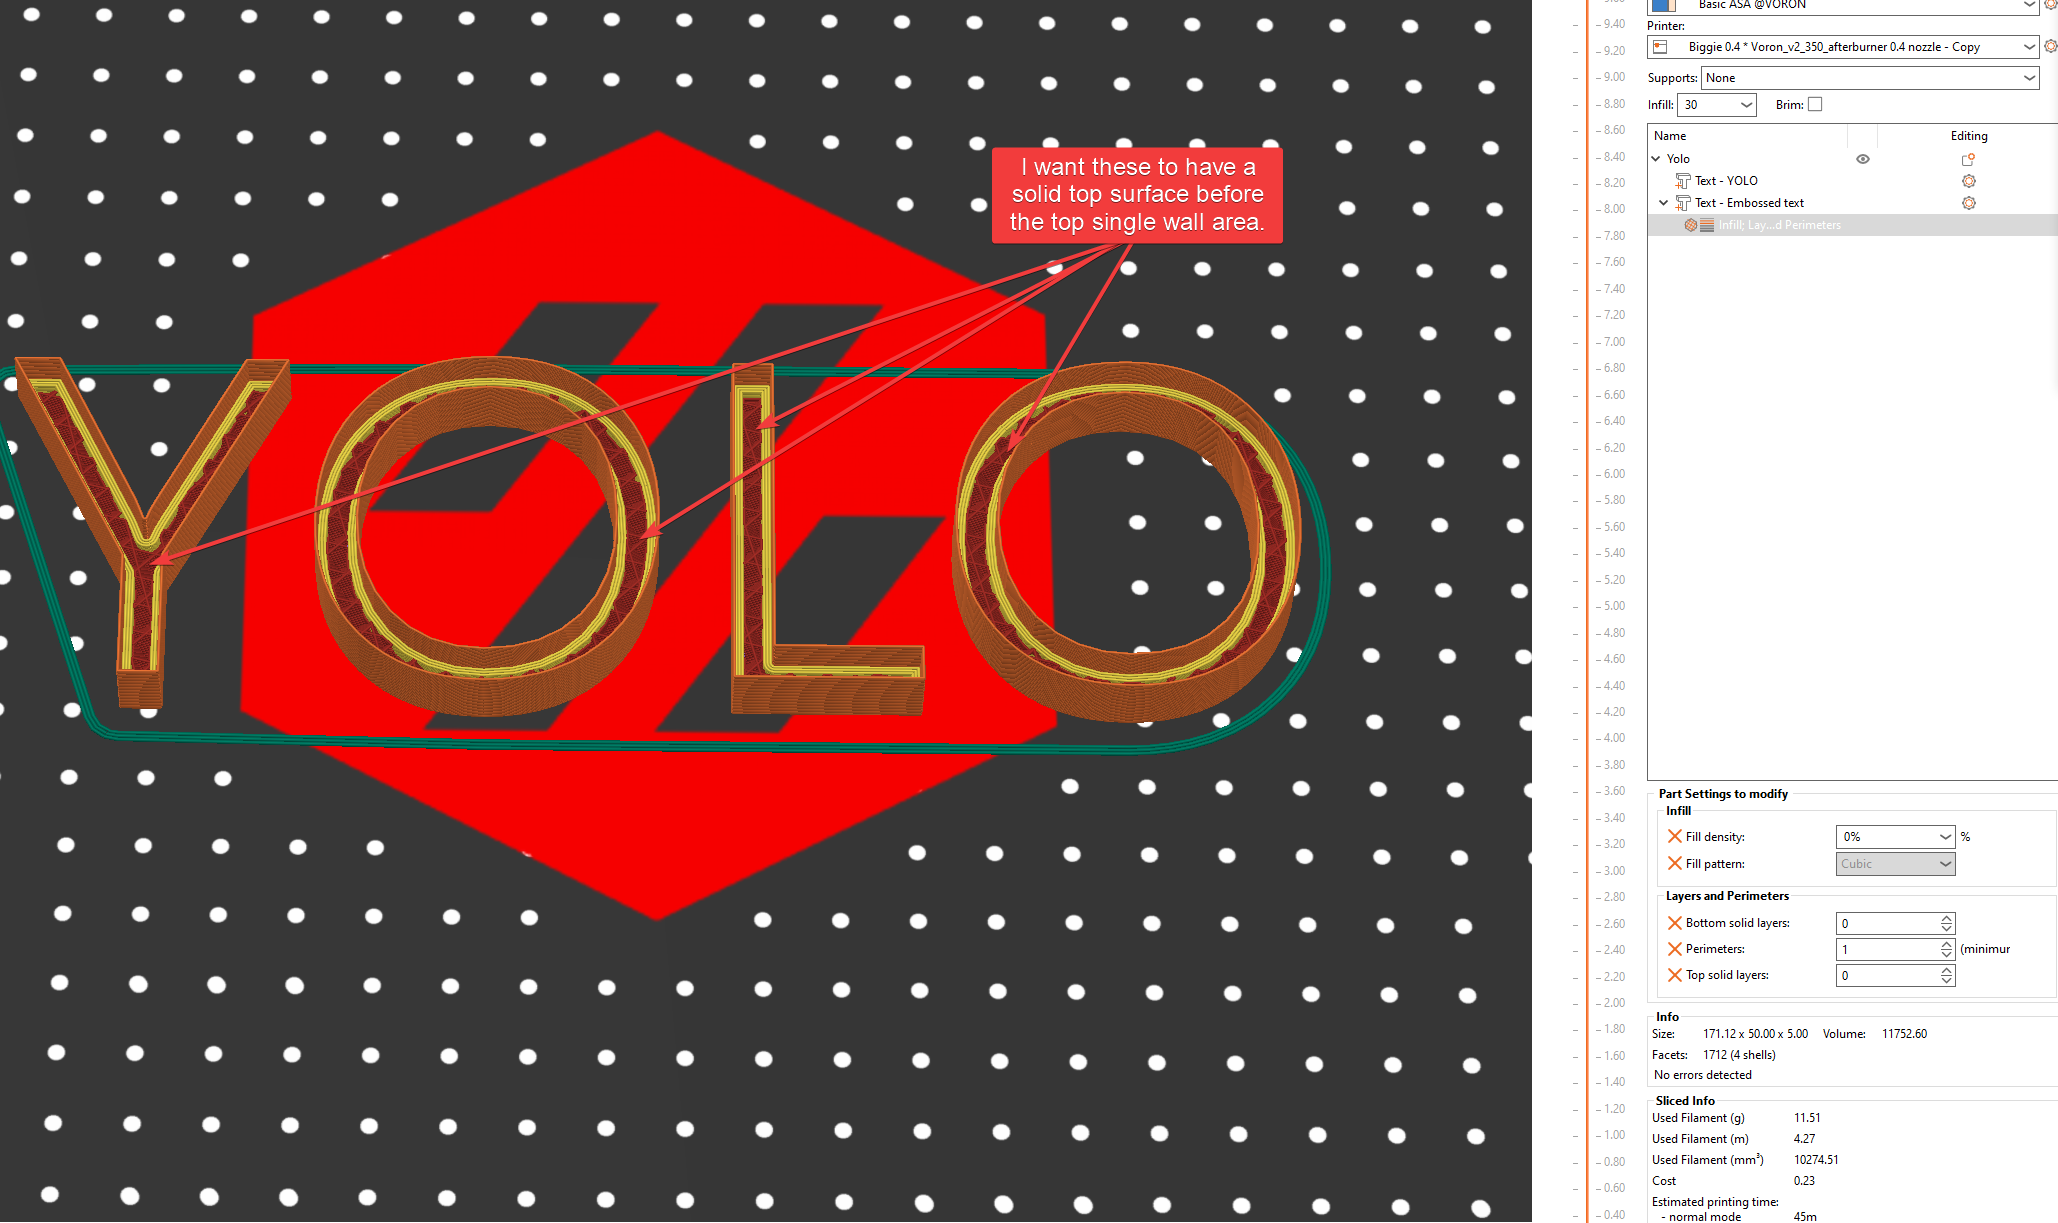
How to levitate part and still get top surface of part underneath
I'm trying to create a part that is basically one solid part on bottom and a single wall version of it on top. The documentation seems to indicate I need to use parts to do this which seems fine, but when I use parts my lower part doesn't get a top surface. Even when I try to trick it by setting a bottom surface of the top part it doesn't give me a solid surface. See picture for a clear example. I don't seem to be able to upload a 3mf unfortunately but the key info can be seen in the screenshot.
Can someone help me figure out how to do this the right way? Or let me know if this is a bug that I should post on PrusaSlicer github.
PrusaSlicer Version: Version 2.7.4+win64
RE: How to levitate part and still get top surface of part underneath
Zip Compress the .3mf file then you can post the zip file
regards Joan
I try to make safe suggestions,You should understand the context and ensure you are happy that they are safe before attempting to apply my suggestions, what you do, is YOUR responsibility.Location Halifax UK
RE: How to levitate part and still get top surface of part underneath
Thanks for the tip on zipping the 3mf. Here it is.
RE: How to levitate part and still get top surface of part underneath
Hmmm.
not quite what you wanted
but might do the job
Yolo-NoTopLayer JT
I try to make safe suggestions,You should understand the context and ensure you are happy that they are safe before attempting to apply my suggestions, what you do, is YOUR responsibility.Location Halifax UK
RE: How to levitate part and still get top surface of part underneath
Here is how I did it
Started in CAD and made text, TEST, extruded upwards 5mm, "Upper"
Added a "pin", 0.1 by 0.1 through all letters so all letters become one body
Copy body, move copy downwards 5mm
Added a "pin" from bottom of upper body to bottom of lower body, (5mm).
Result is two bodies, one with a pin that is 5mm long
Save mesh
Open in PS
Split body to -->OBJECTS!!<--
Add settings to Upper body
File is attached
Prusa i3 MK3S+ FW 3.11.0 (kit dec -20), PrusaSlicer 2.6.1+win64, Fusion 360, Windows 10
RE:
Thanks for the approaches. @ringarm67 I think I need to read your post a few times and look at the associated project to make sure I follow what you did. But I think it will work and is similar to one of the ideas I had but a bit cleaner.
<edit> as I actually try to slice and export this it doesn't export to a file or my printer, so something isn't quite right. I get the no extrusions in the first layer.

This seems like a bug though right? Or is PrusaSlicer working as it should?
RE:
OK. This is like a "double" suduko puzzle. First guess what the task exactly is, and then try to solve it. Fun 🙂
So I downloaded your file "Yolo-NoTopLayer" and opened it in PrusaSlicer 2.7.3 (old machine I have to update).
What I changed:
- I split the object into two objects
howto? : add a second object to the plate. Copy the part of the mainobject to the second object (merged).
now you have two merged objects. Delete copied part from main one. Delete the second object from second one.
NB: Maybe this is some thinkering, trial and error, but can be done.
- Now I added to the second object a tiny cylinder 1 x 1 x 5 mm somewhere so it will stand in a massiv part. And lifted the text to 7.5mm. the cylinder will prevent the text from falling down.
NB: The cylinder will be invisible because it will be part of the first (bottom) object.
NB: You will get error because of gcode conflict, ignore that after slicing,
We will do what we have always done. We will find hope in the impossible.
RE: How to levitate part and still get top surface of part underneath
This seems like a bug though right? Or is PrusaSlicer working as it should?
Oooh, forgot to tell you about the warning.
The pin that keeps upper body 5mm above plate is just 0,1 by 0,1mm so it is unprintable. That's why PS shows a warning, so no bug.
Don't know which cad program you use, the Fusion360 file is attached
Prusa i3 MK3S+ FW 3.11.0 (kit dec -20), PrusaSlicer 2.6.1+win64, Fusion 360, Windows 10
RE: How to levitate part and still get top surface of part underneath
@maybeitslesotho
Sorry, I have another printer when I tested it, and it worked, then I just changed to MK3S and saved it 😪
Here is a corrected file, the pin is bigger 0,5 by 0,5....
Prusa i3 MK3S+ FW 3.11.0 (kit dec -20), PrusaSlicer 2.6.1+win64, Fusion 360, Windows 10
RE: How to levitate part and still get top surface of part underneath
No worries. I appreciate the help. I did basically this with the model I'm actually using this for and the print it starting now. It's an 11 hour print so we'll see how it goes. Also we have tornado and thunderstorm watches here all day so let's hope I don't lose power in the middle of the print.
RE: How to levitate part and still get top surface of part underneath
Best of Luck!
Joan
I try to make safe suggestions,You should understand the context and ensure you are happy that they are safe before attempting to apply my suggestions, what you do, is YOUR responsibility.Location Halifax UK
RE: How to levitate part and still get top surface of part underneath
@maybeitslesotho
Here is an alternative you may find useful, it's dynamic and completely adjustable.

I built one using each perimeter generator type so you can choose.
Regards
RE: How to levitate part and still get top surface of part underneath
dynamic and completely adjustable.
If you only know how. First my compliment. I try to design following this rule: "principle of Occam's razor: that the easiest explanation tends to be the right one" And on first sight, your solution is better then mine (according this rule).
But now: How did you do it? What I understand:
- You made a copy of the object. (because the basic height is exact the same.
- You turned into a negative. And because it is merged into one, it is posssible to lift it, so it cuts only upper half of object.
- Somehow you scaled it so every character is about 99% of original.
But how, because a normale scaling on the negative object, gives all kinds of abnormalities.
It is not done with a specific parameter for this one negative part (so you would see an extra setting there).
Only thing I can imagine is, to split it to separate parts, scale down, and build the object again. (but that is a lot of steps, far from Ockham ;-))
We will do what we have always done. We will find hope in the impossible.
RE:
@eef
I'm happy to explain, I will try to teach it the way Swiss_Cheese taught it to me.
I started by adding a Text, right click [Add Shape] Text.
:You for Example could add "Eef" as your text.
Use the Height and Depth settings in the text tool to achieve the size you need for the "Text Object".
:You for Example could might set your Height to 75mm and Depth to 12mm.
Then click the drop down menu just below that to expose the advanced controls.
Next go to the Object menu, Right click on the Text Object, and Add part, just select a Box. You could select any part, however we are only using the part to open the Object, this shows us the Text "Part" inside the Object.
Next select the Text "Part" and copy and paste it. The effect will be that it pastes in the exact same location as the copied part.
Delete the Box, its no longer needed. Then select the lowest Text in the stack, the one you just pasted. Right click and select Edit text, in the text tool go to the very bottom and choose the Operation "Cut" this has the effect of turning the Text into a "Negative Volume" while leaving all its dynamic properties intact.
Now you can use the Boldness: setting in the text tool to "Inset" the Text. (This is not the same as scaling)
The slider will only allow you to slide to minus -200 or +200 however you can type in much greater values.
You for example may want to set your to -1000.
Then you can either set the distance "From surface:" using the Text tool, use the move Gizmo, or set the position in the Part manipulation pane.
I used the Part manipulation pane and set the height to 18.43 for the example in the Image below.

I should also mention, if you happen to be a CADD user, you have a great advantage as you can also easily create parts in CADD to be used as Negative Volumes but you would have to adjust the Inset in CADD. This just happens to be an easy way to do this in Slic3r, and levitating parts in Slic3r is still a very necessary thing with many benefits.
I hope I gave the instruction well, if you have any questions just ask and I'll do my best to answer.
It takes about 1min and 40 to make this.
Regards
RE: How to levitate part and still get top surface of part underneath
Thank you for your fast reply. Something to learn ! I will use your text to add some remarks etcetera to show the big steps:
ADD A TEXT
I started by adding a Text, right click [Add Shape] Text. :You for Example could add "Eef" as your text.
Use the Height and Depth settings in the text tool to achieve the size you need for the "Text Object". :You for Example could might set your Height to 75mm and Depth to 12mm.
Then click the drop down menu just below that to expose the advanced controls. <--- THIS IS NOT NEEDED HERE, BUT LATER WORKING ON THE NEGATIVE PARTHOW TO COPY AN OBJECT WHILE KEEPING THE POSITION + MEASUREMENTS
Next go to the Object menu, Right click on the Text Object, and Add part, just select a Box. You could select any part, however we are only using the part to open the Object, this shows us the Text "Part" inside the Object.
Next select the Text "Part" and copy and paste it. The effect will be that it pastes in the exact same location as the copied part.
Delete the Box, its no longer needed.BUILD THE NEGATIVE PART TO BE USED TO CUT AWAY INSIDE
Then select the lowest Text in the stack, the one you just pasted. Right click and select Edit text, in the text tool
click the drop down menu just below that to expose the advanced controls.
go to the very bottom and choose the Operation "Cut" this has the effect of turning the Text into a "Negative Volume" while leaving all its dynamic properties intact.
Now you can use the Boldness: setting in the text tool to "Inset" the Text. (This is not the same as scaling)
The slider will only allow you to slide to minus -200 or +200 however you can type in much greater values.
You for example may want to set your to -1000.POSITION THE NEGATIVE TEXT?CUT
Then you can either set the distance "From surface:" using the Text tool, use the move Gizmo, or set the position in the Part manipulation pane.
I used the Part manipulation pane and set the height to 18.43 for the example in the Image below.
Took a bit longer then two minutes, but surely the better way to solve this. With the remark: IF it is text. Otherwise one of the methods mentioned above comes in. 
I should also mention, if you happen to be a CADD user, you have a great advantage as you can also easily create parts in CADD to be used as Negative Volumes but you would have to adjust the Inset in CADD. This just happens to be an easy way to do this in Slic3r, and levitating parts in Slic3r is still a very necessary thing with many benefits.
For bigger and more complex stuff I also use: Blender. Or the Mesh workbench in FreeCAD (my CADD).
We will do what we have always done. We will find hope in the impossible.
RE: How to levitate part and still get top surface of part underneath
@eef
I'm Glad you found this helpful, and that you seem to grasp it. I want to mention that it's not just Text, Insetting can be done with any form that can be entered via the text tool, this means any TTF (True Type Font) you create, these can be images, shapes, or letters of any shape. Not only can they be brought in and inset in this way, but they can also be warped around other shapes and inset as well.
Don't cut the technique short, it has a great deal of usefulness in slicer. I would have preferred that Prusa implemented this in a more straight forward way as I'm not a fan of adding things like Text tools to a slicer, but it's there and can be used to achieve our needs. If we only know how.
Regards, and thank Swiss_Cheese