RE:
I solved my problems with VFA and now I am very satisfied... the important thing is the position of the pulley and the belt and also the position of the smooth pulleys... I tensioned the belt to 85Hz...
my smooth pulleys are not all perfect... the bearings have a difference in vertical distance in the center... I changed the position of the bearings... turned upside down with the spacer in the middle and checked with the caliper
in prusaslicer I changed the profile speed as PRUSA recommended I set the perimeters to 200mm/s for PLA and PETGI will use structural profile only for ASA - ABS or other special plastics... I also changed the preferred direction to clockwise...
RE:
Prusa Blue Core One Option
What else do they have, besides a door that does not break (but instead may bend when it gets too warm) and the promise that "we are the good guys, trust us that we will not lock you in or otherwise abuse your data"? The latter was the selling point for me, but with hindsight I am not sure I still want to treat the "good guys" benefit for the general organizational incompetence they are exhibiting.
Well, they have the blue option…
RE: VFA Artifacts on X+Y Straight Edges
I flipped the Y belt a few years ago on my KE. Eliminated the belt ripple on that axis. On my AD5M I sanded the teeth off the belt where they run over the flat idlers which dramatically reduced the belt ripple on pure X moves. Bambu does the same on the A1 printers.
....
A stupid idea I got while reading all the exchanges around the pulley and belt pattern matching, would it be possible to do a simple test by flipping the belts? Even at slower speed to avoid slippage. The idea behind is to confirm or not the pattern influence. The ideal would be to have non-toothed pulley too, but seems unlikely.
To go further, trapezoidal pulleys also exists (maybe not at this size unfortunately), with multiple grooves to improve contact area (easily doubling it). They can slip under severe constrains, but with good tension and well tuned acceleration it could do the job without any trace of belt pattern.
What do you think?
RE: VFA Artifacts on X+Y Straight Edges
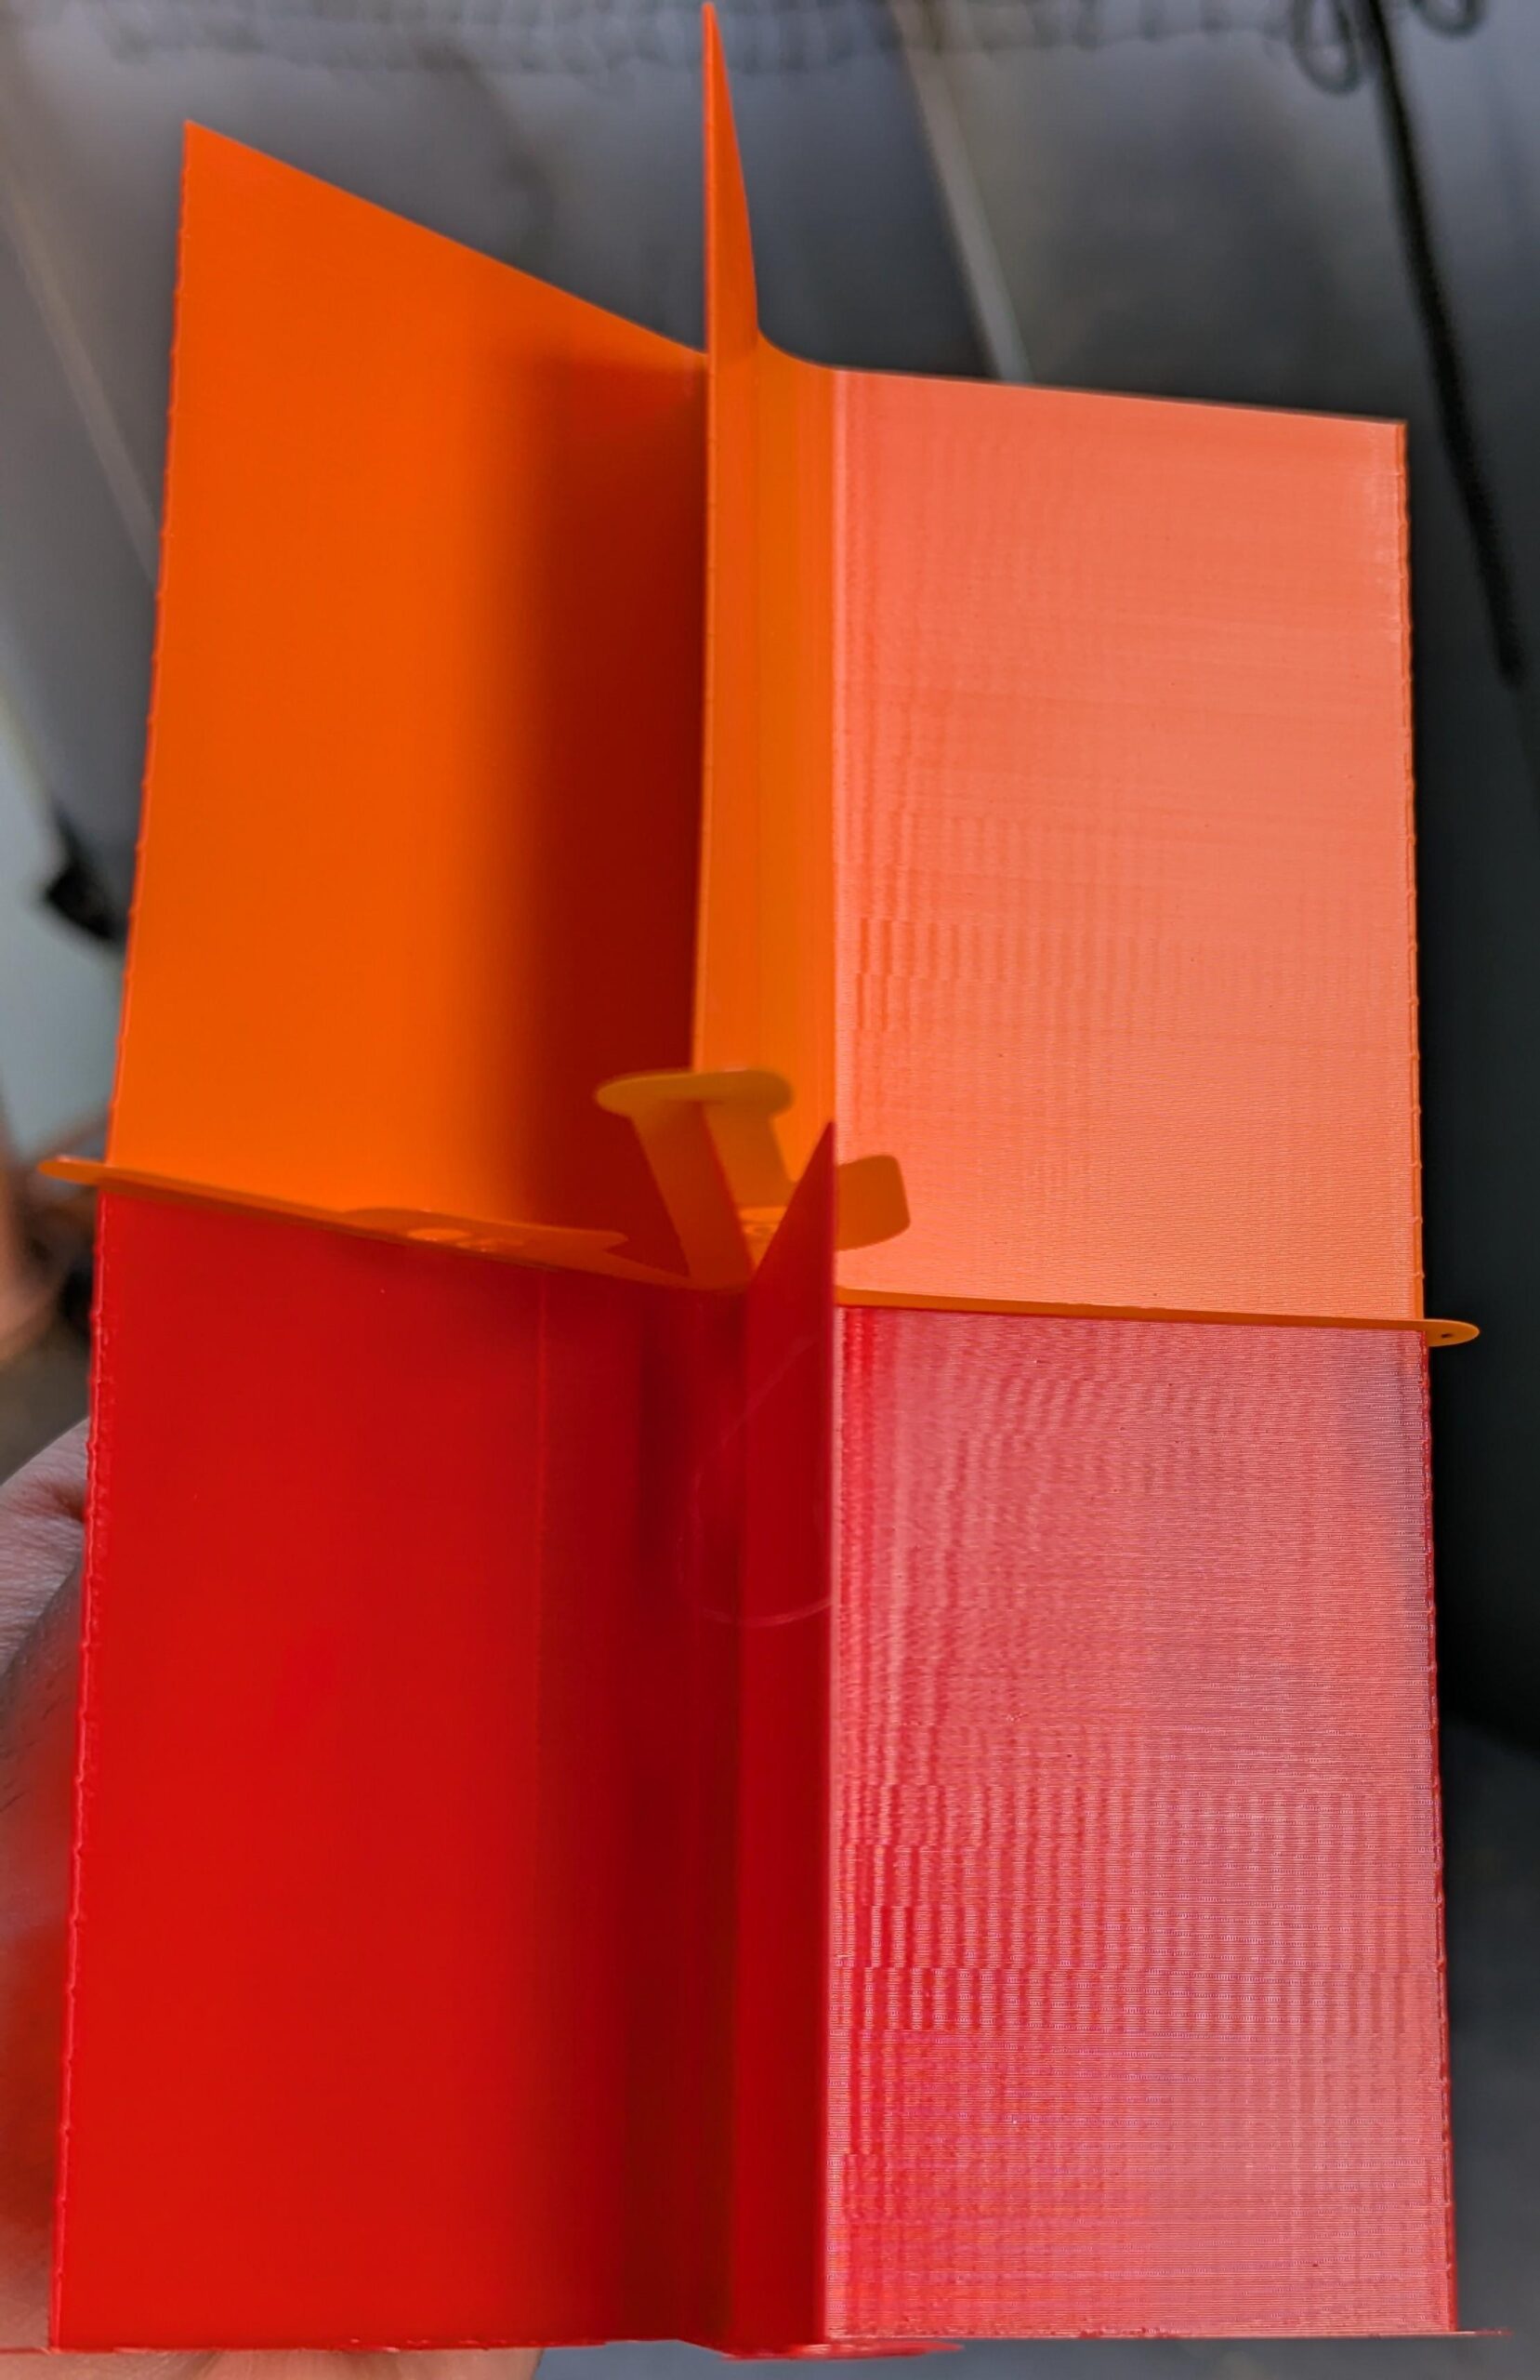
The mail arrived and I replaced both Prusa motor pulleys. The picture conditions (top = Prusa, bottom = Mellow) are a bit unfair because the orange filament is less shiny and the angle is not 100% identical, but it shows that I got basically zero improvement with the new pulleys. Visually they look almost the same, the Prusa pulleys are a bit less shiny and about 0.05g heavier. I'm not sure what to make of this. Buying tons of pulleys without a measure of what makes a pulley good isn't a solution, so I'll have to wait and hope for a solution from Prusa.
RE: VFA Artifacts on X+Y Straight Edges
That's really sad to hear. Somehow that gives us one really positive experience and one neutral/negative experience. Would still be great to get more evidence from other printers.
RE:
That's the problem with Aliexpress type products. The QC is all over the place. You could order a set of pulleys that work great, then order another set that should be the same but were in fact made in a different factory on a different CNC machine and they will be worse than the stock pulleys.
RE: VFA Artifacts on X+Y Straight Edges
The only time I saw this severe intensity of artefacts in the middle of this exact print, but not really at the top nor bottom, was when the motors were bad. Are yours resonating? How much? The fact the ripples don't align is also suspicious, normally they'd kinda elongate as you increase speed, but here they kinda shifted weirdly in the middle.
Either that, bad pulley lottery or your artefacts are caused by something else. Now I wonder by what.
RE: VFA Artifacts on X+Y Straight Edges
The mail arrived and I replaced both Prusa motor pulleys. The picture conditions (top = Prusa, bottom = Mellow) are a bit unfair because the orange filament is less shiny and the angle is not 100% identical, but it shows that I got basically zero improvement with the new pulleys. Visually they look almost the same, the Prusa pulleys are a bit less shiny and about 0.05g heavier. I'm not sure what to make of this. Buying tons of pulleys without a measure of what makes a pulley good isn't a solution, so I'll have to wait and hope for a solution from Prusa.
Almost exactly what mine look like. I have to get above 250mm/sec to get them to kindasortamostly go away. I've printed as slow as 25mm/sec and still see them. I can use "fuzzy skin" in the slicer with 0.1 thickness and 0.3 point distance and still see them a bit.
RE: VFA Artifacts on X+Y Straight Edges
Yes, around 80mm/s the printer gets quite loud. I tried the 6.3.3 version of phase stepping and it worked to some degree in reducing the noise, but the calibration failed multiple times or gave me wildly different results. I reverted to hopefully try again with a more refined algorithm.
I have a second set of pulleys from Mellow, so I could verify whether that makes a difference. The item description said that I was supposed to receive an allen key with the pulleys (which I didn't get), so I'm not sure if it's "original". The packaging stated Mellow as the brand.
The only time I saw this severe intensity of artefacts in the middle of this exact print, but not really at the top nor bottom, was when the motors were bad. Are yours resonating? How much? The fact the ripples don't align is also suspicious, normally they'd kinda elongate as you increase speed, but here they kinda shifted weirdly in the middle.
Either that, bad pulley lottery or your artefacts are caused by something else. Now I wonder by what.
RE: VFA Artifacts on X+Y Straight Edges
Thats some extreme VFAs, i only have some visible for the first lower 1/3 maybe of the height, then they dissapear for the rest of that VFA-test print.
RE: VFA Artifacts on X+Y Straight Edges
Replacing the smooth idlers that interface with the toothed side of the belt with 20mm toothed idlers has nearly eliminated the vfa's from my prints, there were only two that needed replacing, they are the ones at the front of the gantry.
RE: VFA Artifacts on X+Y Straight Edges
I did some more experiments. The noise (and VFA?) of my printer is produced by the linear rail resonating when the motors vibrate at specific frequencies. The artifacts shifted slightly upwards after retightening a few screws on the linear rail and the XY-assembly. Different pulleys did have a minor effect on position and intensity of the VFAs, although the process of swapping could have influenced that as well. I'll wait to see whether the motor vibrations can be reduced sufficiently by calibrated phase stepping or whether I need a replacement.
RE: VFA Artifacts on X+Y Straight Edges
To add my experience: tightening the belts gave a minor improvement in structural speeds.
All other recommended actions didn’t make a difference.
What did help A LOT was converting to 1.5GT belts and pulleys.
This test sample uses the same structural profile, printed at a 60° angle, which tends to produce the worst results.
Keep in mind that the filament had absorbed moisture due to the weather.
Since I can't seem to post pictures here, here’s a link to them:
http://youtube.com/post/UgkxyCxfrOSUfBZjoqJYvLLNelNxXqN6B4pY?si=Q5gT5H577c1kzNUi
RE: VFA Artifacts on X+Y Straight Edges
To add my experience: tightening the belts gave a minor improvement in structural speeds.
All other recommended actions didn’t make a difference.
What did help A LOT was converting to 1.5GT belts and pulleys.
This test sample uses the same structural profile, printed at a 60° angle, which tends to produce the worst results.
Keep in mind that the filament had absorbed moisture due to the weather.
Since I can't seem to post pictures here, here’s a link to them:http://youtube.com/post/UgkxyCxfrOSUfBZjoqJYvLLNelNxXqN6B4pY?si=Q5gT5H577c1kzNUi
Were you able to find a solution to the scaling problem after the conversion to GT1.5 belts? This is only a viable solution if we can adjust the steps for correct dimensions.
-J
RE: VFA Artifacts on X+Y Straight Edges
To add my experience: tightening the belts gave a minor improvement in structural speeds.
All other recommended actions didn’t make a difference.
What did help A LOT was converting to 1.5GT belts and pulleys.
This test sample uses the same structural profile, printed at a 60° angle, which tends to produce the worst results.
Keep in mind that the filament had absorbed moisture due to the weather.
Since I can't seem to post pictures here, here’s a link to them:http://youtube.com/post/UgkxyCxfrOSUfBZjoqJYvLLNelNxXqN6B4pY?si=Q5gT5H577c1kzNUi
Can we expect a video showing the process in a bit more detail mate?
RE:
I made the switch to 1.5mm pitch belts and pulleys yesterday afternoon, and I'm also seeing a big improvement in VFAs. I'll post some photos in a mo, but first I can answer the scaling question.
If you issue the M92 command over the USB serial port you see that the CORE One uses 100 steps/mm for X and Y. After swapping to the 1.5mm pitch I confirmed that prints do come out 1.5% smaller ((21 teeth x 1.5mm)/(16 teeth x 2mm) = 98.44%). So logically you'd expect to have to tell the printer that it needs more steps per mm, but in fact the only way I could get a bigger print was to use a number smaller than 100. The command M92 X98.44 Y98.44 restores the original scale.
I made three models, all with dimensions 100mm x 10mm, with the only difference being the text, so that I could keep track of which print was which. The purple pieces were printed before I did the belt swap - the 'Default' part came out at 100mm (minus a little PETG shrinkage), the X98.44 part came out 1.5mm longer, and the X101.59 part came out 1.5mm shorter.
The orange parts were printed after the belt swap, and the X98.44 part came out the same length as the original Default part.
(click on the photo to see both ends of the pieces!)

Unfortunately there's no way to put these values into the printer permanently, but if you include
M92 X98.44 Y98.44
as the first line of the printer preset's Start G-code it will ensure that the part will print at the correct scale. After it's been sent once, the printer will remember it until the next power cycle.
RE: VFA Artifacts on X+Y Straight Edges
I made the switch to 1.5mm pitch belts and pulleys yesterday afternoon, and I'm also seeing a big improvement in VFAs. I'll post some photos in a mo, but first I can answer the scaling question.
If you issue the M92 command over the USB serial port you see that the CORE One uses 100 steps/mm for X and Y. After swapping to the 1.5mm pitch I confirmed that prints do come out 1.5% smaller ((21 teeth x 1.5mm)/(16 teeth x 2mm) = 98.44%). So logically you'd expect to have to tell the printer that it needs more steps per mm, but in fact the only way I could get a bigger print was to use a number smaller than 100. The command M92 X98.44 Y98.44 restores the original scale.
I made three models, all with dimensions 100mm x 10mm, with the only difference being the text, so that I could keep track of which print was print. The purple pieces were printed before I did the belt swap - the 'Default' part came out at 100mm (minus a little PETG shrinkage), the X98.44 part came out 1.5mm longer, and the X101.59 part came out 1.5mm shorter.
The orange parts were printed after the belt swap, and the X98.44 part came out the same length as the original Default part.
(click on the photo to see both ends of the pieces!)

Unfortunately there's no way to put these values into the printer permanently, but if you include
M92 X98.44 Y98.44as the first line of the printer preset's Start G-code it will ensure that the part will print at the correct scale. After it's been sent once, the printer will remember it until the next power cycle.
So just include it on the start gcode and leave it there? Seems pretty simple. Hopefully Prusa will let us set it in the firmware on the printer as standard.
RE: VFA Artifacts on X+Y Straight Edges
Yes, like Chris and Ratlet mentioned adding that code in the slicer is all you need.
Working on the video but first i need to do more testing at different speeds...
You know, some sanity checking for the inevitable comments...
RE: VFA Artifacts on X+Y Straight Edges
Yes, that's all it needs. And if you want to print an old G-code that didn't have that in the Start G-code, you only have to send the instruction once per power cycle. You can do that over the serial port, but I've made a simple one-line G-code file that only includes that command, and copied it to the SD card. I can just 'print' it (much like the command for the phase stepping wizard) if I want to make sure the printer has the correct scale. I even edited the 'modified' date of that file to 100 years hence, to make sure it's always top of the list of files. I agree though, a menu option to cater for 1.5mm setups would be nice.
RE:
I made some draft instructions for the belt swap. I think if you've built the printer from a kit you'll know how to do it anyway, so my instructions are more for the benefit of people who bought the assembled version.
They were written 'after the event', so I might have missed a step or two, and I haven't road tested them since, but they should get you close.
Use at your own risk!