RE: Failed Y-calibration of a new CoreOne
Best not to read so much 🙂
How many printers are sold. And now there are a few cases. Support needs time to adjust to a new model.It doesn't seem to be a general problem And not an unsolvable one. Wait for the assembly instructions to see exactly how the X axis is mounted.
It would certainly be interesting to see whether the angle really doesn't fit when removed or whether other factors are involved.
@martinf -- thank you for checking the (non-) effect of the bowden tube and cable harness. Makes sense that the force they exert is small; that's the way it should be. I just thought that they looked to have quite a sharp bend in your photo. Anyway, too bad that they do not get you close to a solution.
I can certainly relate to your frustration with your Core One, especially since Prusa has a reputation for solid engineering an great support and does not seem to be living up to either. Have you indicated to the support team that you are considering to return the printer? At least Prusa gives you 60 days to make that call (without the need to get into a quality/warranty debate).
In the meantime, I am spending too much time reading the threads here in preparation of receiving my Core One kit, and am having some doubts... With a kit, I can watch out for a few potential issues while putting things together, as long as the root causes are identified in time. On the other hand, I won't have the warranty for a fully functional printer (obviously).
Would I have a 60-day return window on the kit? Would that mean taking everything apart again, putting all parts in their repsective bags and sending them back? That appears to be what the support page says: "Pack the order down as it was received." ( https://www.prusa3d.com/page/refund-and-returns_939/ -- which seems to apply to kits as well?)
RE: Failed Y-calibration of a new CoreOne
There is a test print for the XL to check the quality of the belt tension.
That should also work on the Core One.
If the printer is set to the correct tension according to the instructions and you print a rectangle of maximum size, you should be able to recognize the deviation relative to the bed.
The sheet should lie absolutely straight.
I would confront the support with this.If the belt tension is setup up according to the instructions (resonance frequency of 85Hz on both belts), the printer fails to perform the calibration of the Y-axis. This was the situation when I started this new thread/topic. The printer misses the 2.5mm gap in the of the expected/required travel of the y-axis and aborts the calibration without any further message or hint.
Therefore no chance to print anything on the printer with equally tensioned belts. But if printing would start, a rectangle would be out of shape by about 0.5°.
Support doesn't question the gap of 2-3mm on this printer they have sent me (I've shown it with photos and a video). But they think it's good enough to close the gap by extensive belt tension on the right side. If there are no visible print defects, they suggest everything is fine...
Yes, thats really the solution you have to accept on a new - and not inexpensive - printer, isn't it?
RE: Failed Y-calibration of a new CoreOne
@martinf -- thank you for checking the (non-) effect of the bowden tube and cable harness. Makes sense that the force they exert is small; that's the way it should be. I just thought that they looked to have quite a sharp bend in your photo. Anyway, too bad that they do not get you close to a solution.
I can certainly relate to your frustration with your Core One, especially since Prusa has a reputation for solid engineering an great support and does not seem to be living up to either. Have you indicated to the support team that you are considering to return the printer? At least Prusa gives you 60 days to make that call (without the need to get into a quality/warranty debate).
In the meantime, I am spending too much time reading the threads here in preparation of receiving my Core One kit, and am having some doubts... With a kit, I can watch out for a few potential issues while putting things together, as long as the root causes are identified in time. On the other hand, I won't have the warranty for a fully functional printer (obviously).
Would I have a 60-day return window on the kit? Would that mean taking everything apart again, putting all parts in their repsective bags and sending them back? That appears to be what the support page says: "Pack the order down as it was received." ( https://www.prusa3d.com/page/refund-and-returns_939/ -- which seems to apply to kits as well?)
Yes, I think you are much better off with a kit! You can check everything (incl. the exact bending angle of these 2 brackets) before and while putting everything together. I have built 2 Prusa printers (MK3 and MK4) from kits and the experience was great!
Except from this design flaw, I'm sure the Core One printer will be a great device. I like my MK4s for it's reliability and print quality and most parts have made it over to the Core One.
If I take my crystal ball and take a sharp look, I can see a Core One model with an upgraded solution for attaching the X-carriage to the Y-axis bearings 😀 .
I've made two proposals to the Prusa support:
- sending the printer back for replacement of these 2 brackets (or exchange for a new printer)
- replacing the brackets by myself if they send two 'good' brackets to me
They refused to accept either proposal. If they don't agree on an acceptable solution, we will return the printer for a refund. The printer we will buy then may have another logo on it...
RE: Failed Y-calibration of a new CoreOne
For what it's worth, I have the same problem (covered in another thread, though many of my posts are not visible it appears, after a week or two). To have the X carriage straight, support suggested I set one belt to 85Hz and the other to whatever was necessary to square the carriage up so calibration could complete. Doing so left me with 85Hz on one belt, and the other was so low in tension it didn't even register on their application. I've been in contact with support about this multiple times now, and reached out again today. I am supposed to hear back via email this time, but communication via email has been slow historically, so we will see. I don't want to return the printer, I just want it to be correctly setup and not out of square.
RE:
I will chime in here as well, since I was mentioned at the start of the thread. Needless to say I'm far from impressed
Initially, I thought everything was off to a great start. I contacted support and they asked me to follow up with an email with all my issues and evidence and they would get back to me with next steps and solutions, even offering a return for service. Below is what I sent for completeness, along with many photos and videos (Ive left out some of them as they have been fixed)
Belt Tensioning and Axis Alignment
I've documented my experience in this thread on the forum, but here is a summary.I was getting homing issues (Auto-home would take several minutes or fail), so I looked at the belt tensions after finding the above thread. They weren't in spec with the docs, which state both should be ~85Hz, so I began adjusting using the app and the XL documentation (adjusted for the Core One). Once they were both around 85Hz I moved onto alignment, this is when I noticed the right side was 8-10mm away from the frame while the left side was tight to it, this resulted in y-axis calibration failing. If I then adjusted the belts further I could get the alignment square to the frame with both sides sitting tight at the same time, however then the tensions were way off. The left was very loose and not recording a frequency on the app and the right was very tight and recording around 99Hz. So I further loosened both sides so the right was 85Hz and the frame was square. However this means the left is very loose now, but the axis calibration now passes. There doesn't seem to be any way to get the gantry aligned with both belts tight and around 85hz
Still an issue
Z-axis skew and noises
I have not yet commented on this in a forum post, but someone else also posted a similar issue here
I started a print and during bed levelling I noticed the nozzle was colliding with the bed during some of the moves, specifically when moving to the right. The leveling failed and prompted me to calibrate the Z axis and during the calibration the rear and right screws bottomed out about 5-10mm before the left screw did, showing the axis was indeed way out of skew. I also noticed during Z moves there is a deep thud noise sometimes, I've attached a video which captures it called Z-axis noises (Ignore the noise of me turning the dial)
Update: This issue was fixed and documented it on the above forum post. TLDR my lead screws weren't greased.
Nozzle cleaning failures with PETG
This feels more like a software issue or a issue with my PETG, but I thought I'd include it as I also made a forum post here
Perhaps its more of an issue to raise on the firmware GitHub, but with oozing filaments like PETG I was constantly getting failures during the nozzle cleaning phase of the print because the printer would squish a small piece of filament on the nozzle and it would never clean off. I had to make sure my nozzle was clean of all filament and it had stopped oozing at 170C before I could start a print without failure.This was made worse by the known bug that opening the Core One door during startup or print end can hard crash the printer
Still an issue
Metal sounding rattle during Y movements
I've not been able to trace exactly where the noise is coming from, but there is a metal on metal sounding rattle during fast Y-axis moves, I've attached a video called Y-axis noises, and you can specifically hear then around the 5 second and 12 second marks. Y-axis noises
Still an issue
Terrible print quality
This may be a combination of some of the above issues, but my prints have had awful print quality. I've attached some photos below. I tried re-slicing, and multiple filaments (both shown in the images are PLA from different brands, the grey is fresh out of the seal today)
Update: This issue was fixed by fixing my issues with Z-axis binding by greasing the lead screws. Top is before fixing the Z issues, bottom is after. The only real issue I have with print quality now is VFA
I've also noticed a strange noise coming from the swing arm when the extruder head moves around the back right of the bed, I don't have a recording of it yet, I will try and capture one, but I'm pretty sure its from the swing arm
Since sending the above (Excluding the swing arm comment which is new), I've had zero replies. I even followed up with the video I posted on the other thread showing the x-axis skew with zero belt tension (found here: ), and sent a follow up asking for any updates. Its now been 8 days since sending the above email with no response.
After 3-4 days I reached out to live chat again to try and get some movement, however I was met with a very different response to my first live chat. I was first told that my axis wasn't aligned, and that was the first thing I needed to fix. However, when I explained it was not possible to align the axis while maintaining similar tensions in both sides I had the response:
The CORE X/Y design will balance that after few movements with the head.
Which is untrue in the cases where the axis is simply bent. Then I tried explaining my Z axis issues, and was told the noises are normal and should not cause the issues I see, and said its likely the filament or the model (I tried multiple filaments, and the model is widely used as its Multiboard). I sent the 3MF of the model and was told its problematic as:
Printing 0,8 mm thick wall with 0.4 mm nozzle is not really possible. The extruded width is always 0.45 mm, so the printer will underextrude in order to get it right. This will most likely result in the issue we are seeing in the photos.
From there they tried walking me through aligning and tensioning the belts with the following instructions:
First, tighten them so the X/Y is equal on both sides on the front.
Now move the head around manually, till the tension is equal on both sides.
When I said it wasn't possible to tension them both the same while keeping it aligned I was asked to try to move the print head in circle by hand for a minute or two. Which didn't work. At this point I needed to go out and the chat closed due to inactivity. It is also clear that there was an issue with the Z-axis and it wasn't the filament or the model since I used the same filament and model before and after the fix. And the Z-axis noise I heard was a stepper skipping a step or the nut binding or both.
So yeah that's my experience so far. As it stands my printer prints fine, but there are strange noises still (Y-axis and the swing arm), and the 'solution' to the x-axis alignment is far from satisfactory for my taste, so I'm not sure what to do next
RE: Failed Y-calibration of a new CoreOne
I had this same issue today with failed homing/nozzle cleaning. I had the same gaps at the Y -axis end stops. Spent 3 hours on chat while they had me try to bend the brackets in situ then re-tension the belts in multiple successive iterations. Was able to eventually close the gap and get both belts to 85Hz, but y axis calibration and homing still failed. (Got disconnected from support chat—so troubleshooting stopped there). So not totally sure it’s the bend of those brackets solely causing the problem, but I’m not sticking around to find out. I was not at all comfortable trying to bend a brand new factory assembled printer into conformity (what long term effects would this have), so will be returning for a refund. I’m sure they will get it worked out in the coming months.
RE: Failed Y-calibration of a new CoreOne
Thank you David,
for sharing your experience with us. I think you are a very patient man😀!
The last sign of life we have received from Prusa support was 4 days ago when they instructed us to do the same thing as they told you: just tighten the belts to the tension needed to get the x-axis pulled right angled to the y-axis.
One of the pro arguments for buying and trusting in the Core One was the good reputation of the Prusa support. We have trusted in receiving the support needed if anything is wrong with this new printer. But so far this support is an absolute let down.
When they instruct us to void the requirement for equal tension of both belts of an Core X/Y printer, they prove that they don't seem to understand the basic working principles of the print head's dynamic movements. For moving the head in a straight line, both motors have to be moved simultaneously. On each acceleration and deceleration the belts have to transfer the motor force to the print head. If one belt is more loose than the other, the movement transfered from the motor to the print head is delayed compared to the other, more tensioned belt. This causes wobbly movements in every phase of acceleration and deceleration. And practiacally the print head is ALWAYS changing it's speed.
I think uneven tension of the belts is a major reason for VFA!
RE: Failed Y-calibration of a new CoreOne
When they instruct us to void the requirement for equal tension of both belts of an Core X/Y printer, they prove that they don't seem to understand the basic working principles of the print head's dynamic movements. For moving the head in a straight line, both motors have to be moved simultaneously. On each acceleration and deceleration the belts have to transfer the motor force to the print head. If one belt is more loose than the other, the movement transfered from the motor to the print head is delayed compared to the other, more tensioned belt. This causes wobbly movements in every phase of acceleration and deceleration. And practiacally the print head is ALWAYS changing it's speed.
The incorrect belt tension should also derail the input shaping. Its factory tuning must assume a certain belt tension and will hence no longer be valid. The resonance frequency of the "print head mass + elastic belt" system will shift in direct proportion with the resonance frequency measured when plucking the belt during tension adjustment.
RE: Failed Y-calibration of a new CoreOne
The incorrect belt tension should also derail the input shaping. Its factory tuning must assume a certain belt tension and will hence no longer be valid. The resonance frequency of the "print head mass + elastic belt" system will shift in direct proportion with the resonance frequency measured when plucking the belt during tension adjustment.
Yes, you're absolutely right, Jürgen.
RE: Failed Y-calibration of a new CoreOne
I have not recieved my printer yet, and I don’t have any experience from 3d printers as this is my first, so take that into consideration when reading this.
it strikes me as a bit odd with a design that incorporates two rigid elements in the frame for the x-y and the brackets for the x both being steel. If either of those are out of alignment and that is not caught in quality control the belts are simply not going to pull the combined assembly straight, that is not their primary task. The only way I see that fixed is to get the rigid components in alignment in the first place. The other way out of that situation is to remove one rigid component and make it more flexible letting one component be the physical reference for what is square, so if we assume the frame is square, why the metal brackets, why not use printed brackets?
Then I may have misunderstood this completely, but I will be checking mine when it arrives.
/Anders
RE: Failed Y-calibration of a new CoreOne
Yes, in my opinion it's not a good design decision to rely on the precision of bending two metal brackets to the exactly same angle. Any deviation from the 90° target angle introduces static forces on the bearings and may cause a mis-angled x axis. Yes, it'a not at all the task of the belts to pull the axis straight (even if the Prusa support tries to instruct their customers these days).
There are many possible design solutions to connect the y bearings with the x axis in a proper way and I'm pretty sure Prusa will come up with a good solution sooner or later.
Until then the precision of the printer you receive is based on luck.
I would advice to check the printer you receive with these steps:
- power off the printer
- loosen the belts (or check if both are tensioned to the target frequency of 85Hz)
- pull the x carriage to the front and check if it hits the limit blocks on both sides simulataneously. If there is a gap on one side, the bending angle of the metal brackets may be off.
RE: Failed Y-calibration of a new CoreOne
it strikes me as a bit odd with a design that incorporates two rigid elements in the frame for the x-y and the brackets for the x both being steel. If either of those are out of alignment and that is not caught in quality control the belts are simply not going to pull the combined assembly straight, that is not their primary task. The only way I see that fixed is to get the rigid components in alignment in the first place. The other way out of that situation is to remove one rigid component and make it more flexible letting one component be the physical reference for what is square, so if we assume the frame is square, why the metal brackets, why not use printed brackets?
You are right -- the gantry assembly is indeed over-constrained by the two rigid brackets which define its angle. But in practice it is often difficult to avoid over-constraining a mechanism, because you need the stability of rigid mounts. With the brackets it may be important to make them quite stiff to ensure that the axes of the idlers stay vertical despite the pull of the belts.
Most printer designs feature similar over-constrained degrees of freedom. E.g. the dual guide rods for the Y and Z axis must be precisely parallel to avoid binding. In a "theoretically perfect" design one would use only one rod, plus some slotted bearing on the opposite side which constrains the motion only in one dimension rather than two. But in real-world designs one often accepts the extra constraints, to obtain supports which can carry a load and don't wear down too quickly over time. As you state, the price one pays is the need to precisely align those over-constrained components during assembly.
RE: Failed Y-calibration of a new CoreOne
I think rigidity is not a problem at all if the alignment is good.
Take a look at this solution of a competitor whose name somehow escaped my mind 😉 :
The connection of the x carriage to the rails of the y axis is rigid and the angle is precisely defined. This printer works absolutely fine for me and many others... 😀
RE: Failed Y-calibration of a new CoreOne
Take a look at this solution of a competitor whose name somehow escaped my mind 😉 :
The connection of the x carriage to the rails of the y axis is rigid and the angle is precisely defined.
But the angle is over-constrained in this design as well, and relies on exact manufacturing tolerances: The design requires precise 90° angles between the bores for the X and Y axes in both mounting blocks. It is probably easier to achieve the required tolerances with the molded (or machined?) part used by the-competitor-who-shall-remain-unnamed than with the bent metal bracket which Prusa chose to use.
It's certainly a solvable problem. I would expect Prusa to either tighten the tolerances on the bent brackets, or add shims or such to enable corrections of the angle during assembly, or replace the bent bracket with a machined/molded/printed part with lower tolerances.
RE:
When I received our long awaited new printer exactly one week ago and I recognized that it isn't able to calibrate the Y axis, I was confident that the support would help to get this printer running in a short time.
But when the days passed and the instructions received from the support (width delays of days), were pointing into an unacceptable (covering up the problem by overtensioning one belt and having the other belt loose), and they ignored our offer for sending back the printer for repair or exchange the flawed brackets by ourselfs if they sent us precisley bent ones, we thought about cancelling this order and just buy a printer ready for use.
Support even ignored by request for creating a return shippment label (silent since 4 days...)
I discussed the situation with my colleagues and back in my mind there was the suggestion from @Rainer (thanks again!) to correct the wrong angle with underlays. And finally we decided to take this road...
From our workshop I got myself many metal strips with different thickness. With already loosened belts I unscrewed the three M3 screws on the left metal bracket that attach the bracket to the X-carriage.
With the left side loose, I was able to check the accuracy of the right bracket. The angle was only off by about 1mm (gap size). I tried some of my prepared strips and ended up with correcting the angle widh a strip with a thickness 0,07mm.
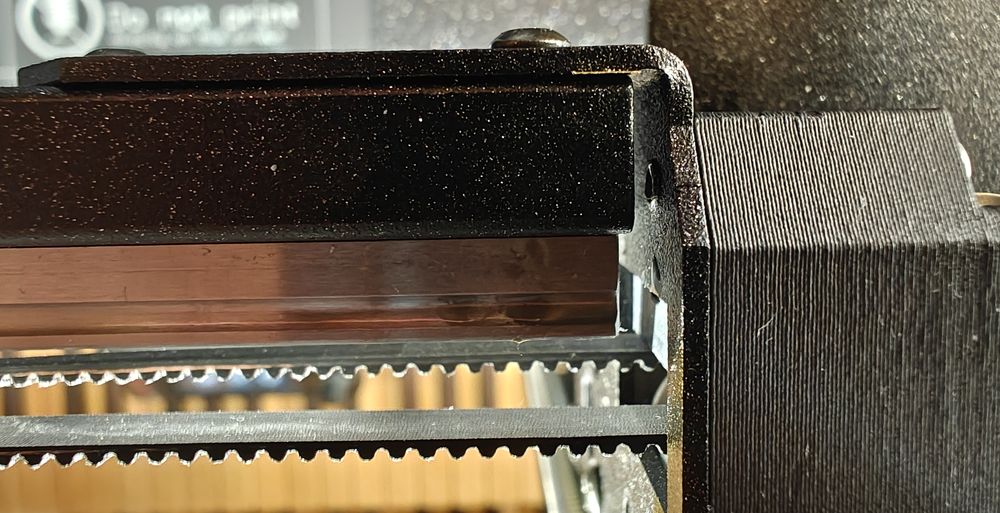
Hope you are able to detect the tiny strip right from the screw head 😀 .
With this side aligned now, I moved on to the left bracket by first tightening that screws again. The resulting gap on the right side was almost 4mm (not much better than before the correction of the right side bracket). So it looks like the right side bracket was pretty close to 90° but the left side bracket is far off...
And this thoughts proved to be true. After trying many stripes with differing thickness and different underlay positions, I ended up with the a 0.35mm strip located at the following position:


Position of the strip is as important as it's thickness because when you torque the screws and the strip is too far away, the metal bracket just bends and you end up at a wrong angle. For really correcting the angle you have to move the strip pretty close to the mounting screw.
With angles on both brackets corrected (and still loosened) belts, the previous 4mm gap was gone - it's ZERO now. After tensioning both belts to 85Hz the gap remained zero and the calibration of the Y axis succeeded for the first time for this printer!
So I was able to do some test prints. I think we may call us lucky. The misaligned X-axis seems the only flaw of this printer. No VFA, no metallic rattling, just some resonances when the Z axis is moving fast.
Of course it's not the preferred way to have to 'repair' your new printer to get it able to print. But in these early days of the Core One it seems to be the only way to get the problem solved if you got a printer with this misalignment.
If your printer is affected too, I hope you get your problem solved too. And I'm glad if this description does help you a little bit😊.
Martin
RE: Failed Y-calibration of a new CoreOne
When I received our long awaited new printer exactly one week ago and I recognized that it isn't able to calibrate the Y axis, I was confident that the support would help to get this printer running in a short time.
But when the days passed and the instructions received from the support (width delays of days), were pointing into an unacceptable (covering up the problem by overtensioning one belt and having the other belt loose), and they ignored our offer for sending back the printer for repair or exchange the flawed brackets by ourselfs if they sent us precisley bent ones, we thought about cancelling this order and just buy a printer ready for use.
Support even ignored by request for creating a return shippment label (silent since 4 days...)
I discussed the situation with my colleagues and back in my mind there was the suggestion from @Rainer (thanks again!) to correct the wrong angle with underlays. And finally we decided to take this road...
From our workshop I got myself many metal strips with different thickness. With already loosened belts I unscrewed the three M3 screws on the left metal bracket that attach the bracket to the X-carriage.
With the left side loose, I was able to check the accuracy of the right bracket. The angle was only off by about 1mm (gap size). I tried some of my prepared strips and ended up with correcting the angle widh a strip with a thickness 0,07mm.
Hope you are able to detect the tiny strip right from the screw head 😀 .
With this side aligned now, I moved on to the left bracket by first tightening that screws again. The resulting gap on the right side was almost 4mm (not much better than before the correction of the right side bracket). So it looks like the right side bracket was pretty close to 90° but the left side bracket is far off...
And this thoughts proved to be true. After trying many stripes with differing thickness and different underlay positions, I ended up with the a 0.35mm strip located at the following position:
Position of the strip is as important as it's thickness because when you torque the screws and the strip is too far away, the metal bracket just bends and you end up at a wrong angle. For really correcting the angle you have to move the strip pretty close to the mounting screw.
With angles on both brackets corrected (and still loosened) belts, the previous 4mm gap was gone - it's ZERO now. After tensioning both belts to 85Hz the gap remained zero and the calibration of the Y axis succeeded for the first time for this printer!
So I was able to do some test prints. I think we may call us lucky. The misaligned X-axis seems the only flaw of this printer. No VFA, no metallic rattling, just some resonances when the Z axis is moving fast.
Of course it's not the preferred way to have to 'repair' your new printer to get it able to print. But in these early days of the Core One it seems to be the only way to get the problem solved if you got a printer with this misalignment.
If your printer is affected too, I hope you get your problem solved too. And I'm glad if this description does help you a little bit😊.
Martin
Can you share with support, or put it on GitHub. I think it's important to make sure Prusa know. Nice work.
RE: Failed Y-calibration of a new CoreOne
Can you share with support, or put it on GitHub. I think it's important to make sure Prusa know. Nice work.
I might have misunderstood all along in which direction "Prusa support" is meant to work. 😛
But yes, congratulations on your fixed printer, Martin!
RE: Failed Y-calibration of a new CoreOne
Can you share with support, or put it on GitHub. I think it's important to make sure Prusa know. Nice work.
Thanks for your suggestion, Brian! Sent a link to the 'solution' post to the Prusa support.
Yes, I think it's important for Prusa to be able to support the affected customers and possibly find a better design in the next iteration of this printer.
RE: Failed Y-calibration of a new CoreOne
I'm glad if I could help.I was sure that it had to work like this. Unfortunately, I'm used to things like this in my day-to-day work.
I think it's just things that are due to the start-up process.I'm sure Prusa will adjust it accordingly.
In any case, I will make this fine adjustment to my printer.The result seems to be convincing.
When I received our long awaited new printer exactly one week ago and I recognized that it isn't able to calibrate the Y axis, I was confident that the support would help to get this printer running in a short time.
But when the days passed and the instructions received from the support (width delays of days), were pointing into an unacceptable (covering up the problem by overtensioning one belt and having the other belt loose), and they ignored our offer for sending back the printer for repair or exchange the flawed brackets by ourselfs if they sent us precisley bent ones, we thought about cancelling this order and just buy a printer ready for use.
Support even ignored by request for creating a return shippment label (silent since 4 days...)
I discussed the situation with my colleagues and back in my mind there was the suggestion from @Rainer (thanks again!) to correct the wrong angle with underlays. And finally we decided to take this road...
From our workshop I got myself many metal strips with different thickness. With already loosened belts I unscrewed the three M3 screws on the left metal bracket that attach the bracket to the X-carriage.
With the left side loose, I was able to check the accuracy of the right bracket. The angle was only off by about 1mm (gap size). I tried some of my prepared strips and ended up with correcting the angle widh a strip with a thickness 0,07mm.
Hope you are able to detect the tiny strip right from the screw head 😀 .
With this side aligned now, I moved on to the left bracket by first tightening that screws again. The resulting gap on the right side was almost 4mm (not much better than before the correction of the right side bracket). So it looks like the right side bracket was pretty close to 90° but the left side bracket is far off...
And this thoughts proved to be true. After trying many stripes with differing thickness and different underlay positions, I ended up with the a 0.35mm strip located at the following position:
Position of the strip is as important as it's thickness because when you torque the screws and the strip is too far away, the metal bracket just bends and you end up at a wrong angle. For really correcting the angle you have to move the strip pretty close to the mounting screw.
With angles on both brackets corrected (and still loosened) belts, the previous 4mm gap was gone - it's ZERO now. After tensioning both belts to 85Hz the gap remained zero and the calibration of the Y axis succeeded for the first time for this printer!
So I was able to do some test prints. I think we may call us lucky. The misaligned X-axis seems the only flaw of this printer. No VFA, no metallic rattling, just some resonances when the Z axis is moving fast.
Of course it's not the preferred way to have to 'repair' your new printer to get it able to print. But in these early days of the Core One it seems to be the only way to get the problem solved if you got a printer with this misalignment.
If your printer is affected too, I hope you get your problem solved too. And I'm glad if this description does help you a little bit😊.
Martin
RE: Failed Y-calibration of a new CoreOne
What are these strips made of? Where did you get them?