GUIDE: How to print with multiple nozzle sizes
It's not officially supported so it's not as easy and simple as using the new painter to color things (foreshadowing), but it is completely doable.
This is a bit of a followup to an older thread. But I figure a new thread as a helpful guide in the OP is easier to read than digging through pages for a single post. A lot of info here is aggregated from other users, I simply wrote this all out and tested that it would work.
Setting up the XL:
Other than physically changing out the nozzles on your Nextruders, you will also need to change settings in the printer via LCD control panel for each tool to specify the nozzle size.
Settings > Tools > Tool # > Nozzle Diameter
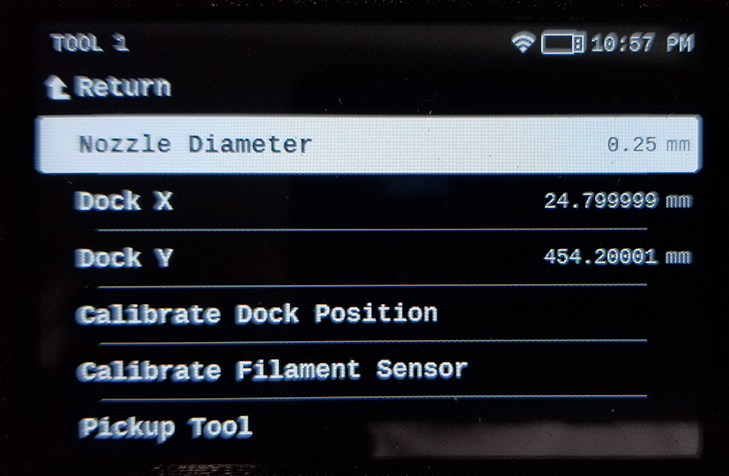
Do this for every nozzle you change. If you forget to do this, the XL will warn you that nozzle sizes don't match up when you try to start a print.
I also ran the "Tool Offset Calibration" in Control after changing out the nozzles. Not sure if necessary.
One bug(?)/missing feature(?) that seems to have carried over from Prusa's MMU is that things tend to print in ascending order. Meaning Tool 1 will probably print before Tool 2/3/4/5 when doing a 5 tool print. So in the MMU sense that you want to keep your lighter colors closer to Filament 1; for the XL you probably want to keep your smaller nozzle sizes near Tool 1.
Mostly mentioning this for those from the original thread that want to print facedown signs and don't want the small lettering crowded out by the background overflow. But its a good thing to keep in mind, in general, until Prusa adds a feature that lets us choose toolhead print order.
Setting up PrusaSlicer:
Printer Settings
You're going to want to create a new Printer Settings profile for your multi-nozzlesize setup to match your physical printer: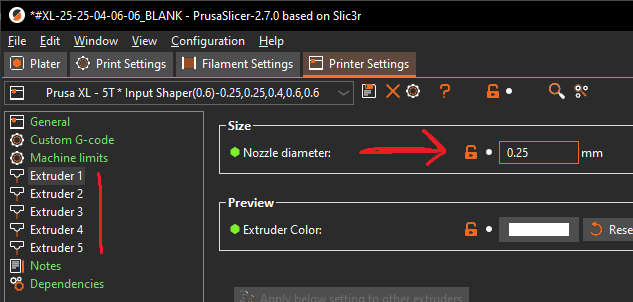
Filament
Make sure your filaments are set for your specific setup. Some filaments have dependencies on nozzlesizes and/or whether you're using Input Shaper.
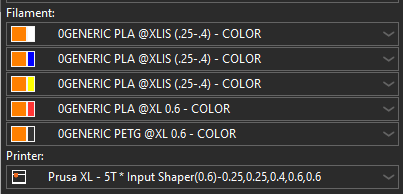
XL has no need for purging like the MMU does, so no need to worry about whites on 1 and reds on 5.
Print Settings
There is a soft limit on layer heights per nozzle size. That is to say when setting the Printer Setting to a certain nozzle size, only these default layer heights will be selectable in the Print Settings dropdown.
.25 nozzles: 0.07, 0.12, and 0.15
.4 nozzles: .10, .15, .20, .25
.6 nozzles: .15, .20, .25, .32
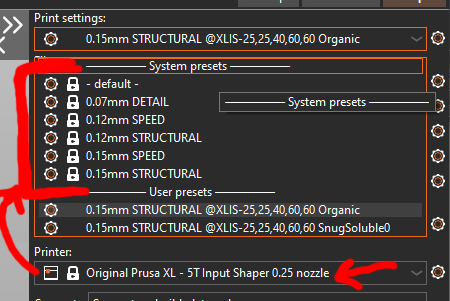
With my setup having .25 and .6 nozzles, my largest default layer height (for ease of setup) is 0.15mm layer height.
Why is it a soft limit then? Because PrusaSlicer doesn't stop you from just going into your Print Settings and setting whatever layer height you want. Just make sure whatever you choose is doable by your hardware. Ex: .25 nozzles can do .2mm layer height but will it look nice?? And if you don't care about it looking nice then why go through all this trouble?
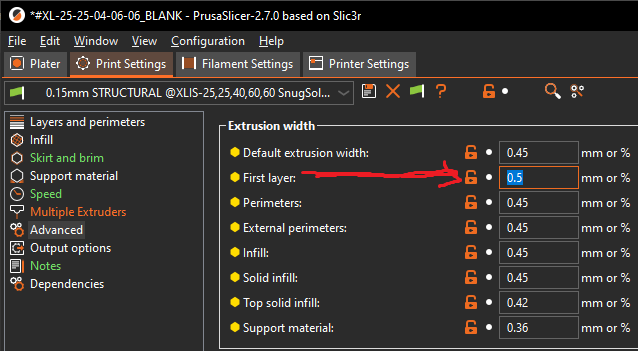
I'm not 100% certain how important it is to set extrusion widths in here since we'll be doing it later on, but at the very least this is the only place you can setup the "First layer" width. I went with .4 nozzle defaults as it was the 'middle/average' nozzle in my setup (.25, .25, .4, .6, .6). Feel free to experiment with this, I didn't. If you get elephants foot issues, this is where I'd go first.
There are a few hard[er] limitations:
- You cannot use a wipe(prime) tower. PrusaSlicer will simply not let you slice otherwise. So untick that.

- PrusaSlicer 2.7.0 has a "20mm retraction on filament when not in use" by default, so this isn't as much of an issue as it once was as long as you're updated. However, you probably also want to enable "infill before perimeters" so your perimeters have less of a chance at being ugly from not being primed. So things like lighting infill may not suit this sort of application well.

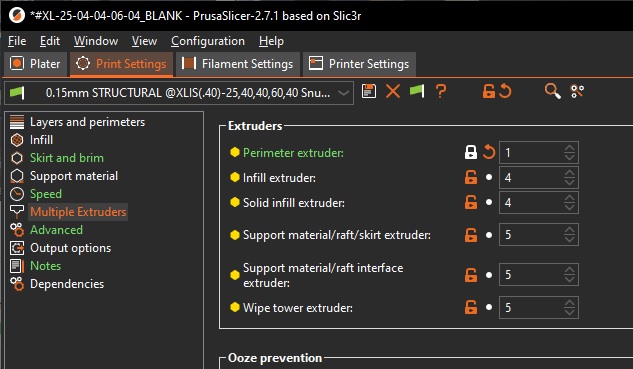
- If you are using support/interface/raft/skirt structures, then you must designate a tool/nozzle to print them. That tool can still be used to print things on your actual model, but it will be the only tool used to print support things; no more multi-color rainbow support trees.
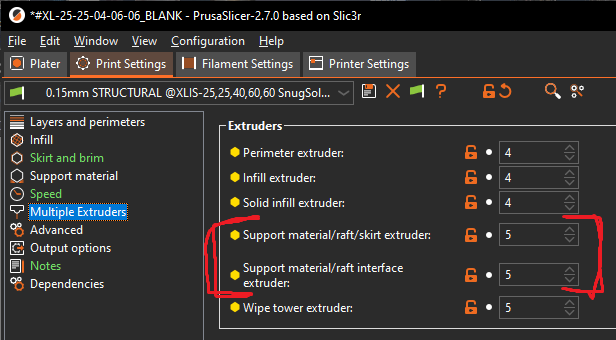
- It doesn't have to be the same tool/nozzle for both options, but it cannot be left as zero (default). PrusaSlicer will nag/wont let you slice if you leave it as zero.
- I haven't noticed the Perimeter/Infil/SolidInfil extruder options affecting anything. Maybe when multi-nozzle gets officially supported? ¯\_(ツ)_/¯
- It doesn't have to be the same tool/nozzle for both options, but it cannot be left as zero (default). PrusaSlicer will nag/wont let you slice if you leave it as zero.
And the biggest limitation imho:
- The 'things' you want printed by different nozzles are per part, thus MUST be part-separated for any kind of granularity. Ex: you wanted text printed with your .25 nozzle but your background printed with a .6 nozzle, the text and background shapes must be their own seperate stl/3mf files that you import together into PrusaSlicer as a single multi-part object. If you've done multi-colored prints before PrusaSlicer introduced the painter tool, then you already know the deal.
BUT WHY THO? Because different nozzle sizes use different extrusion widths (otherwise why would you) and to designate the extrusion width of a thing, we use part Modifiers.
Right-click a part on the Plater view > Add Settings > Extrusion Width
These are just the default values from PrusaSlicer for .25, .4, and .6 mm nozzles. Feel free to modify as you wish.

-
- I've included Fill density and perimeters because 10% with a .25 nozzle is not the same as 10% with a .4/.6 nozzle. Similarly with Perimeters.
You can be outlandish with your extrusion widths as I've tried before, but there are physical limits that PrusaSlicer may or may not warn you about.
Luckily, once you have the necessary Modifiers for each nozzlesize setup on a part, you can copy/paste the modifiers with Ctrl+C/Ctrl+V to any other part you want printed with that tool. Simply left-click on the line below your model name that contains the list of modifiers, click Ctrl+C on your keyboard, left-click on the part you want to paste the modifiers onto, Ctrl+V on your keyboard.

-
- This is why I've setup a sort of template 3mf file as you can read in the filename of some screenshots. That way I can just import the model(s) I want to print and copy/paste Modifiers for the different nozzles sizes without having to start from scratch every time.
But can't I just use modifier shapes and things instead of CAD'ing things part-seperated? Yes. But how are you going to get granularity when the model is a 3-dimentional dragon Pokemon with complex shapes that arn't simple boxes/cylinders/spheres? Exactly.
For a more solid example, I used this Dragonite MMU Remix by drodfro to test things. It could use some optimization but it works great as a test/example:
That is a zipped 3mf file with all the previously mentioned multi-nozzlesize things. Feel free to change/experiment/whatever. The model is sized to 150%. .25 nozzles are used for the claws (white filament) and the bag(black filament), .4 nozzle for the supports and green of the wings, .6 nozzles for the body and stomach parts.
My print was a failure for unrelated reasons, but as a multi-nozzlesize test it was a success. The claws look great; my little experience with .6 nozzles makes me assume it wouldn't have faired quite as well as the .25 did. Similarly with the black strap part of the bag; imagine how disastrous printing a standing toothpick with a .6 nozzle would be. Some seam issues with the .6 nozzle orange part but printed as expected.


And here's a copy of my "template" file for the lazy like me:
Ideally, I imagine the slicer should look something like this where each toolhead is basically its own printer and we could just paint onto a model to designate which tool does what, exactly how we can paint colors now. Also bunch of parameters (like extrusion widths) that are currently in Print Settings should be linked to each tool instead of a single overall print. But we aint there just yet, so we gotta make do.

I think that's everything you need to know. If you find any errors or optimizations feel free to point them out. I've only done preliminary tests to get things sliced and printing. Unfortunately you can't edit posts in this forum after like 30 seconds of posting, so errors in this OP will be forevermore. But this should be a good starting point for anyone wanting to do multi-nozzlesize printing.
If you have questions feel free to ask, but I don't guarantee to have an answer. I'm not a programmer/scripter; gcode is one step away from moonrunes to me. 3D printing is my hobby, not my dayjob. If shit fucks up it's not my fault.
Good luck
XL-5T, MK3S MMU3 || Printing with multiple nozzle-sizes: Official Guide, Unofficial(old) || PrusaSlicer Fork || Other advanced slicer tactics || TPU || HF Nozzles
RE: GUIDE: How to print with multiple nozzle sizes
This is AWESOME. I have a 5T and am just now venturing from the default .6mm nozzles to all .4mm ObXidian to begin testing that out. Once done with that I will be looking to find prints that work with this kind of thing. Thank you for the detailed post. Keep us updated.
RE:
Great work!
A big part of my purchasing decision was being able to do exactly this in my prints for customers. I know Prusa are working on it and hope it is integrated soon.
Unfortunately, one thing that does create a big issue is that you cannot set the First Layer extrusion width on a per object basis.
As a result, all the first layers will print at whatever the First Layer is set to under Print Settings. The layers after that work as intended.
This is a big issue for those of us printing with text or other fine detail on the face down side of the print.
Here is a screen capture from the example file you uploaded. From right to left are the 0.25, 0.4 and 0.6 nozzles.

RE: GUIDE: How to print with multiple nozzle sizes
Another issue for doing small text with a 0.25 nozzle is not being able to set the first layer speed on a per extruder basis.
I find I have trouble free success at 12mm/s. Stepping up to even 15mm/s causes inconsistent first layer adhesion issues because the extrusions are so small and get torn away by fast movements.
RE: GUIDE: How to print with multiple nozzle sizes
The default first layers speeds for IS and nonIS with a .25 nozzle are 20-25 mm/s. Sounds weird that you're limited to half that.
If you haven't already maybe try creating a new printer profile based on a .25 nozzle because my examples are IS .6 based. A quick comparison in the slicer only shows travel speed accel and retraction settings as a difference which sounds almost completely irrelevant to laying down filament. Maybe there are 'hidden parameters' or something.
There's also a difference with default IS and nonIS PLA filament. Prusa defaults IS temps to 230 while nonIS is 215. And so many people lowered their temps to around 200 because of .6 stringing issues. So you may want to double check that as well.
Also double check first layer height. Prusa's defaults for .25 nozzle still use .2mm as the first layer which sounds relatively high to me.
The dragonite test first layer was just small triangles so the .25 nozzles never really got any speed going. I've also never printed with a .25 nozzle until that test print so I'm no expert. If you want to upload a test model that youre having trouble with I'd be interested in giving it a try.
XL-5T, MK3S MMU3 || Printing with multiple nozzle-sizes: Official Guide, Unofficial(old) || PrusaSlicer Fork || Other advanced slicer tactics || TPU || HF Nozzles
RE: GUIDE: How to print with multiple nozzle sizes
That was literally you 3MF opened and told to slice, so it's a limitation of the slicer. Definitely not having a go at you.
I'm not being limited in my speeds, it's just the speed I found success on very smal text successfully printing at with a 0.25 nozzle. Just means my first layer is very slow.
I've done tests now with a 0.4 nozzle for text and 0.6 for the rest. First layer is fine at 30-40mm/s and whatever you like for the rest.
Using the IS or non-IS profile make no difference.
The first layer still gets 100% sliced at the First Layer extrusion width setting because you don't get any more control over that. I tried reducing the first layer width to try and get a happy medium between the 0.4 and 0.6, but the results were poort for the first layer from the 0.6 nozzle.
As long as I do text of ~7mm+ in height, a first layer width of 0.62 seems to be OK, as does 0.65.
RE: GUIDE: How to print with multiple nozzle sizes
I glossed over it in my original post but I was wrong about the Perimeter/Infil/SolidInfill parameters doing nothing. If you leave the extruder as default rather than picking a single filament/tool then it does work. Different day, different mindset.


XL-5T, MK3S MMU3 || Printing with multiple nozzle-sizes: Official Guide, Unofficial(old) || PrusaSlicer Fork || Other advanced slicer tactics || TPU || HF Nozzles
RE: GUIDE: How to print with multiple nozzle sizes
Thanks @baconfase for your extensive post describing how to print with multiple nozzle diameters.
The PrusaSlicer team is very well aware of the limitations regarding mixing various nozzle diameters. However mixing various nozzle diameters is a chicken-egg problem: There were no toolchangers widely available before the XL, thus there was no software to support it. Nowadays we as a community are discovering the possibilities, options and strengths of the toolchanger setup equipped with different nozzle diameters.
PrusaSlicer inherited many features of the original Slic3r project including the structure of the print / filament / printer profiles. It requires a non-trivial effort to rework the configuration structure to support different print profiles per nozzle. We plan to rework the configuration layer in one of the major PrusaSlicer releases, however we want to do it right at first as doing it wrong and then modifying the configuration structure with each successive release will introduce incompatibilites of the config profiles and project files, leading to a maintainance nightmare. Thus we are happy to collect the experience and suggestions from the community and distill the requirements from it before we do the big leap of reworking the configuration layer.
RE: GUIDE: How to print with multiple nozzle sizes
“There were no Toolchangers widely available before the XL” WTF?!?!
Thats nonsense! The E3d machine was shipped in 2018 for crying out loud!!!! And we’ve been using Prusaslicer with it for at least two years now! Prior to that we were using Simplify3d which has fully supported all aspects of toolchanging. My E3d toolchanger can have four different nozzle sizes and all work fine and I use Prusaslicer!
You guys need to get the heck off your high horse and start looking at the lessons learned by E3d users as well as Jubalee users and stop acting like only you can solve it while making your users wait for you to figure out what has already been figured out. This comment explains ALOT!
RE:
“There were no Toolchangers widely available before the XL” WTF?!?!
Thats nonsense! The E3d machine was shipped in 2018 for crying out loud!!!! And we’ve been using Prusaslicer with it for at least two years now! Prior to that we were using Simplify3d which has fully supported all aspects of toolchanging. My E3d toolchanger can have four different nozzle sizes and all work fine and I use Prusaslicer!
You guys need to get the heck off your high horse and start looking at the lessons learned by E3d users as well as Jubalee users and stop acting like only you can solve it while making your users wait for you to figure out what has already been figured out. This comment explains ALOT!
To be fair, the E3D tool changer was an experimental motion system platform, not a 3D printer. E3D made this very clear.
The Jubilee was also a DIY motion system, not a fully fledged production 3D printer.
RE: GUIDE: How to print with multiple nozzle sizes
Wait… It’s experimental so then it’s not a 3d printer?
In our market they label something as experimental when the producer admits it’s incomplete as in not fully baked. In the E3d’s case the incompleteness were the very same things that the XL needs! Jo was at MRRF in 2019 (I know cause interviewed him) and saw all the Toolchangers there. He knew there were lessons learned that he could apply. The community of E3d users have been exploring and solving these issues now for more than four years. Issues that are not at all relevant to non-toolchangers, yet vital for reliability and quality when one is toolchanging. Issues such as heater control, priming and wiping, slicer setups, combining materials, optimizing extrusion flow, issues in small toolpaths, optimizing feeder stepper currents, etc, etc. When the XL was announced I tried repeatedly to get the message to Prusa that they had better review the community posts… you can see my comments in the XL blog. Obviously I and that community were ignored and now the users who bought into the notion that the XL is not an experimental machine are getting all sorts of problems. Problems that they had assumed Prusa would have already worked out such as having different nozzle sizes between tools, priming and wiping, etc… many of these issues coulda, shoulda been already solved in Prusaslicer! If you dig into GitHub you’ll see the features and issues I posted years ago explicitly for a couple of these issues none of which were addressed.
If you’re a 3d printing wonk, who has a knack for solving 3d printing problems, the XL is absolutely brilliant! If however you just want to get an item printed and don’t want to deal with the machine at all then unfortunately, at this time, the XL may not be your best choice. E3d users are not surprised.
RE: GUIDE: How to print with multiple nozzle sizes
To be fair I have not read all the replies. But my use case is support material with 0.6 and 0.4 for the model. I am/will be purchasing .4 and .6 Diamond's for my 5t xl.
RE:
I just posted another thread to this forum where I created a fork of prusa slicer that allows the wipe tower to be enabled even with mismatching nozzle sizes or slicing settings. Not sure if it's worth doing any testing for you, but it may simplify some of the steps you had to go through. Although admittedly, brute force disabling certain checks does increase the risk of a screwed up print or crashing your head for example.
Brand new to 3D printing and my 5-tool XL is my first 3D Printer!Check out my Multi-Tool fork of PrusaSlicer to mix and match nozzle sizes.
RE: GUIDE: How to print with multiple nozzle sizes
Another correction:
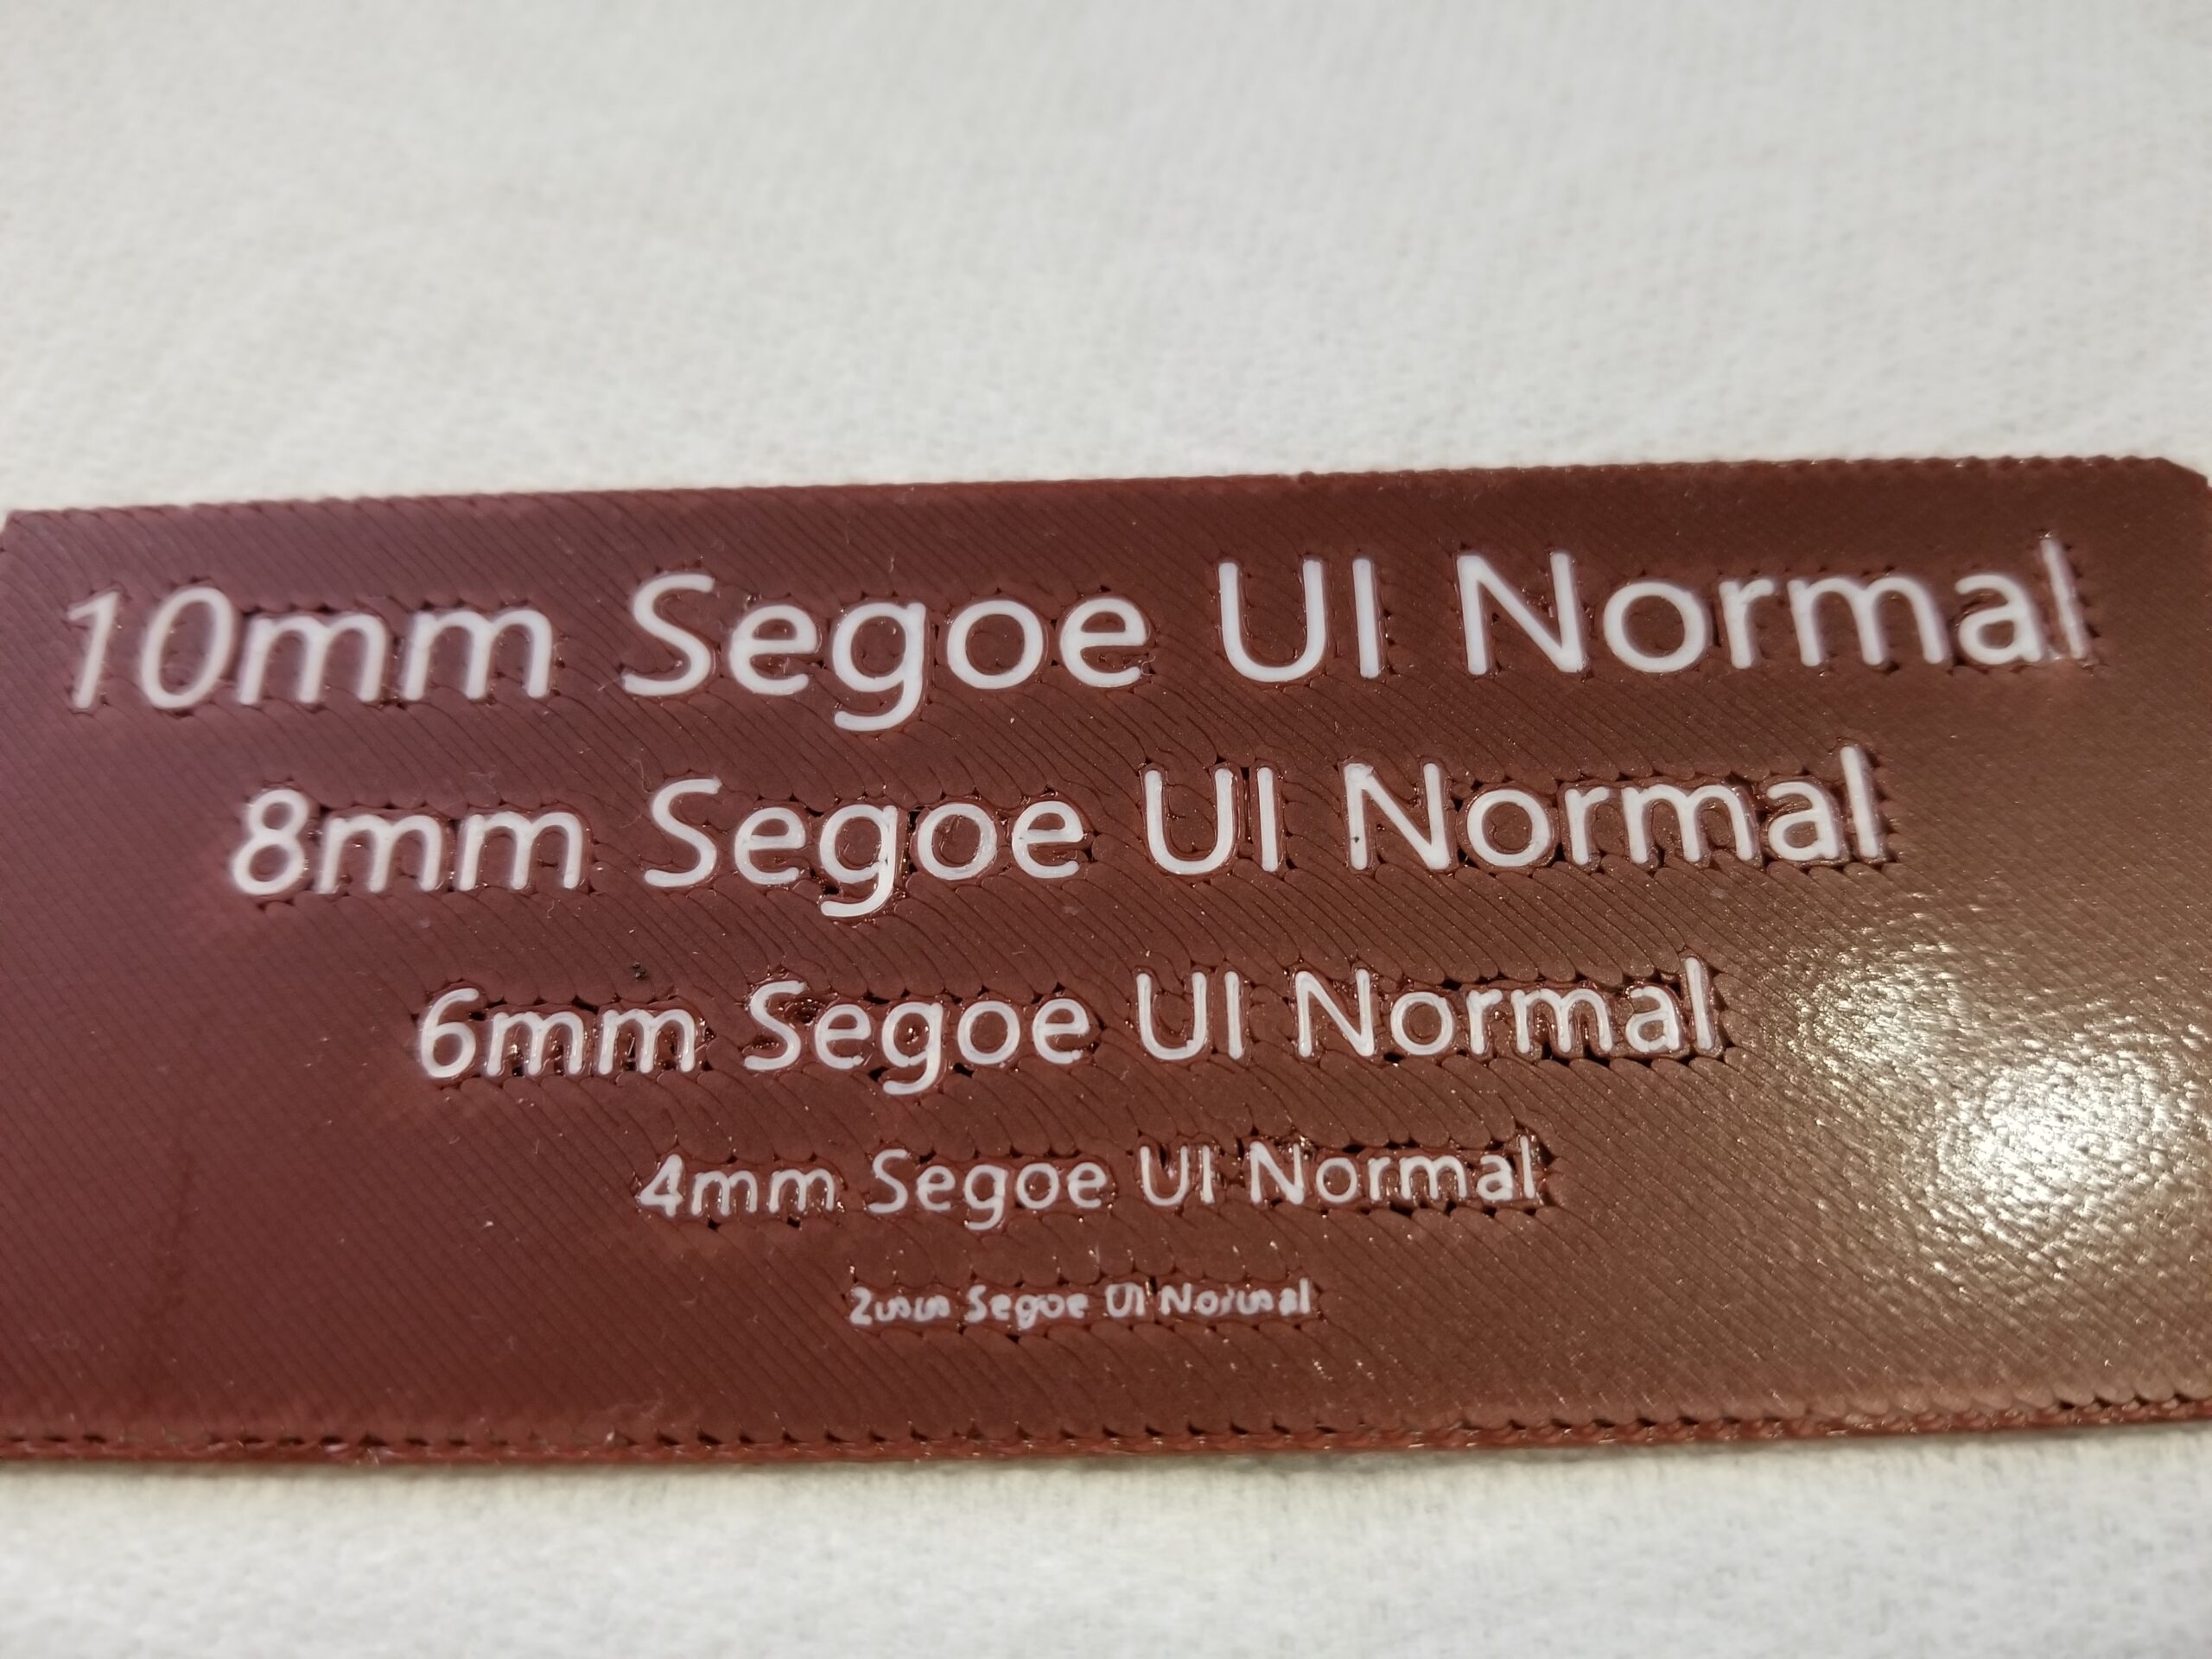
Set First Layer width in settings to zero to allow the slicer to print extrusion widths based on the nozzle size. Here is an example of a quick text-down / text-onbed print using a .25 white and .6 brown:
XL-5T, MK3S MMU3 || Printing with multiple nozzle-sizes: Official Guide, Unofficial(old) || PrusaSlicer Fork || Other advanced slicer tactics || TPU || HF Nozzles
RE: GUIDE: How to print with multiple nozzle sizes
Following off the logic from my post above, it seems that is the magic sauce to 'can we just use the painter tool for different extrusion widths,' which invalidates the original assumption that things need to be part-separated with modifiers, is to just set all the extrusion widths in Print Settings to zero and let the slicer figure it out from the arachne and Printer Settings nozzle sizes.

Example:
- Single-part, non-seperated object.
- Printer Settings: Tool1 - black, .25 nozzle ; Tool3 - grey, .4nozzle ; Tool5 - red, .25 nozzle
- All Extrusion Widths in Print Settings set to zero.
- Just use painter tool, no extrusion width modifiers at all.


Blurry picture from a running print but I'd say the extrusion widths of the grey are significantly wider than that of the black which matches the sliced preview.
Another sliced preview comparison of zero+paint vs part-wide modifier:


So there are some weird inconsistencies but it's def easier to paint things than it is to CAD-separate things. And esp with PS 2.7.2 fixing the long standing 'random color where it shouldn't be bug' things are pretty damn great for multi-color, multi-nozzle size printing. 👍
XL-5T, MK3S MMU3 || Printing with multiple nozzle-sizes: Official Guide, Unofficial(old) || PrusaSlicer Fork || Other advanced slicer tactics || TPU || HF Nozzles
Don't forget about linear/pressure advance
High-quality and fast prints depend on the correct setting of the pressure advance parameter, which strongly depends on the nozzle size. Unfortunately the per-filament g-code settings base their choice of that value on the diameter of the first(!) nozzle. This is of course somewhat broken if you ant to print with multiple nozzle sizes.
Thus, for fast high-quality prints, you should create separate filament settings for each nozzle diameter and set that value manually.
My test pattern generator is here: https://www.printables.com/model/782422-linear-pressure-advance-test – there are others …
RE: GUIDE: How to print with multiple nozzle sizes
Hi, I've already written my comment to the thread below. But it seems a bit quiet there. So I thought I'd try my luck here as well:
Im curious if you've made any further progress here.
I'm currently using Nikhil S.'s experimental build (Github link is below) with the automatic width setting (all widths =0). I'm combining 0.25mm and 0.6mm nozzles, and it works quite well for simple objects. Printing labels with text or ornaments on a flat surface is especially useful and straight forward.
Do you have any interesting use cases that you've also tried? What limits you the most? I will be experimenting more in the upcoming days, so if you have some interesting ideas, let's share them! 🙂
Github experimental build for Mixing of different nozzle diameters: https://github.com/DoubleStrike/PrusaSlicer-MultiTool
RE: GUIDE: How to print with multiple nozzle sizes
High-quality and fast prints depend on the correct setting of the pressure advance parameter, which strongly depends on the nozzle size. Unfortunately the per-filament g-code settings base their choice of that value on the diameter of the first(!) nozzle. This is of course somewhat broken if you ant to print with multiple nozzle sizes.
Thus, for fast high-quality prints, you should create separate filament settings for each nozzle diameter and set that value manually.
My test pattern generator is here: https://www.printables.com/model/782422-linear-pressure-advance-test – there are others …
TBH this info just flew over my head until recently since it's not something I've ever messed with and you basically lost me at "If somebody knows the equivalent Windows magic, please leave a note." It only really clicked when I read surfalex2000's description on his take on an LA test print. Basically, any saved custom filament profiles created in the past may have old/erroneous Start G-code with "if nozzle_diameter[0]". At some point this was fixed in PS to use a variable instead of using [just] the first nozzle: "if nozzle_diameter[filament_extruder_id]".
So people that have already customized their K/S values should be able to just replace some zeros with some text, otherwise just hit the reset your filament start g-code to default by clicking on the lock icon and be good to go.
Old PS code that assumes all nozzles are the same as the first nozzle by using value zero:
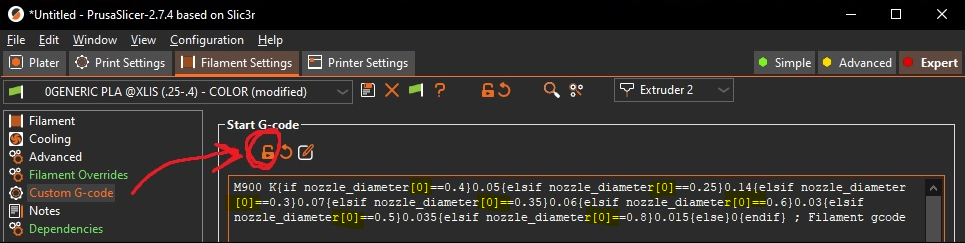
Updated/fixed PS code with variable nozzle ID:

If you're still getting seemingly-pressure-related printing issues, then you may need to create a custom profile for that specific filament to correct its specific K/S values. Otherwise, this is the update/fix that addresses the issue Mattius-U pointed out.
XL-5T, MK3S MMU3 || Printing with multiple nozzle-sizes: Official Guide, Unofficial(old) || PrusaSlicer Fork || Other advanced slicer tactics || TPU || HF Nozzles
RE: GUIDE: How to print with multiple nozzle sizes
Just a small update/note.
TLDR: Set your layer height limits to be the same along all extruders to non-zero values.
In PS 2.8.1, I had to set all height limits for all extruders to zero to get multi-sized nozzles and wipe tower slicing in that fork.
With 2.9.0, PS by default allows for multi-sized nozzles and the wipe tower. However, it has changed [again] and requires all those height limits to be exactly the same for all extruders, but cannot be set to zero, for PS to allow slicing with a wipe tower and multi-sized nozzles without having to use Nikhil's fork. Otherwise, you get the error about things not being "sliced equally" whatever that means.
Example with pictures:
Setting both limits on all 5 extruders to zero:

Will get you this error and you cannot slice your project:

So to workaround/fix this, I just set these limits to all 5 extruders:

And you're good to go for slicing with the new warning:

And just to muddy the waters: zero on two of the .25 nozzles and one of the .4 nozzles does still work, but setting a second .4 nozzle to zero will no longer allow slicing. Weird, but it is what it is.
XL-5T, MK3S MMU3 || Printing with multiple nozzle-sizes: Official Guide, Unofficial(old) || PrusaSlicer Fork || Other advanced slicer tactics || TPU || HF Nozzles
RE: GUIDE: How to print with multiple nozzle sizes
Just wanted to say that I found this tutorial incredibly helpful, thank you for your in-depth write up!
🍻