MK3S to MK3.5 via MK3S+ Build Experience
Phew. That was a bit more drama than I'd anticipated. Not quite as pleasurable an experience as the initial MK3S or Enclosure builds. Part cause by my own interference. That being said, there are a few generic issues mentioned in the comments repeated here. I tried to assemble my learnings for anyone else who attempts this.
I had bought the upgrade a few months ago waiting to undertake it while I finished a few projects. I didn't quite appreciate that one had to print their own parts which would have been OK but I realised when I went to go do it that the 0.4 nozzles I bought ages ago were the wrong type--too long. I usually do 0.8 on everything. I found my original 0.4 that was looking pretty grizzly but still functional. I don't often print with PETG and it started leaking around the print head resulting in problems with parts printing -- crashes, leaks, failed parts. I started printing the upgrade parts in smaller groups instead of the full plate 3mf files supplied leaving the xLCD cover and supports to last purely because they were biggest. I'm glad I did--I tried to service the hot end which was loose and snapped off one of the wires with PETG still loaded therefore putting an end to any further printing. Luckily, it appears I had just enough self-printed essential parts to do the upgrades.
Carry forward, I was jumping back and forth between the enclosure assembly instructions, the 3S to 3S+, 3S to 3.5 assembly instructions and replacing of hot end assembly. The comments were incredibly helpful particularly with people mentioning pieces they disassembled after assembling because they were using an enclosure specifically with wiring. It was in the comments that I realised I didn't need to mess with the new hot plate which was a bit of a relief.
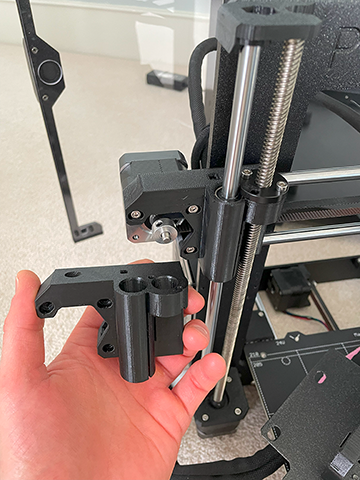
Being that this was nearly a complete disassembly, I tried to upgrade the optional X-axis parts included in the files however there aren't instructions for them. I ended up having to demount both Z-axis motors to replace, realised one of them was identical to MK3S and read the MK4 assembly instructions to decipher where the 30mm screw goes included in the upgrade kit. I do see the benefit in the X-end Motor piece for adjusting the tension of the X belt. I just could have used a bit of explanation. (pictured with old in my hand
In rebuilding the hot end assembly, I ordered replacements off Amazon (speed and Brexit mean Prusa original parts are just not worth it) and figured I would do it proper with a torque wrench since I don't have the ability to print substitute parts at the moment. That was an effort too! They are either outrageously expensive, don't go down to 2.5 Nm or don't contain female end keys. I ended on this LIBRATON Torque Wrench 1/4" with sockets for £35 but it too was missing 1/4" to 7mm adapter for the nozzles. This was ALSO tedious to find on immediate availability but finally found Facom 1/4 Inch Socket Rail at Toolstation because it was immediately available.
The top of the fan shroud broke after I'd finally reassembled the hot end. Luckily, it still works with the nut inserted but I may look for an alternative design.

Now that the printer is operational, I tried printing the missing parts. The PETG was getting gloopy, particularly second layer and crashing some parts. After some back and forth with the chat on the weekend (how great was that!), I tried lowering the speed of the infill but that didn't work. In the end, I managed to get the parts to print 0.2 STRUCTURAL. Anything faster, even 0.2 FAST, resulted in less good parts. Discussion here.

In the process of calibrating, I started to think there was more of an issue with the bed level so printed thispart (note: for some peculiar reason the gcode for PLA would do a test extrusion like 3 cm above the bed. weird, so I generated my own in the end with Slicer). Ultimately, I think it has to do with the Pinda overhanging the side of the steel sheet as commented herebecause it's the last 2 cm. See my response here.
So I managed to get it all reassembled and printed xLCD components on the upgraded machine but it was a pretty harrowing experience all told. Hopefully this helps someone forsee some of these issues before they start!

RE: MK3S to MK3.5 via MK3S+ Build Experience
Welcome back in the maker world.
I like those activity and I love Prusa because I can put my hands on it. Purchasing *any* other firm gives you a ready assembled printer, closed source, that once it becomes obsolete, it will end up in the trash. You will be always able to upgrade a PRUSA, even it it will be a money nonsense (upgrading a MK3S to a MK3.9 it is... 😎 ) you will be able to do it.
I purchased the MK3S PRUSA assembled because I needed to print immediately. With the time I realized it was a bad idea, since I kept it like a relic, since it was assembled in the PRUSA labs. I refused to apply upgraded for a while, but then I started to mod.
When I purchased the MK3S to MK3S+ upgrade, I kept it for months in its box, and then I decided to upgrade the MK3S when I was ready, and I knew what to do.
Same for MMU2 -> MMU3. I wanted to be sure it had a stable FW and that I had in advance the part for the future MK3.5 board connection.
I purchased the MK4 in kit, and finally I enjoy the assembling of the kit. It took two days of careful assembly, but no issues or errors were performed. It worked at first start without any issue.
For the MK3S+ -> MK3.5 after the good experience of the MK4, again, before I performed the upgrade I was double check sure to have all I needed, that the current firmware was stable with no issues, the community of early adopters did not have issues, and then I started to update.
I did not encountered all those issues, the upgrade was smooth and it take one day. In my case I did not own an enclosure. In some cases I was a little maniac during the parts printing with PETG to have the best quality (e.g. printing in variable layer height 😆 ). I did not use any torque wrench during the assembly, even if I have all the possible tools, even a precision torque screwdriver for Hard Disk maintenance.
I could say that the assembly instructions are not the best, and they are a little confused in many parts, mixing between the various versions of the printers. It is easy to make mess.
Regards