Need Help with a Multi-Part, Multi-Color Print
Guys,
I need help with a print. I've been doing these Reese hitch covers for a while now and have them down pretty well. I have pretty much mastered SolidWorks sufficiently to allow me to build the models as needed. But, recently, I have been asked a couple times to use colors that have proven somewhat translucent (neons and quasi-neons). Seeing as I use black as the base color for these things, these colors don't come out as they should. For those why don't know, at least when painting (and proving true with 3DP filament), "neon" colors, which apparently includes basic yellow and orange (so far), must be backed by white in order for them to look right. I have started building the base model with cavities, then building inserts that fill these cavities. After building an assembly, I save them as STLs, as a unit. I can then assign the inserts to be printed in white and with higher infill density. To illustrate the difference:
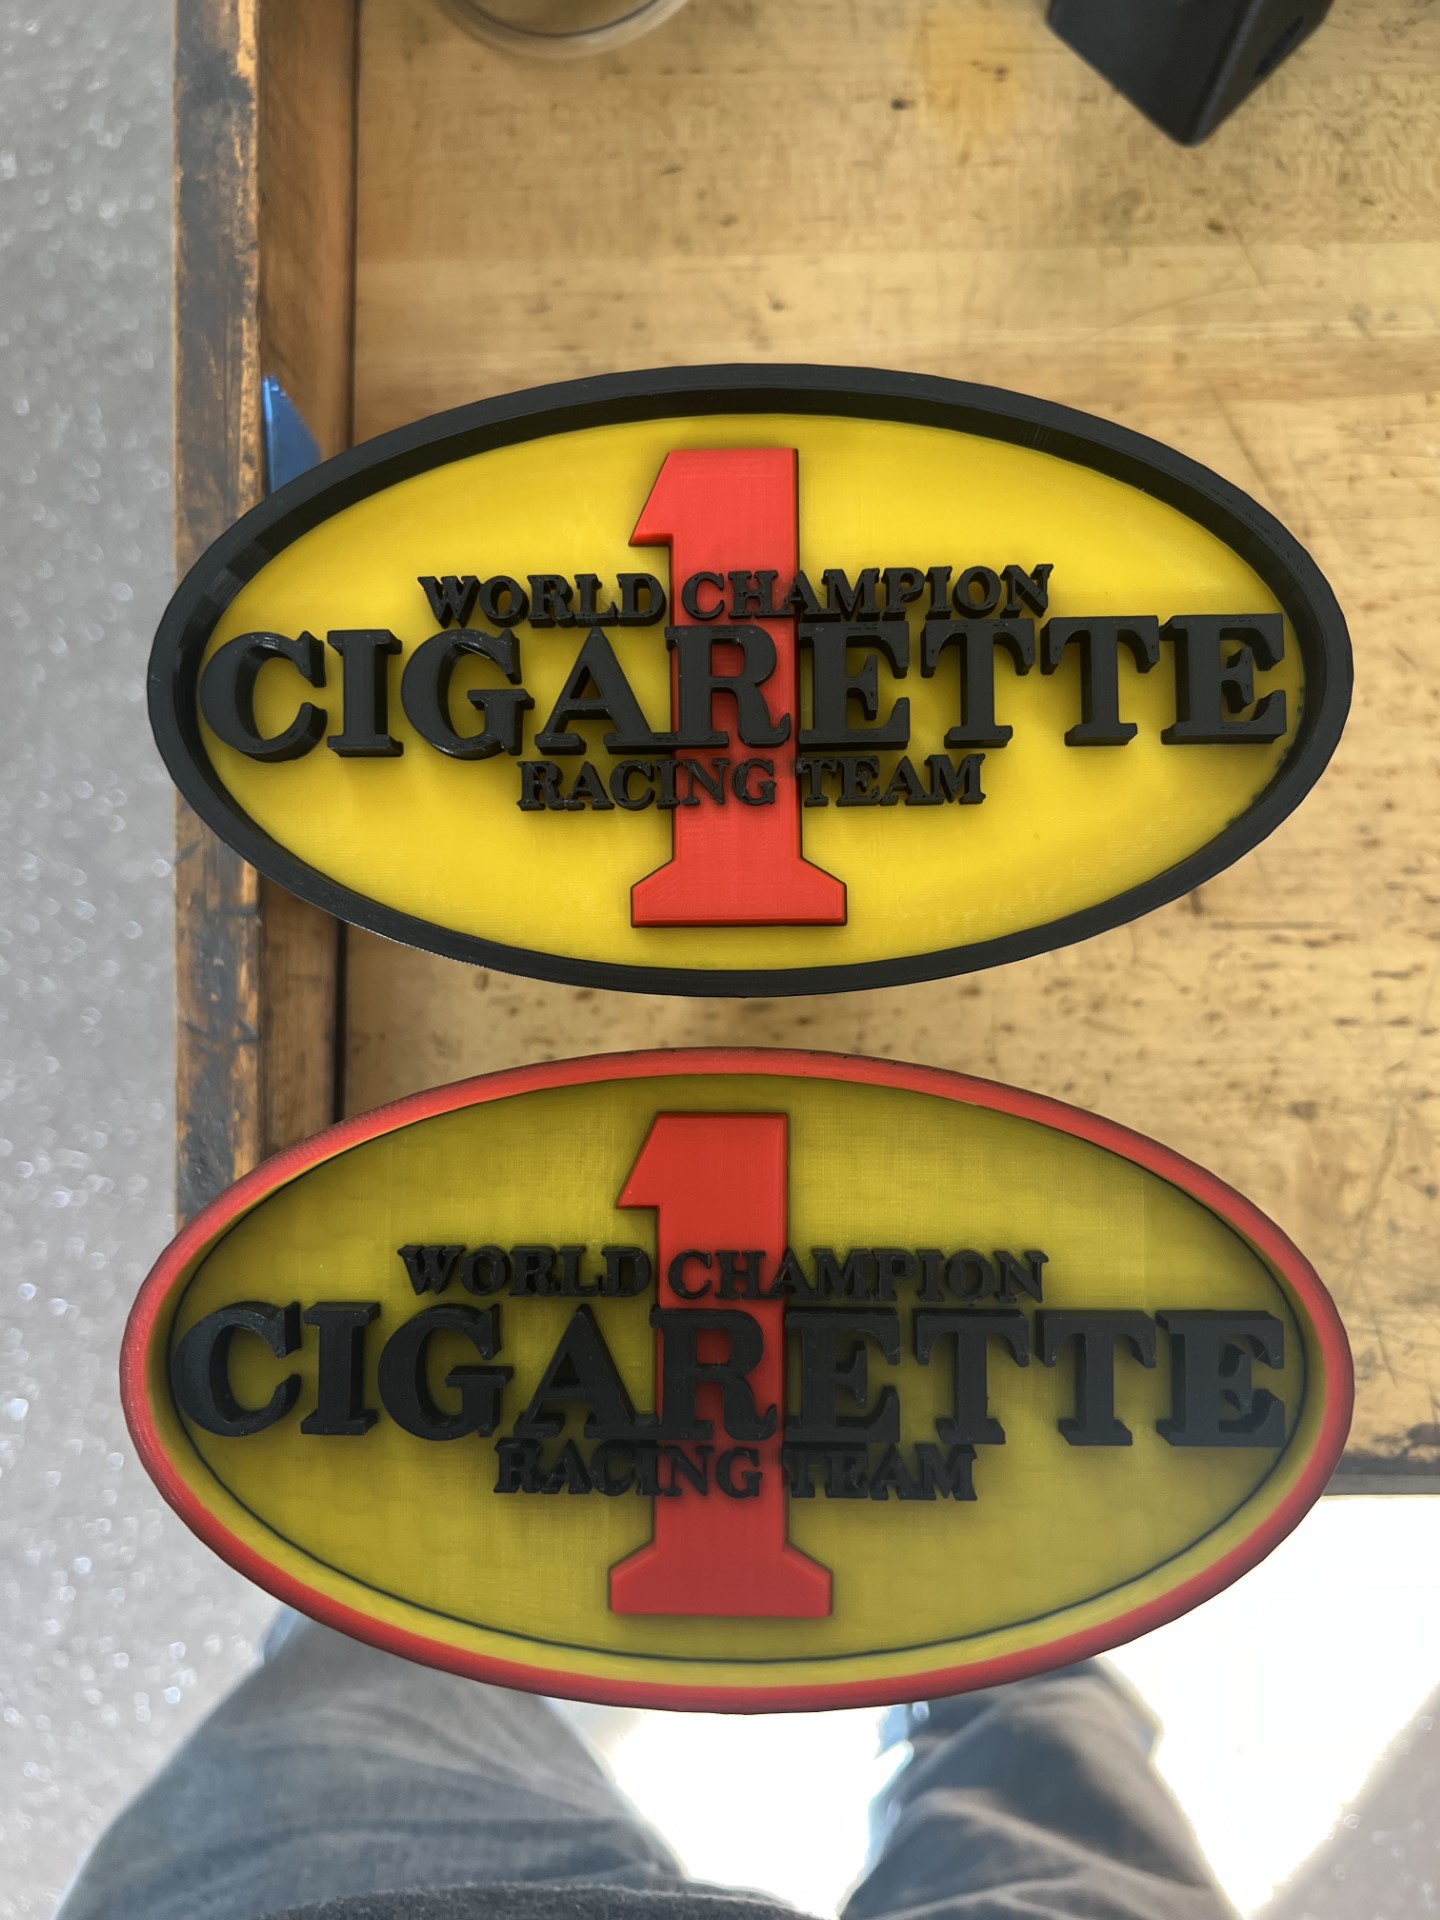
The top one is with a white insert under the oval face, the bottom one is without.
Side note.... For the record, I still haven't figured out why there is a black outline between the red "1" and the yellow oval face. Why wouldn't it just print the red and yellow right on top of the white...? There's literally nothing black anywhere near it.
Up until this last one, this has been working pretty well. But THIS one has been giving me fits:


This is the first one that I want/need to make that ring a color that needs the white backing filler. The alternating orange and black strip is supposed to be all orange. There is a white insert under the "1" and one under that outer ring, where the strip in question is. As you can see in the bottom pic, the finished one, the red on top came out fine, as did the yellow "1" and the orange bevel around it. But the orange RING.....
Here's the finny thing... Despite the fact that there really shouldn't be any black anywhere near that inner ring, I get this in the Slicer:

For clarity, the orange in the screencap is actually black filament, the magenta is actually white filament, the blue is actually yellow filament and the yellow is actually orange filament (I know... Not at all confusing).
What is up with the "teeth"? The models involved are simple elliptical bodies, perfectly fitted to each other:


Here are the files: An mf3 and the STLs, locationally bound:
I'm at a loss. I've printed three of these things, with model (STL) changes between, and keep getting this anomaly. I'm sure it's a setting or three I've got wrong, but if anybody wants to take a crack at why PrusaSlicer is interpreting these parts this way, I'm all ears.
I can provide the SolidWorks files, too, if they are of any use to anybody, but they are SW2017 files, and SW won't allow me to save them for a previous version, nor will a future version open them (my ONE gripe with SW), so I'm not holding my breath. Parasolids might be an option, but I'm not sure they would be of any value.
Thanks. Brad.
RE: Need Help with a Multi-Part, Multi-Color Print
The painting tool is a great feature which is very easy and convenient for lots of people, myself included, to use on other people's models. But since you're doing the modelling yourself and from scratch, it's actually sub-optimal.
You'd be much better off saving seperate stl(s) for each part of the model you want to color differently rather than relying on the painting tool in PrusaSlicer. That way every letter and shape can be set as a single solid color rather than having to fight the painter tool's quirks and bugs (random colors popping up where they shouldn't be). Also you can avoid having perimeters drawn around the bottom of where each model meets which gives you a more monolithic looking 'background'. Plus if you tick 'interface shells' you can have full bottom/top layers between each color rather than having 'hollow infill'.
Uploaded a quick example of what I mean. All I did was take your one-piece- stl and split it on the 'background plane', then saved the individual letters as their own stl, and then imported all parts as a single piece into PS. Again, quick example so I didn't take the time to separate out the '1'.

XL-5T, MK3S MMU3 || Printing with multiple nozzle-sizes: Official Guide, Unofficial(old) || PrusaSlicer Fork || Other advanced slicer tactics || TPU || HF Nozzles
RE: Need Help with a Multi-Part, Multi-Color Print
BaconFase,
That would be a monumental PITA on the modeling side. I chatted with support yesterday, and she was unable to resolve the issue, so she escalated it to the upper support team, and they are working on a solution.
There really is no valid reason to print the main body in black other than that's what I started with on the very first one of these that I printed for myself (essentially the whole reason I bought the printer to begin with) and have arbitrarily stuck to it ever since. In the meantime, the simplest solution was to eliminate the multi-part approach and the black from the color list altogether, go with the original single part solid body, paint the outer surface white and the other features their respective colors and move forward. Scrolling through the slice shows no weird anomalies and it appears it will print as desired.


I will be printing one up in the next couple days and will post the results.
Thanks. Brad.
RE: Need Help with a Multi-Part, Multi-Color Print
Guys,

This worked.
Would still like to know how to fix the issue Described above, though.
Thanks. Brad.
It really is simplest to make the whole up of multiple parts and assign each to a different extruder - then an underlying biasing colour is just another part.
The painting function in PS is just a crude fallback for cases when the original design files are unavailable.
Cheerio,
RE: Need Help with a Multi-Part, Multi-Color Print
It really is simplest to make the whole up of multiple parts and assign each to a different extruder - then an underlying biasing colour is just another part.
The painting function in PS is just a crude fallback for cases when the original design files are unavailable.
Cheerio,
Diem,
Painting these models up in PS is crazy simple, from my experience, especially since I discovered the usefulness of "Bucket Fill".
Additionally, if you look at the pic, the tops of the lettering and the elliptical ring are red, and the sides are orange. I do this sort of thing quite often with various colors. It hasn't been a problem until I tried bright colors over the black infill. The problem with your method is that once you assign a color to a body, you can't paint and surface of it any other color. Following your method, I would need a separate model for each of these surfaces, which seems incredibly tedious.
It's just curious why PS decided it needed black infill when black was otherwise nowhere to be found in the slice, especially since there was zero space between the models involved. I can't find any function within PS that will associate any color to infill. And, believe me, I tried. Assigning white as the infill color was the first thing I tried to do. The really weird thing is that the filler body under the "1" worked perfectly, and with the exact same wall thickness parameters.
Thanks. Brad.
RE: Need Help with a Multi-Part, Multi-Color Print
once you assign a color to a body, you can't paint and surface of it any other color.
You absolutely can. Assigning a color only sets the default for that part.
Here's a cube I assigned to black and painted a white spot in the corner.

Then all I do is change the assigned filament to the red.

It's just curious why PS decided it needed black infill when black was otherwise nowhere to be found
Its a "random" bug with the tool that has been there since it was introduced.
I'm not sure what incredible tedium it adds to your workflow. All you'd have to change is at the step when you turn your lettering from 2d to 3d, is to create them as individual parts rather than merging them as a single part. Then instead of having to do any painting, you'd just shift-click to select all your text on the side list and hit the number on your keyboard that corresponds to your filament color.
XL-5T, MK3S MMU3 || Printing with multiple nozzle-sizes: Official Guide, Unofficial(old) || PrusaSlicer Fork || Other advanced slicer tactics || TPU || HF Nozzles