MMU2S PETG Success!
I have had a MK3S with MMU2S for well over a year and have finally got it working reliably printing 2 colour PETG at 260 degrees Celsius with no print fan. The key to success with the MMU2S is understanding the Prusa Slicer setttings and how they relate to the hardware.
If you have a stock MK3S you might need to adapt these settings, I have upgraded mine with a Mosquito v2 hot end from Slice Engineering. The heat break in the Mosquito is a little narrower than the PTFE tube between it and the extruder cog. This means when retracted for a filament change the hot tip must stay inside the narrower metal heat break so that it stayed squished to fit back inside later. It must also not be pulled up through the extruder cog before it has cooled enough not to deform. Finally, the speed at which is it pulled out of the melt zone and the distance, number and time for the cooling moves are what stops long stringy tips or blobs.
Filament Settings
All default for Prusament PETG except for:
1. Nozzle: First layer 250, Other layers 260 (this is to produce really good interlayer adhesion, at this temp your linear advance needs to be K=0.07)
2. Cooling: All cooling disabled (if your print object is going to be prone to curling though then default cooling settings are just fine, the thing I print to sell is shaped in a way where it will never curl)
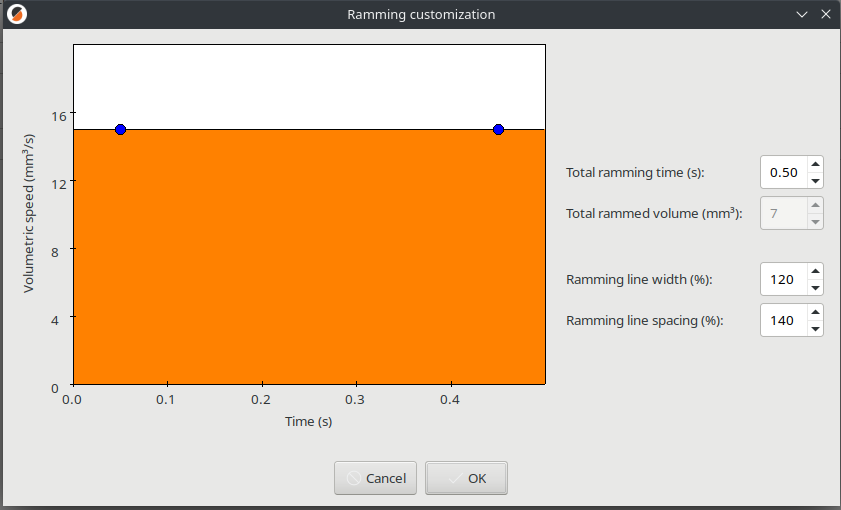
3. Advanced: Max volumetric speed: 12mm3/s, Minimal purge on wipe tower: 0mm3, Unloading speed at the start: 200mm/s, Delay after unloading: 8s, Number of cooling moves: 3, Speed of first cooling move: 1mm/s, Speed of the last cooling move: 20mm/s, Ramming settings: Total ramming time (s): 0.50, Ramming line width (%): 120, Ramming line spacing (%): 140, Volumetric speed (mm3/s): 15mm/s
Printer Settings
1. Single extruder MM setup: Cooling tube position: 15mm, Cooling tube length: 11mm, Extra loading distance: -18 (everything else default)
Explanation: This is what the above settings do...
1.First a 0.5s ram is done at 15mm3/s (or at least 12mm3/s if the cap applies). This helps the filament break cleanly from the melt zone. Just a very quick, hard ram is all you need at 260 degrees Celsius.
2. The filament is retracted 15mm at 200mm/s, or maybe the printer can't actually move the filament that fast so it will just be retracting at maximum speed. You want this so that the filament necks and makes a very thin string only which is easy to get rid of with cooling moves later...
3. The high speed retraction stops after moving 15mm, and this means the hot tip will be right in the middle of the Mosquito heat break heatsink fins where maximum cooling will happen.
4. The extruder cog then pauses for 8 seconds so the heat break can absorb the heat from the hot filament tip to cool it solid while also ensuring the tip is no fatter than the tube it is inside (which is the narrowest spot the filament has to pass through on it's way to the melt zone.
5. The cooled tip then moves up and down 3 time gradually increasing speed from 1mm/s to 20mm/s. The filament will move upward 5.5mm and downward 5.5mm, this means on the downward dip the tip comes to 1.5mm of the melt zone and this melts off any stringy tip.
6. Finally now that the tip is cool, thin enough to slide in the narrowest spot it will encounter and has no more than a very short stringy tip, it retracts at 20mm/s until it exits above the extruder cog and the MMU2S drags it back up to wait in the MMU2S.
I should say I have the latest upgraded MMU2S razor blade holder and it is activated. With these latest settings I've done thousands of filament changes and not had a single jam where the razor has had to cut a fat tip. I have seen the razor in action while developing these settings though and it cuts pretty good.
So what I have learned, is that the MMU2S can work very well, but you really have to engineer your own settings for the filament type and temperature you are printing. An advantage of printing at higher temperatures is that the colour change purge needs less wasted filament to completely change colour.
As we all know the internet if full of MMU2s tears! So I hope this post helps some of you. If you have a stock e3d hotend then you will need to work out if the heat break or the PTFE tube is the narrower part and do the cooling moves in whatever is narrower. You will have to adapt the cooling tube length and cooling tube position if you have different hardware to me.
My MMU2S is used to print a commercial PETG product and I am now so happy with it that when my one MMU2S unit is at capacity I am going to buy another one for my second MK2S.
I also cannot speed highly enough of the Mosquito v2 hot end, it is so easy to change nozzles. The e3d hotend always gets damages after a while from nozzle changes and then leaks as well. A tip for the Mosquito, if the heat break ever gets clogged, use the extra long hex driver Slice Engineering recommend to remove it and then torch it with a little cheg's propane gas torch. It gets it red hot within seconds and totally burns out any clogged plastic. The Mosquito heat break cools so efficiently the usual unclogging methods such as disabling the heat break fan will not work, a Mosquito can actually work with no head break fan it cools so well (but I would not actually recommend printing like that). I wish Prusa offered a Mk3S without a hot end so you can just buy the Mosquito from the start.
RE: MMU2S PETG Success!
The picture I tried to post didn't work so here it is
RE: MMU2S PETG Success!
Just wanted to say thanks for the terrific info and explanation!
Happy printing 😊
Hooroo
RE: MMU2S PETG Success!
Wanted to take a moment to complement OP on their post which I believe is the most concise and informative post about this topic that I have been able to find. I would have appreciated a graphic of your ramming settings, however, what is present was sufficient to resolve the issues I was experiencing with tip formation (PETG, Hatchbox). Specifically, I believe the cooling movement components of your configuration were the most helpful. I've attached my configuration, which is an interpretation of OP's values. Printing temperature tested between 230-240c.

RE: MMU2S PETG Success!
Also, i'll note that i'm running mk3s+ w/ mmu2s (factory assembled mk3s+, stock mmu2s, most recent firmwares). Prior to finding this thread, i was reading this one. The major difference between them being the cooling move speeds.
I'm going to look further into how effective the 8s delay is (mid-toolchange). Throughout my ownership of MMU2s, i've been concerned with how long tool changes take, and an additional 8 seconds for each adds up. I still need to measure times and all, as i think there may be a bug with "Delay after unloading" [filament_toolchange_delay] is calculated into total print time.
Oh final note: My original config screenshot shows filament_toolchange_delay as 4s, because i was playing around with the value. At this time i've really only tested and seen success in OP's original suggestion of 8 seconds.
RE:
I've also taken a minute to map various parameters to what they render to in gcode.
;--------------------
; CP TOOLCHANGE START
; toolchange #248
; material : PETG -> PETG
;--------------------
M220 B
M220 S100
; CP TOOLCHANGE UNLOAD
;WIDTH:0.6
G1  X242.095 Y32.722
M900 K0
G1 F15511               ; ramming_settings
G1  X177.467  E1.5545   ; ramming_settings
G1  X112.839  E1.5545   ; ramming_settings
;WIDTH:0.5
G1 E-15.0000 F12000 ; filament_unloading_speed_start
G1 E-24.5000 F5400
G1 E-7.0000 F2700
G1 E-3.5000 F1620   ; filament_unloading_speed
M104 S230           ; wouldnt it be great if this were exposed to the user
G1  Y31.882
G1  X242.095   E20.0000 F388     ; number of movements here dictated by filament_cooling_moves
                                 ; filament_cooling_initial_speed
G1  X112.839   E-20.0000 F1861   ;
G1  X229.118   E20.0000 F3000    ; filament_cooling_final_speed
G1  X148.472   E-20.0000         ; count of actions here matches filament_cooling_moves
G1  X210.201  E20.0000           ; count of actions here matches filament_cooling_moves
G1  X160.201  E-20.0000          ; count of actions here matches filament_cooling_moves
G4 S4.000                        ; filament_toolchange_delay
G1 E-35.0000 F2000               ; *unsure*
G1  X112.839 Y32.052   F2400
G4 S0
; Filament-specific end gcode

T2
RE:
Simply amazing. I've added the OP's setting to my heavily TZB modified MK3S+/MMU2 and prior to applying them I was getting horrible tips. I implemented his suggestions, and the tips are perfect now. Added to the latest TZB firmware/hardware changes and my MMU is FINALLY reasonably dependable. I want to cry lol. It's been a looooooooong road.
Thank you Bart Lee for your kind contribution.
Pete
RE: MMU2S PETG Success!
THANK YOU THANK YOU THANK YOU
RE: MMU2S PETG Success!
Nifty. So what are the dimensions of a standard MK3+S ? And the parameters for PLA?
RE:
It's been a few months. How are these settings treating you? I print with mostly Prusament PETG and Atomic Filament PETG and am similiarly on stock nozzle and hotend.
Do you also disable all cooling like OP?
RE: MMU2S PETG Success!
Ok I have been testing more with the setting provided and I have had pretty good success. I am running a E3D Revo hotend and am printing PETG, looking for low stringing on parts that have a lot of MMU changes which for me is at around 235/240C.
Filament:
Temperature: 235/235
Bed: 90/90
Cooling Keep Fan Always on: off
Cooling Enable auto cooling: off
Advanced:
max volumetric speed: 12 mm3/s
minimal purge on wipe tower: 0 mm3
unloading speed at the start 200
Cooling moves: 2
Ramming: none, turn it off completely.
For the Revo nozzle, I adjusted the printer settings, single extruder MMU setup:
cooling tube position: 25mm
cooling tube length: 15mm
filament parking position: 85mm
extra loading distance:-18mm
I tried printing with No sparse layers, but that was causing a lot of issues with creating large globs that the print head was hitting. I still am getting these globs on the wipe tower, so if anyone knows how I can reduce the thick lines on my wipe tower I would appreciate some help. Hope these settings can help someone get to a point where their filament tips are nice and having good MMU load/unload 🙂
RE: MMU2S PETG Success!
Sorry to bump an old thread - however i have a bit more insight to pass along that may be useful to anyone that is struggling to get the mmu to create a clean purge block. I spent quite a number of hours fiddling with prusaslicer settings a few years ago when i had originally replied to this thread - however, after revisiting my printing hobby over the past few weeks (after taking a year or two pause), i found that my heatblock was leaking filament on its top. I think the reason i had so many issues was because of this leak causing various pressure-related problems. After correcting the nozzle leak, prints are crystal clean, as is the purge block - with default prusa settings.