Re: Rock Bottom
. . . Jltx on these forums is currently working on a project to shave around 200 grams off the extruder just for this reason.
Sounds good (makes sense too), does he have a thread or some place where he's posting progress of his project ?
Re: Rock Bottom
. . . Jltx on these forums is currently working on a project to shave around 200 grams off the extruder just for this reason.
Sounds good (makes sense too), does he have a thread or some place where he's posting progress of his project ?
https://shop.prusa3d.com/forum/original-prusa-i3-mk3-f30/seeking-advanced-testers-t15276.html#p74564
https://www.thingiverse.com/thing:2845416
My MK3 Parts: [Bowden] [New Shoes] [TPU Micro Springs]
Re: Rock Bottom
. . . Jltx on these forums is currently working on a project to shave around 200 grams off the extruder just for this reason.
Sounds good (makes sense too), does he have a thread or some place where he's posting progress of his project ?
https://shop.prusa3d.com/forum/original-prusa-i3-mk3-f30/seeking-advanced-testers-t15276.html#p74564
https://www.thingiverse.com/thing:2845416
Great, thanks, I'll check it out.
Re: Rock Bottom
Haven't yet received my MK3, but I'm planning to put it in a cabinet & around here I can't find a paver that is the required size to fit in the cabinet. So, I plan on casting my own(60 lb bag of pre-mixed concrete is ~$5). This seems particularly attractive if you want bolts in it, as you can place them when casting & not deal with drilling & filling. With this method, I do worry about getting the mounts exactly level & not tweaking the squareness of the frame.
Was disappointed to hear from @Brigandier that the sorbothane feet didn't do the trick, as I bought some in anticipation.
Re: Rock Bottom
Sorbothane might be preferable to my cork layer ... it might still be useful!
I considered the cement route, but am more comfortable with a hammer drill than a cement mixer.'
Working now on eliminating the movement of the table that the paver sits on ...
-- Clint Goss
Re: Rock Bottom
Another (expensive!) vibration isolation product to throw into the mix.
https://www.audiomediainternational.com/new-gear/isoacoustics-brings-isopuck-to-market
Re: Rock Bottom
Haven't yet received my MK3, but I'm planning to put it in a cabinet & around here I can't find a paver that is the required size to fit in the cabinet. So, I plan on casting my own(60 lb bag of pre-mixed concrete is ~$5). This seems particularly attractive if you want bolts in it, as you can place them when casting & not deal with drilling & filling. With this method, I do worry about getting the mounts exactly level & not tweaking the squareness of the frame.
Was disappointed to hear from @Brigandier that the sorbothane feet didn't do the trick, as I bought some in anticipation.
They are definitely a HUGE improvement over the rubber feet, so use them if you have em. Just don't expect it to completely knock out the Y axis ringing, gotta slow down external perimeters for that. They do make the machine quieter and support Z better if you use all six. 🙂
My MK3 Parts: [Bowden] [New Shoes] [TPU Micro Springs]
Re: Rock Bottom
It seems like, if you are bolting the printer to a cement block, cork or sorbothane (really any flexible material) between the printer and the cement will diminish the efficacy of bolting it to cement. That is, it will allow the printer to vibrate without vibrating the cement block. I understand the concern about the mounting surface interface between the concrete & the printer frame - but IMHO any flexible material between them is bad.
Definitely. If you are going to go rigid, go rigid. If you aren't a psychopath about print quality, then the sorbothane is probably the next best option unless you can figure out a way to get the printer to stop generating vibration in Y.
My MK3 Parts: [Bowden] [New Shoes] [TPU Micro Springs]
Re: Rock Bottom
One consideration is the practical weight limit ...
So, I plan on casting my own(60 lb bag of pre-mixed concrete is ~$5).
I would definitely make the printer easy to remove from the base, and also make it so that it is possible to pick up the entire base+printer combo. I can do this with the Home Depot Paver with work gloves on ...
-- Clint Goss
Re: Rock Bottom
Vibration Comparison
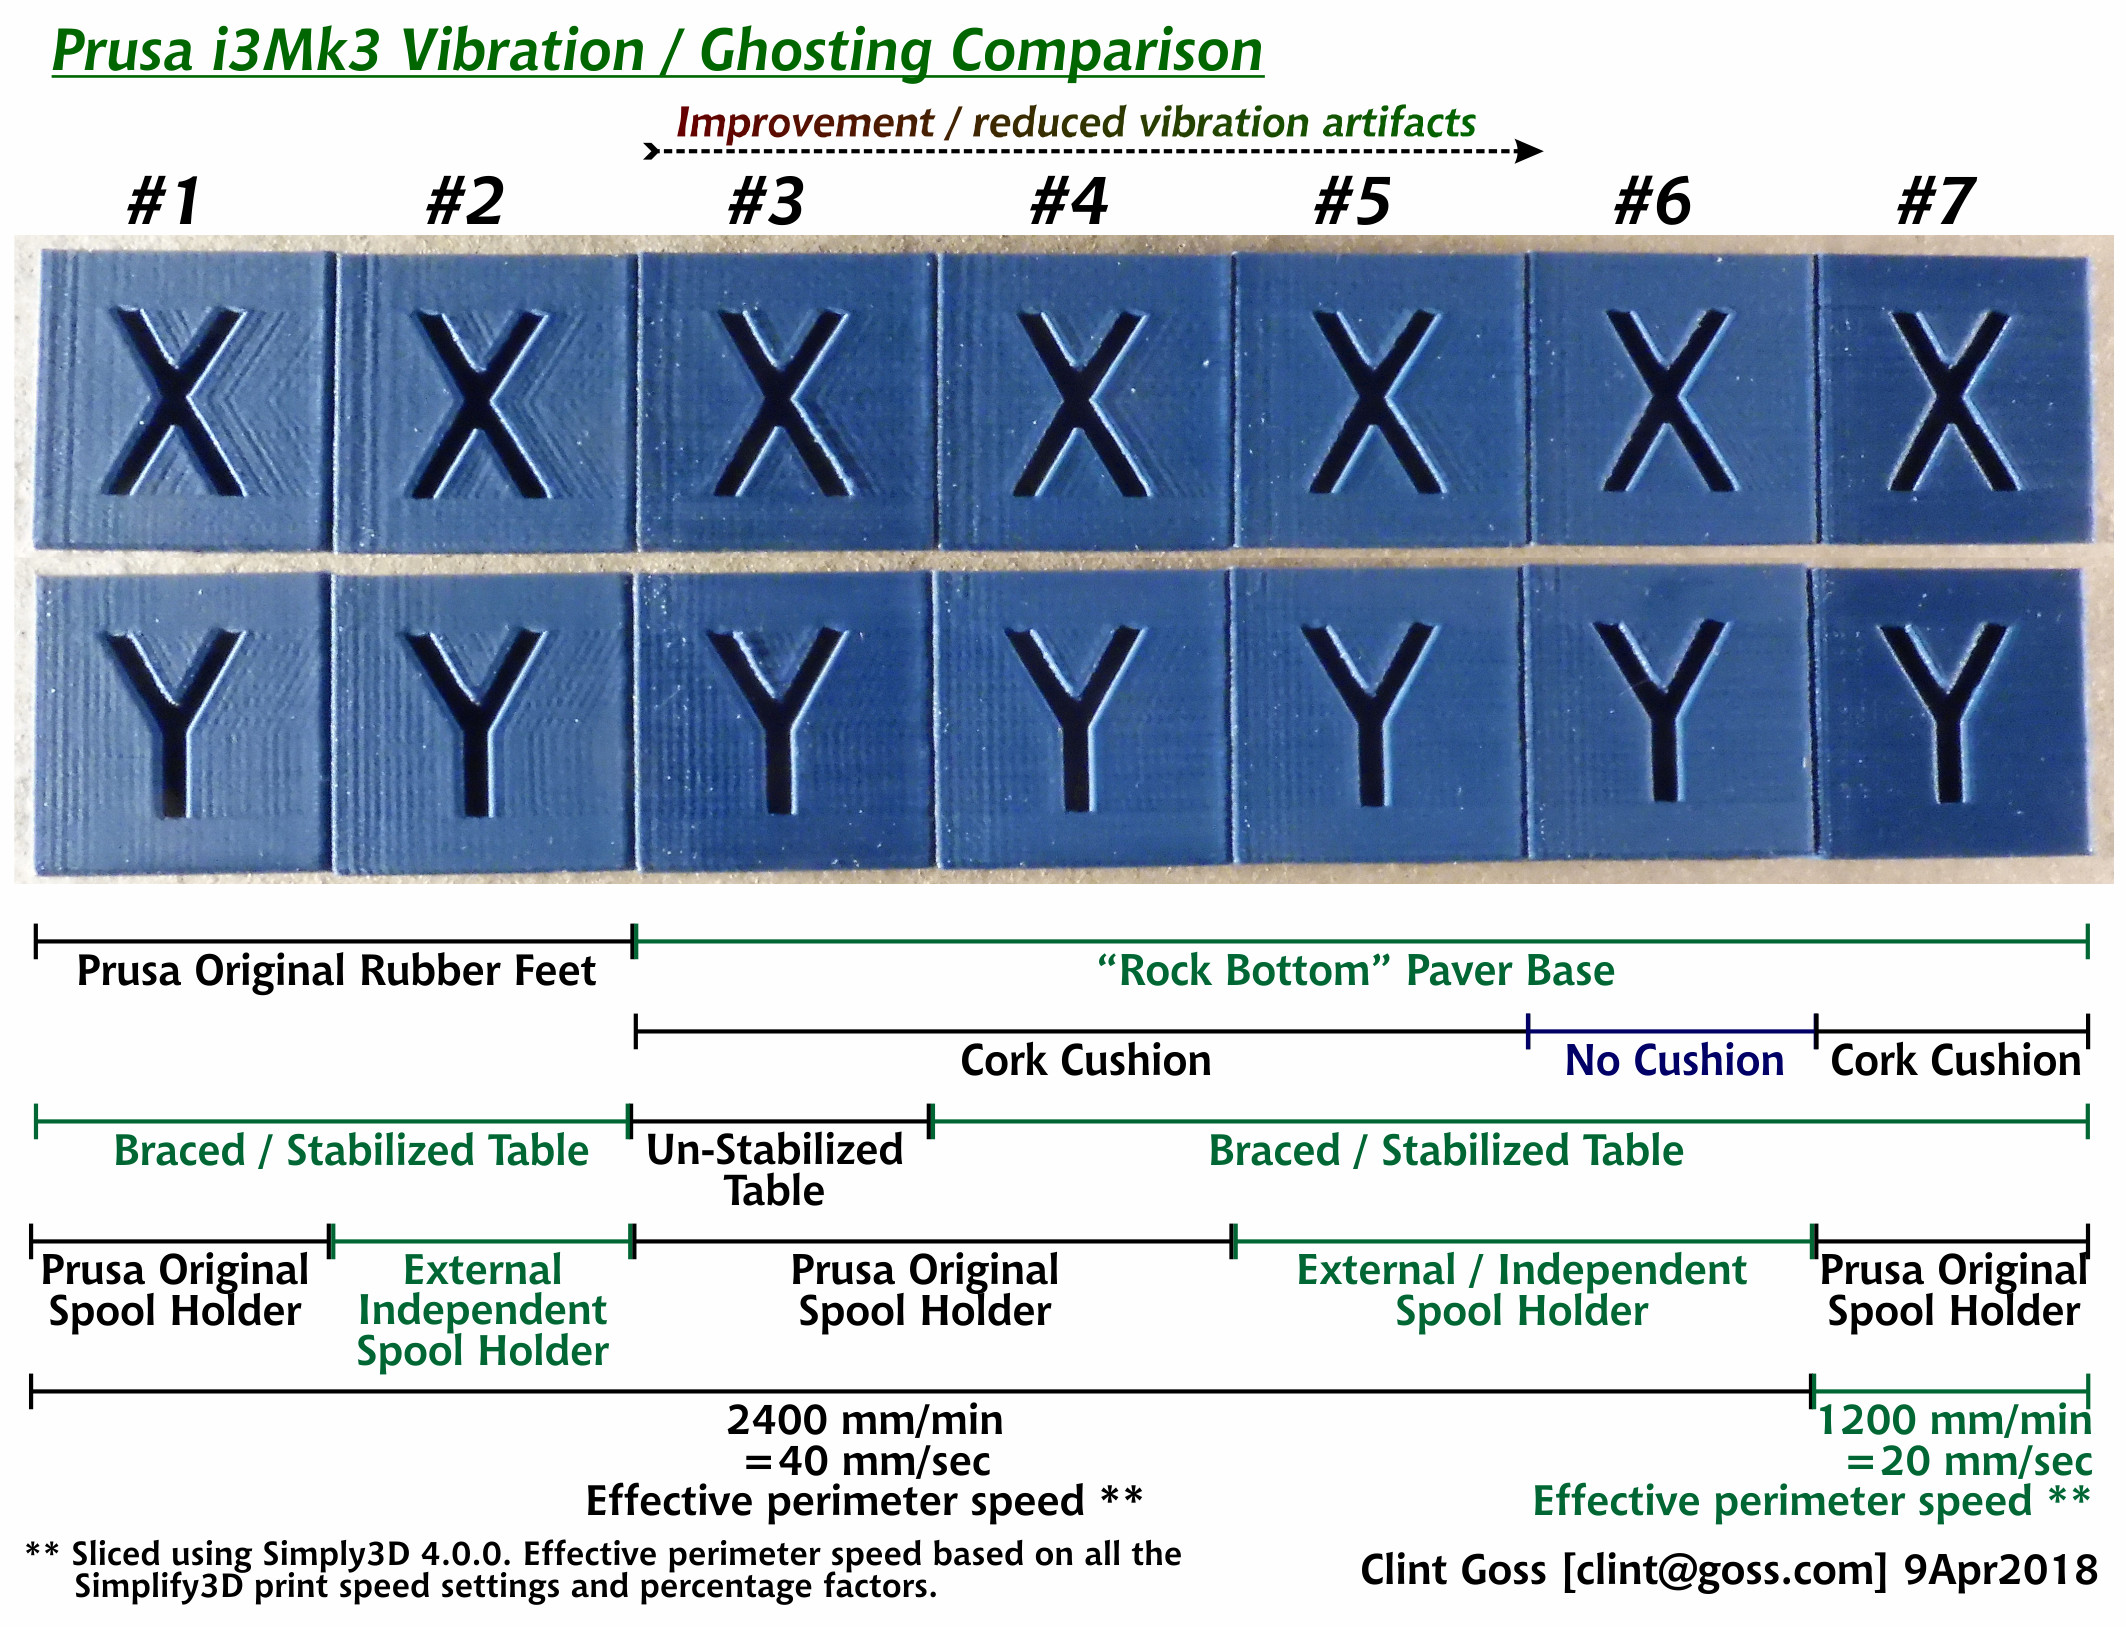
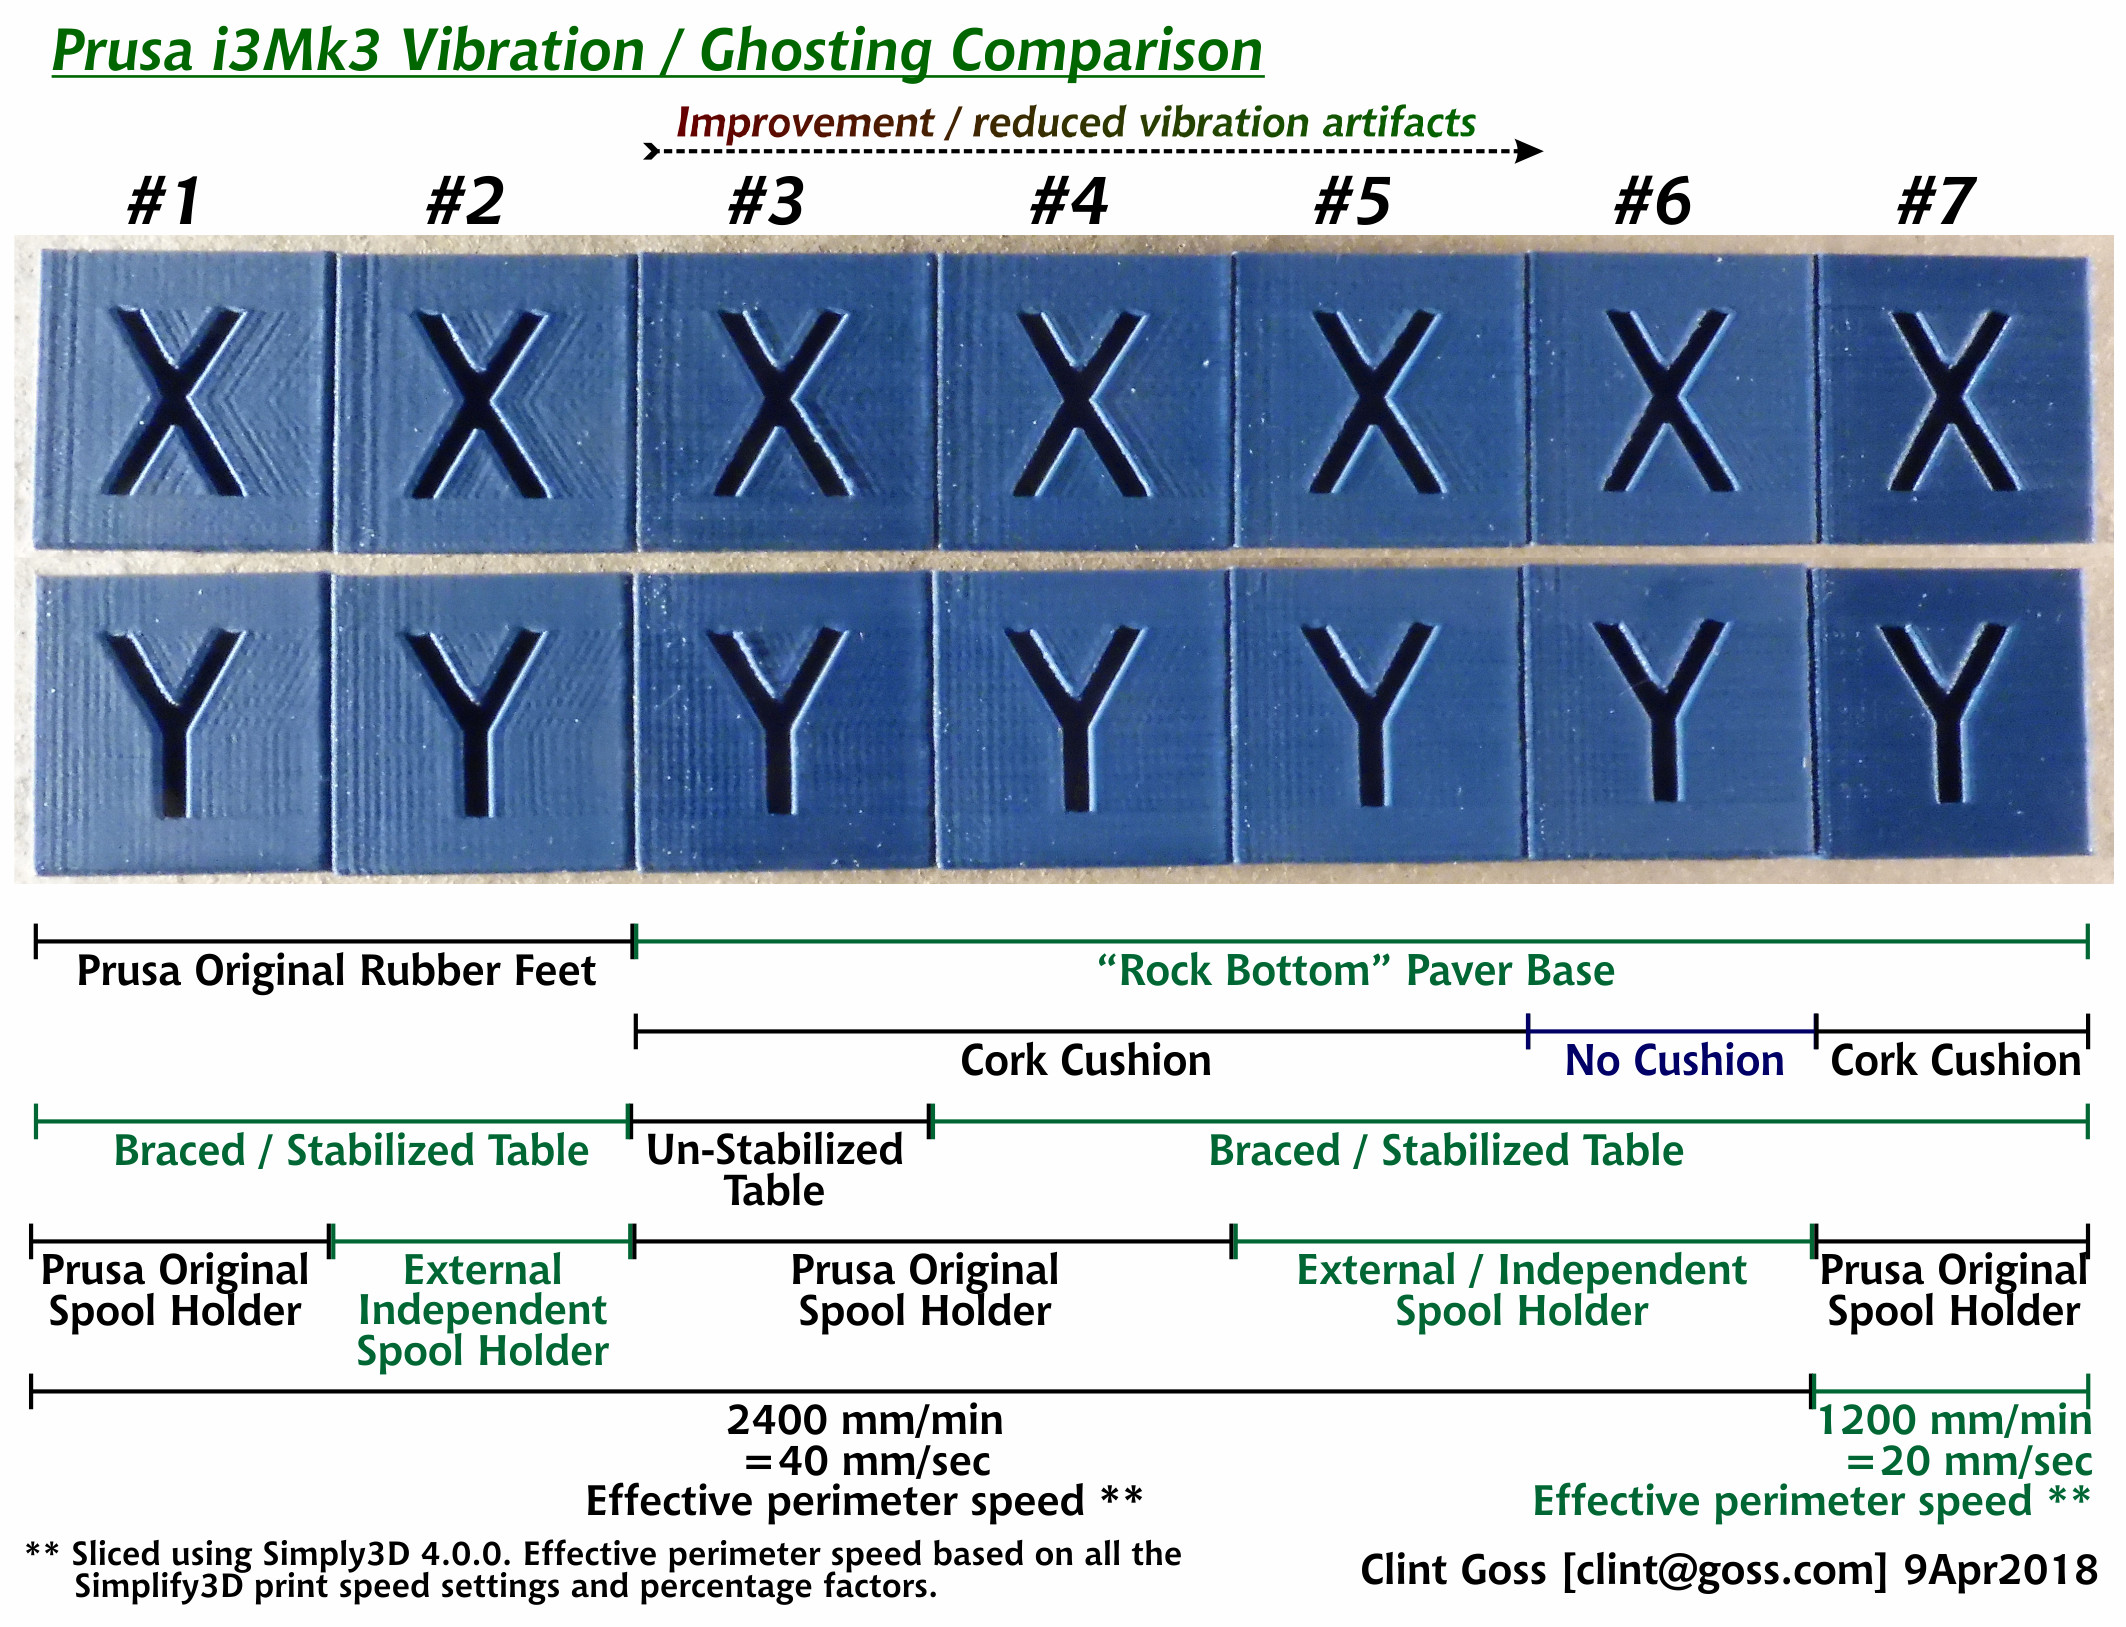
Here’s results of some testing I did over the last 3 days to identify issues causing ghosting / vibration artifacts.
For those who want an “executive summary”, here are my results: If you want to reduce, I believe that you should, from most effective to least effective (but still worthwhile):
(1) Print slower;
(2) Replace Prusa’s original rubber feet with a “Rock Bottom” style foundation;
(3) Brace your table/bench to something as stable as your house (assuming lack of external vibrations such as truck traffic);
(4) Consider an external spool holder,
(5) (least effective) Remove any cushion layer in the “Rock Bottom” setup and go for a more rigid “direct connection”.
For those who want the details …
I printed a set of 20mm XYZ Calibration Cubes ( https://www.thingiverse.com/thing:1278865 ) under different setup conditions. The comparison shows the X and Y faces of the prints, ordered to show improvement from left to right (although this is not the order they were printed). Print conditions were kept as stable as I could, including the same G-code, except for #7 which changed only the perimeter speed. Print details are provided at the end of this description.
On the assumption that multiple issues potentially contribute to ghosting, I tried to think of all the things that might contribute and that I could do something about. I came up with these five questions / things to test:
** How do Prusa’s original rubber feet compare with my “Rock Bottom” Home Depot Paver modification?
Compare tests #1 to #4 and #2 to #5. These two tests have the same conditions except for the rubber feet. There is a very noticeable reduction in artifacts.
** Is the thin Cork cushion that I included in the “Rock Bottom” setup worse than a more rigid “No Cork” setup?
Compare tests #5 to #6. There seems to be a slight, barely noticeable, possibly non-existent improvement. So slight that I’ve decided to use the cork cushion in my setup. I am concerned that a direct connection might wrench the frame rails out-of-true and the cork provides a compensation to this issue.
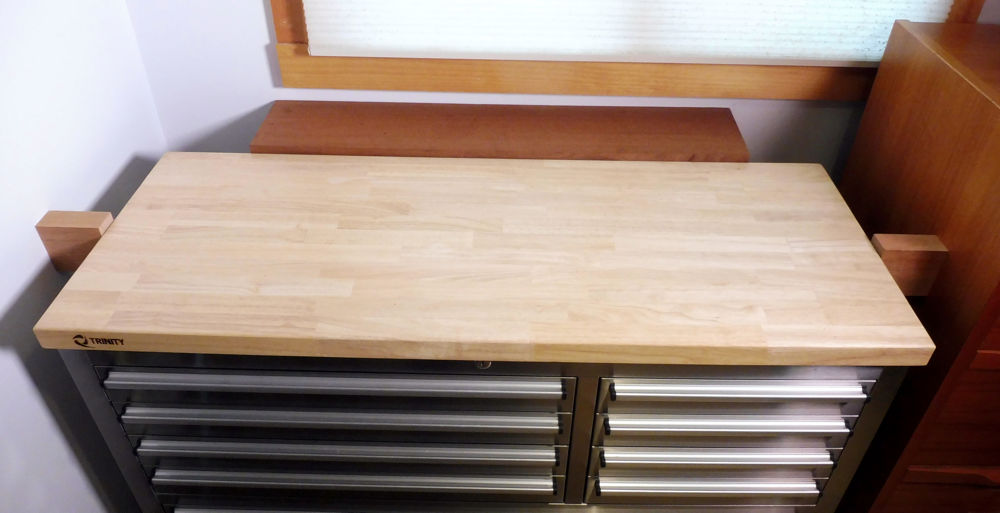
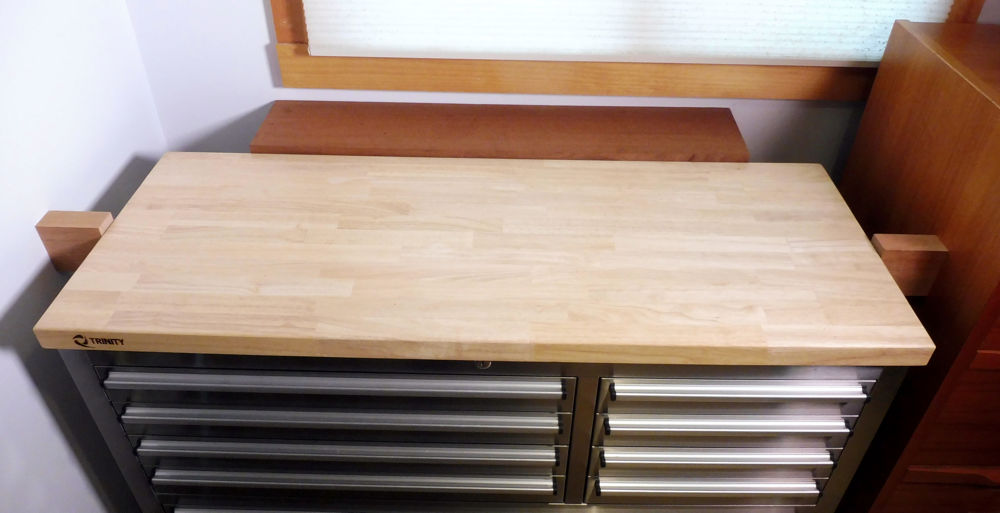
** The table / workbench I am using originally had wheels, which caused quite a bit of shaking. I removed them as sat the workbench directly on a carpet over the foundation slab. However, you could still feel shaking in the table. Rather than removing the carpet, I braced the table against the walls of the house, using wood blocks. Is that an improvement?
Compare tests #3 to #4. A noticeable improvement. There were many ways to couple the workbench to the house, but I had to come up with a reasonably aesthetic and non-damaging solution. I used blocks of very well-seasoned wood to brace the bench against the wall and between the wall and a very heavy cabinet.
** The stock spool holder from Prusa noticeably wobbles during prints. Is placing the filament spool external to the printer an improvement for ghosting / vibration artifacts?
Compare tests #1 to #2 and #4 to #5. There seems to be a small improvement.
In addition to reducing artifacts, I’m also concerned about frame issues that might be caused in the long-run by *any* frame-mounted spool holder … so I think this mod is a good one.
** What is the effect of print speed?
Compare tests #4 to #7 – the effect of a reduction to 50% print speed for perimeters is massive – I think the most significant contribution to reducing ghosting / vibration artifacts.
----
Details of prints #1 to #6. Print #7 was modified to reduce the speed
Clint Goss, 6Apr2018 to 8Apr2018, xyzCalibration_cube.stl, (thing:1278865, by iDig3Dprinting, 19Jan2016, CC-BY-SA)
Prusa i3Mk3 (SN CZPX1218X004XC53322, EINSY_04a, E3Dv6Full/0.4mm, 26Mar2018, FW 3.1.3-245)
S3D 4.0.0 Parameters (based on S3D-supplied Prusa i3Mk3 profile 23Mar2018):
Extruder: Noz 0.40, ExtMult 1.00, ExtWid Man 0.40, Retr 1.00, ExRestart 0.00, RVertLift 0.00, RSpeed 2400, Coast 0.2, Wipe 2.00
Layer: Ht 0.10, TSolid 4, BSolid 4, Shells 2, In-Out, No PI Seq, No Vase, FHt: 150%, FWid 100%, FSpeed 50%, Yes OptFast
Additions: Yes Skirt, Layers 2, Offset 1.00; Outlines 2 /
Infill: Int Rect, Ext Rect, 30%, OutOver 20%, Wid 100%, MinLen 5.00, Combine 1, No IncSolid, IntAng 45, -45, ExtAng 45, -45
Support: No
Temp: 200°C, 60°C
Cooling: 1:0, 2:100, No Blip, No Incr, No Bridge
G-Code: Yes 5D, No RelDist, Yes AllowZ, No Indep, No M101, Yes Sticky, No Offsets, Offset 0.00, 0.00, 0.00, Yes UpMachDef, Type Cart, Build 250, 210, 210, Orig 0, 0, 0, Home Min, Min, Min, Flip No X, Yes Y, No Z, Offset: X 0, Y 0, Yes UpdFirmConfig, Type RepRap, Baud 115200
Scripts: S3D Std Starting & Ending
Speeds: Default 4800 mm/min (=80mm/sec), Outline 50%, Solid Infill 80%, Supp 80%, X/Y Move 12000, Z Move 1000, No Adjust below 15sec, DownTo 20%
Other: Area 50, ExInflat 0.00, BrExMult 100%, BrSpMult 100%, No FixedAngle, No BrPerim, HCompress 0.00, FilDia 1.75, Price 46, Den 1.25, ChgRetDist 12, ChResDist -0.50, ChRetSp 600
Advanced: No Start, No Stop, ExThinType Perim, InThinType GapFill, Overlap 25%. MinExLen 1.00, MinPWid 50%, MxPWid 200%, EndExtDist 0.20, Yes Open, Yes ForceRet, No MinTRetr 3.00, Yes RetWipe, Yes WipeOuter, No AvoidCross, MaxDetour 3.0, NonManSeg Heal, No Merge.
MatterHackers Blue PRO Series PLA 1.75mm; 200°C / 60°C; Z=-0.725mm.
-- Clint Goss
Re: Rock Bottom
Thanks clint, for the detailed write-up on the results of your testing. I thought it was very helpful.
Re: Rock Bottom
Thanks bhawkeye -
I think, in the end, it comes down to "if it shakes, make it stop!". What the testing showed was how important "making it stop" is, if you're looking for a nice surface to your print.
Another thing, which does not come through in the photos, is the dramatic improvement in the *patina* of the finished print, when you slow it down. It's simply gorgeous, especially under a loupe.
-- Clint Goss
Re: Rock Bottom
Not sure if you wanted to try these snapin mounts i made. I have them on mine and it is rock solid (pun intended).
I mounted the printer on a sheet of this rubber material I have on top of the paver. You keep your stock mounts and they snug down.
Re: Rock Bottom
Sweet!
More elegant than my contraption ...
-- Clint Goss
Re: Rock Bottom
Thanks, although elegant might be a bit much. They are self printable in true prusa fashion!
I did go with the paver like you. It definitely seems to help.
I am surprised from your matrix that taking the spool off the printer Z axis did not help though. I see that thing wobbling on quick XY action and wanted to hang it from the table.
Where did you mount your external holder from? The table or the printer base?
Re: Rock Bottom
Ray -
Paver seems to be a winner. All other stuff is my Rube Goldberg ...
However, ... I realized that drilling the paver is "somewhat less precise than you might hope". So I set things up to accommodate a bolt location that is variable by maybe 5mm in all directions. But if your printed part design had a larger hole and used a washer under a wing nut on top, that would accomplish the same thing.
I am surprised from your matrix that taking the spool off the printer Z axis did not help though.
It did help, but not as much as other mods. I am compare tests #1 to #2 and #4 to #5. There seems to be a small improvement.
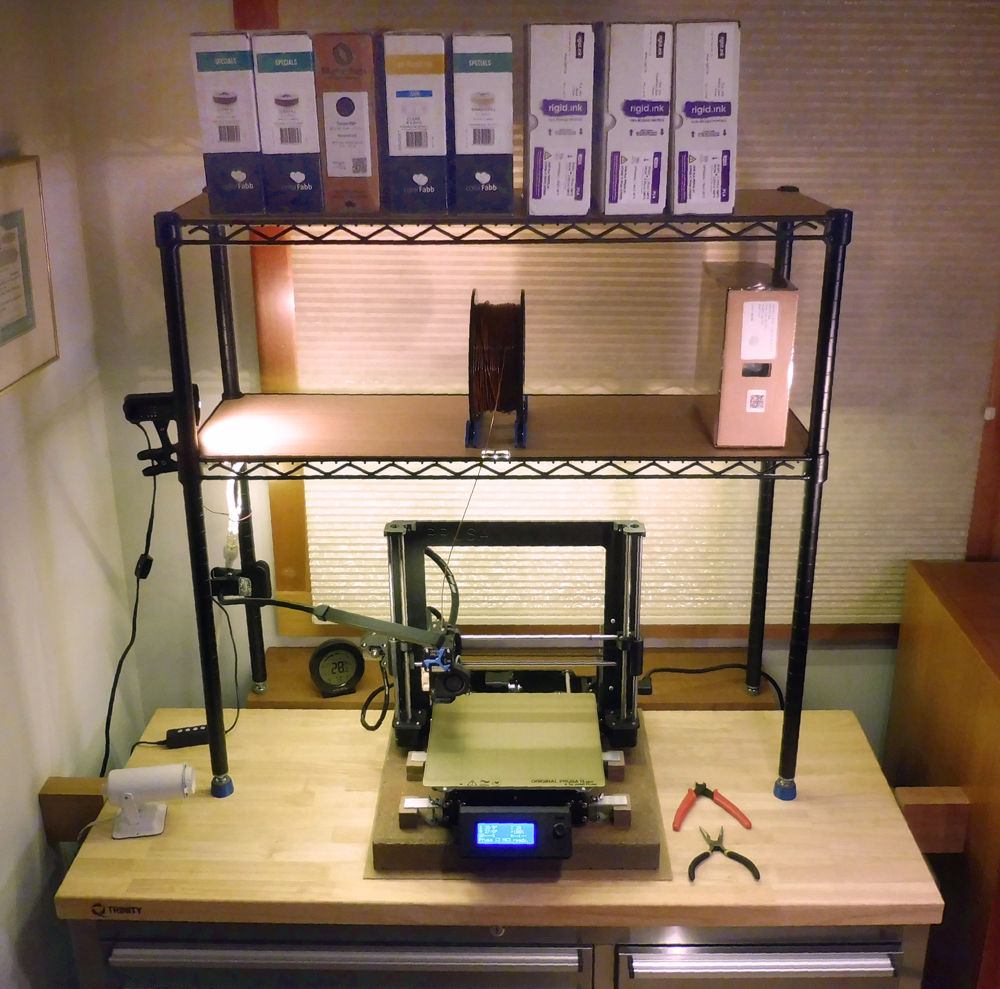
Here is my current setup (and no, it's not always this tidy ... taking a photo is a great excuse to clean up!)
Shelves are from Uline.
I added 1/4" (really 5.2mm) Lauan to make the shelves "solid".
Rope lighting under the bottom shelf and lots of other lights.
Filament passes *through* the bottom shelf, with one wire segment cut out to make a small square for the filament. I wanted to be able to slide the filament roller forward and pull straight *down* on the filament roll when the spool is nearly used up.
One downside of this setup: if the shelves ever fail (for whatever reason), the printer is at risk.
-- Clint Goss
Re: Rock Bottom
We need a rigid mount solution that allows fine leveling. Rigid mounts screwed down into concrete get things rigid, but you are also depending on that concrete paver to be very precisely level (which I highly doubt is the case). This could introduce kinks into the machine and give you new problems.
My MK3 Parts: [Bowden] [New Shoes] [TPU Micro Springs]
Re: Rock Bottom
Yeah, I noticed that when drilling the paver too. Since the clips slide in the extrusion, they gave me a bit of adjustment there. I thought of simply slotting the hole perpendicularly and combined with the extrusion direction it should give a bit of adjustment.
Looks good. I'll have to get an external spool holder printed up to try.
Hopefully the new firmware with linear advance can help on not having to dial down the perimeter speed too much.
Thanks for the tests and visual guide.
Ray A.

