Rock Bottom
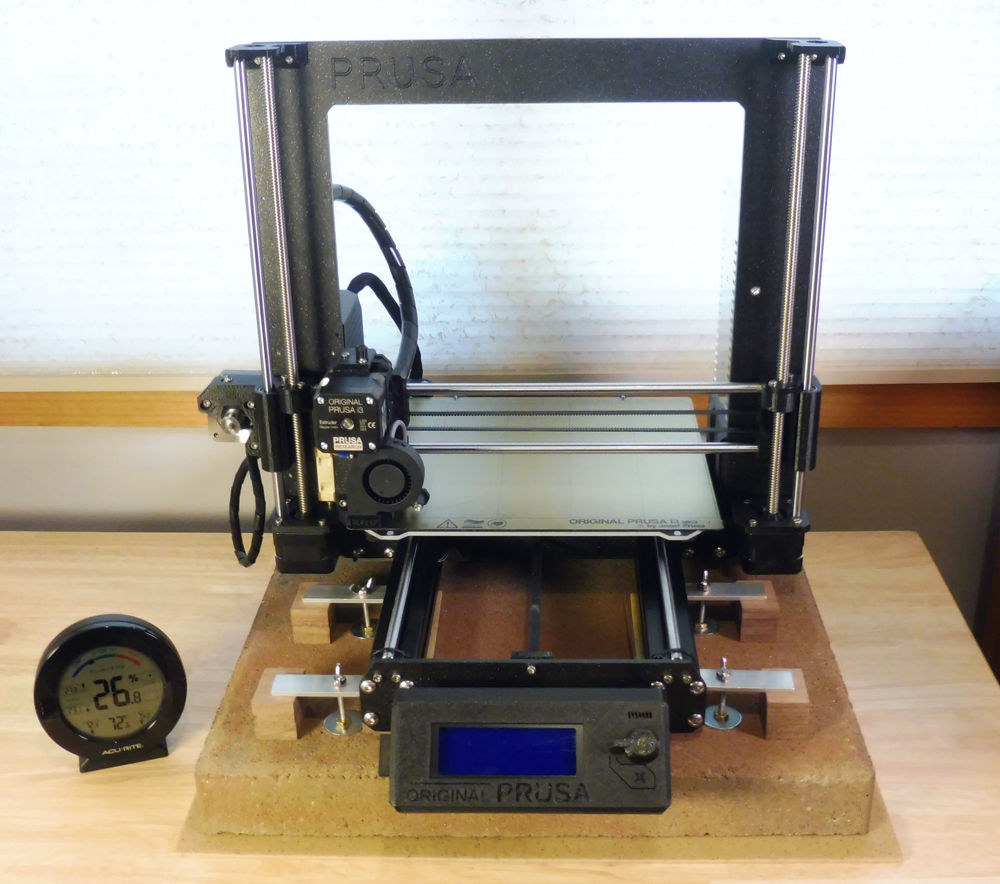
Here’s my replacement for the i3 Mk3 rubber feet – spurred by suggestions and encouragement from folks who have dealt with vibration and vertical lines. I’ve basically bolted the printer’s frame directly to a set of wood blocks and a 35 lb. Paver using six bracing bars.
I’ll let the images do most of the explanation …
Here’s the key info on parts and some construction notes (more pics below):
The “Rock” or “Paver” – a Home Depot Palomino 16” x 16” x 1.75” Palomino Square Concrete Step Stone (Model # 72681, Internet #203647570, Store SKU #760441). It weighs 35.6 lbs. and more than double the weight of Mk3 (16.0 lbs. with the Spring Steel Sheet, but without the filament holder or filament).
Threaded rod – #8-32, hack-sawed to appropriate lengths.
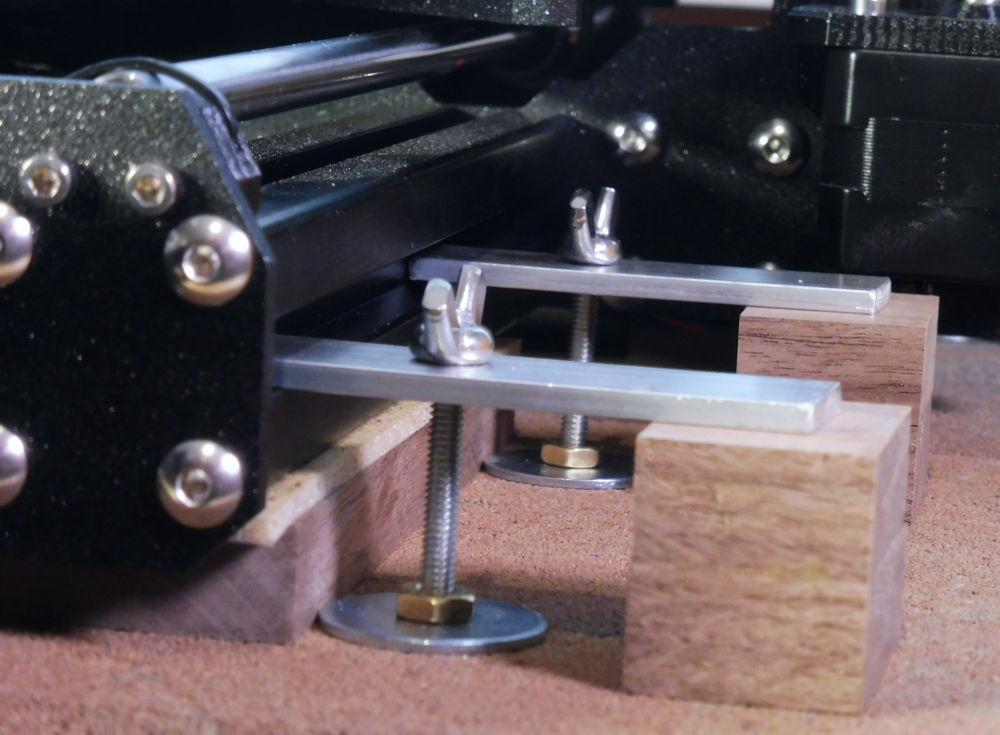
“Riser blocks” from 1/2” walnut (cut-offs I had lying around). Single-width blocks sit directly under the rails in six places. Double-width blocks are used under the outboard ends of the bracing bars.
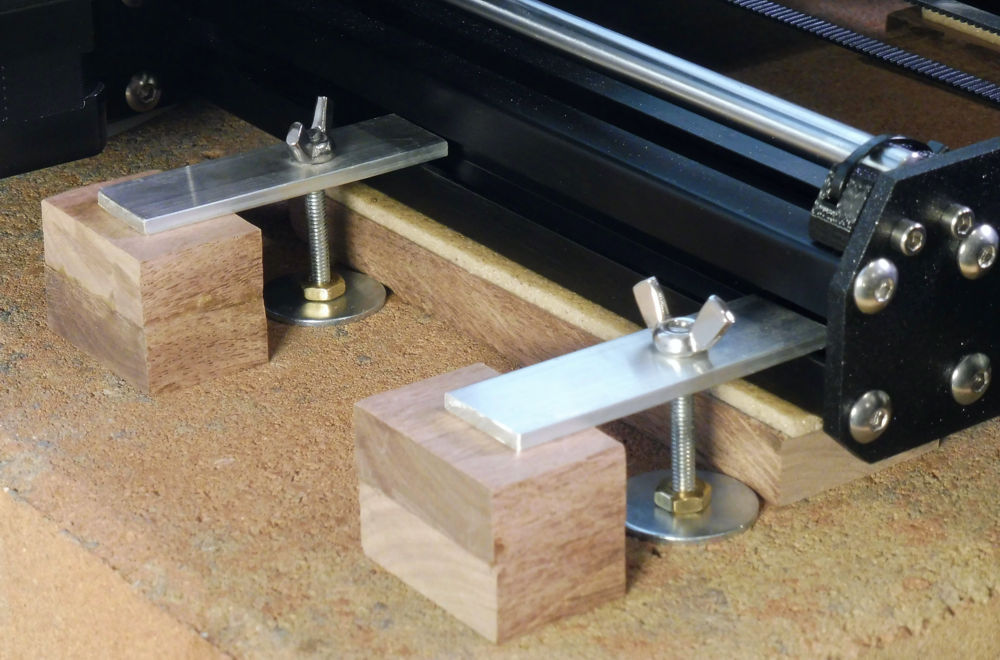
“Bracing Bars” from 3/4” x 1/8” flat aluminum bar, cut and drilled. These hold the Mk3 down onto the riser blocks.
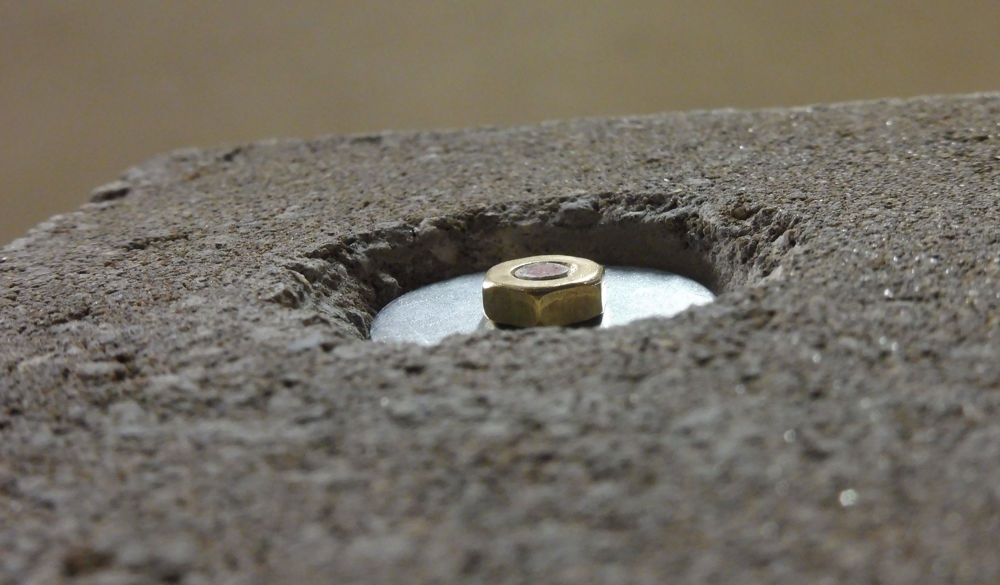
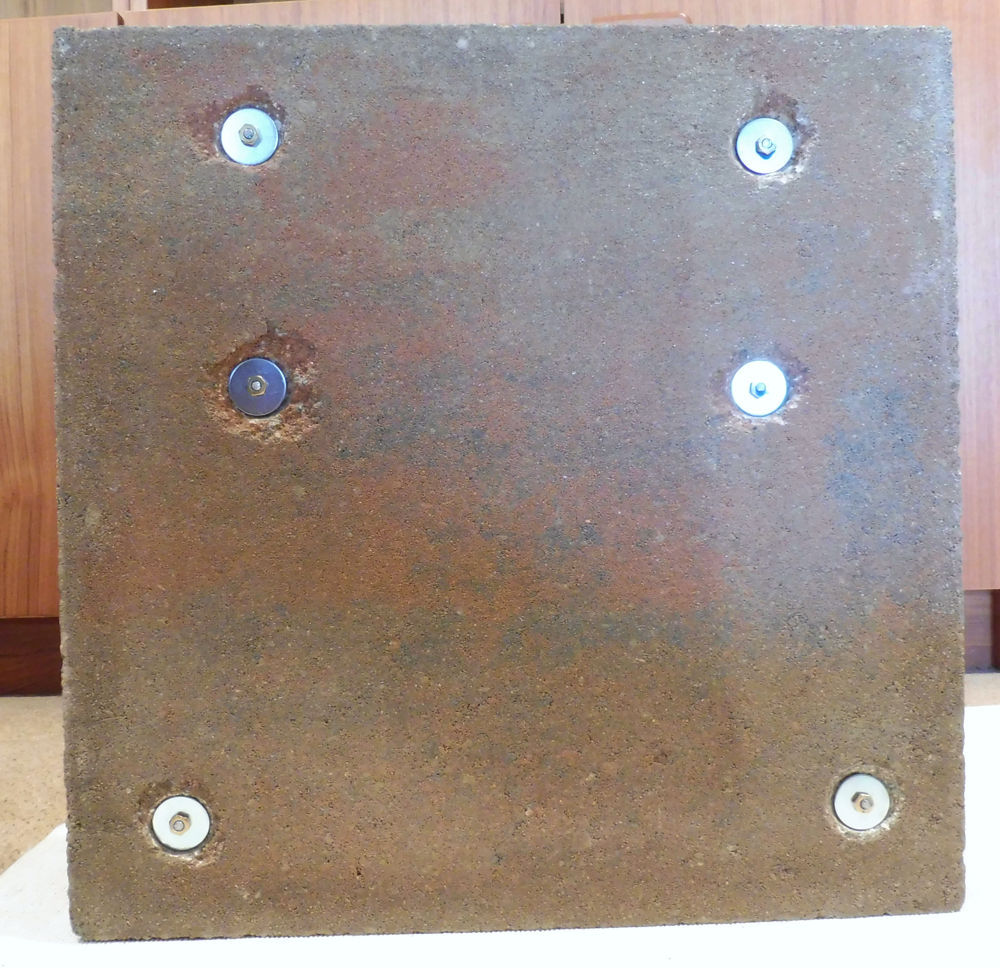
Washers (1”) to hold the rod in place on the top and bottom of the Paver. Hex nuts for the top and bottom of the block, and wing nuts to facilitate removing the printer.
The bracing bars extend into the lower rails to pull down on the printer. Note that the position of the printer is not critical – there is a bit of play when assembling. The riser blocks are currently free-floating, but I plan on fixing them to the Paver with construction adhesive appropriate for a wood-concrete bond.
I drilled the holes with a 3/16” carbide auger bit and a hammer drill. The countersinking was done with a 1” Forstner bit – not designed for cement, but it did work, although it is probably toast. (I would opt for a 1.25” Forstner in the future … centering the bit is difficult and the countersink tends to be off-center).
Finally, I’ve added an optional, thin cushion layer to the top of the riser blocks that sit under the printer rails – for noise abatement and to compensate for any out-of-true situation cause by the paver (which *appears* level). I have Eco Cork Foam – 0.126” thick underlayment for engineered floors. (Home depot Model # 220000503, Internet #204700858, Store SKU #1001235985). This material is somewhat compressible … one concern is that the cork under some parts of the printer will compress more and the printer will not sit flat.
Just finished assembly … no results / eval to report yet …
Thoughts and feedback welcome!
Countersinking on the bottom of the paver:
I'll add more photos in a reply to this post ...
-- Clint Goss
Re: Rock Bottom
Hell yeah, please do some XYZ calibration cubes at 35-45mm/s external perimeter speeds. My sorbothane feet mod helped with the ringing in Y this speed causes, but it only shortened the length of the effect instead of getting rid of it completely. Curious if this is the nail in that coffin.
My MK3 Parts: [Bowden] [New Shoes] [TPU Micro Springs]
Re: Rock Bottom
More photos ...
Assembled, right side, with printer rail, braces, and riser blocks with cushion.
Left side assembly:
Left rear assembly, showing low-hanging ribbon cables. This issue of the extra-low hanging cables actually started me down this path - with the original rubber feet, the printer actually sat on these cables.

-- Clint Goss
Re: Rock Bottom
Brigandier -
Curious if this is the nail in that coffin.
More like a sledge hammer for a matchbox!
This was not expensive, but it took a full day of drilling and sawing. However, I was solving multiple issues - ringing, vibration, and low-hanging ribbon cables.
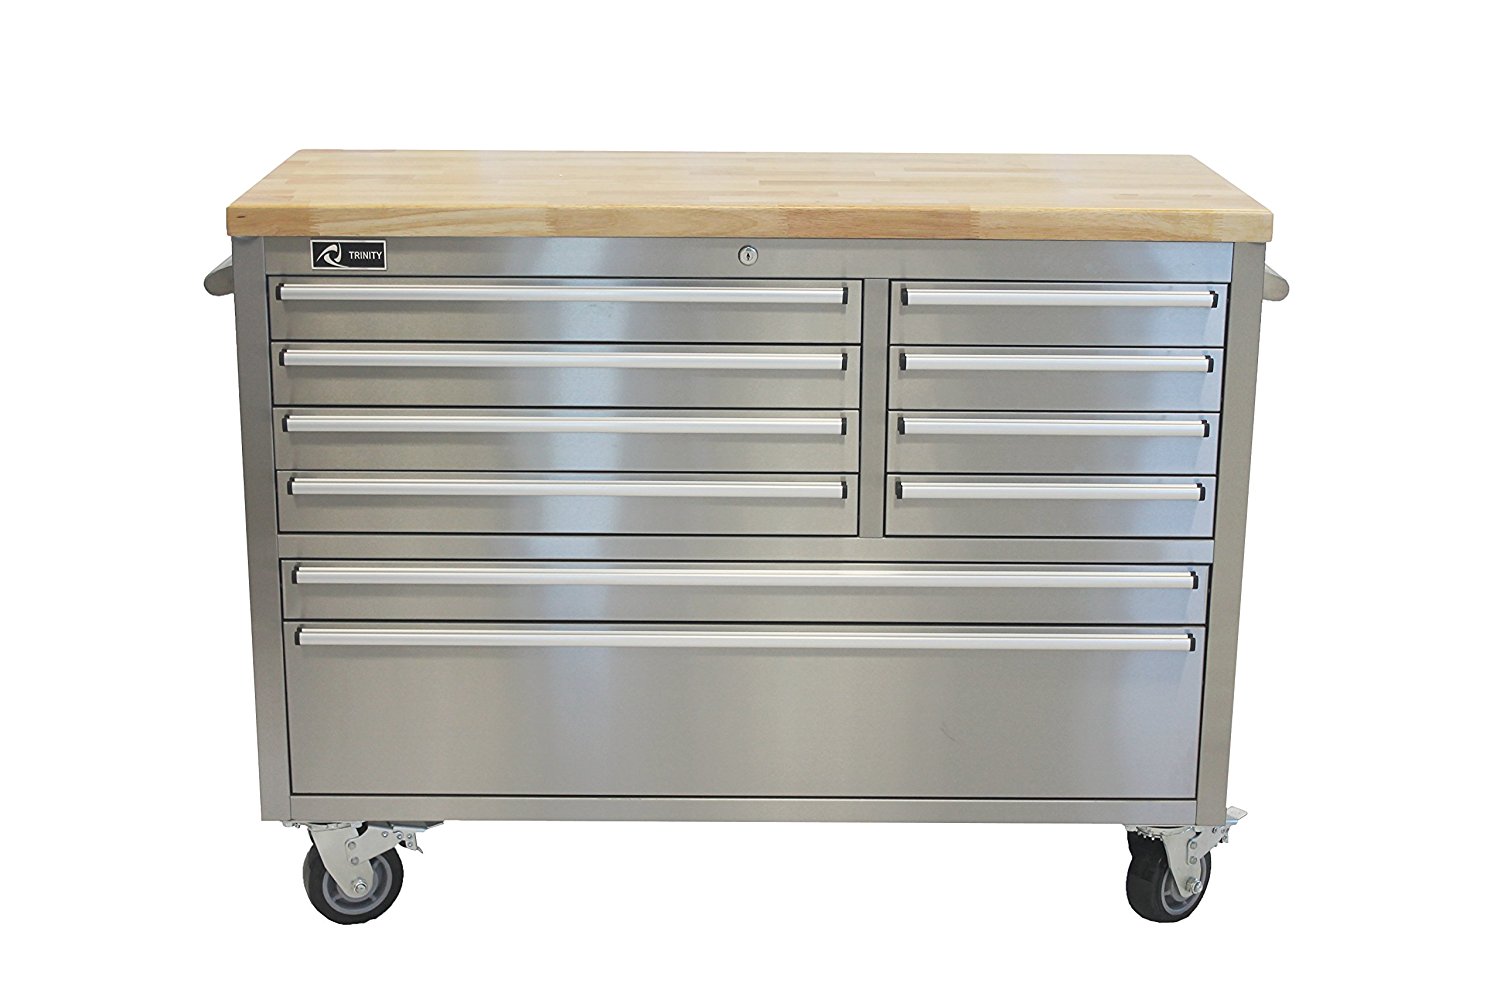
In addition, I've removed the (silly) wheels at the bottom of my workbench, which is now solid - it now sits directly on our slab foundation. We're not near a truck-route (nor a fault line), so I don't think there's much ambient vibration.
-- Clint Goss
Re: Rock Bottom
Brigandier -
Curious if this is the nail in that coffin.
More like a sledge hammer for a matchbox!
This was not expensive, but it took a full day of drilling and sawing. However, I was solving multiple issues - ringing, vibration, and low-hanging ribbon cables.
In addition, I've removed the (silly) wheels at the bottom of my workbench, which is now solid - it now sits directly on our slab foundation. We're not near a truck-route (nor a fault line), so I don't think there's much ambient vibration.
Depending on your results, I will modify the sorbothane feet mod. The feet mount in any direction into the 3030 extrusion, no reason we can't put them on the sides and add a hole for screw standoffs. Thinking the following:
My MK3 Parts: [Bowden] [New Shoes] [TPU Micro Springs]
Re: Rock Bottom
Brigandier -
Be happy to run test ... but please suggest a specific "XYZ calibration cube" to use (STL or G-Code or even OpenSCAD) ... I have not done this type of calibration before.
Just completed a full "zero hour" test - Self test, calibrate XYZ, Calibrate Z. Wanted to make sure bolting the rails to the Paver didn't wrench anything.
Results seem to reasonably match pre-Paver values, but I'm new to this: Measured skew went from 0.06 deg to 0.03; Y dist from min Left: 10.75 to 10.65, Right: 10.86 to 10.84. I'm not sure the +/- variability in these tests are. Are these changes reasonable? (i.e. indicate I didn't wrench /twist anything)?
-- Clint Goss
Re: Rock Bottom
https://www.thingiverse.com/thing:1278865 This one tends to be the usual one floating around. It's not a great test, but since everyone else uses it, it'll be good to compare to.
My MK3 Parts: [Bowden] [New Shoes] [TPU Micro Springs]
Re: Rock Bottom
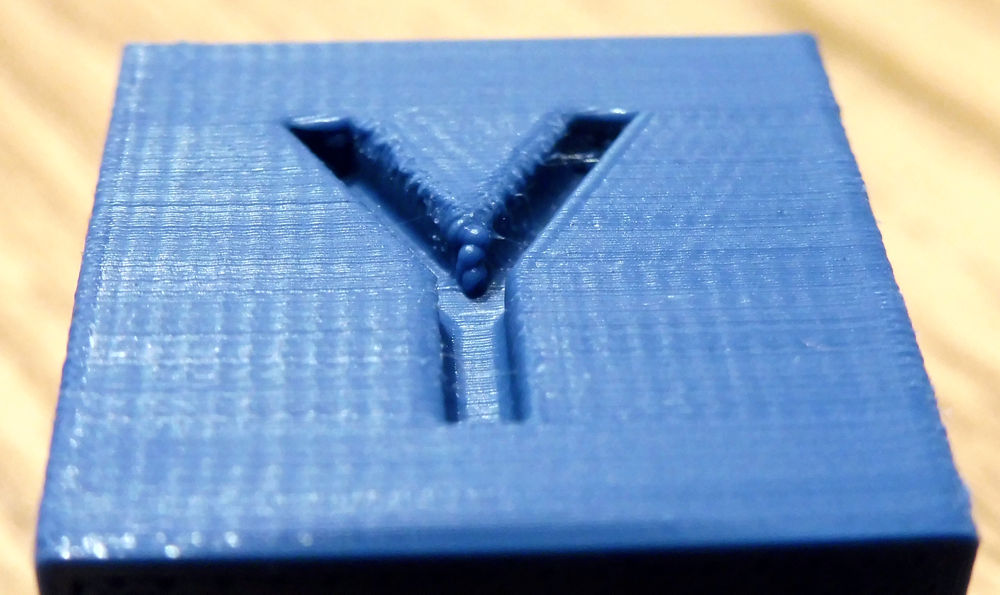
Here’s a test using the XYZ 20mm Calibration Cube ( https://www.thingiverse.com/thing:1278865 ) after replacing the original rubber feet with my “Rock Bottom” installation.
Printed in MatterHackers PRO PLA at 200°C / 60°C. I configured S3D so that (I think) it will print the perimeters at 40mm/sec (main “Default” speed 4800 mm/min, Outlines at 50%, and turned OFF the “Adjust printing speed for layers below 15 sec”). Setup details are below.
The 20mm cube measured (Avg ±StdDev of 4 measurements each):
X: 20.04 ±0.016 mm
Y: 19.97 ±0.019 mm
Z: 20.13 ±0.019 mm
Thoughts welcome!
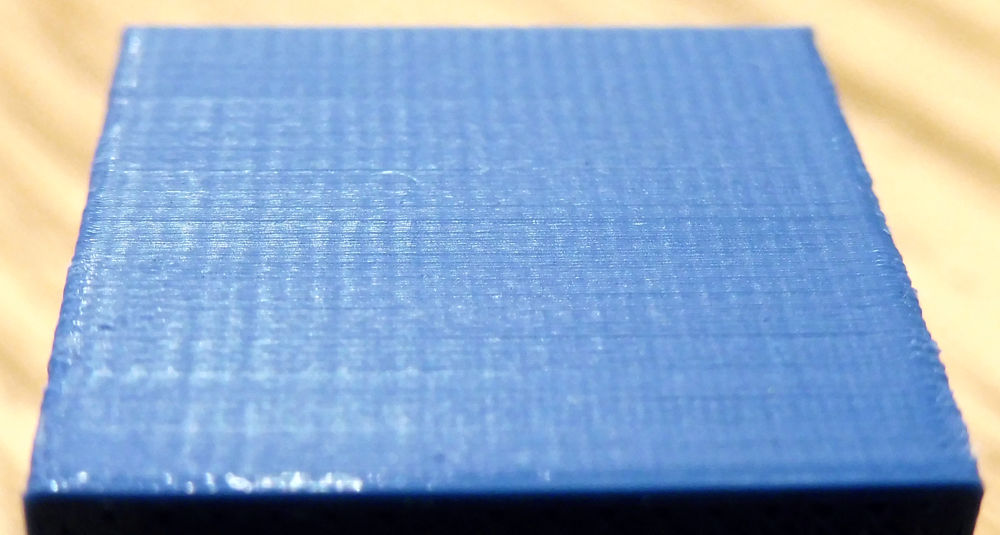
Pics are with a spotlight at an extreme angle to maximize shadows from surface bumps:

Back face:
Details
Clint Goss, 6Apr2018, xyzCalibration_cube.stl, (thing:1278865, by iDig3Dprinting, 19Jan2016, CC-BY-SA)
Prusa i3Mk3 (SN CZPX1218X004XC53322, EINSY_04a, E3Dv6Full/0.4mm, 26Mar2018, FW 3.1.3-245)
S3D 4.0.0 Parameters (based on S3D-supplied Prusa i3Mk3 profile 23Mar2018):
Extruder: Noz 0.40, ExtMult 1.00, ExtWid Man 0.40, Retr 1.00, ExRestart 0.00, RVertLift 0.00, RSpeed 2400, Coast 0.2, Wipe 2.00
Layer: Ht 0.10, TSolid 4, BSolid 4, Shells 2, In-Out, No PI Seq, No Vase, FHt: 150%, FWid 100%, FSpeed 50%, Yes OptFast
Additions: Yes Skirt, Layers 2, Offset 1.00; Outlines 2 /
Infill: Int Rect, Ext Rect, 30%, OutOver 20%, Wid 100%, MinLen 5.00, Combine 1, No IncSolid, IntAng 45, -45, ExtAng 45, -45
Support: No
Temp: 200°C, 60°C
Cooling: 1:0, 2:100, No Blip, No Incr, No Bridge
G-Code: Yes 5D, No RelDist, Yes AllowZ, No Indep, No M101, Yes Sticky, No Offsets, Offset 0.00, 0.00, 0.00, Yes UpMachDef, Type Cart, Build 250, 210, 210, Orig 0, 0, 0, Home Min, Min, Min, Flip No X, Yes Y, No Z, Offset: X 0, Y 0, Yes UpdFirmConfig, Type RepRap, Baud 115200
Scripts: S3D Std Starting & Ending
Speeds: Default 4800 mm/min (=80mm/sec), Outline 50%, Solid Infill 80%, Supp 80%, X/Y Move 12000, Z Move 1000, No Adjust below 15sec, DownTo 20%
Other: Area 50, ExInflat 0.00, BrExMult 100%, BrSpMult 100%, No FixedAngle, No BrPerim, HCompress 0.00, FilDia 1.75, Price 46, Den 1.25, ChgRetDist 12, ChResDist -0.50, ChRetSp 600
Advanced: No Start, No Stop, ExThinType Perim, InThinType GapFill, Overlap 25%. MinExLen 1.00, MinPWid 50%, MxPWid 200%, EndExtDist 0.20, Yes Open, Yes ForceRet, No MinTRetr 3.00, Yes RetWipe, Yes WipeOuter, No AvoidCross, MaxDetour 3.0, NonManSeg Heal, No Merge.
MatterHackers Blue PRO Series PLA 1.75mm; 200°C / 60°C; Z=-0.725mm.
-- Clint Goss
Re: Rock Bottom
so after all that you have ghosting on the y and my old wanhao 13 plus can print better on my mk3 its perfect on the rubber feet so don't see any improvement just my opinion
Re: Rock Bottom
so after all that you have ghosting on the y and my old wanhao 13 plus can print better on my mk3 its perfect on the rubber feet so don't see any improvement just my opinion
If I am reading this correctly, he's printing his external perimeters at 40mm/s, this outcome is pretty nice for the MK3...
Clint, can you try this with Linear Advance enabled firmware? Please find 3.1.3 attached with it turned on. If you are using S3D, you'll also need to make sure the following is in your start G-Code:
M900 K30
If you do this, fire off another with same settings speedwise and such. Then try one with say... 20% outline speed. If you want better quality, that is. 🙂
My MK3 Parts: [Bowden] [New Shoes] [TPU Micro Springs]
Re: Rock Bottom
Well, I'm such a newbie at this ... got my printer 5 days ago ... I didn't really know whether these prints were "as good as it gets" or not.
I feel that ...
Clint, can you try this with Linear Advance enabled firmware?
... updating firmware and dealing with LA is probably beyond what I can deal with.
However, my next step is to repeat the Cube test with the Rock Bottom unit sitting on the concrete foundation. Actually it will be on a low-pile run that sits on the foundation. Currently it is on a workbench table ...
... which still shakes slightly in the printer's Y direction, even after removing the wheels.
For a real comparison, a test matrix of [with / no table] X [orig feet / sorbothane / Rock Bottom] would be nice (but a lot of work).
-- Clint Goss
Re: Rock Bottom
I printed @JLTX's feet and attached rubber bottoms to them and though the printer sits solidly on my desk I see no real improvement in print quality...
Re: Rock Bottom
Despite what I though was a solid base - a heavy workbench sitting on a thin carpet on a cement foundation - I got a wakeup (by accident). I have a small spotlight sitting on a cardboard box perched on the same table. The light flickers. This is a *great* indicator of movement. It is only in the Y direction.
I am guessing that printers with solid feet are either (A) sliding on their table or (B) coupling to the table and shaking or moving it. This is all guesswork on my part, but some testing would shed some light. Unfortunately, the testing requires major changes in printing setup ...
Pictures of all the various Ripple and Moire problems look (to me) like a roadmap for the motion of the heat bed ...
If we effectively bolted the i3 frame to the Earth, would these issues go away?
("Honey, I need to bring in a pile driver and slam a few steel posts through the center of the house ...")
-- Clint Goss
Re: Rock Bottom
Pictures of all the various Ripple and Moire problems look (to me) like a roadmap for the motion of the heat bed ...
Actually, I think it's been determined that the Moire patterns in particular are caused by microstepping in the extruder. This supposed to be addressed in a future firmware update.
Re: Rock Bottom
("Honey, I need to bring in a pile driver and slam a few steel posts through the center of the house ...")
😀
The thing that confuses me a little is that people seem to take two somewhat opposing approaches to reducing vibration (artefacts), firstly we have the 'this-thing-is-going-nowhere' approach where we see people add mass to the printer (your approach), and secondly we see people attempting to decouple the printer from the surface it's sat on . . . . are these two approaches doing opposite things ?
I have my speakers sat on IsoAcoustic desktop stands, these are designed specifically for decoupling heavy speakers from your desktop, I wonder if placing a printer on these would do anything useful ?
Re: Rock Bottom
("Honey, I need to bring in a pile driver and slam a few steel posts through the center of the house ...")
😀
The thing that confuses me a little is that people seem to take two somewhat opposing approaches to reducing vibration (artefacts), firstly we have the 'this-thing-is-going-nowhere' approach where we see people add mass to the printer (your approach), and secondly we see people attempting to decouple the printer from the surface it's sat on . . . . are these two approaches doing opposite things ?
I have my speakers sat in IsoAcoustic desktop stands, these are designed specifically for decoupling heavy speakers from your desktop, I wonder if placing a printer on these would do anything useful ?
It's not that there are two schools of thought, it's that there are two answers people arrive at in order:
First thought process and (incorrect) answer: I have ringing in my prints, that's gotta be caused by vibration. If I can absorb the vibration, the problem will go away. Hey, it'll be quieter as well!
Second thought process and (correct) answer: Since mounting my printer on springs, the symptom got a little better but I have introduced inaccuracies due to things like like frame twisting, or made the problem worse (the rubber feet that come with the printer). Maybe instead of getting rid of vibration, I prevent it from happening in the first place? I'll stiffen this thing so hard it'll never vibrate again.
Unfortunately that second answer usually ends up in concrete blocks or steel sheets and a lot of work. 
My MK3 Parts: [Bowden] [New Shoes] [TPU Micro Springs]
Re: Rock Bottom
Second thought process and (correct) answer: Since mounting my printer on springs, the symptom got a little better but I have introduced inaccuracies due to things like like frame twisting . . .
So in your opinion what would be the best approach, some form of bolting the printer into position so that it is super stiff ?
What I thought might be useful about the IsoAcoustic stands is that they are designed to give (flex/absorb) in just one axis, with a speaker this would be front to back - but they can be oriented sideways to absorb sideways movement if that's what's needed - the point being that they can be 'tuned' to one axis, which might be useful (??), possibly a more methodical approach as opposed to simply placing the printer on a flexible, absorbing, spongy surface (like a rubber mat) ?
I've not got my Mk3 yet (just ordered yesterday), so I can't add anything concrete to the discussion, just throwing ideas out there.
Check out the "New Shoes" link in my sig. I installed sorbothane feet on my MK3, which is far superior to rubber because it dumps vibration out in other directions or heat. It's commonly used to isolate high end audio equipment. In my experience, it helped with my ringing, but only by lessening the length. For instance, if we draw a line representing the side of a cube corner to corner, with | representing ringing and - representing no ringing, this is what I had:
|||||||||||||||||||||||||||||||||---------------------------------------------------
and this is what it turned into:
||||||||||||||||--------------------------------------------------------------------
Sure, the effect was "lessened", but it's still there. Or in cases of the rubber feet (that are bouncy especially in Y!) that were installed to help make the printer quieter, it makes it worse by converting the vibration from high frequency small waves to low frequency high waves:
|-|-|-|-|-|-|-|-|-|-|-|-|-|-|-|-|-|-|-|-|-|-|-|-|-|-|-|-|-|-|-|---------------------
So yes, unless you are actively getting the vibration to never happen, you're going to have the artifact in some way. Anything else just affects the duration. The only reason I haven't gone full rigid myself is lack of a good way to connect rigid bolts to the machine and lack of tools to get the holes in my paver. 🙂
My MK3 Parts: [Bowden] [New Shoes] [TPU Micro Springs]
Re: Rock Bottom
Check out the "New Shoes" link in my sig . . . .
Will do !
I installed sorbothane feet on my MK3, which is far superior to rubber because it dumps vibration out in other directions or heat. It's commonly used to isolate high end audio equipment. In my experience, it helped with my ringing, but only by lessening the length. For instance, if we draw a line representing the side of a cube corner to corner, with | representing ringing and - representing no ringing, this is what I had:
|||||||||||||||||||||||||||||||||---------------------------------------------------
and this is what it turned into:
||||||||||||||||--------------------------------------------------------------------
Sure, the effect was "lessened", but it's still there. Or in cases of the rubber feet (that are bouncy especially in Y!) that were installed to help make the printer quieter, it makes it worse by converting the vibration from high frequency small waves to low frequency high waves:
|-|-|-|-|-|-|-|-|-|-|-|-|-|-|-|-|-|-|-|-|-|-|-|-|-|-|-|-|-|-|-|---------------------
Thanks for the info . . . interesting !
There might be things you could do with inverting the phase of the vibration (and cancelling it out, to some extent), this would likely be easier to do with the lower frequency vibration as any cancellation would be easier to align, not sure how you'd approach it, but I might have a think about it, maybe it could be done in software/firmware ?
So yes, unless you are actively getting the vibration to never happen, you're going to have the artifact in some way. Anything else just affects the duration. The only reason I haven't gone full rigid myself is lack of a good way to connect rigid bolts to the machine and lack of tools to get the holes in my paver. 🙂
Would reducing the weight of the moving print assembly and moving rods help at all (through lessening the inertia) ?
Re: Rock Bottom
There might be things you could do with inverting the phase of the vibration (and cancelling it out, to some extent), this would likely be easier to do with the lower frequency vibration as any cancellation would be easier to align, not sure how you'd approach it, but I might have a think about it, maybe it could be done in software/firmware ?
Would reducing the weight of the moving print assembly and move rods help at all (through lessening the inertia) ?
In theory yes, but you'd still be reacting vs preventing. If it can't be prevented, it may be better to try to find a way to change the design so the vibration is happening in a less critical axis. We were wondering about doing this by turning the Y stepper and belt 90 degrees, just never went very far.
Reducing the weight is going to help both during initial movement as well as stopping, allowing for better quality while increasing print speed. Jltx on these forums is currently working on a project to shave around 200 grams off the extruder just for this reason.
My MK3 Parts: [Bowden] [New Shoes] [TPU Micro Springs]