Overextrusion issues with Mosquito Magnum
I have been printing a lot of fixtures with PETG (Atomic PETG) lately, and speed has become an issue. In hopes of a significant speedup, I replaced the stock V6 on my MK3S with the Mosquito Magnum. The only other hardware change besides that was swapping the original heater (whose wire I snapped trying to get it loose) with the 50W slice heater. I was able to reuse the original thermistor. I am using a brass E3D 0.8mm nozzle.
Initially things were great - I was able to crank the flow way, way up and prints were flying. It wasn't until I'd printed a pile of fixtures when I realized that they weren't quite fitting like they were supposed to. After measuring a few spots, the issue was pretty clear. 1mm thick walls were measuring around 1.6-1.8mm!
So far I've tried adjusting:
- Extrusion Multiplier - obviously this wasn't going to do much given how bad the overextrusion was.
- Filament Diameter - I actually tried measuring the filament finally and found that it was consistently .05mm smaller than the "ideal". Unfortunately this didn't do anything either.
- E-steps - I made a small gcode file with the "M92 XXX M500" and played with that until a small calibration shape I made started resembling the desired dimensions. I got pretty close with XXX around 130 or so (remember stock extruder) but when I tried printing an actual part with that value I was getting signs of underextrusion.
So the first question is, did I miss anything by just swapping the hotend + heater and expecting everything to work properly?
Best Answer by Cullinaire:
I decided to look outside Prusaslicer for relief, and found it in Cura! Cura respects the single perimeter setting. Hopefully I can tune the other settings to make a successful print (my model needs special considerations for bridging).
RE: r
linear advance is another detail to look at since you changed your entire hotend. best to copy the material profile so you can adjust your custom gcode lines there.
the overextrusion should be fixable with the extrusion multiplier in prusaslicer. print a cube ins vase mode (or single perimeter), check wall thickness, adjust as needed.
filament diameter...you can fiddle with 2 knobs that control the same number, or just dial in only the extrusion multiplier - your choice.
changing e-steps should not be necessary (and it is just a third knob to control how much filament the printer pulls in).
1,6mm measured width compared to 1mm in the slicer is quite the deviation
RE: Some more discoveries
I tried playing with the linear advance but even small deviations from the default value had very negative effects on extrusion, so I left it alone for now.
Another thing I've done since was extruder estep calibration via the known length filament feed method - I've settled at 266 as the current value.
With this value in effect, I made a small 10mm open top cube with 1mm walls, and printed it in vase mode. I verified thru the M503 command that the new estep value was still in effect. The result was promising - the walls are close enough to 1mm that I could nudge it with the extrusion multiplier value.
The problem remains though, when I try to print the actual fixture - which was drafted in the exact same way I did the cube with the same 1mm thick walls - continues to print those 1mm walls much thicker.
So at this point I am realizing that I don't really have an overextrusion problem, I have a possible slicer problem. The cube and the fixture were sliced using the exact same settings - except that the fixture understandably cannot use vase mode.
I've attached the 3mf project of the fixture in question if anyone would like to try printing it - you'd only need to print the bottom 3-4 layers or so since that's where the issue starts. The walls are intended to be 1mm thick, printed in a single perimeter pass using a 0.8mm nozzle.
The culprit
After really sitting down and observing the print process, the issue boils down to the way perimeters are printed. Even on the fixture print, the initial bead being laid down is indeed around 1mm, but it is always doubled up resulting in a much greater thickness in the end.
Here are the slicer settings being used - I'm not sure how else to ensure that the perimeters are not being doubled up other than using vase mode (which won't work for my design).
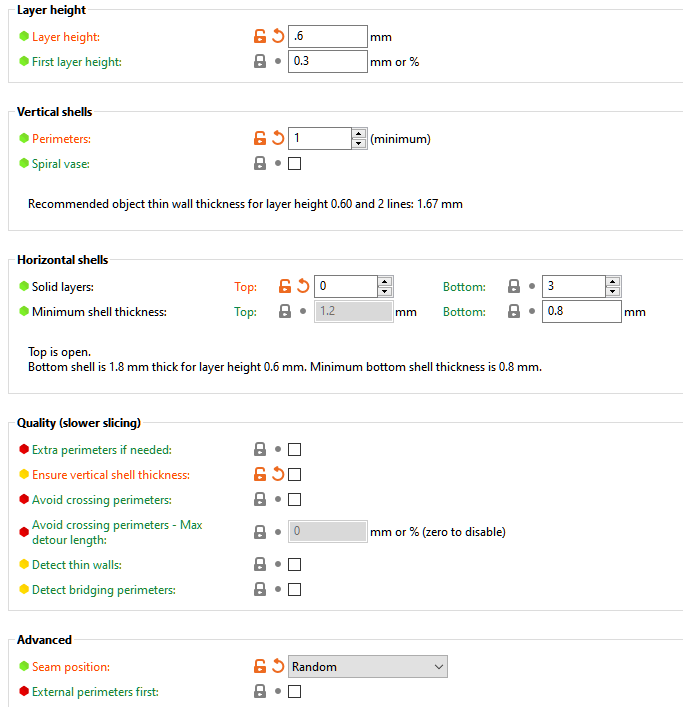
RE: r
thats what i found too. if you preview the layer in the slicer, you can see it moving more than once over some thin wall segments, laying down a second line and thickening the part. i also couldnt find a way around this.
can you live with doing 2 perimeters and maybe stepping nozzle size down a bit, or redesigning the part so the recommended thin wall thickness for 2 lines of perimeter can be met? that should also look better and be tougher since the outer line is continiouus and not interrupted near such thin wall extensions.
Can't be helped
At this point that is what I may be resigned to doing, going back to the 0.6mm I've been using for a while. Although I will lose some outright flow rate, I should still be able to crank up the perimeter speed. But I probably could have achieved that with the V6.
The part really doesn't require that much strength, at least not horizontally. Speed of printing and low material usage were the top priorities, so I was really counting on being able to do single pass perimeters.
Thanks for your input!
Problem solved, for now
I decided to look outside Prusaslicer for relief, and found it in Cura! Cura respects the single perimeter setting. Hopefully I can tune the other settings to make a successful print (my model needs special considerations for bridging).
RE: Love the big chonky style. Settings look good. Nozzle or caliper quality perhaps?
After really sitting down and observing the print process, the issue boils down to the way perimeters are printed. Even on the fixture print, the initial bead being laid down is indeed around 1mm, but it is always doubled up resulting in a much greater thickness in the end.
I'm not seeing any doubling up in the slicer preview. Do you mean when printing, or in the slicer?

Those bridge layers (e.g., 2.7mm) are going to be tricky with those big extrusions, but if the underside is hidden, that being ugly shouldn't be a problem.
I'm a fan of the single-perimeter "big chonky" technique myself. I use it for tabletop scenery. Looking through your print settings, I'm not seeing anything that should account for excessive over extrusion. Your layer height and extrusion widths are well within the capabilities of the 0.8mm nozzle... assuming you're using a quality nozzle. Are you using E3D, P3-D, or one of the better brands? Budget nozzles often don't adhere to the geometry that allows you to get away with those wide extrusions. An insufficient "B" dimension will result in rough extrusion edges.
The Prusa conditional code in the printer custom g-code is a mess. Unless you hop around between printers a lot, you might just cut all that out and insert the M900 Kxx factor you know you need.
It is odd that your modified Prusament PETG profile shows a diameter of 1.7mm. Is your filament that far off? Stupid question, but do your calipers have sufficient resolution? That might account for problems. I realized my first cheap set was only good to 0.1mm.
I found that using a 3D Solex 0.6-0.8mm nozzle let my standard V6 hotend push filament at a faster rate than my stock Mk3 extruder can push it. So far, that's met all of my needs for the Mk3.
move the horizontal slider to see exactly how the layer is printed.
if you look closely, you will see that during the second pass the thin wall sections become a tiny bit ticker. sadly it doesnt really show that it lays down a 2nd full fat line of material, it just clips into the other line. the result on an actual printer is different than what the slicer does here...congrats, a bug.
Interesting
move the horizontal slider to see exactly how the layer is printed.
if you look closely, you will see that during the second pass the thin wall sections become a tiny bit ticker. sadly it doesnt really show that it lays down a 2nd full fat line of material, it just clips into the other line. the result on an actual printer is different than what the slicer does here...congrats, a bug.
Interesting. Segment 289-294 on the slider really shows it. I've done a lot of printing with very similar settings (1 perimeter, perimeter width = 200% of nozzle size, height 80% of nozzle size) and don't see a visible indication of over extrusion. I'll try to watch it during a print.
Very much so
I wasn't aware of the horizontal slider in Prusaslicer that lets you see the toolpath - after watching both Cura and PS sliced gcode in action on the actual printer, the definitive conclusion is: Both slicers do in fact build up the 1mm walls with two passes even with vertical perimeters set at 1. The difference is that PS lays the passes down more or less side by side, whereas the Cura gcode stacks the passes on top of one another much better resulting in a thinner wall.
bobstro - the 0.8mm nozzle was part of the E3D "fun pack" so I would imagine that its quality should be sufficient for the job at hand. Where did you obtain your 3D Solex nozzle? The only place I could find so far that sells them specific for the Prusa is their own website and I would prefer to buy from a US-based distributor (most of whom only carry nozzles for incompatible printers).
The caliper I'm using is of very high quality, and I too was shocked when I measured the filament (claimed +- 0.02mm tolerance, which actually was met, just not at 1.75mm). That being said I have had no complaints about the performance of the filament brand with which I have exclusively printed dozens of kg so far.
US distributor for 3D Solex
[...] bobstro - the 0.8mm nozzle was part of the E3D "fun pack" so I would imagine that its quality should be sufficient for the job at hand.
Yep, those are good ones. Just wanted to make sure as I've seen some cheap nozzles with really crappy geometry and finish.
Where did you obtain your 3D Solex nozzle? The only place I could find so far that sells them specific for the Prusa is their own website and I would prefer to buy from a US-based distributor (most of whom only carry nozzles for incompatible printers).
Heh. I ordered directly from their website and my order was lost for 5+ months. I finally got someone to respond and they apologetically sent my order to a local US distributor. I've never purchased from him myself, but try the gr 5 store. I think they sell singles if you contact them directly. BE SURE you're getting the V6 style for the Prusa.
Love the Solex 3D Matchless nozzles on a Prusa
Edit: Just to be clear - I LOVE the 3D Solex nozzles. They're just a pain in the butt to buy in the US.