Problem with first layer
Hi!
I've printed the Benchy, Marvin Keyring, Batman Bust, and they all have come out great.
Now I'm trying to print my own design but Im having problems with the first layer. Do you have any tips?
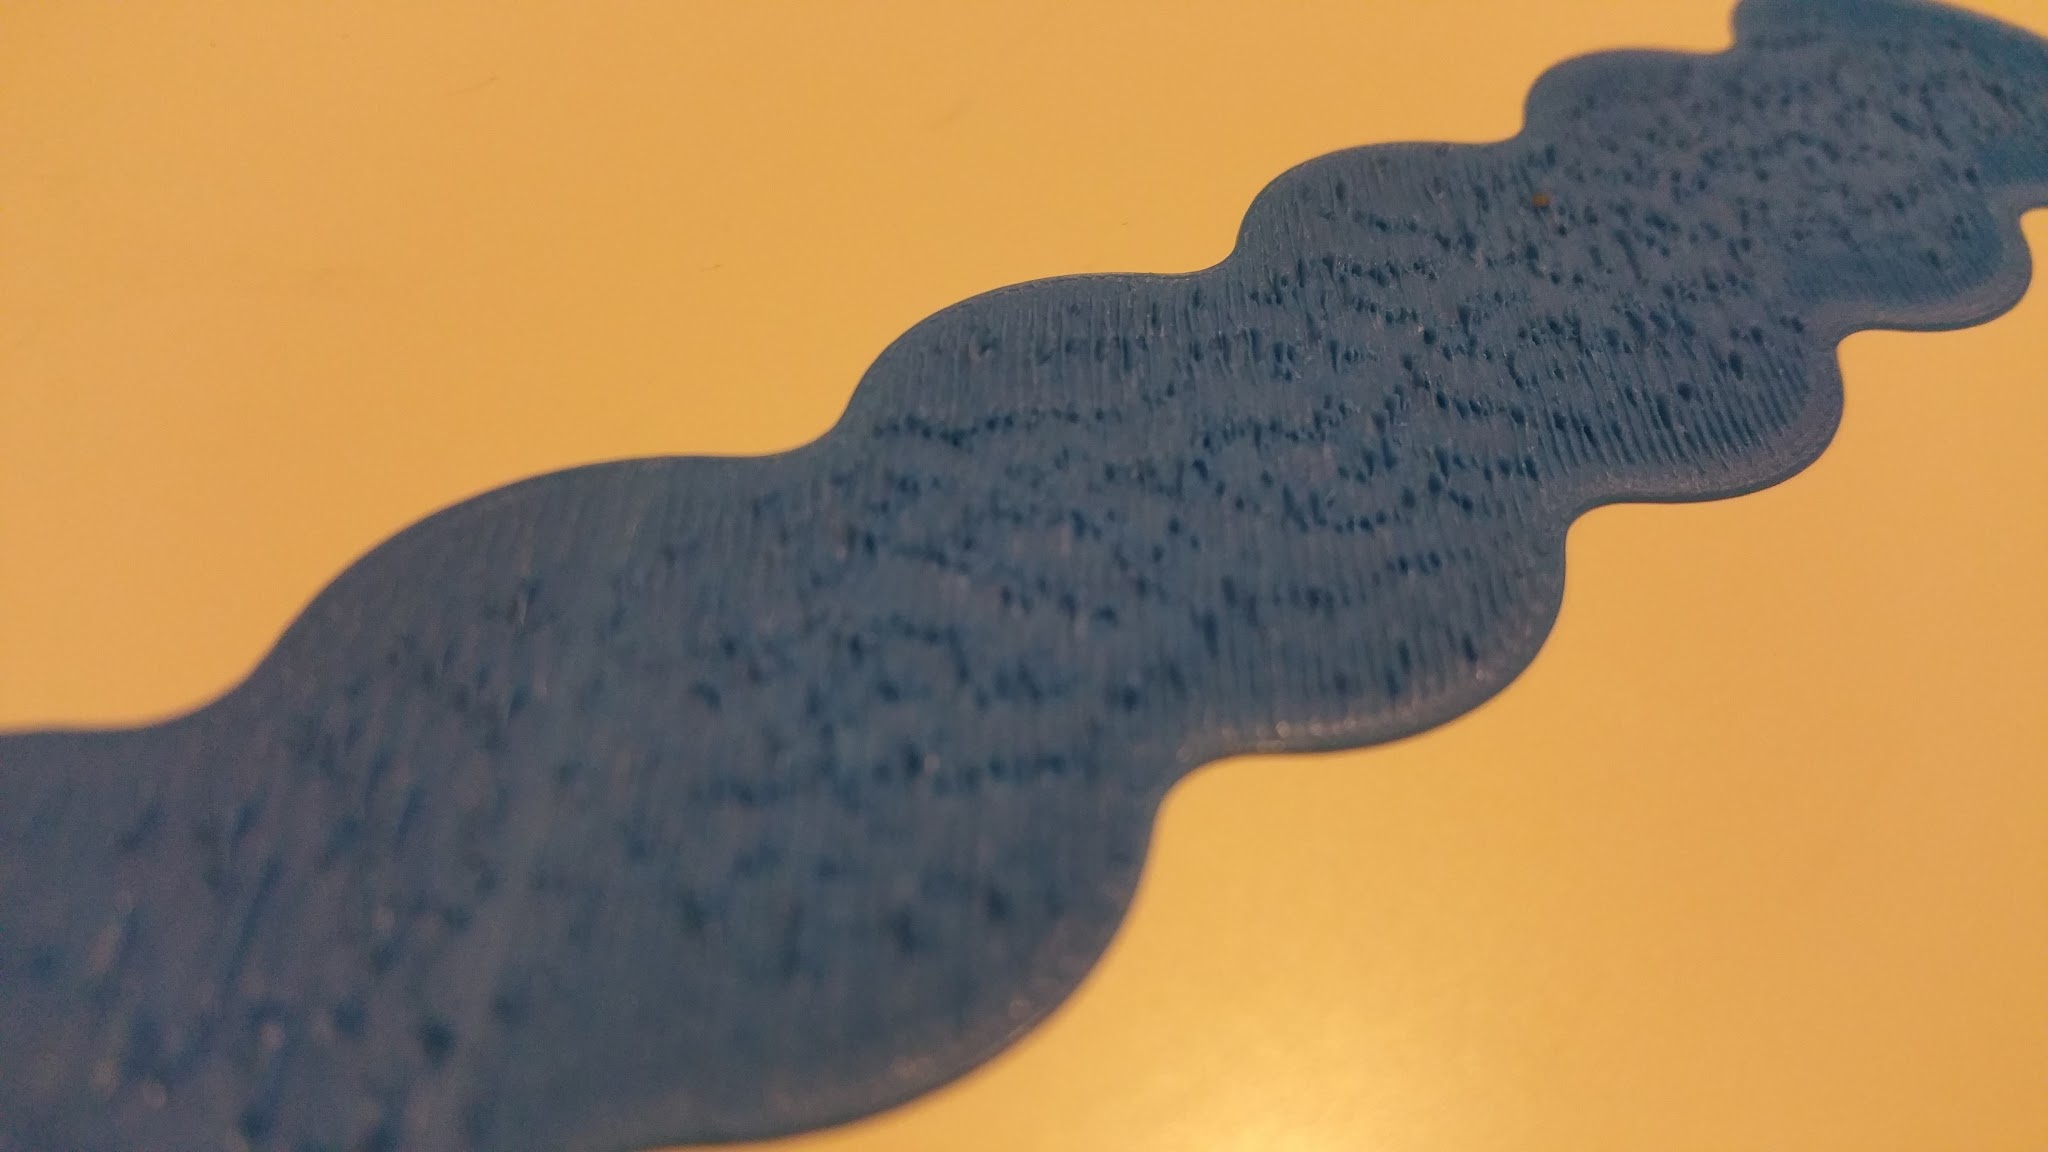
Here is a picture of the first layer:
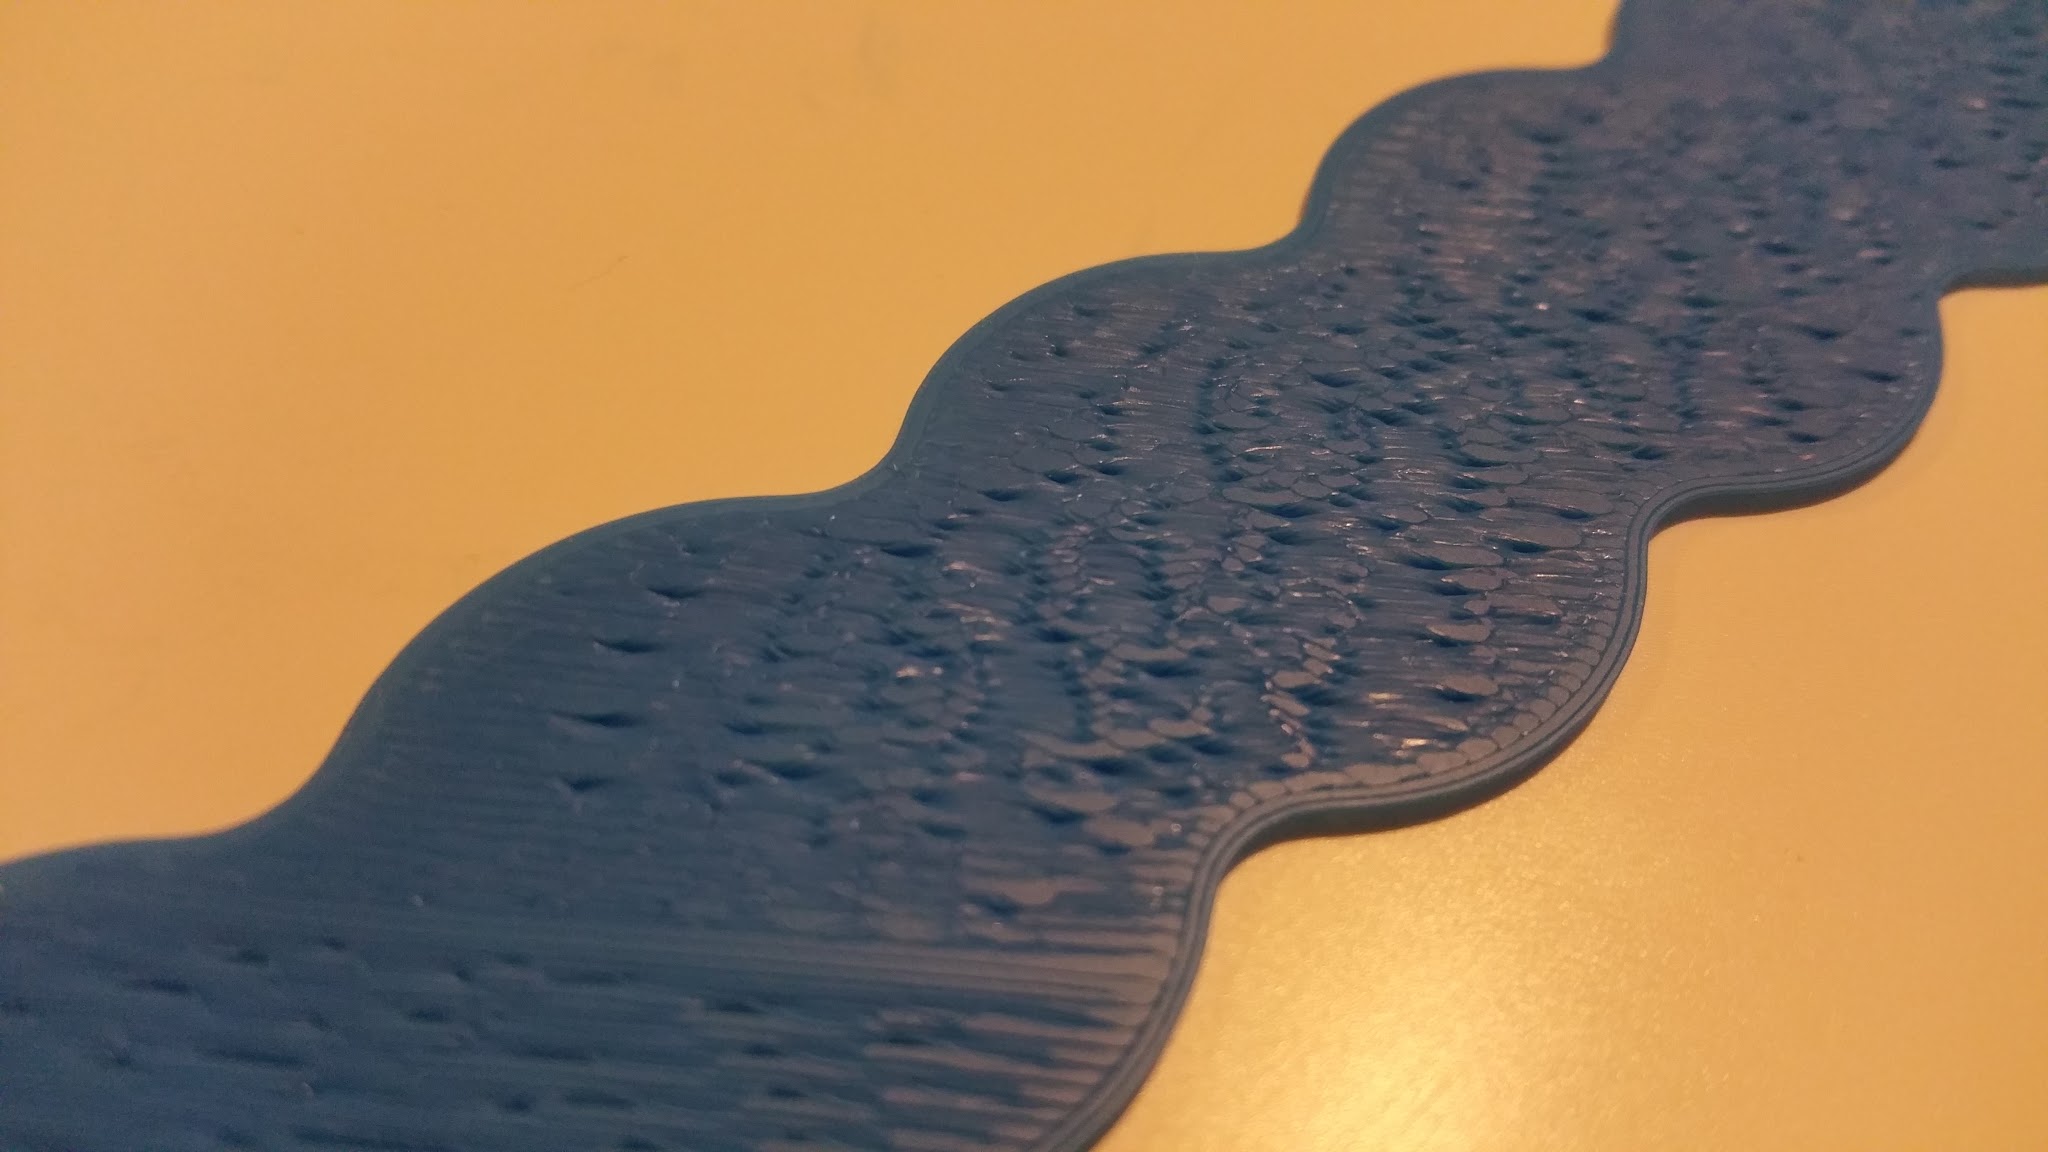
And the bottom side:
I tryed adjust the Z-level, from 0.2mm to 0.6mm with only a small difference in how the filament sticks to the bed. Still far from good though.
When looking at the extrusion it looks like it overlaps the line before, smushing out that line, and it goes on like that.
Prusa PLA
Temp 190, 200, 210 degrees tested
Prusa PLA 1.75mm, 0.2mm layerhight preset in Slicer.
No brim, no raft
Could it be an extrusion problem? During this first layer, I made sure that the roll of filament wasnt tight or anything but that didnt make any difference either.
The printer is calibrated and everything, although its a bit off in the Y axis, spot on X axis though.
The print before turned out good.
Me on MyMiniFactory!
Me on Instagram
3D Printing Live Feeds
Prusa MK2 Usergroup Slack Live Chat
Unofficial live chat by users for users.
Re: Problem with first layer
Hi Patrik
Looks very much like a filament feed issue; a nozzle clear may be in order (try the ultimaker "atomic method" - Google).
Can you also upload your GCode so I can have a quick look at your settings.
Peter
Please note: I do not have any affiliation with Prusa Research. Any advices given are offered in good faith. It is your responsibility to ensure that by following my advice you do not suffer or cause injury, damage…
Re: Problem with first layer
Hi Patrik
Looks very much like a filament feed issue; a nozzle clear may be in order (try the ultimaker "atomic method" - Google).
Can you also upload your GCode so I can have a quick look at your settings.
Peter
Gcode is here: https://drive.google.com/open?id=0B21eOSeJjbALaDNoZlNJSVdSSzA
When I load the filament it seems to feed well, but I'll search for the Atomic Method!
Me on MyMiniFactory!
Me on Instagram
3D Printing Live Feeds
Prusa MK2 Usergroup Slack Live Chat
Unofficial live chat by users for users.
Re: Problem with first layer
Hi Patrick,
what setting do you use for the 1st layer height ?
because regarding your G1 Z codes, you have:
G1 Z0.350 F7200.000
G1 Z0.550 F7200.000
G1 Z0.750 F7200.000
G1 Z0.950 F7200.000
G1 Z1.150 F7200.000
meaning you start with a first layer of 0.35 mm, and then each additional layer are .2 mm high.
Try with a 0.2 mm for the first layer instead.
I'm like Jon Snow, I know nothing.
Re: Problem with first layer
Hi Patrick,
what setting do you use for the 1st layer height ?
because regarding your G1 Z codes, you have:
G1 Z0.350 F7200.000
G1 Z0.550 F7200.000
G1 Z0.750 F7200.000
G1 Z0.950 F7200.000
G1 Z1.150 F7200.000
meaning you start with a first layer of 0.35 mm, and then each additional layer are .2 mm high.
Try with a 0.2 mm for the first layer instead.
OK I'll give that a try! Thought a larger layer height for the first layer was good to get better adhesion? Other than the first layer height It's sliced with the default profile.
Me on MyMiniFactory!
Me on Instagram
3D Printing Live Feeds
Prusa MK2 Usergroup Slack Live Chat
Unofficial live chat by users for users.
Re: Problem with first layer
Update! I changed the first layer height to 0.2mm as well as the rest of the layers.
I think that I've managed to have the nozzle way to close to the heatbed, with Live Adjust Z axis values at -0.6mm
I've missed the - sign, so I've increased the negative value, when I wanted to raise the nozzle, so I've actualy pushed it even closer to the heatbed, which problably resulted in the bad extrution and the "chewing" on the filament.
I'm at around -0.05 now, and it looks better, although not good at all, I'll go back to a simple 2x2x2cm cube and staart from scratch I think 🙂 Maybe upping the extruder multiplier to 1.05 as a start. It looks like it not extruding enough plastic.
EDIT: -0.15, looks ok now so far, second layer through on a simple cylinder. Back at 210 degrees atm
EDIT: More fails 🙁
Doing the autocalibration adjusting Z level to make sure that the plastic is sticking onto the bed without beeing squeezed out to much, found a good setting, but when I'm trying to print my cube with a Skirt around it, the scirt dosnt stick and its drawn into the print area. Really strange
Me on MyMiniFactory!
Me on Instagram
3D Printing Live Feeds
Prusa MK2 Usergroup Slack Live Chat
Unofficial live chat by users for users.
Re: Problem with first layer
Patrick
For me, there is an issue with the initial calibration insofar as the actual nozzle gap is down to the perception of the user, with the printer trying to print at a first layer height that it is not allowed to print at...
In firmware, the closest the nozzle is allowed to be to the bed (Z_MIN) is 0.2mm.
The V2Calibration GCode file has been sliced with a layer height of 0.15mm
The thickness of the line laid down when printing the V2Calibration file is rather subjective, but it makes a whole load of difference to the user when printing models that are not sliced using the default Slic3e profiles; in fact it makes it almost impossible to obtain a good print using some other slicers.
Recognising and understanding the above, I have adopted a somewhat different approach to calibration and for the past few days, my approach had been working very well, although it will not work with profiles as supplied by Prusa Research.
Quite simply, I have ignored the "Live Calibration" feature (set to 0.000) and have adjusted the nozzle gap to 0.18mm as follows:
Align Z axis (move to top)
Autohome nozzle
Measure nozzle gap
Raise Z 60mm
Loosen probe nut, adjust, tighten
repeat from point 3 until nozzle gap is 0.18mm
Since calibrating in this manner, and increasing the bed temperature to 60 degrees, I have not had any issues. Please also note that my first layer height is 0.2mm but I also over-extrude the first layer slightly.
If you believe that your extrusion factor requires calibration then carry out the following:
Load some filament
Mark the filament 110mm from the top or the extruder housing
Feed 100mm of flament
measure from top of extruder to mark on filament (should be 10mm)
Calculate the amended extruder steps
Use the M92 GCode command to set extruder steps
Repeat the process to ensure the new value is good.
Peter
Please note: I do not have any affiliation with Prusa Research. Any advices given are offered in good faith. It is your responsibility to ensure that by following my advice you do not suffer or cause injury, damage…
Re: Problem with first layer
Patrick
For me, there is an issue with the initial calibration insofar as the actual nozzle gap is down to the perception of the user, with the printer trying to print at a first layer height that it is not allowed to print at...
In firmware, the closest the nozzle is allowed to be to the bed (Z_MIN) is 0.2mm.
The V2Calibration GCode file has been sliced with a layer height of 0.15mm
The thickness of the line laid down when printing the V2Calibration file is rather subjective, but it makes a whole load of difference to the user when printing models that are not sliced using the default Slic3e profiles; in fact it makes it almost impossible to obtain a good print using some other slicers.
Recognising and understanding the above, I have adopted a somewhat different approach to calibration and for the past few days, my approach had been working very well, although it will not work with profiles as supplied by Prusa Research.
Quite simply, I have ignored the "Live Calibration" feature (set to 0.000) and have adjusted the nozzle gap to 0.18mm as follows:
Align Z axis (move to top)
Autohome nozzle
Measure nozzle gap
Raise Z 60mm
Loosen probe nut, adjust, tighten
repeat from point 3 until nozzle gap is 0.18mm
Since calibrating in this manner, and increasing the bed temperature to 60 degrees, I have not had any issues. Please also note that my first layer height is 0.2mm but I also over-extrude the first layer slightly.
If you believe that your extrusion factor requires calibration then carry out the following:
Load some filament
Mark the filament 110mm from the top or the extruder housing
Feed 100mm of flament
measure from top of extruder to mark on filament (should be 10mm)
Calculate the amended extruder steps
Use the M92 GCode command to set extruder steps
Repeat the process to ensure the new value is good.
Peter
Thank you!
Yes, I'm going to do the Extruder Steps test as the next step.
I just finished a 9 hour print, and part from needing to adjust the live Z adjustment for the first layer to get it ok, (Im at around -0.280mm now) it looks pretty ok. Still some issues with it though.
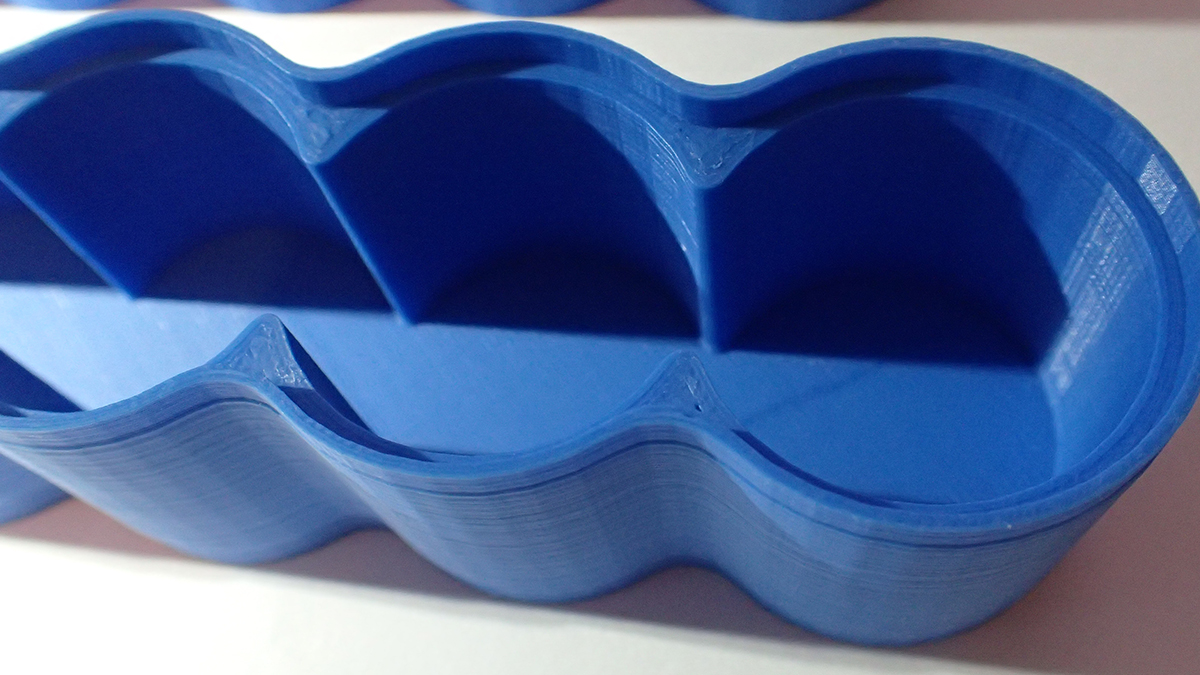
I just have a feeling that I'm under extruding, which results in that I have a much smaller tolerance when it comes to nozzle height and to get the first layer to stick I have to get the nozzle pretty low to the bed, and after the first layer I need to raise it some (around 0.02-0.05 mm), to not get artifacts where it looks like its way to close, like in the first images I posted. And still if I look at the bottom of my print after its done it looks like it havnt squeezed the filament enough to the bed...
Another thing I can see, visible in the above image as well of the bottom layer, is that the adhesion looks better closer to the outher shell, than it does closer to the center of the model?
The extruder steps test will be interesting!
Me on MyMiniFactory!
Me on Instagram
3D Printing Live Feeds
Prusa MK2 Usergroup Slack Live Chat
Unofficial live chat by users for users.
Re: Problem with first layer
Patrik
That first layer is just slightly too high. You can see the infill is not quite filling all the gaps where it meets up with the loops.
The mess at the top looks to be caused by some excess plastic on the filament being deposited; there is not much you can do to prevent that.
Peter
Please note: I do not have any affiliation with Prusa Research. Any advices given are offered in good faith. It is your responsibility to ensure that by following my advice you do not suffer or cause injury, damage…
Re: Problem with first layer
Patrik
That first layer is just slightly too high. You can see the infill is not quite filling all the gaps where it meets up with the loops.
The mess at the top looks to be caused by some excess plastic on the filament being deposited; there is not much you can do to prevent that.
Peter
yep, thats what I'm guessing as well. The mess on the top is just the Skirt that was drawn into the print, since the first part of it didnt stick.
I just calibrated the Steps/mm... My extruder extruded 94mm when I sent the G1E100F90 code, so I adjusted the Steps/mm and now it extrudes exactly 100mm. So I was underextruding some, not much though, but a few %.
I still have issues with first layer.
Whats happening is that I have to live adjust the Z value while it lays out the Shirt as well as the first layer. When the first layer is done and second layer starts, its way to close though, I get the ripples in the layer as the first pictures shows. So I have to raise the nozzle some again, often around 0.2 mm, and after that it prints fine.
Not sure what to do to fix that?
Printing with layer height 0.2, First layer 0.3
200 Degrees, 65 degrees on the plate for the first layer, 60 degrees for the rest.
Me on MyMiniFactory!
Me on Instagram
3D Printing Live Feeds
Prusa MK2 Usergroup Slack Live Chat
Unofficial live chat by users for users.
Re: Problem with first layer
Patrik
I think your first layer at 0.3mm would probably be better printed at 215 degrees.
I print all first layers at 215 then drop to anything from 185 to 205 depending on volume of filament I am melting (rough guess, but depends on layer height and speed).
That 6% under-extrusion will make a whole load of difference for the first layer; I over-extrude my first layers by about 15%.
Peter.
Please note: I do not have any affiliation with Prusa Research. Any advices given are offered in good faith. It is your responsibility to ensure that by following my advice you do not suffer or cause injury, damage…
Re: Problem with first layer
Patrik
I think your first layer at 0.3mm would probably be better printed at 215 degrees.
I print all first layers at 215 then drop to anything from 185 to 205 depending on volume of filament I am melting (rough guess, but depends on layer height and speed).
That 6% under-extrusion will make a whole load of difference for the first layer; I over-extrude my first layers by about 15%.
Peter.
ok one step closer, I'll try what you suggest.
Is it "extrusion width" for first layer that you set to like 115% then?
My default value is 0.45?
No I've also fixed my Y axis offset of the bed, so when doing the calibrate Z the probe is in the circle spot on. A slight offset on the last circle though, but I guess thats ok.
Me on MyMiniFactory!
Me on Instagram
3D Printing Live Feeds
Prusa MK2 Usergroup Slack Live Chat
Unofficial live chat by users for users.
Re: Problem with first layer
Patrik
I don't think first layer over-extrusion is something that you can easily "dial in" when using Slic3r, but it is something that can easily be done with some other slicers...
{KISSlicer example:} Simply set the "Bed Roughness" parameter to 0.05mm and offset all Z heights by -0.03mm, so printing at a first layer height of 0.2mm will add 0.05mm bed roughness for the first layer and then reduce all Z parameters by 0.03mm will print a first layer of 0.22mm with filament feed calculations for 0.25mm.
But, as I have mentioned a couple of times on here, I have calibrated the printer somewhat differently and the results so far a pretty darned good.
It seems to me that the calibration methods devised by PR actually set the initial nozzle gap at about only 0.1mm (which could damage the PEI build plate with the heated nozzle) and when printing with the default Slic3r settings, cause an over-extrusion on both the first and second layers; not what I want...
Peter
Please note: I do not have any affiliation with Prusa Research. Any advices given are offered in good faith. It is your responsibility to ensure that by following my advice you do not suffer or cause injury, damage…
Re: Problem with first layer
I'm totally stuck now, after 10 attempts I havn't managed to get anything to stick onto the bed 😀
Testing with simple cubes etc...
Testing to change the flow rate in octoprint to 115% but I dont see any difference at all.
Me on MyMiniFactory!
Me on Instagram
3D Printing Live Feeds
Prusa MK2 Usergroup Slack Live Chat
Unofficial live chat by users for users.
Re: Problem with first layer
Another 10 attempts... Not sure whats wrong 🙁 nothing sticks..
The only thing that sticks is the first line it places at the bottom of the buildplate after calibration, before the start of the print. That line is nice and have a perfect adhesion. When it then starts to print nothing sticks.
Me on MyMiniFactory!
Me on Instagram
3D Printing Live Feeds
Prusa MK2 Usergroup Slack Live Chat
Unofficial live chat by users for users.
Re: Problem with first layer
Another test that might give some more input...
If I do autohome, and then use a paper (around 0.1mm?) and then adjust the Z offset, I land on -0.767 before I start to feel friction between the paper and the nozzle. This sounds very high? Should I adjust the position of the probe? Could it be to far down?
Me on MyMiniFactory!
Me on Instagram
3D Printing Live Feeds
Prusa MK2 Usergroup Slack Live Chat
Unofficial live chat by users for users.
Re: Problem with first layer
Im starting to think that its an extrusion issue causing this... When doing the autocalibration the PLA that I remove from the bed is really really thin, kind of like a very thin fishing line.
Me on MyMiniFactory!
Me on Instagram
3D Printing Live Feeds
Prusa MK2 Usergroup Slack Live Chat
Unofficial live chat by users for users.
Re: Problem with first layer
Last test...
AutoHome
Used a 35mm film (0.14mm.. don't have any other tools to measure that small tolerances at home atm...) to measure the distance, it was to tight, less than 0.14 at least.
I adjusted my probe just a little, and did autohome again, now the film fit's with some extra space so I guess its between 0.14 and 0.18.
I did this with Live Z Adjust set to 0.0
Tested the Autocalibration print again, but I had to do Live Z Adjust down to 0.1 mm, before it started to stick to the buildplate, and its still VERY thin!
The line of PLA that it places in the bottom of the buildplate before it starts the print is thick and nice, closer to what I would expect, but when it starts to print, it starts with a thin extrusion for about 3 cm, and after that it gets even thinner?
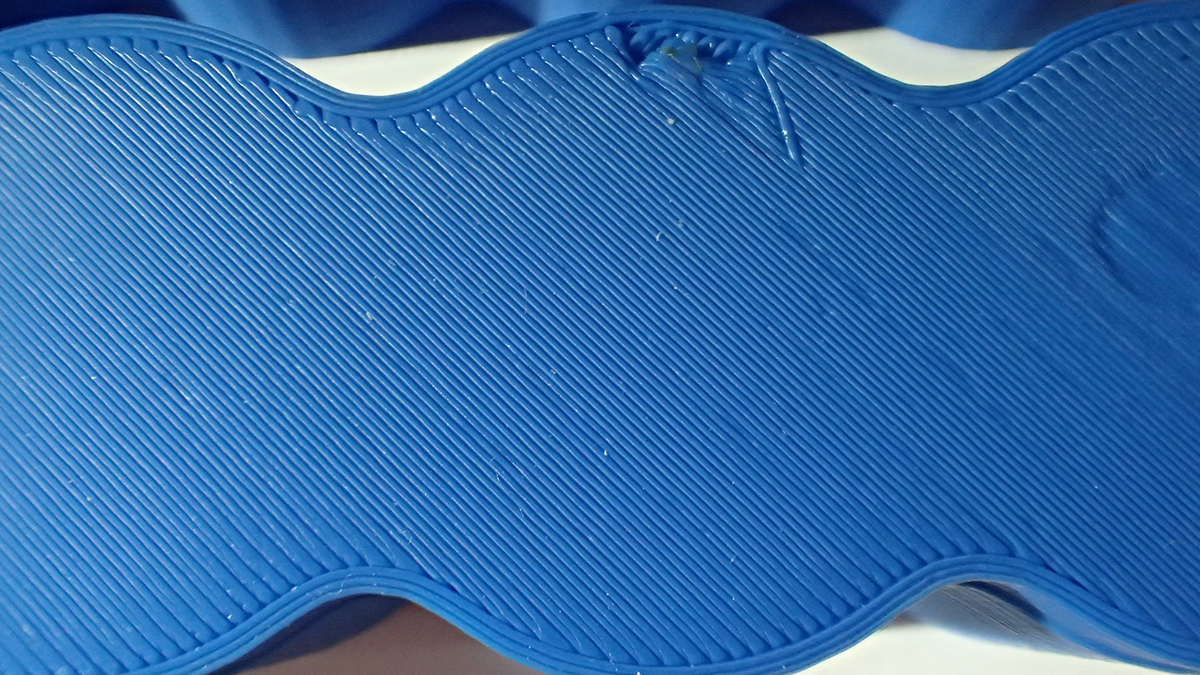
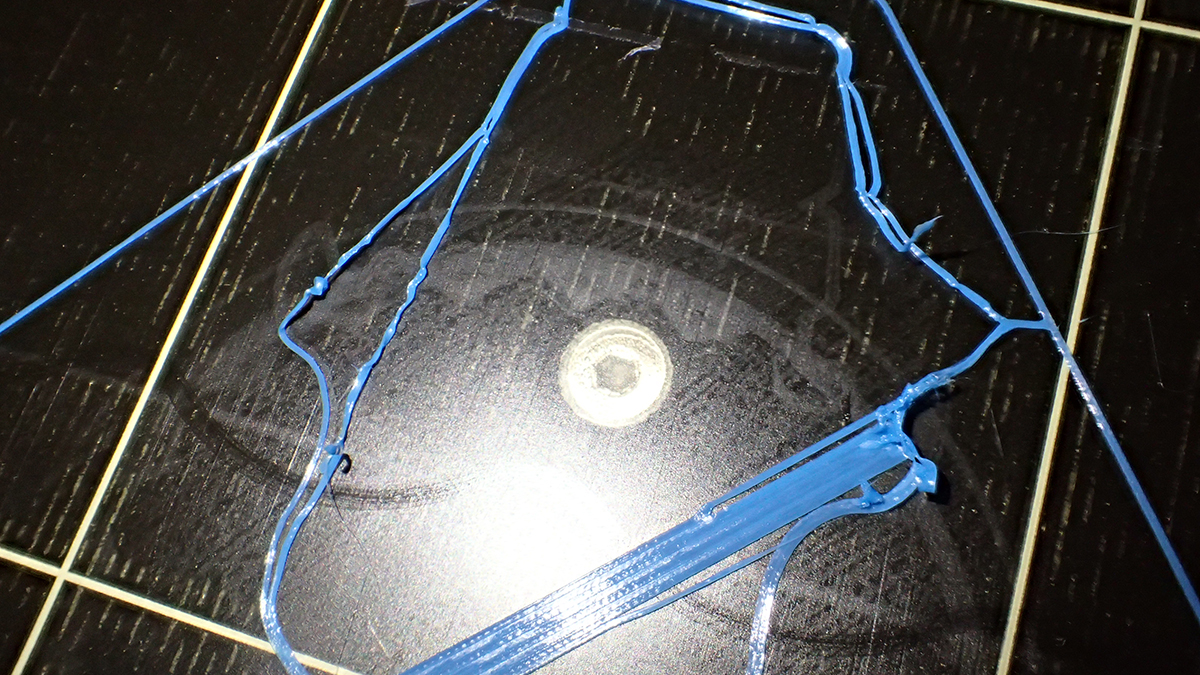
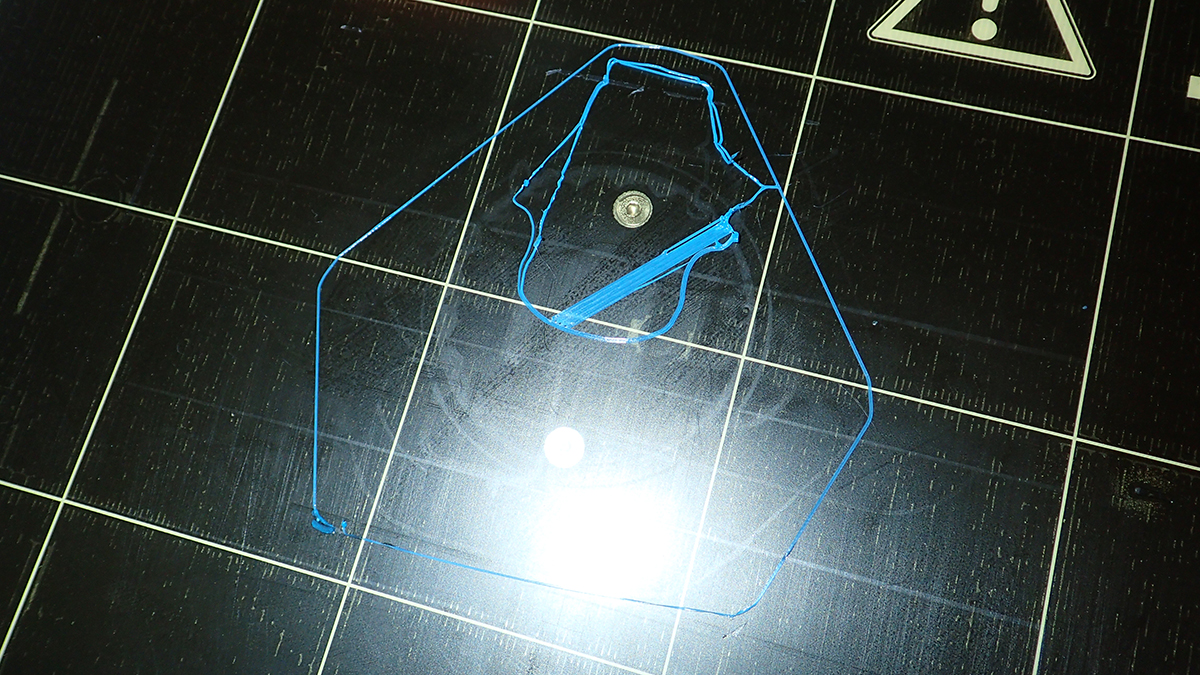
After the V2 calibration test fail, I tested the dragon that's included on the card, and that one ended up like this... Does this look like a normal extrusion to you? (remember that I did the extrusion calibration so its really extruding 100mm filament when I tell it to (it extruded 94mm before I updated the steps / mm.
I give up for today I think, and let the printer sit for a few days, maybe it feels lonely and starts to behave :/
Me on MyMiniFactory!
Me on Instagram
3D Printing Live Feeds
Prusa MK2 Usergroup Slack Live Chat
Unofficial live chat by users for users.
Re: Problem with first layer
What do you use for cleaning heatbed? Your heatbed looks too shiny, like greasy. My heatbed looks dim with no marks of previous prints.
Re: Problem with first layer
What do you use for cleaning heatbed?
Window cleaner as instructions, and gluestick with challenging prints.
When it sticks it really sticks well
Me on MyMiniFactory!
Me on Instagram
3D Printing Live Feeds
Prusa MK2 Usergroup Slack Live Chat
Unofficial live chat by users for users.