Re: Fine tune your MK3 Z axis
It depends on the filament.
With ABS, the shrinkage will cause it to be about the right size.
Unfortunately, they switched to PETG without changing the the tolerance, and the result is both ends of my smooth rod mount are loose.
Ultimately I don't think the switch to PETG was thought through very well.
So yeah, these things start to matter as the mistakes start piling up.
Can't even replace the motor mount without a major disassembly, which is a bit ridiculous.
This is my conclusion as well. The SCAD files are hierarchical and you can see where the base design has not changed for a long time, back from the days of ABS parts and lower tolerances. So now some of those oversized screw holes are creating issues with higher speeds and tolerances.
Re: Fine tune your MK3 Z axis
Your reason for shrinkage seems reasonable.
Do you want to adjust the hole dimension on some details for the test?
Do you have any suggestions? What details and what dimension?
I can not test because my printer has not yet arrived.
Bear MK3 with Bondtech extruder
Re: Fine tune your MK3 Z axis
I wouldn't hardcode the tolerance because it will vary between filament size as well as layer height.
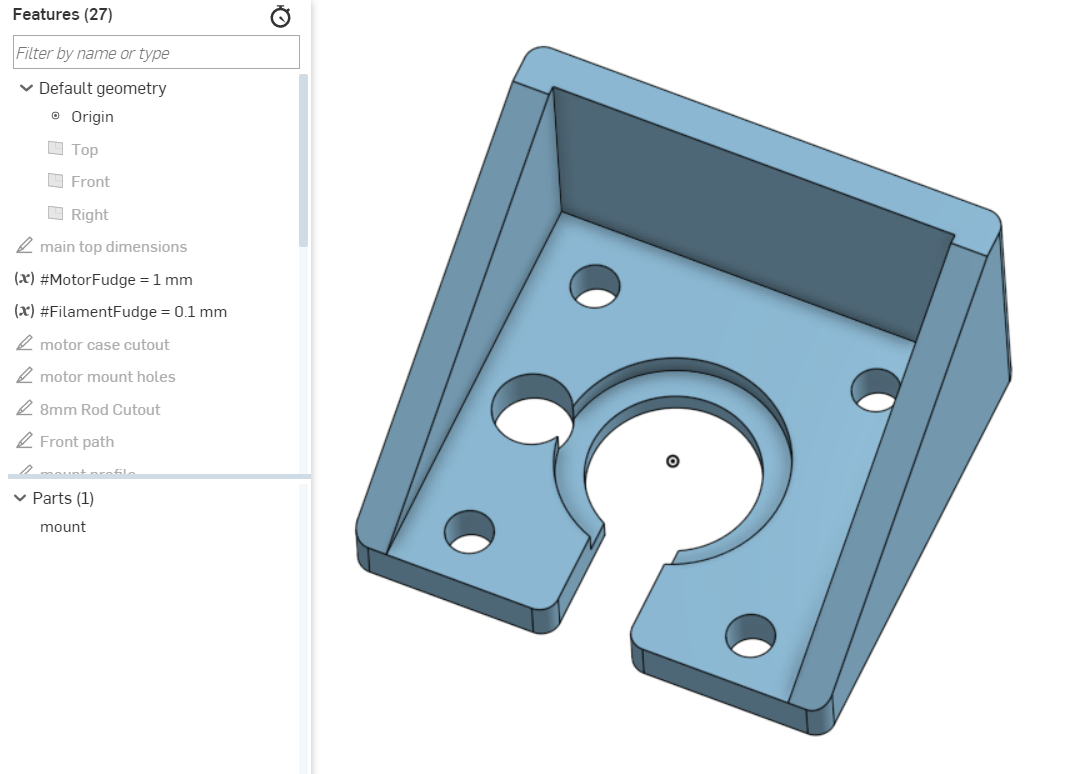
Here's a late night quick render of what I would do. I don't have the actual numbers in front of me so I don't know what thickness or where to put the frame holes.
Re: Fine tune your MK3 Z axis
I wouldn't hardcode the tolerance because it will vary between filament size as well as layer height.
Here's a late night quick render of what I would do. I don't have the actual numbers in front of me so I don't know what thickness or where to put the frame holes.
zmount.png
This looks just like what I was just planning. Thicker top plate with float and cut out. Also tighter thicker Z tops. When first assembling leave the Tnuts disconnected and Z tops loose (maybe just one side). Now you can easily slide gantry up and down to get fixed rods parallel and tighten Z top. Then connect T nut and adjust motor float. I’ll wait for yours now. 🙂
Re: Fine tune your MK3 Z axis
Hi All,
I am coming to the party of custom Z mount with my fix plus adding few others features :
Files available on Thingiverse : https://www.thingiverse.com/thing:2775169


I have done few print tests (like smooth rod diameter) but I did not mount the latest version on my MK2s yet
Re: Fine tune your MK3 Z axis
Looks great! Can you redo the tops too? They also have oversized mounting holes etc when reprinting.
Re: Fine tune your MK3 Z axis
This looks just like what I was just planning. Thicker top plate with float and cut out. Also tighter thicker Z tops. When first assembling leave the Tnuts disconnected and Z tops loose (maybe just one side). Now you can easily slide gantry up and down to get fixed rods parallel and tighten Z top. Then connect T nut and adjust motor float. I’ll wait for yours now. 🙂
It's on Onshape (free) if you want to copy and fiddle with it. Search for Prusa I3 MK3 Z mount.
Looks like gregsaun is also on the path as well.
Personally, I would reprint everything in ABS.
PETG under both heat and pressure just doesn't fare as well as ABS.
I'm not looking forward to what happens to this printer when I put it in my enclosure.
Again, I think it's crazy that not only are these parts not being injection molded to take the load off their print farm, but from a design aspect they are still barely alpha quality. It's 2018 already!
Re: Fine tune your MK3 Z axis
Looks great! Can you redo the tops too? They also have oversized mounting holes etc when reprinting.
Already done in the past and with another dimensional issue fixed : https://www.thingiverse.com/thing:2552246 . This issue as been fixed in MK3 files (at least the one on GitHub)
I am going to make a newer version of the z tops to improve smooth rod hole and add selective infill. Will be fixed tomorrow.
BTW, I tested the Z motor mounts but the smooth rod hole is a bit too tight. Will be fixed tomorrow as well 🙂
Great job! Nice touch on the infill. Saved me a bunch of work. Can you get crackin on the other parts too? 🙂
Re: Fine tune your MK3 Z axis
BTW, Gregsaun, I think you could countersink those screw heads and still use stock m3x10 without hurting strength.
Re: Fine tune your MK3 Z axis
Ok sounds good.... so should b be waiting untl tomorrow to print all the parts?
Re: Fine tune your MK3 Z axis
BTW, Gregsaun, I think you could countersink those screw heads and still use stock m3x10 without hurting strength.
Yes and no 😀 . The main problem is the removable part in front. With countersink hole in front we will get only 2mm of plastic (or less depending the technique used for the "hole in air") which will not be enough strong to avoid the front part twisting. I did not test countersink so maybe I am wrong but 8 longer screws are not expensive.
Re: Fine tune your MK3 Z axis
Ok sounds good.... so should b be waiting untl tomorrow to print all the parts?
I have updated the files, you can try it. As it is quite hard to find the perfect diameter for smooth rod hole that works for everyone, getting feedback on this is very welcome. 🙂
It should be a bit hard to insert the smooth rod, this is done on purpose. I have designed the hole slightly too small but the shape is made to be expandable.
Re: Fine tune your MK3 Z axis
Looks great! Can you redo the tops too? They also have oversized mounting holes etc when reprinting.
Already done in the past and with another dimensional issue fixed : https://www.thingiverse.com/thing:2552246 . This issue as been fixed in MK3 files (at least the one on GitHub)
I am going to make a newer version of the z tops to improve smooth rod hole and add selective infill. Will be fixed tomorrow.
BTW, I tested the Z motor mounts but the smooth rod hole is a bit too tight. Will be fixed tomorrow as well 🙂
Great job! Nice touch on the infill. Saved me a bunch of work. Can you get crackin on the other parts too? 🙂
Both are updated now, you can download them on my Thingiverse
Re: Fine tune your MK3 Z axis
Perfect!!! Thank you. Would you be able to take a peek at the x axis ends now? The bearings fall straight down. The holes that constrain them are too big on both the idler and motor holder on the r1 parts. :-/
Re: Fine tune your MK3 Z axis
For now I do not have much time for the X axis. It is the most complex part and to do good job I have to go deep and this will takes several days/weeks. I would like to first release my Prusa i3 Bear Upgrade version 2.0 : https://github.com/gregsaun/prusa_i3_bear_upgrade/tree/dev
Re: Fine tune your MK3 Z axis
BTW, Gregsaun, I think you could countersink those screw heads and still use stock m3x10 without hurting strength.
Yes and no 😀 . The main problem is the removable part in front. With countersink hole in front we will get only 2mm of plastic (or less depending the technique used for the "hole in air") which will not be enough strong to avoid the front part twisting. I did not test countersink so maybe I am wrong but 8 longer screws are not expensive.
No worries. I can do it myself (thanks for the step). Once it is all bolted down tight the front will be brace against the insert on the metal motor surface. So the sides are where twisting forces would impinge but its still full thickness. In general interior points are not strength areas, and the perimeter has the most mechanical advantage which is why you see those reinforced.
I agree with you but I still prefer 12mm screw 😀 . Keep us updated on your modification of my modification 😆 ! Be careful with the selective infill I have added (check sketches names on Fusion 360), and might be good to make hole big enough for a washer as well.
Re: Fine tune your MK3 Z axis
Where are the new mk3 z tops you said you were working on? Am I missing something?