Requesting assistance diagnosing issue(s) with my print
Hello everyone!
As the title states, I'm looking for some assistance to help diagnose what went wrong with my print here. I've attached 3 photos of the print, with supports still connected, for your viewing (dis)pleasure. I will admit up front that this is my third print ever (1 - prusa logo from sd card, 2 - tree frog from sd card) and the first time having to try and slice anything myself.
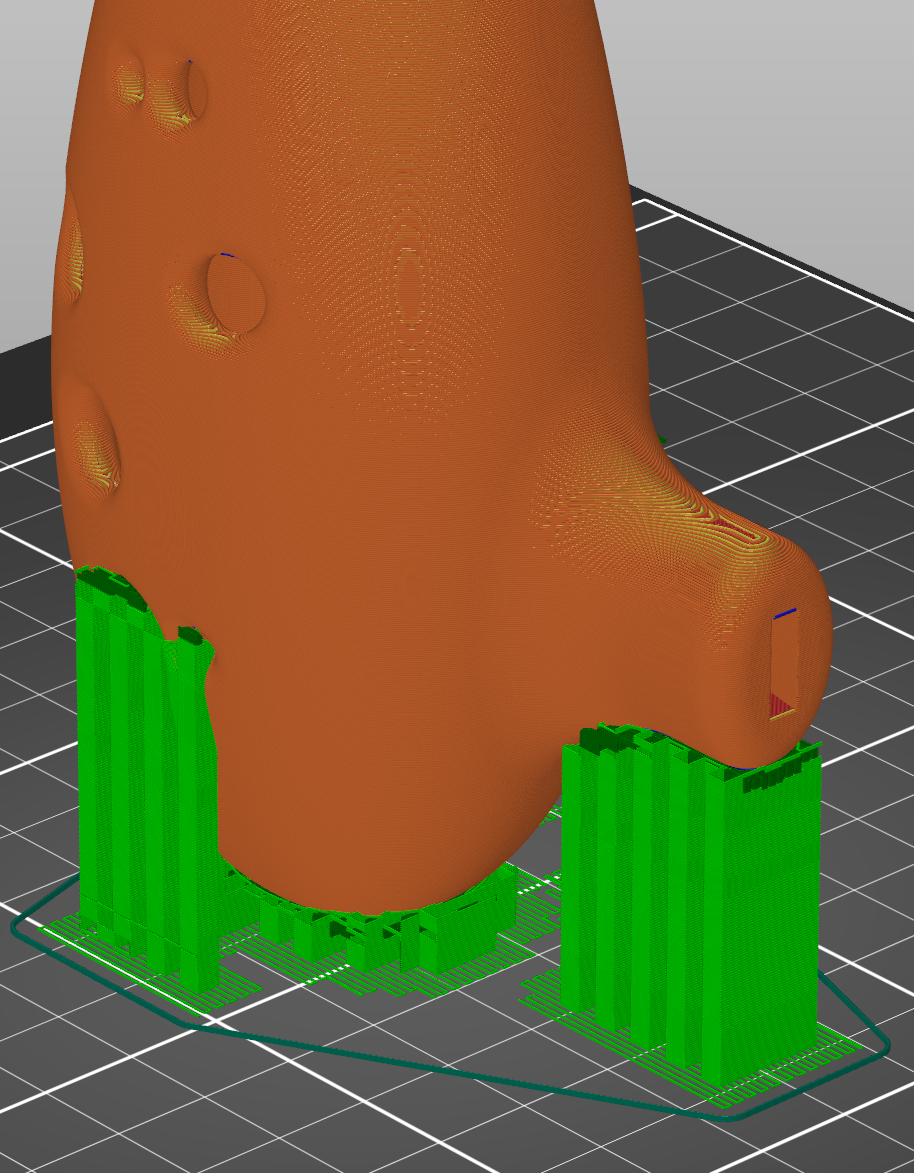
I started with this model: https://www.thingiverse.com/thing:2755765
I imported it into the latest 2.3.3 version of PrusaSlicer.
To my knowledge, almost all all slicer settings were default for the MK3S+ (from being setup by the wizard when initially installing and launching the slicer program). I used the .20mm Quality preset, but changed: the infill from 15% to 20%. When I selected "Supports on build plate only" (per suggestion from the thingiverse comments), slicer said I needed to enable some settings that were currently disabled in order to use the support functionality (Detect Bridging Parameters and Generate Support Material), which I clicked Yes.
Here's what it looks like sliced:
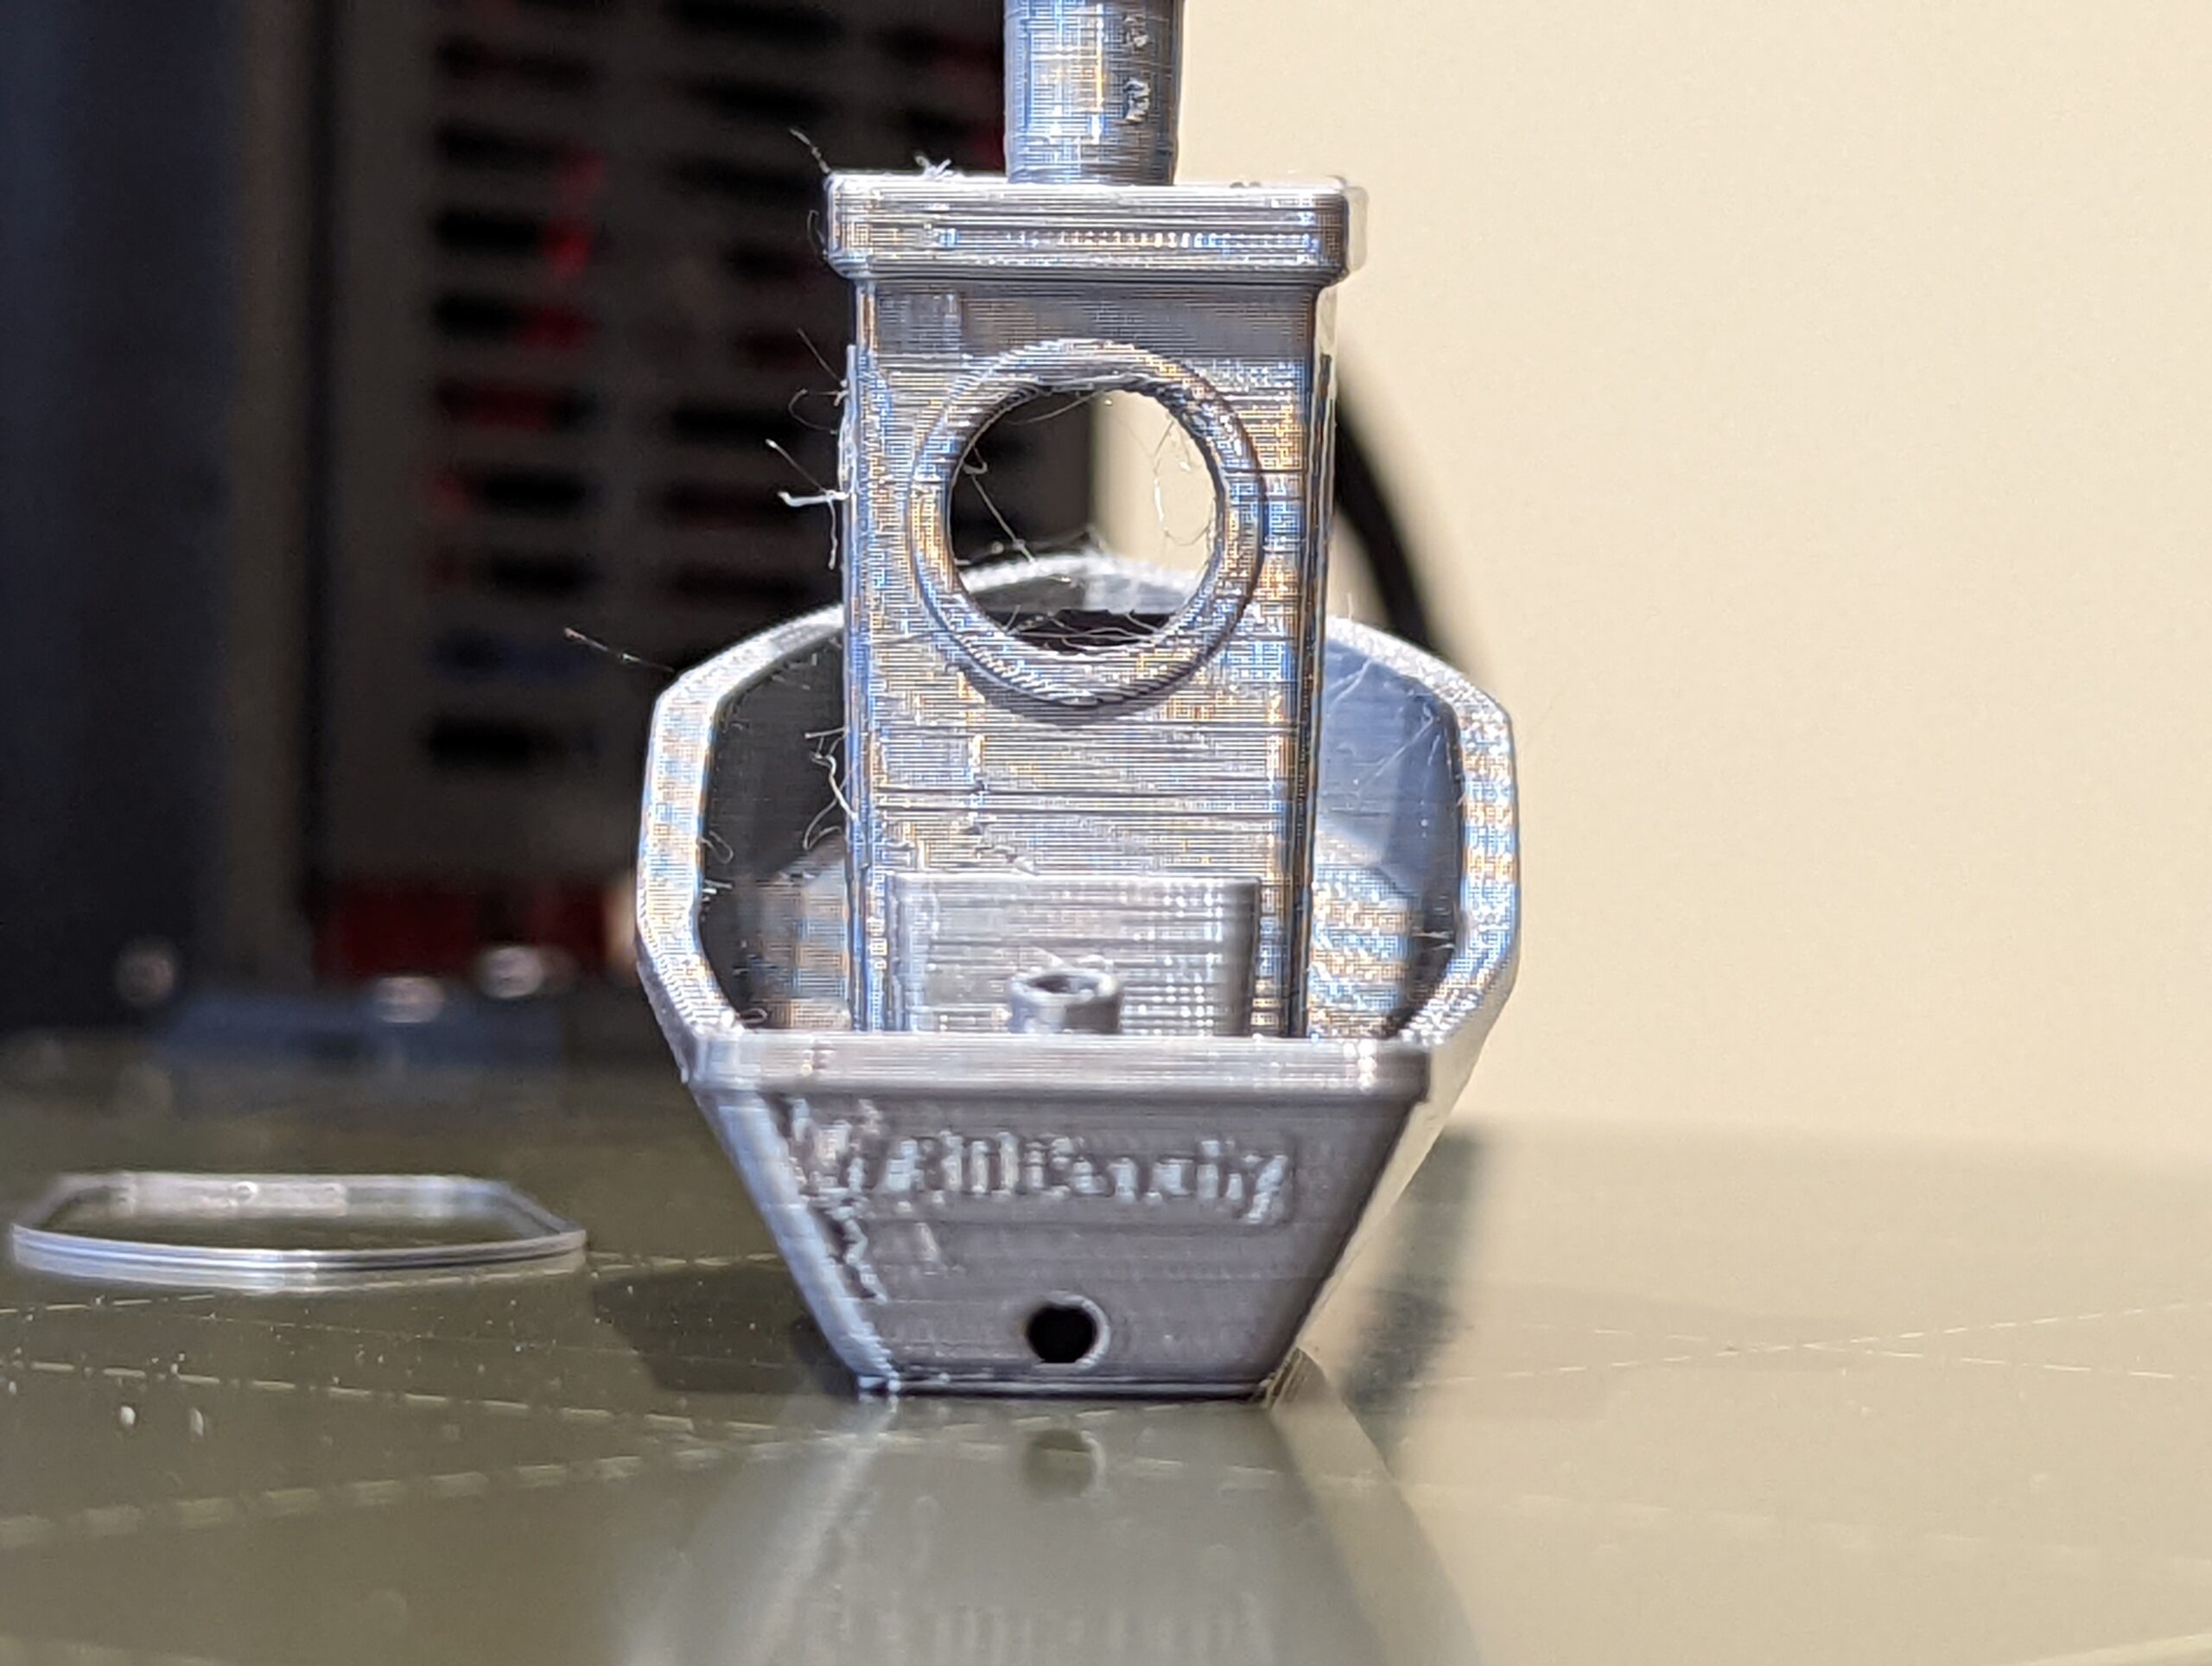
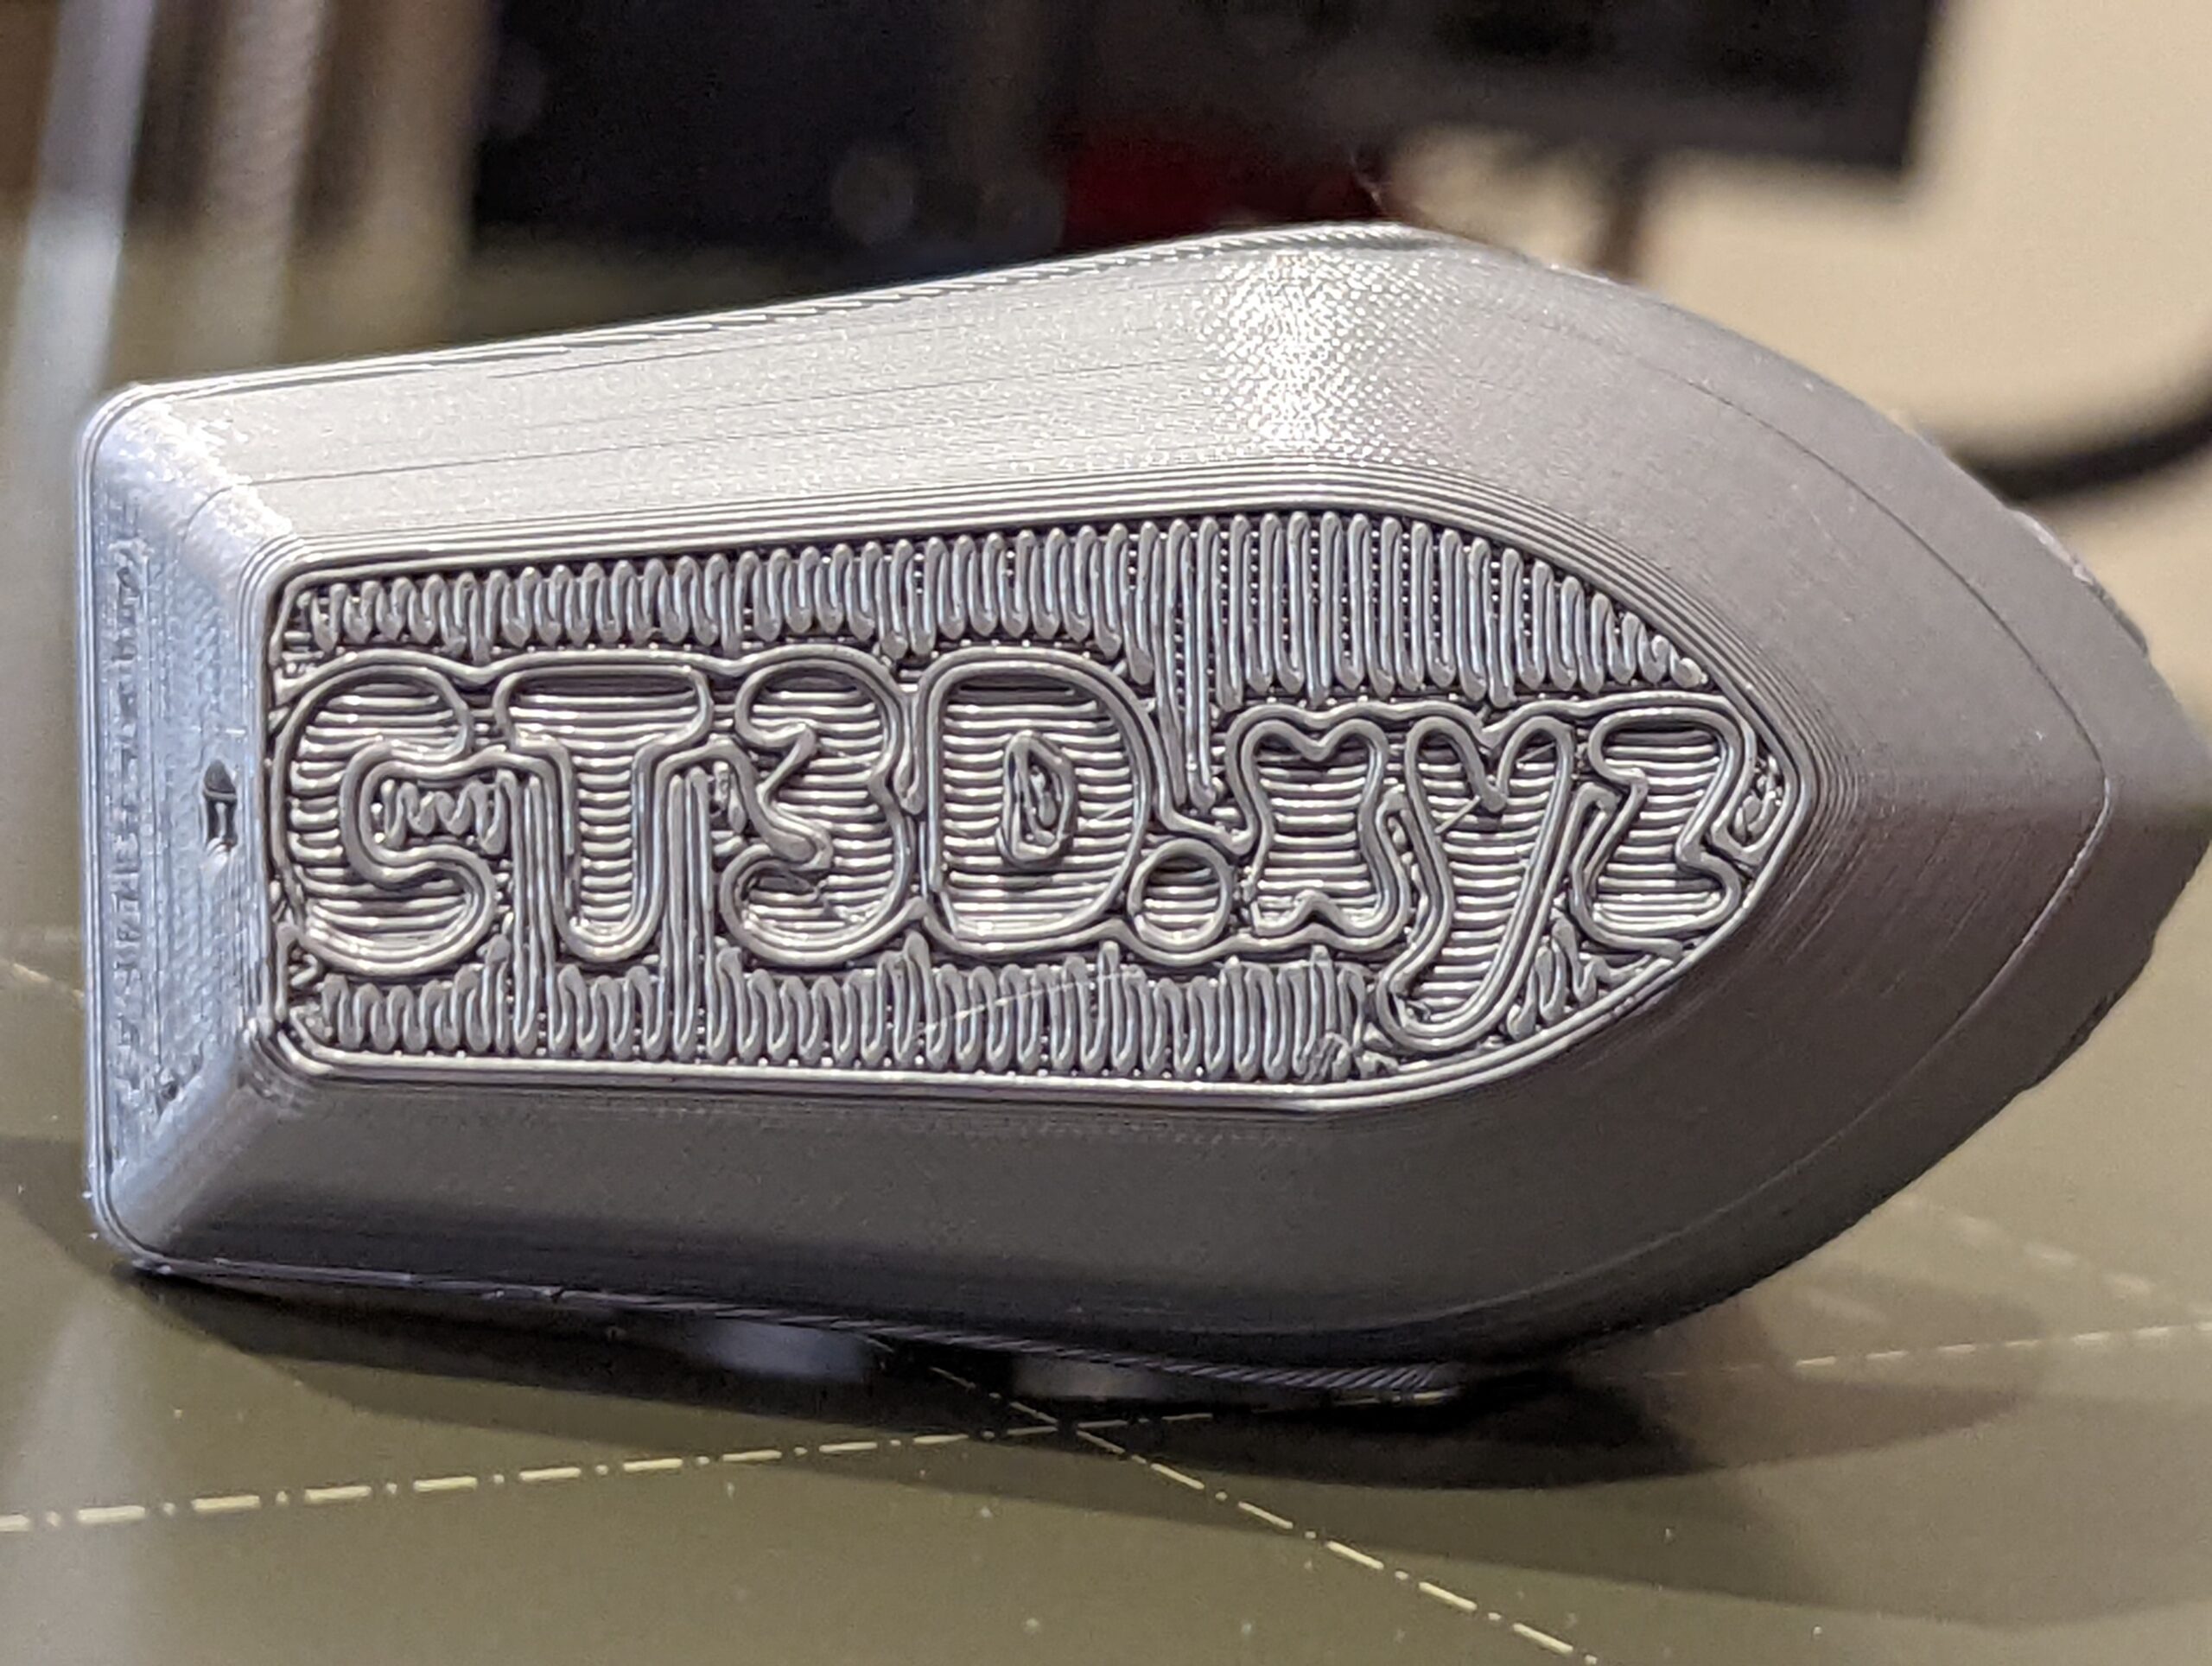
And here are some shots of the print:
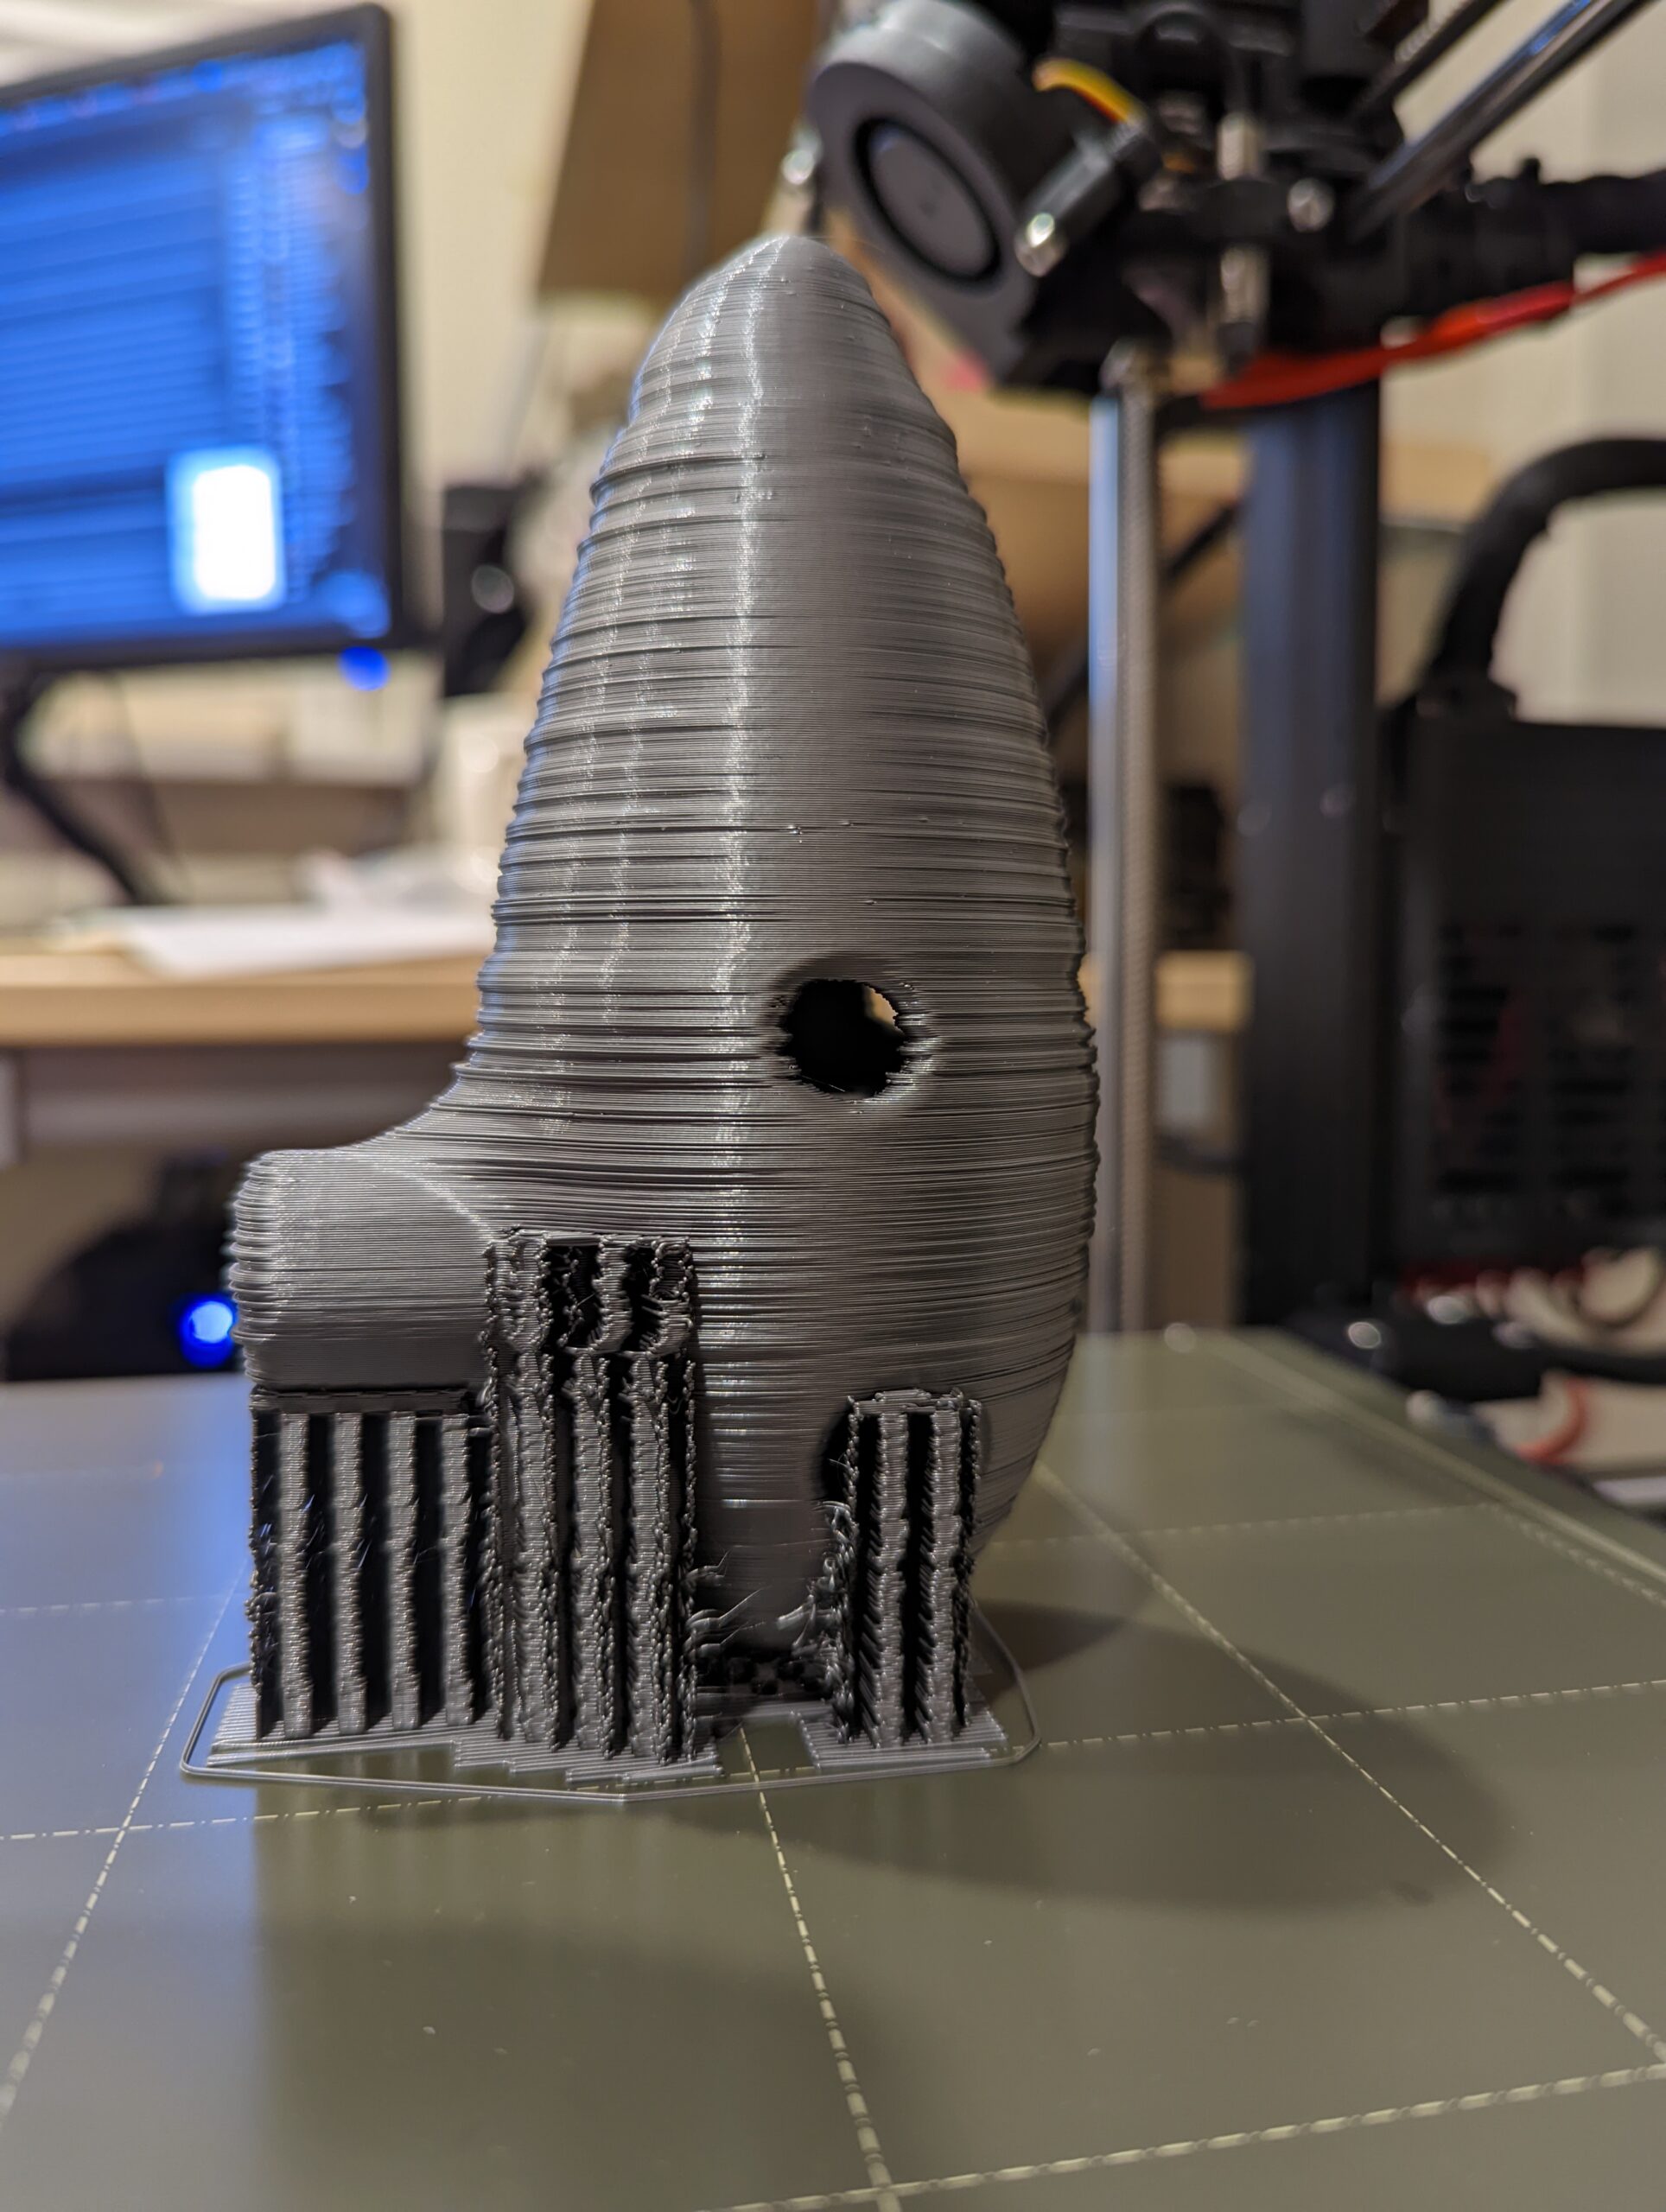
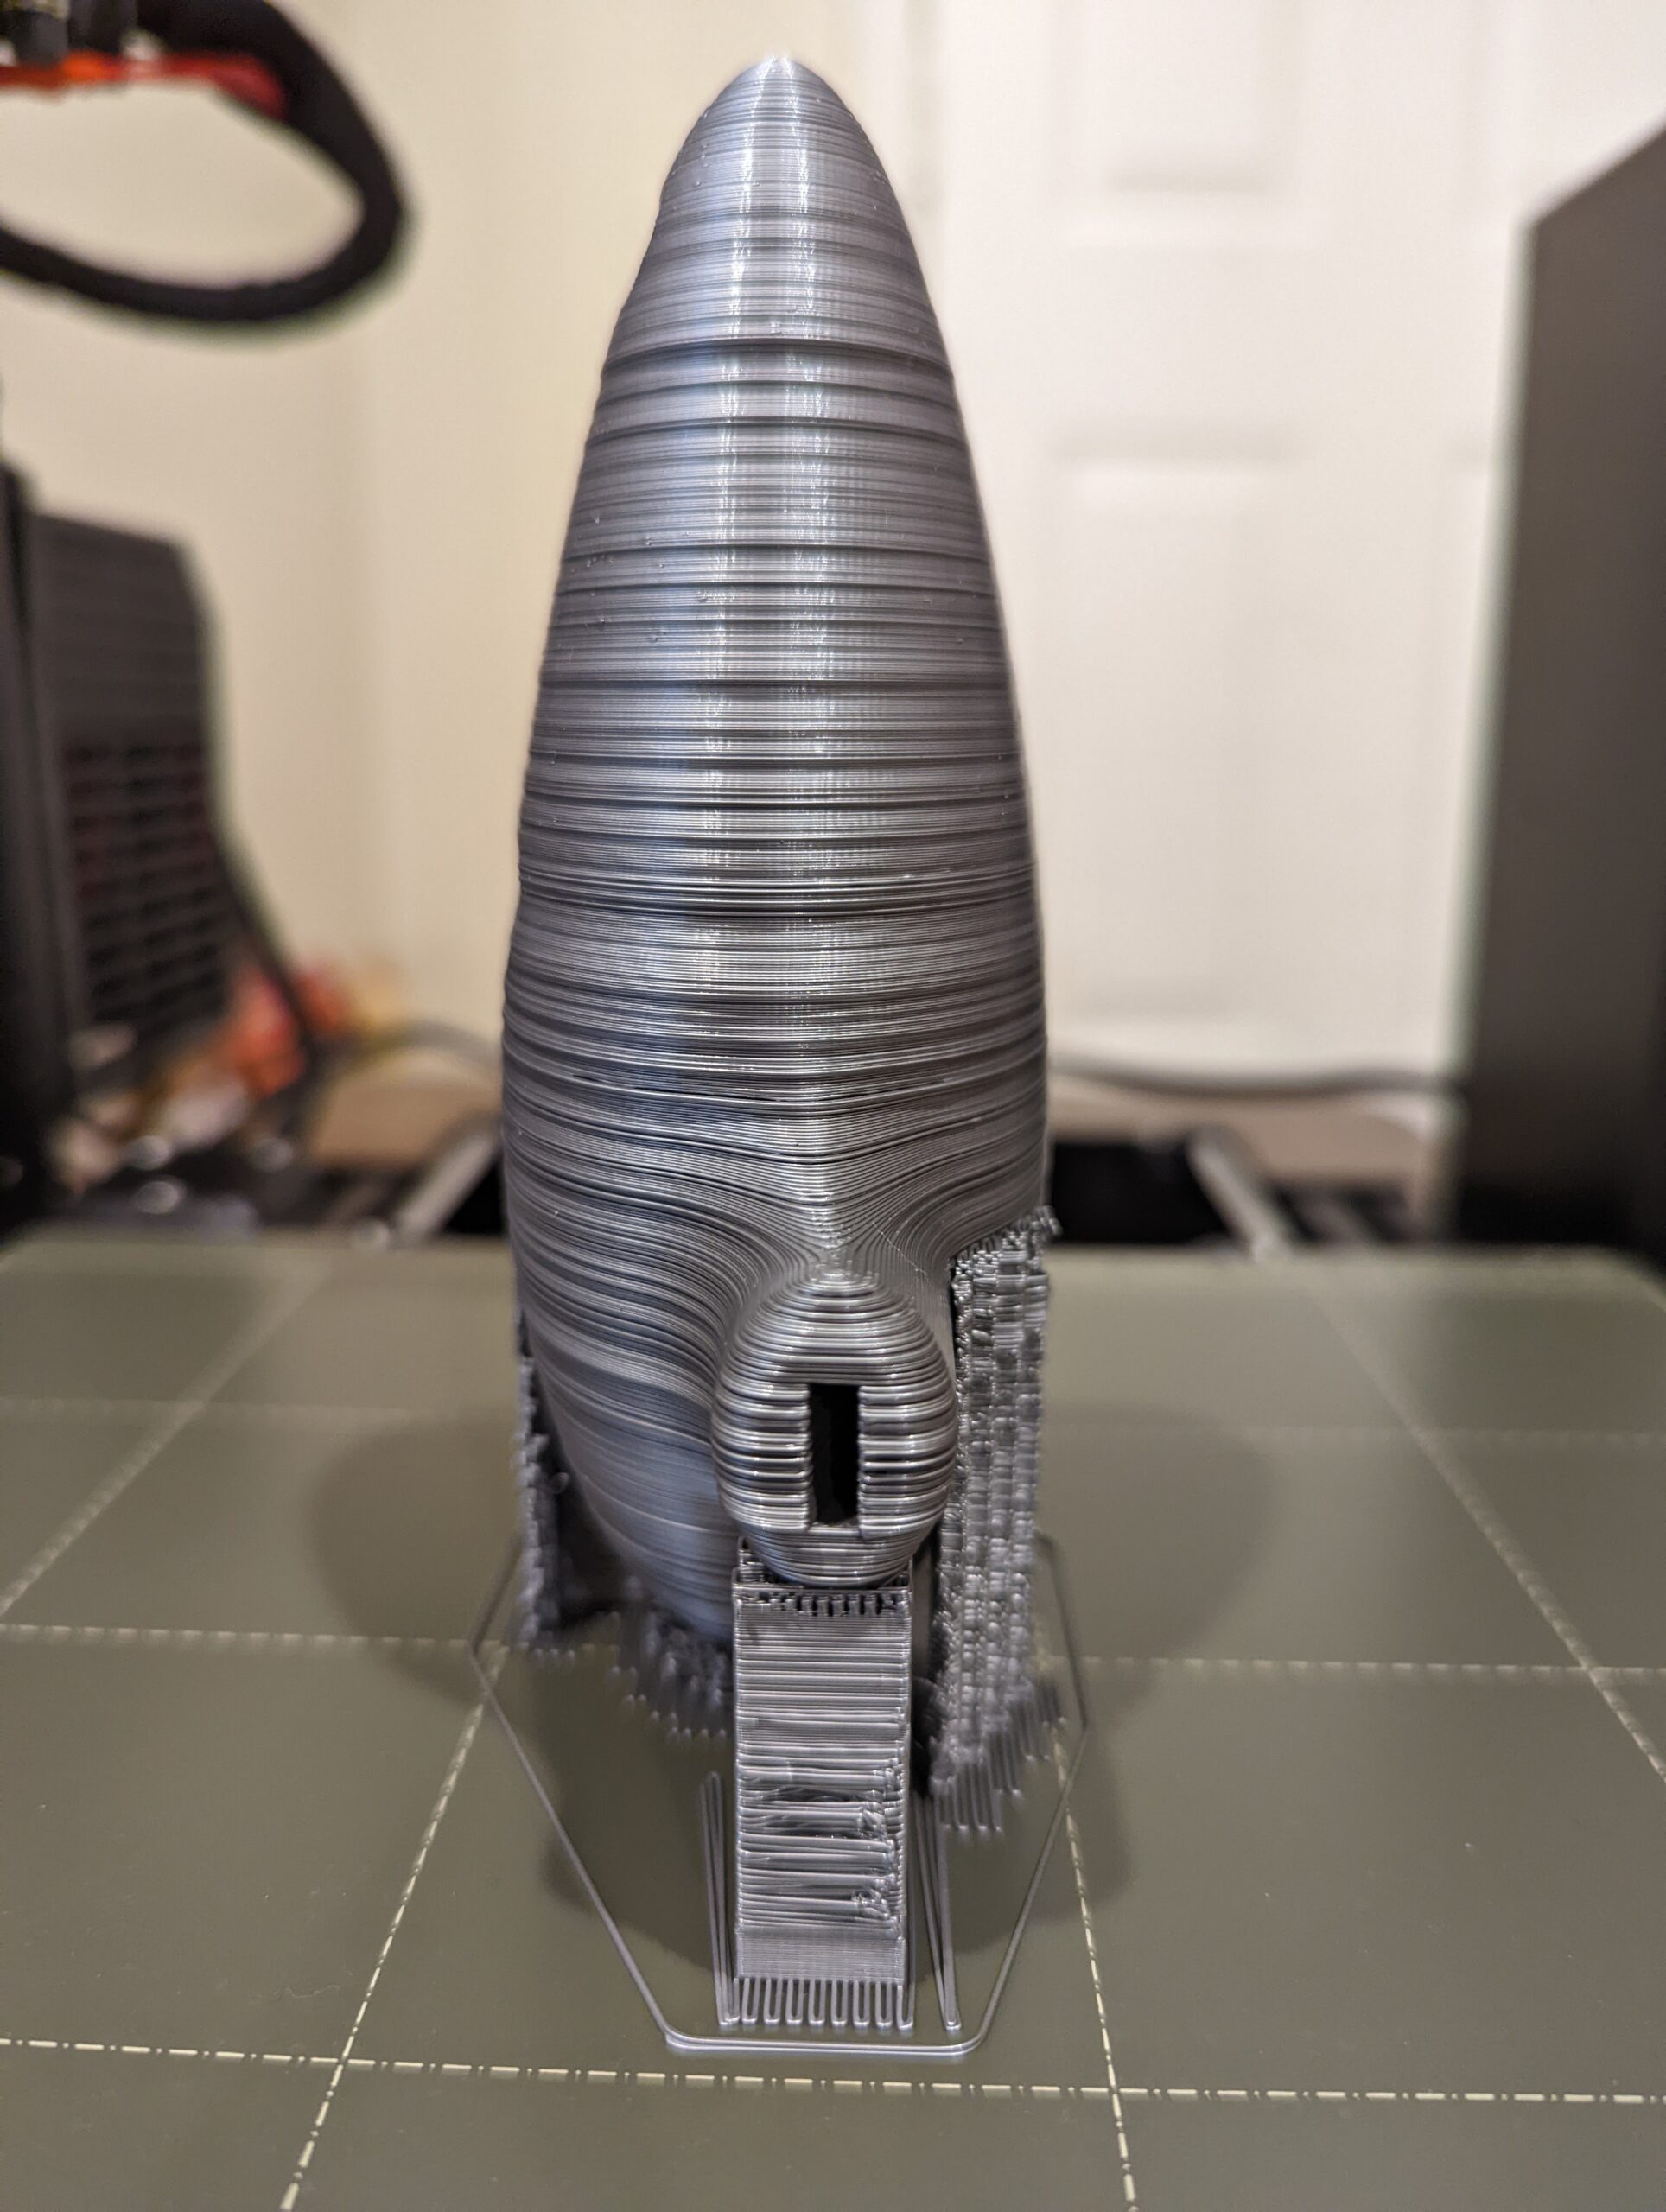
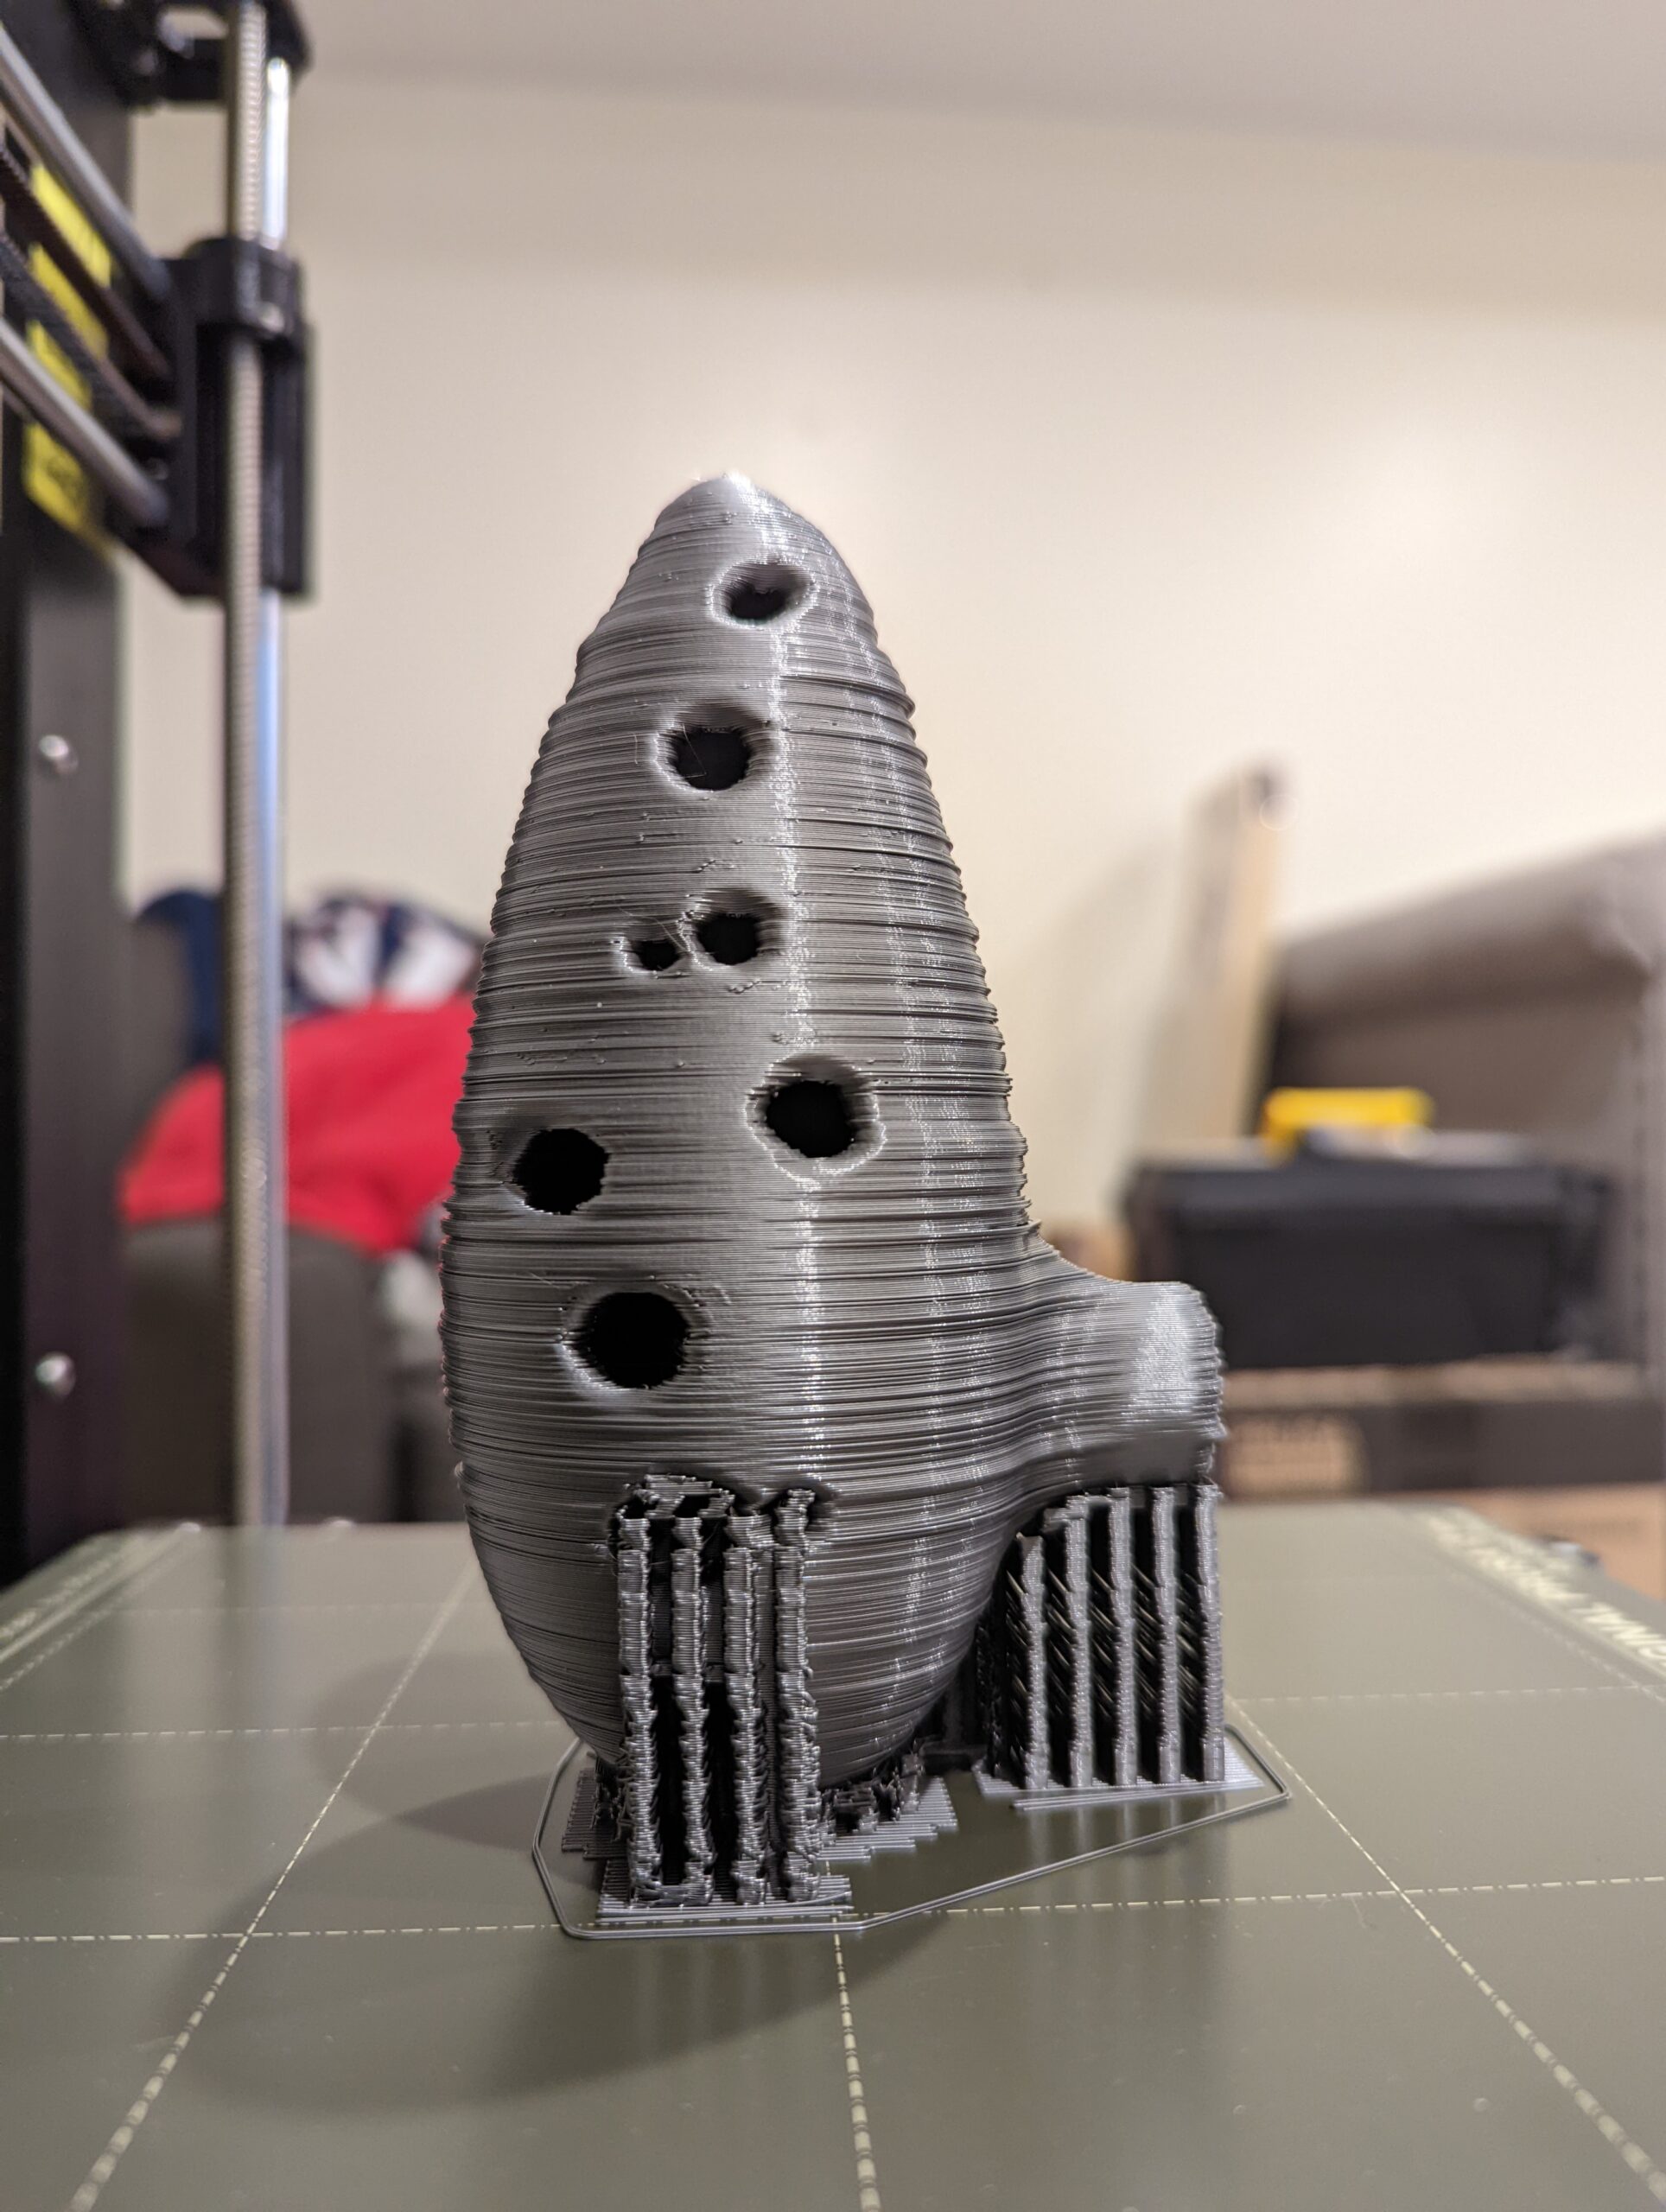
As you can see, it looks more like a bunch of lines stacked on top of each other, and less like a single solid object. I assume this is partially due to the .20mm height setting, but amplified by whatever is causing the variable offset between layers.
My research of the forums, blog posts, youtube videos etc. has made me think it could be one (or more) of the following:
- Vibrations/wobble of the entire machine from a less than stable surface. (It's on a small but sturdy wooden table.)
- Belt tension. (The belts seem to be pretty well tensioned, the support menu values are in the 250-270 range and they "feel good", but I suppose my lack of experience means my "feel" means very little here. I am planning on printing a PETG belt tension gauge others have recommended for my next print to verify.)
- Screws are too tight on some of the parts (Plausible, not sure how relevant, but they are definitely NOT loose)
- Screws are too loose on some of the parts (I do not think this is true, they are all snug after inspection)
- Bearings need to be greased. (As mentioned this is my 3rd part, 2 hours of use prior to starting this print, and while the assembly instructions very clearly said "You do NOT need to grease the bearings right now, they come pre-lubricated, but you will have to do it in the future for maintenance", I understand that it could very well just be time for a little of that maintenance from the very beginning. )
- Slicer settings are wrong. (I know very little about the settings and went with defaults as a starting baseline, however I don't think they would necessarily be causing such odd irregularities. I have found this on the prusa 3d models database, which I will probably try next (after working through all other hardware-based suggestions from the community). https://www.prusaprinters.org/prints/65399-12-hole-playable-ocarina/files)
I think that's everything I can think of, so while I wait for your awesome and helpful replies, I'm going to double check the tightness on all relevant screws/bolts, print the belt tension tool, lube up the bearings a bit, and try to print some smaller calibration-test items from the 3d models database to maybe help assist in the diagnosis. If you have any suggestions as to which calibration-test items I should be printing, I'm listening!
Thank you for your time everyone!
RE:
Could be from wet filament. You can dry it with a food dehydrator or air fryer. Search the forum for more info on drying.
Mk3S+,SL1S
RE: Requesting assistance diagnosing issue(s) with my print
That looks like a physical printer problem rather than a slicer problem.
First thing to check is your grub screw on the Y axis motor at the back of the bed isn't loose. Unless they are fitted correctly they can loosen over time and cause just that effect. The back and forth offset movement is a classic indicator of that.
Second would be belt tension on the y axis. Plenty of instructions on how to do that already so no point repeating.
As you have already discovered from your research the bearing smoothness can make a huge difference to proper operation. Manually sliding the bed and extruder around to feel how smooth it is is easy to do though and should rapidly indicate if it is a bearing problem.
Third would be checking the Z axis. Its possible the motors arent lifting/lowering the axis correctly. This would lead to squished layers but it doesnt look quite like that. Looks too extreme. Although Im not sure how you would go about checking that as manually moving them is a lot more difficult. Its quite easy to cross thread the t nuts when assembling which is why theres a specific warning in the manual at that step.
RE: Requesting assistance diagnosing issue(s) with my print
Since the OP didn't list it explicitly in his original post (he just mentioned screws), my money is on loose grub screws or the grub screws not tightened against the flat side of the shaft.
Formerly known on this forum as @fuchsr -- https://foxrun3d.com/
I agree with the advice given above 'though I can't see any obvious Z motor problems.
But
That's a very ambitious first print: if the printer is not spot-on the top notes will be very weak at best and the timbre off. That said, even this first attempt may produce a few notes at the bottom of the range 'though the holes will need to be smoothed to become air-tight.
When you re-print, slice with extra perimeters (try 4) and use 50% cubic fill. Musical instruments, even wind, get a lot of their tone from the stiffness/resonance of their structure. For performance quality, especially in the top register, you would need to experiment with varying fill densities - but going straight for 100% fill might dissappoint.
This is the sort of print that I would normally suggest delaying until you have a few months experience, minute inaccuracies and variations in the settings will have a big acoustic effect.
Don't depair; with experience you will produce decent, playable instruments.
If you have any suggestions as to which calibration-test items I should be printing, I'm listening!
Yes: none.
Every user builds their printer slightly differently and even the pre-built ones get shaken in transit so during the first few weeks of use the printer will run-in and settle its parts together; then you will have to go over the basic maintenance checks, lubricate and recalibrate. Even if you got everything dialled in perfectly today, it would all need re-doing.
Better to settle, temporarily, for a basic working printer and get some useful printing done, make your early mistakes, establish a routine and generally get used to the process. Then when you do your one month service you can take extra care knowing the new settings on your now stable printer are likely to last for several months.
Start with simple, useful objects. Work up to larger, more complex ones as you gain experience. Leave calibration-test prints for the rare occasions you really need them.
Cheerio,
RE:
I agree that it's definitely a mechanical issue with the printer.
From the photos above, there's some definite inconsistency and layer shifting on the Y axis.
Improperly tightened grub screw, as pointed out previously in the thread, is a likely cause.
Loose or misaligned anything in the Y mechanism is also possible.
If this were mine, I would carefully inspect the heatbed mounting, the 'squished frog', Y stepper, drive belt hardware, etc., check to be sure that everything is tight, and also inspect the X and Z hardware to be sure everything is in good mechanical shape.
Something like a test cube is a good print to use for testing for layer shifting and similar mechanical issues..
RE: Requesting assistance diagnosing issue(s) with my print
Hey everyone, I am back with some updates. First, thank you all for the advice and discussion, it's been very helpful reading it and learning from your collective experience!
Here's what I've done since the initial post:
- Checked all grub screws were secured snuggly on the flat parts of the motors.
- Lubed up all smooth rods.
- Re-built the hotend/extruder assembly with extra care to make sure the heatsink and hot end were perfectly oriented (it seemed a little twisted when I took a closer look.)
- Made sure all bolts were correctly tightened (not too loose, not overly tightened). Specifically I think the heatbed screws were a little looser than they should've been. Tightening these up a little bit significantly reduced noise with X & Y movement, which was a 2 for 1 improvement. I think this might've been the biggest improvement, but that's just a guess.
- I attempted to print the belt tension tool using the Prusament White PETG, but that was a nightmare I eventually gave up on. I will return to PETG when I am more comfortable with dialing in the quality of the hardware build. (For those interested, the PETG was not sticking to the textured steel sheet at all, no matter what settings I tried. Live adjusting the Z value eventually got it to partially stick, but it was so easy to remove, a small gust of wind could remove it. The first layer calibration for PETG was also nowhere close to what it should look like, the lines were very separated, not a single "sheet" plastic square at the end. I read so many forum posts, and tried tweaking first layer temperatures, Z values, SLOW speed, SLOW acceleration, washed the textured sheet with dish soap and hot water...nothing worked. I'm sure I'll be posting about this in the future when I attempt to re-tackle the issue).
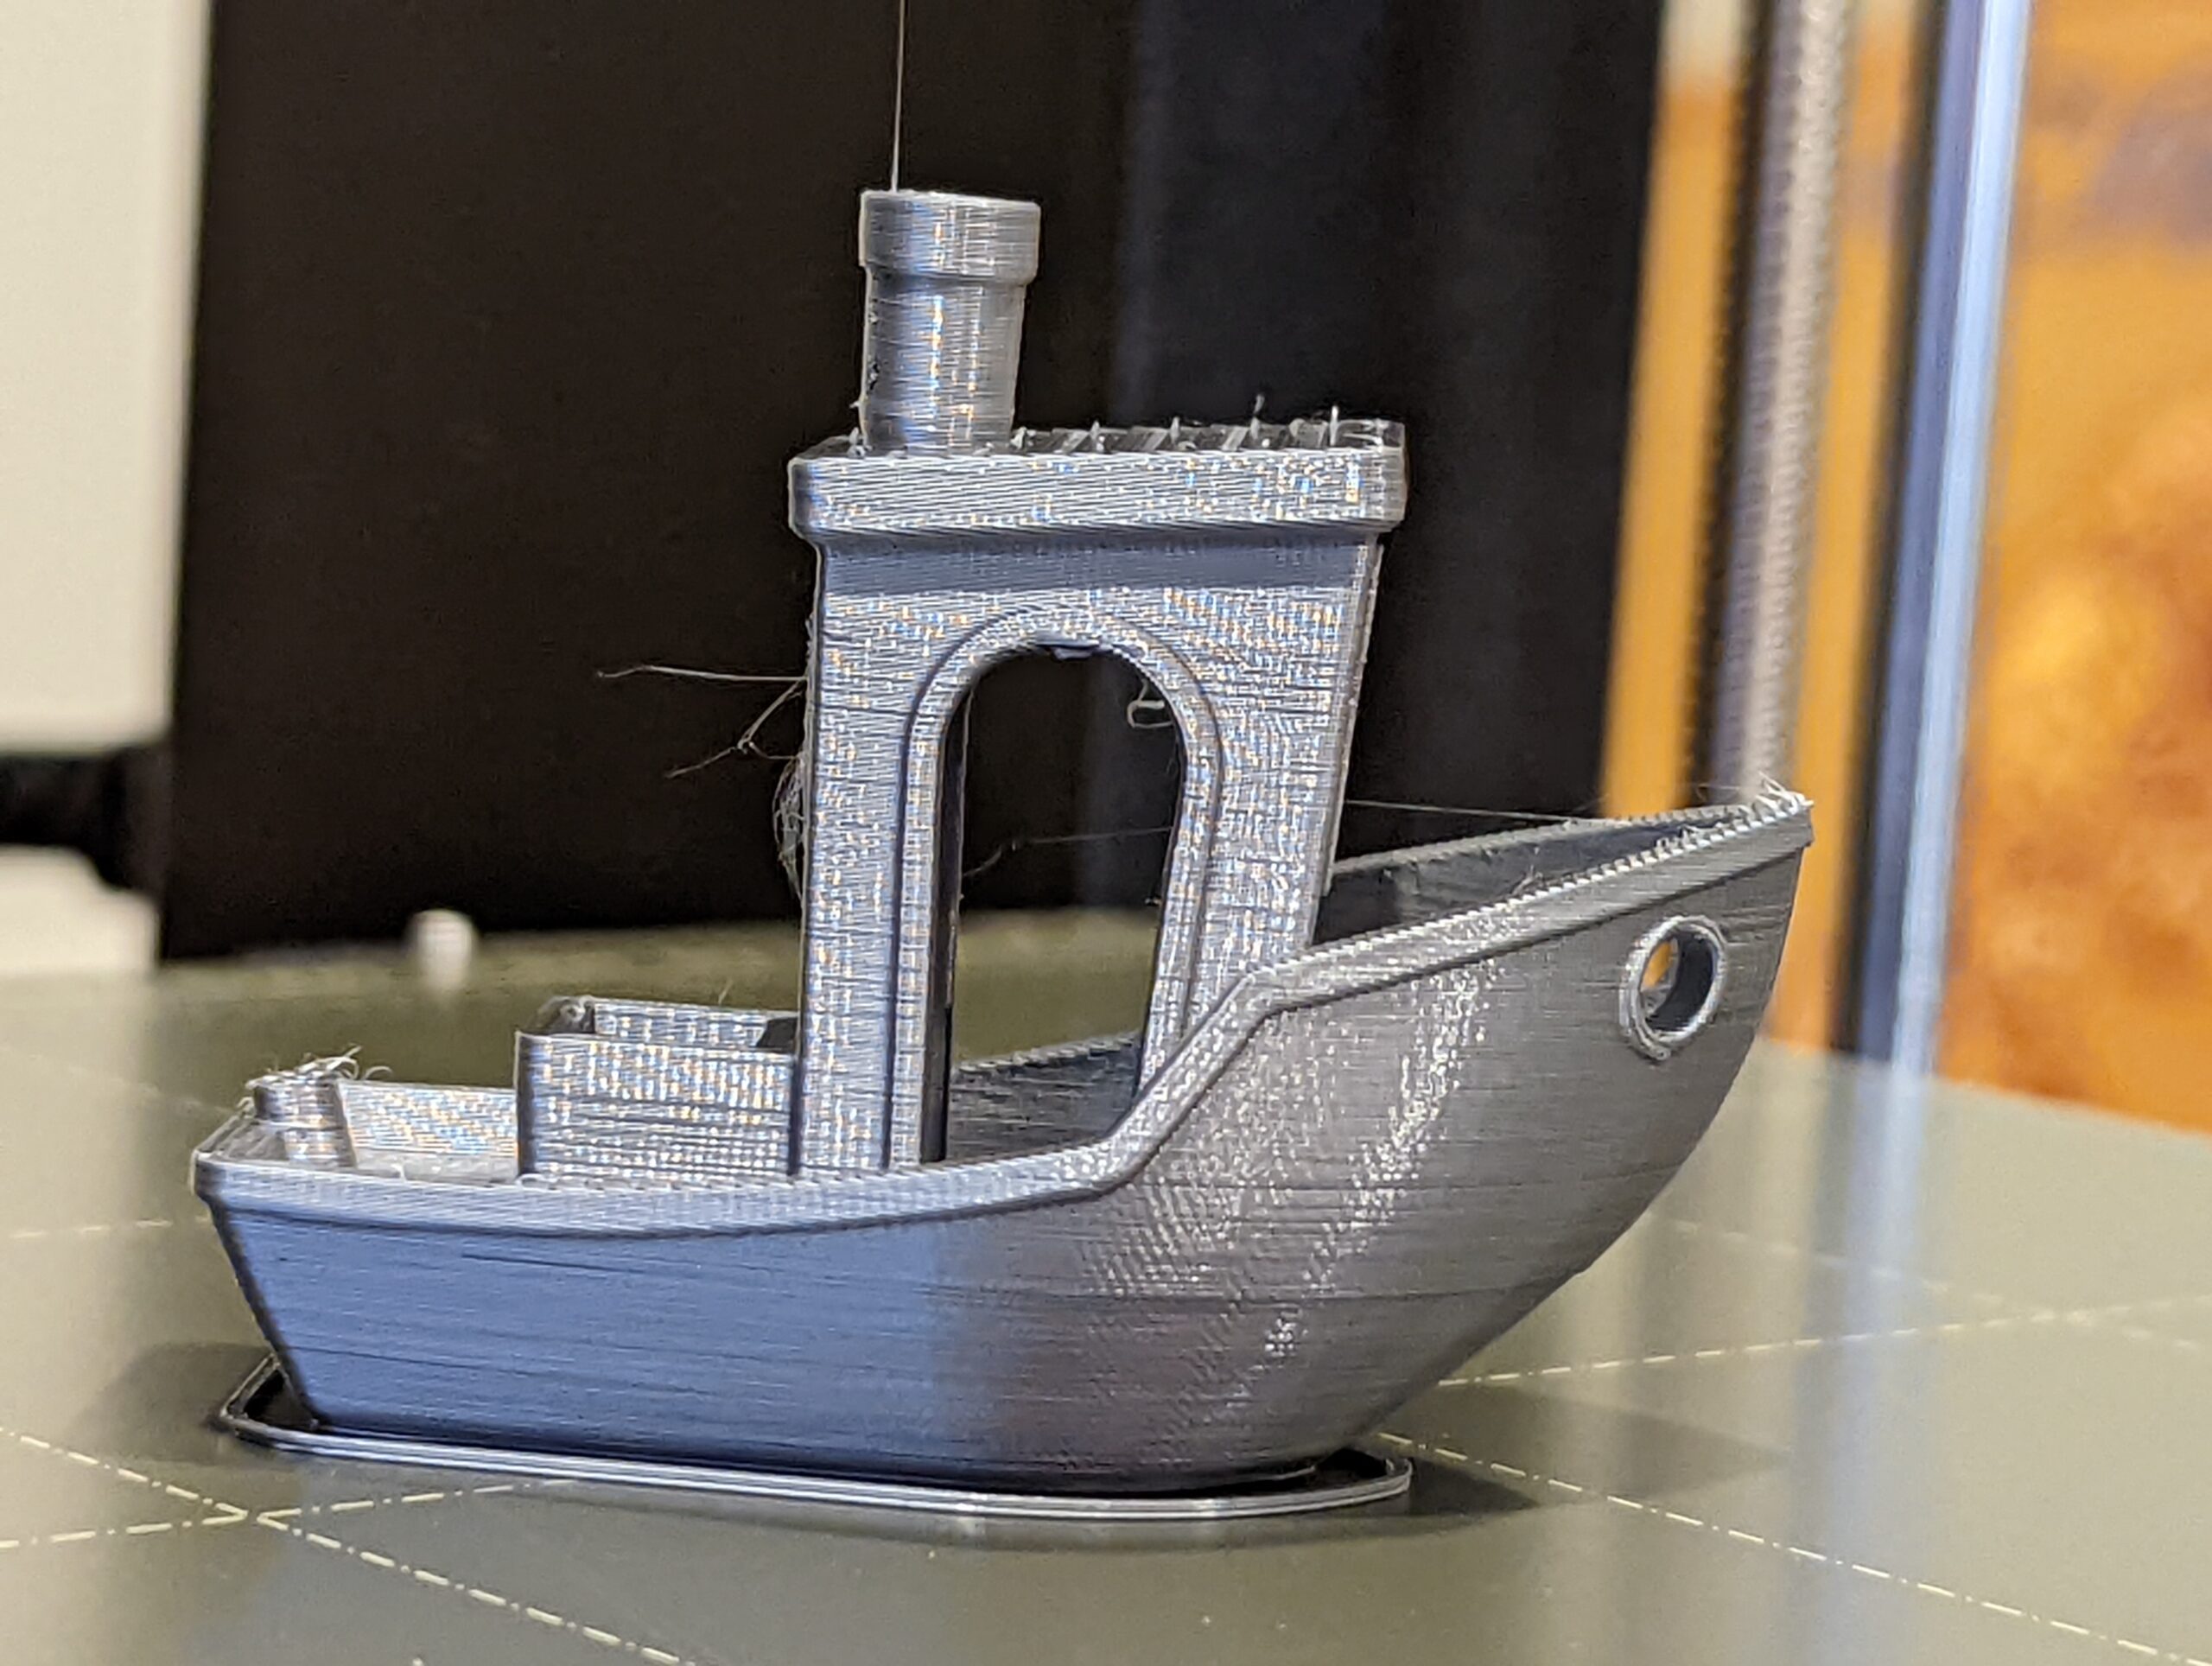
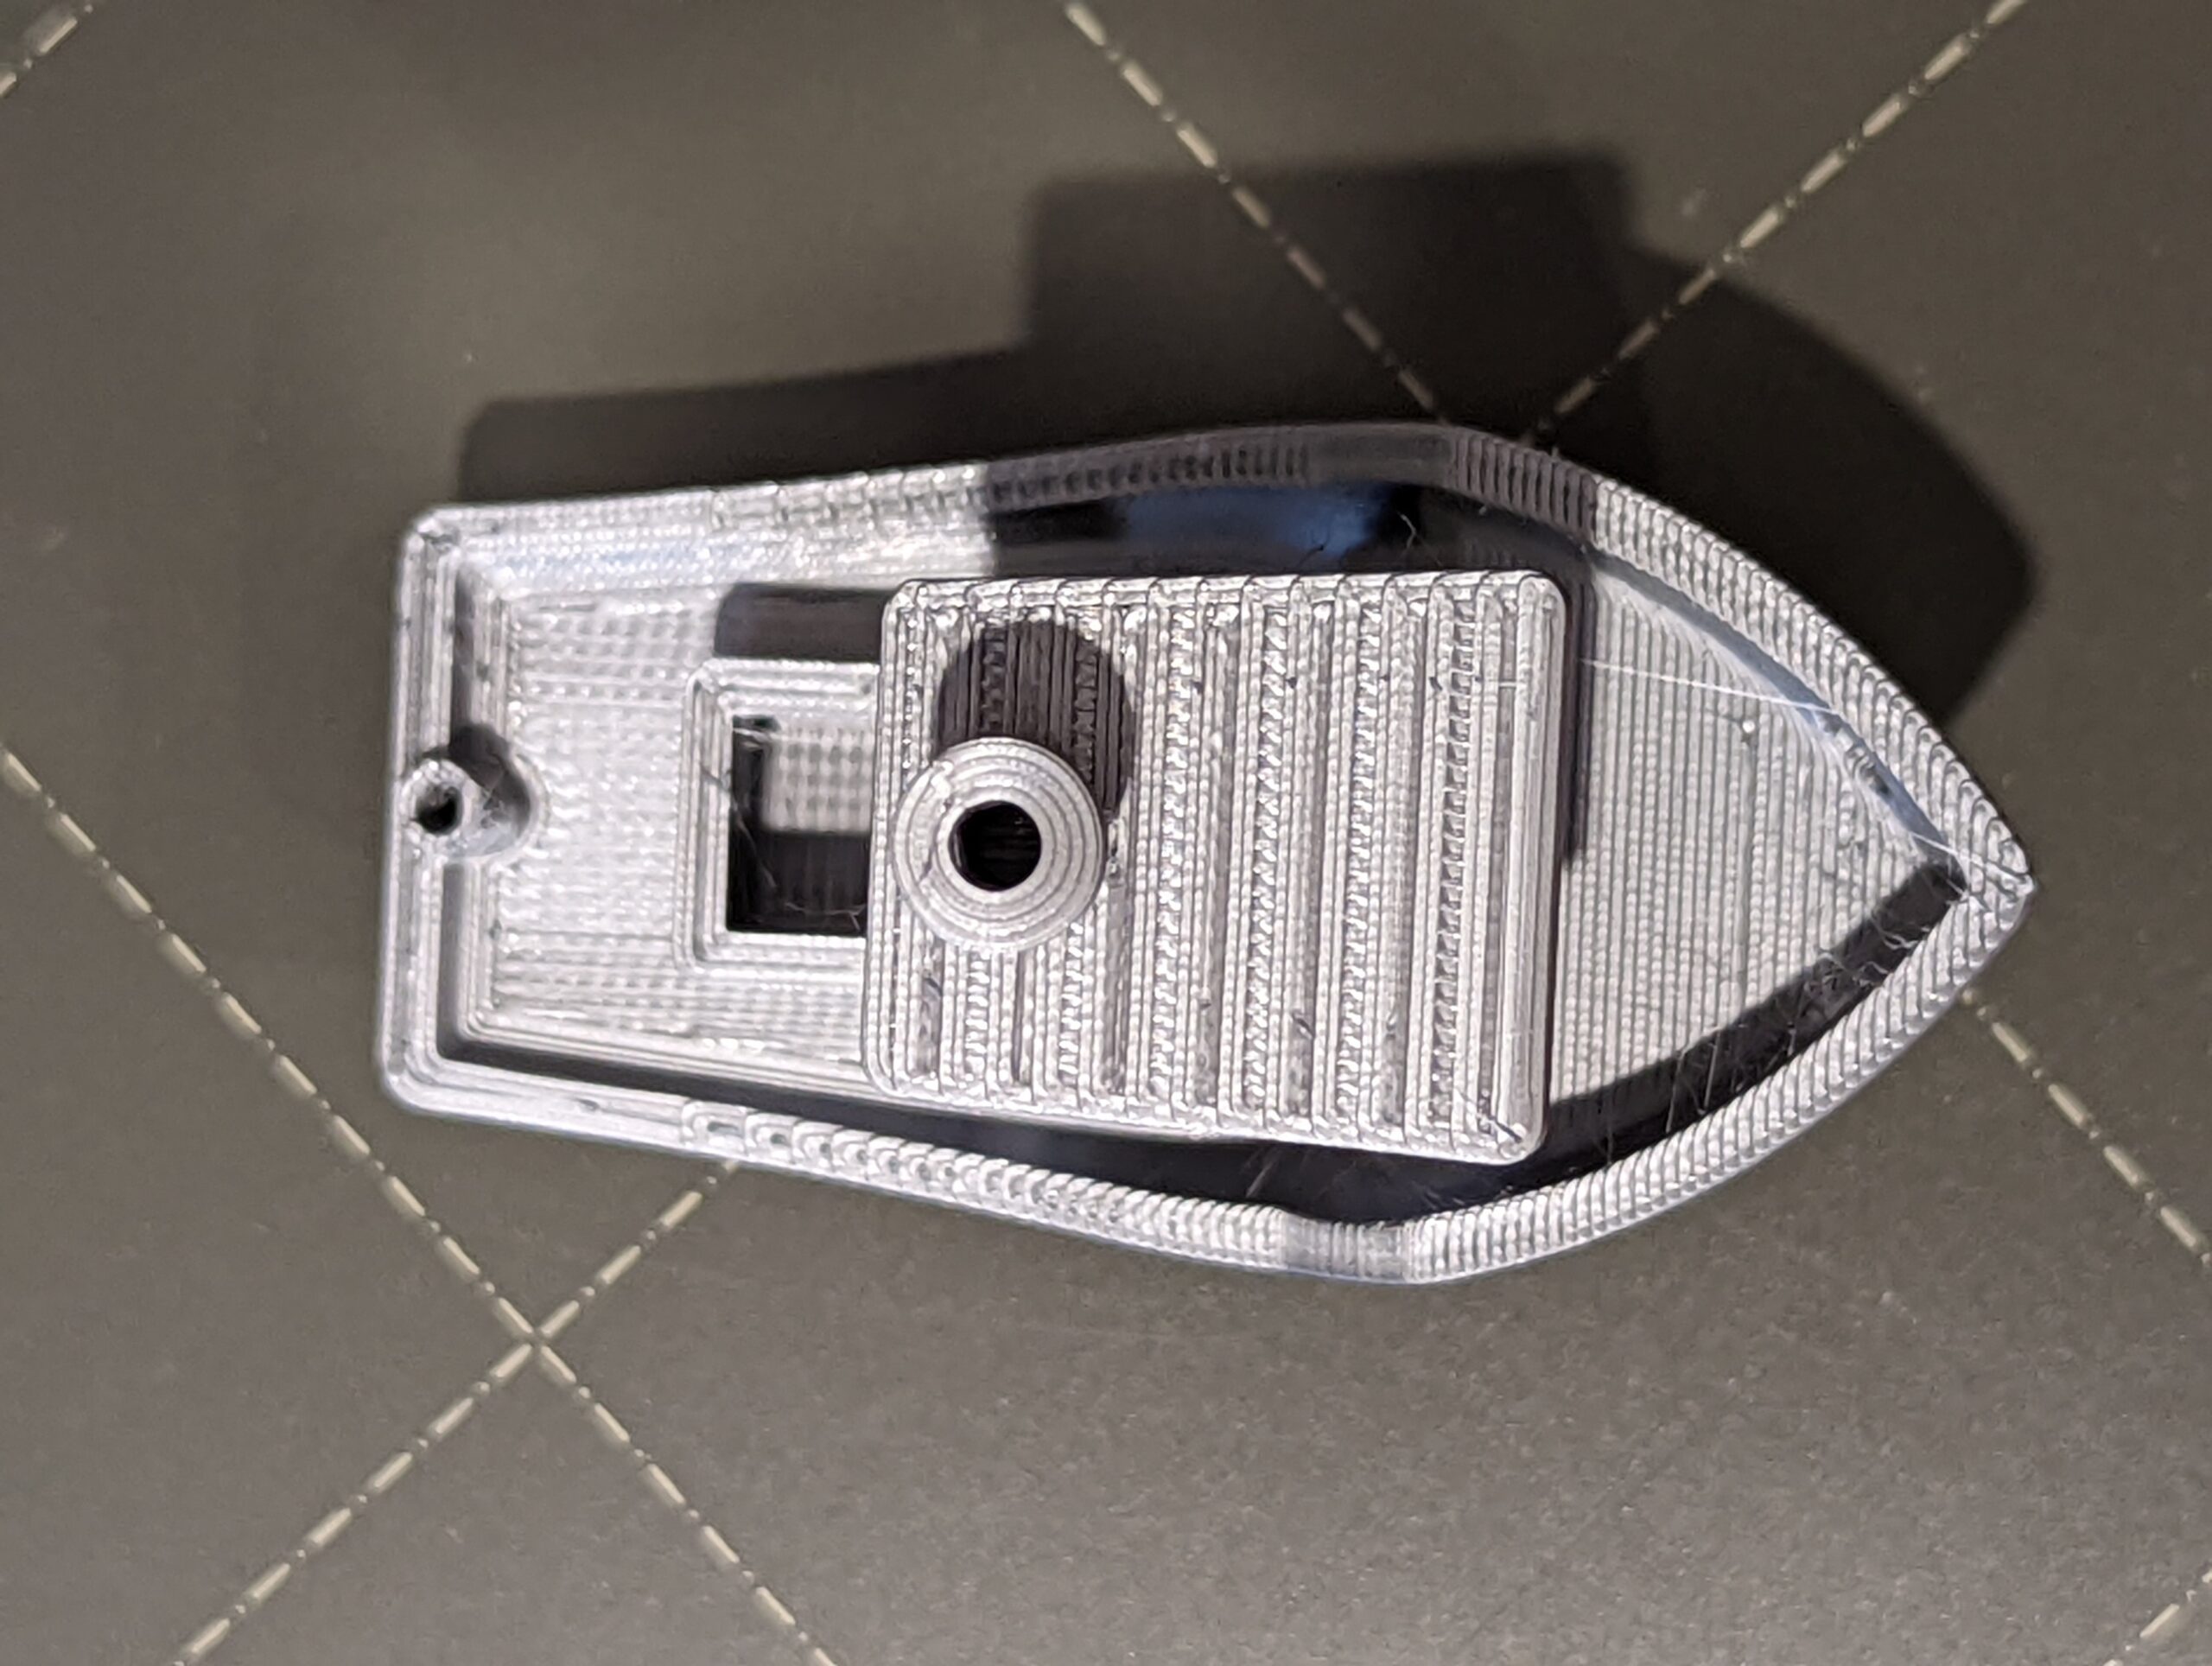
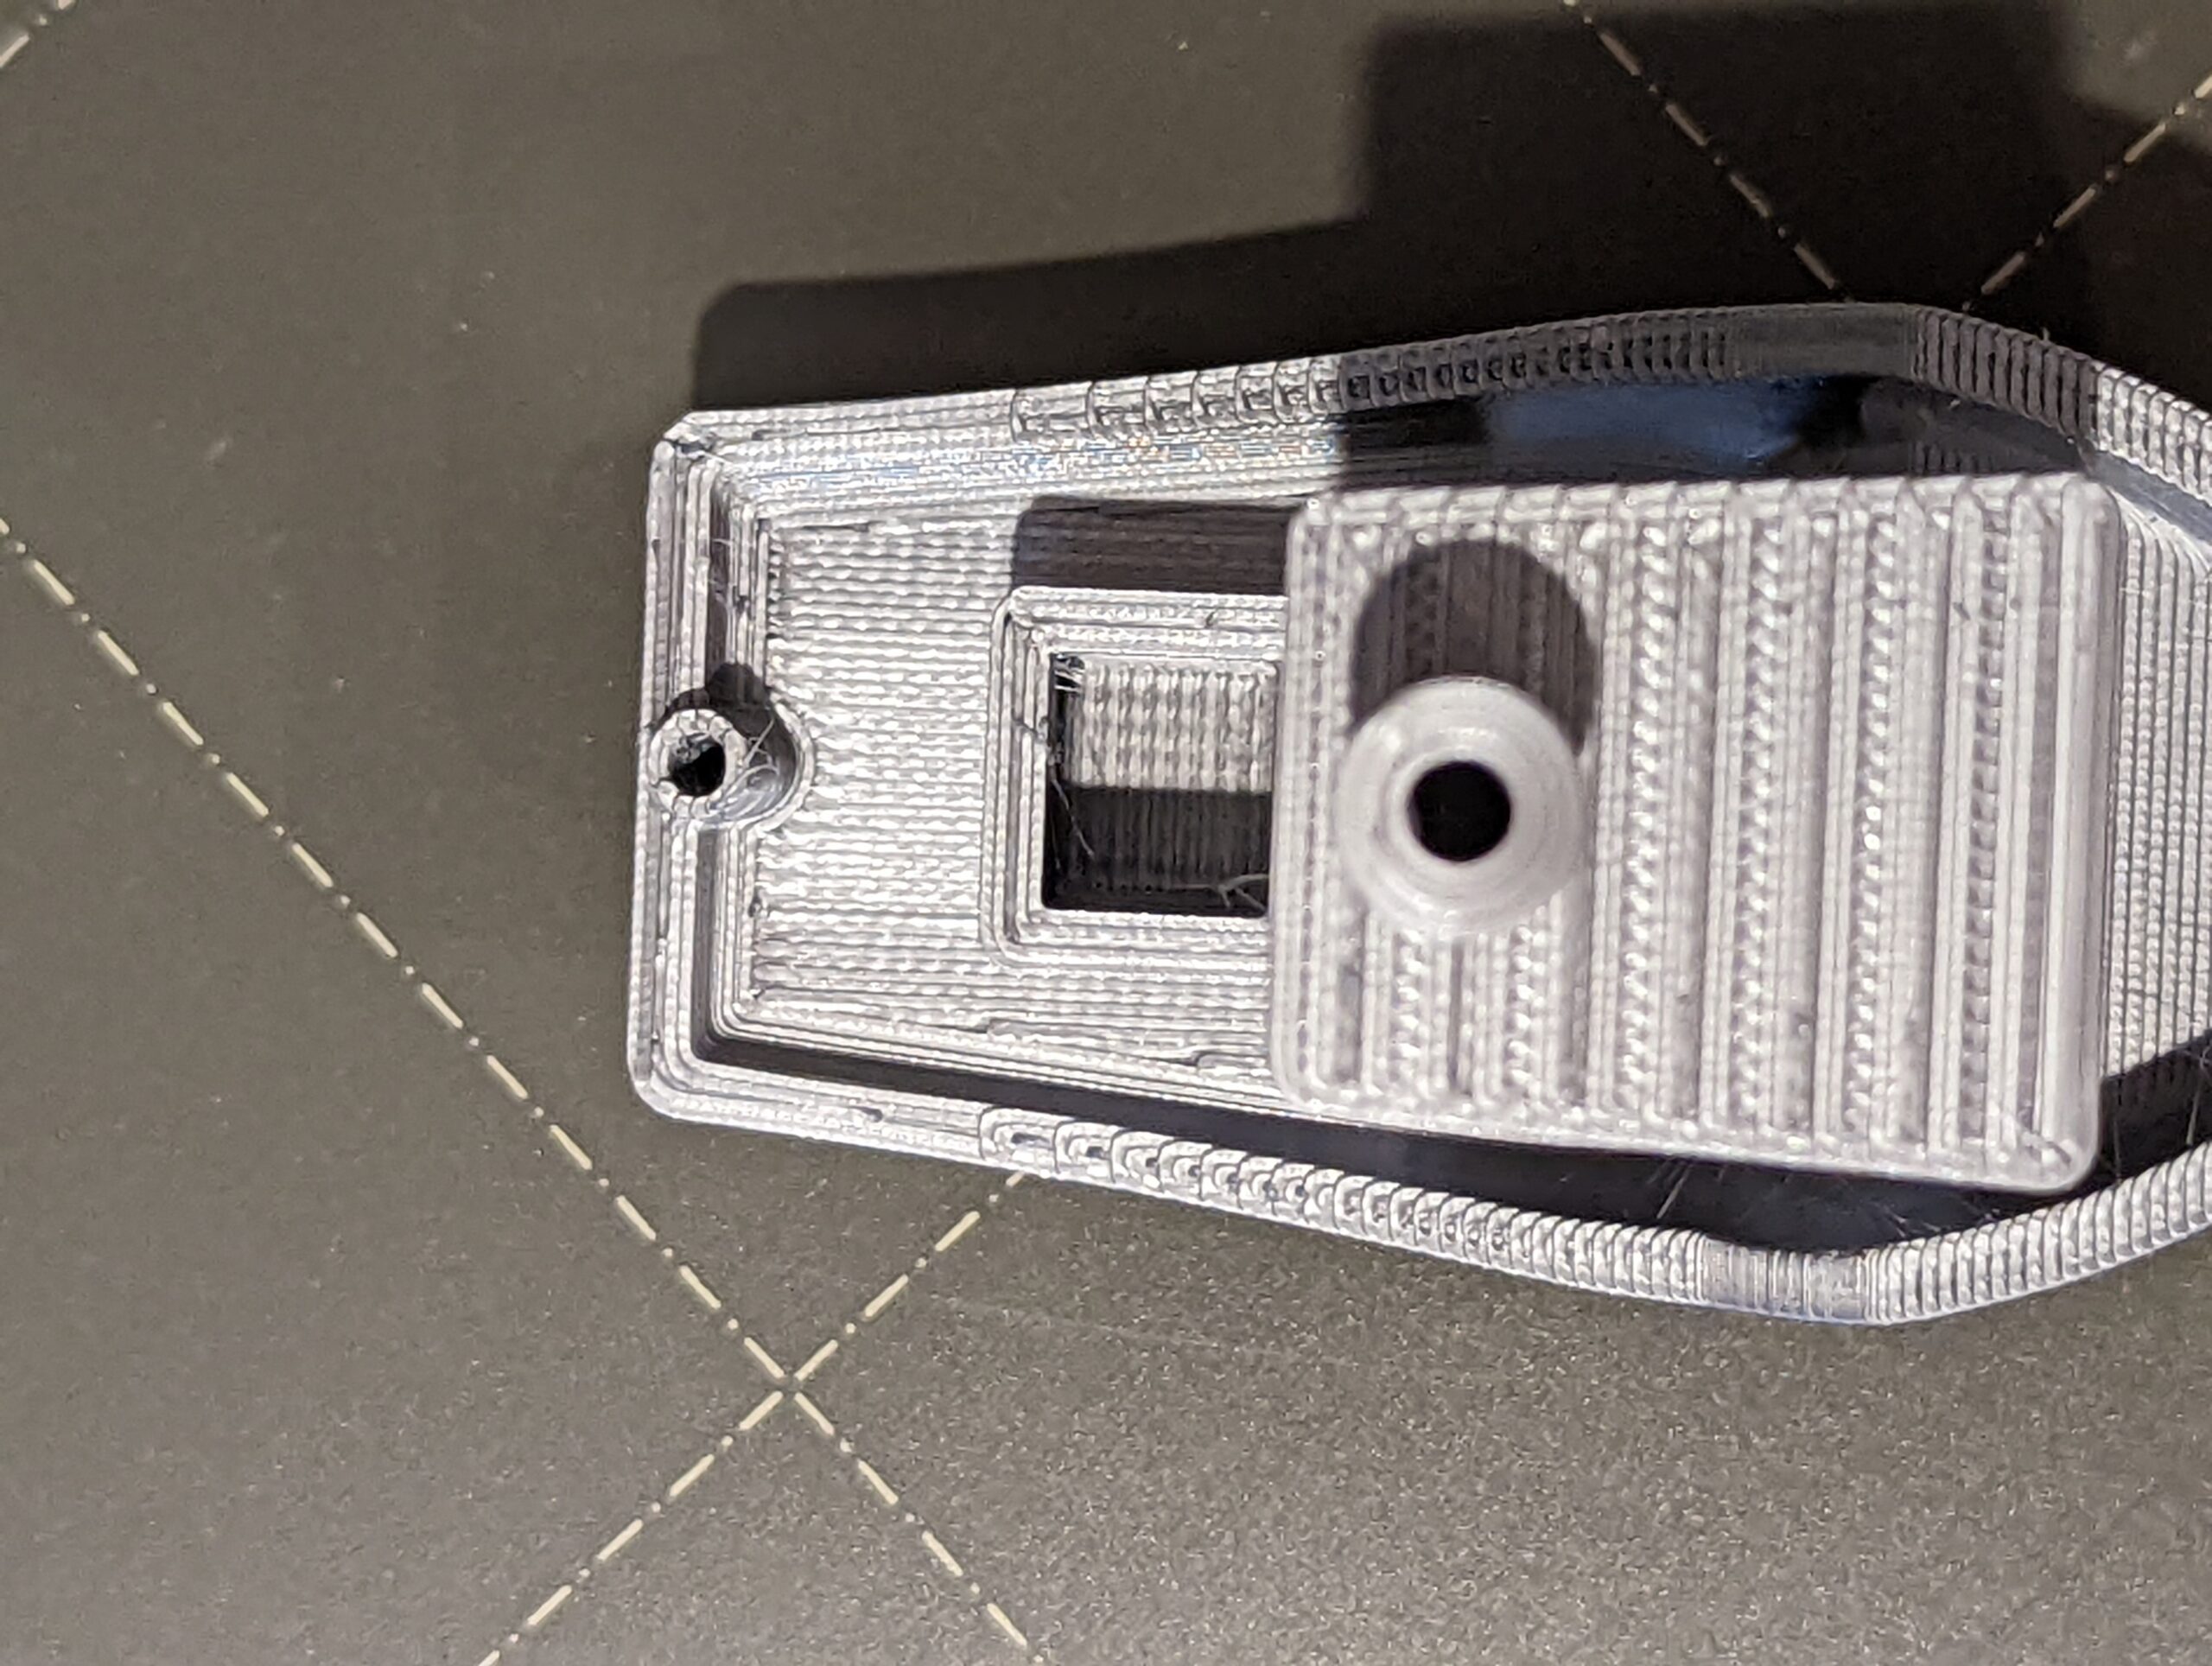
- Finally decided belts still feel really good, don't need the tool right now, going to give PLA prints another shot. Printed a calibration cube and a Benchy boat, both came out significantly better.
I see a little ghosting, a little stringing, and the infamous hull line here, but overall it does not seem to have any of the issues from my previous post, so I think the printer is in a much better place. If you see anything concerning or wrong, or something that can be/should be improved in these images, please let me know. Thanks for the help everyone <3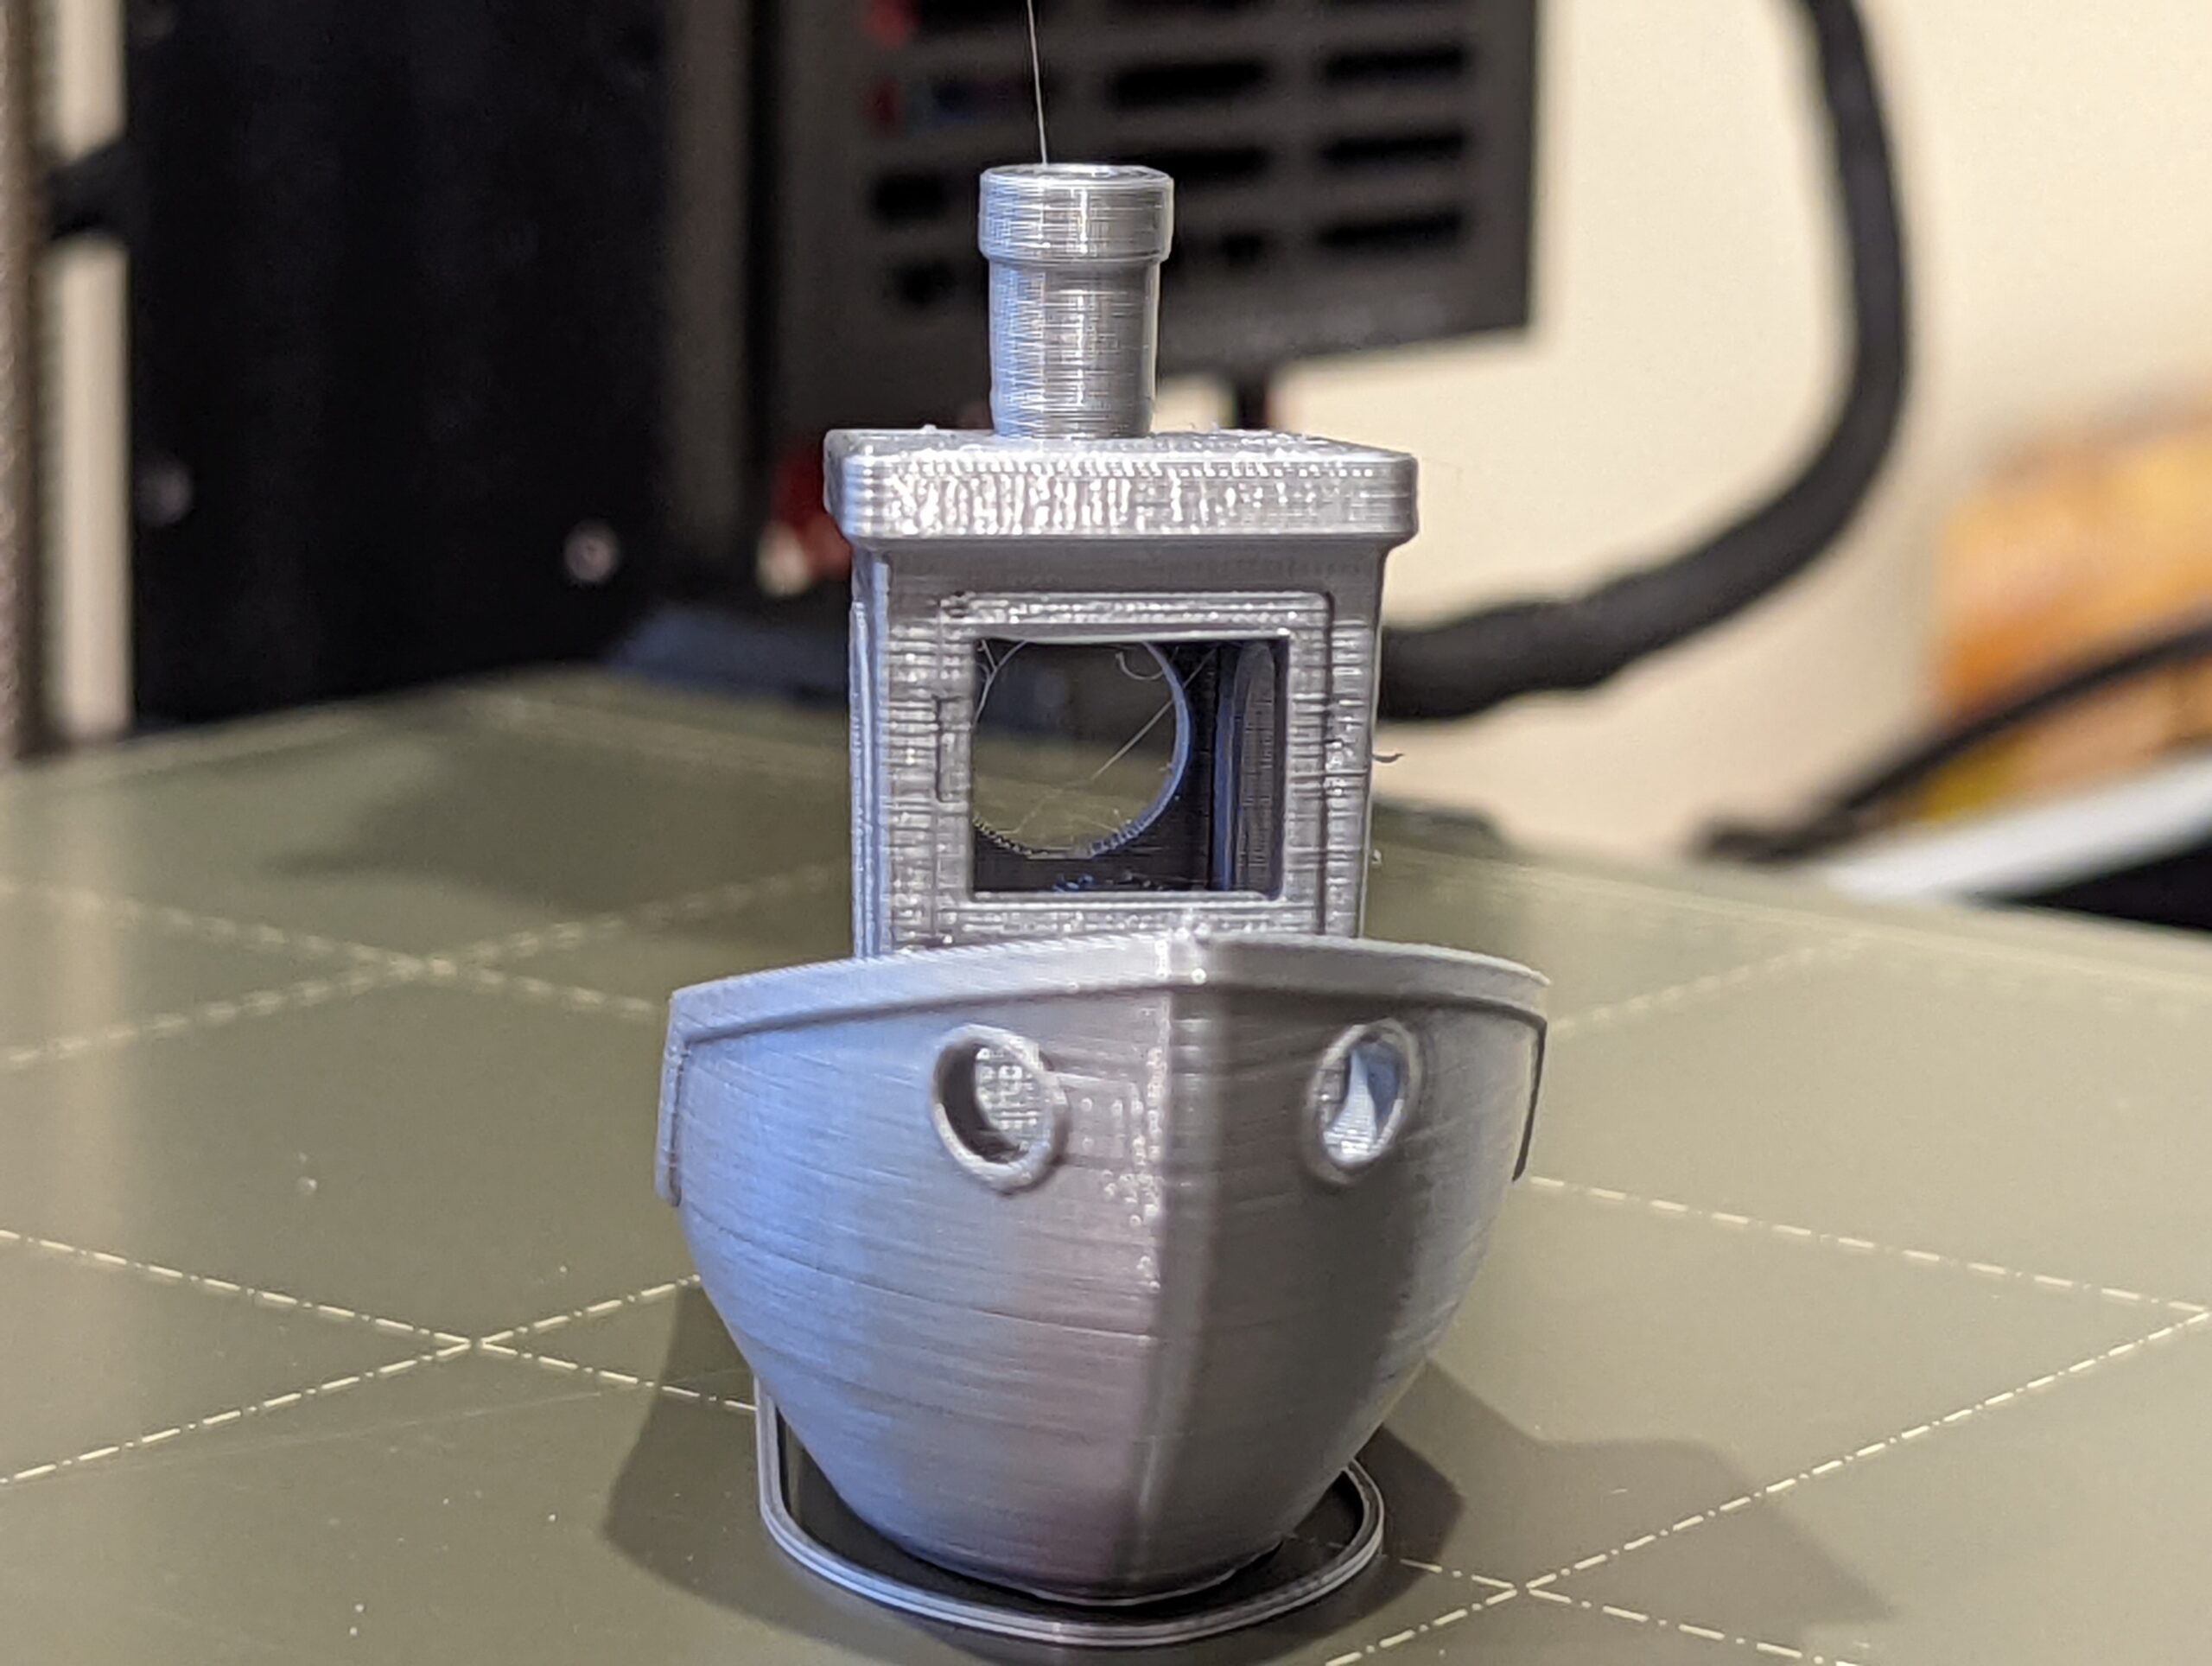
RE: Requesting assistance diagnosing issue(s) with my print
I agree with the advice given above 'though I can't see any obvious Z motor problems.
But
That's a very ambitious first print: if the printer is not spot-on the top notes will be very weak at best and the timbre off. That said, even this first attempt may produce a few notes at the bottom of the range 'though the holes will need to be smoothed to become air-tight.
When you re-print, slice with extra perimeters (try 4) and use 50% cubic fill. Musical instruments, even wind, get a lot of their tone from the stiffness/resonance of their structure. For performance quality, especially in the top register, you would need to experiment with varying fill densities - but going straight for 100% fill might dissappoint.
This is the sort of print that I would normally suggest delaying until you have a few months experience, minute inaccuracies and variations in the settings will have a big acoustic effect.
Don't depair; with experience you will produce decent, playable instruments.
If you have any suggestions as to which calibration-test items I should be printing, I'm listening!
Yes: none.
Every user builds their printer slightly differently and even the pre-built ones get shaken in transit so during the first few weeks of use the printer will run-in and settle its parts together; then you will have to go over the basic maintenance checks, lubricate and recalibrate. Even if you got everything dialled in perfectly today, it would all need re-doing.
Better to settle, temporarily, for a basic working printer and get some useful printing done, make your early mistakes, establish a routine and generally get used to the process. Then when you do your one month service you can take extra care knowing the new settings on your now stable printer are likely to last for several months.
Start with simple, useful objects. Work up to larger, more complex ones as you gain experience. Leave calibration-test prints for the rare occasions you really need them.
Cheerio,
It was 100% absolutely too ambitious for a first print, no question. Ultimately I'm glad I did do it, because it helped me discover some clear issues with the hardware, a good learning experience.
Also, it technically does still produce sound, and my kids love it. I will eventually re-make it so it has more accurate sound, but for now they're happy and that was the goal of the print. I appreciate your suggestions about wind instruments and print settings, I will remember this when I give it another shot!
RE: Requesting assistance diagnosing issue(s) with my print
Again, it's difficult to tell for sure from web photos, but it looks like your Z may be too high.
RE: Requesting assistance diagnosing issue(s) with my print
What gave you that impression?
I thought from the bottom layer that the Z might be a little high, but I wasn't sure. First layer calibration seemed to look correct, but maybe the gcode is doing something different that I wasn't aware of.
RE: Requesting assistance diagnosing issue(s) with my print
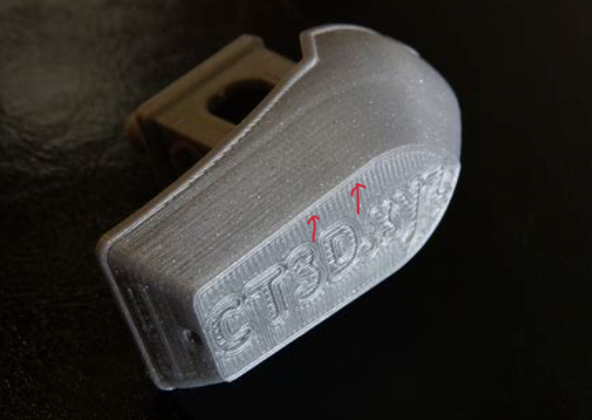
Look at the shape of the beads on the bottom layer of the print of Boaty McBoatface.
On my monitor, they look more round than oval, indicating possibly not enough 'squish' and Z too high.
RE: Requesting assistance diagnosing issue(s) with my print
Now that @jsw has pointed it out about your z-offset, I see it too. This is what you are aiming for, your lines of fill should snug up to the perimeters.
Mk3S+,SL1S
RE: Requesting assistance diagnosing issue(s) with my print
Plus, you mentioned you had problems with PETG sticking.everything you described sounds like the nozzle way to high (live Z not negative enough).
Formerly known on this forum as @fuchsr -- https://foxrun3d.com/
RE: Requesting assistance diagnosing issue(s) with my print
Interesting, my live Z value is -1.900 right now. I was trying to stay away from hitting -2.000 as I've read elsewhere in the forums that is maybe a limit for the live adjust system?
With these values being as they are, and the consensus that I need to adjust it even lower, I'm thinking I need to change the position of the SuperPINDA probe? The probe is already very close to the nozzle...should I be moving it up or down based on the desire to lower the live Z?
RE: Requesting assistance diagnosing issue(s) with my print
If you're close to or above -2, I would reposition the PINDA higher.
The Super PINDA should have about 1.5 mm distance between nozzle and SPINDA, so that you’re around -1 when your Live Z is correct. (For the old PINDA, it was 0.8mm).
Instructions for adjusting the PINDA are in Step 16 of https://help.prusa3d.com/en/guide/how-to-replace-superpinda-mini-mini_179912 (Mini) or https://help.prusa3d.com/en/guide/how-to-replace-superpinda-mk3s-mk3s_179920 (Mk3S)
I put this little helper on Prusaprinters.org to help position the SPINDA: https://www.prusaprinters.org/prints/57192. Works better than zip ties or credit cards, which have less well-defined heights.
May sound counter-intuitive to move the PINDA higher, but by doing so the nozzle can move closer to the print bed before the PINDA triggers. For an illustration of relationship of distance of PINDA to nozzle and sheet, see 
Formerly known on this forum as @fuchsr -- https://foxrun3d.com/
RE: Requesting assistance diagnosing issue(s) with my print
This makes sense, I figured I needed to move it higher and I appreciate the confirmation! As you mentioned, I've used the zip tie method described in the handbook. I will probably print out that part (I've been eyeing it as one of my next prints) instead to keep it handy.
RE: Requesting assistance diagnosing issue(s) with my print
The built in Z calibration is fine for getting you close to a usable Z height but many folks here use Jeff Jordan’s “Life adjust-z, my way” prints to really dial it in.
You can find the files here, near the bottom of page 42.
I will typically start one of these prints where the built in calibration left me and then adjust the z height more negative half way through the print. The more you use it, the better you learn to see from the top layer if you need to go up or down. Also as I’ve used it more I change the Z height 3 or 4 times during one print if I’m not seeing something I like. When I think I have it right, I’ll print a full sheet on my (supposed) perfect Z height, without any changes, to confirm or otherwise. Rinse and repeat as needed.
Two other thoughts: if you’re switching from the smooth sheet for PLA to the textured sheet for PETG you’ll have to make a Z height adjustment for the different sheet thicknesses AND you’ll have to adjust for the PETG as it typically needs more first layer “squish” than PLA. There are lots of discussions here about both of these items which I’m sure can be easily searched.
Glad to hear you’re making good progress. Best of luck and have fun!
RE: Requesting assistance diagnosing issue(s) with my print
Just to add to what RandyM9 wrote, the satin sheet is also noticeably thinner than the smooth sheet, very similar to the textured sheet.
Formerly known on this forum as @fuchsr -- https://foxrun3d.com/
RE: Requesting assistance diagnosing issue(s) with my print
@fuchsr makes a good point. I don’t have the smooth sheet, only the satin and textured which are similar in thickness, but I have read about the difference in the smooth sheet so it’s good to be aware of that.
I should have mentioned to read Jeff Jordan’s first post which describes his process and how his files should be used. I’ve actually read through the entire thread which contains lots of useful information.
Here’s a link to the intro page:
Enjoy!