Is this printable as-is and how thin can I make the walls?
I want to print a lamp shade extender. Here's the object in Blender:
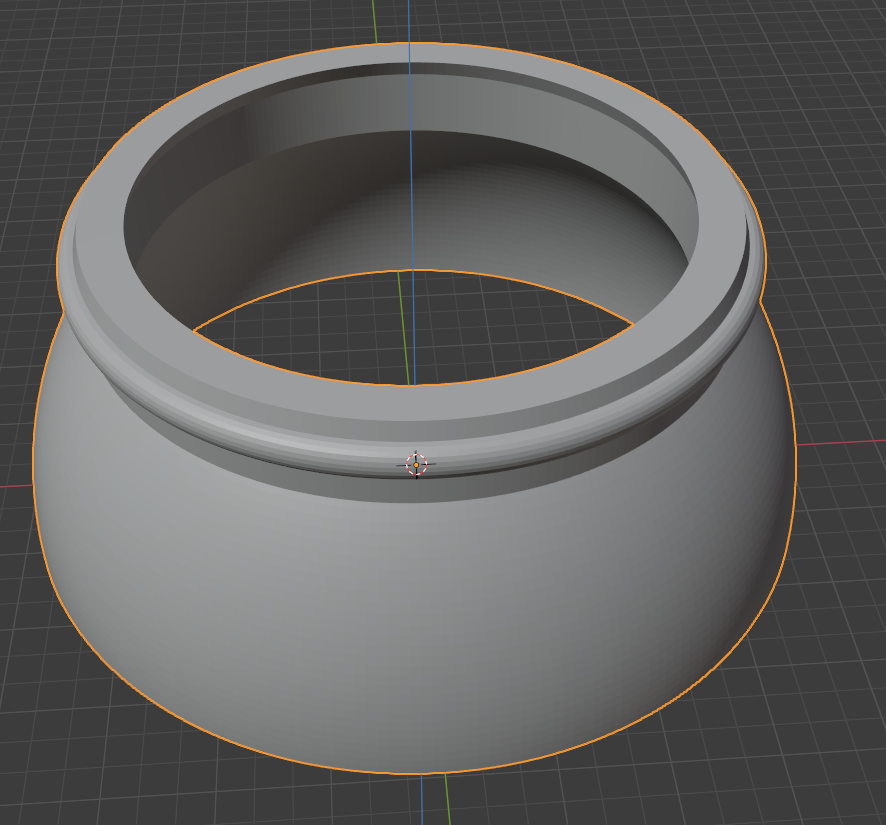
And here is a cross section:
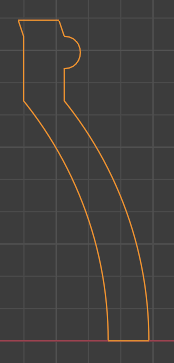
This should snap into place at the bottom of the current lamp shade (which is so short I keep getting blinded by the light bulb). The ridge at the top should go over a bump on the interior bottom of the current lamp shade. I am considering changing the top part to look like this:

That would use less filament and it would make it easier to snap the top part of this into the bottom of the lampshade, since the part that has to slide over the lip on the lamp shade rim isn't one reinforced circle all the way around. I'm printing this in PLA and the walls are approximately 1/3" thick (about 0.8mm).
At least, this is what I'm trying to do. Here's my questions:
1) Will I need to add supports, either for the bottom (which is part of a sphere), or for the 1/2 circle ridge around the top?
2) I did some searching for wall thickness for printing and found a few sources with varying information. From what I saw, it looked like I shouldn't make the walls less than about 0.8mm. I'm using standard equipment and settings (in other words, defaults) for a MK3S+. Can I make the walls thinner? Or do they need to be thicker? (It looks kind of thick, to me, in proportion to its size, which is about 4 5/16 diameter on the outside of the circle at the top.
I'm also interested in any other tips about this or anything I need to be aware of with a shape like this. (Especially since it involves sections that overhang empty space.)
RE:
That should print without support. The very underside of the curved section/rim around the top might look a bit rough but from my understanding its the bit the will clip into the existing shade anyway so you wont see it.
As for the wall thickness, with a 0.4mm nozzle the default extrusion width is 0.45 so I would increase your wall to be slightly above 0.9, 1mm is probably a good value.
You might also need to use a brim as the contact area is quite small (especially if the default elephants foot value of 0.2 is applied). Looking at your model its hard to judge scale but it doesn't look like the walls are 0.8mm thick, they look thicker to me. How are you measuring the thickness ? Blender has the measurement tool which works semi ok 🙂 I design using Blender too so.... if you want to share so we can look at the base geo then you can zip up a file and attach it. Must be zipped or the forum doesn't accept them.
I would not recommend your second design with the 3 tabs though. At the moment if you have 2 perimeters of thickness. With the orientation that will print in then the tabs will be relying purely on the layer adhesion. With such a thin part its quite likely they will just snap. I would extend their size to either the full rim like in your first option or in effect 3 much wider ones, so it looks like 3 slots cut into the rim , that would allow a bit more flex as you are inserting it and give a lot more surface area. Either that or make the whole thing about 1.5-2mm thick to give you 4-5 perimeters.
If I was making it I would also use petg, as the interlayer adhesion is better, its more flexible and depending on what type of light bulb it is will withstand any heat from it better.
RE: Is this printable as-is and how thin can I make the walls?
Agreed - That should print. I make a similar design as a rocket motor retained and tail cone and it printed with a raft or supports.
--------------------
Chuck H
3D Printer Review Blog
RE: Is this printable as-is and how thin can I make the walls?
The very underside of the curved section/rim around the top might look a bit rough but from my understanding its the bit the will clip into the existing shade anyway so you wont see it.
I tried printing something else recently that involved a straight slope on the underside and saw that - it's rough. Sadly, no matter how I print that other item, something will be on the underside. With this piece, yes, you're right, that part will not be seen, so I'm not worried about it there.
Looking at your model its hard to judge scale but it doesn't look like the walls are 0.8mm thick, they look thicker to me.
Yes, it looks rather thick to me. I designed the shape by slicing out one vertical "strip" from a UV sphere and then doing the top part with bezier curves, converting the top to a mesh, then joining them. Once done, I duplicated it and moved the dupe in 0.8mm. After that, I also checked with the measuring tool. It STILL looks rather thick to me. The part that fits in the lamp shade is just about 0.8mm, about 1/3", but it looks rather thick to me, even after checking it multiple times. Out of shere paranoia, I just checked again. A little over 0.3" I ordered black translucent filament from Atom for this, which I want to try for this. Whether it works will depend on how bright the bulb is when it shines through. I don't know how much thickness will impact that, since I've never used translucent filament before. (I suspect, for the numbers we're talking about, it won't matter much, since we're talking about the thin side of wall values.)
You might also need to use a brim as the contact area is quite small (especially if the default elephants foot value of 0.2 is applied).
Good point and easy enough to fix. Elephant's foot is a new issue, but, heck, I'm still quite new, so thank you!
As for the wall thickness, with a 0.4mm nozzle the default extrusion width is 0.45 so I would increase your wall to be slightly above 0.9, 1mm is probably a good value.
Would this also be part of the elephant's foot issue? It would be problematical to print that and it'd make it spread?
I design using Blender too so....
Cool! I've always wanted to learn 3D. Right now using the Prusa and a Shapeoko CNC system are part of a business I'll be starting. Both of those will require a lot of 3D modeling, and I'm looking forward to that. I'll be learning a lot. Eventually I want to do more 3D modeling and animation. While I have people telling me to use one program for 3D printing, and others telling me to use something specific for CNC, and still others recommending multiple programs for when I get into rendering and animation, I really don't want to learn multiple programs and get confused by different keyboard shortcuts and so on. I have had some tell me that if I want to make projects with tight fits, in printing or CNC, that Blender can't do that since it can't do precise measurements, but that doesn't seem to be a problem. (The only problem I have with Blender, so far, is when I want to print something round, often it's possible to see multiple faces on it. I've just increased the segment count when I make circles or spheres.)
if you want to share so we can look at the base geo then you can zip up a file and attach it.
Done! (Didn't realize I could do that.)
The file includes a few extra parts, including what I used as a boolean modifier to cut out part of that upper rim.
would extend their size to either the full rim like in your first option or in effect 3 much wider ones, so it looks like 3 slots cut into the rim , that would allow a bit more flex as you are inserting it and give a lot more surface area. Either that or make the whole thing about 1.5-2mm thick to give you 4-5 perimeters.
I can cut the the main part of this and print just the top and experiment with it to see what I get. I can think of several things I can do in that area. I'll probably print the 3 tab version first and see if that snaps in and feels okay. If so, it should work unless the lamp falls on the floor or it gets whacked by something (or by a grandkid..). If that doesn't work, I'll try it with it running all the way around. I can play with that until it works, then print the whole thing out.
If I was making it I would also use petg, as the interlayer adhesion is better, its more flexible and depending on what type of light bulb it is will withstand any heat from it better.
This is the 2nd time I've put up something I'm considering printing and someone has recommended PETG. I've only been printing for a few weeks. PLA prints are generally working, but does it take much to learn to deal with PETG or is it a matter of just swapping reels and making sure I specify PETG when slicing it?
I'm using an LED bulb and I have felt around the area - not that warm at all around the current lamp shade. Will PETG also help with the rougher edge on the bottom of the rim sticking out around the top?
RE: Is this printable as-is and how thin can I make the walls?
Quick note: It was probably a decimal point placement issue, like me hitting 8.xxx mm instead of 0.8mm, but the wall was definitely thicker than I thought! The difference is enough I'm wondering if I used cm for conversion instead of mm. Anyway, I'm going to take care of that by using my original profile shape, duplicate and move it to one side, then link them and spin the result again.
This is why I try to get myself in the habit of doing 0.xxx instead of just .xxx. It helps me keep it straight.
RE: Is this printable as-is and how thin can I make the walls?
@tango
do what the rest of us do, print it and learn.
Let us know how it goes.
Regards
Swiss_Cheese
The Filament Whisperer
RE: Is this printable as-is and how thin can I make the walls?
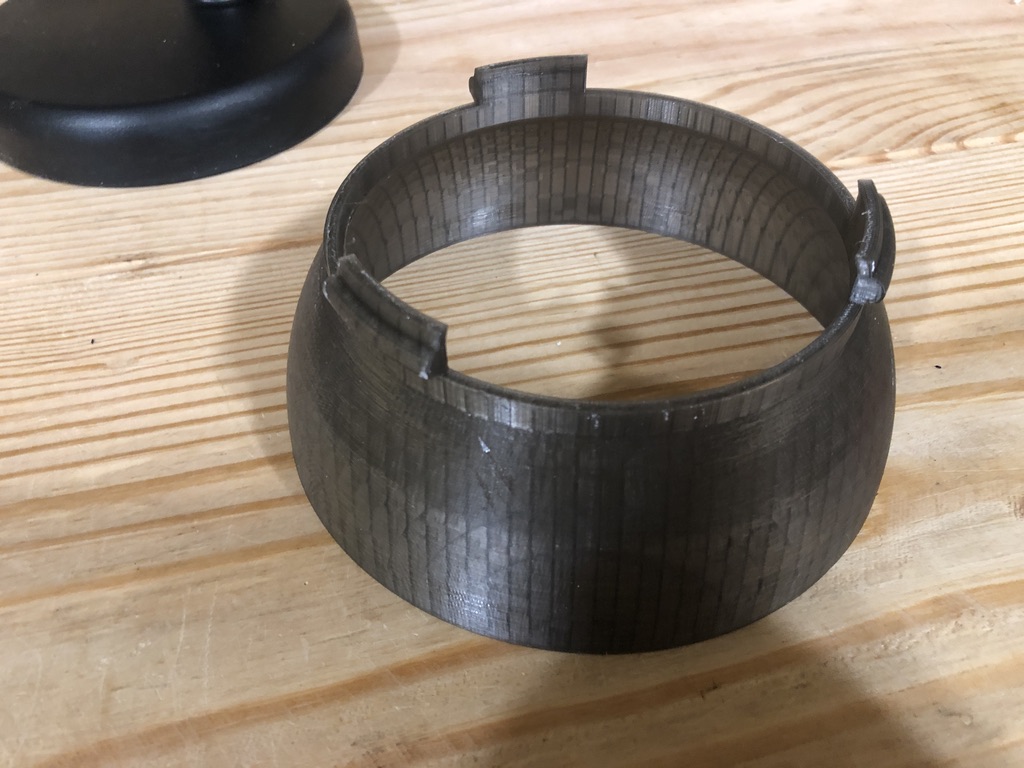
Okay, got it done! Here it is by itself. I used transparent black PLA for this one:
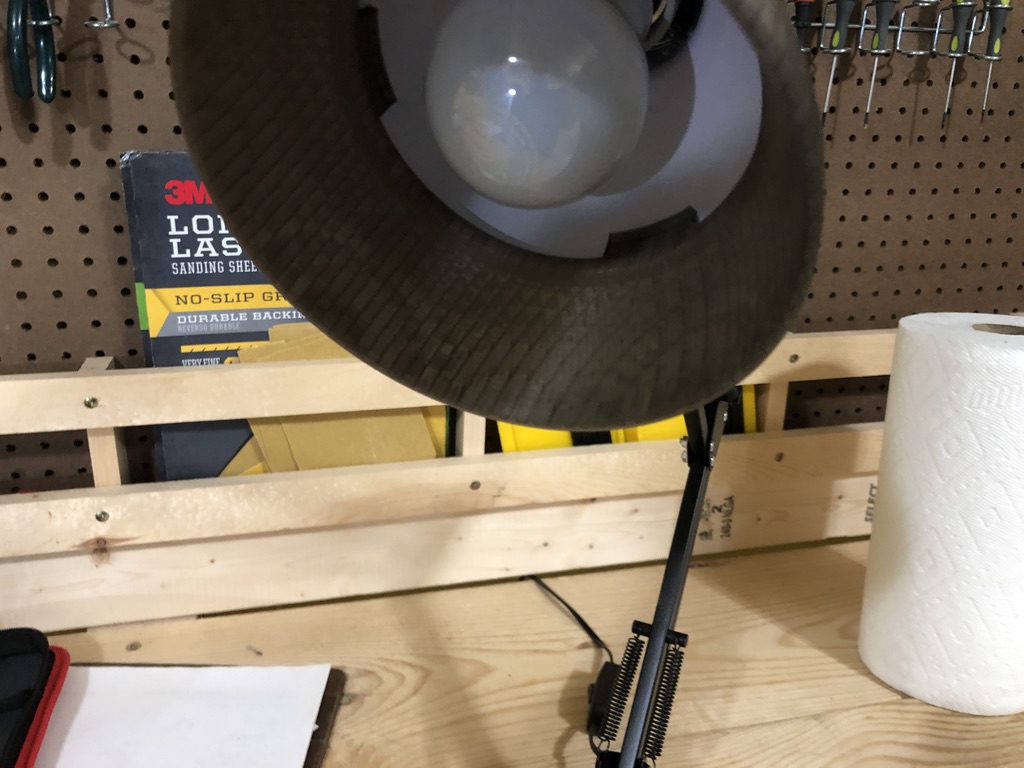
Here's one of the two lamps it went on. Note how the bulb comes down significantly below the lamp shade on it. I think it's a poor design. It'd have to be a tiny bulb to not run into problems with the light blinding someone frequently.
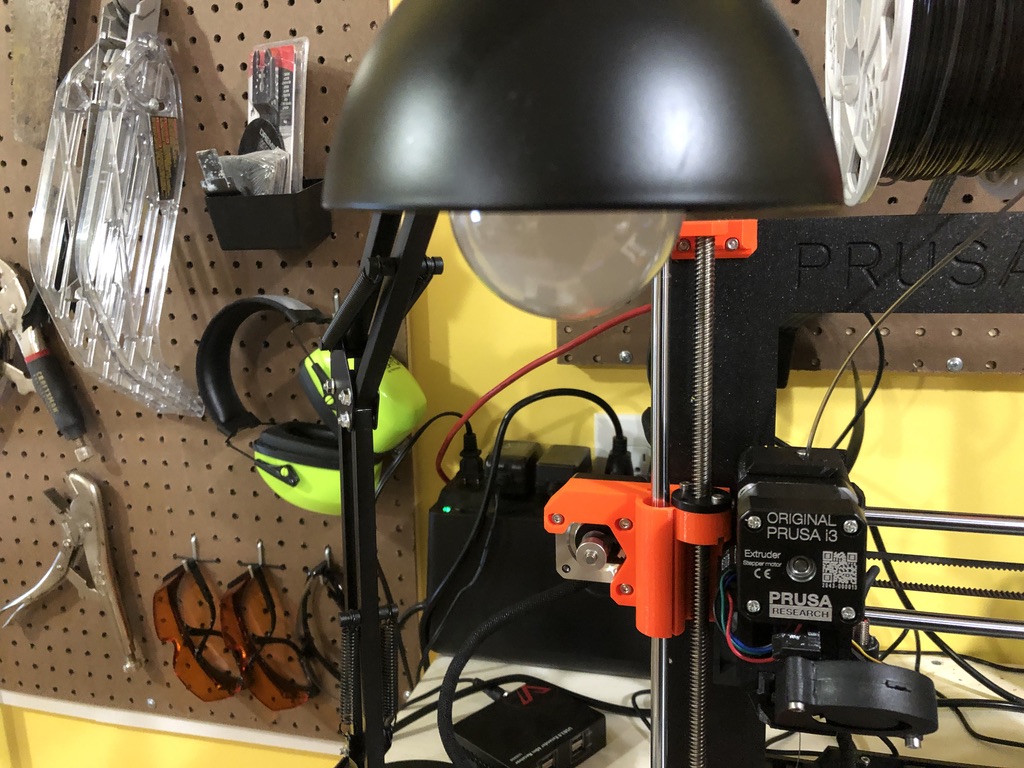
Here's the shade extension on it. It does look a bit awkward, but I think, given the shape on the original lampshade, there wasn't much I could do with it, so I think it's about as good a shape as I could get.

Here's a view showing the inside:
I'm printing a 2nd one now, out of black PLA. I'll figure whether black or transparent black works best for the one on the print table and use the best one there and use the other one for the lamp on my workbench.
I would not recommend your second design with the 3 tabs though. At the moment if you have 2 perimeters of thickness.
I think, for the thickness you were talking about, that I was originally going to try, that would have been correct. I made several test pieces to see how it'd fit into the original shade. I had measured the shade and the rim around the inside with a digital caliper and was glad to see I had been right on target with it. With the thicker walls, it's a good thing I stuck with the three tynes instead of the "snap on part" going all the way around. I had tested different thicknesses and with a 1/8" thickness (what I settled on), if I had had the snap-on ridge going all the way around, I'm not sure I could have shoved it onto the original shade. I'm glad you told me to go with something thicker, since it worked just fine.
do what the rest of us do, print it and learn.
After years of teaching in and out of a classroom, I've learned it's always wise to ask those with more experience first. While experience can be a good teacher, often one can avoid mistakes by asking those who have spent time working in a field first. There's a few tweaks I don't think I would have made without suggestions from people here. I'm sure as I gain experience and have printed more than 6-8 different items, I'll feel better about having some idea of what works and what doesn't.
RE:
@tango
After years of teaching in and out of a classroom, I've learned it's always wise to ask those with more experience first. While experience can be a good teacher, often one can avoid mistakes by asking those who have spent time working in a field first. There's a few tweaks I don't think I would have made without suggestions from people here. I'm sure as I gain experience and have printed more than 6-8 different items, I'll feel better about having some idea of what works and what doesn't.
I was not faulting you for this, I had been following the thread and it seemed like it was time to just take the leap.
It looks good, nicely done. I don't know how hot the lamp gets but be aware that PLA wont take much radiant heat before it deforms.
Regards
Swiss_Cheese
The Filament Whisperer
RE: Is this printable as-is and how thin can I make the walls?
I was not faulting you for this, I had been following the thread and it seemed like it was time to just take the leap.
I used to move too quickly on so many things and end up with messes that took me time to figure out - so now I'm more cautious!
It looks good, nicely done. I don't know how hot the lamp gets but be aware that PLA wont take much radiant heat before it deforms.
Both bulbs are LEDs, at least now. But that's a key point to remember in the long run. With LEDs, there is barely heat to notice, but I do need to remember not to change to incandescent bulbs. (I probably should have put lettering on my pieces that said, "Do not use with incandescent or high wattage bulbs." That's one thing I'll remember next time I do a project like this.)
RE: Is this printable as-is and how thin can I make the walls?
@tango
I think its worthy of note:
Not to put to fine of a point on it, but be aware, many if not all LED light bulbs use drivers, and the drivers can get hot in some cases.
Regards
Swiss_Cheese
The Filament Whisperer
RE: Is this printable as-is and how thin can I make the walls?
@tango
I think its worthy of note:
Not to put to fine of a point on it, but be aware, many if not all LED light bulbs use drivers, and the drivers can get hot in some cases.
Regards
Swiss_Cheese
Yes, quite worth noting!
I'm still getting used to PLA and printing. I'd like to move on and try PETG as well, but I know there are things I need to be aware of to do that. From what I understand, PrusaSlicer will handle a lot of those issues (like temps and so on), but I haven't had time to research what I need to know to change.
RE: Is this printable as-is and how thin can I make the walls?
Well don't suffer from to much trepidation, the community is here, and it's not as big a deal as your currently thinking it is, all you have to do to avoid a problem is pay attention to the printer.
👍
Swiss_Cheese
The Filament Whisperer
RE: Is this printable as-is and how thin can I make the walls?
Well don't suffer from to much trepidation, the community is here, and it's not as big a deal as your currently thinking it is, all you have to do to avoid a problem is pay attention to the printer.
The big challenge for me, now, is to learn and understand what I can do with overhangs and unsupported structures. I'm working on that. For instance, I want to make pottery stamps that you push into the clay and it makes an impression in the clay. Still working on how to do that if there isn't a flat side! (I'll figure out out - just looking at all possible ideas, including what shape I can use for the stamp.)