Filament not forming a rectangle in 1st layer calibration
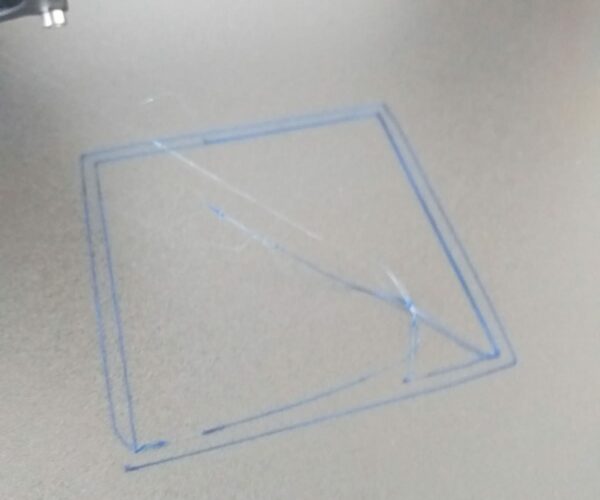
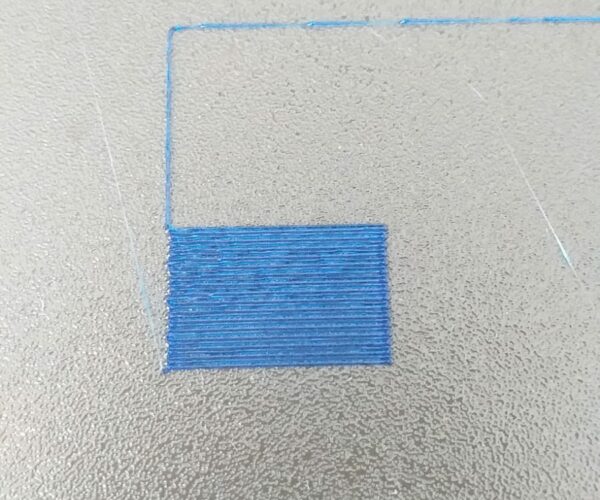
Hi, I have spent a several hours each day for two days without success. Do you know why the PETG filament did not form a rectangle on the smooth PEI sheet? Where are those missing filament? Looks like it was bitten from the rectangle. While it was making a zig zag pattern, in some areas the filament sticked well but in other areas, they just moved around as the extruder moved across the sheet.
RE: Filament not forming a rectangle in 1st layer calibration
Another example
RE: Filament not forming a rectangle in 1st layer calibration
@prusanewuser
That is not low enough.
--------------------
Chuck H
3D Printer Review Blog
RE: Filament not forming a rectangle in 1st layer calibration
Another example
Going by that 2nd picture, your Live-Z is too high. If you have not already done so, try using Jeff Jordan's "Life Adjust" procedure for calibrating your Live-Z setting. It is much easier to use and understand than the onboard routine and much easier to make mid-print adjustments accurately with. In general, start high (less negative) and work lower (more negative) in large increments (e.g. 0.1mm) until the filament starts to stick on its own. When you've got your Live-Z setting adjusted properly, you should be able to gently rub the extruded lines on the PEI surface without dislodging them. Then start lowering (more negative) the level until there are no gaps between layers. You should not be able to peel the lines apart after printing, but the top should be regular. With PETG you'll typically want to be a bit higher than with PLA, but the square should still close up neatly.
I've got some notes with pics on both the on-board and "Life Adjust" Live-Z procedures here. It's also important to make sure the bed is properly cleaned. Give it a good clean and be sure to use a release agent like Windex when printing PETG on the smooth PEI sheet. More notes here.
and miscellaneous other tech projects
He is intelligent, but not experienced. His pattern indicates two dimensional thinking. -- Spock in Star Trek: The Wrath of Khan Unfortunately,…
RE: Filament not forming a rectangle in 1st layer calibration
I am still puzzled by the missing filament from the rectangle. Where did it go?
Here is another issue. As some filment did not stick to the sheet, I though the extruder was not low enough so I lowered it just little by little. Then, in one trial, it started having "ka ka ka" sound sometimes as it moved across the smooth sheet. What are those sound? Too low and the extruder hit the heat bed? So suddenly it went from not low enough to too low to cause those hitting sound?
Now, the zig zag pattern became better (but still not perfect. see the round edge in the second traces from the bottom) and the rectangle were formed well. So it "seems" that calibration was done at least ok. However, after I started the print job, filament did not stick well and the print job failed. What is happening here?
RE: Filament not forming a rectangle in 1st layer calibration
I have no problem in doing 1st level calibration on the textured sheet with PETG. Usually I can get a perfect one within 3 trials. However, for smooth sheet with things like Windex, I cannot get it work. The entire today is spent on getting it to work. Does the solution make it more difficult for PETG to adhere on the PEI sheet? Does the Prusament filament which came without vacuum sealed caused this problem?
RE: Filament not forming a rectangle in 1st layer calibration
If you switch sheets, pei-powder coated you need to adjust the first layer, of course you need to do this on every print you start, a big tip to learn is: check the first lines, and adjust, then wen first layer is ready check the whole first layer, then you can check id the whole bed is OK.
To 3d print you need 2 things.
1. Clean bed, use dish soap and a lot of hot water, do this a few times. A few print you can do alcohol, but only dish soap cleans of everything.
2. First layer, this needs to be 100% perfect.
Both settings are needed to get a good sticking to bed, and less 3d printer problems.
See youtube for movies on how it should look like!
Then if you are not certain if it is OK or not, this is what I do:
Do a z-calibration.
Print a few squares on the bed, start printing, adjust the first layer to high, and start lowering it in little steps, then you see what setting is the best.
Your pictures:
If the corners are rounded, then you are to high.
Line of your square, the lines are not sticking together.
Petg, print this with powder coated if possible.
Petg on pei, you need to clean, then use window cleaner or glue stick, otherwise the pei will get damaged.
RE: Filament not forming a rectangle in 1st layer calibration
@peter-m
I know we need to recalibrate whenever we change the sheets and we need to clean the sheet. I did both already. Yet, it still did not work.
RE: Filament not forming a rectangle in 1st layer calibration
(accidentally post another forum subject, because i am tired for calibration 😀 )
i have same issue as a newbie maybe my newbie ts steps can provide different perspective
read many forum post and youtube etc also contact support chat 2 times
1 kilo gray pla finished in a few days but i purchased petg with powder coated sheet and troubles started
First day prints are great for a newbie
when my pla finished everything goes wrong
Thank to support i have some progress for z calibration
my z offset is -1600 now (PINDA checked)
but still need development for sticking (no sticking)
is there any help will be great
Thank you
RE: Filament not forming a rectangle in 1st layer calibration
now i try to use https://forum.prusa3d.com/forum/original-prusa-i3-mk3s-mk3-assembly-and-first-prints-troubleshooting/life-adjust-z-my-way/ Jeff Jordan's calibration surfaces at -1595
what i learn from this even -1 means a lot in 3d printing world
ı have no idea what should i do now, lets low z then try again 😀 😀
RE: Filament not forming a rectangle in 1st layer calibration
Another example
Going by that 2nd picture, your Live-Z is too high. If you have not already done so, try using Jeff Jordan's "Life Adjust" procedure for calibrating your Live-Z setting. It is much easier to use and understand than the onboard routine and much easier to make mid-print adjustments accurately with. In general, start high (less negative) and work lower (more negative) in large increments (e.g. 0.1mm) until the filament starts to stick on its own. When you've got your Live-Z setting adjusted properly, you should be able to gently rub the extruded lines on the PEI surface without dislodging them. Then start lowering (more negative) the level until there are no gaps between layers. You should not be able to peel the lines apart after printing, but the top should be regular. With PETG you'll typically want to be a bit higher than with PLA, but the square should still close up neatly.
I've got some notes with pics on both the on-board and "Life Adjust" Live-Z procedures here. It's also important to make sure the bed is properly cleaned. Give it a good clean and be sure to use a release agent like Windex when printing PETG on the smooth PEI sheet. More notes here.
Thanks. I tried @jeffjordan file. I adjusted the nozzle height in trial1. At the end it was not bad so I tried it again without changing the height. However, as you see in trial2.jpg, even at the same height throughout the entire print, different areas look very different. What is wrong here?
RE: Filament not forming a rectangle in 1st layer calibration
second trial
RE: Filament not forming a rectangle in 1st layer calibration
Looks too high.
--------------------
Chuck H
3D Printer Review Blog
RE: Filament not forming a rectangle in 1st layer calibration
What is the cause of this? Didn't have this problem when using another spool of Prusament White PETG last year. This happened at the end of the first trial. It happens often with this new spool especially when printing the first layer on PEI sheet. Usually when printing the first few layers, filament got accumulated around the nozzle and moved with it. Even I made a good 1st layer calibration, often after starting a real print job, filament did not stick to the smooth sheet well and became noodles around the nozzle.
Prusa support checked a few times. There is no leakage in my hotend and I replaced the nozzle with a new one. Not sure if the filament has issue since it arrived without vacuum sealed.
RE: Filament not forming a rectangle in 1st layer calibration
@prusanewuser
Each spool of filament is different. Two spools can require slightly different Z offsets. The makeup can change from batch to batch.
Since this is vastly different, it could be that your offset has shifted or your pinda has moved. I have found that and your Z can shift for what ever reason.
--------------------
Chuck H
3D Printer Review Blog
RE: Filament not forming a rectangle in 1st layer calibration
Thanks. I worry that the filament may have turned bad as it was not seal. I also worry that my build plate or heat bed is not even.
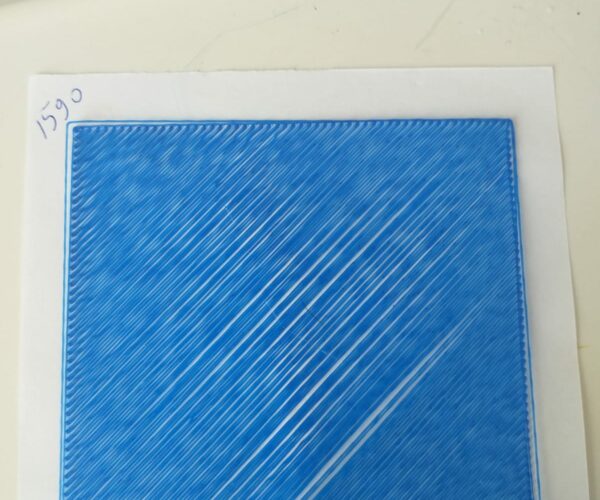
Is this good enough? Do I need to lower the Z further?
What are those irregularities in the center of the print? How do I avoid getting them?
RE: Filament not forming a rectangle in 1st layer calibration
For the past few days I spend the entire day doing 1st layer calibration on the smooth sheet. Even I got good one, as soon as I started printing, filament failed to stick to the sheet again. Today I even used a brand new PEI smooth sheet. Again, after 1st layer calibration which looked fine, the filament failed to stick to the PEI sheet again when the print job started. What could be wrong?
RE: Filament not forming a rectangle in 1st layer calibration
@prusanewuser
This square looks a little better.
--------------------
Chuck H
3D Printer Review Blog
RE: Filament not forming a rectangle in 1st layer calibration
@prusanewuser
Picture of failed print?
RE: Filament not forming a rectangle in 1st layer calibration
Just like the old sheet, filament could not stick to the new sheet and moved around the top of the PEI.


