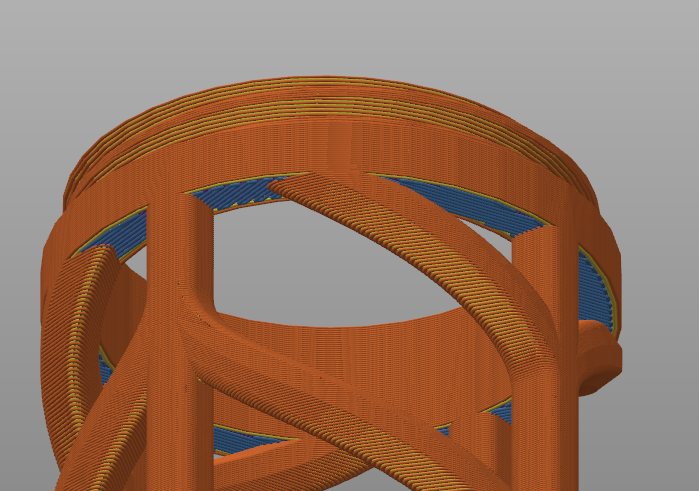
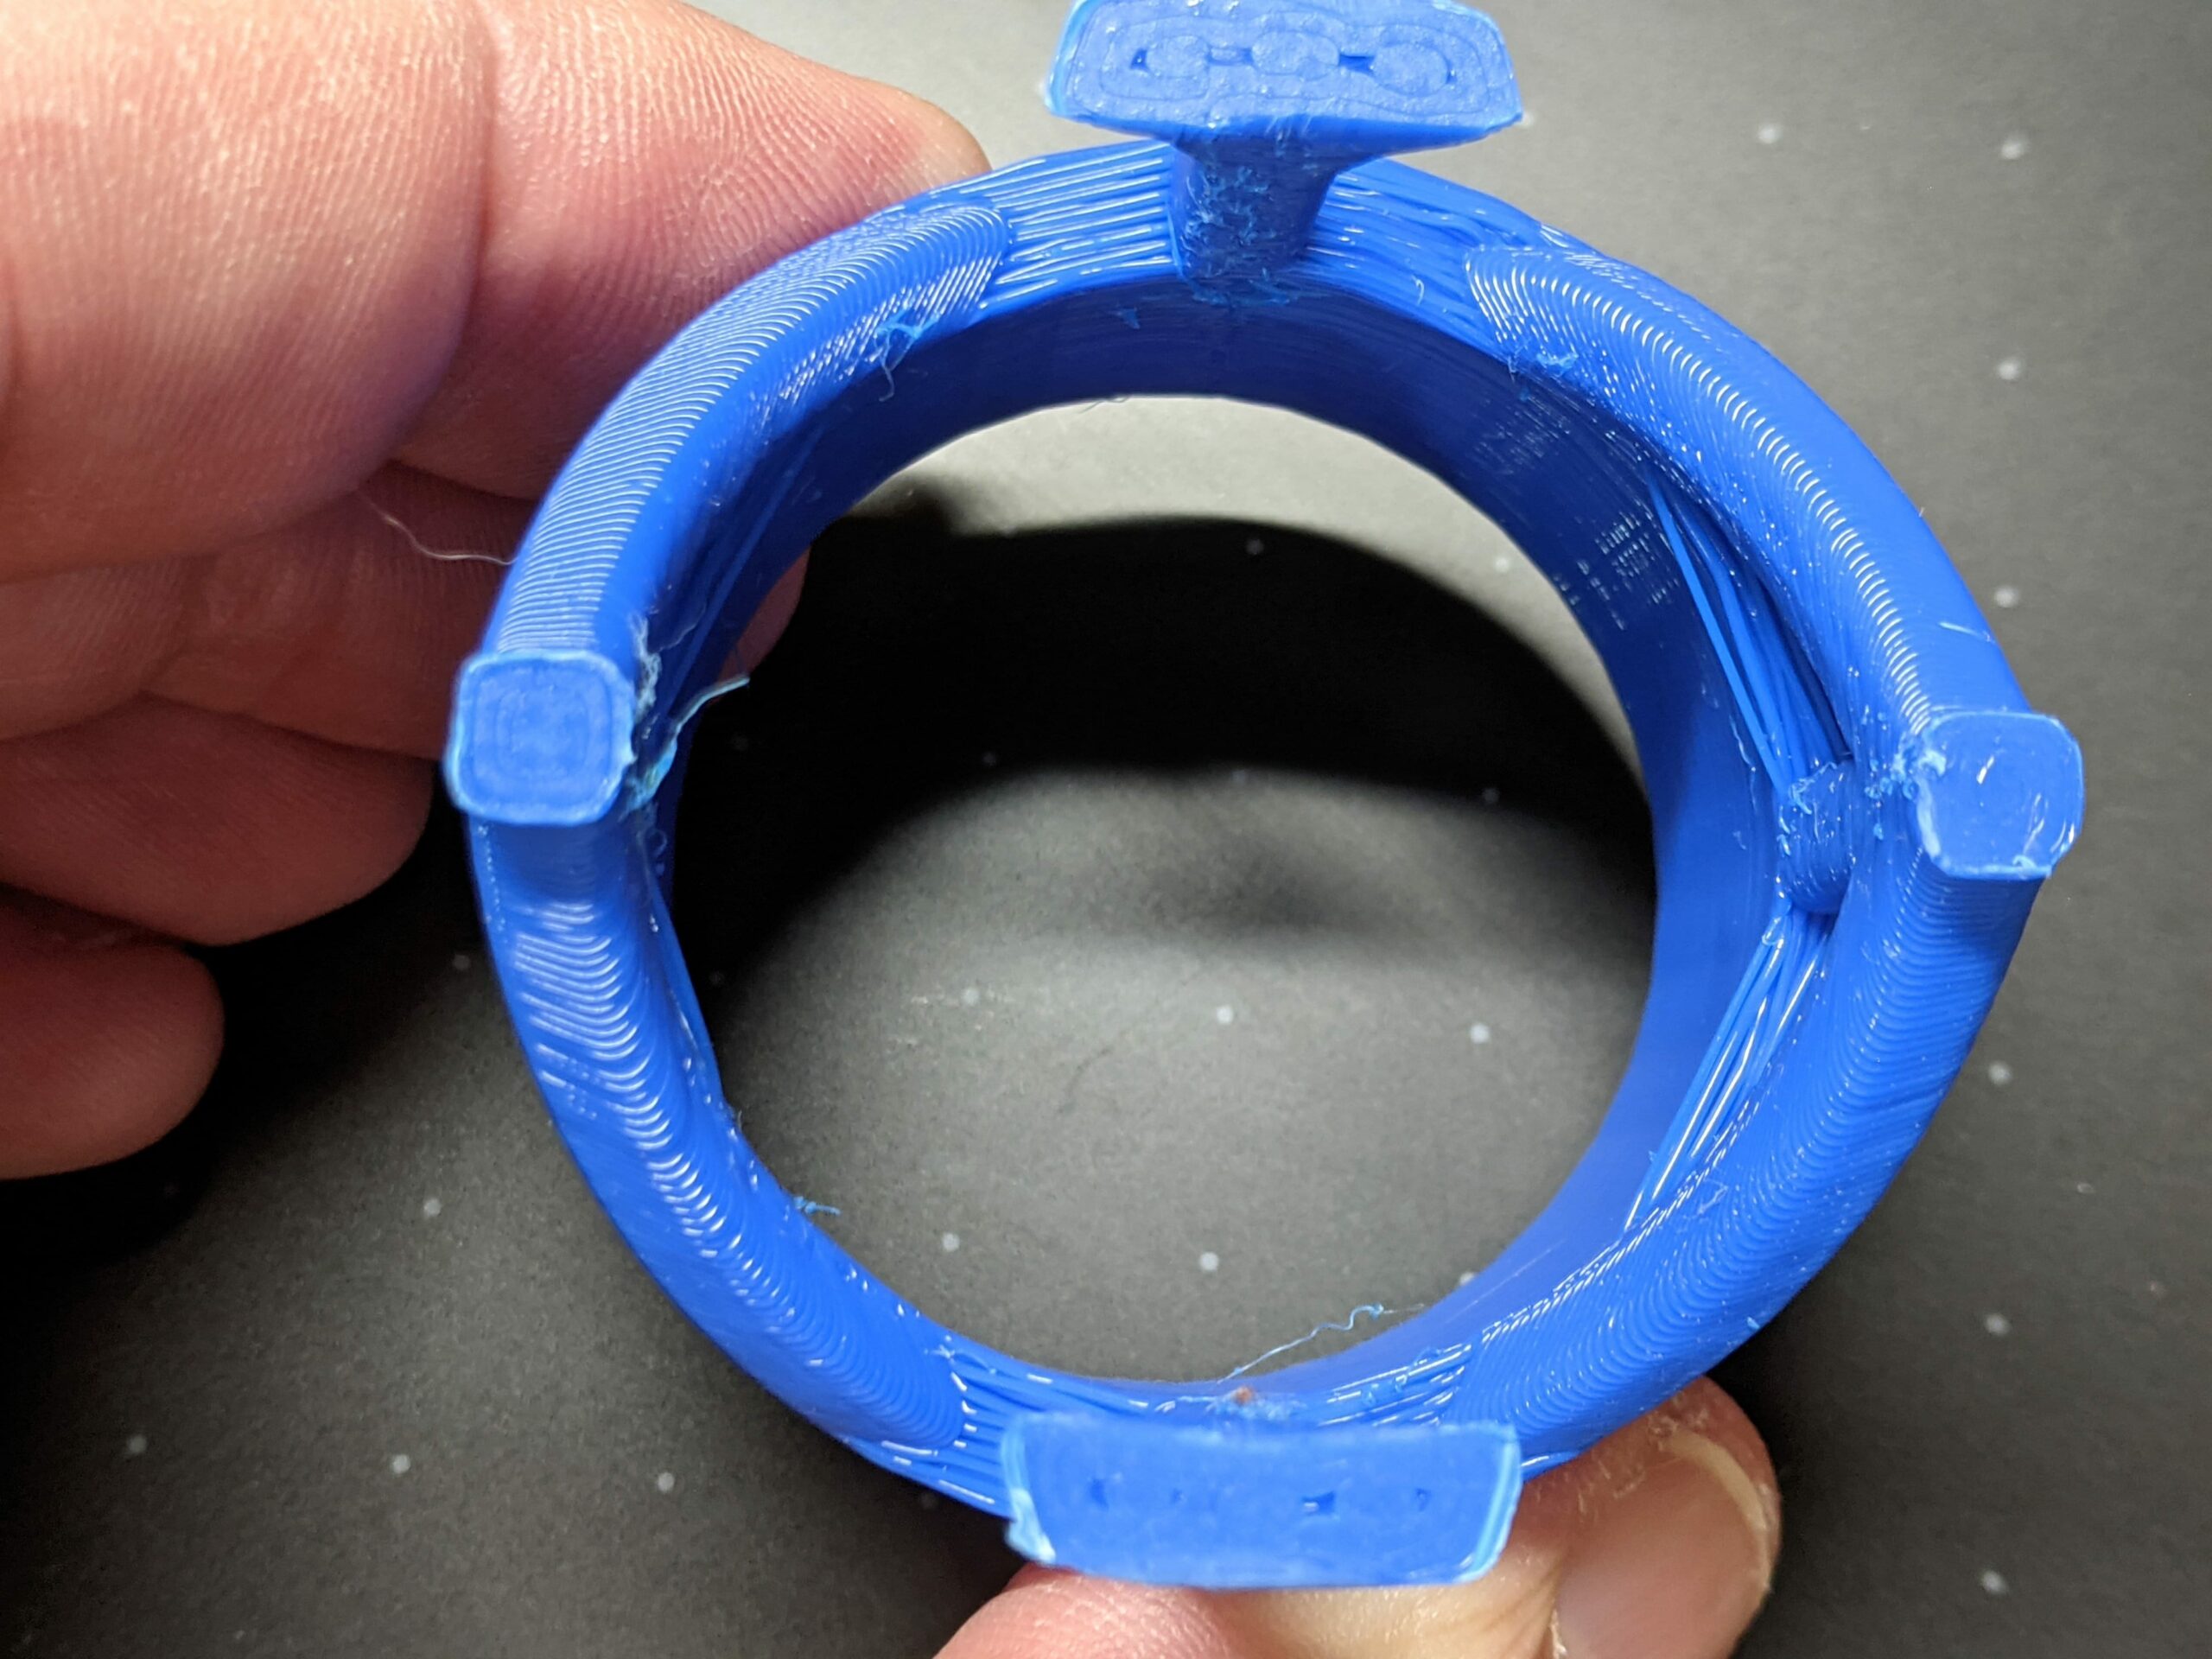
Cooling Inconstancies on Overhangs?
Hello, Overhang without supports struggle. I may be trying to defy the laws of gravity again here, however in running tests on same material I'm able to pull off 65 degree overhangs.
I understand I may need to print with supports on this model, but it seems almost perfect on one side or section. Do I have a cooling issue and consider a better shroud?
What can be done to have consistency all the way around this model. I was able to print four lattices perfectly top and bottom which I don't understand, but everything else is just rough.
Printed .2 layer on .4 model on hatcbox PLA no supports. I may be pushing my limits on designs without supports, but wanted to exhaust all options if you have any thing in mind that may improve. I will try lower layer heights to improve threading on mechanical side as well.
I'm not getting consistent cooling at rear of the model.
MK3s+ with stock parts. I just installed on sock and recalibrated PID hoping tis would help some, but open to ideas.
This a pole for plant support.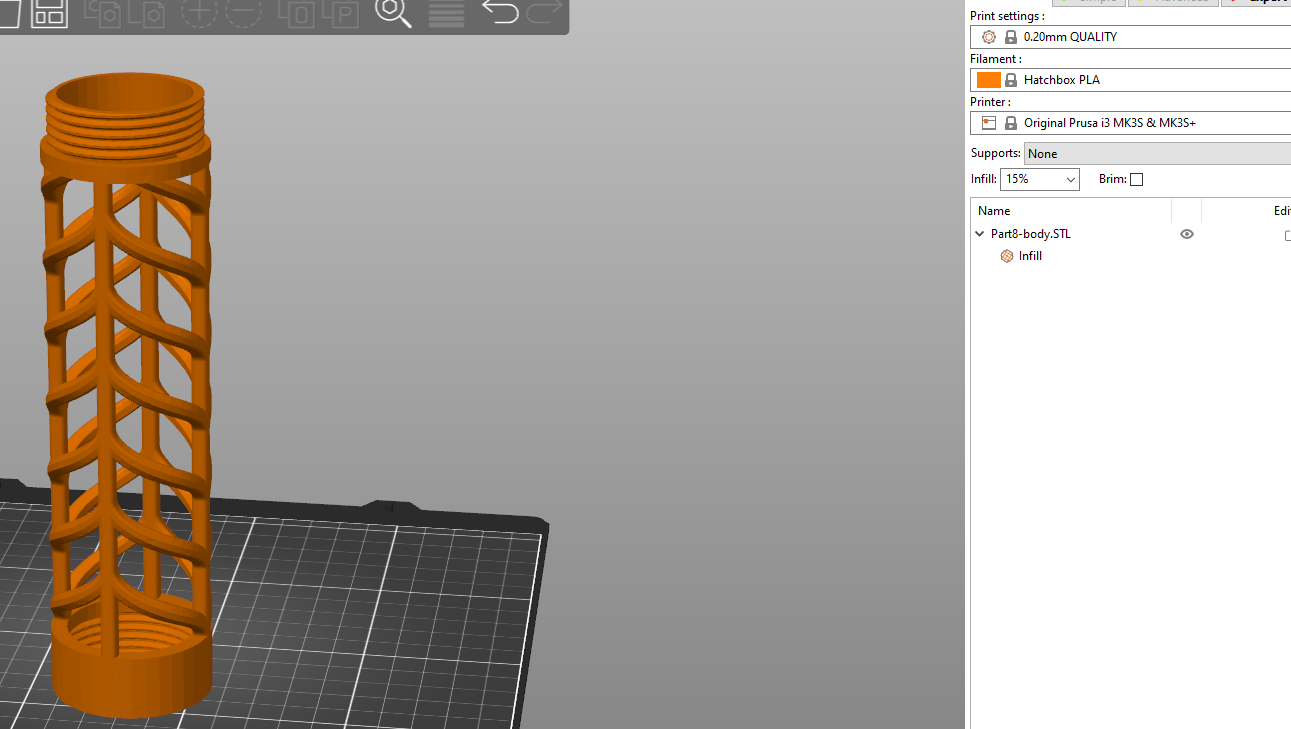
Best Answer by Swiss_Cheese:
@dst
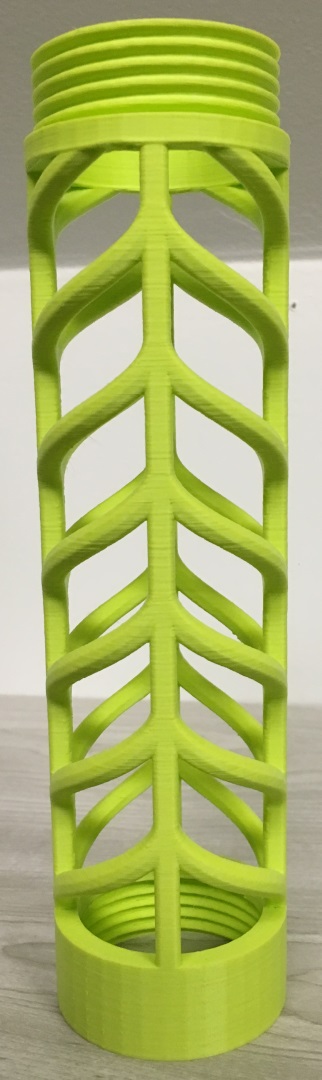
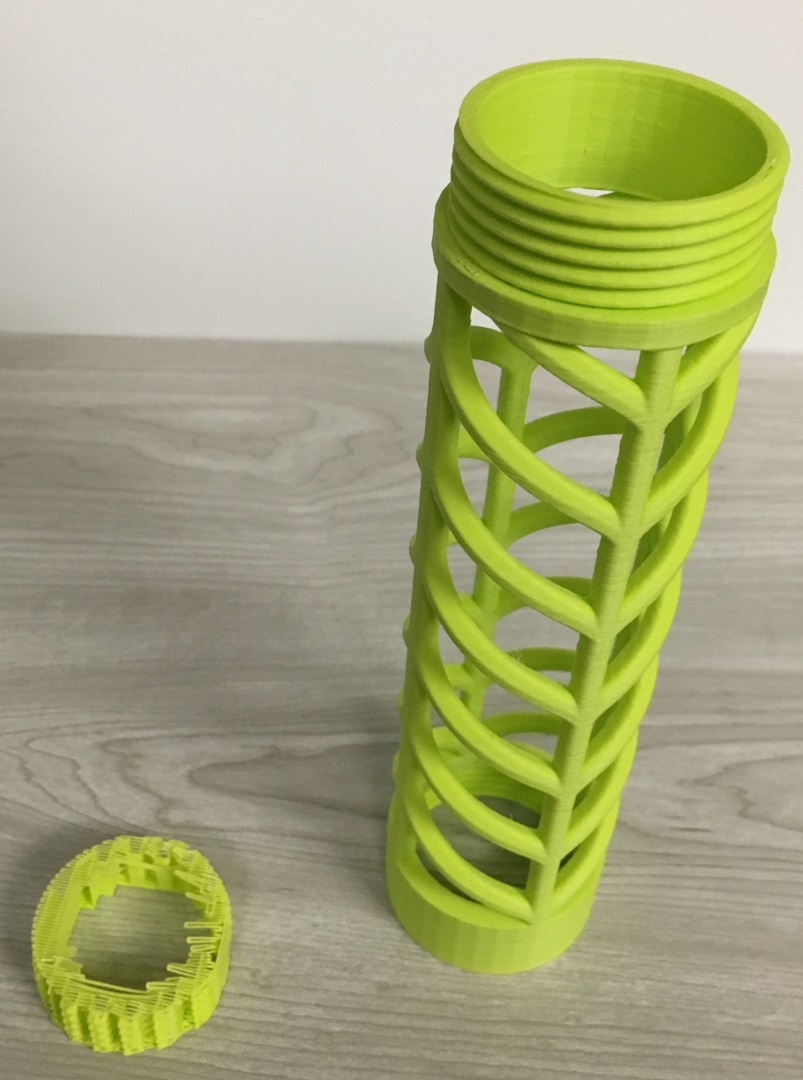
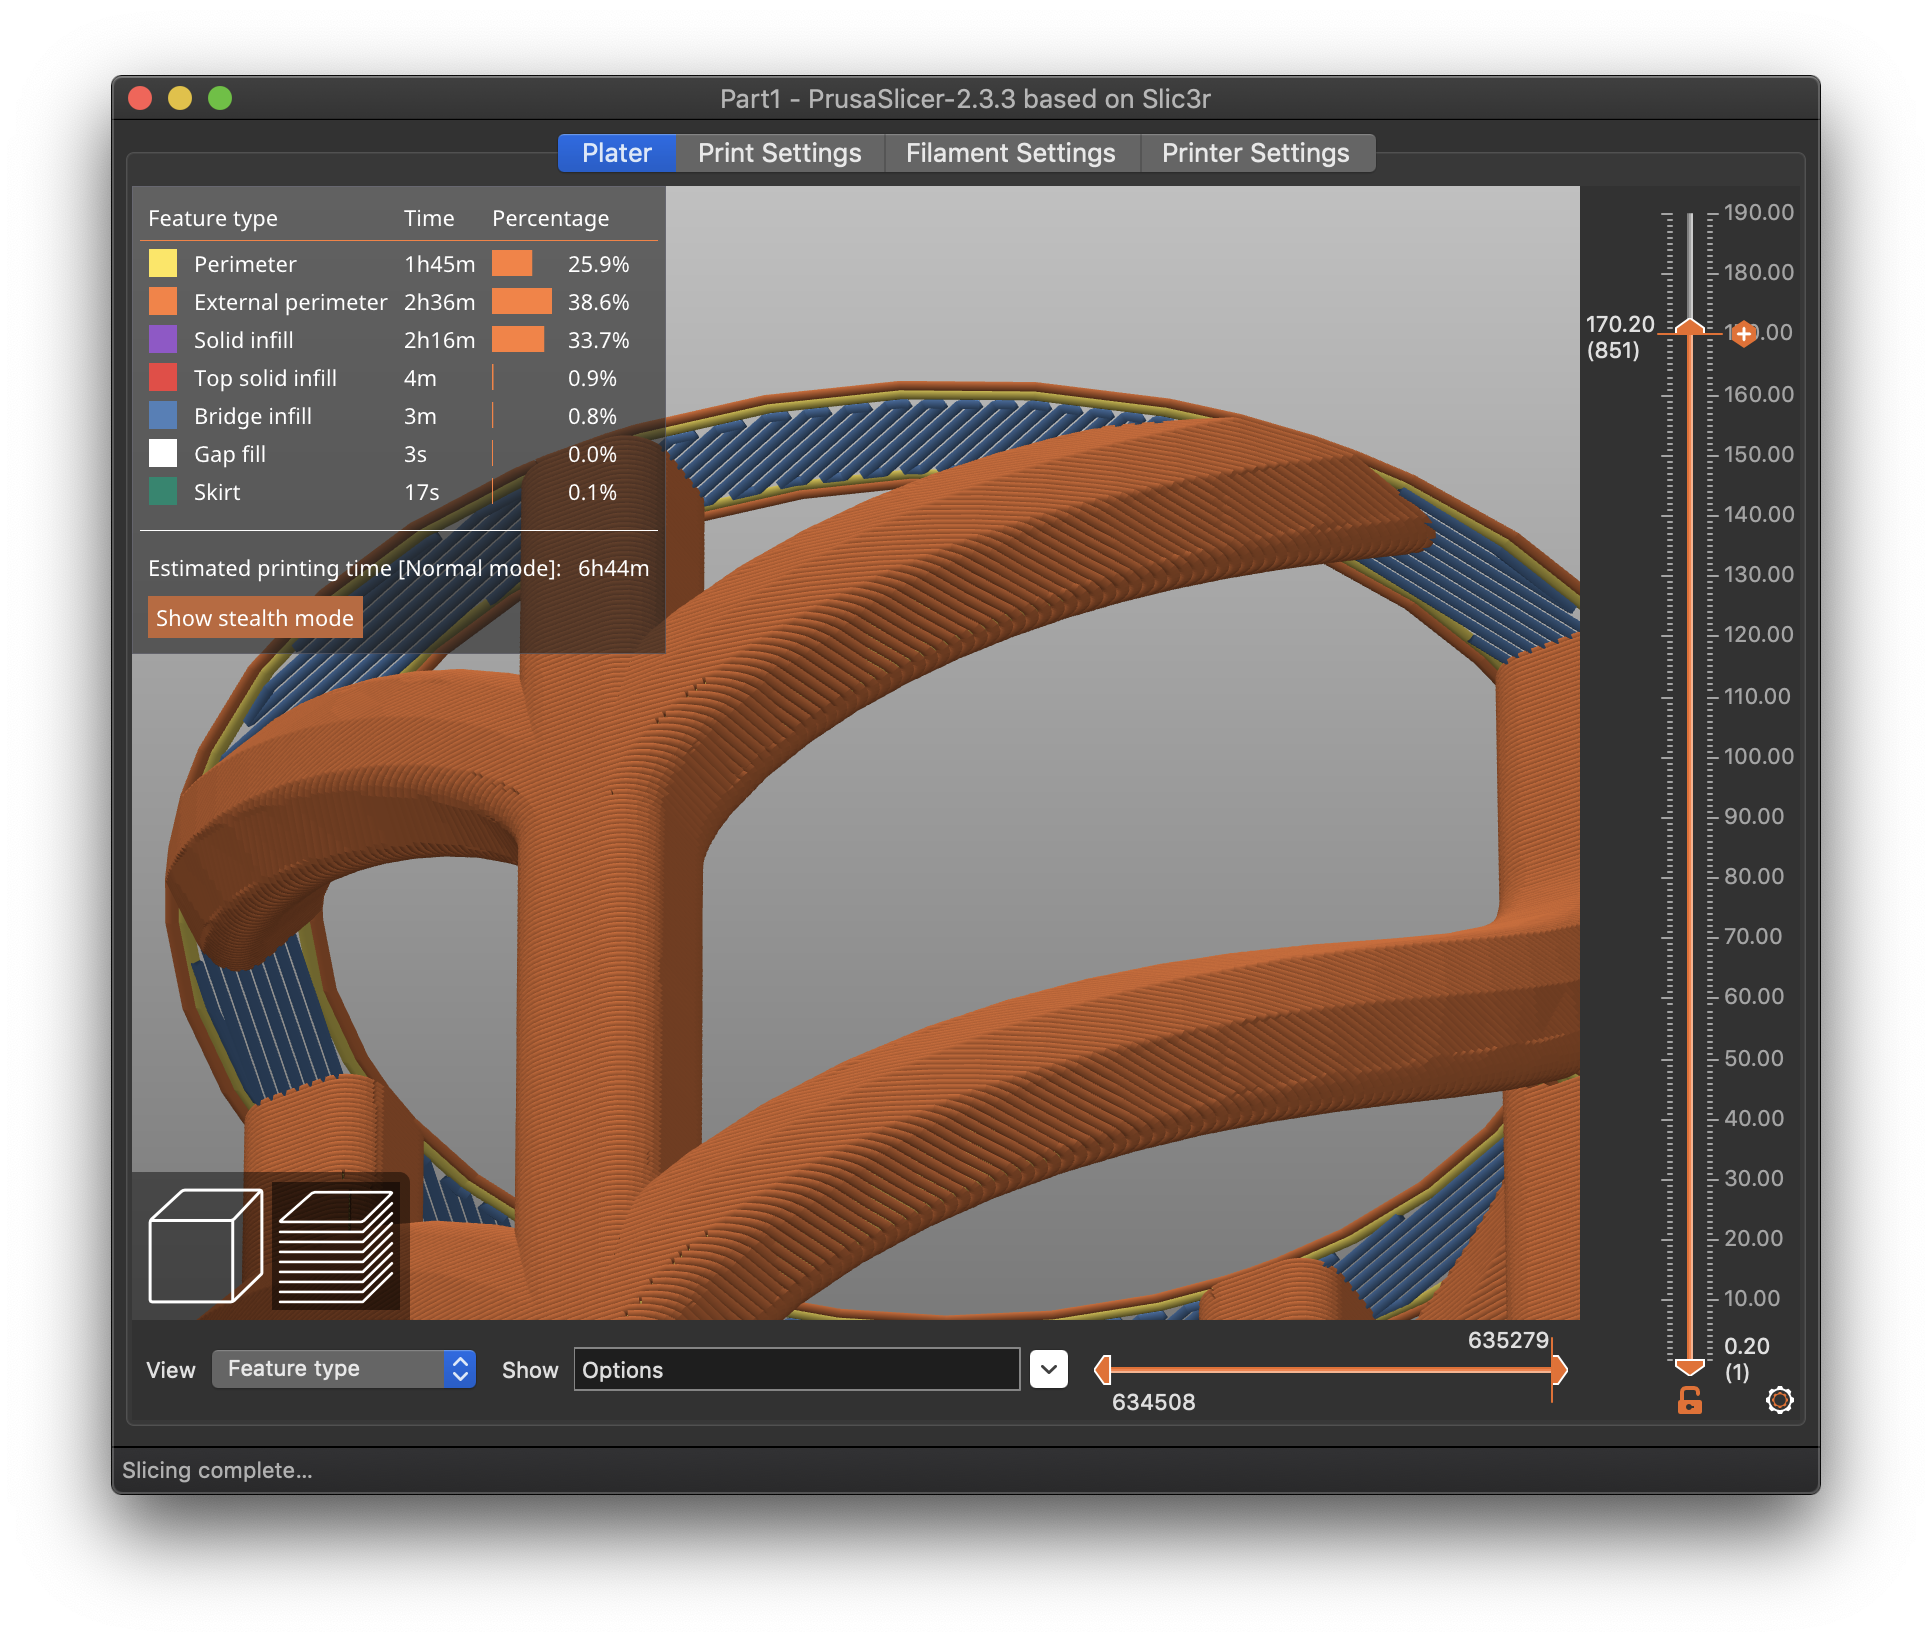
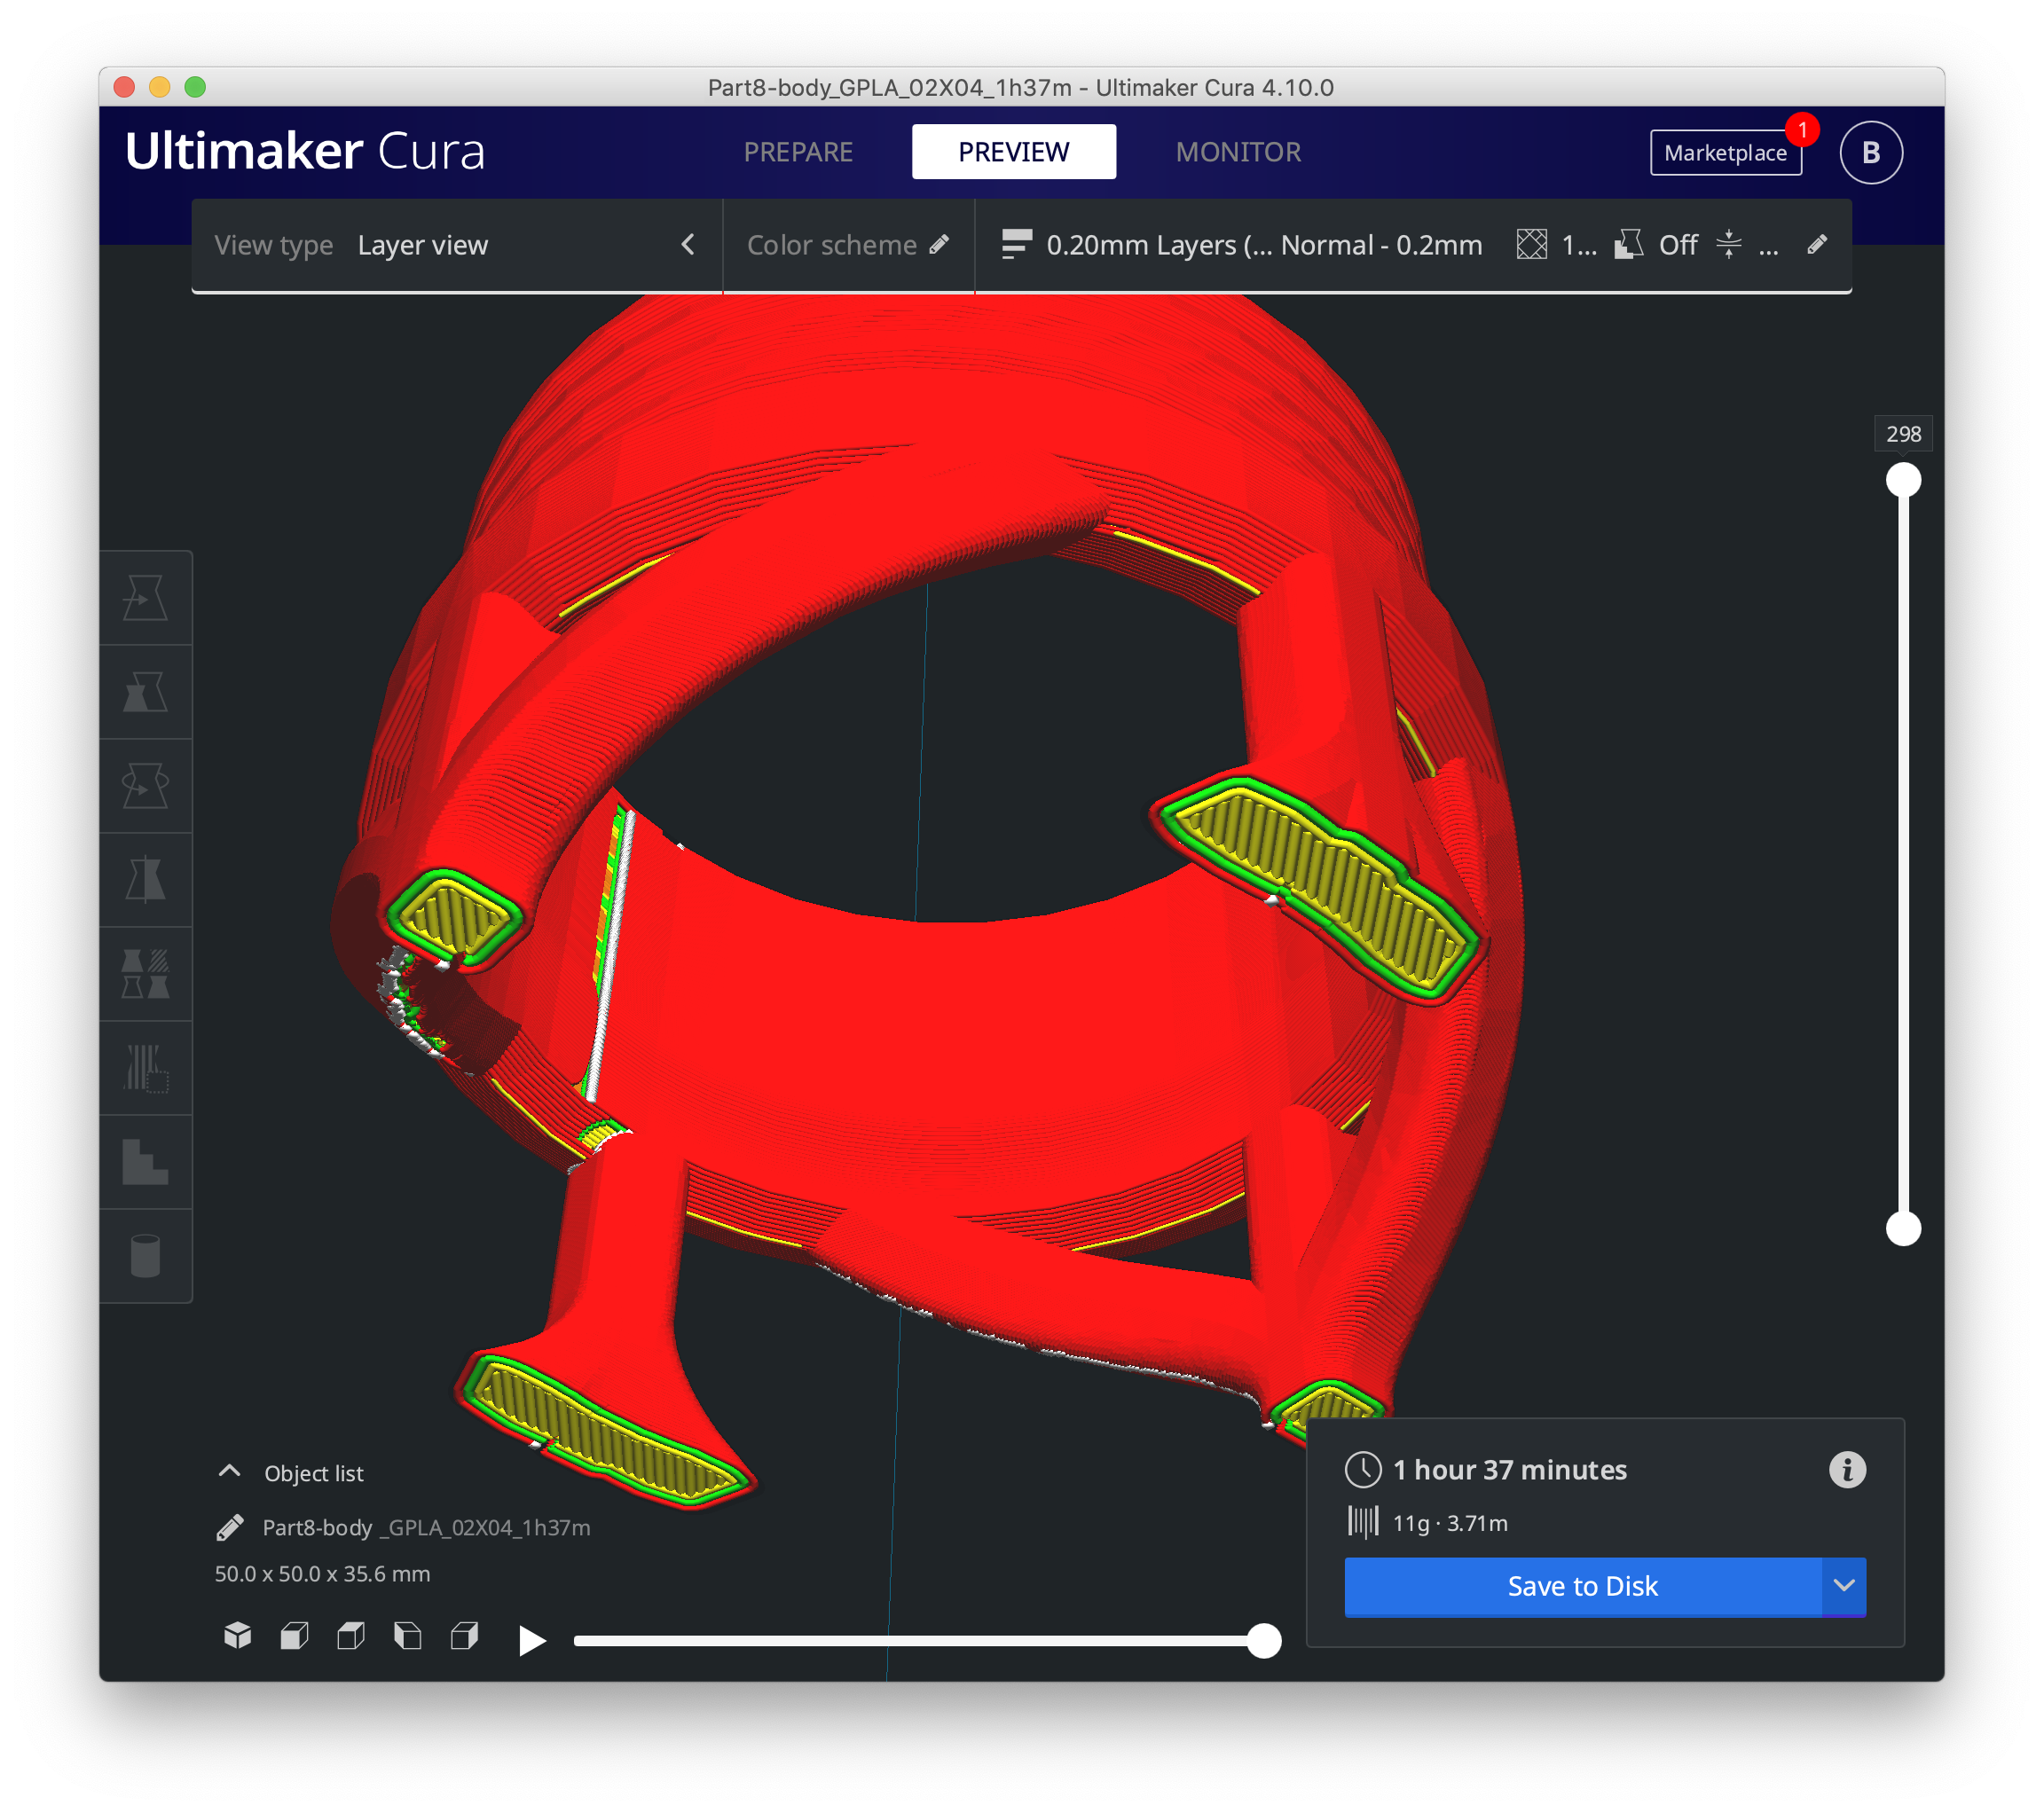
This was printed with 38.14 grams of PLA, it is your original design and printed at 0.2 speed preset and 2 perimeters with slight modifications to that profile. I left the print in your original orientation.
Profile Modifications:
"Ensure vertical shell thickness" was turned off as mentioned in my previous post, as well I changed the external perimeters to 0.5. I removed the part modification you made in the side panel and simply applied it to the overall build area as there were no other objects.
Front view
I added a very minor amount of support material to the lower inside brim, with the paint on support tool, it's under the bridging area of the print near the threads, as you can not expect to have a successful print if your first few layers are failing. Aside from this no support material was used. I came up with a way to remove the bridging at the top of the print (as an experiment for myself), and it was successful, however I will still recommend that you model in your own supports in this area.
Support used
I treated your print as if it was a temperature tower/speed tower I used the repeating pattern to apply different temperatures & printing speeds to each of the Tine sections to find the best combination. While I didn't have any blemishes as extreme as those shown in your image, I did have a definable area of improvement.

Rear view
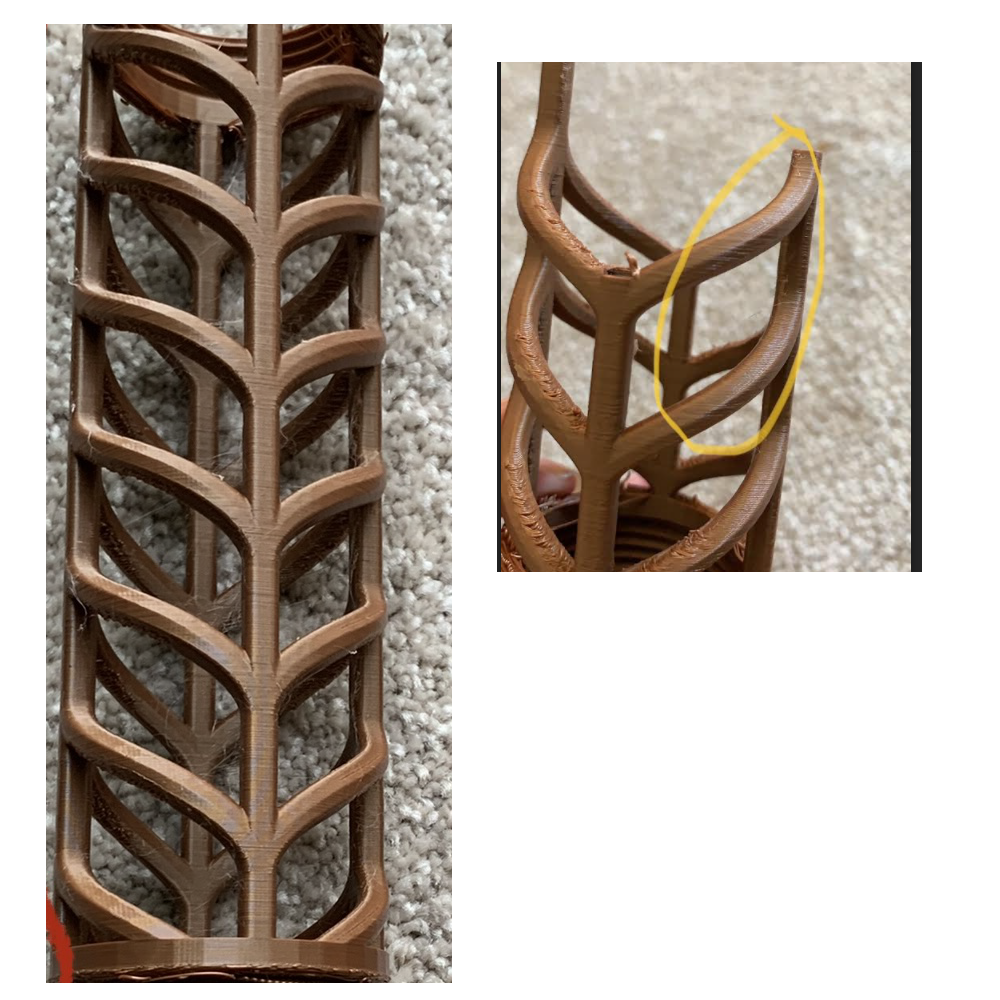
(I had to try and show the blemishes, they didn't want to show very well on camera and they are minimal in person as well.)
I started the print at 100% speed & 210C hot end, using M220 and M104 commands I stepped the speed and temp down throughout the print and then increased it back to full speed and temp to finish the top from 170mm to 190mm
In the end the best result was had for my filament (Overture) Matte PLA) at a speed of 50% and filament temperature of 200C. should work well for Hatchbox also
This was only a first attempt and I'm very confident you can tune this model to perfection for your MK3s+ with stock parts, I printed this one on my MK3 stock.
I hope this information helps you.
Good luck.
Swiss_Cheese
Mom, wife, career woman, tinkerer.
Are you seriously not going to add a Zipped .3mf file again?
The Filament Whisperer
Zipped file this time
File zipped
Mom, wife, career woman, tinkerer.
@dst
For starters I run all my Hatchbox PLA's @ 205C they seem to love this temp in my experience, of course faster printing I might bump it up a touch.
aside from that I believe you are having issues with Infill on your steep overhanging areas, the answer may be getting rid of or adjusting the level of infill on those areas. The infill I'm talking about is the purple colored infill along the walls of your Print in the areas you shown in your pictures (it shows as purple when Feature type is selected in the lower view menu) In slicer its listed as "solid infill" but it can also be controlled by top and bottom layer amount, perimeter amount, infill amount and ticking or UN-ticking "Ensure vertical shell thickness" and a couple other places I cant think of right now 🤔. anyway it can cause disasters on steep overhangs, however can be mitigated with some skill.

In this models case, I turned off Ensure vertical Shell thickness to remove the excess Infill.

Of course this still needs to be tested and could require another perimeter or selective infill to succeed.
Another area I'm reasonably sure your going to have a quality issue with is going to be your underside top portion where the bridging is taking place on a curve, bridging is normally fine when applied properly in straight lines, however bridges don't curve very well in mid-air. I would expect that you will need to support this area, If your the designer, I'm going to suggest that you model the supports in for the the best quality and easiest removal, I design as well and I have found very little use for Prusa supports, they tend to be more trouble then they are worth (good for Noobs that don't have modeling skills) but as a designer you will never go back once you get modeled in supports figured out.
The Blue areas are the bridging I'm referring too.
That's all the time I have for now, I like the design, I believe it can be tuned to print properly.
To sum up: Cooling is to be considered, however I believe this problem is caused by to much material and the way that material is being applied in those areas that your images are pointing out. As well remember to give some consideration to the curved Bridged areas at the top.
I hope this helps.
Swiss_Cheese
The Filament Whisperer
Don't rule out cooling issues, but try to reduce heat in general
[...] I understand I may need to print with supports on this model, but it seems almost perfect on one side or section. Do I have a cooling issue and consider a better shroud?
The easiest way to test would be to cut down your model to only the problem areas to save your time and sanity and try printing the same part set to varying rotations. If your fan is inconsistent, the defects will usually be oriented towards the rear of the print bed. If rotating does improve results, you can try improving your cooling airflow.
Just keep in mind that there are limits and gravity still applies. Cooling lets you "fake it" a bit, but only within limits.
- Lower layer heights can help.
- Orientation can help.
- Avoiding bridges hanging in air (as in this example) can help.
- Do try printing at cooler temperatures.
- Take a look at Filament Settings->Cooling->Cooling thresholds. Slowing down (giving the fan more time) can help.
- If you are concerned about the nozzle heat contributing to problems, you can print a "cooling tower" located away from the main print so the nozzle has to move away for a few seconds, allowing more cooling.
- Some filaments are more tolerant of bridges and overhangs. I really like the way Colorfabb nGen prints.
Some people have success plunking a table fan down for specific problem prints.
[...] I'm not getting consistent cooling at rear of the model.
That's not unheard of. Do a few tests. Also:
- Check to make sure your fan duct is seated properly.
- Check for any obstruction in the fan flow.
- Consider using a silicone sock if you're not already. That will keep some heat from the block away from the print.
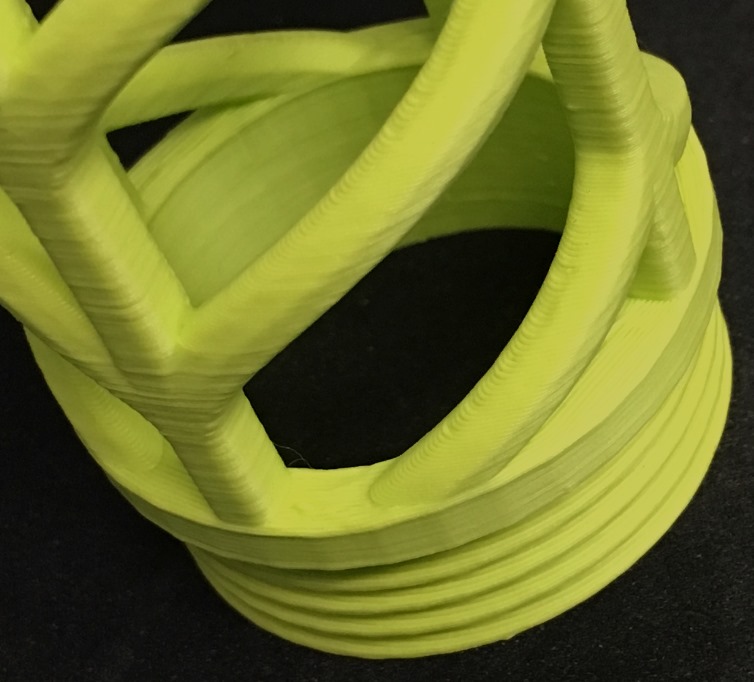
Worst case for unsupported bridging
You're definitely going to have a challenge with the top piece without support:
The curved pillars are a challenge, but the top is going to be particularly difficult. Those curved lines between the pillars have to literally be printed in air. A point-to-point straight bridge can be printed by stretching the filament taut across, but there's no way to get free-floating filament to curve, at least not with what we've got available today. Also, notice the direction of the bridging (blue) infill as it changes with the orientation of the print. This part is going to be very difficult without supports.
I'm running an experiment, I removed the bridging in that area. Ill let you know how it goes in 5 hours.
Or sooner if it fails 🤣
Regards
Swiss_Cheese
The Filament Whisperer
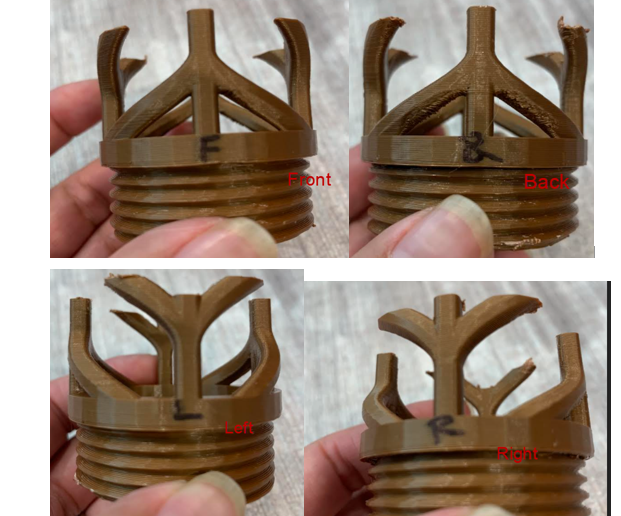
Using Cura for analysis shows interesting results
I cut down your STL and plunked it into Cura. A few interesting things:
The undersides are not even all the way around the print. I wonder if this correlates to your inconsistencies?
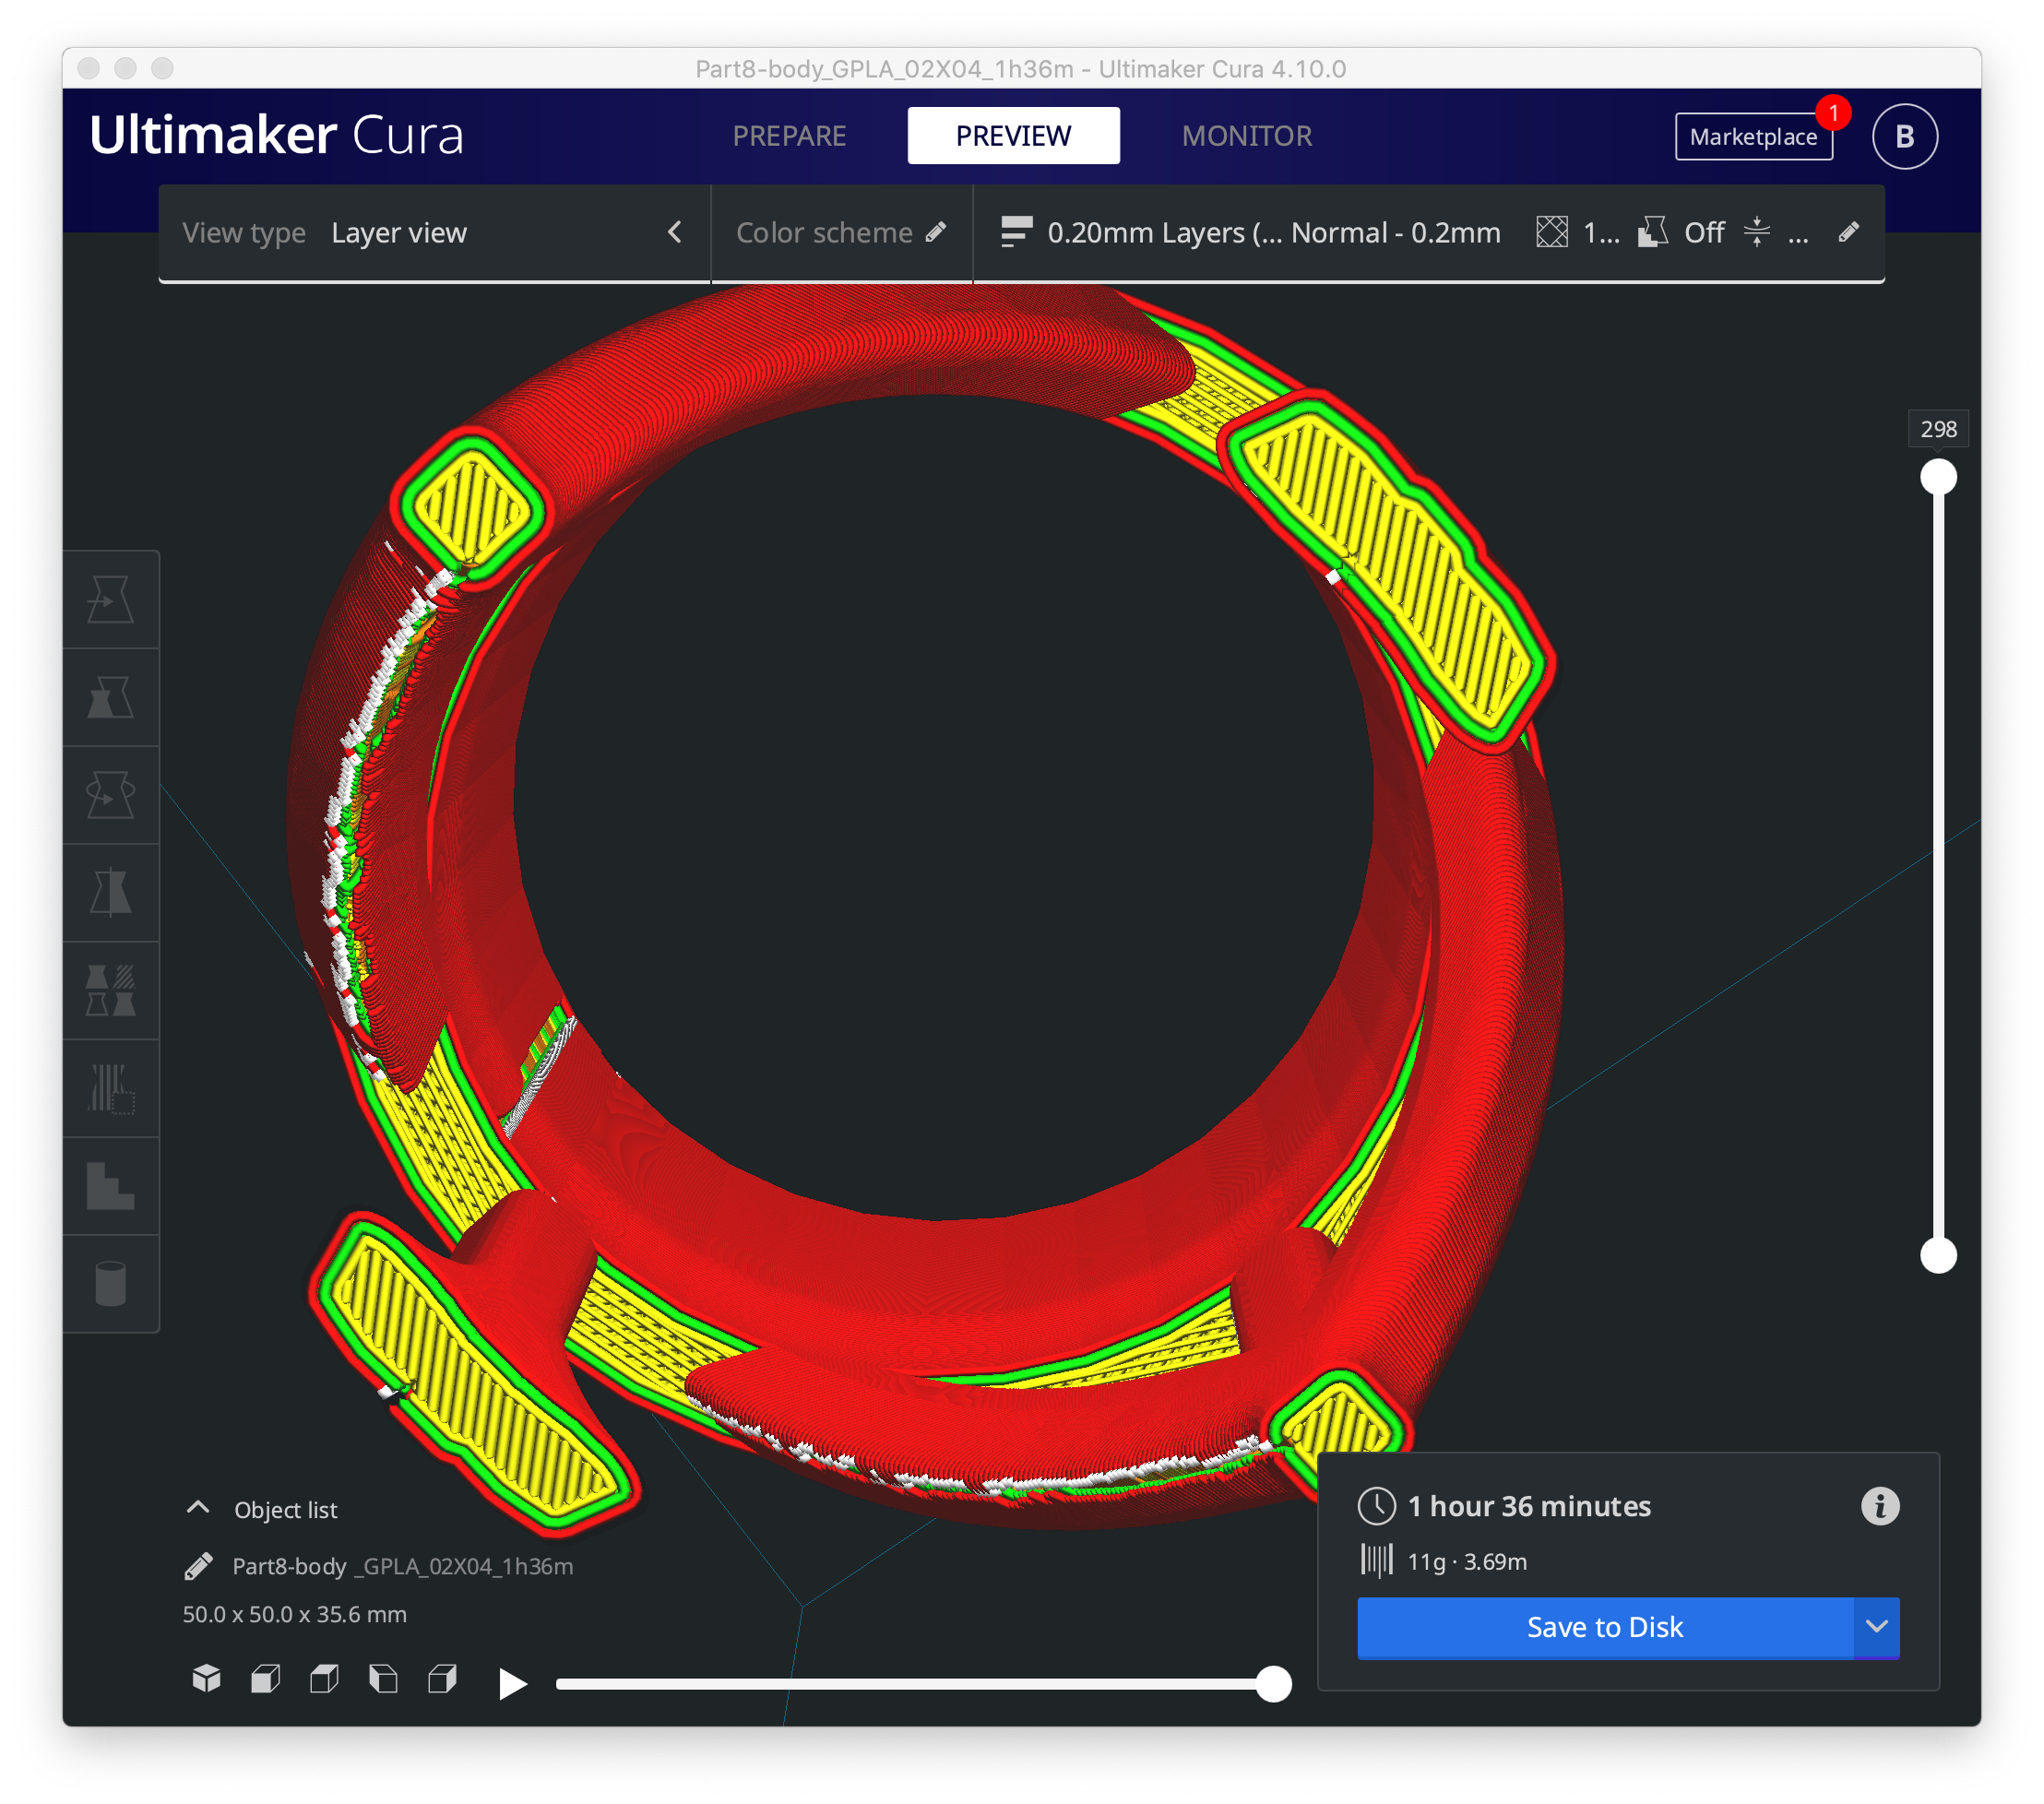
Notice the "fuzz" at the bottom of 2 of the curved pillar segments. That indicates the STL may not be smooth or consistent at those points. Try another z-seam location (random to test). I'd definitely try rotating the part on the bed and see if the inconsistencies move with the rotation or say on the part.
Cura highlights the same challenge when printing the top part with overhangs:
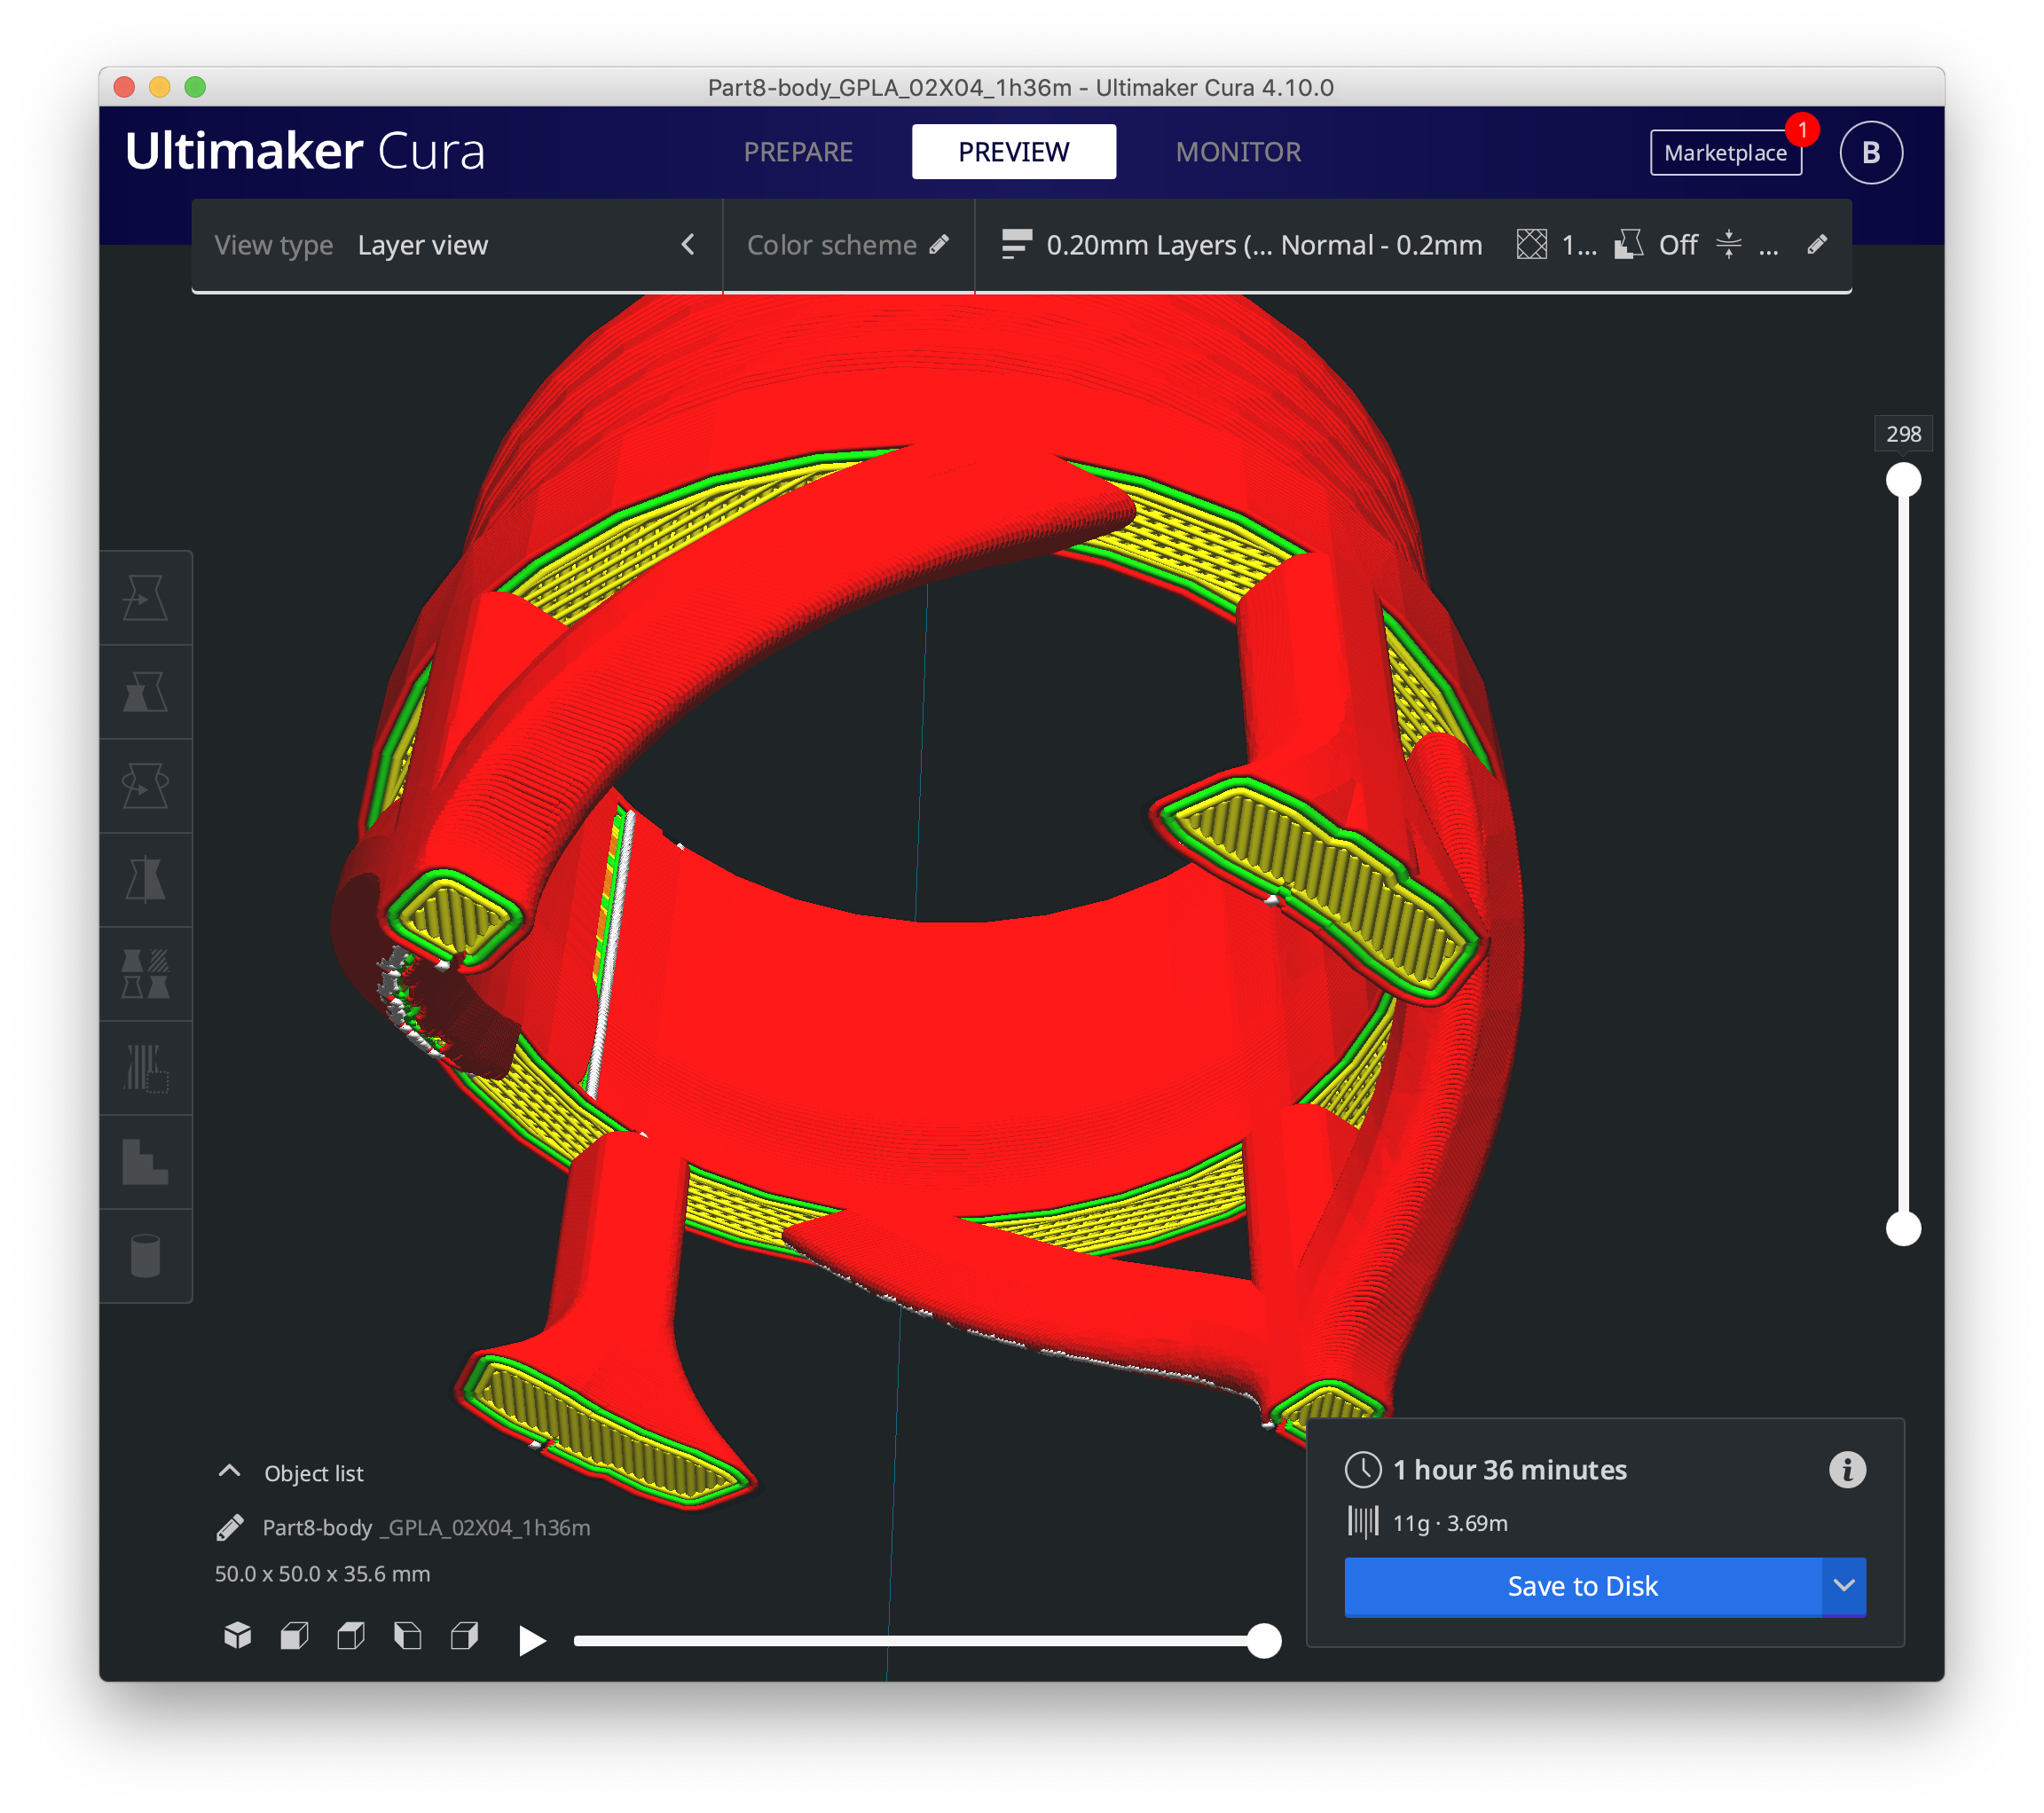
Cura has some interesting suggestions for making overhangs more printable:
It's a little hard to see, but essentially it's made all of the overhangs (the pillars and start of the top piece) V-shaped on the underside. This prints everything as perimeters, and while the 1st line across won't be curved, the layers built atop it have a better change to keep the desired curved shape.
Bridging with mesh mixer an option?
@swiss-cheese. Thank you!
Hatchbox 205 check!
I’m going to fiddle with this tonight with the infill and perimeter on this model. Makes sense that it would output differently if the infill algorithms are inconsistent across areas of the model. What I think I’ll do is mark up with a sharpie the orientation front back and rear before I lose sight. These symmetrical models are playing games with me.
Worst case for unsupported bridging
Your are totally right, it’s going to need to bridge on something. What if I meshmixed a bunch of mini tree supports for those areas only as separate stl? I’ve never done it before, but saw it on one of Angus’ MM tutorials and and may solve the bridging ? Or I just fill those holes in design strategically where blue bridges are as my final resort. Such a fine line between aesthetics an ability to print!
I’m also experimenting on VLH for threaded areas in slicing @Bobstro suggested and increasing space between threads. From an engineering standpoint the pole doesn’t need to hold up a whole lot of weight or crazy heights -so even reducing the amount of threading needed can be an Improvement.
Can’t wait to see your results!
Mom, wife, career woman, tinkerer.
Temps and design considerations
[...] Hatchbox 205 check!
I've gone as low as 180C with PLA with good results. Most print fine at 190C. Cooler is better with bridging and overhangs.
Your are totally right, it’s going to need to bridge on something. What if I meshmixed a bunch of mini tree supports for those areas only as separate stl? I’ve never done it before, but saw it on one of Angus’ MM tutorials and and may solve the bridging ? Or I just fill those holes in design strategically where blue bridges are as my final resort. Such a fine line between aesthetics an ability to print!
A sleeve of thin material from the top pillars to the undersides of the top part should work. Something that will knock out easily and clean up quickly with a deburring tool perhaps. It's really going to be a question of how much post-processing you're willing to do. I'd definitely see if you can't get the undersides of the top part modified for that V cross-section.
I’m also experimenting on VLH for threaded areas in slicing @Bobstro suggested and increasing space between threads. From an engineering standpoint the pole doesn’t need to hold up a whole lot of weight or crazy heights -so even reducing the amount of threading needed can be an Improvement.
Don't forget you can add a bit of width to the thread extrusions as well.
Gravity is one of those laws that's really hard to break.
Consider finishing each part of your lattice with a short, vertical, rod. Then cut off and invert your top, create ports to accomodate the rods and glue them together afterwards.
@bobstro's table fan suggestion is well worth trying.
Cheerio,
Thank you!
Notice the "fuzz" at the bottom of 2 of the curved pillar segments. That indicates the STL may not be smooth or consistent at those points. Try another z-seam location (random to test). I'd definitely try rotating the part on the bed and see if the inconsistencies move with the rotation or say on the part.
I do notice the fuzz. I"ll pull it up and cura to see. Is there a tool in any of the mesh mixers that would help smoothen that you know of? I preview before and after. Yes, I plan on marking up the test print again to isolate area to just satisfy the nuances with my set up.
A sleeve of thin material from the top pillars to the undersides of the top part should work. Something that will knock out easily and clean up quickly with a deburring tool perhaps. It's really going to be a question of how much post-processing you're willing to do. I'd definitely see if you can't get the undersides of the top part modified for that V cross-section.
I think the tree supports in meshmixer are fairly non invasive so I will give that ago in those areas especially. I really don't want to abandon the design, but a little modification to the design would probably go a long way.
I also did install new shroud by @MMartin_au. I'm noticing some improvements in cooling all together, but the model was not as complex.
THank you! Check- width to extrusion on layer where threads are.
Mom, wife, career woman, tinkerer.
Cura has some good support options worth trying
I do notice the fuzz. I"ll pull it up and cura to see. Is there a tool in any of the mesh mixers that would help smoothen that you know of? I preview before and after. Yes, I plan on marking up the test print again to isolate area to just satisfy the nuances with my set up.
It does seem to move with the z-seam location, so if you still see fuzz on the same areas after rotating, try changing the z-seam location. You might try the paint-on z-seams in recent PrusaSlicer versions.
I think the tree supports in meshmixer are fairly non invasive so I will give that ago in those areas especially. I really don't want to abandon the design, but a little modification to the design would probably go a long way.
If you're going to fire up Cura, try their tree supports. They work very well for delicate miniatures and might just be the bit of extra support this print needs!
I also did install new shroud by @MMartin_au. I'm noticing some improvements in cooling all together, but the model was not as complex.
That's good. A shroud and sock are things that won't make a huge difference, but help a little now and then.
@dst
This was printed with 38.14 grams of PLA, it is your original design and printed at 0.2 speed preset and 2 perimeters with slight modifications to that profile. I left the print in your original orientation.
Profile Modifications:
"Ensure vertical shell thickness" was turned off as mentioned in my previous post, as well I changed the external perimeters to 0.5. I removed the part modification you made in the side panel and simply applied it to the overall build area as there were no other objects.
Front view
I added a very minor amount of support material to the lower inside brim, with the paint on support tool, it's under the bridging area of the print near the threads, as you can not expect to have a successful print if your first few layers are failing. Aside from this no support material was used. I came up with a way to remove the bridging at the top of the print (as an experiment for myself), and it was successful, however I will still recommend that you model in your own supports in this area.
Support used
I treated your print as if it was a temperature tower/speed tower I used the repeating pattern to apply different temperatures & printing speeds to each of the Tine sections to find the best combination. While I didn't have any blemishes as extreme as those shown in your image, I did have a definable area of improvement.
Rear view
(I had to try and show the blemishes, they didn't want to show very well on camera and they are minimal in person as well.)
I started the print at 100% speed & 210C hot end, using M220 and M104 commands I stepped the speed and temp down throughout the print and then increased it back to full speed and temp to finish the top from 170mm to 190mm
In the end the best result was had for my filament (Overture) Matte PLA) at a speed of 50% and filament temperature of 200C. should work well for Hatchbox also
This was only a first attempt and I'm very confident you can tune this model to perfection for your MK3s+ with stock parts, I printed this one on my MK3 stock.
I hope this information helps you.
Good luck.
Swiss_Cheese
The Filament Whisperer
Great Results!
@Swiss_Cheese Wow, great results! Thank you for feedback and giving me hope after all. I'll absorb this report back. I'm attempting to mesh mix some tree supports where bridging needs it and tower various settings and document it.
Mom, wife, career woman, tinkerer.
Almost, but not quite good bridging with no supports
I was curious to see what sort of results are possible with no supports. I made a few adjustments to my normal slicer settings.
- Reduced PLA print temperature to 190C to improve cooling and reduce sagging for bridges.
- Painted on z-seam to align seam on the inside of each pillar segment to reduce underside fuzz.
- Increased extrusion width to 0.75mm (for 0.4mm nozzle) to improve overhang and thread results.
- Enabled variable layer heights. Most of the print used 0.21mm layer heights, but parts were at 0.32mm. The threads printed nicely at just 0ver 0.2mm layer height. This cut-down print finished in 1h5m.
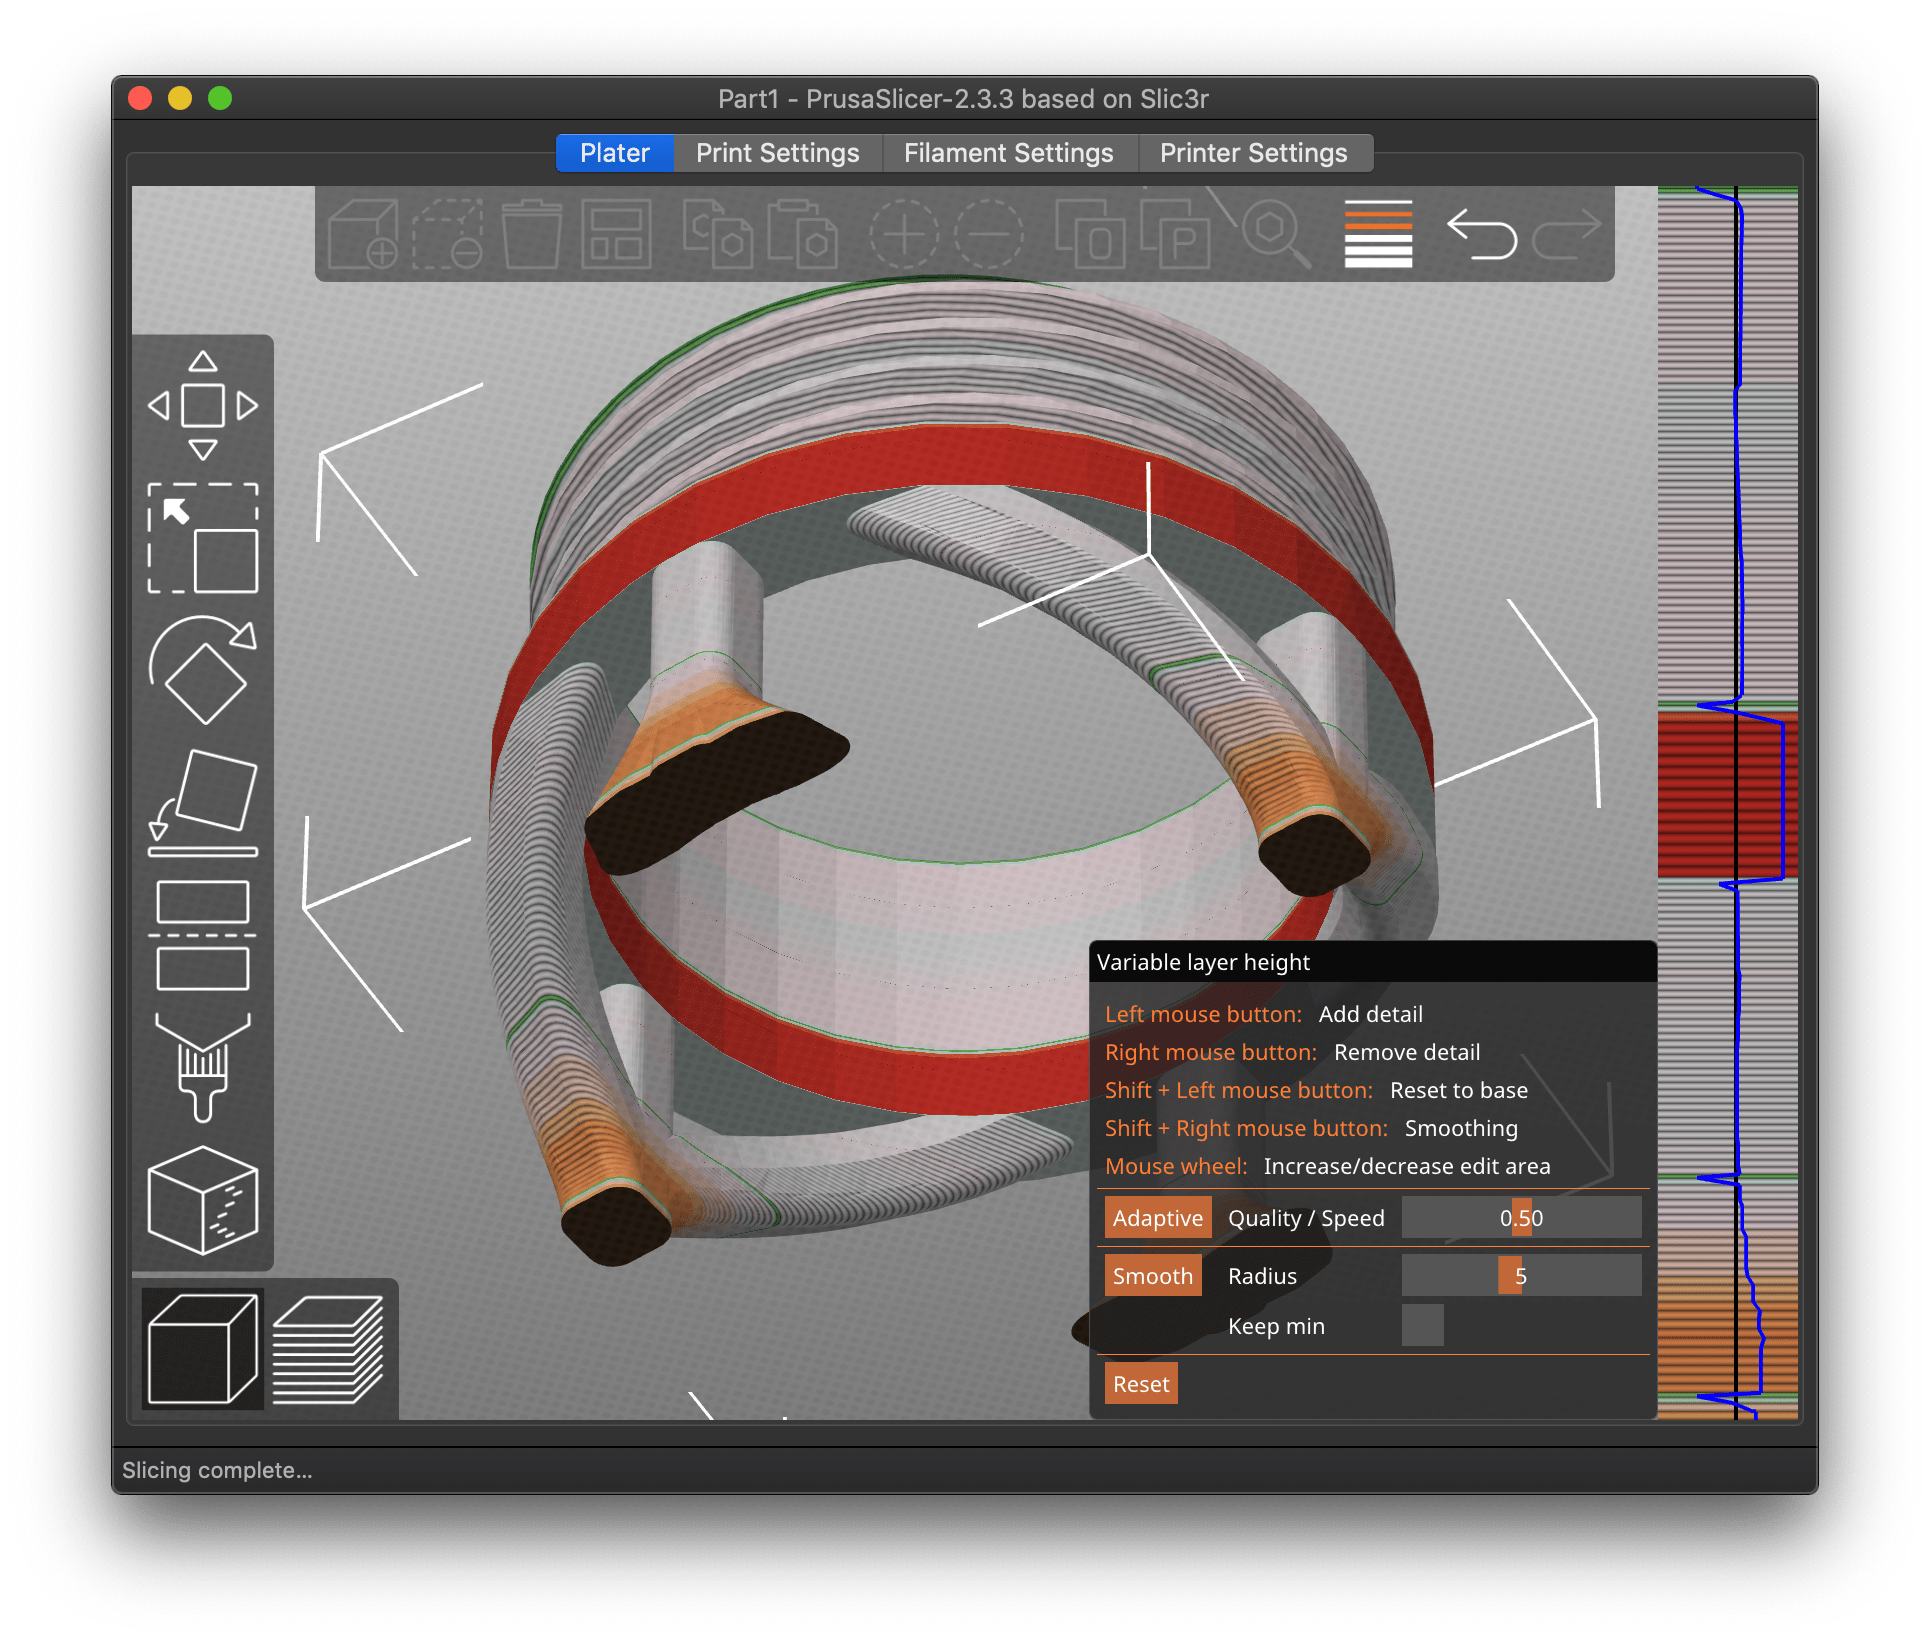
- The big change was increasing the number of perimeters to avoid using an infill pattern on the bridging layer. This produces a still tricky-to-print overhang, but one that prints more easily and recovers quickly. Of course, the blue overhangs can't print with curves as shown in the preview, but they do print better than the usual bridging pattern.
The pillar undersides came out nicely. The bridging is "not bad" for zero support. Probably not good enough for a commercial product, but it does give hope that just a little support will go a long way.
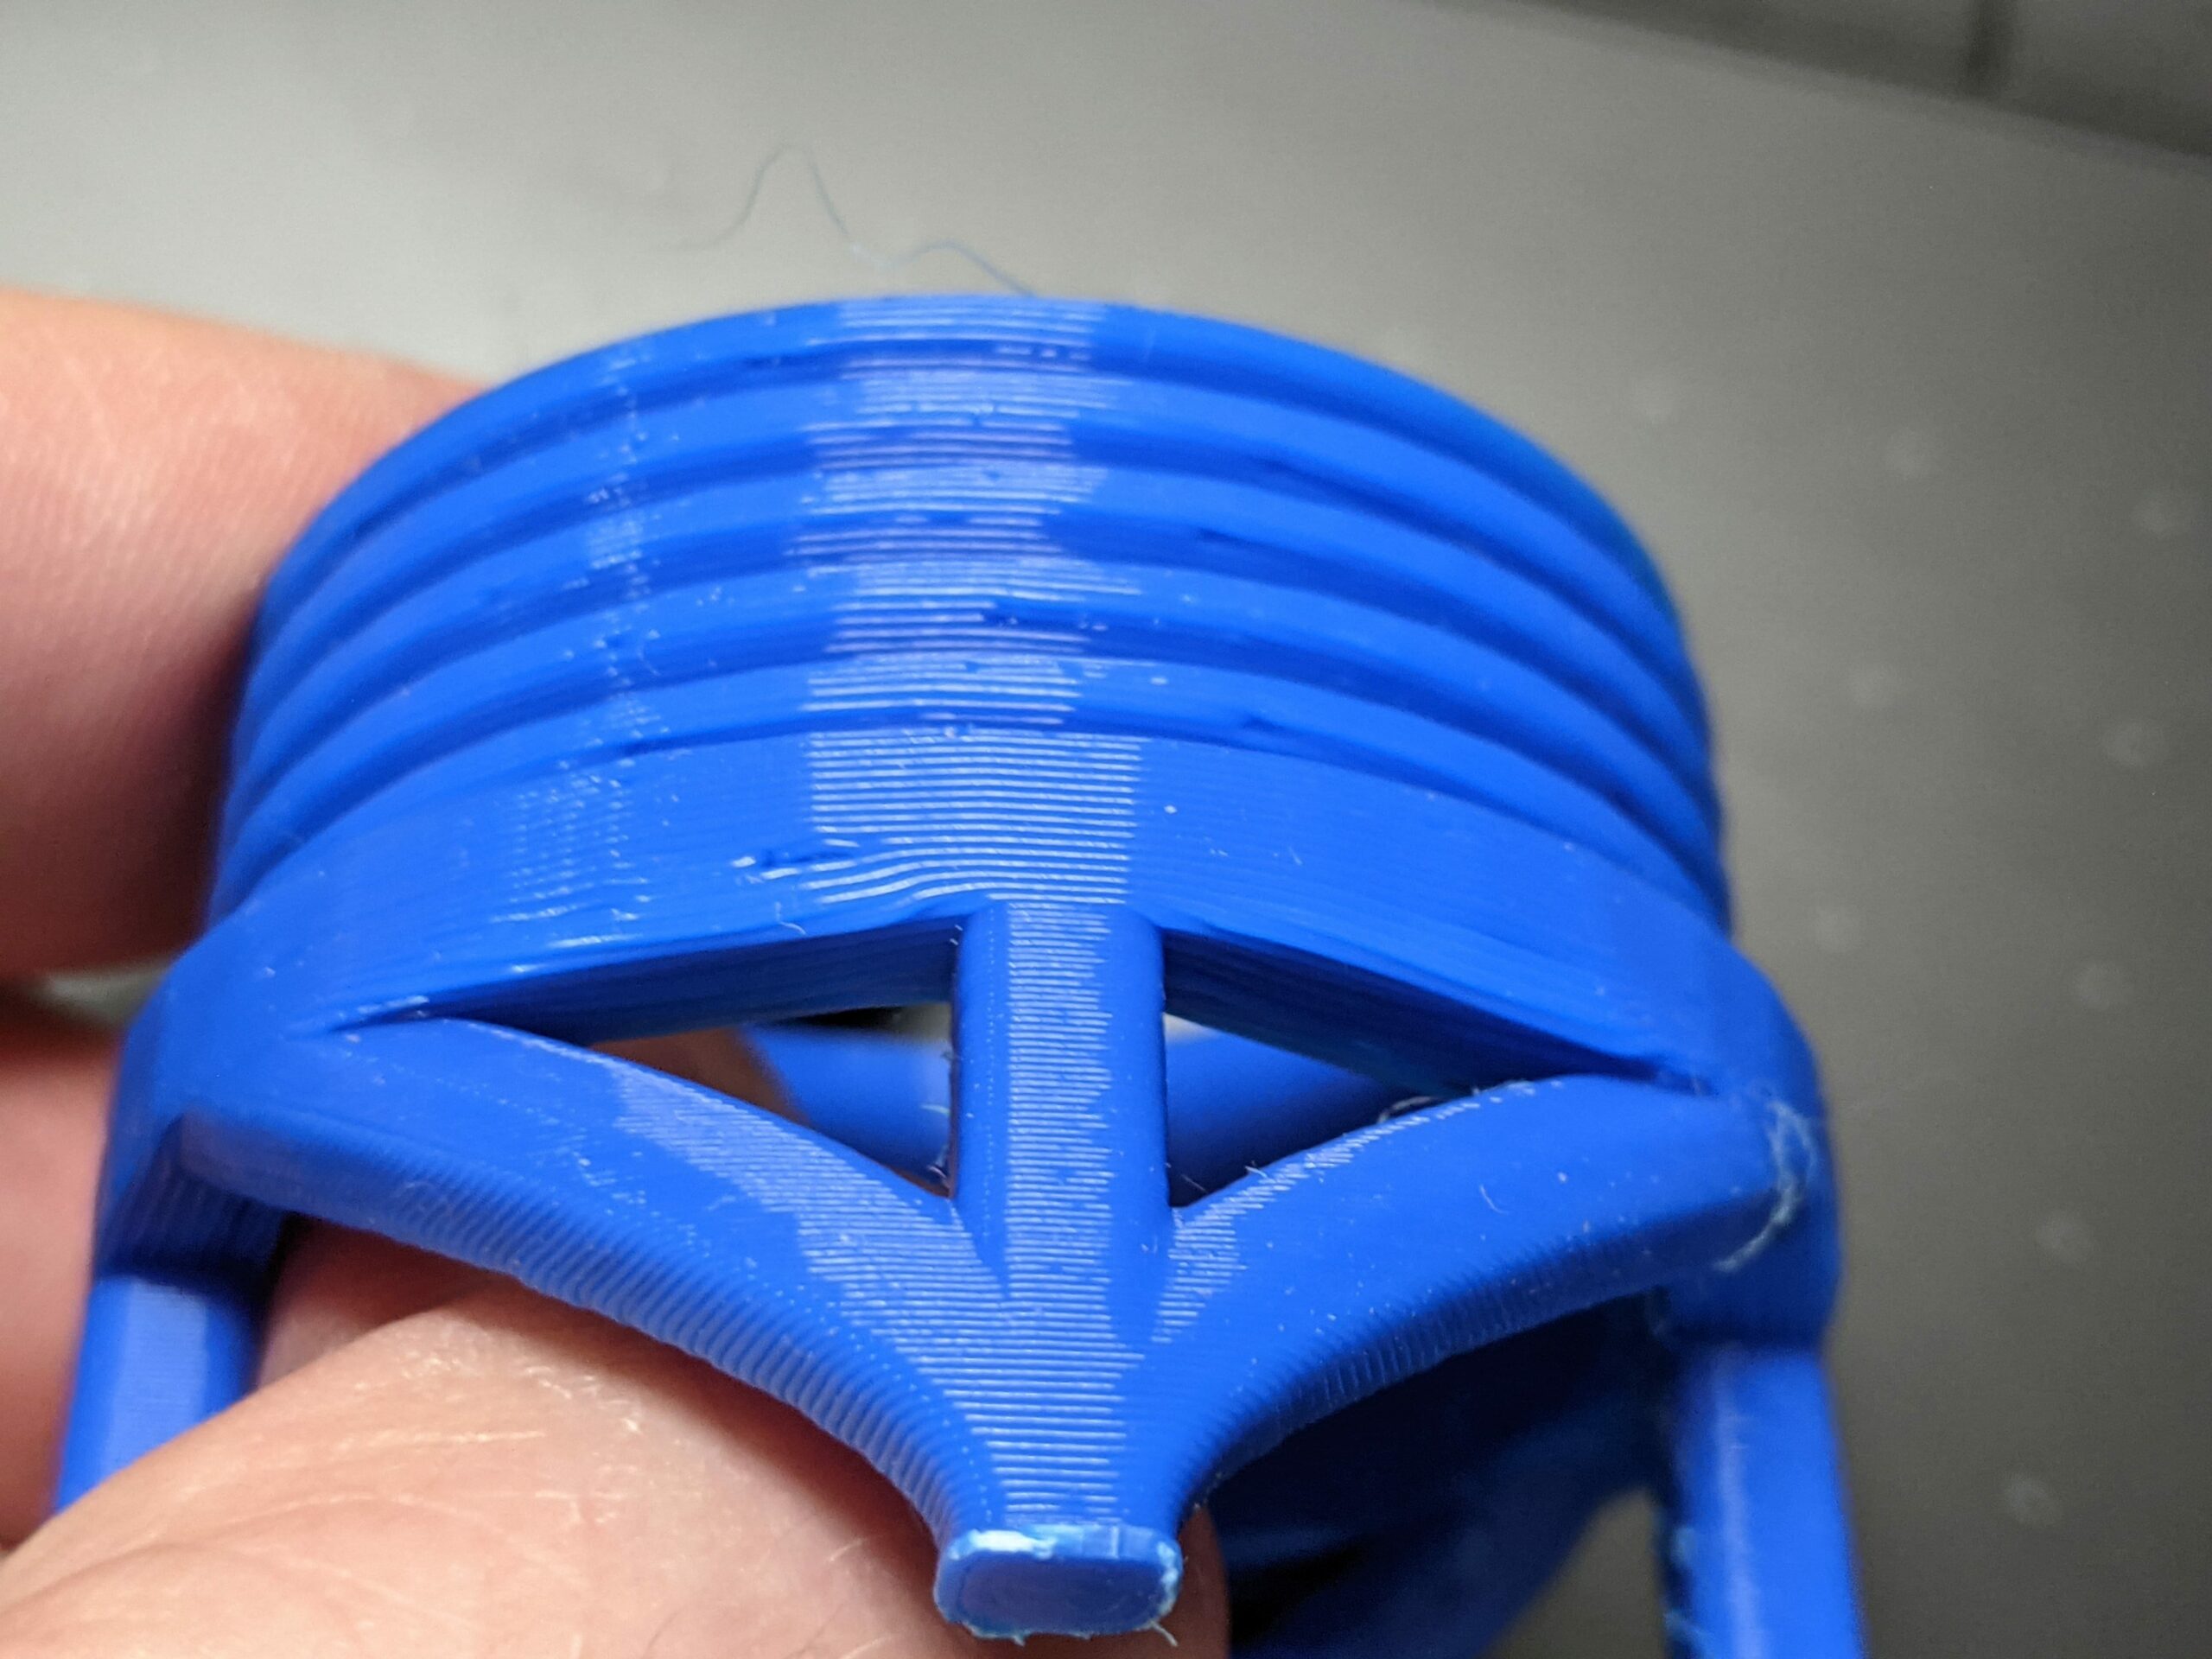
Physics and gravity still apply, so there are still some nasty undersides.
My Mk3 is still offline, so I had to print on my Sidewinder, but the results are better than I expected.
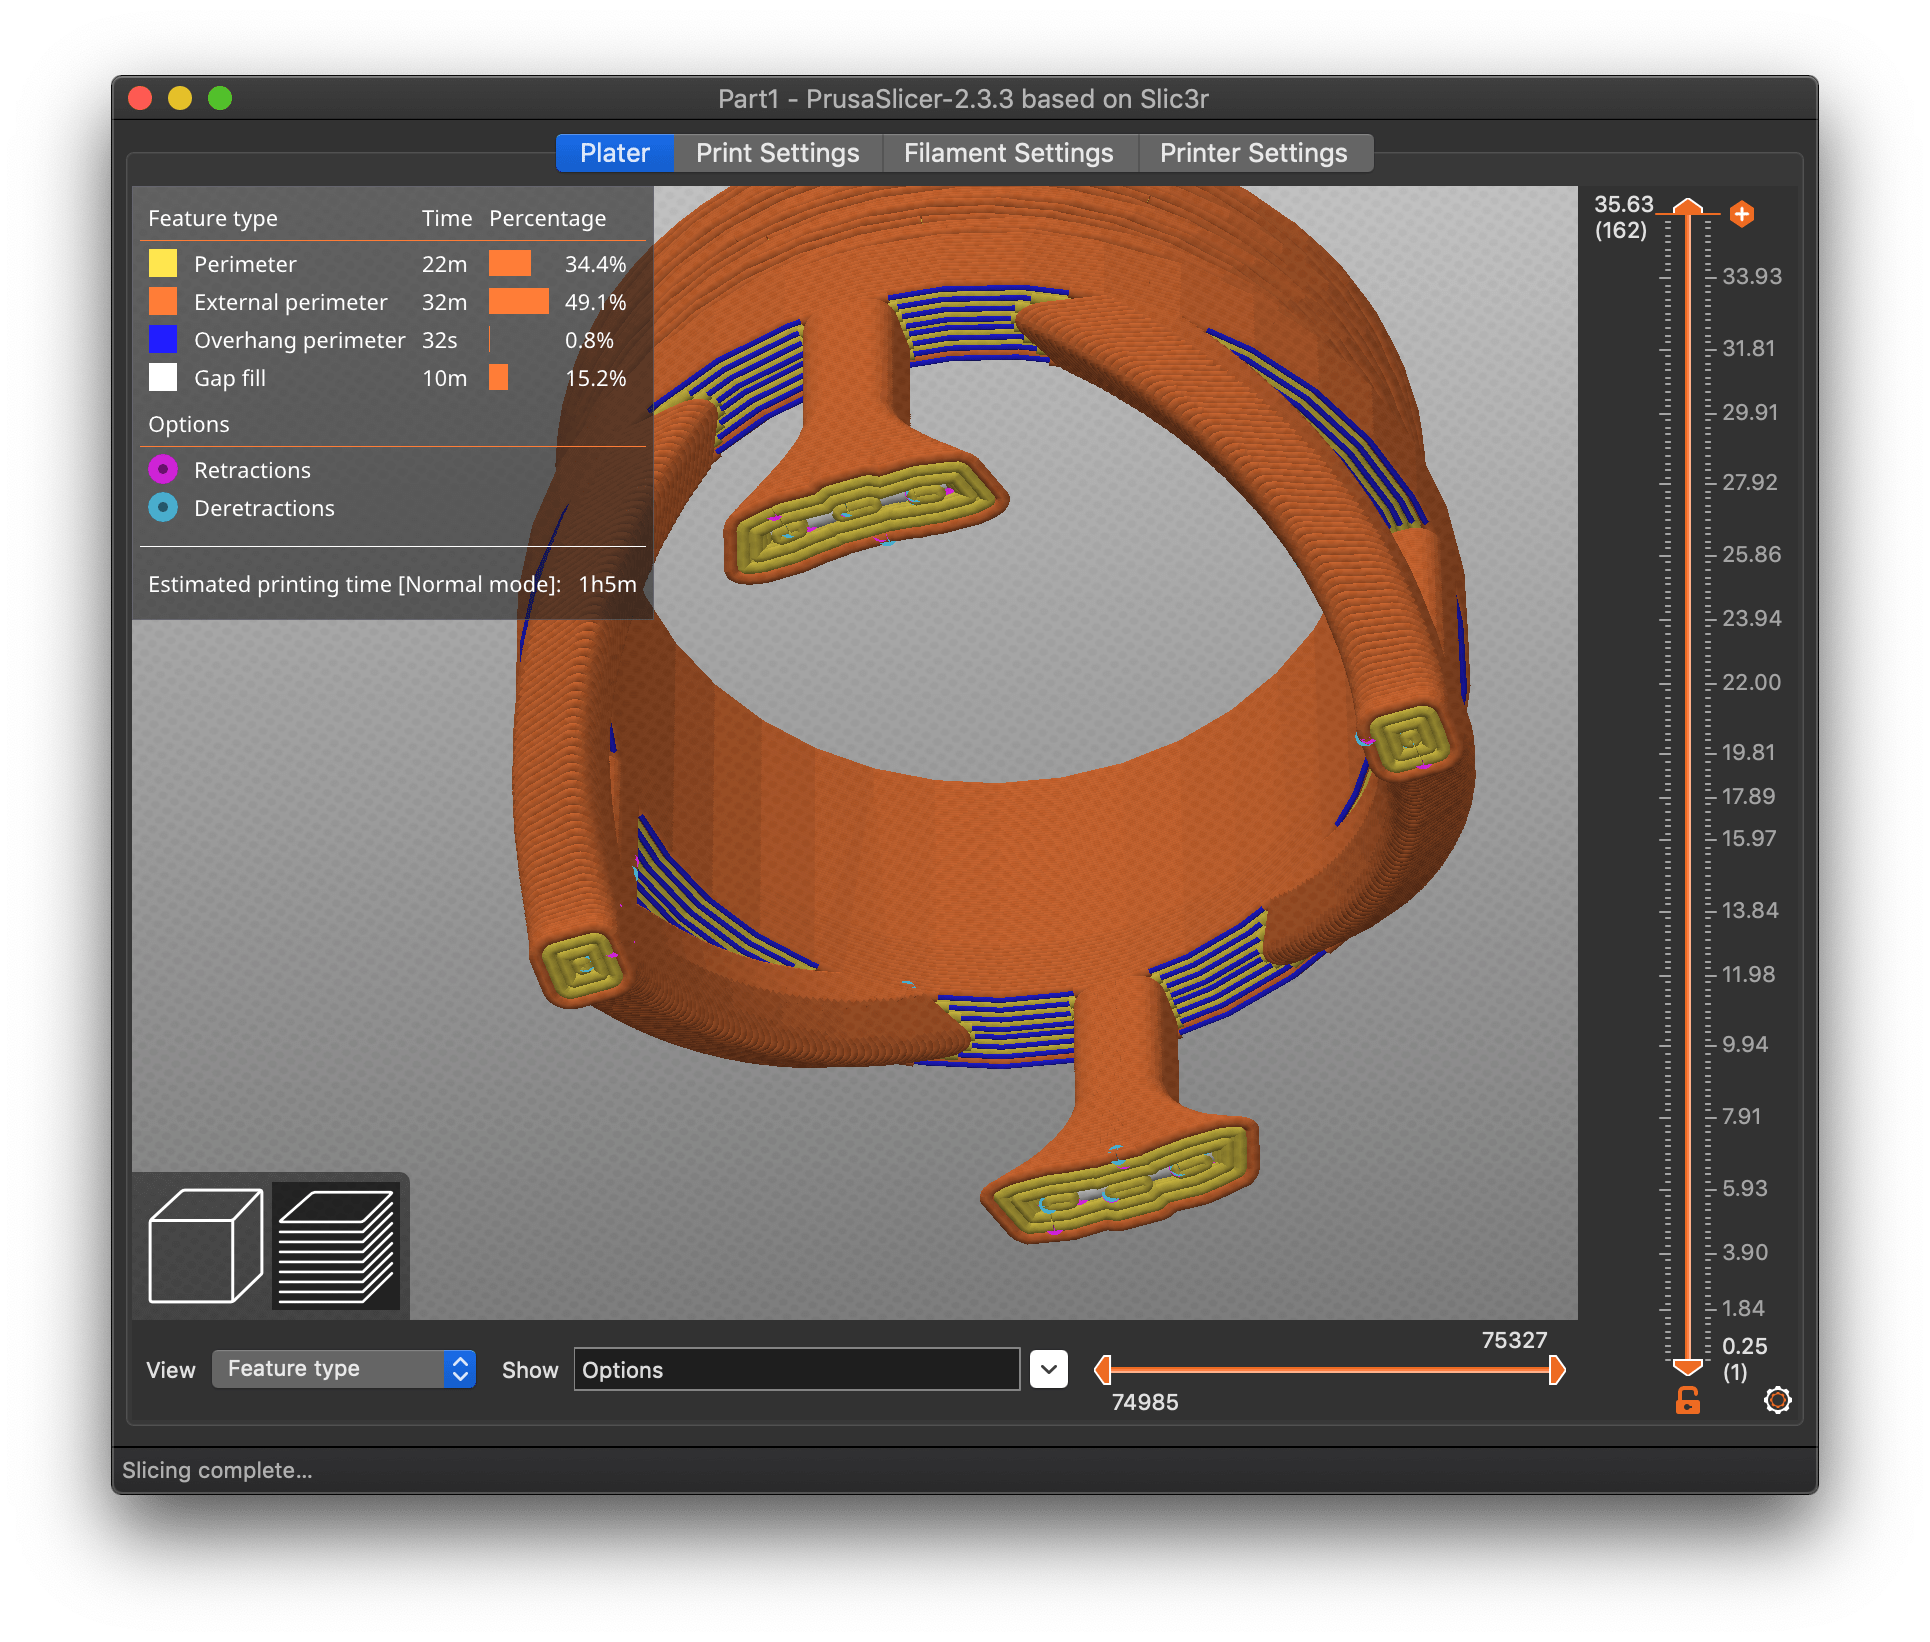
@bobstro
Using a height range modifier I added 6 perimeters to the area and made it 4 layers high, this eliminated any bridging. Slicer wants to print the inner most layer first by default, so it takes the shortest path in this instance, and that in turn helps to control the shape of the following layers.

I got a very clean result minus a couple of strands that were able to be pulled away. as well it maintained the shape in a very reasonable fashion.
I was pleased with the result and am planing to develop this more for future use. this was first go and I watched it print I think with some minor adjustments it can be very useful.
@dst
My understanding is that you are designing products for resale?, this is why I was recommending using modeled in supports for a cleaner look, as this does not present well at this stage and can effect perceived value. However I feel it can be adjusted to that point if using plastics such as ABS or ASA that lend themselves well to very easy post processing. Currently Designed in supports are the way to go IMO.
Regards,
Swiss_Cheese
The Filament Whisperer
@dst
Based on what I learned from printing this model yesterday, I'm Printing a second with different settings and orientation, the result should be greatly improved. I'll post when the print is completed.
Regards
Swiss_Cheese
The Filament Whisperer
Test Attempt Perimeter
@Bostro/Swiss_Cheese, Thank you gents for your priceless feedback! I am determined for a solution as you are.
Yes, intended for sale worthy product I hope. At this point, I would just like to score a successful model for my Monstera that is begging me for some stylish support. See how I am newbie and all, I may be biting more than I can chew at least at first trials, but truly having fun tinkering along. My kids are all... " You are printing that again?" I had to print something fun for them in between trial and errors.
I also flipped orientation to check male threads on .2 print and print section with recommended perimeter settings of the lattices with increase perimeter and slightly wider width. Much improved latticed for everywhere but the rear at 200 w Hatchbox and the minute I dropped temps to lower 195/190, filament hardened much quicker and on corners of lattices pulled and shifted it off bed. I also think new shroud is overcooling and not getting good adhesion and need to compensate by increasing bed temp even with fan off at first few layers. Much improved on lattices though. I'm curious if tree supports would work, just didn't get that far and will need slice the bridge problem with recomended bridge perimeters and sacrificial supported. I just want to have to pay designer to model that in. If I do go that route, I much rather go the peg, hole, glue router @Diem suggested.
Mom, wife, career woman, tinkerer.
I'm pretty sure I know what the problems are, I'll post results when done. currently at 50% 3.5 hours left, no cooling issues, its looking flawless.
Regards
Swiss_Cheese
The Filament Whisperer