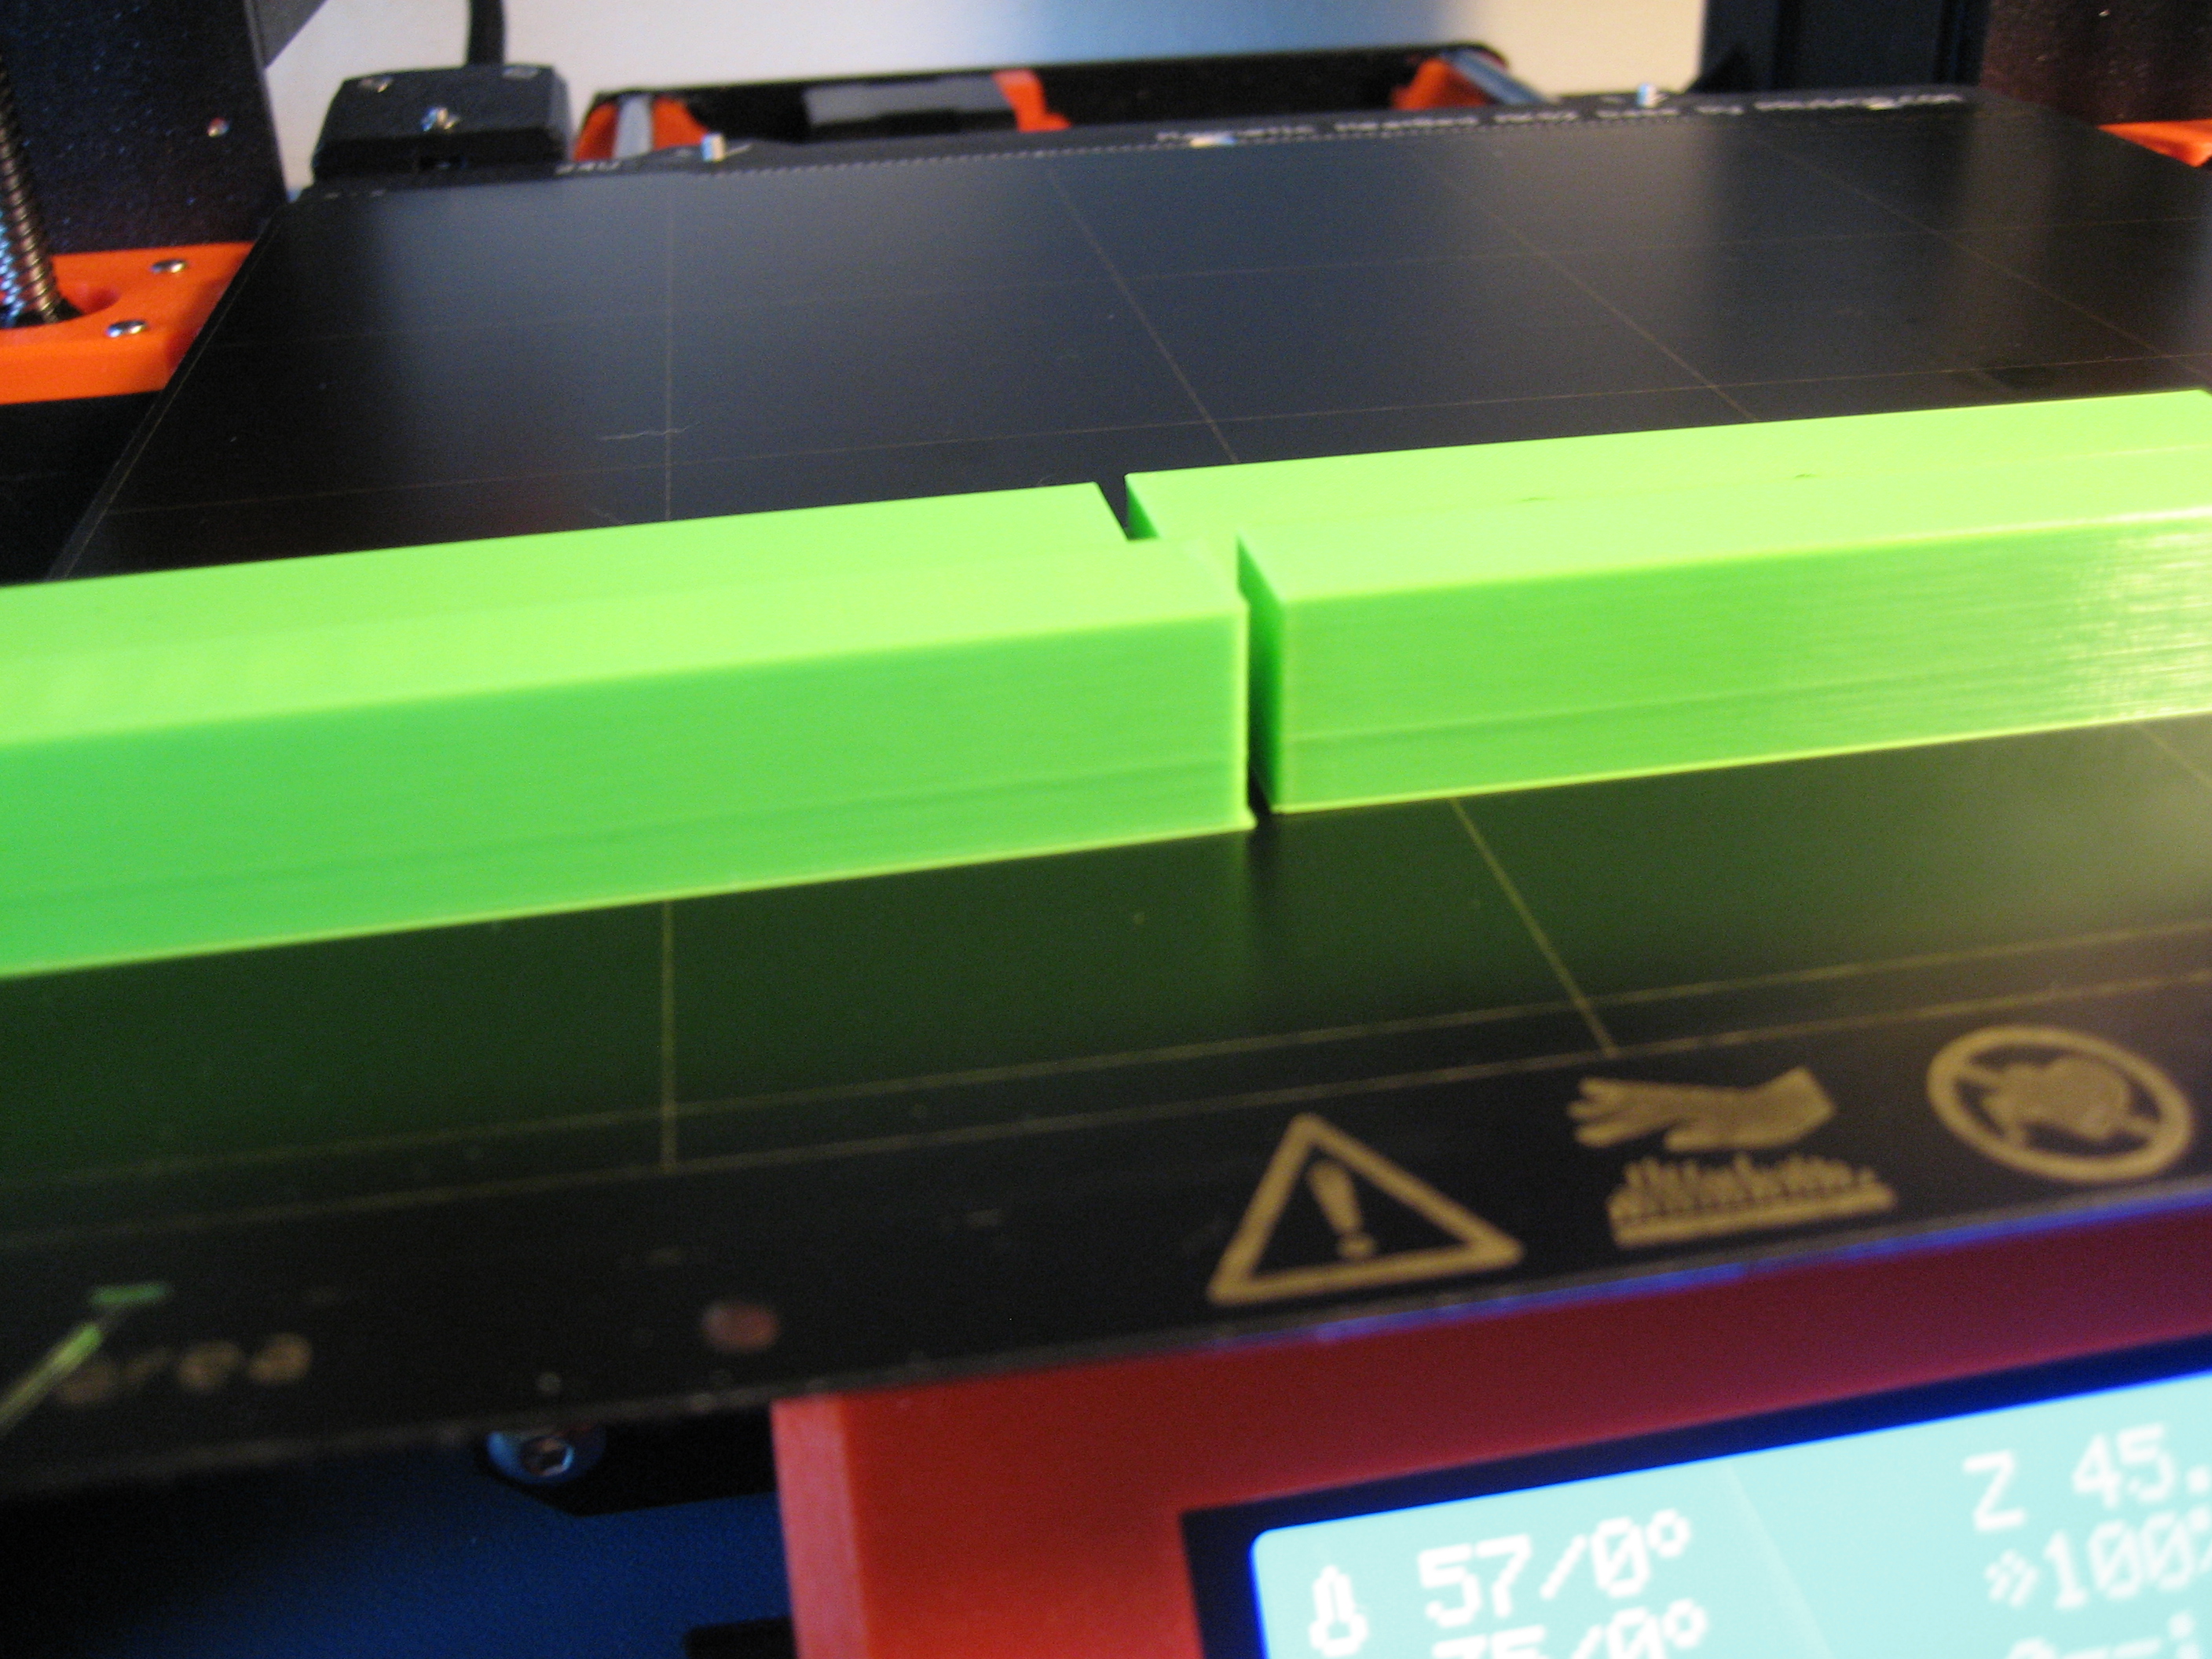
Bulge when print reaches "solid" layers
Hi everyone,
I'm trying to print a case for my headphones. Unfortunatly my MK3 produces a bulge everytime it reaches a sort of plateau (= a couple of solid top layers) and from there on continues with a larger diameter:
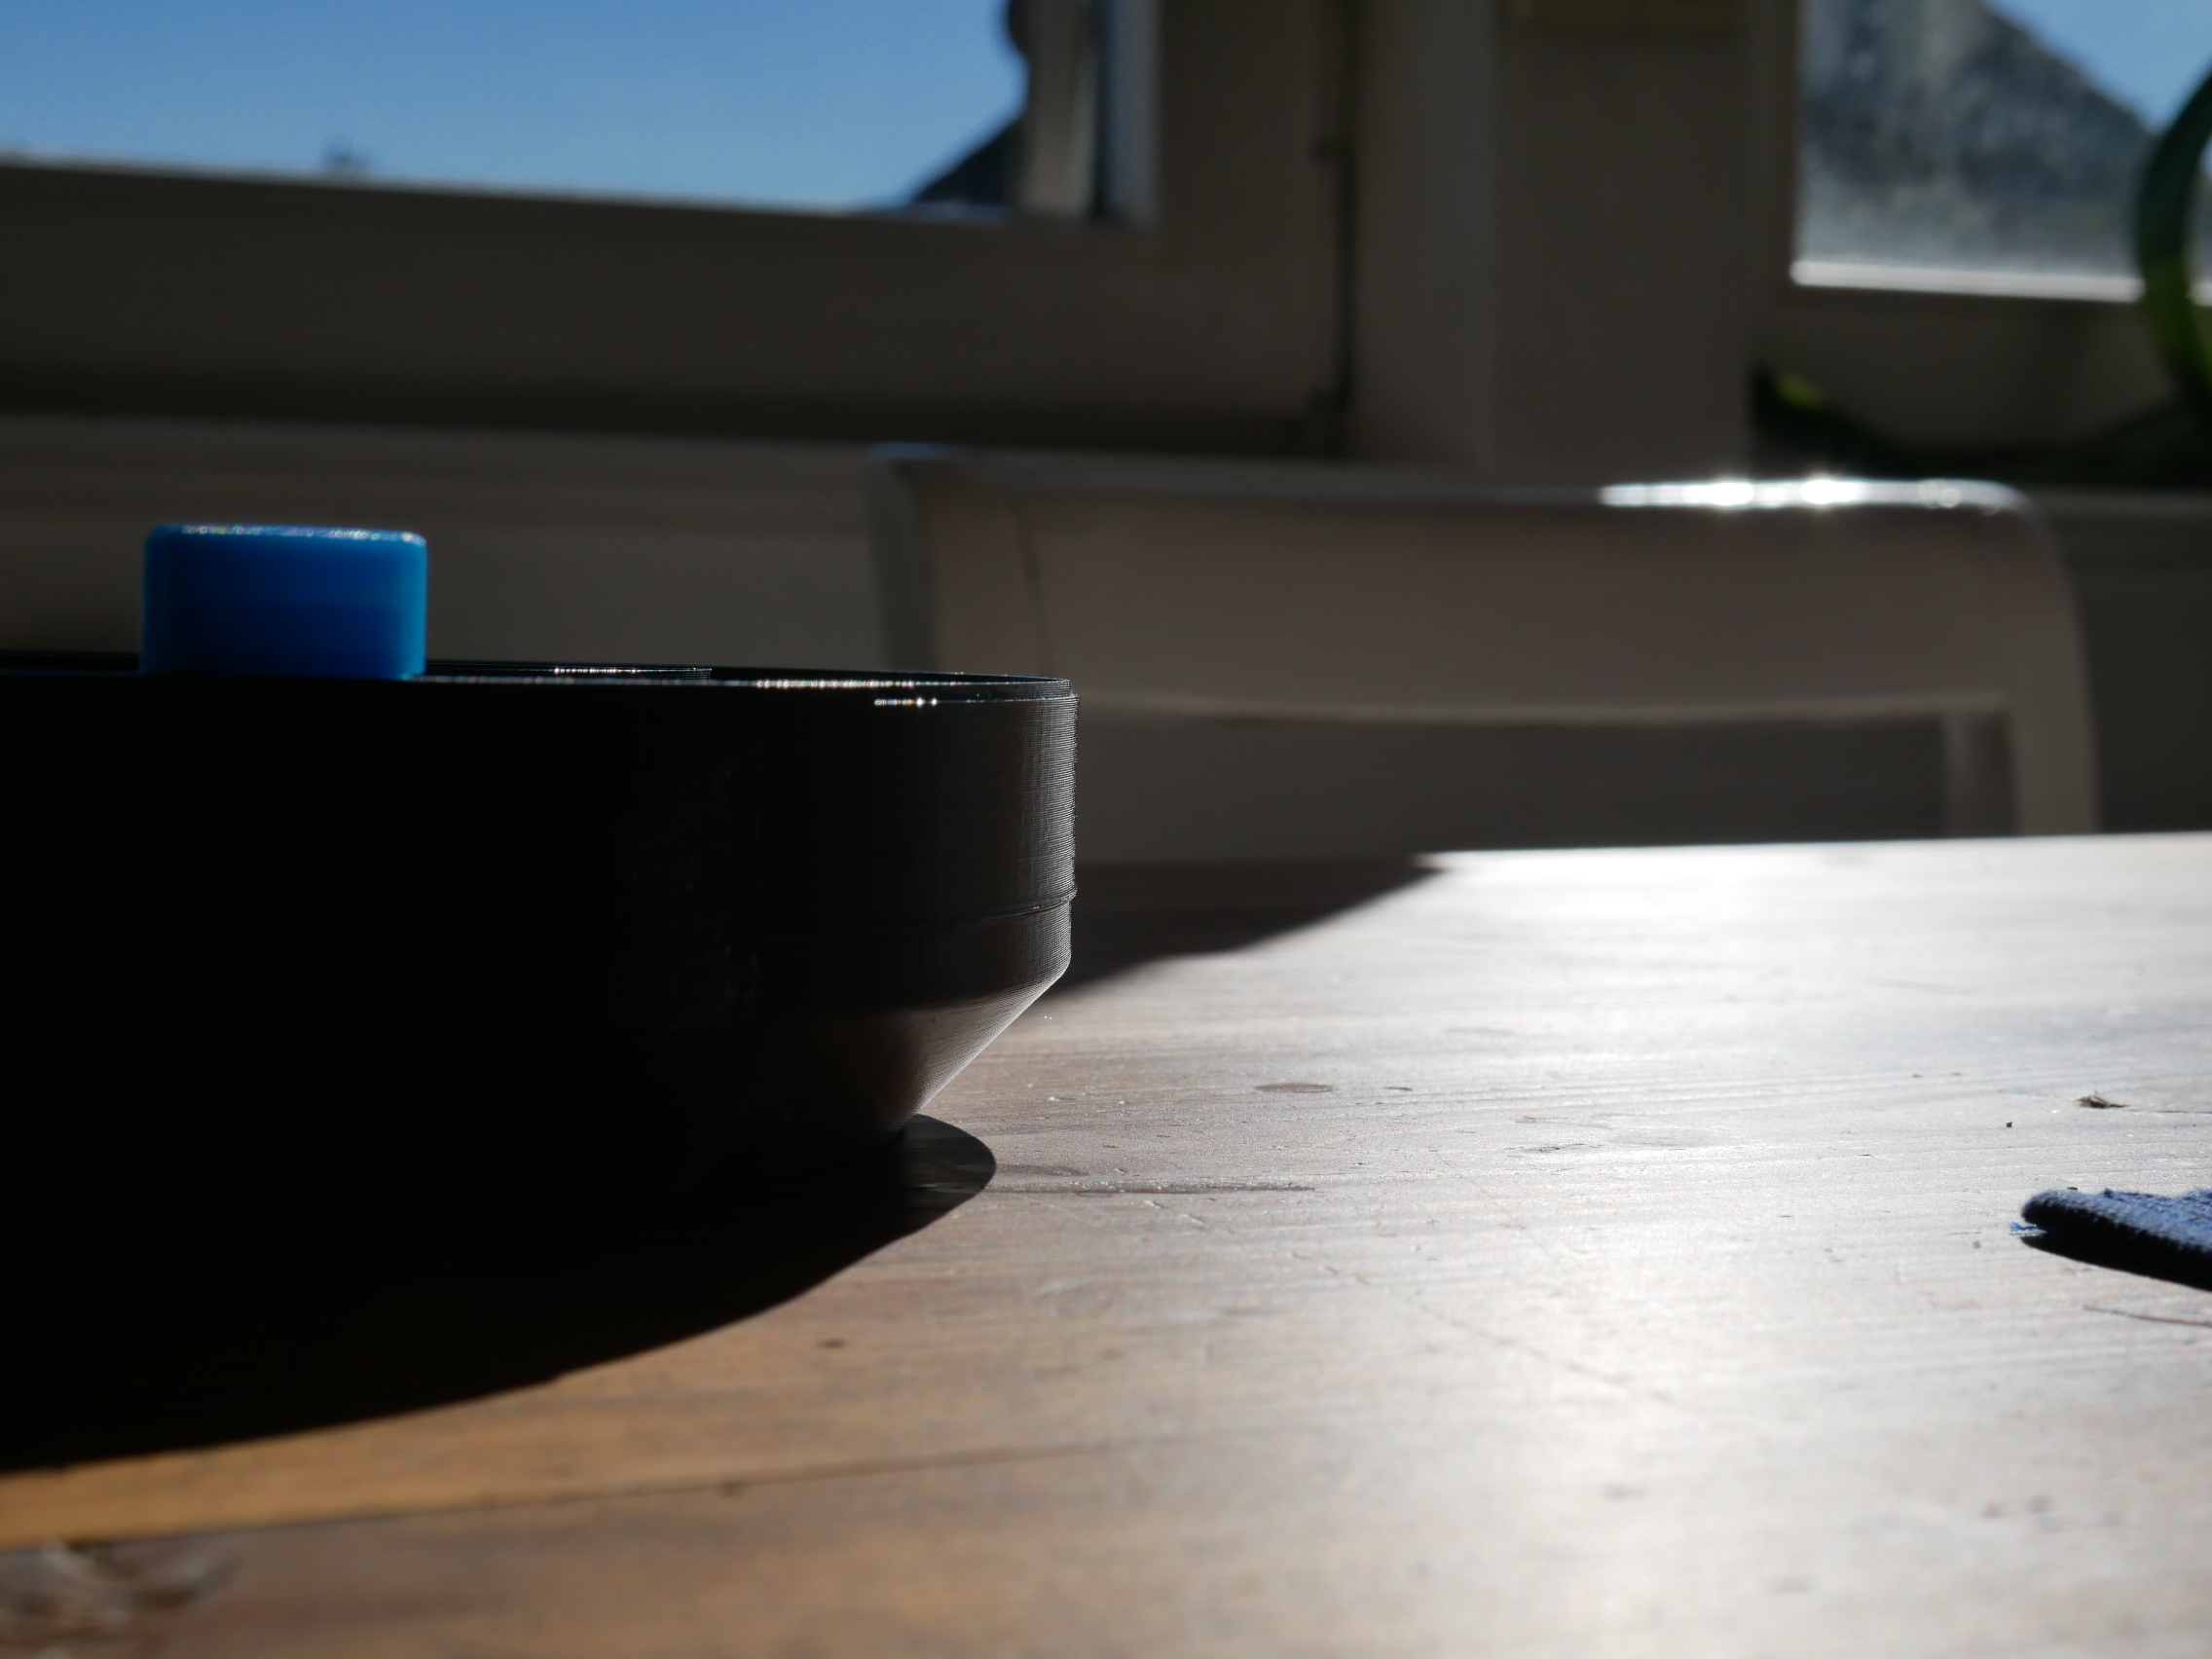
Here the correlation between the bulge and the solid layers is obvious:
My setup:
I3 MK3
Slic3r PE 1.42.0 alpha5
Standard settings 0.2 mm except 4 % infill
Prusament PETG
Here is what I tried:
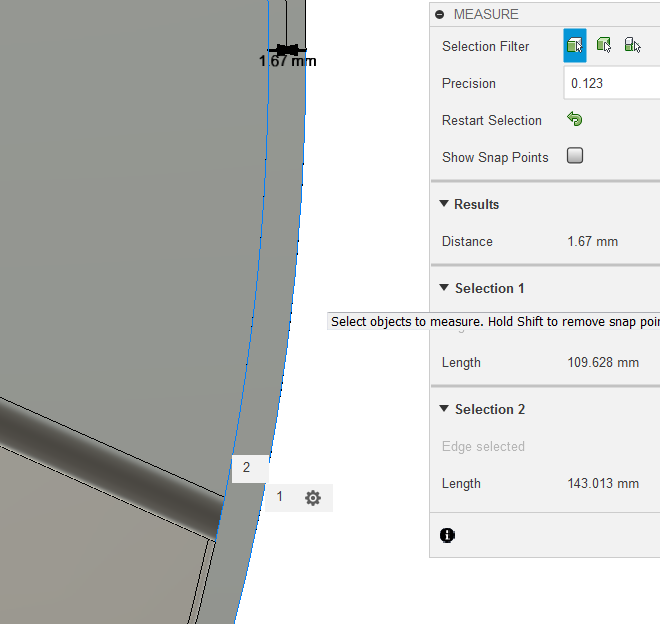
- Varied the wall thickness between 1.67mm and 2 mm
- Made part of the wall 2 perimeters smaller (0.86mm)
- Searched the forum:
This guy seems to have the same problem:
https://shop.prusa3d.com/forum/how-do-i-print-this-printing-help--f79/printing-issue-shifting-sort-of-what-is-this-from--t27652.html#p128060
The solution provided I think I can disconfirm: It's not the wall becoming thicker, but there is a shift to the outside as one can see on the picture of the inside
Another maybe related problem:
https://shop.prusa3d.com/forum/how-do-i-print-this-printing-help--f63/thicker-lines-around-perimeter--t26867.html#p122789
I don't see a connection to the seaming position? Can anyone confirm that?
Any help is highly appreciated. And there are some specific questions I would like to ask:
- is it the slicer that draws a larger perimeter or is it some kind of "mechanical" problem during the print?
- How can I review the gcode to find out if the printer really tries to follow the same path each layer?
- Which alternative slicer could help here?
- How can I change the geometry of my design?
Thanks in advance!
Re: Buldge when print reaches "solid" layers
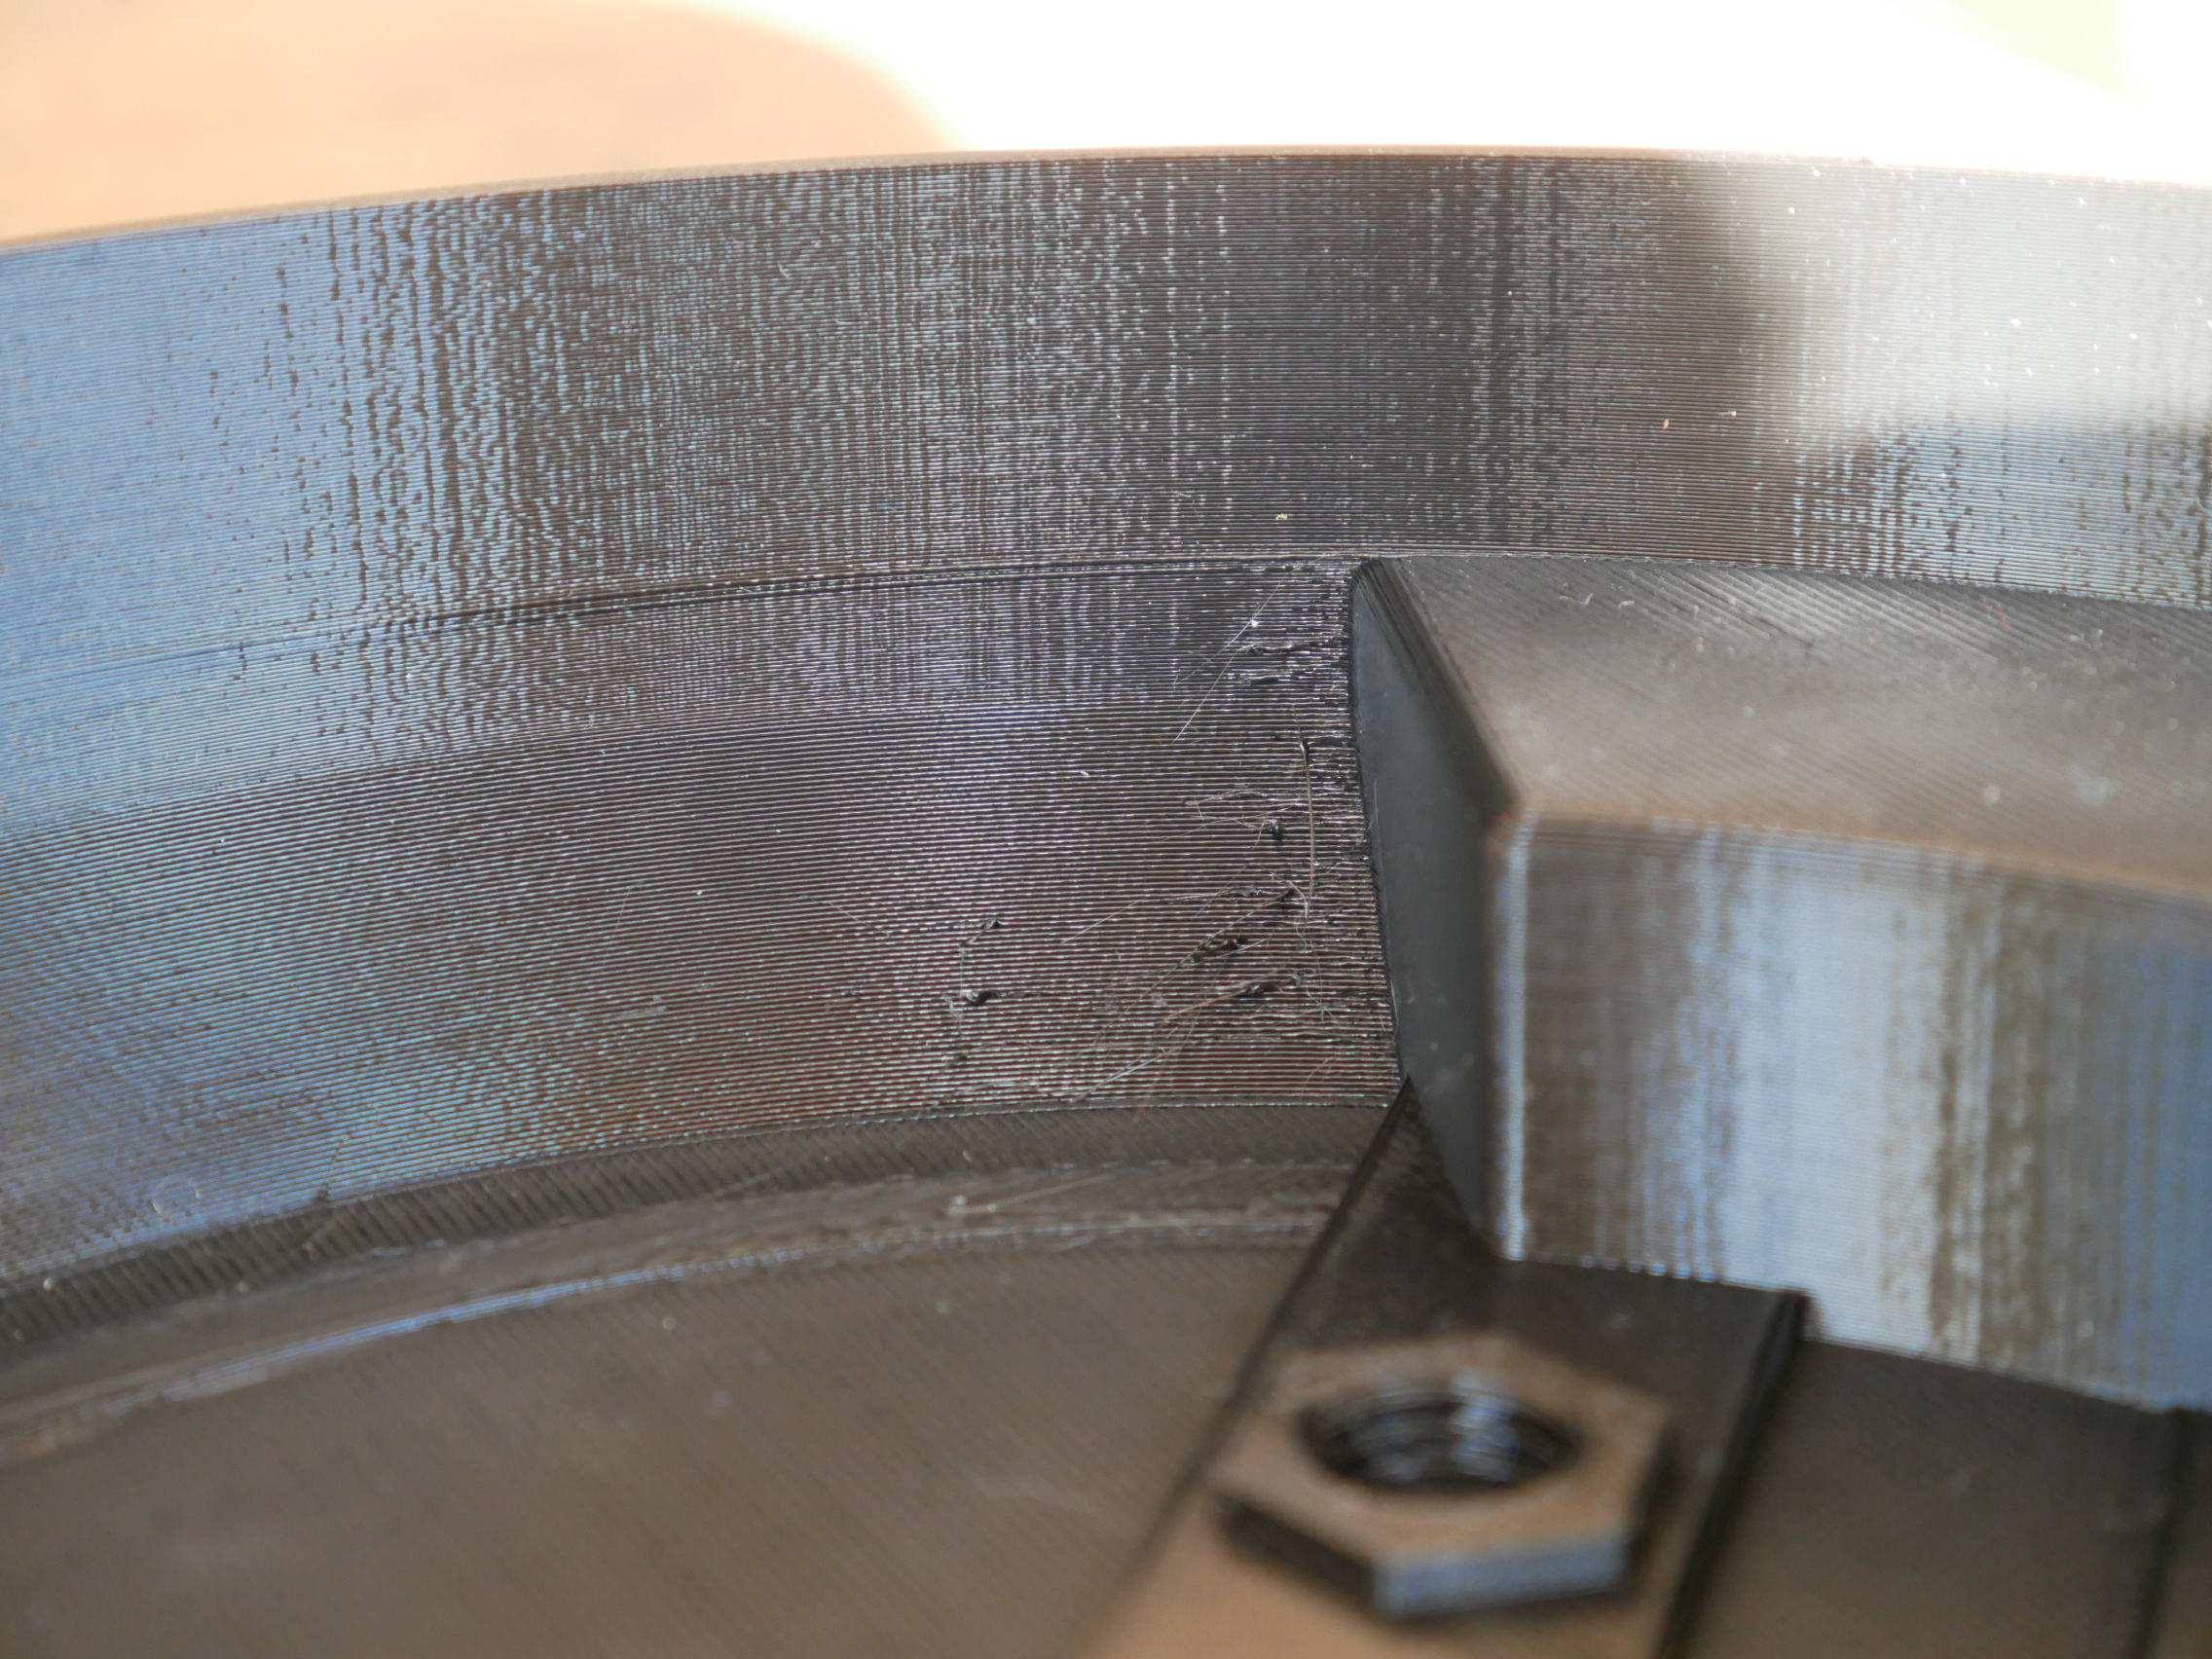
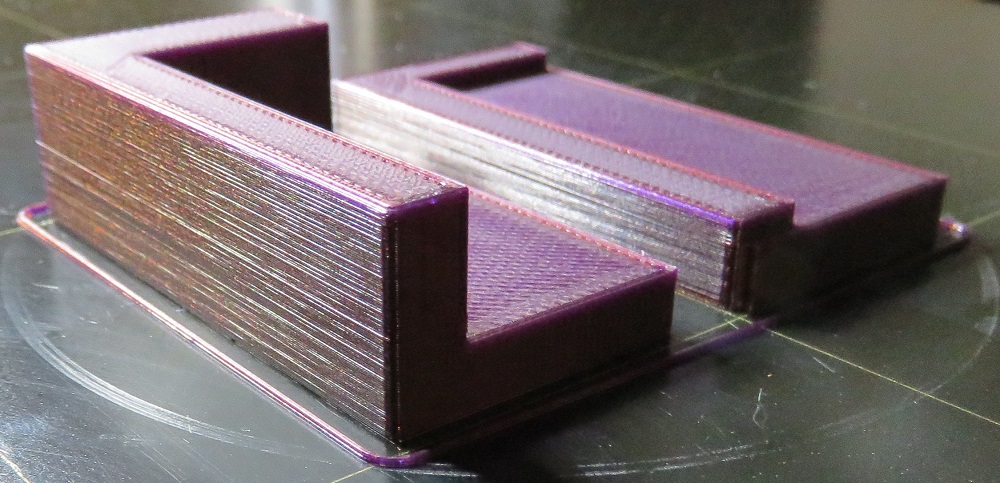
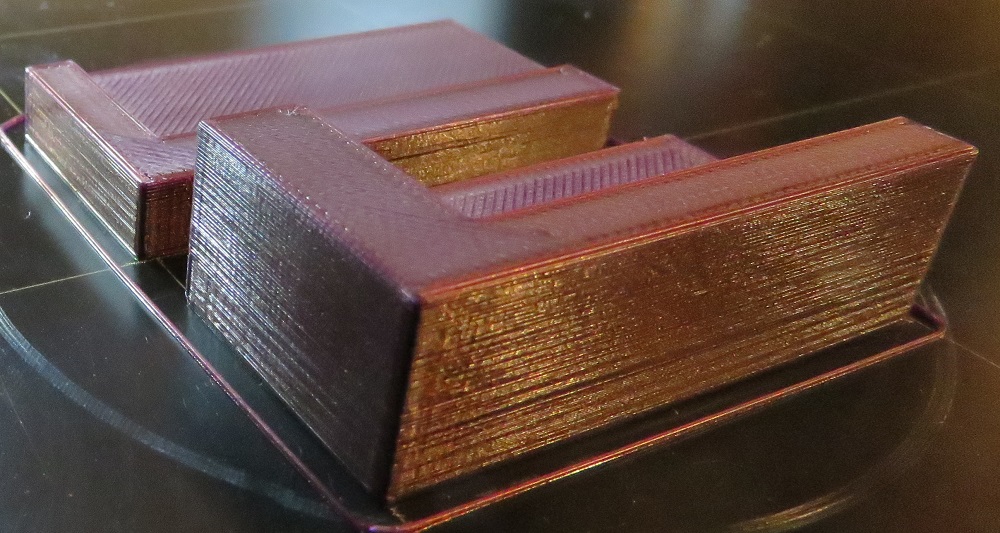
I just wanted to add some more pictures.
This what slic3r does before the buldge:

And during that buldge:

Wall thickness:
Re: Buldge when print reaches "solid" layers
I'm not 100% certain on the cause, but two factors come to mind. One if the internal printer flow characteristics, the other is the nozzle temperature recovery.
To remove nozzle heat recovery from the suspect list - and I know this is painful - try setting the print speed down to 50% and see if the bulge it still there.
Re: Buldge when print reaches "solid" layers
Try slicing the file, then spending time in Slic3rPE's preview mode. In particular, check out the Speed option and see if those distortions correspond to sudden shifts in speed. One obvious possibility is that the speeds on the layers with more variation (the lower layers in your pics) slow the printer down with acceleration, deceleration & jerk. The layers with the distortion are where the print appears (from what we can see in the pics) to be able to come up to full speed. The first thing I'd try is simply slowing it down. Way down. Use the front knob to dial it back to about 50% and see if the problem persists. If not, you have a strong clue.
I used to have real problems with irregularities with external surfaces as layers change (e.g. openings, internal structure) until I finally realized it's better to add an hour to a print by slowing down than failing several times at higher speeds. Definitely slow down external perimeters.
You could try doing a Linear Advance, extrusion multiplier and other calibrations for your filament.
Re: Buldge when print reaches "solid" layers
Thank you for your advice!
So I did as I was told:
(I also set infill/perimeters overlap to 15 % and Number of perimeters to 3).
But I'm afraid, I had no luck at all. The problem might have shifted a bit from a buldge to a continously thicker wall beginning with the solid infill layers, but that's about it.
Any other suggestions?
Re: Buldge when print reaches "solid" layers
Slowing from 35 to 30 is not a significant change. Try slowing external perimeters down to 20 or less. You can also insert a short delay at the start of each layer to let the nozzle temp stabilize before printing. And another try and see is printing external perimeters first.
Sorry I don't have a solid answer, but these sorts of minor defects are in that "Cost of doing business in 3D FDM" category like belt ringing and I've never spent any time finding the exact cause... though I might spend some time on it when my present print is finished tomorrow.
Re: Buldge when print reaches "solid" layers
Maybe try slicing it with a different slicer like Cura?
I have seen the issues you are having before with slic3er with my MK3 and haven't seen anything like this at work where I slice with simplify3d. So I would guess that it is a slicer issue. One might be able to work around it, but it never bothered me enough so far as I am usually printing mechanical parts.
Re: Buldge when print reaches "solid" layers
Ok, here is what I tried - with no success:
1. External Perimeter speed down to 17 (thanks for the hint, I had understood that the problem might be the speed difference perimeters and infill) and in the same print "external perimeters first".
2. Slicing with Cura
I'd love to check out Simplify3D, but it's too expensive for my private usage (and their "free trial"/full refund during the first 30 days is too risky for my little brain).
I redesigned my case for the plateau to be an extra part and this works fine. Still I hate problems left unsolved.
Thanks everyone for their ideas!
Re: Buldge when print reaches "solid" layers
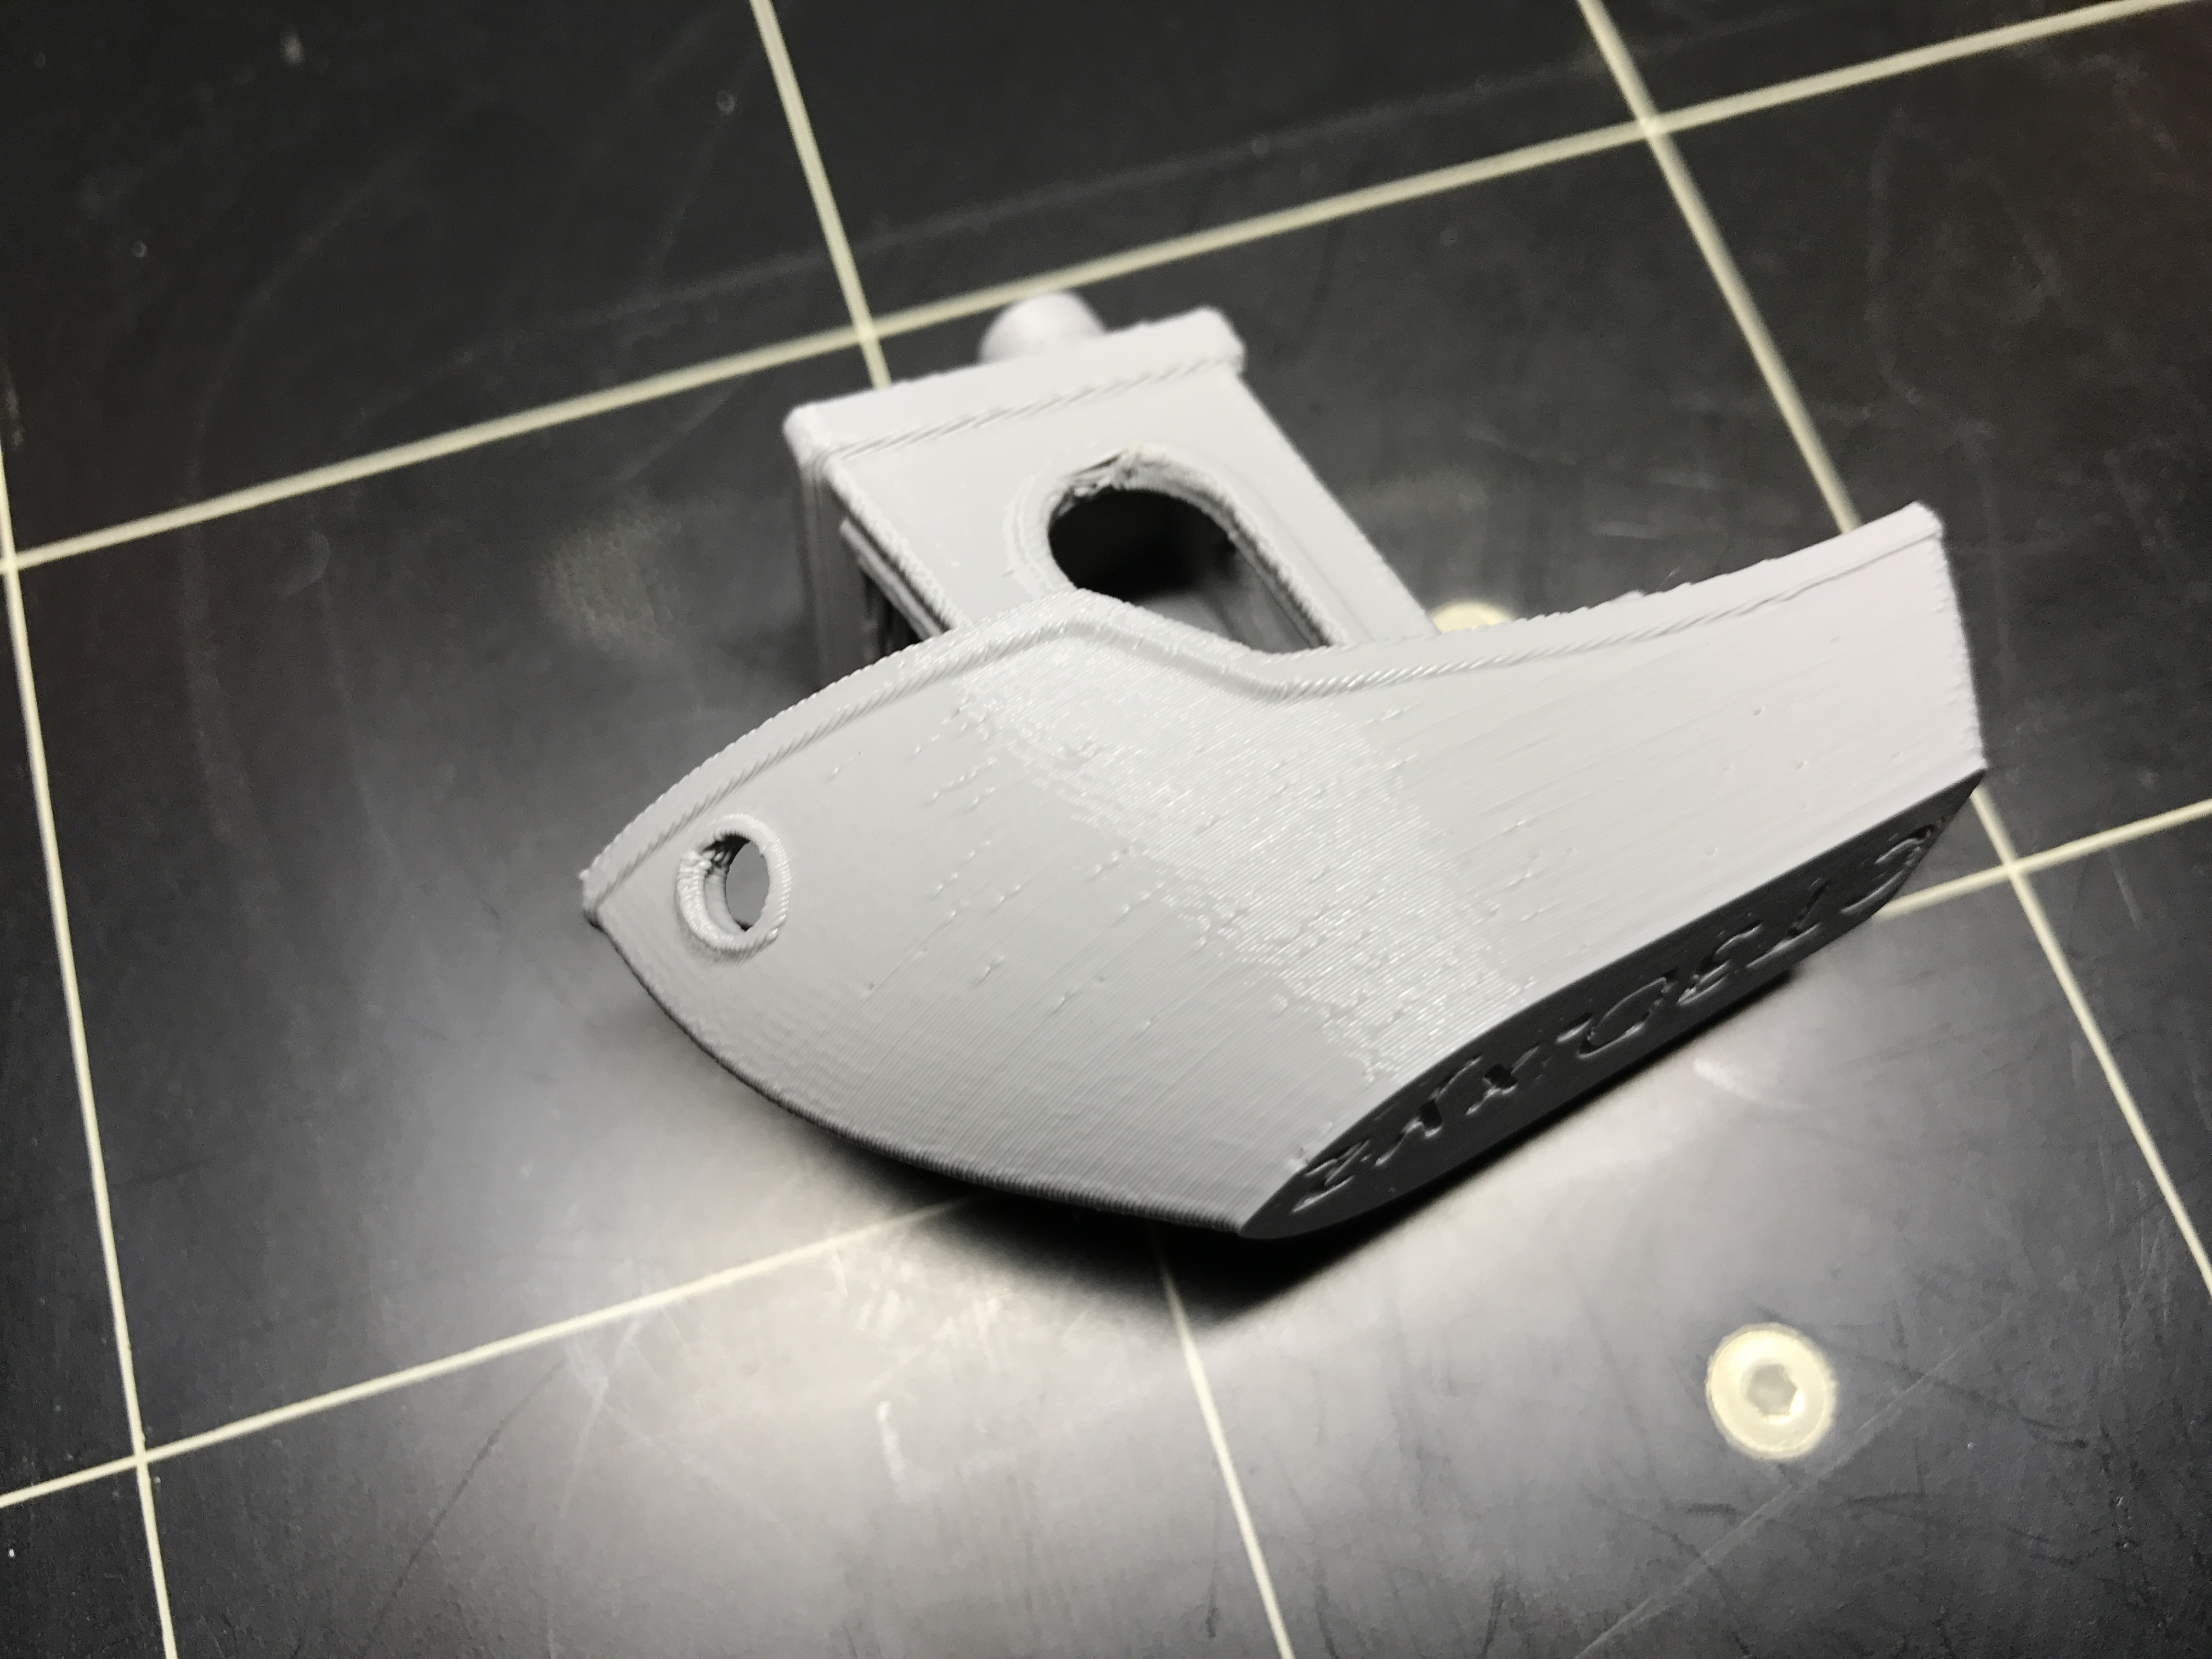
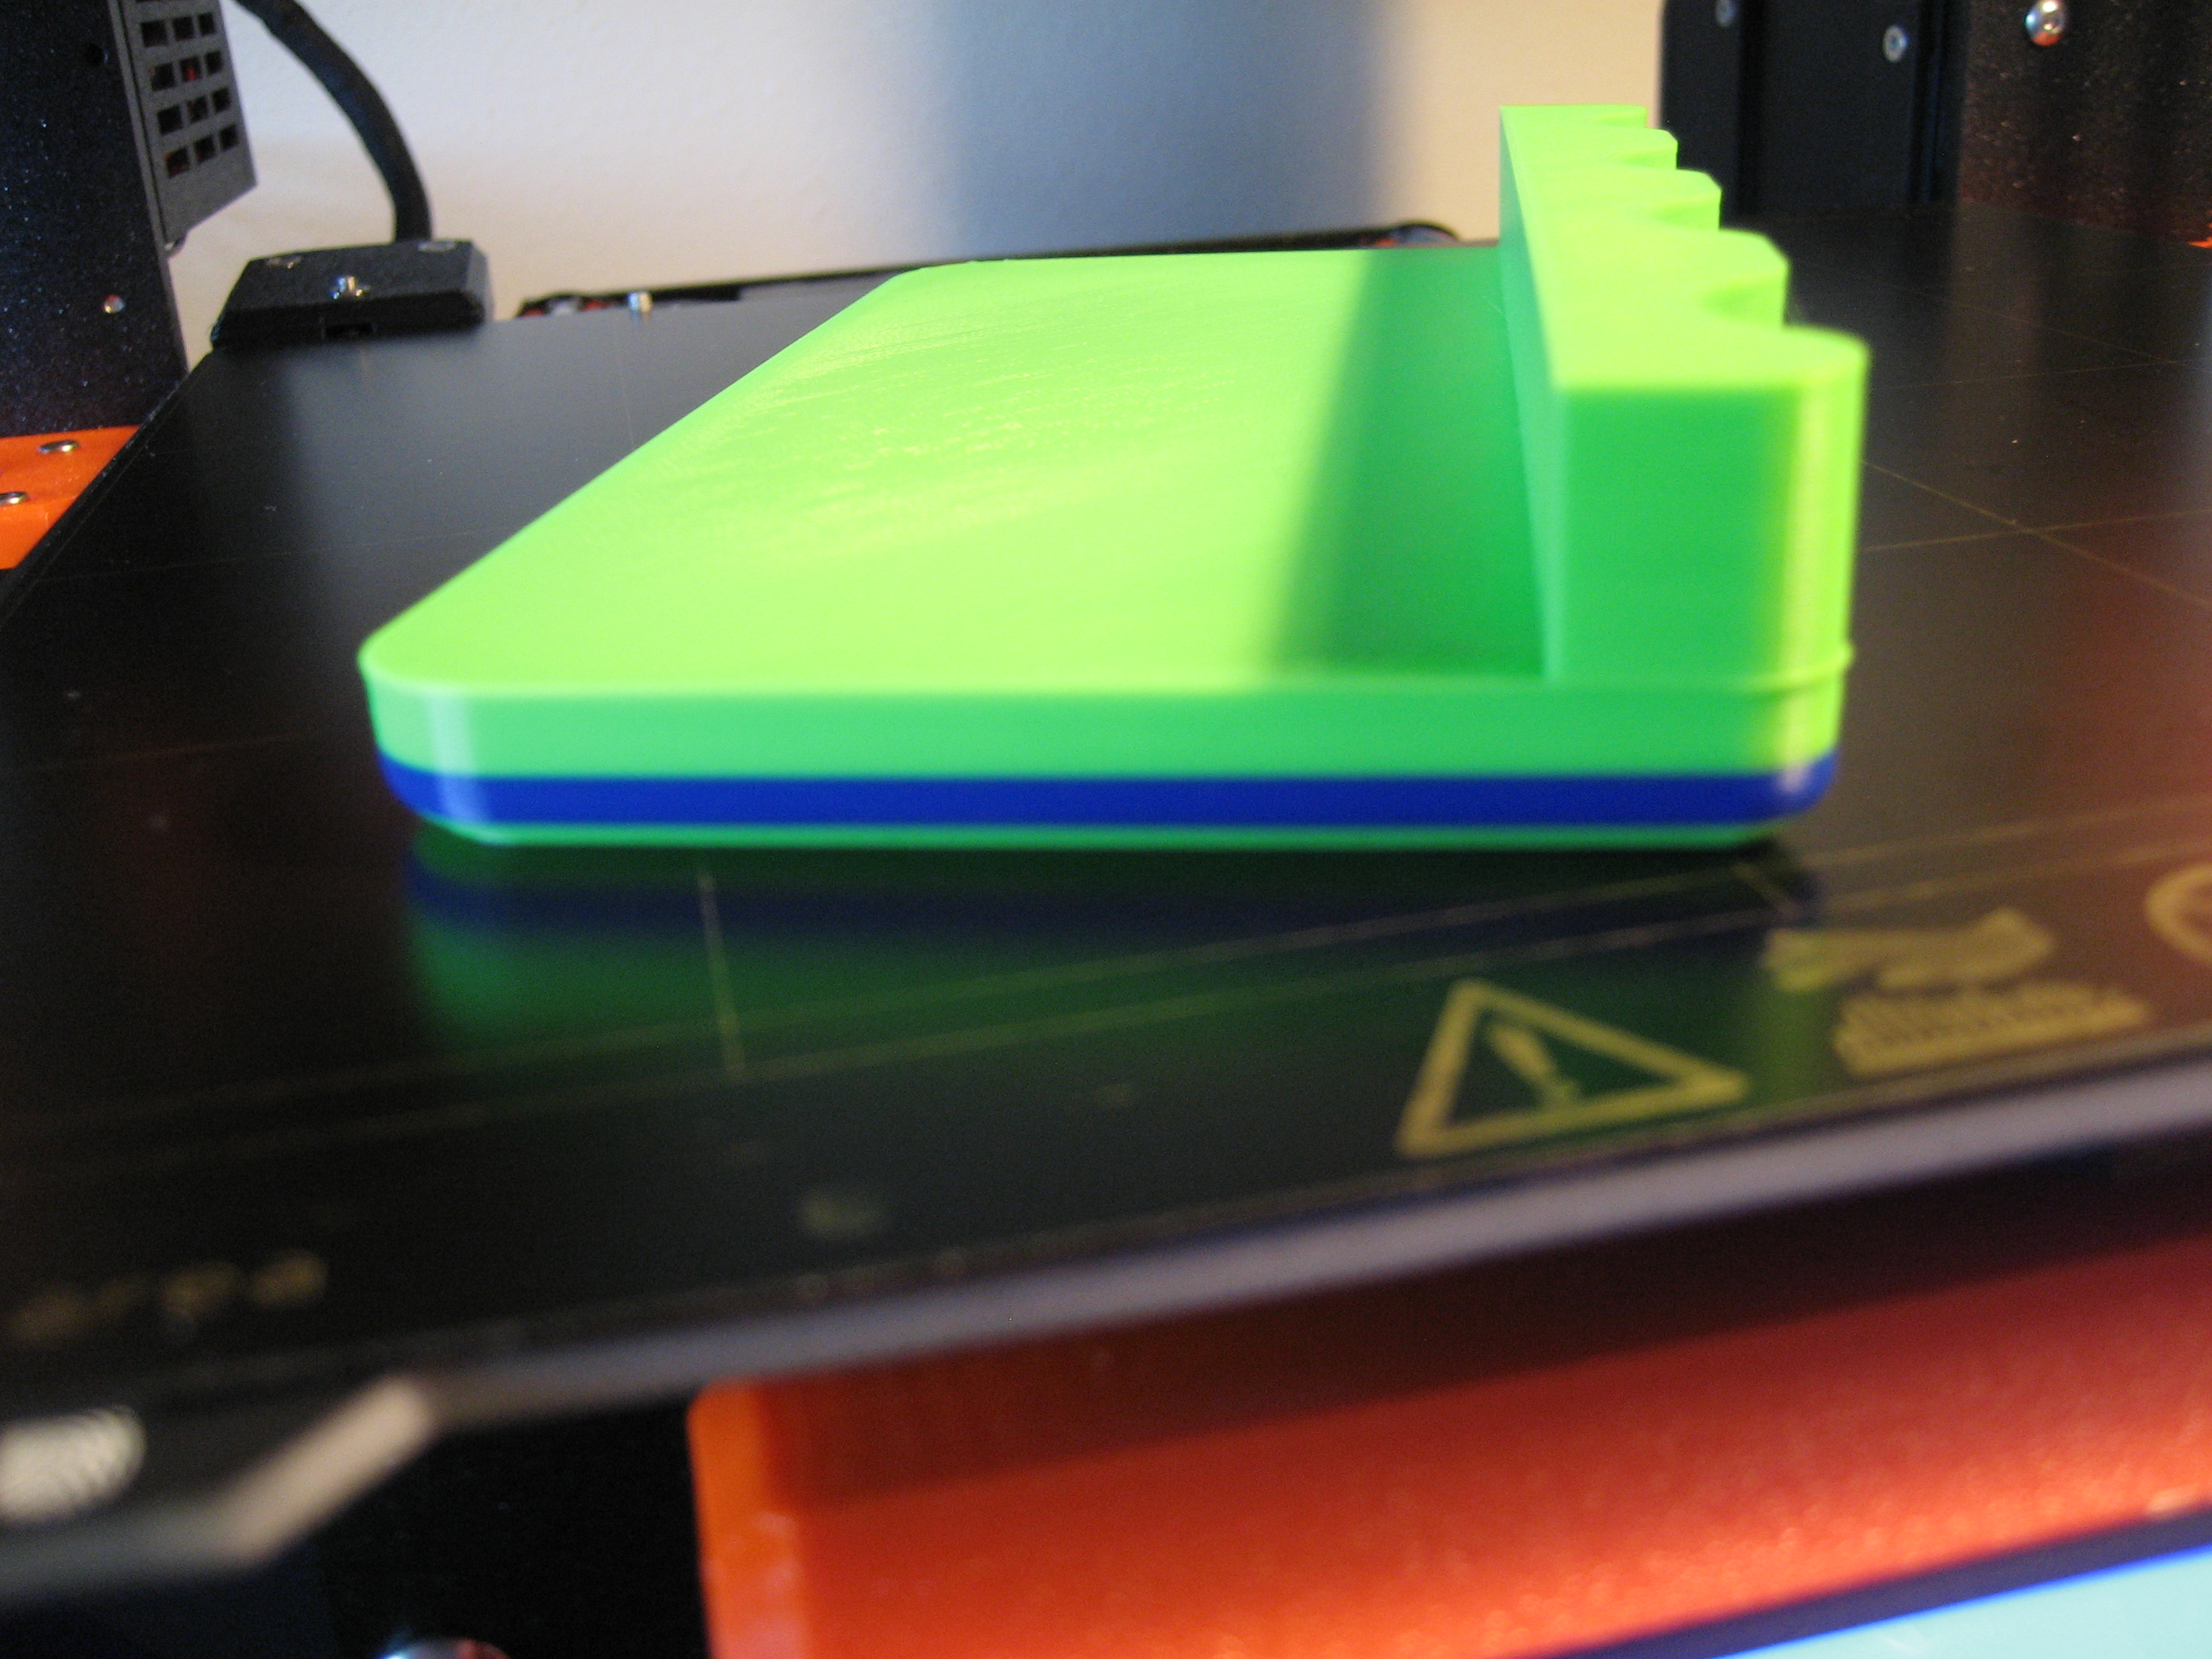
I have the exact same issue and unfortunately it is on an object where cosmetic appeal is very important. I have just started using my new MK3 and am using primarily default settings at 0.15mm layer heights. Prints have been great other than this issue. I have searched high and wide on the net the last few days trying to find a solution. I use Slic3r PE but to be fair I have also seen this issue on the same objects on my CoreXY machine using Curaengine but this is the worst I've seen it. It also seems to be worse with some filaments and with darker filaments it isn't as noticeably visible of course.
It occurs on the last few solid infill layers of a "shelf" and seems to get progressively worse. It sometimes occurs on the last top layers but is not as bad and not as noticeable as it is just a slight bowing outwards. I'll show some pictures as well.
One thing I've noticed on close inspection is that for me it usually is NOT every layer adjacent to the solid layers at a certain point. It is every OTHER layer. AND, as I move across the piece it often disappears but the layer below appears with the same issue. Really this is that the slight bulge is starting at one corner and then tapering off as you move to the next corner and for the layers above and below the opposite direction occurs. This gives the appearance of a large line that is actually smaller lines slightly offset at alternating corners. If that makes sense. The bulge occurs all the way around the part as for other posters on other threads including walls that are not adjacent to actual solid infill but are just on the same level.
My thoughts were:
Belt tension - checked and seems fine
Slicing (maybe very slight errors in start and stop points since each layer starts in a different spot) - checked gcode and everthing (X, Y, Z and E settings, speed and flow rate) seemed OK
Then I thought uneven shrinkage - I made test objects and a 100mm part came out to 99.82mm with the affected areas slightly larger but still under 100mm. So I adjusted filament width of solid infill to try and ensure good adhesion between lines as the "shrinkage" if it occured always appears to be greater in the direction that the fill filament is laid down. (This will likely also always occur consistent with start stop points for each layer). Not a materials expert but this still seems like a possibility to me.
I reduced overlap between fill and overlap and dropped temperature and increased from 2 to 3 perimeters in case infill layers were pushing out perimeters.
I changed infill pattern below solid level to a stronger one rectilinear at 50% instead of gyroid at 15% in case it was more an issue with the less dense sections.
None of this helped. One thing that DID seem to change the result, but it is still there maybe slightly better, was to change the fill angle from 45 degrees to 0 degrees. But definitely not a solution.
I printed one test object with no top layers and the issue goes away completely.
I will continue working on the issue and giving some thought but any other ideas would be great !
Pictures are:
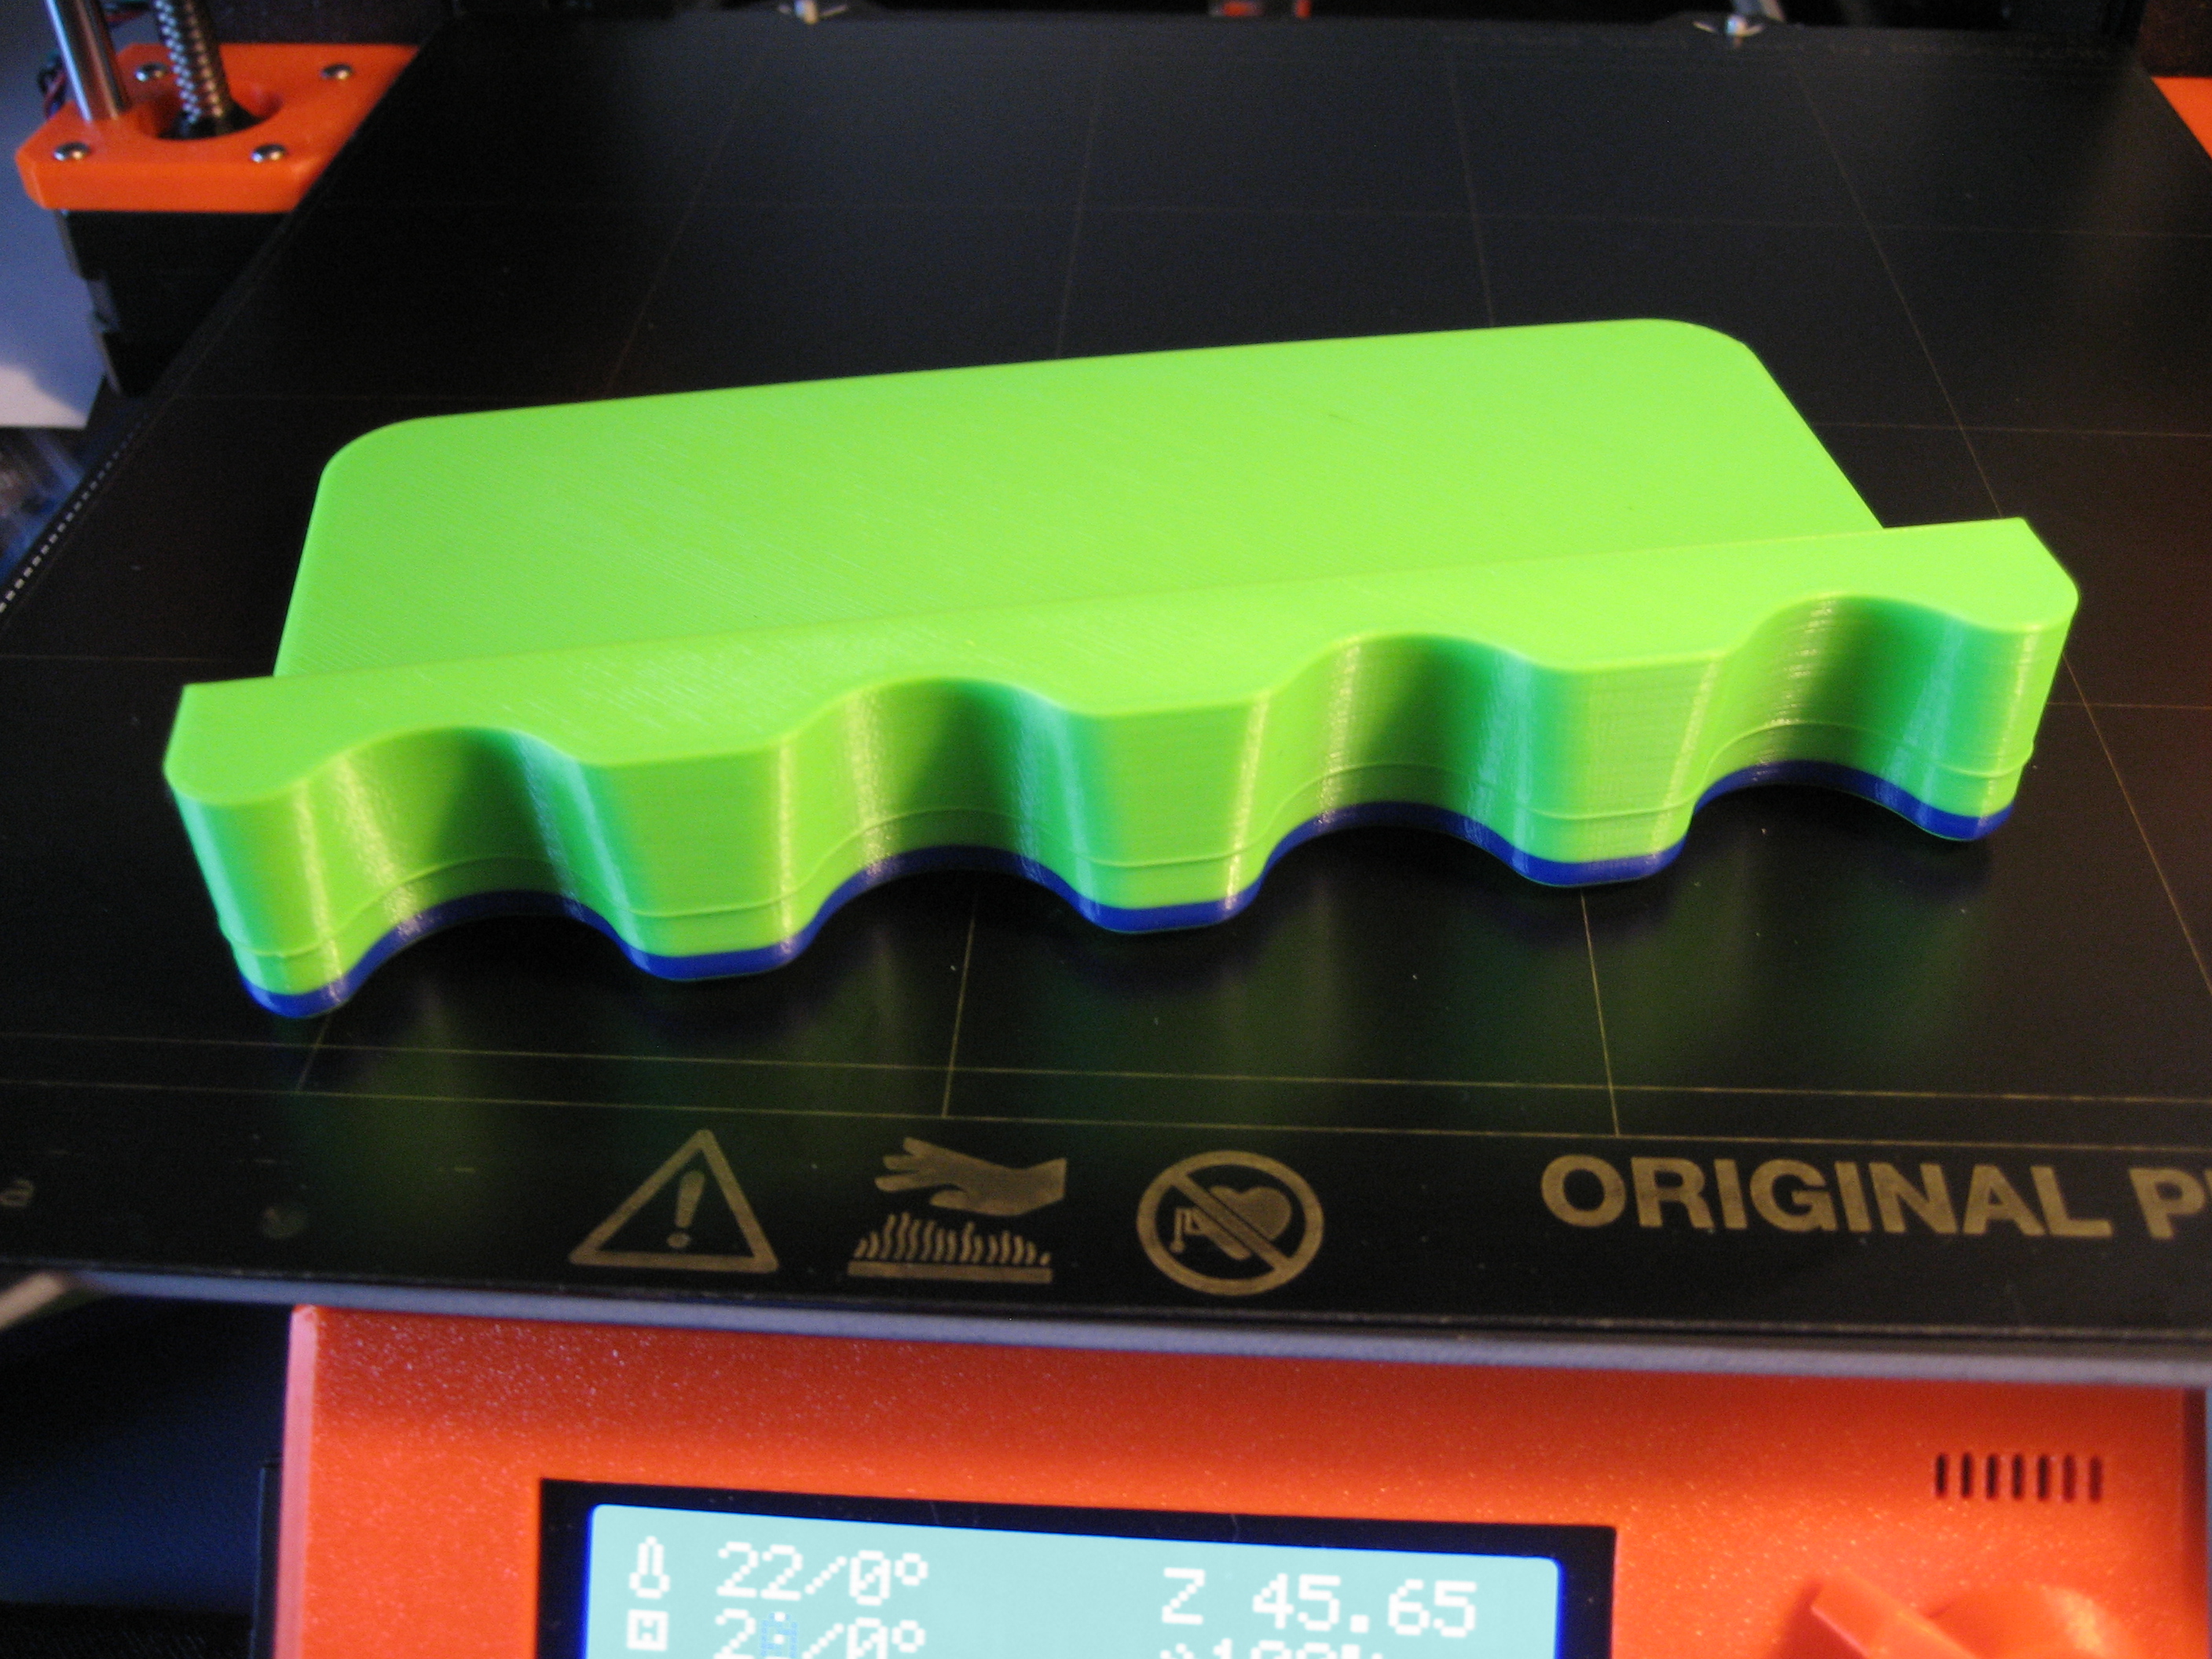
- two test objects side by side (one with no shelf and no top (no solid top layers) and one with solid layers with the problem)
-2 pictures of the real object with the problem front and side. From the side you can see the "shelf" which some how causes the issue
Re: Buldge when print reaches "solid" layers
It is a strange phenomena. Why does it only happen if the print continues above the shelve? Theoretically the problem should be visible everytime there is a solid cover on top of a rather basic design?
We both reduced the overlap between infill and perimeters (in my case to 15 %). Maybe setting it to 0 (or even negative values seem to be valid) might help.
An easy and fast to print model would be of help, too. I'm afraid I'm out of this this weekend. And of course Prusa's thoughts would be interesting as well.
Re: Buldge when print reaches "solid" layers
There is a setting somewhere that is off by default to "detect thin walls" or something. I've seen this in a few parts where the spacing is too wide for a single extrusion width but too narrow for two. By default it will still try to fit two in and cause something like this when that area is overfilled.
Changing the setting to on will remove the second internal line and underfill that area slightly and prevent this from happening.
It may not be the case here but it is one cause of such issues where the part geometry isn't ideal for FDM
Re: Buldge when print reaches "solid" layers
Detect thinwalls is generally for perimeters. From the manual:
Detect thin walls: this feature checks for collisions between perimeters. It ensures that the printer doesn't try to extrude too close paths, and uses the medial axis algorithm in order to transform thin walls into single-pass extrusions.
Re: Buldge when print reaches "solid" layers
I ran out of prusa filament and started to use an alternative brand while waiting on my order from prusa..... Because their filament is cheap and awesome.
Now the reason I tell you this, I had this too happen with the alternative filament....
I guess it is caused by extrusion multiplier and the filament diameter.
Now i have not fixed it with my new filament and I do not think I will since I ordered 3 rolls from Prusa that hopefully would get me back on high quality printing.
I am not paid to say this, but nothing but issues with my alternative brand, issues like this.
Re: Buldge when print reaches "solid" layers
No I definitely have noticed the problem varies with different filaments (the part with the curves in the picture I posted is something I've printed lots of times in different colors) even just different colors of the same manufacturer. The issue has occurred with Prusa supplied filament as well as Hatchbox and 3D Solutech.
I thought wall thickness might be an issue too and have tried more perimeters but with no success.
Also the lines occur even where the solid infill is not adjacent (in my pic with the curves the curved section is adjacent to 15% infill gyroid with the solid "shelf" back a few centimeters.
I tried to produce a smaller test object to make for shorter print times for testing that was the same shape (rectangular with rectangular higher portion) as in the pic of mine with 2 test objects side by side, but it did not replicate the problem. I have noticed that the issue is more pronounced on larger items of similar shape which leads me to think it might be related to a parameter that is size dependent.
These could include:
- cooling time (elapsed time between layers)
-cooling paramaters - fan %
-print speed for infill and perimeters
-acceleration/jerk/etc
What else? None of these really explain why it appears to be offset for a layer more at one corner than another but maybe they produce some tiny artifact that causes nozzle bumps or something. Not sure.
Would love to hear PRUSAs thoughts too.
Re: Buldge when print reaches "solid" layers
Also Nicolai, I agree that we would expect the issue to occur on any flat solid layer including the utmost top layer, and in fact I DO find it occurring on the final top layer but it is definitely not as severe.
One thing I just noticed when trying to create a smaller test object with different variations is that the print speed was different for solid layers of the shelf vs solid layers on the higher part. I think this is just a factor of the size of the filament runs on the smaller raised section of the objects I am printing but I will try and explore this a little more too.
Re: Buldge when print reaches "solid" layers
@marvijn: I'm sorry to tell you, that I could tell no difference (regarding this problem) between "das filament" (a German brand seen as average) and prusament. All pics posted above are prusament...
I can kind of confirm the large-diameter-theory. My difficult case measires almost 20 cm in diameter. I did not mention a small (5 cm) test object I produced last week, where the problem did not occur - back on my case it reappeared using the same settings.
Re: Buldge when print reaches "solid" layers
I tried programming a pause after each solid layer of the "shelf" of my test object. No luck. In the picture you can see the test with the pause on the right which looks pretty much like the one on the left. I paused 60 seconds.
I did this thinking that that each layer started pretty much where the previous layer's shelf ended (not actually true depending on the infill) and that the pause would allow for additional cooling. Did this as opposed to slowing down print speed just as a test.
As I mentioned previously and as you might be able to see in the picture (but probably not) the test on the right has about 3 layers on its left hand side that protrude relative to the others. These are all separated by a layer that is NOT exhibiting this issue. Compare these to the previous test on the left which has 3 protruding lines on its right hand side. These all appear to be shifted ONE layer. The left side of the PAUSE test has the protrusions one layer higher than the right side of the previous test. Similarly the left side of the previous test has the protrusions one layer higher than the right side of the Paused test. It is like every start corner is slightly shifted in X and Y.
Anyways. I'll keep trying.
Re: Buldge when print reaches "solid" layers
The image of the two parts is too fuzzy to really see anything except the bulge. I'm rather surprised adding a 60s delay between layers didn't resolve the issue. I'm going to do some tests myself this weekend. I can't imagine it's thermals in the part expanding when those top layers are thrown down ... but that's about all that's left. And even then, others have seen this with much smaller surfaces, and I've seen it is 2x2 towers.
There are hints the firmware increases and decreases flow to compensate for various things happening to normalize the nozzle pressure, but those tweaks should be complete before several layers are affected, but then maybe I'm not looking at it the right way. As I said, I have a few tests to run... now I am really curious.
---
So I printed a couple examples. Neither show the symptom. There is a bit of texture change near the flat, probably temp related, and a very subtle change of the common layers between the two parts (top image, front part, left rising edge above flat) - but nothing else beyond the ghosting I can really see, even under magnification. The slices were stock Prusament PLA @ 0.15mm on a Mk3. gcode attached (took an hour in Stealth).
I think It may be belts, or some other mechanical issue.

Re: Buldge when print reaches "solid" layers
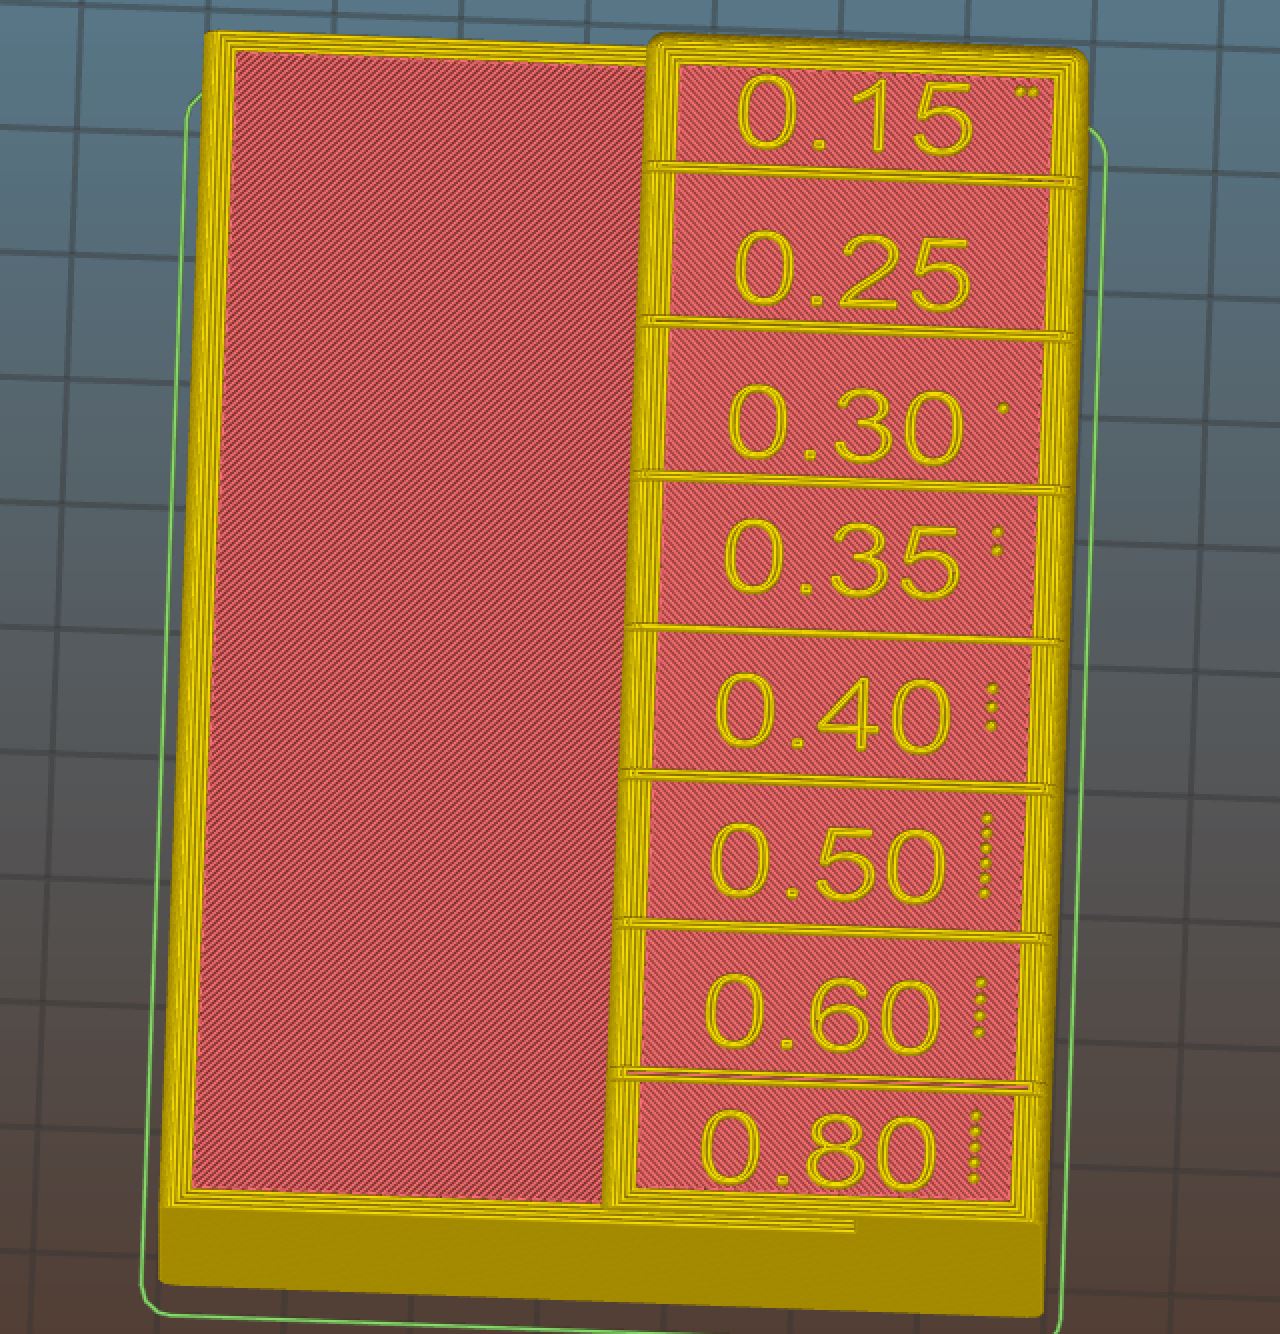
I designed and printed a quick (30 min/8gr) test object:
https://www.thingiverse.com/thing:3469328
My findings are that I almost get rid of the buldge by setting perimeters/infill overlap to -30%.
I guess it's time for my first extrusion multiplier calibration. Or does anyone have a better idea?
Re: Buldge when print reaches "solid" layers
I printed a whole bunch of test items over the weekend trying to narrow down the problem. I'll post more when I have the time and I'll try the 30% overlap. I had thought the issue was either 1) some type of asymmetric cooling symptom depending on cross sectional diathermic properties; or 2) something mechanical as suggested universally.
I think I eliminated the shrinkage of cooling as, at least, the sole issue. I simply printed a 2 loop wide skirt that was higher than the affected areas of the object and the anomaly occurs in the skirt as well as the object when I do that. So it must be belts or threads or something? Backlash or another form of hysteresis?
Saga continues.
Glad you got a workaround for most of your problem Nicolai !! Question: is that negative 30% you used?