ABS with overhangs
I'm printing parts for a Voron on my MK3S and everything has printed great except this one part - the printhead rear. The overhangs are really bad where the section is smaller (the part is show upside down):
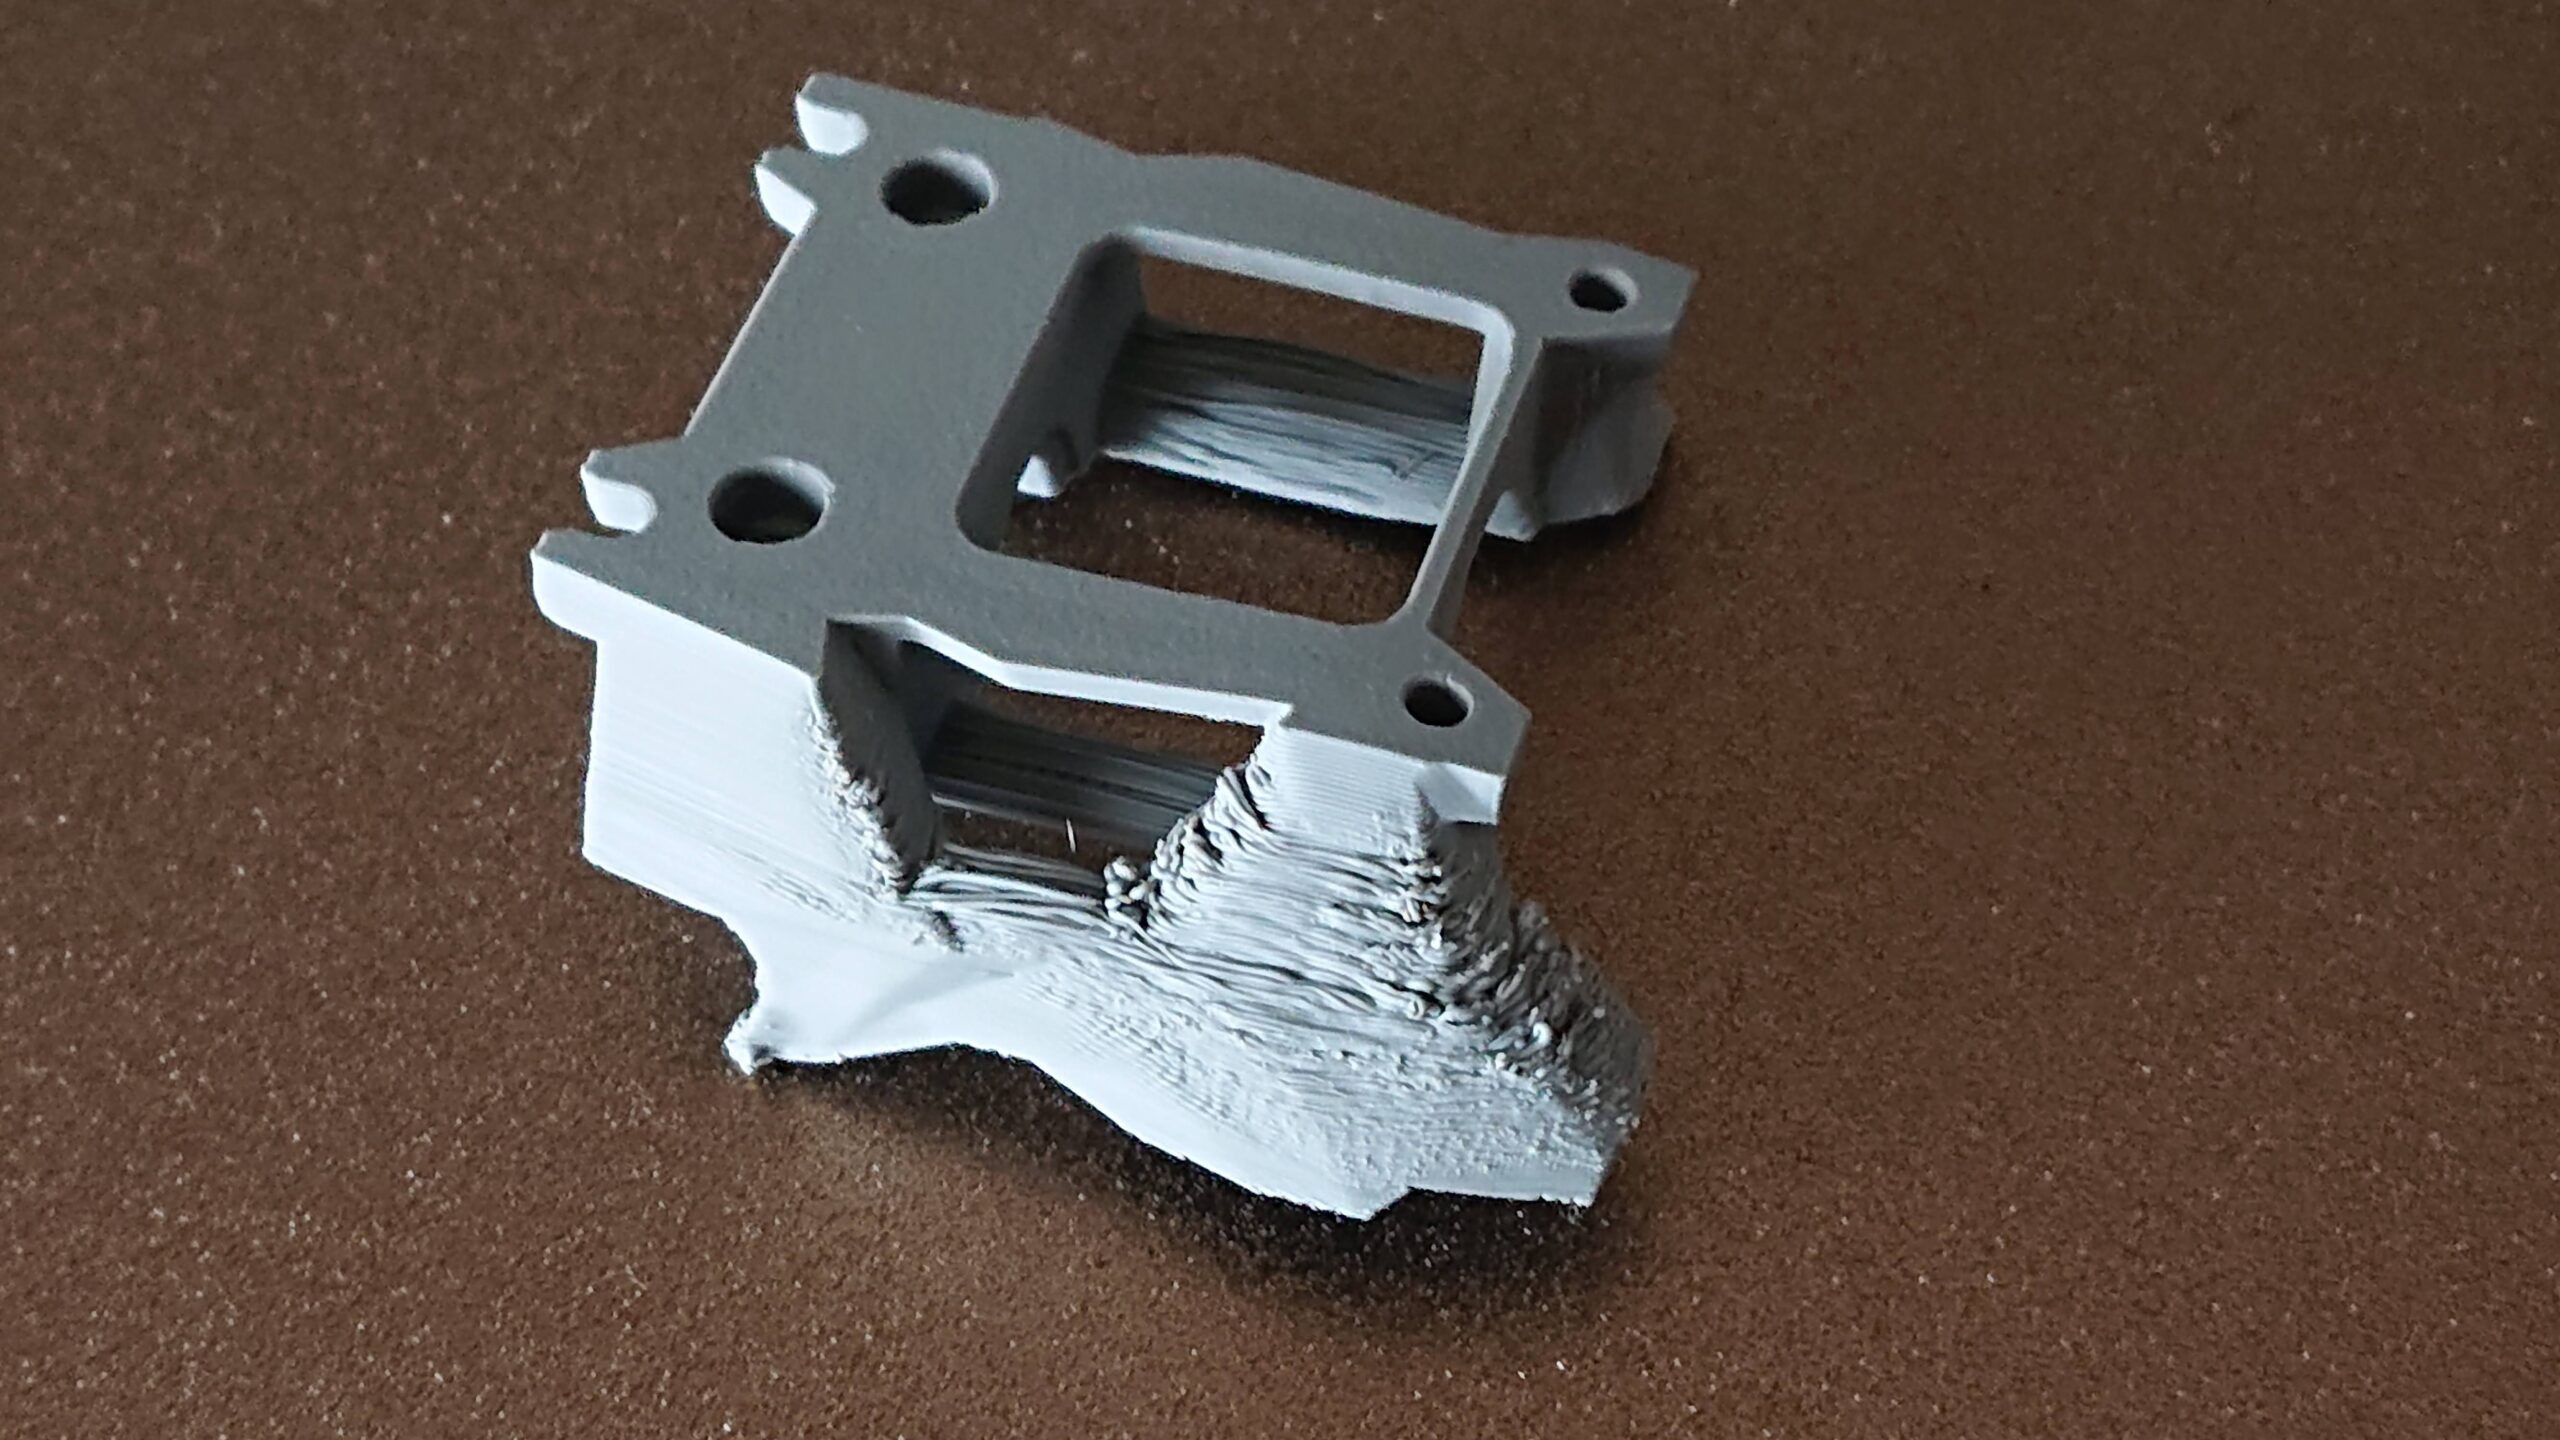
A temperature tower doesn't really tell me much as each layer is almost identical:
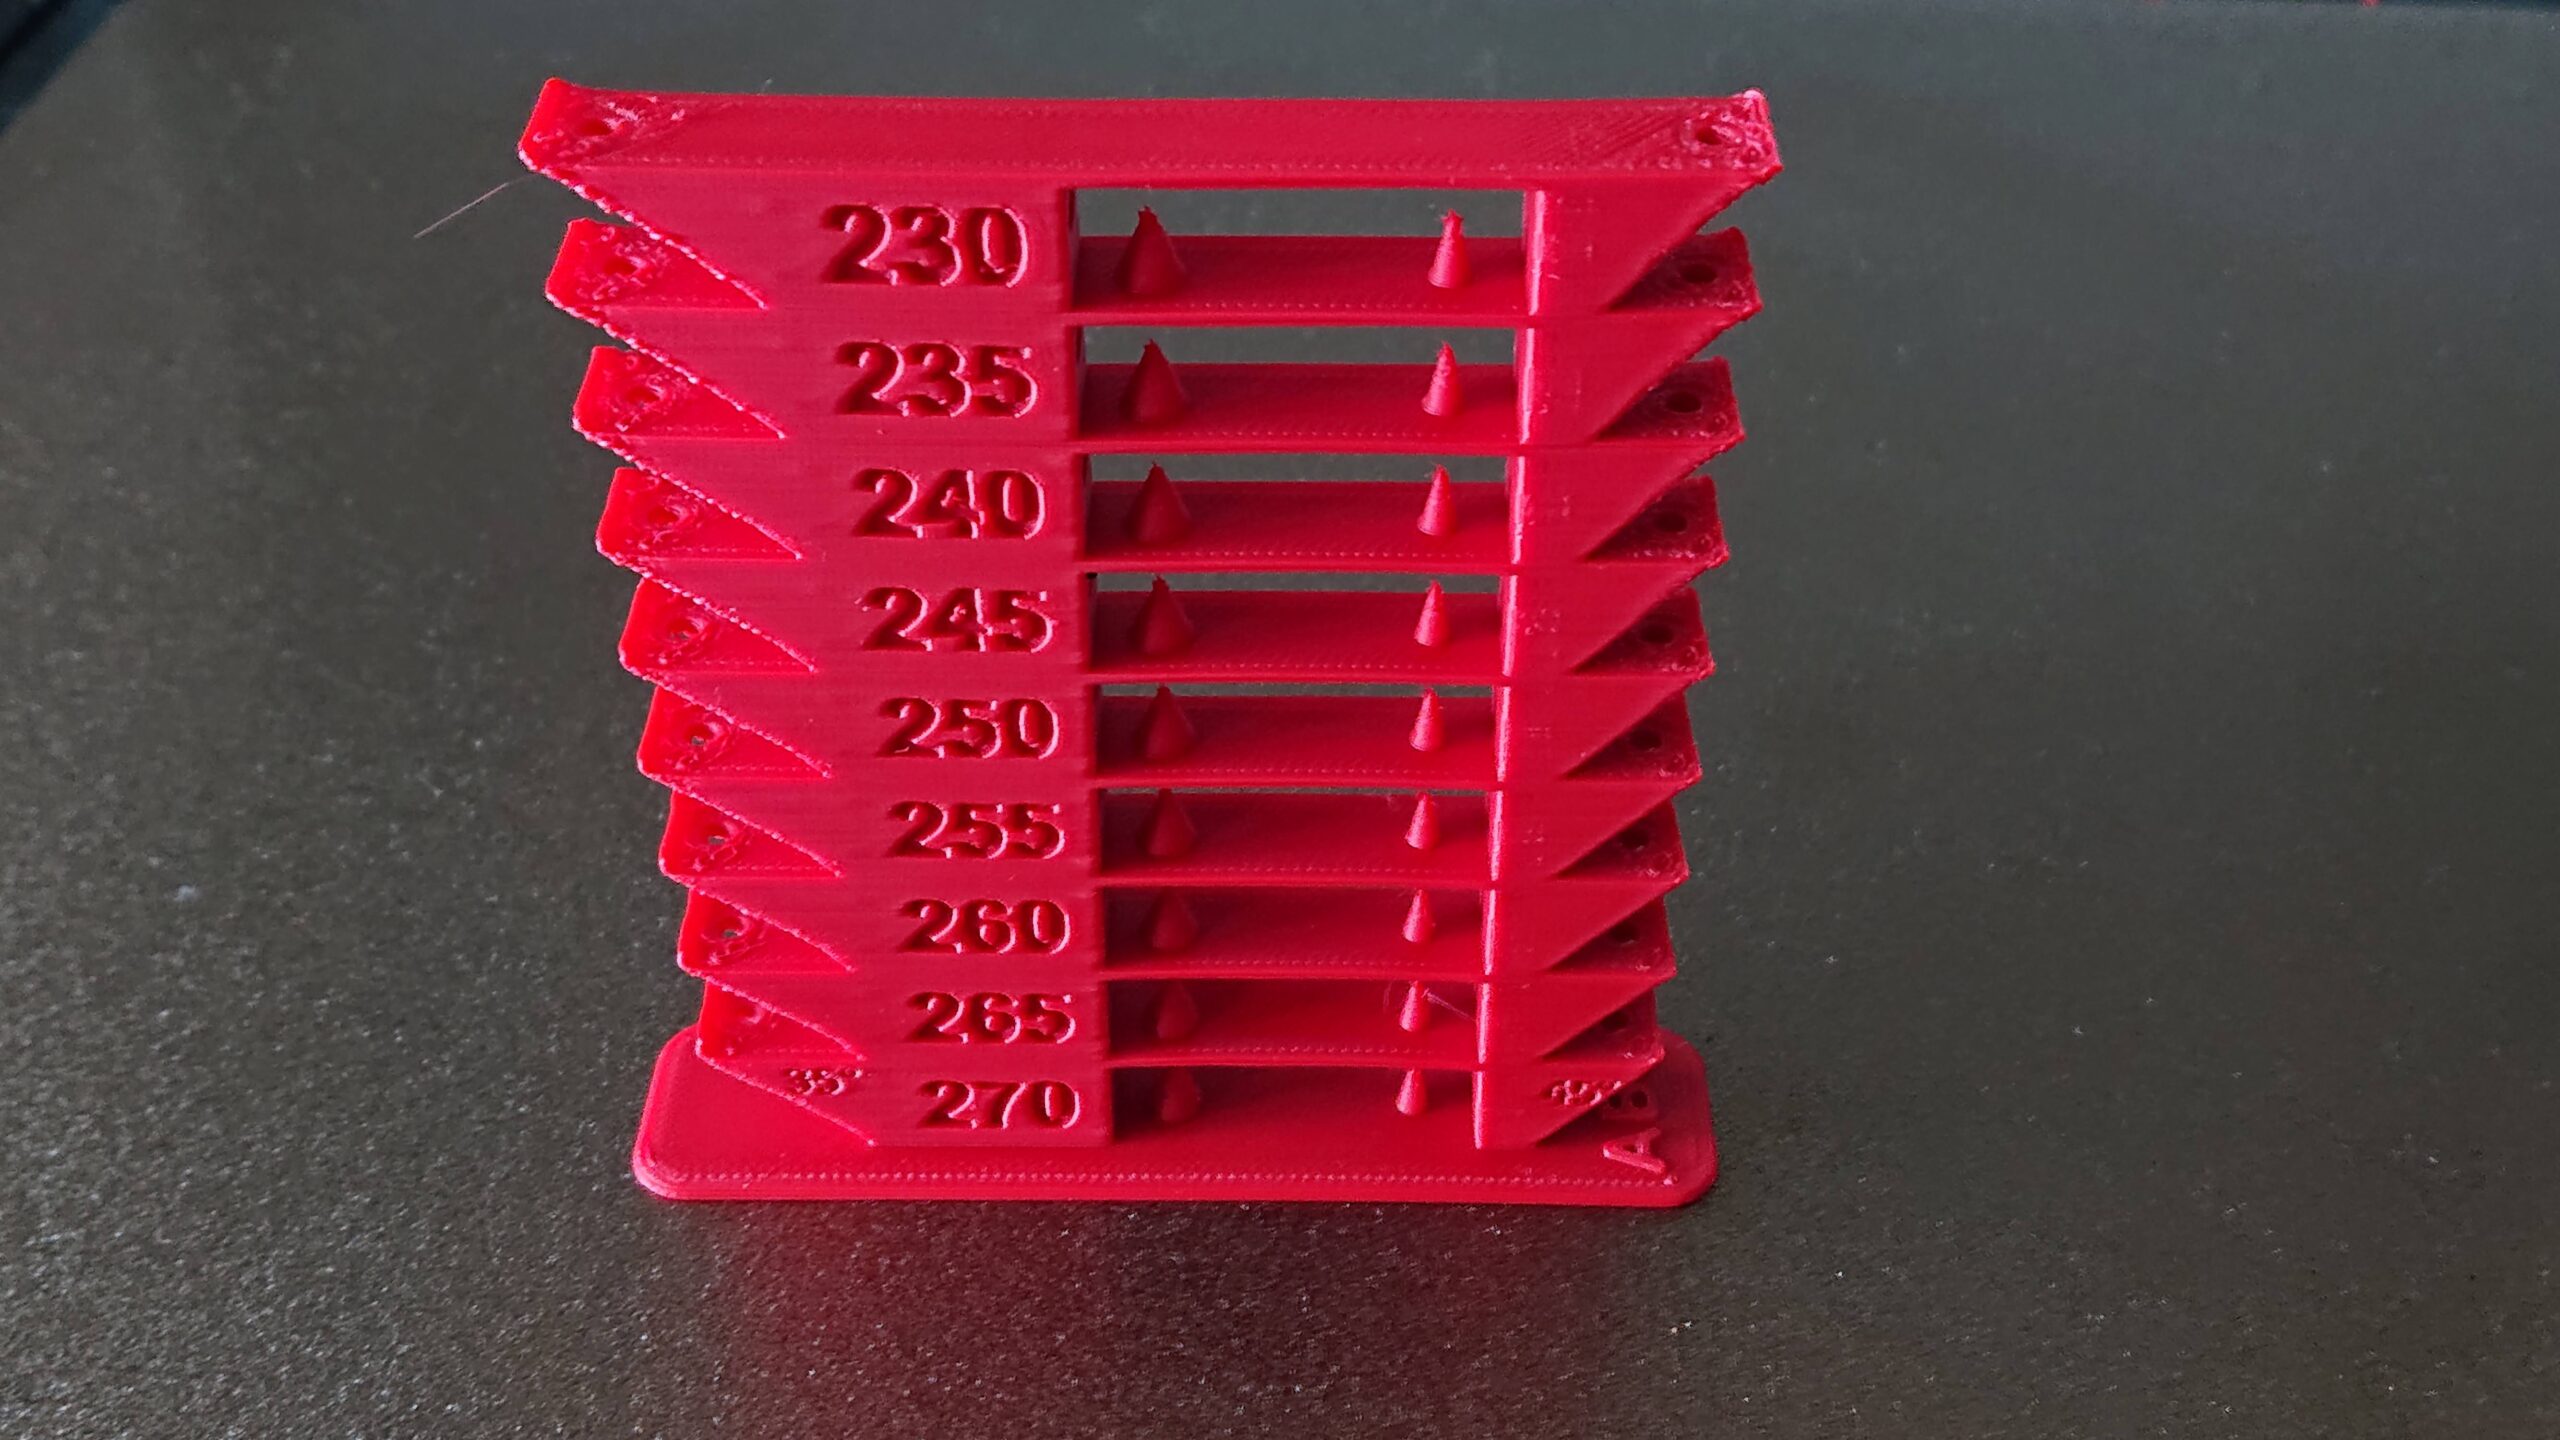
I've tried slowing down to 20mm/s on the perimeters, decreasing and increasing print temperature (my normal print temp is 245°C) and increasing bed temperature to try and stop the curling. These are test pieces which are the model above but with a large negative volume to avoid wasting material.
I don't seem to be getting anywhere. The print fan is off except where the layer size reduces, which is above the overhang and the printer is in an enclosure with the ambient temperature above 40°C.
I'd be grateful for any suggestions?
Best Answer by Thejiral:
Overhangs will be tough with the parts fan off. On the other side, the more you cool the worse the layer adhesion. One thing I would try first is to slow down the print... and then slow it down even further. Not just overhangs, all of it. You can do so easily during print by reducing global speed, if you watch the print, you can see that the overhangs are challenged as soon as you see the slightest tendency to creep upwards. If you see that, slow down... and slow down some more.
If you are already at snailpace and overhangs still don't look acceptable it is time to increase part cooling, maybe 10-15% first and if that is not enough try stepwise more. If you have an enclosure the negative effect shouldn't be as large as without. If layer adhesion isn't perfect but good enough, you can use the part to assemble your Voron. With the Voron one can print ABS also fine with parts cooling fan on, as needed. There you can reprint parts if needed.
RE:
Overhangs will be tough with the parts fan off. On the other side, the more you cool the worse the layer adhesion. One thing I would try first is to slow down the print... and then slow it down even further. Not just overhangs, all of it. You can do so easily during print by reducing global speed, if you watch the print, you can see that the overhangs are challenged as soon as you see the slightest tendency to creep upwards. If you see that, slow down... and slow down some more.
If you are already at snailpace and overhangs still don't look acceptable it is time to increase part cooling, maybe 10-15% first and if that is not enough try stepwise more. If you have an enclosure the negative effect shouldn't be as large as without. If layer adhesion isn't perfect but good enough, you can use the part to assemble your Voron. With the Voron one can print ABS also fine with parts cooling fan on, as needed. There you can reprint parts if needed.
Mk3s MMU2s, Voron 0.1, Voron 2.4
RE: ABS with overhangs
With the Voron one can print ABS also fine with parts coolin fan on, as needed.
I can't wait to be able to print ABS without worrying that I'm going to fry the electronics on my Prusas. Thanks for the advice - I'll give it a whizz.
RE: ABS with overhangs
Dang. I am currently printing parts for a Voron 2.4 on my 3S+ and while I can't say that everything has gone perfectly, I haven't had anything that looked like that, just some minor aesthetic issues with the first couple layers that I seem to have mostly solved now. One thing I am doing different from you is I am using ASA rather than ABS, which is supposed to make it a little easier although some of the Voron nerds apparently think that's a waste. I'm using Polymaker ASA for the black parts and Prusament for the accent parts, same settings for both. Used the default Prusament settings in PS as my starting point.
One thing I learned along the way is that the "normal" part cooling settings for ASA/ABS can be thrown out the window once you are printing in an enclosure. Doing my test prints I kept increasing my part cooling until I finally settled on 60% where it seems to reach a point of diminishing returns. I also changed it to start the part cooling at the beginning of the second layer (IIRC the default is to start on the 4th layer), which seemed to make an improvement in the ugliness I was seeing in the first few layers.
I basically got it to where I was satisfied, even if not totally happy, and proceeded to start printing parts (functional parts are functional). Somewhere along the way in the middle of printing gantry and X carriage parts I made a couple changes that made a way bigger improvement than I thought they should have; I switched away from the stupid satin steel sheet that Prusa recommends for ASA, and back to the regular textured sheet that I use for PETG just to see what would happen. I also switched to 7x7 mesh bed leveling and between those two things I have been pretty happy with my ASA prints since then. Depending on how long it takes before I actually start building, I may go back and re-print some of my earlier parts, at least those where the first layer will be visible on the finished printer.
Also one other thing I did a while back, was to make the Delta-P fan shroud mod to both my 3s+ and my Bear for part cooling. No idea if that is making any difference in my ASA results or not, but it's sure a huge improvement in visibility of the nozzle.
RE:
^^ How is layer adhesion with your ASA? I have been using Fillamentum ASA a few times and while it is quite neat I found layer adhesion a bit underwhelming even when taking care regarding part cooling, compared to alternatives. Others however swear that ASA layer adhesion is perfectly fine.
That is on my Prusa with enclosure. On my Voron 0.1 adhesion is much less of an issue I think. I haven't tested it that much though.
Mk3s MMU2s, Voron 0.1, Voron 2.4
RE: ABS with overhangs
Dang.
I know, although my language has been more colourful! This is the only part I've had trouble with. I do like Polymaker stuff and re-printed one of my minis with their Polylite ABS.
RE: ABS with overhangs
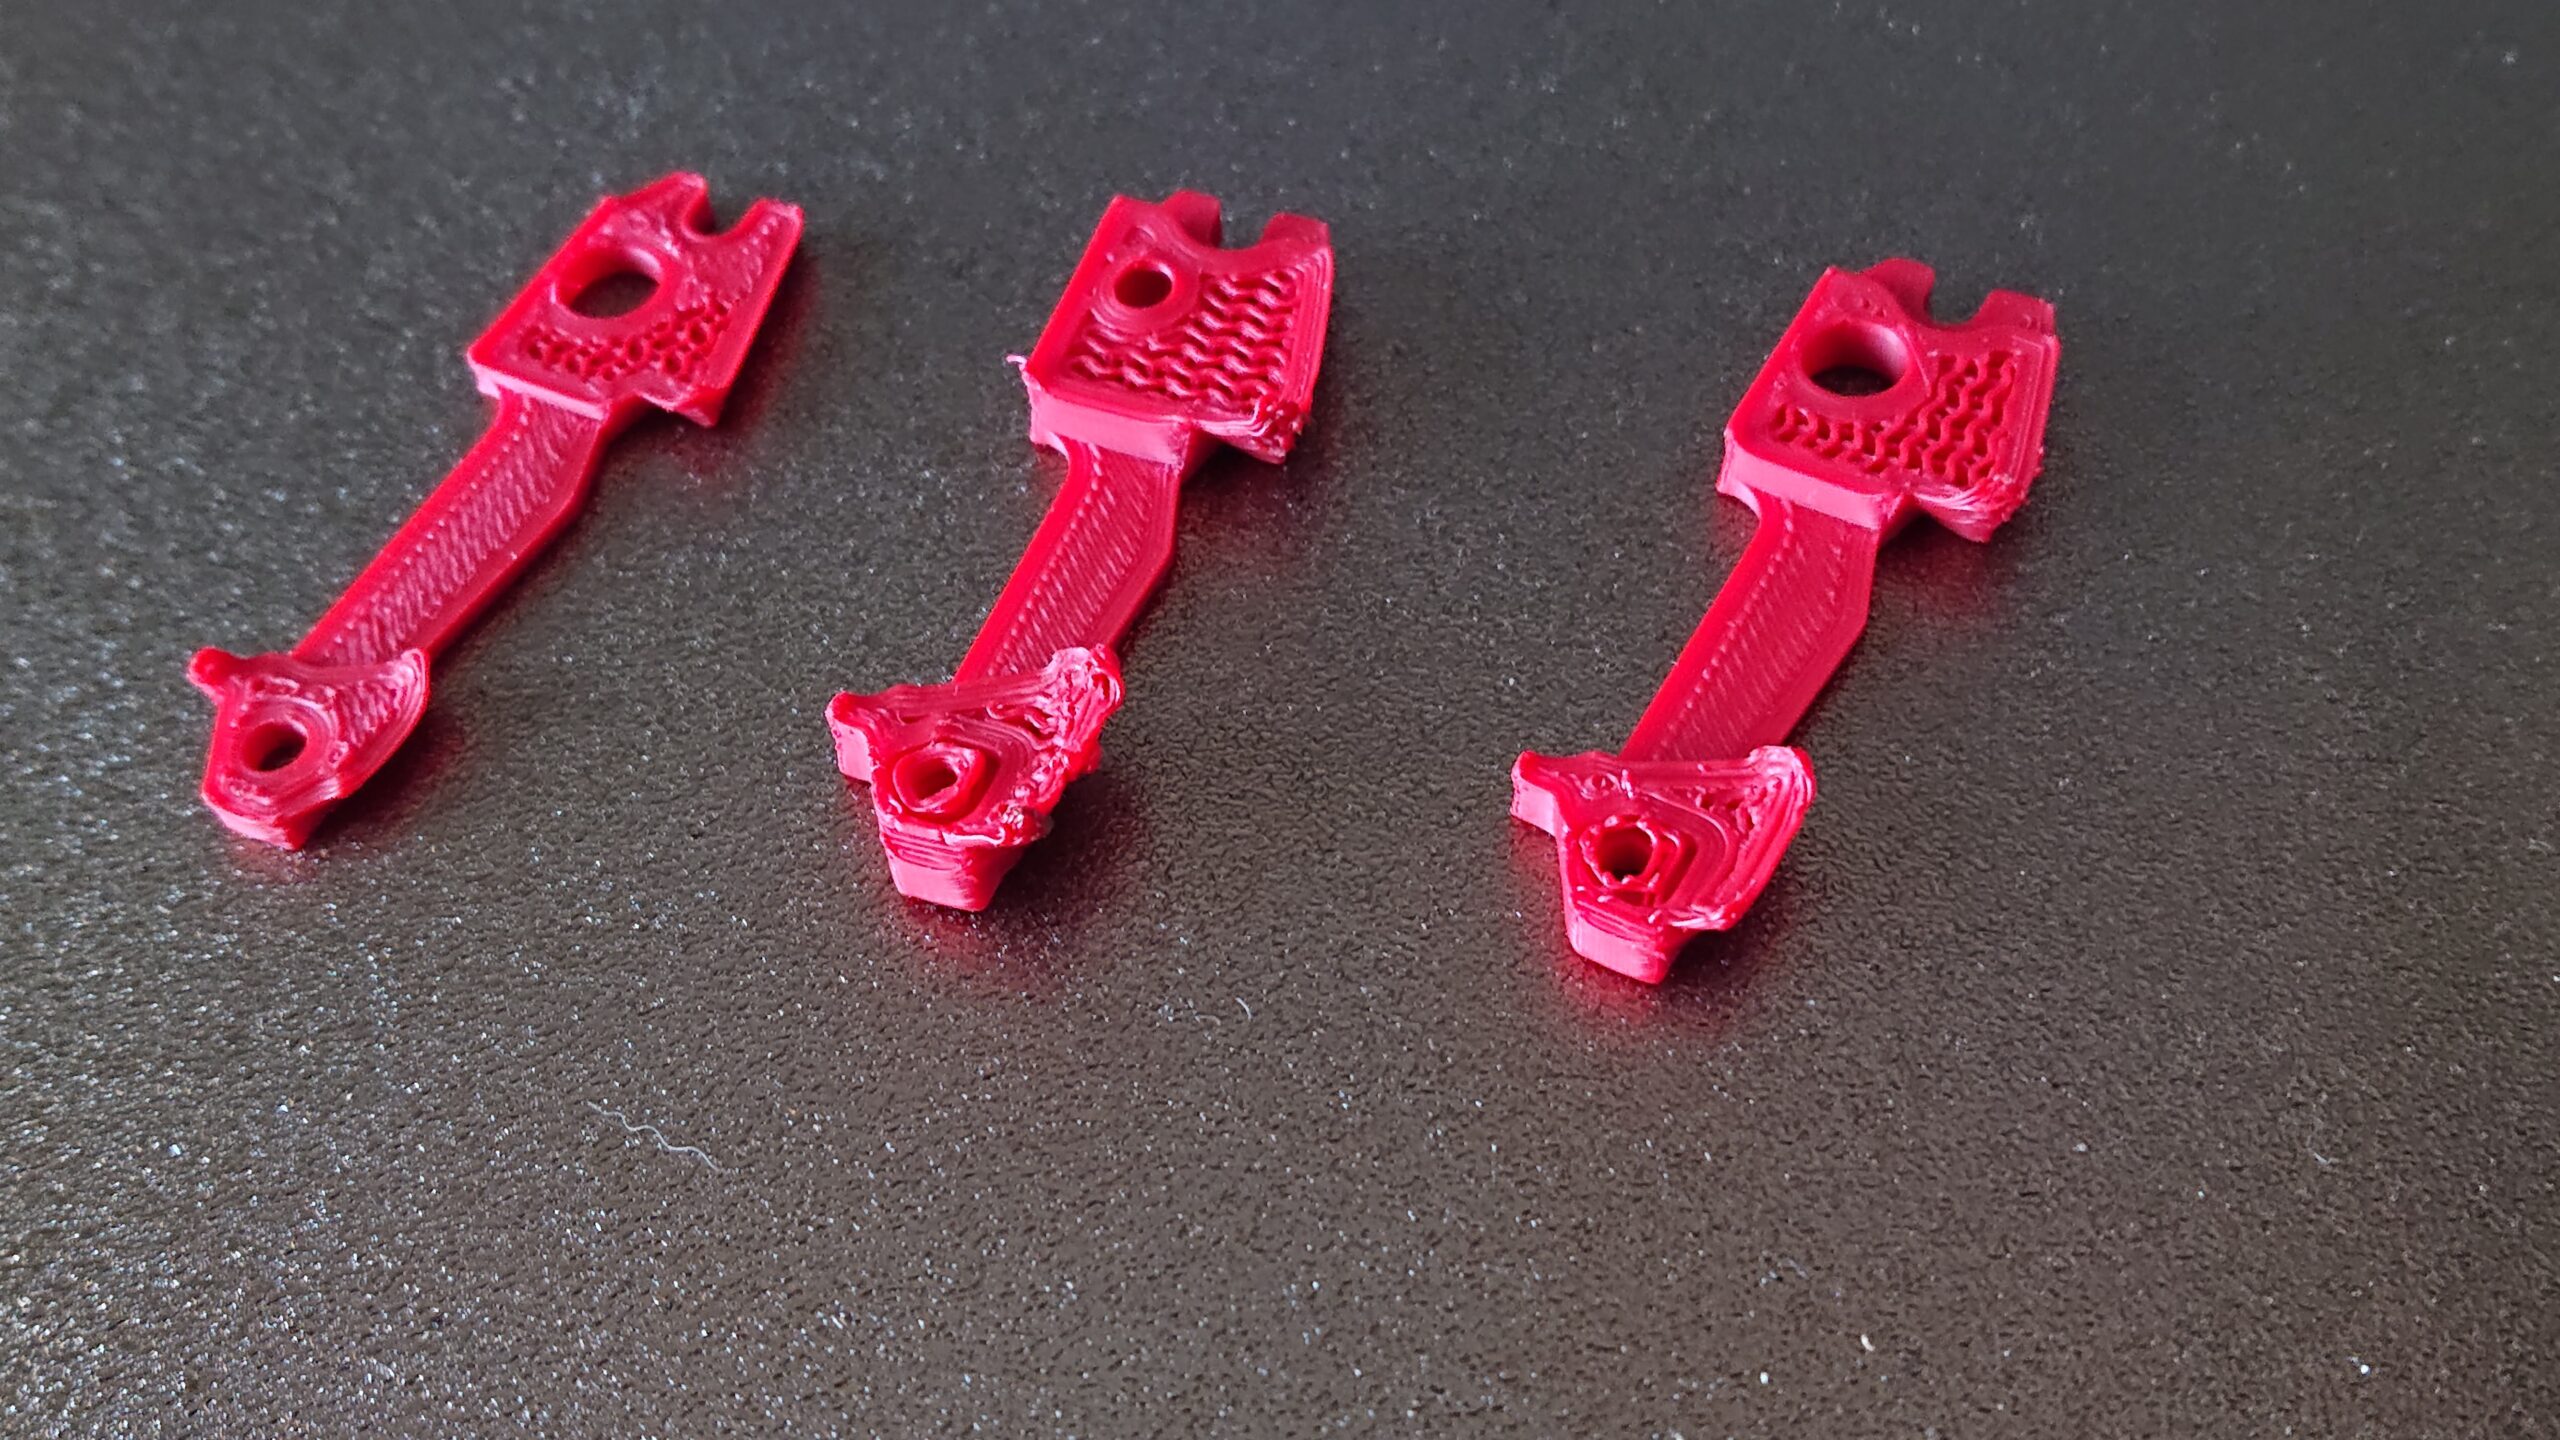
@thejiral, @netpackrat. Cooling seems to be doing the trick. It seems a bit counter-intuitive to me but I slowed the perimeters down. For this first attempt with cooling my perimeters are 20mm/s, small perimeters and external perimeters are 10mm/s, cooling is always on, set between 15% and 40% and so far-so good. It looks a lot better. I need to see how the bridge turns out and I may need to adjust the speed and cooling for those. If this comes out OK I think I'll print the actual part and worry about fine-tuning when I'm not so eager to finish the Voron, but this is a heck of a start, so many thanks.
RE:
I’m also printing parts for a Voron on my MK3S+. Several forum members seem to be doing the same at present.
My experience differs somehow from Netpackrat's. I’m using Prusament ASA (black for the main color and red for accent ). At first I was planning to print on the smooth sheet, but I decided to give the satin sheet a try and it works nicely. No problems of warping or adhesion whatsoever, although I’m helping it a bit spraying the plate once a week with a thin layer of 3Dlac.
@Alidaf, you didn’t say for which Voron model are these parts. In my case, it’s a Voron 2.4r2 and everything is cleverly designed. There’re practically no steep overhangs or long bridges anywhere. The finish of the pieces seem to my eyes as good as with PLA. I’m printing inside a Lack enclosure using basically Prusa standard profile for this filament, lowering a bit the bed and nozzle temperatures. Print fan at 20% from layer 5 and above, Fan disabled for layers 1 to 4.
The only parts not printed in ASA are the two halves of the hotend mount, On these I used Prusament PA11-CF for better thermal resistance, Probably overkill, though.
RE:
@Alidaf, you didn’t say for which Voron model are these parts.
I'm printing the LDO version of the 2.4R2. This particular component is a Stealthburner part for the Clockwork 1 and the Revo Micro, although they are almost identical for most of the supported hot ends.
I'm printing out the whole part now in a spare colour that I don't mind wasting. The last test piece came out pretty good. Even the bridges. If this prints OK then I'll have learned something and I can get back to my chosen colours; 3DQF Military Grey with Lemon Yellow accents. It's looking pretty smart even if I do say so myself.
I'm using a satin sheet too.
RE: ABS with overhangs
@thejiral, @netpackrat. And here is the before and after...

I pushed the speeds back up to default so the only difference is the cooling, and what a difference it has made. There's still room to tweak the very tip where the layer area is minimum, but I'm happy with this as a functional print so thanks all.
RE: ABS with overhangs
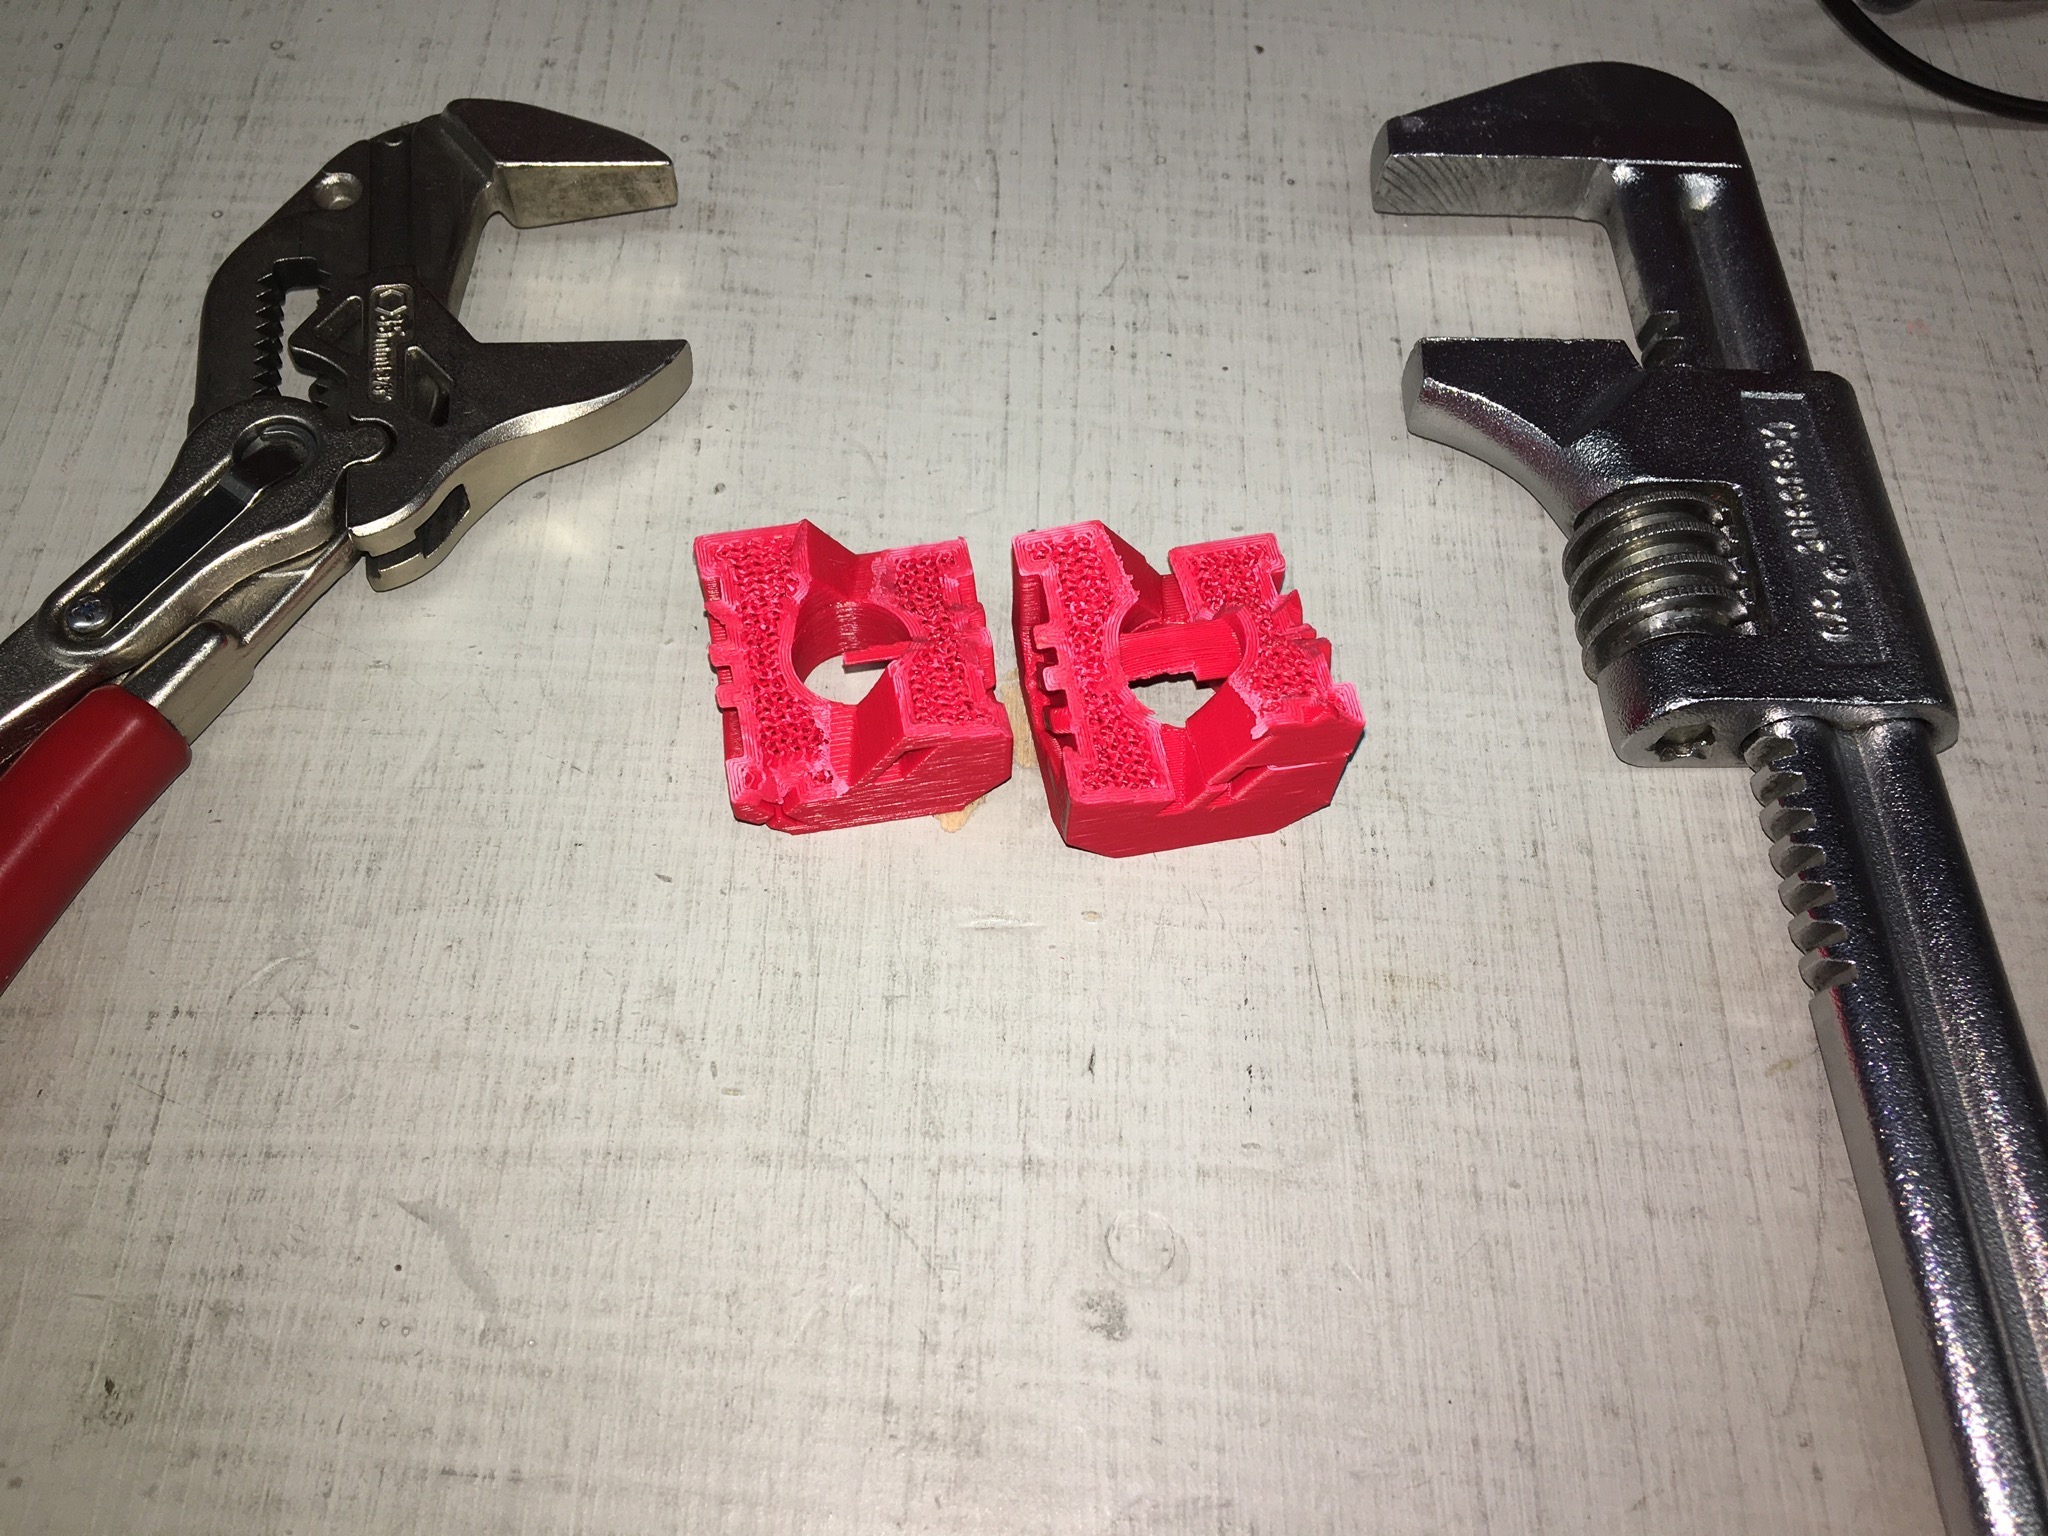
Based on the unscientific sacrifice of one of my test cubes, I would say the layer adhesion is pretty good. This took quite a bit of force, and it didn't break cleanly along layer lines. Rather the breaks are jagged and uneven.
RE: ABS with overhangs
You brute! Voron test cube RIP 😬.
I've run tests in engineering labs that were less scientific than that. That is actually useful info, especially the observation that the break wasn't clean. Did you clamp parallel or perpendicular to the layers? Did you torque or bend, and around which axis? My PhD was in fracture mechanics 🤪. A very long time ago!
As they say, if violence wasn't your last resort, you didn't resort to enough of it. I tried to line up parallel to the layer lines and twist the cube apart along them. There are places where the layer adhesion did fail, but notably they weren't generally in the same plane, so a lot of the failure was across the layers. If layer adhesion was a problem I would have expected a much cleaner break.
RE: ABS with overhangs
I’m also printing parts for a Voron on my MK3S+. Several forum members seem to be doing the same at present.
It's almost like a disease.
RE: ABS with overhangs
Related to the delays of the XL ? 😏
RE: ABS with overhangs
Related to the delays of the XL ? 😏
I don't think mine was. I am interested but I tend to go all in and would want the 5 toolhead version, which is way out of my budget. I run a social enterprise based around 3D printing and need something that will fulfil the safety case, i.e. a transparent enclosure to act as a barrier and some form of external, manual control. My 4 Prusas are plumbed into Platsa cabinets and wouldn't be easy to move around (they act as the farm for fund raising and I'd like them to stay where they are) so I looked for alternatives. The Prusa enclosure fits the bill but I wanted a bigger print volume so I looked at the Rat Rig V-Core. Unfortunately it lacks the enclosure and electronics mounting panels. Plus my experience with the Rat Rig V-Minion hasn't been that great so far - enjoyable build but dreadfully inconstant prints, mostly due to the poor quality Z-probe that needed recalibrating every few prints, and an ever increasing cost to upgrade/modify it. It has so far cost more than 2 MK3s where my Prusa Minis have been far more reliable and easier to use, albeit slower. The Voron kit gives me everything I need within the same budget as another MK3S and an enclosure and is giving me something to do until the classes start. I do love my upgraded MK3s and Minis though and given the chance of a fully loaded XL, I'd have one in a heartbeat.
RE: ABS with overhangs
Related to the delays of the XL ? 😏
Not at all. It's related to the fact that while I was waiting for my Prusa kit to ship last spring, I stumbled upon videos of Vorons printing at speed, and wanted one. I also want to print difficult materials quickly.
RE:
I'm not suggesting that a Voron is a direct replacement for a XL The tool changer only puts the Prusa on another league, as well as things like a segmented hotbed or auto first layer calibration.
I was considering to pre-order a Prusa XL with 2 toolheads until the successive delays discouraged me. We don't know when the XL will be available for real but. for new preorders. for sure it's a very long wait. Therefore, in the meantime, a core XY Voron with bigger printing volume than a MK3S+ seemed a good compromise in cost/performance.
RE: ABS with overhangs
What kind of enclosure temps do you use to print those ABS/ASA parts ?
I have an enclosed Mini with temps reaching around 40 degrees C and found it nowhere near enough to properly print those.
Tried this one: https://github.com/VoronDesign/Voron-Stealthburner/blob/main/STLs/Stealthburner/%5Ba%5D_stealthburner_main_body.stl
It warps and gets off the bed each and every time I try.
RE:
@robert-14 I was using a MK3 in an IKEA Platsa cabinet , so a fairly small volume and well insulated. I have a hygrometer in each cabinet and I'd check up on them every now and then. While printing ABS with the door shut I'd open it up a crack to peek at the temperatures and they tended to around 36-40°C but near the base rather than where it was likely to be hotter.
The Stealthburner body is large on the build plate so quite near the edges where the heat dies away (the heater bed isn't edge to edge and the edges are more affected by even mild drafts) so you could try printing it diagonally to keep it away from the edges. Also, warping was still an occasional bugbear with the MK3s but a thin film of Elmers Purple glue helped with that. Rather than smear the stick over the plate and print straight away I would spray the bed with a good dose of IPA and leave it for around 30 seconds to melt the glue. I'd then wipe around the bed with a dry cloth to get a more uniform film. I'm also using a satin build plate, which may also be helping but the glue technique worked for a few consecutive prints with just a mist of IPA and a wipe between them. You could also try printing a draft shield - it's in the Skirt and Brim section of Prusa Slicer.
I've just tried some 3DLAC plus spray on my Voron build plate (textured so difficult to use glue) and that works very well but it's dear so I'll stick with the Elmers for my Prusas but that or some similar products may be an option for you. I've tried printing some ABS on it have the same issues again but it has a much larger build volume and I haven't started tuning yet.