RE: ABS with overhangs
Thanks alidaf for sharing your experiences. I think you are right about the bed size and heating and I'll therefore pass on the larger parts. The StealthBurner cover is most probably not printable on Mini. At least out of the material I have (F3D ASA). But I will try again, play a bit with adhesives and the smaller parts. Still hope it's possible to print at least some of them. As for the larger ones - I'll print them out of PCTG and replace later on.
RE:
Probably not going to be a really helpful answer to you, but I am using a Wham Bam Hotbox:
https://whambam3d.com/products/hotbox-3d-printer-enclosure?aff=27
It has a built in thermometer, and the highest temp I have seen so far is 36C; usually it reaches low to mid 30s. This is inside a heated garage. I have not attempted to check the accuracy of the thermometer since I have had no compelling reason to, but the temps I am seeing do seem low compared to what others have reported. And yet I haven't had much trouble with warping of the ASA prints, which makes me suspicious of the thermometer and/or how it is mounted in the enclosure.
I did have an unrelated ASA print the other day, where I got through about half of it and then realized that I had forgotten to close the front of the enclosure (had been printing mainly PLA and PETG since finishing the Voron parts and got in the habit of leaving it open). I saw some very minor warping at the corners of the relatively small, rectangular part, but luckily not enough to cause a failure or render the part unusable.
RE:
I use something similar, just made out of some cardboard laying around and a set of printed corners. Tried today with Esun ABS+ and some smaller parts and it warps and unglues from the bed before even finishing the skirt. Don't know how do you manage to do it, I'm slowly giving up. Temps: bed - 100, nozzle - 255, ambient - 35. No way will it print. But - thanks anyways for your suggestions!
RE: ABS with overhangs
I think that whatever the prevailing advice on such things as fan speed and temperatures is, it is very generalised as I found out. I have heard some things that counter the general advice that may be worth considering. One is that a hotter nozzle temperature can make warping worse because the relative contraction from its hotter state to its cooled state is more pronounced. I print ABS at 245°C. Another suggestion to combat warping is to make sure that you have fewer solid layers and more infill. I think the Voron printing guide with more perimeters, and higher infill is for this reason. I've heard people have success with lower bed temperatures so figure that one out! It might work for some but it won't work for everybody.
It might be worth stepping back a bit and focus on printing test pieces rather than diving straight into the build. That way you may gain a better understanding of your specific printing environment and how to compensate. I tried a temperature tower and it didn't help me much but you could try a variation on it by having the nozzle temperature the same for each section but different fan speeds and see how that turns out. I appreciate the absolute urge to build whatever you are working on - it is the rabbit hole of 3D printing, but don't ruin it for yourself through frustration because others have printed the same part it and you haven't. Yet!
It may also help to post some images of your prints and printer setup. Lets see some calibration cubes or even some 1st layer calibration squares. Is your Mini modified? Have you given the nozzle a good clean through with some cleaning filament? Can you hear anything that could be considered abnormal? Do your fans pass the built-in tests?
Don't give up.
FWIW, the settings that worked for me on a MK3S albeit with a Mosquito hot-end, in a cabinet are as follows:
- Print temp = 245°C for all layers
- Bed temp at 100°C for all layers
- Fan speed min = 15%
- Fan speed max = 50%
- Keep fan always on checked
- Enable auto cooling checked
- Disable fan for 1st 2 layers
- Everything else is default.
Print settings for Voron parts:
- 4 perimeters
- 5 top and bottom layers
- Layer height = 0.2mm for all layers
- Ensure vertical shell thickness unchecked
- Infill = 40% Gyroid
- Default for everything else
Now, I imagine a Mini may be more affected by ambient temperatures that could for example affect the filament in the Bowden tube. It could expand enough to increase friction and slow down the effective volumetric flow rate. I have a couple but have never tried printing ABS with them. But, I have had blockages necessitating replacing the PTFE tube so be careful. Keep your eyes and ears open and send some images so we can help a bit more.
I use something similar, just made out of some cardboard laying around and a set of printed corners. Tried today with Esun ABS+ and some smaller parts and it warps and unglues from the bed before even finishing the skirt. Don't know how do you manage to do it, I'm slowly giving up. Temps: bed - 100, nozzle - 255, ambient - 35. No way will it print. But - thanks anyways for your suggestions!
RE:
I think that whatever the prevailing advice on such things as fan speed and temperatures is, it is very generalised as I found out. I have heard some things that counter the general advice that may be worth considering. One is that a hotter nozzle temperature can make warping worse because the relative contraction from its hotter state to its cooled state is more pronounced. I print ABS at 245°C. Another suggestion to combat warping is to make sure that you have fewer solid layers and more infill. I think the Voron printing guide with more perimeters, and higher infill is for this reason. I've heard people have success with lower bed temperatures so figure that one out! It might work for some but it won't work for everybody.
First of all, I want to say - thanks alidaf. I really, really appreciate your help and attitude. Although I did my today tests without a fan enabled I have also observed that a small amount of cooling does not make things worse at all. Going higher with nozzle temp on the other hand does. Anything above 255 was causing quality and extrusion issues both with ABS and ASA. I'll try to go lower as you have suggested.
It might be worth stepping back a bit and focus on printing test pieces rather than diving straight into the build. That way you may gain a better understanding of your specific printing environment and how to compensate. I tried a temperature tower and it didn't help me much but you could try a variation on it by having the nozzle temperature the same for each section but different fan speeds and see how that turns out. I appreciate the absolute urge to build whatever you are working on - it is the rabbit hole of 3D printing, but don't ruin it for yourself through frustration because others have printed the same part it and you haven't. Yet!
I went straight to the building parts, because I have recently done a full service of the printer including bearings, fresh grease, squaring the whole printer and calibrating. It prints other materials very nice. Click and forget reliability.
It may also help to post some images of your prints and printer setup. Lets see some calibration cubes or even some 1st layer calibration squares. Is your Mini modified? Have you given the nozzle a good clean through with some cleaning filament? Can you hear anything that could be considered abnormal? Do your fans pass the built-in tests?
My Mini uses V6 all metal hotend with this extruder: https://www.printables.com/model/131489-prusa-mini-dual-drive-extruder-revision-6/comments and slight modifications (inverted filament switch and this one: https://www.printables.com/model/325753-prusa-mini-dual-drive-extruder-revision-6-modified/collections). I had problems with PLA back in the days, but I have found the issue and with the V6 hotend and single bowden tube stgraight to the extruder it got really reliable. It passes all tests and prints PETG/PCTG and PLA like a hero 😉
Don't give up.
Thanks. I wont!
FWIW, the settings that worked for me on a MK3S albeit with a Mosquito hot-end, in a cabinet are as follows:
- Print temp = 245°C for all layers
- Bed temp at 100°C for all layers
- Fan speed min = 15%
- Fan speed max = 50%
- Keep fan always on checked
- Enable auto cooling checked
- Disable fan for 1st 2 layers
- Everything else is default.
I'll give it a try. A bit lower printing temp with some small amount of cooling and no cooling for first layers.
Print settings for Voron parts:
- 4 perimeters
- 5 top and bottom layers
- Layer height = 0.2mm for all layers
- Ensure vertical shell thickness unchecked
- Infill = 40% Gyroid
- Default for everything else
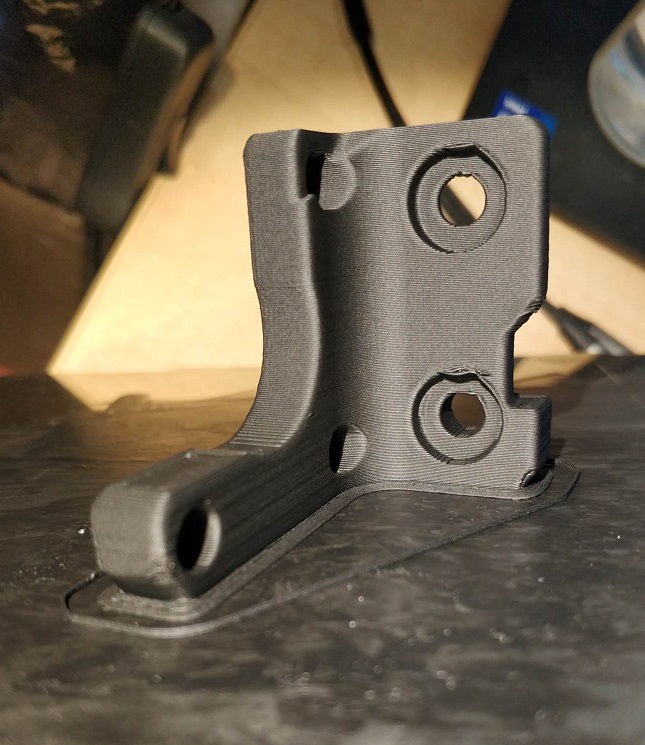
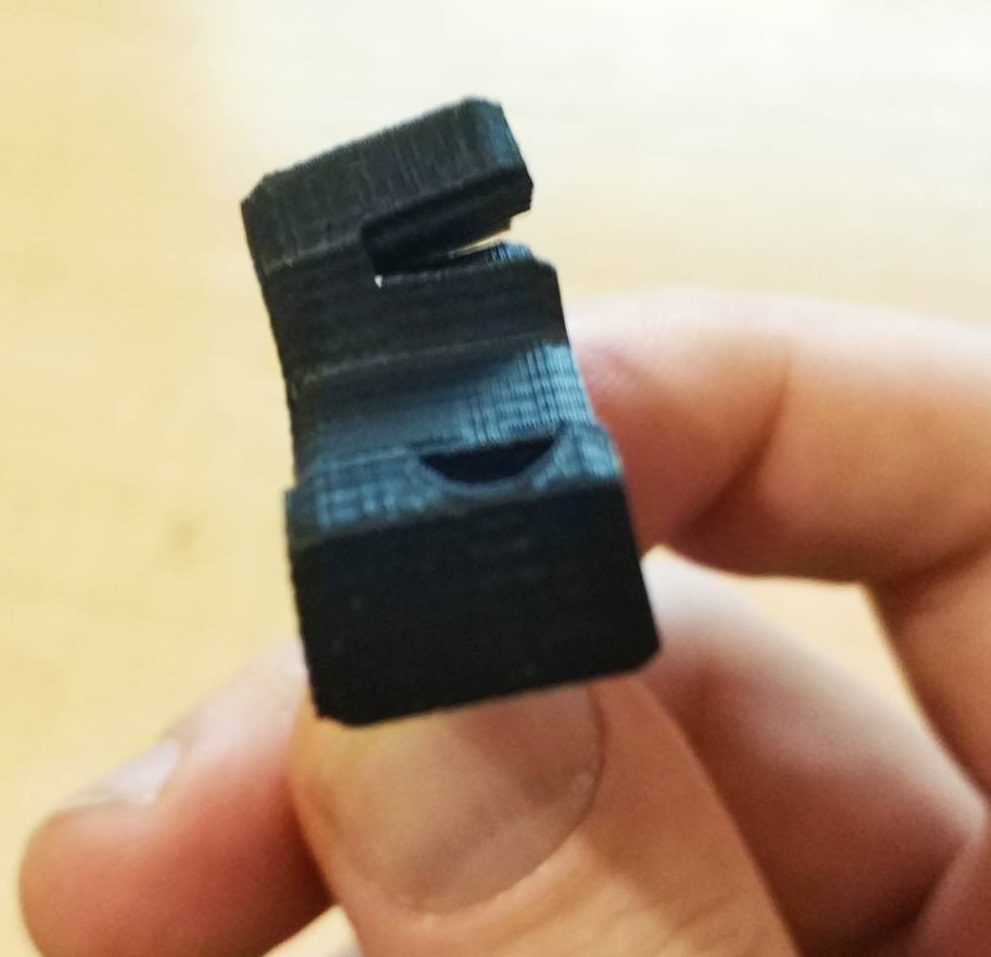
I have used exactly the same parameters as suggested by the Voron design. I only forgot about disabling "ensure vertical shell thickness". Will disable. I think the problem I might have is the bed adhesion. I have some kind of 3d printing glue that I think is not good at all for abs/asa. Tried with no glue on a clean surface and no way. It didn't even start to print and the extruded material was sticking to the nozzle instead of the bed. Then I applied a thin layer of the glue spray, waited for it to dry and then added two more thin layers. The result was much better, but still the edges/skirts warped. I have attached the result I got (still miserable failure). I have some adhesives on order, should be there after the weekend. If it's not enough I'll try the acetone/abs mixture to make the adhesion better and I will post my results here. Maybe it will be of some use for others trying to go into ABS/ASA teritory.
Best Regards
Robert
RE: ABS with overhangs
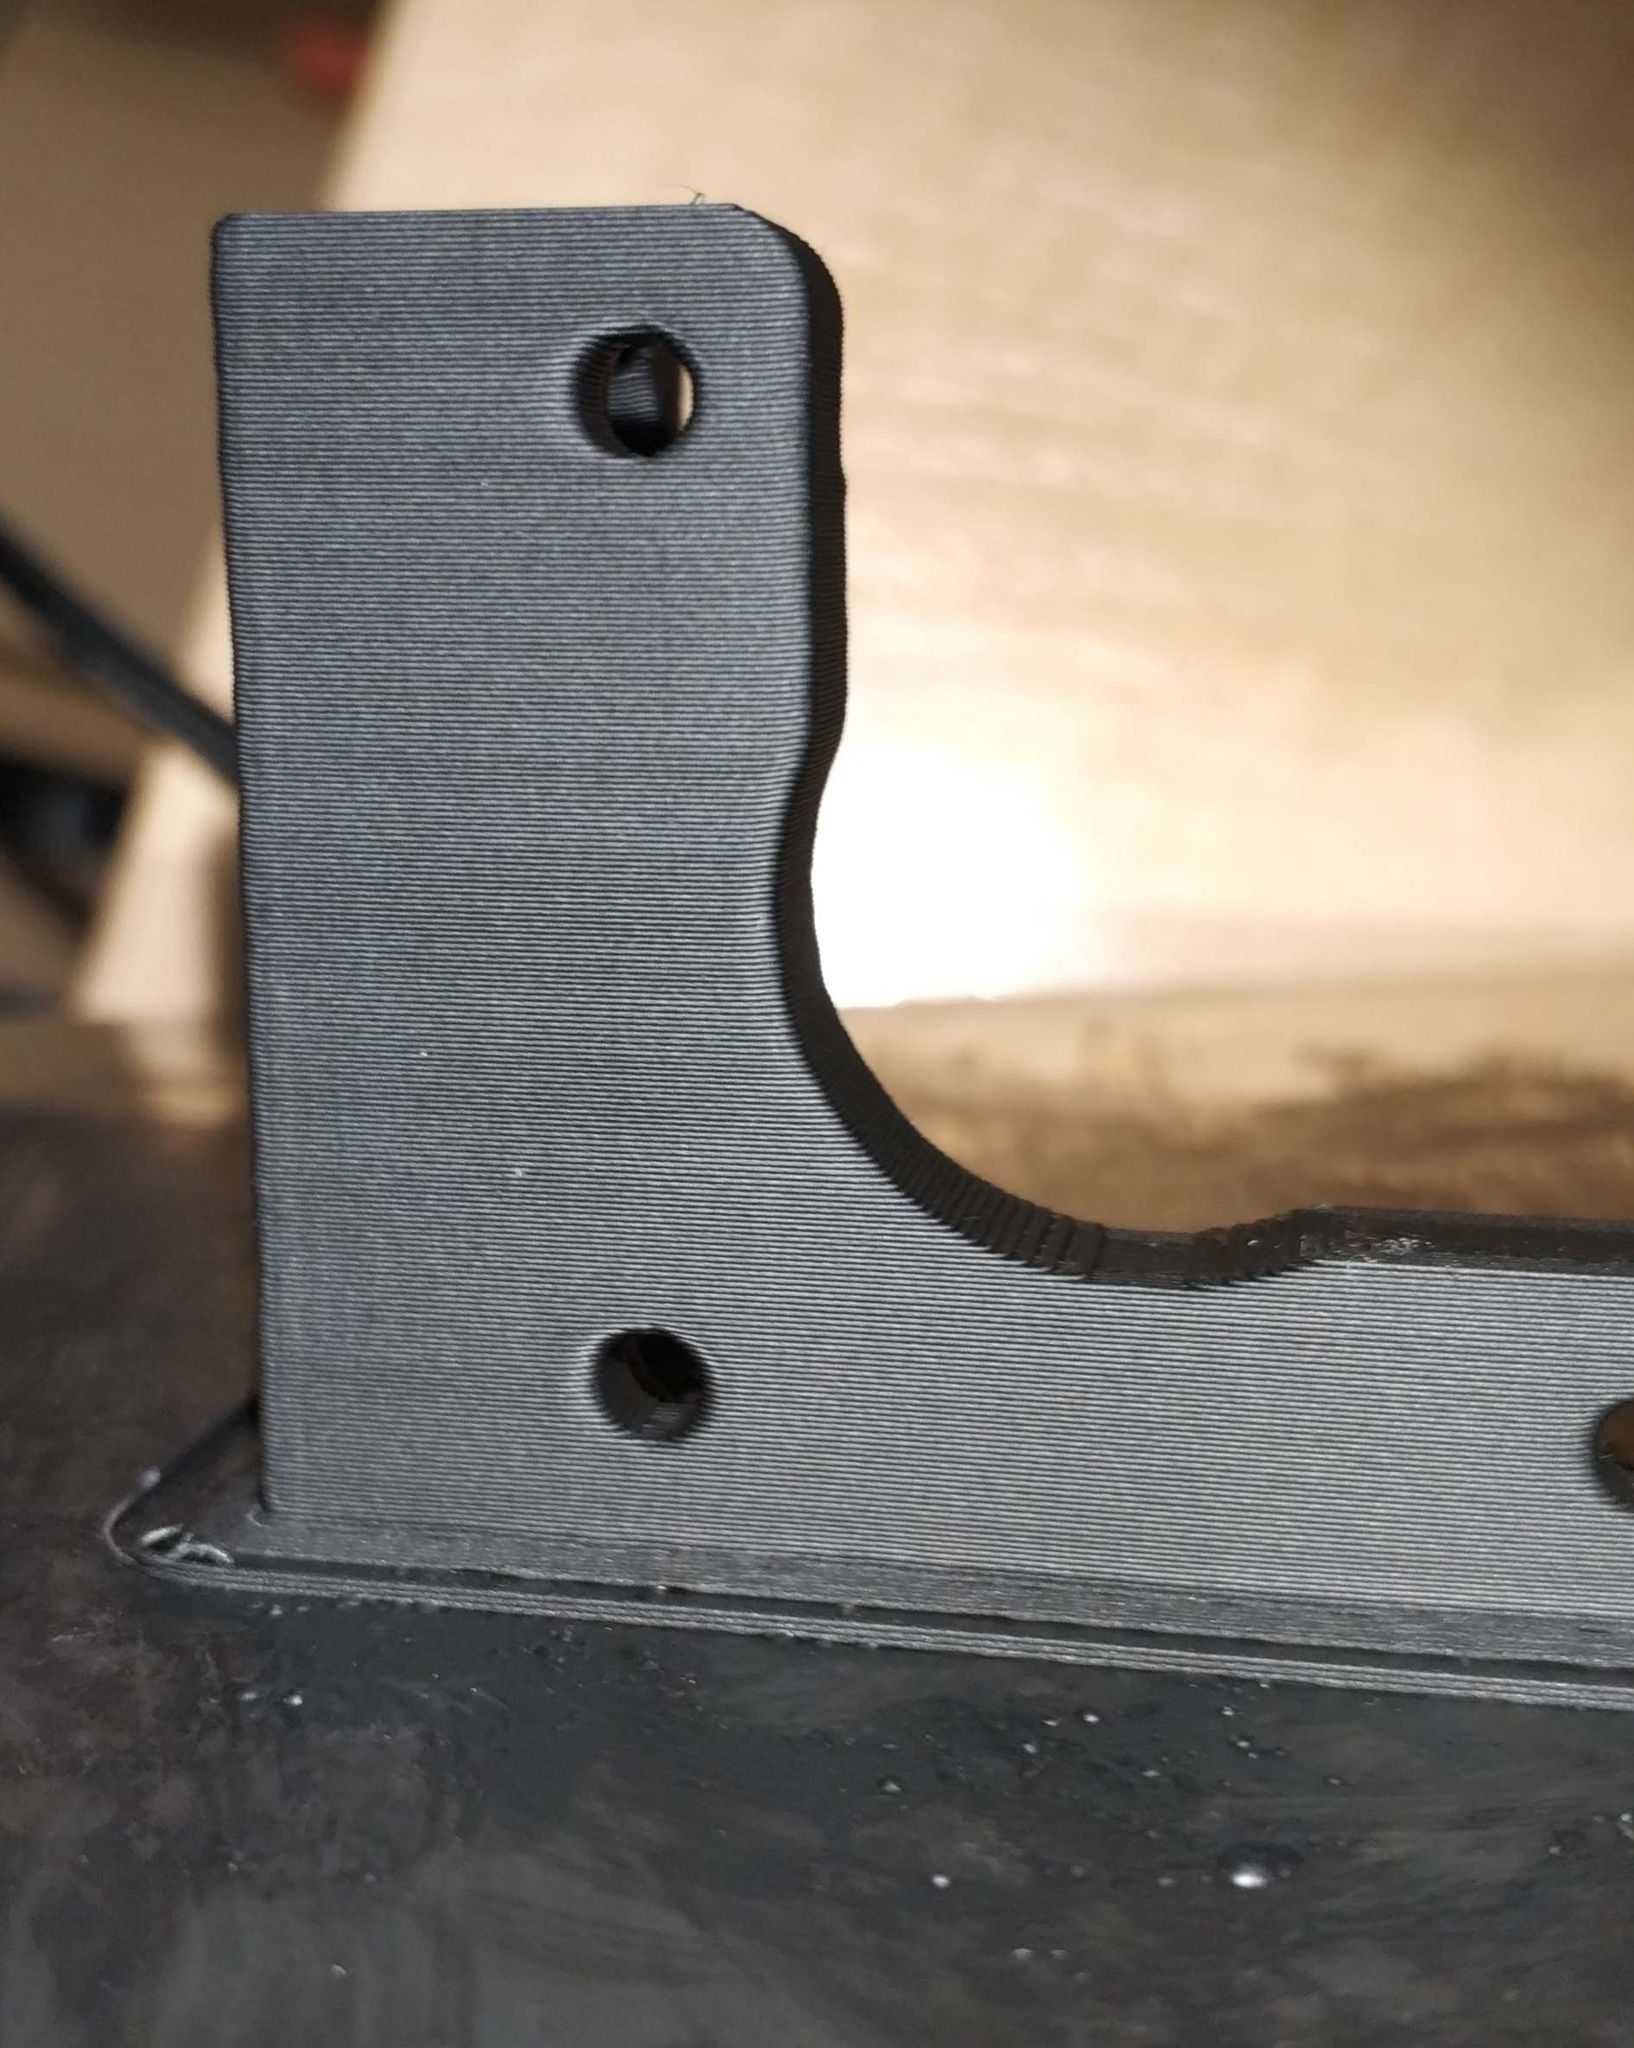
The top of the part looks acceptable, but look at the botom 🙁
RE: ABS with overhangs
@robert-14 Yeah, it really has warped a lot. Apart from some of the overhangs and what looks like a chunky seam in places, the part actually looks incredibly neat so kudos for that. I'm going to assume you've tried all of the plate cleaning advice but looking at your brim, your z-height could be too high. I don't use brims and assume that the extrusion width for brims is the same for the body's first layer but I don't think those strands should be separating like that so first start printing some single layer calibration squares to get that first layer just right. Let the bed cool before you take the square off and tug across the direction of infill. If the layers split apart easily then you are too high. If the surface of the square is rough then you went too low. I typically drop by 0.02mm at a time, print and check.
You could also try Micky Mouse ears instead of a brim? Basically you add a single layer circle to the corners using the add shape feature of Prusa Slicer. The centre of the circle is placed at the corner. They are easily trimmed off afterwards. You can try different sizes but they generally don't need to be too large, i.e. no more than around 10mm diameter.
Try these before the last line of defence - adhesives.
RE:
Ok, I'm back with some feedback. You have a good eye alidaf, much better then mine. I have started from scratch, set the Z offset and it was on the 'too high' side indeed. Tried again and the corners still had tendency to lift up. Then I tried the ABS/acetone method and I had my first finished print.
Result was still not perfect, overhangs were a bit ugly, so I tuned it up a bit. First layer at 250 degree C and slow (15mm/s), other layers 245 with normal speeds and fan at 25%. This gave me quite nice results an I have printed a few parts.
Next, my other adhesives arrived and I tried dimafix. Worked like a charm. No more bloody acetone mess. When it comes to the ASA - it was not sticking to the dimafix either. I had to use the messy acetone mix to get it to stick. It also likes a bit higher temps (250-255). Will stay with ABS+ for now.
The only issue I can still see is those inconsistent layers when looking at the right angle. But that's something I don't know how to manage.
I can see it on many prints. Some might be caused by the loose belts, but I'm not sure TBH.
Now, let's conclude. The issues I had with the adhesion were caused by poor adhesive and what I think is Z offset temperature drift (I don't have the SuperPinda!). The eSun ABS+ with a proper glue works very, very well and I started to like this material a lot. It even smells nice 🙂 Another thing I found (the hard way) is that stock Mini WILL NOT reliable print at 100C bed temp under an enclosure for longer periods. I know it's MK3 area, but if one wants to do it - first thing is to print MINI-y-belt-holder with ABS/ASA and replace the PETG one. The stock one WILL MELT under continous load at this temps. I melted two of them.
Other than that - the x belt became loose, screws loosened up and I had to square it up again and re-do those. I'm thinking about re-printing the Mini with ABS to make it more solid and more up to the heavy task. I have also ordered a few spools of the ABS+ as it's great IMHO and the SuperPinda of course - to avoid further issues with Z height. And printing is ongoing. 20/24h 🙂
Thanks for all the help and suggestions. Those were really helpful!
RE: ABS with overhangs
Glad you are getting somewhere. Looks like you are using the smooth sheet; have you tried the textured at all? I haven't had the need for any glues with the textured (or the satin for that matter). Shouldn't need a brim on any of those parts.
Some of the minor features on the Voron parts are not really optimized for good printing, and the vertical holes on the ones you posted are a good example. Here's a page showing a better way of designing holes like that, along with other useful tips:
https://github.com/gregsaun/maker_cheatsheet/blob/master/3d_printing/techniques.md
I did note that they incorporated the technique shown on that page for mid-air holes, but from what I have read, it appears that was done fairly recently. Not a big deal and once you get dialed the vertical holes print well enough to use, but it did surprise me a little given how much thought has gone into every other aspect of the design of the Vorons.
RE: ABS with overhangs
Thanks for all the help and suggestions. Those were really helpful!
You are most welcome. I think you have the same problem as me with perfectionism but those parts do look very good. There may be some slight z-banding, which is usually a problem with the vertical lead screw but yours is so minimal it could be nothing more than some contamination causing a slight slip or a loose trapezoid nut. You say yourself that you only see those imperfections in certain light but one thing I have learned is that light can be your enemy or your friend so forget about 'imperfections' that are exacerbated by light incident to the layers. If all of your parts end up with that level of quality then you should be on the PIF programme!
I used a MK3S to print my ABS parts and it did have some consequences. I've had to tighten things up since and am just getting back to normal quality with PLA. I hope to only use the Voron to print ABS from now on but I haven't started tuning it yet. Yikes.
My Rat Rig V-Minion had a really awful sensor and was plagued with inconsistency. I tried all sorts of start-up routines to compensate but ended up replacing it with a SuperPINDA. I couldn't convince Rat Rig that there was a problem with the original, which is typical of kit sellers - it's always the builder's fault. They offered a discount on a replacement but the SuperPINDA was still far, FAR cheaper, especially since I was ordering a bunch of spares already, so saved on postage. I had to solder up an extension but it works so much better.
I also re-printed some of my Mini parts with ABS when I tried the E3D Revo Micro and did consider re-printing everything just for a new colour scheme. I ended up removing the Micro because it didn't work very well for me but a new colour scheme still appeals to me and there aren't a lot of parts to re-print. Just be aware of the tolerance fits on some parts like the Y-end/idler holder where the rods are inserted, which may split the ABS if too much force is needed. This is one area where PETG holds it's own but unfortunately has the temperature limitation.
Thanks for the feedback. All of your comments will undoubtedly resonate with many here and it is awesome that you are making progress. Because of it I feel more motivated to tackle the Voron ABS tuning now 👍. Now go build!
RE:
LDO Voron 2.4 kit in da house. 😎 Looks like I will have to re-print my extruder parts also, since they included the Stealthburner upgrade kit and there was a round stepper thrown in the box in bubble wrap, with "gift" written on the tape wrapped around it.
West 3D rocks. They not only honored their free shipping to Anchorage AK with no questions asked, they threw in a $50 gift certificate which paid for the Revo Micro hot end I plan to use.
RE: ABS with overhangs
Glad you are getting somewhere. Looks like you are using the smooth sheet; have you tried the textured at all? I haven't had the need for any glues with the textured (or the satin for that matter). Shouldn't need a brim on any of those parts.
To be honest I did not use the textured one because mine is in so poor condition I have decided to throw it away and ordered a new one. I have previously used it wiah ASA and I was able to make it work.
Some of the minor features on the Voron parts are not really optimized for good printing, and the vertical holes on the ones you posted are a good example. Here's a page showing a better way of designing holes like that, along with other useful tips:
https://github.com/gregsaun/maker_cheatsheet/blob/master/3d_printing/techniques.md
Yeah, I have seen this page. Looks like the principles are nod applied in every design 🙂
LDO Voron 2.4 kit in da house. 😎 Looks like I will have to re-print my extruder parts also, since they included the Stealthburner upgrade kit and there was a round stepper thrown in the box in bubble wrap, with "gift" written on the tape wrapped around it.
Congratulations. I took my chance with the Formbot kit. The LDO one was almost twice the price here, so it was a bit too much. That's very nice they included the round stepper. I'll have to order one. The good thing is it's not very expensive. Right now I'm wondering if I should buy only the stepper and go with CW2 or buy Orbiter 2.0. I'm not sure how well the Orbiter 2.0 would work with the Mellow Fly-SB2040 CAN board, as I want to go CAN straight from the start.
RE:
You are most welcome. I think you have the same problem as me with perfectionism but those parts do look very good. There may be some slight z-banding, which is usually a problem with the vertical lead screw but yours is so minimal it could be nothing more than some contamination causing a slight slip or a loose trapezoid nut. You say yourself that you only see those imperfections in certain light but one thing I have learned is that light can be your enemy or your friend so forget about 'imperfections' that are exacerbated by light incident to the layers.
Yeah. I sometimes go too far and forget, that it's consumer grade FDM not a high res resin printer. I was investigating this issues many times, looking both at https://github.com/prusa3d/Prusa-Firmware/issues/602 and also https://github.com/VoronDesign/Voron-Afterburner/issues/6 and it looks like the small inconsistencies are not really extrusion related but most probably caused by the printer tolerances and imperfections (bearings, belts...).
If all of your parts end up with that level of quality then you should be on the PIF programme!
Looking at all the parts coming out of the Mini right now I think I probably could. Only my Mini might not like it 😉
They parts are very good. They almost look like injection molded. I'm surprised and very happy with the result I get from this ABS+ material.
Just be aware of the tolerance fits on some parts like the Y-end/idler holder where the rods are inserted, which may split the ABS if too much force is needed. This is one area where PETG holds it's own but unfortunately has the temperature limitation.
Yeah. I'm currently thinking about it. Have some parts printed out of PCTG. Will probably try and test some combinations.
Because of it I feel more motivated to tackle the Voron ABS tuning now 👍
I wish you have a good luck with that!
RE: ABS with overhangs
Mellow Fly-SB2040 CAN board, as I want to go CAN straight from the start.
Interesting. I had to google that and skim the github because I didn't know what that was. I honestly don't know enough about a lot of the options to really know what I want, so I was planning pretty much a standard build following the manual. It's not 100% clear to me yet what I even need to re-print for the SB, although I think with the LDO kit that I have, I am supposed to stick with the CW1. Will probably need to reprint stuff as I go as I find that I printed the wrong stuff even using the LDO guide to what to print for their kit.
RE: ABS with overhangs
Interesting. I had to google that and skim the github because I didn't know what that was.
It let's you get rid of all the 18 cables going from the print head back to the electronics and instead use only 4 wires. Makes the build cleaner and less prone to failures in the future. But requires a bit more tinkering with electronics (flashing the boards, enabling CAN bridge mode etc.).
It's not 100% clear to me yet what I even need to re-print for the SB, although I think with the LDO kit that I have, I am supposed to stick with the CW1.
I'm currently on the same boat - researching about what to use. Going exactly with the kit and manual would probably be the most straightforward option, but then - if you want CAN - you have to rebuild almost the whole printer to get rid of the unnecessary wires. Looking at the github page I think you can go with Clockwork2 and a new X carriage: https://github.com/VoronDesign/Voron-Stealthburner/tree/main/STLs but those are only my guesses as I havent build one. Guys on FB group suggested that the only thing needed for SB and CW2 is the round stepper. There is also an interesting pins mod and klicky that might be worth looking at. At least I will probably go with those. Have good luck with your build!
RE:
Mellow Fly-SB2040 CAN board, as I want to go CAN straight from the start.
It's not 100% clear to me yet what I even need to re-print for the SB, although I think with the LDO kit that I have, I am supposed to stick with the CW1. Will probably need to reprint stuff as I go as I find that I printed the wrong stuff even using the LDO guide to what to print for their kit.
I just built the LDO 350 kit with the SB, keeping the CW1. I created a spreadsheet so that I could print JIT I've attached it in case it could help. I was going to stick it on github bit I don't think they take spreadsheets. It's an openoffice .ods spreadsheet. Just to err on the side of caution I take no responsibility for it or how it is used.
RE: ABS with overhangs
Reading through the spreadsheet again, some of the Klicky parts aren't needed and I never updated it because I remained confused and concerned for some time after installing it - I felt like I was missing something because the instructions were confusing. I contacted the dev and he made some changes to the documentation so it may be easier to follow now. It works really well though so I'm happy with it.
I printed parts for the Revo Micro but ended up ditching it for and Dragon so both are in the spreadsheet.
I also never bothered with the PCB cover in the end. It didn't look like it was secured properly and didn't want it falling off.
I know that the file names include numbers and whether the part is an accent but there are some sections where the LDO build deviates slightly.
RE: ABS with overhangs
Getting close now.

Since this discussion took place, LDO came out with a set of modified Stealthburner/Clockwork2 parts that allow the use of the Afterburner/CW1 kit components with SB/CW2. For the time being I decided to go with the standard wiring setup and not try to mess with canbus. I need to install the firmware next, and besides that I am waiting for some ferrule connectors and a crimper to arrive so I can make the last connections between the hot end and the toolhead PCB.
RE: ABS with overhangs
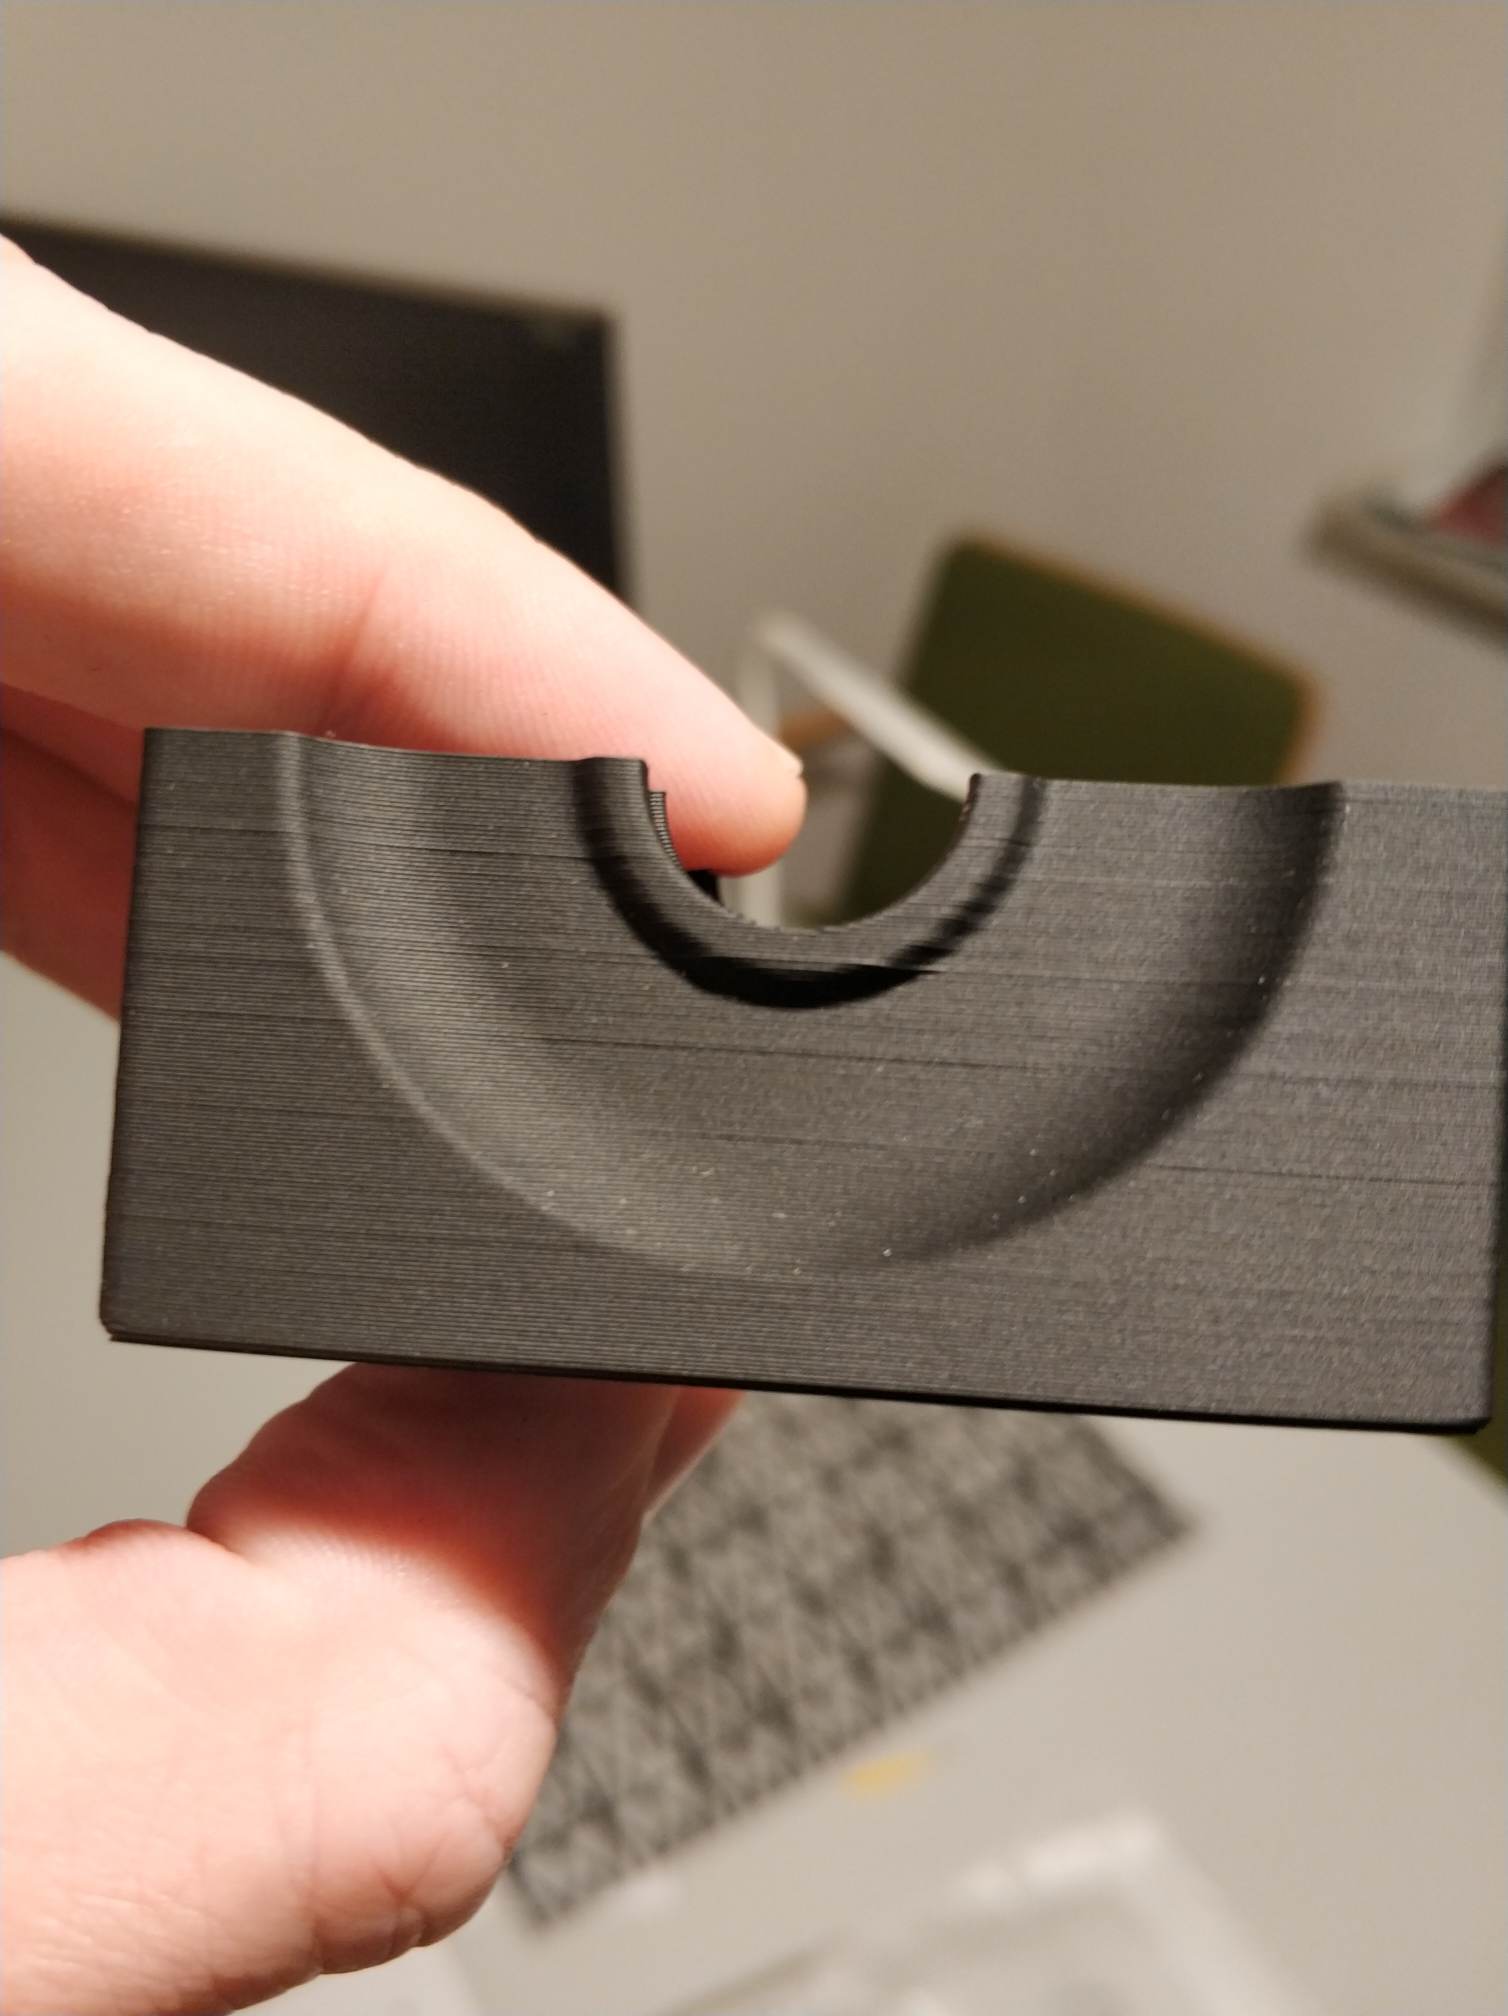
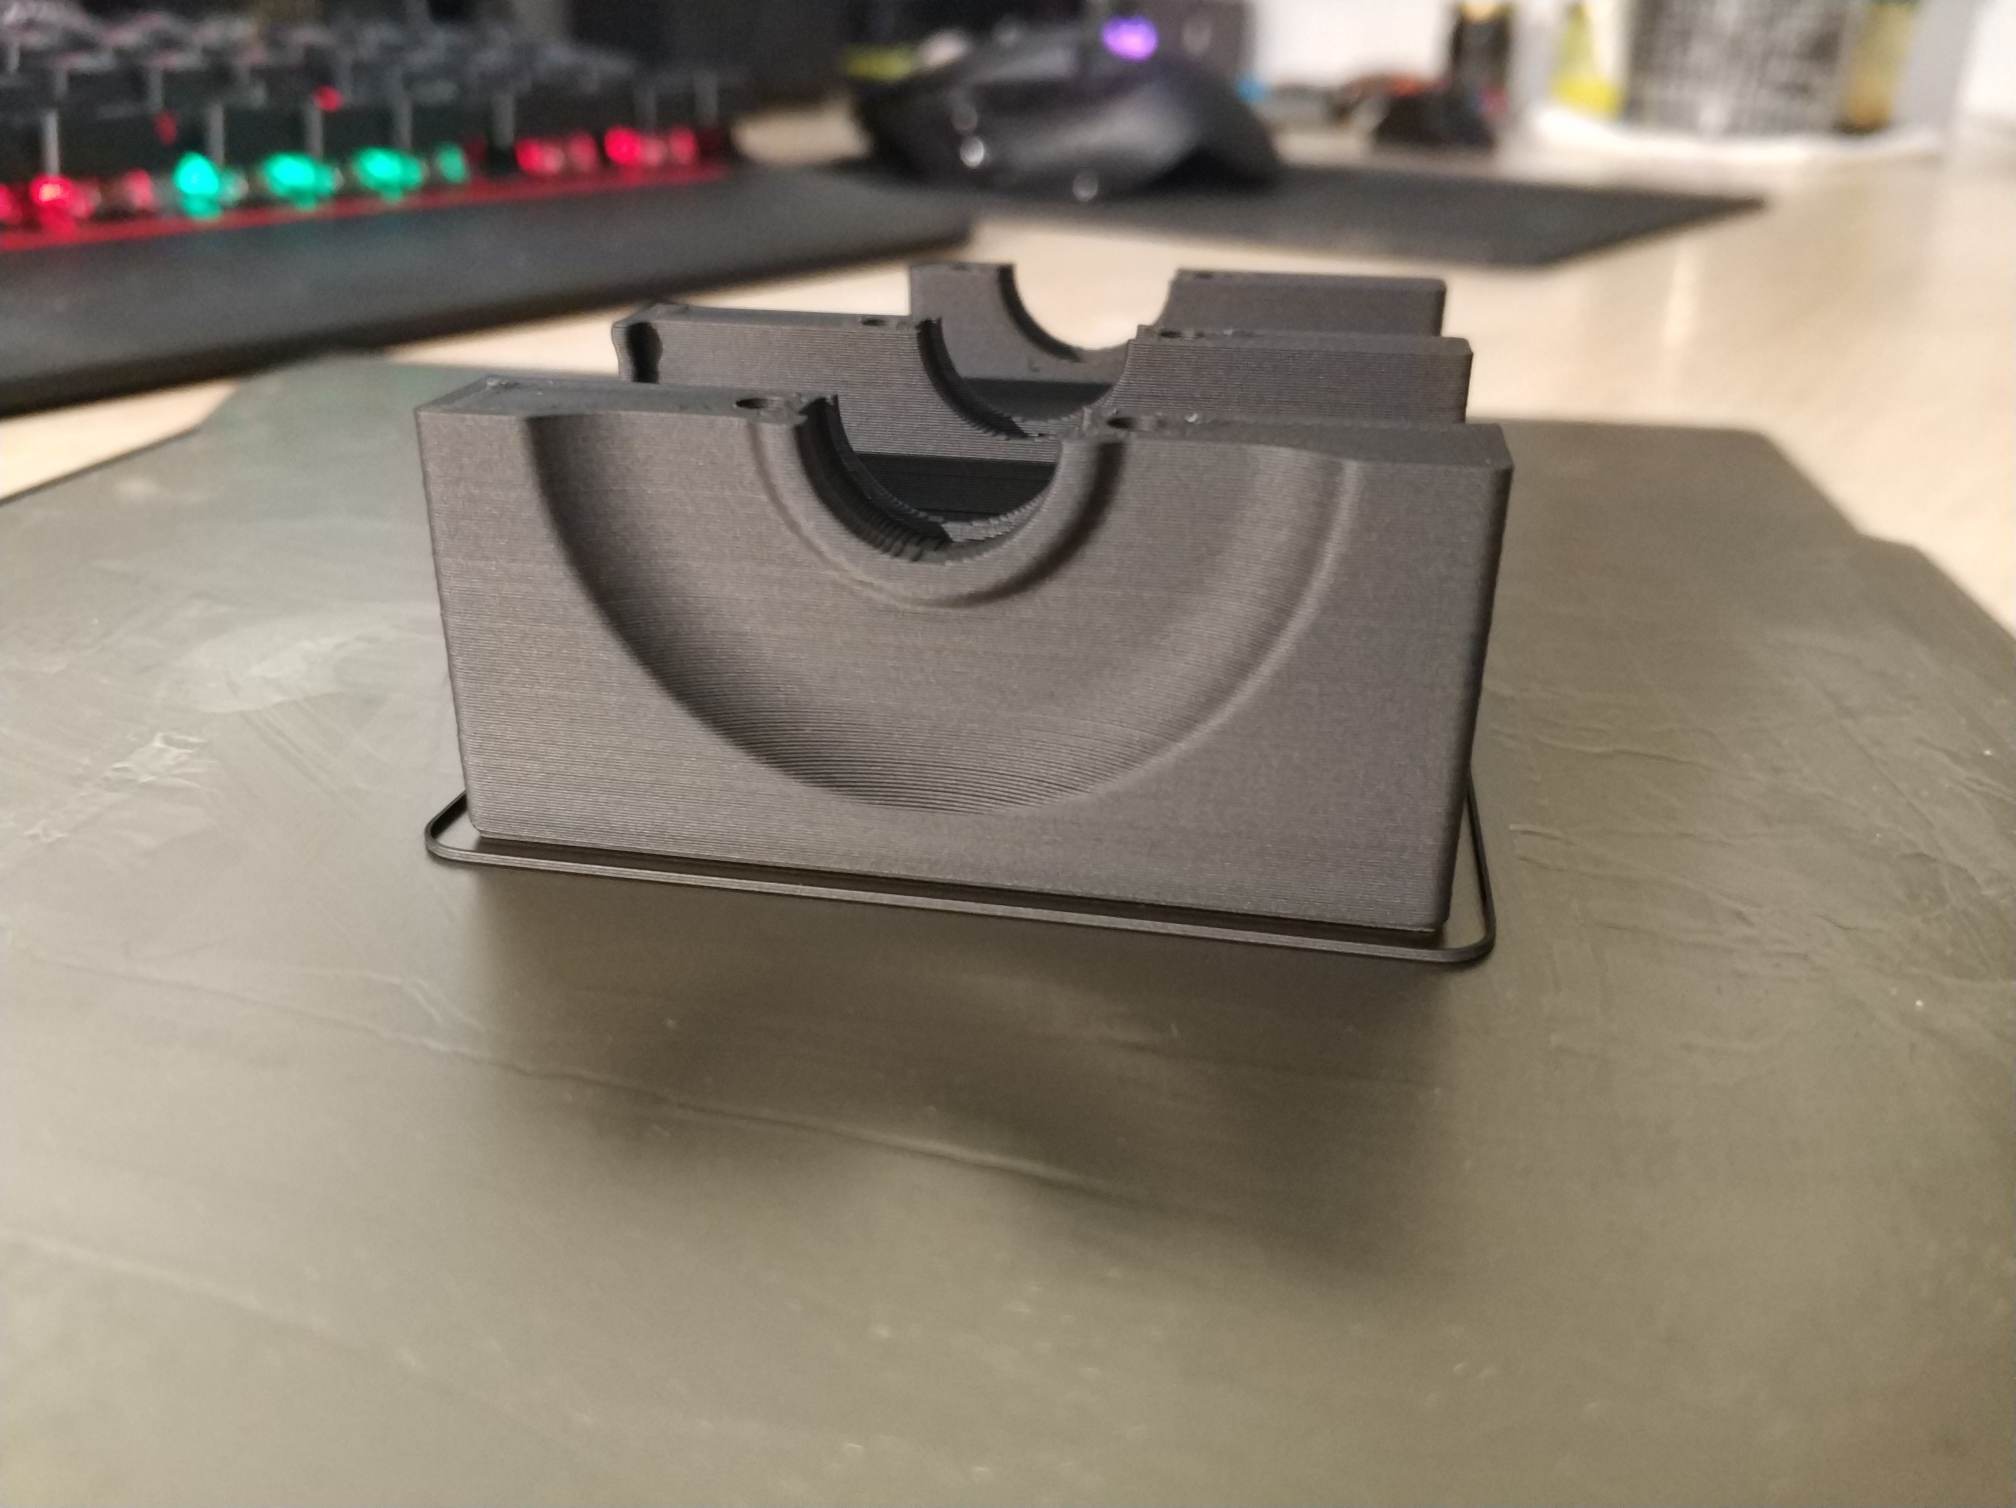
@thejiral, @netpackrat. And here is the before and after...
I pushed the speeds back up to default so the only difference is the cooling, and what a difference it has made. There's still room to tweak the very tip where the layer area is minimum, but I'm happy with this as a functional print so thanks all.

What cooling settings did you use to get this result? I have the same issue with my MK3S+ printing ABS.
Regards
RE:
^^ This part is one of the most challenging parts to print for a Voron.
For my part, I did not print it on my Mk3s but on my Voron 0.1. Personally I would recommend printing it very slow (if need be at snail speed, including infill) and then cranking up the cooling as much as you need to get the overhangs in order. In that order, as speed is only costing time but is not negatively impacting layer adhesion. While cooling does impact layer adhesion negatively. No matter what some tell you, the cooler your enclosure the more it does.
Mk3s MMU2s, Voron 0.1, Voron 2.4