When a print goes really bad
Caution: proceed only if you enjoy horror stories.
I've got an MK3S and an MK3S+. I've recently switched to ABS for some existing designs that will go outdoors.
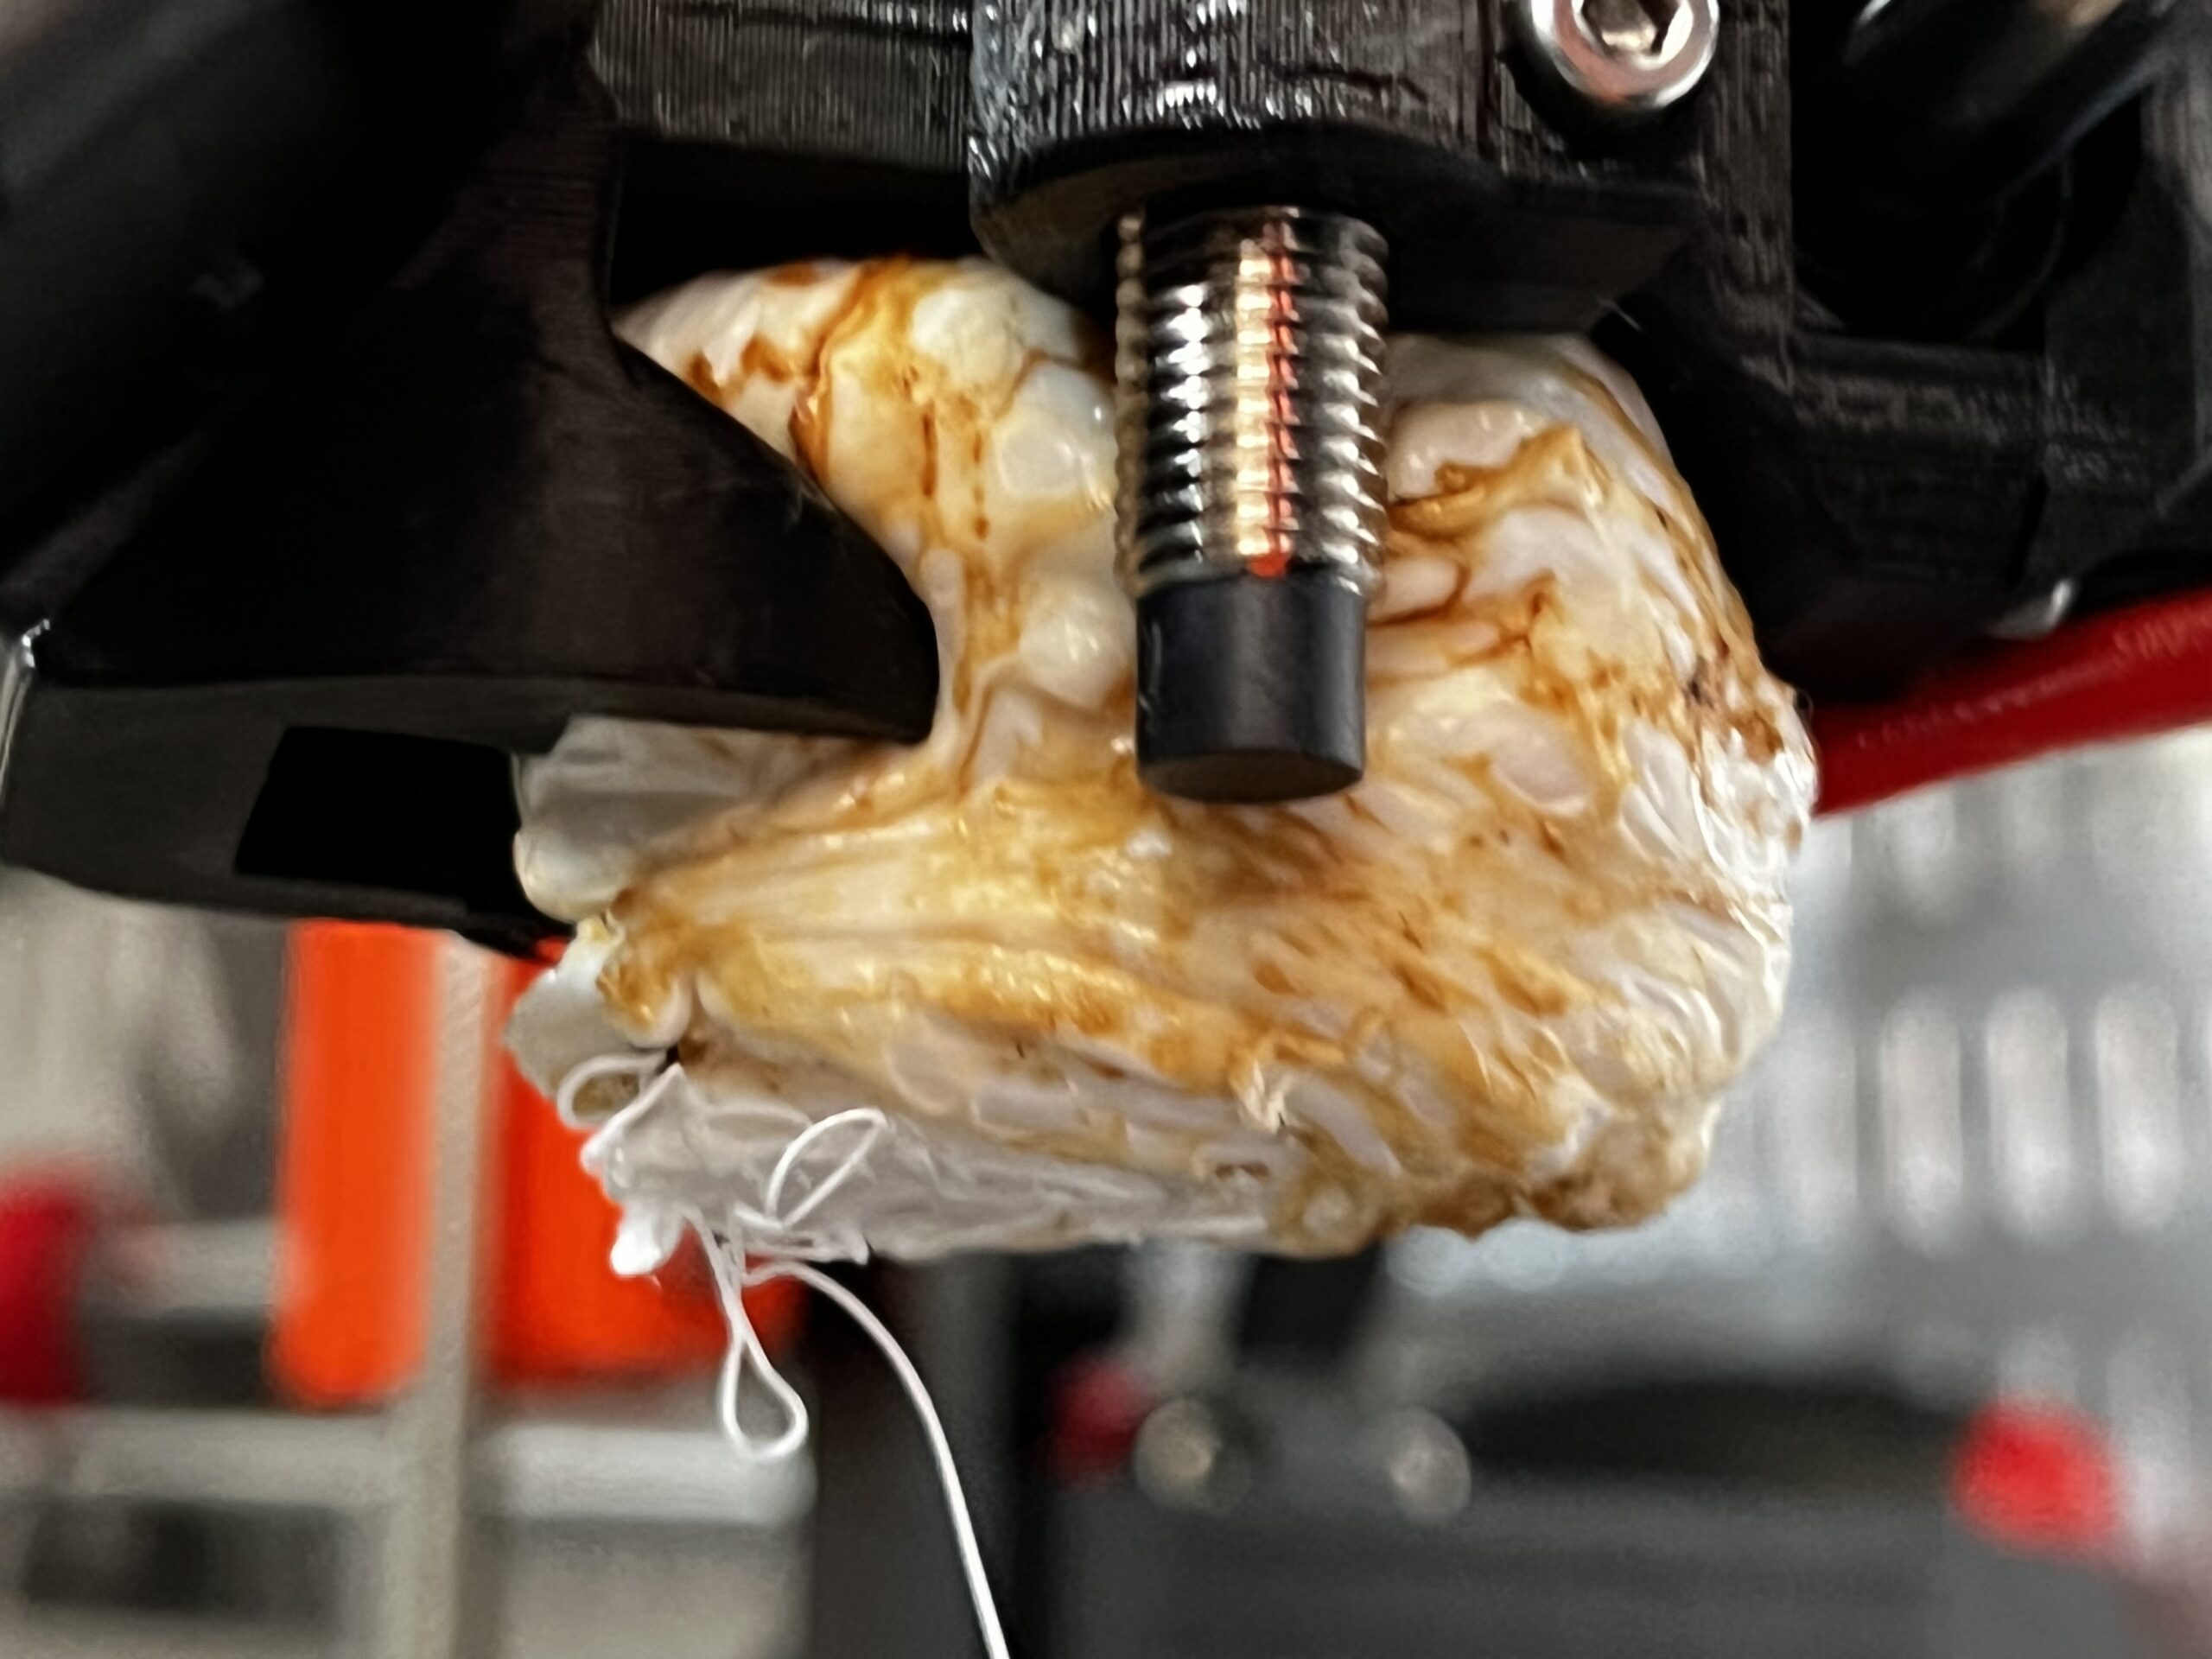
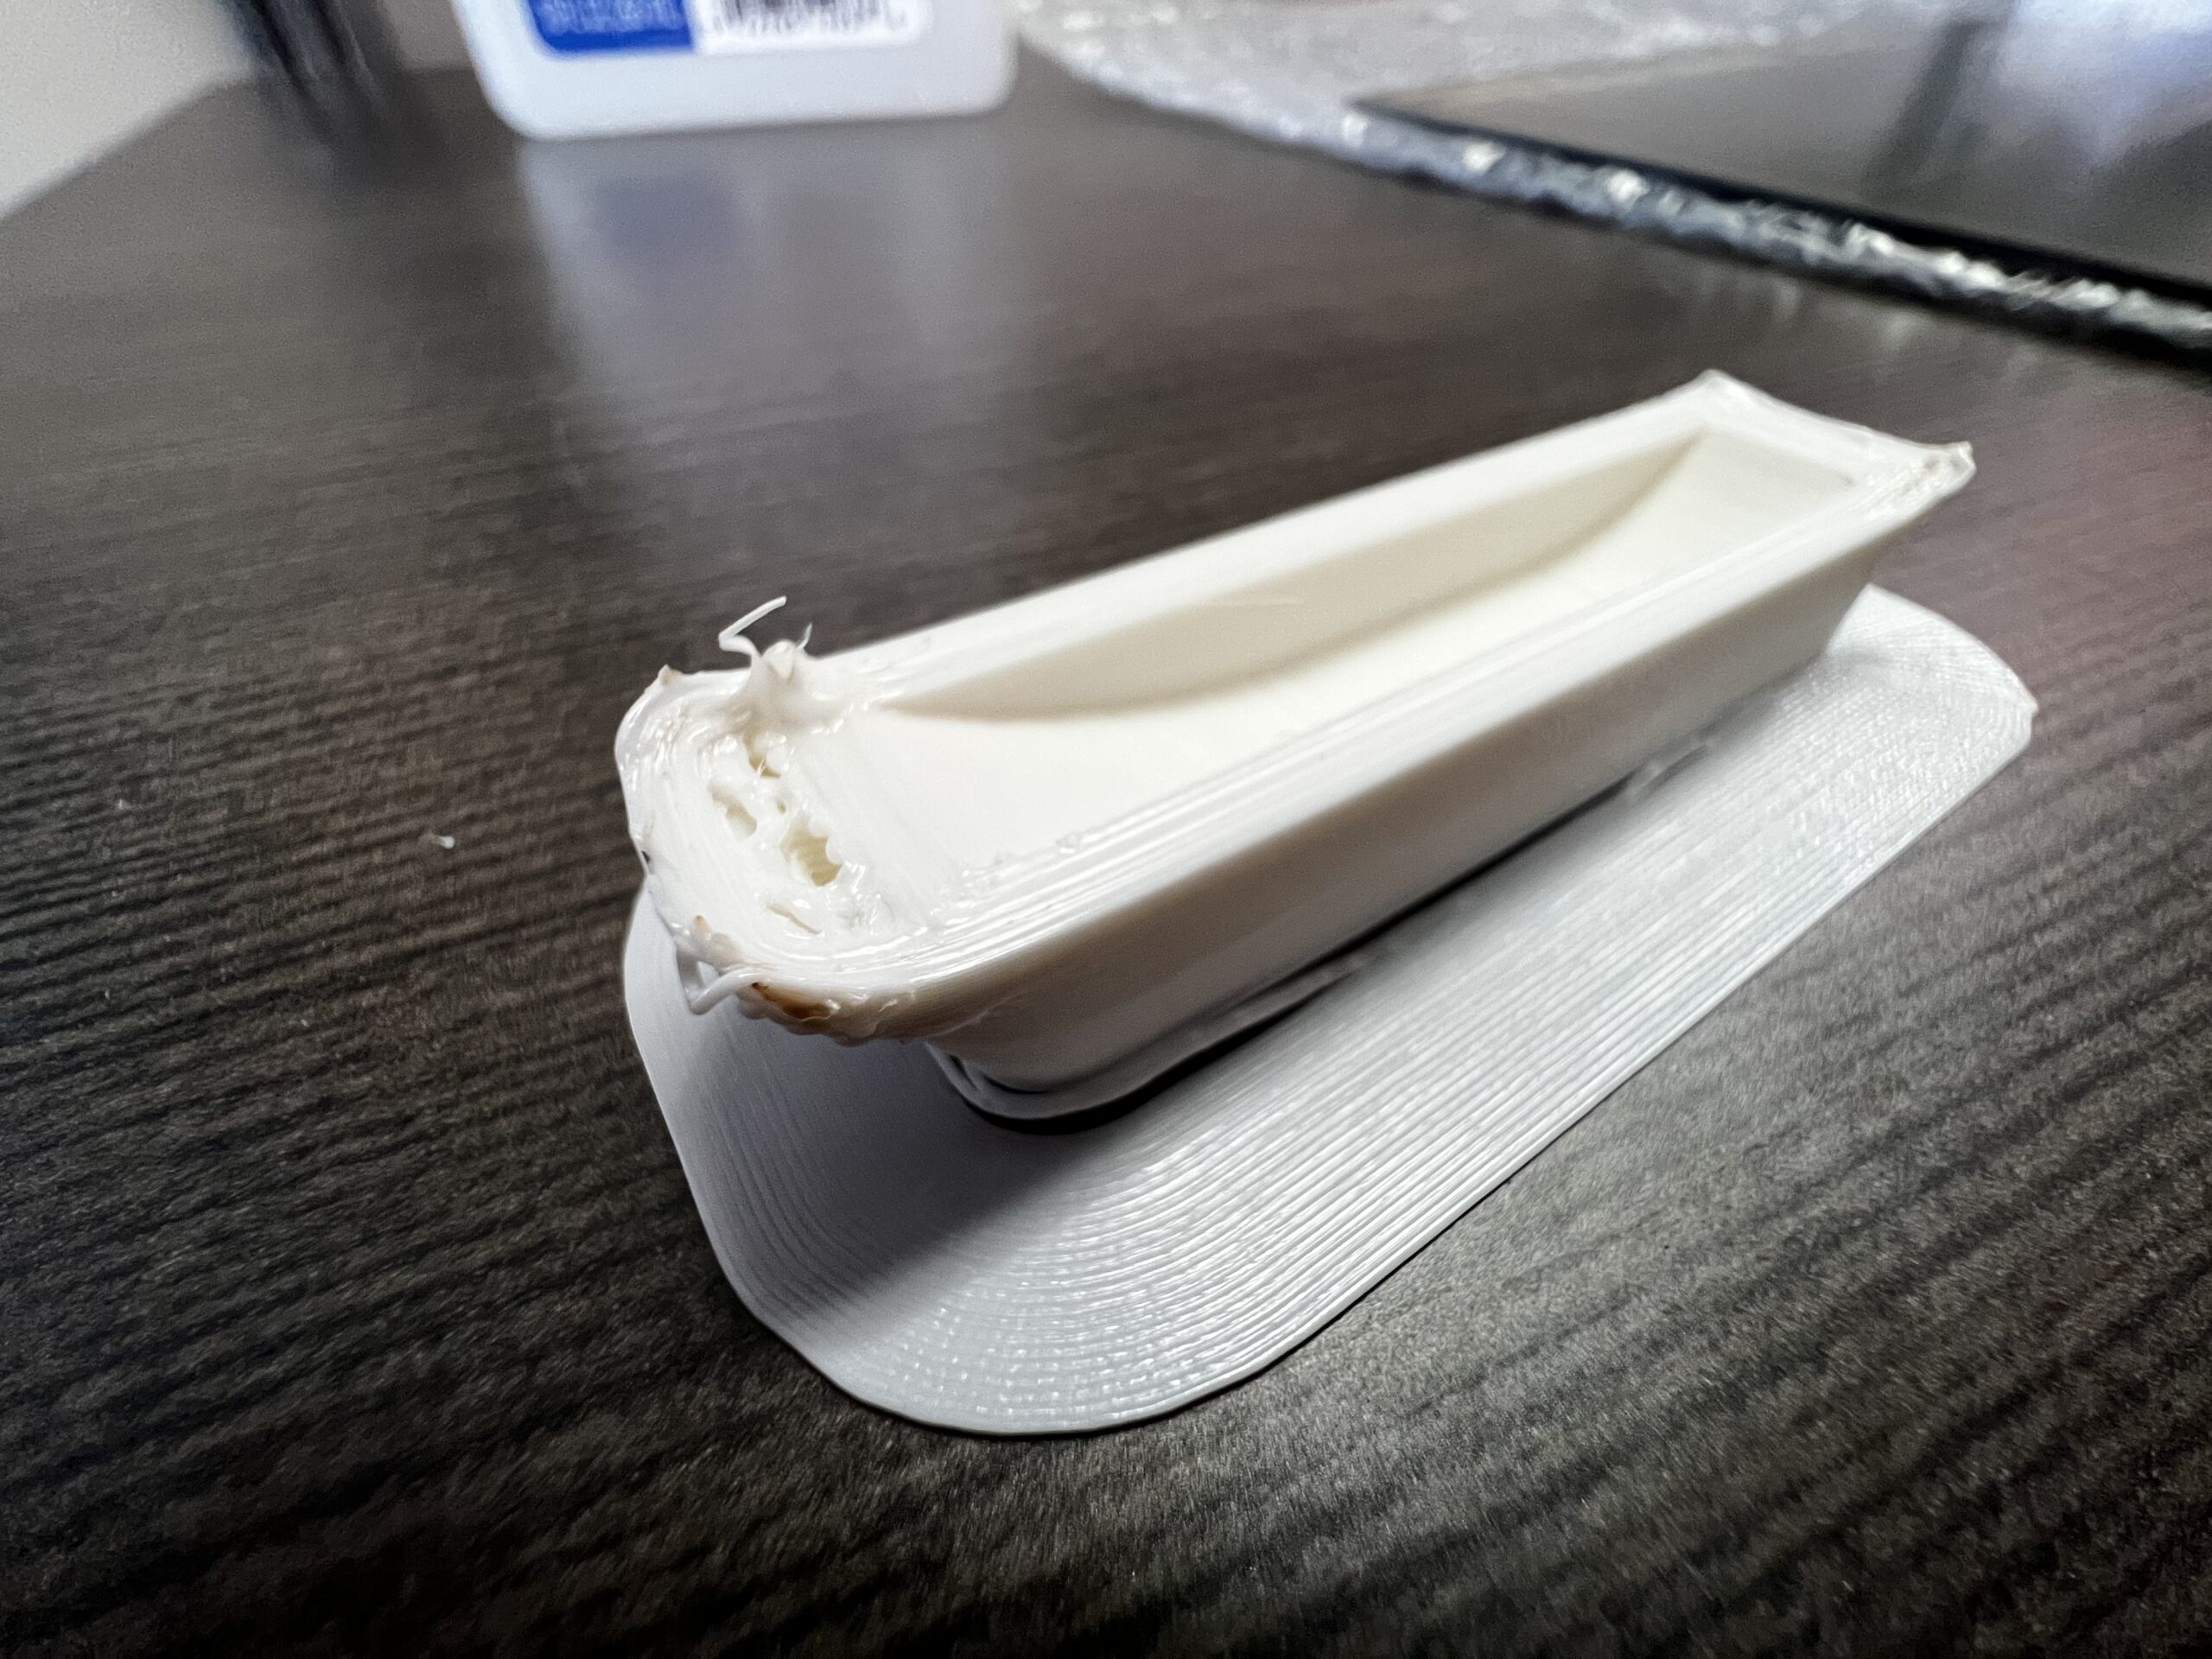
Using the MK3S+, I got through some fairly large (12+ hour ) prints without any problems. Then I kicked off a 14 hour overnight print, on a part with narrow walls (~2mm) at the bed. An hour in it was fine, but 8 hours later I woke to find it dry-rubbing the bed with the truly epic blob shown below. I'd guess a brim would take care of the problem, but I've already redesigned with 5mm walls.
I made almost no progress hacking the blob with cutters. I pulled the fans, but the lower fan shroud is locked in place. I'm sure the ABS has encased the heater block, so I assume I'll need to completely disassemble the extruder. I can do it, I built my MK3S from a kit. I still have the manual, I just need some Haribo Goldbears. Maybe two packs.
Before I go down that route, I'd like any advice or shortcuts to make this easier. In theory the entire blob was heated to its amorphous state by the extruder, would it be worth pre-heating it until it releases a bit? Maybe with some help from a heat gun? Should I go ahead and order a replacement heat block, or any other parts?

Best Answer by Diem:
You have a first class blob of doom. Search for blob of doom to see how others have dealt with them.
Before doing anything, look at pictures of a clean extruder and note the position of the rather delicate wires that are currently hidden, if you damage them you will have to buy replacement parts as broken wires can't be rejoined.
You have probably damaged your fan shroud and will need a replacement.
[Newcomers reading this: You should monitor your first few prints until you have made certain of your first layer calibration, in a week or so all will be working smoothly and leaving the printer running will be OK.]
To remove it:
Raise the nozzle temperature to the printing temperature for the filament in question and allow it to heat for several minutes.
If you are lucky you will be able to prise the blob open - more likely you will need to add heat from outside with a heat gun to aid the softening, sometimes it's worth using a soldering iron to carve chunks off the mass.
Use needle nosed pliers to prise this away; remove it in parts if it won't release the wires.
Once you have the worst removed you decide whether you need to disassemble the extruder to get at all the blob of perhaps you can clean up in situ.
After the cleanup there will be overcooked filament inside the nozzle so at least a purge and probably a cold-pull will be necessary.
Cheerio,
RE: When a print goes really bad
Thanks, now I know the correct terminology. The search worked best with just "doom". I guess I'll not reach "Noble Member" anytime soon after this. Is there a "Doom Blobber" status?
You're right, I don't see any way to release the wires from Mr Blob when he is cold. That's even if I managed to take the thing apart. I've got an old iron tip and a heat gun, so I'll give it a go later today and report back.
RE: When a print goes really bad
It worked great, the blob turned to taffy after about 10 minutes of 255C at the extruder.
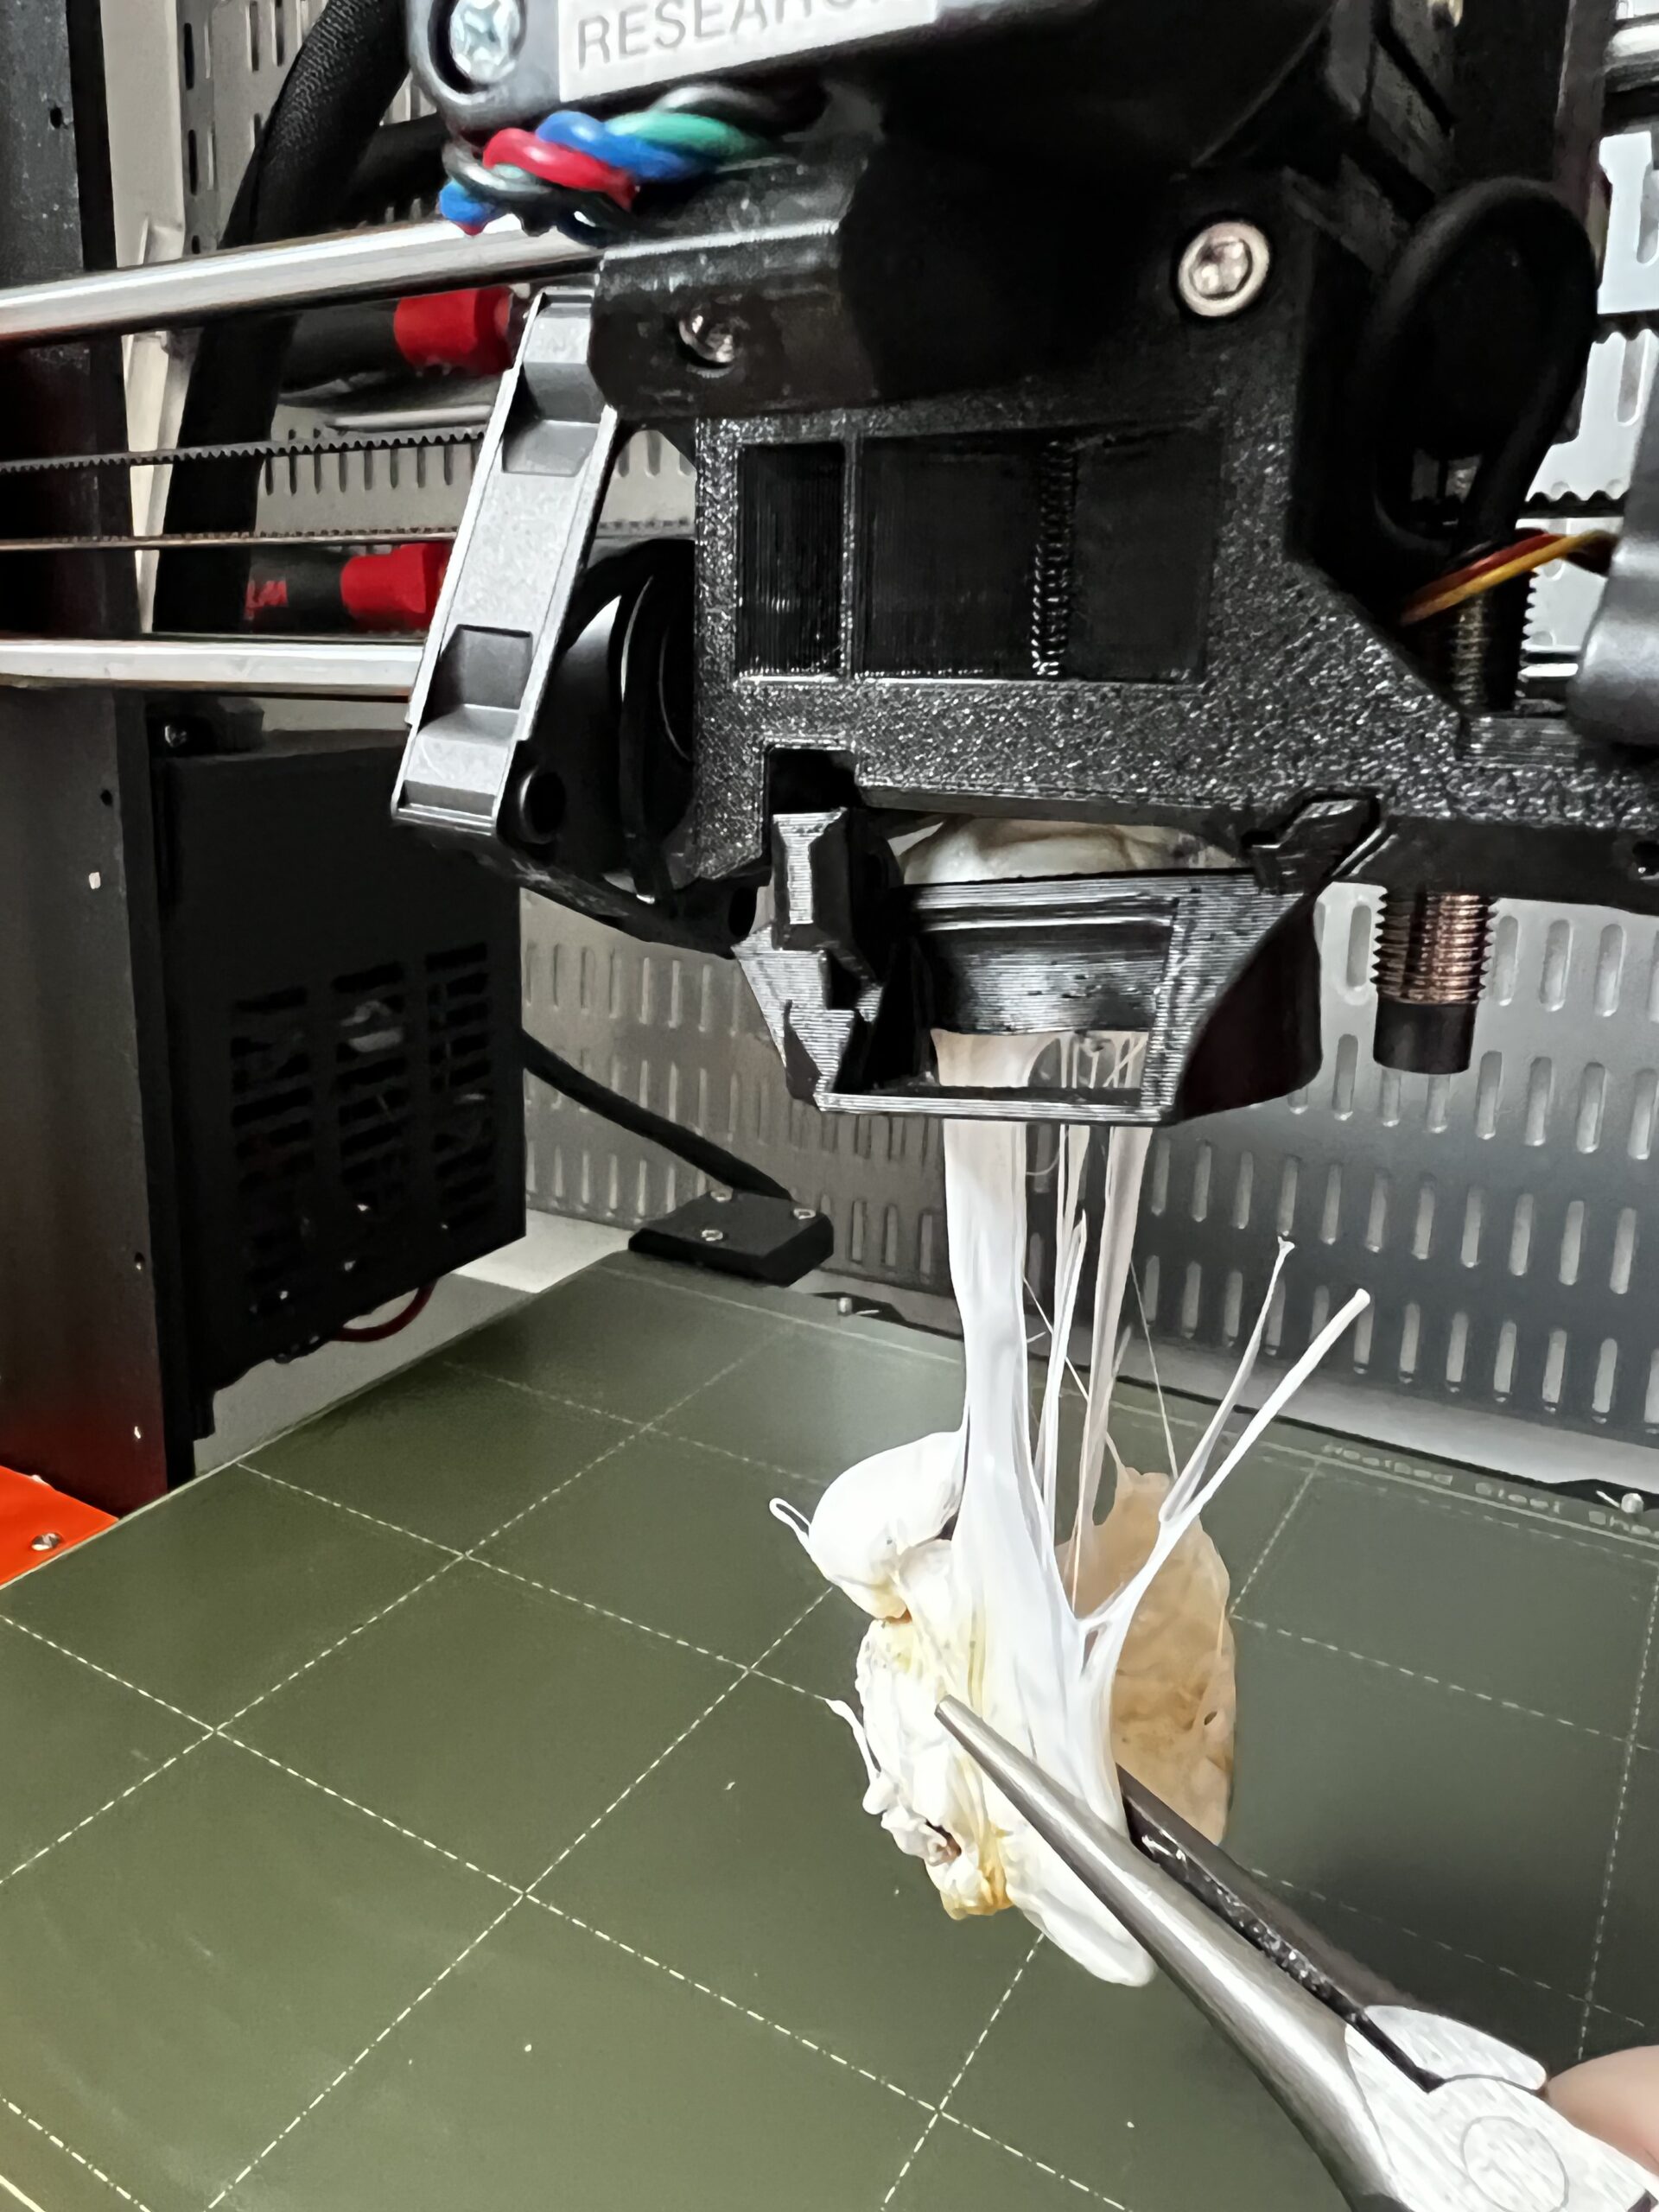
I kinked one of the thermistor wires, but I think it's OK.

As you predicted, the fan shroud needs replacing. The outlet ports warped partially closed. I clipped them open for now, I'll print a new one tomorrow.
I did a cold pull and it looked OK. Then I reloaded ABS and ran quite a bit of filament through before proceeding.
Here's my first layer calibration, I tweaked it up and down but ended where I started. I guess none of the geometry changed.
Thanks a lot, total disaster was avoided, and I only lost a few hours in the process.
RE: When a print goes really bad
If I'm honest your z looks a bit of to me, the general recommendation here is to just use the built in tool to get a rough idea and then proceed as described here: https://forum.prusa3d.com/forum/original-prusa-i3-mk3s-mk3-assembly-and-first-prints-troubleshooting/life-adjust-z-my-way/
Best possible first layer improves adhesion and thus reduces warping and thus reduces the risk of blobs of doom 🙂
RE: When a print goes really bad
I've got an underlying problem that started before the blob. When I squish the first layer, it gets messy. There's a bit of wandering x or y. I tried searching for "jitter" and "squiggle", is there a technical term like "blob of doom" for this?
I'll try the general suggestions from this post on print quality: https://forum.prusa3d.com/forum/original-prusa-i3-mk3s-mk3-assembly-and-first-prints-troubleshooting/bad-quality-over-time/#post-287809

RE: When a print goes really bad
When I started getting the random rough parts in the flat first layer calibration, it was because my PLA had absorbed moisture. I know you said you print with ABS - So not sure if that can be the case there. Do you have another fresh ABS spool you can try with, just to rule out an issue with what you're using? At least then you'll know if it's a printer config, or a filament issue.
When I squish the first layer, it gets messy.
Your first layer Z calibration is a little too low, the nozzle is plowing through the exudate and scraping off a fraction of the layer to build the start of a new blob...
Cheerio,
RE: When a print goes really bad
See below for the best I've gotten using 0.005 mm steps. This printer was factory built and calibrated. The original z offset was -1.34mm, can the 0.11mm change be attributed to higher ABS print temperatures? Should I re-run live-z after changing materials?
I went through the checklist from the quality post above, all was good but it felt like a worthwhile exercise.

That looks much better.
Remember, each print sheet has it's own particular thickness. The nozzle wears over time and the offset changes, usually quite slowly; for example:
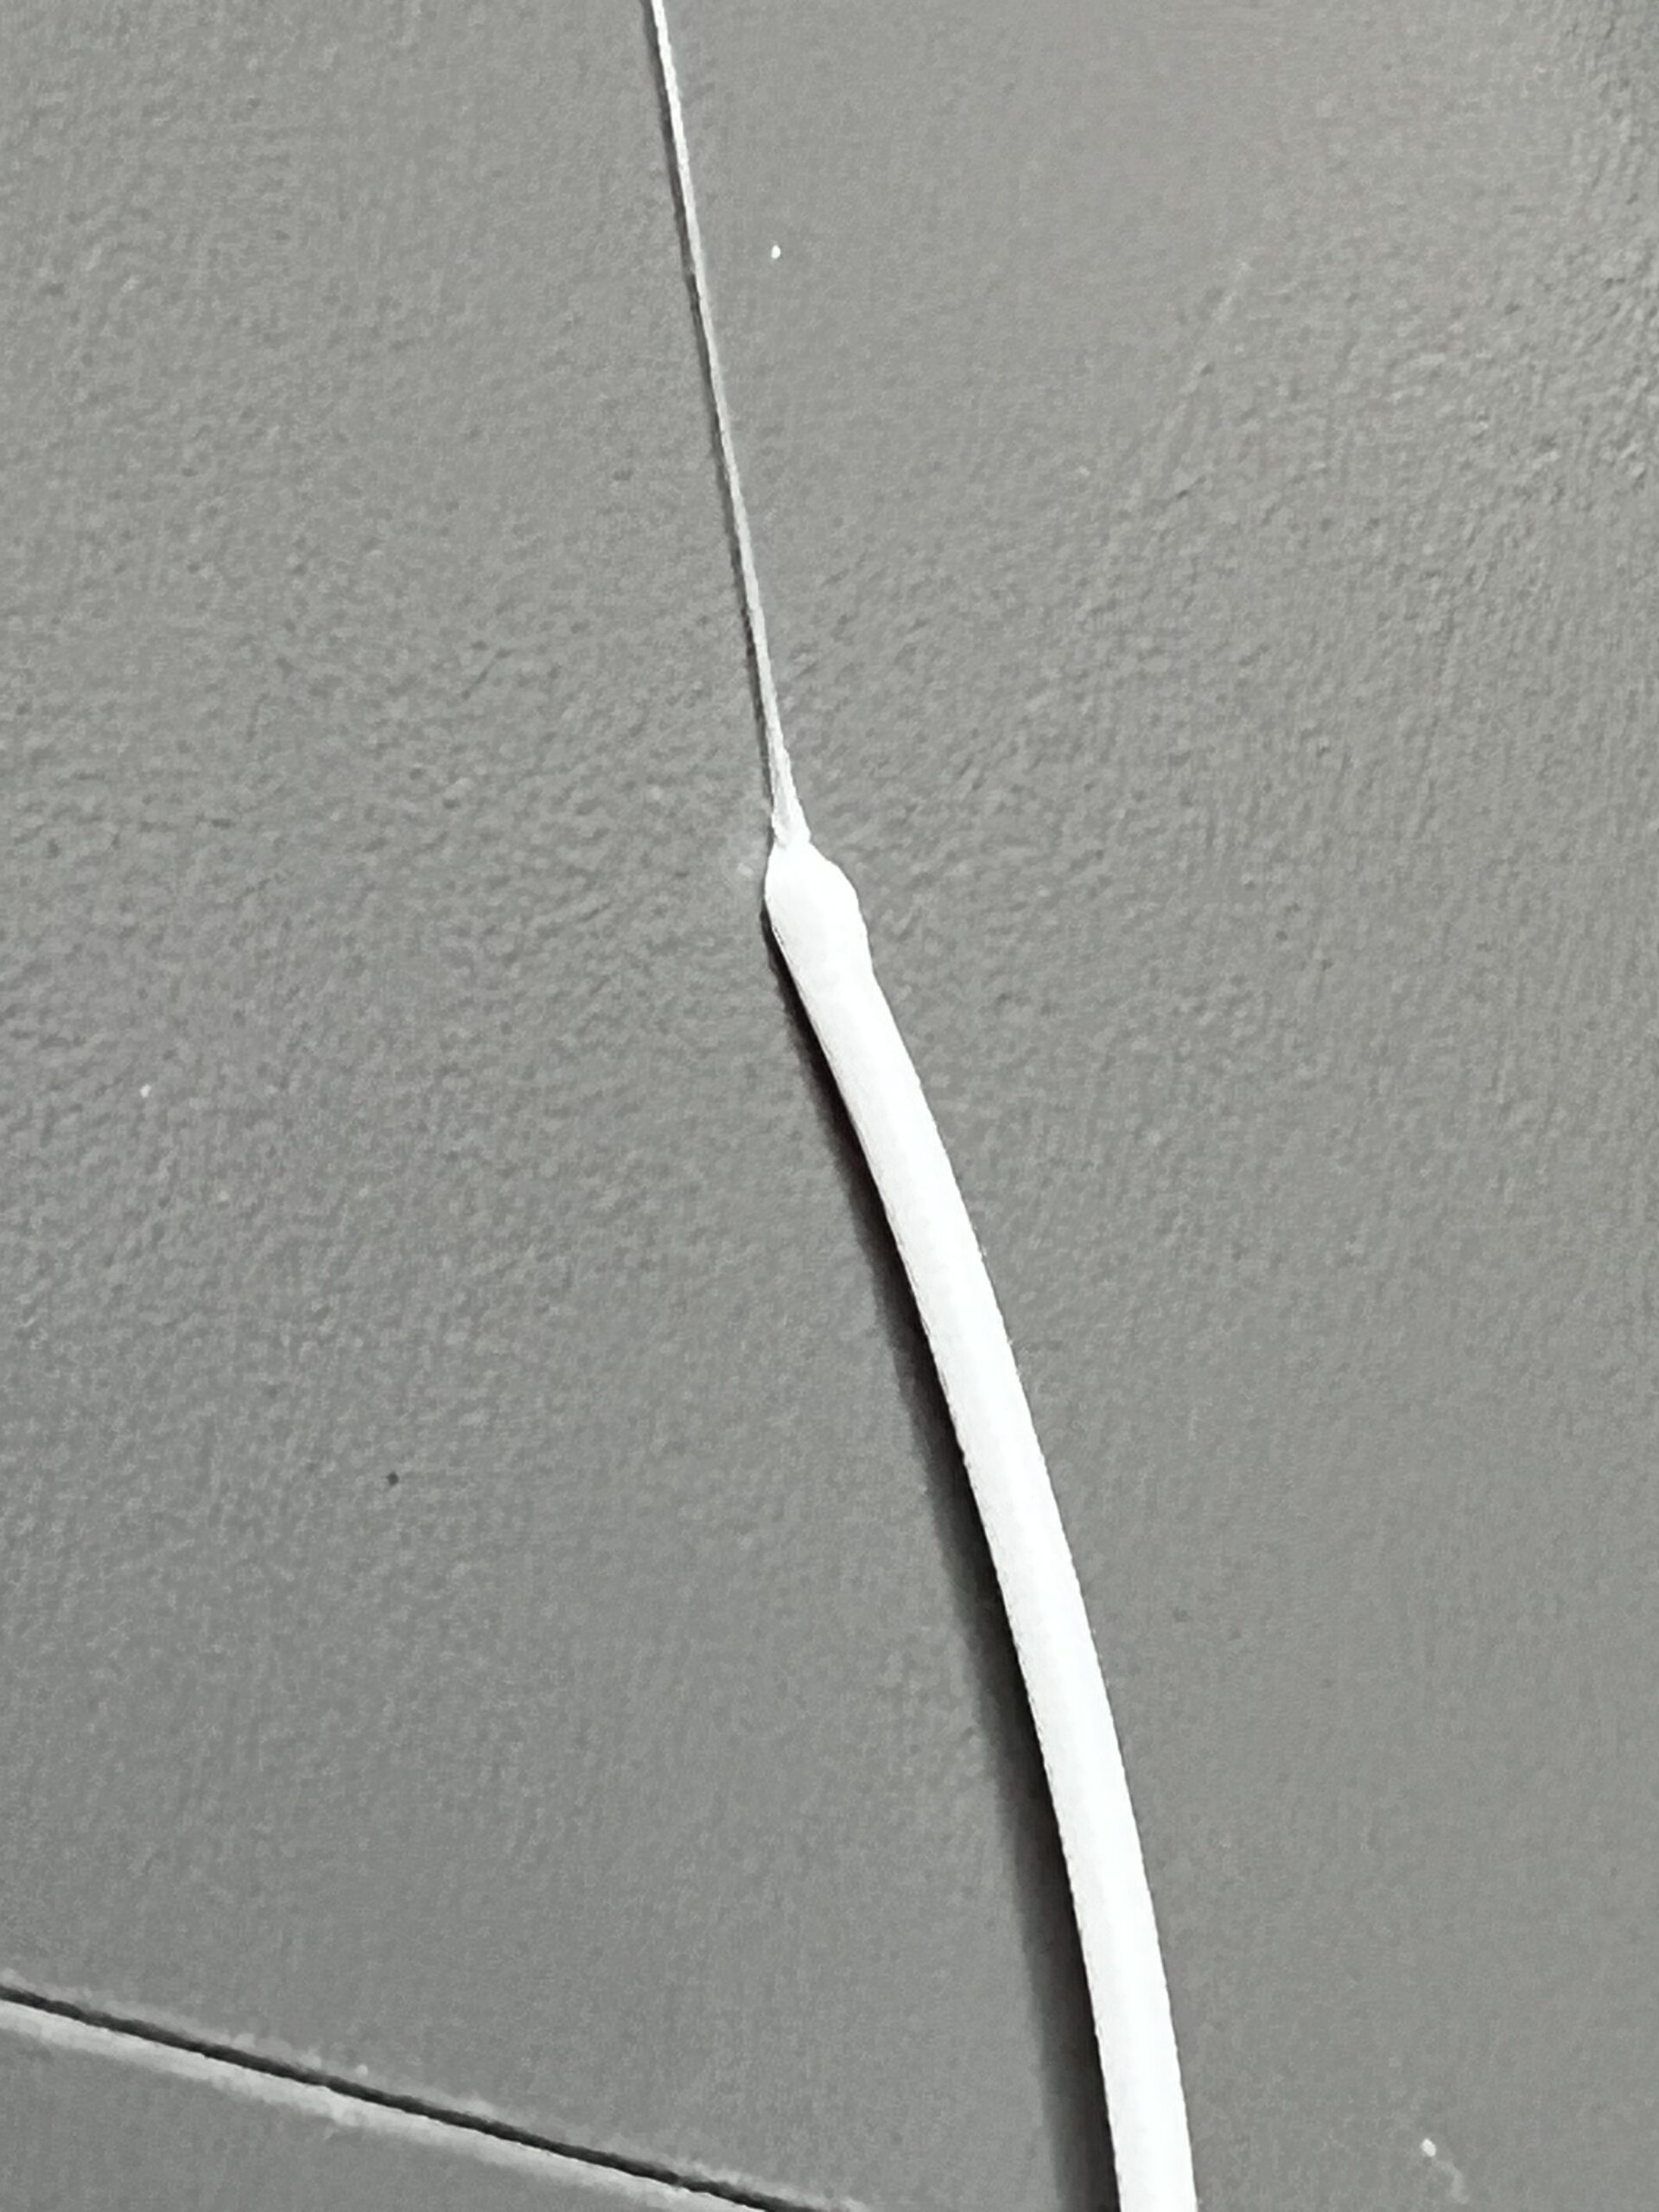
Instead of using hardened nozzles for glow-in-the-dark filament I sometimes reinstall used brass nozzles that are old but still good enough for very basic printing - just to get the last drop of value for money out of them. GitD is not very abrasive and you can push at least a spool through an old nozzle before it is completely useless ...
The other day I refitted an old nozzle and got a first layer offset of -0.745. After printing a few parts for night use I needed to print some copper filled filament and knowing there wasn't much to print I engaged my inherent laziness and didn't change the nozzle. After printing about 150g of copperfill I returned to the GitD - and the first print failed. So I ran another first layer calibration and got a new value of -0.817
This is an extreme case but it demonstrates that first-layer offsets change as nozzles wear in use - and that copperfill really needs a hardened nozzle.
Cheerio,
RE: When a print goes really bad
Another factor to consider is that the thickness of the PEI layer of the steel plate isn't always perfectly even. The Superpinda can't do nothing about this because it senses only metal and a few microns make a difference on the smoothness and adherence of the first layer. That's what the 'bed level correction' tab of the calibration menu is used for. You can enter slight corrections for Front, Rear, Right and Left to compensate for possible PEI layer imperfections.
RE: When a print goes really bad
Now might be a good time to order spare heater and thermistor...
I try to keep spares on hand in case I damage the originals.
I use a soldering iron to cut the excess blob off the wiring side of the heat block if I get a bad blob.
you can print a PETG part cooling Fan shroud, without a part cooling fan shroud
regards Joan
I try to make safe suggestions,You should understand the context and ensure you are happy that they are safe before attempting to apply my suggestions, what you do, is YOUR responsibility.Location Halifax UK
RE: When a print goes really bad
I decided this was still Blob of Doom aftermath, but if it goes much further I'll start a new thread (or threads). I appreciate the help.
Now might be a good time to order spare heater and thermistor...
I'll do that. Burnt goobers are still dropping so there is probably a mini-blob stuck up there someplace. If I'm going to rip it apart I might as well start clean. Plus I did crimp the thermistor wire a bit.
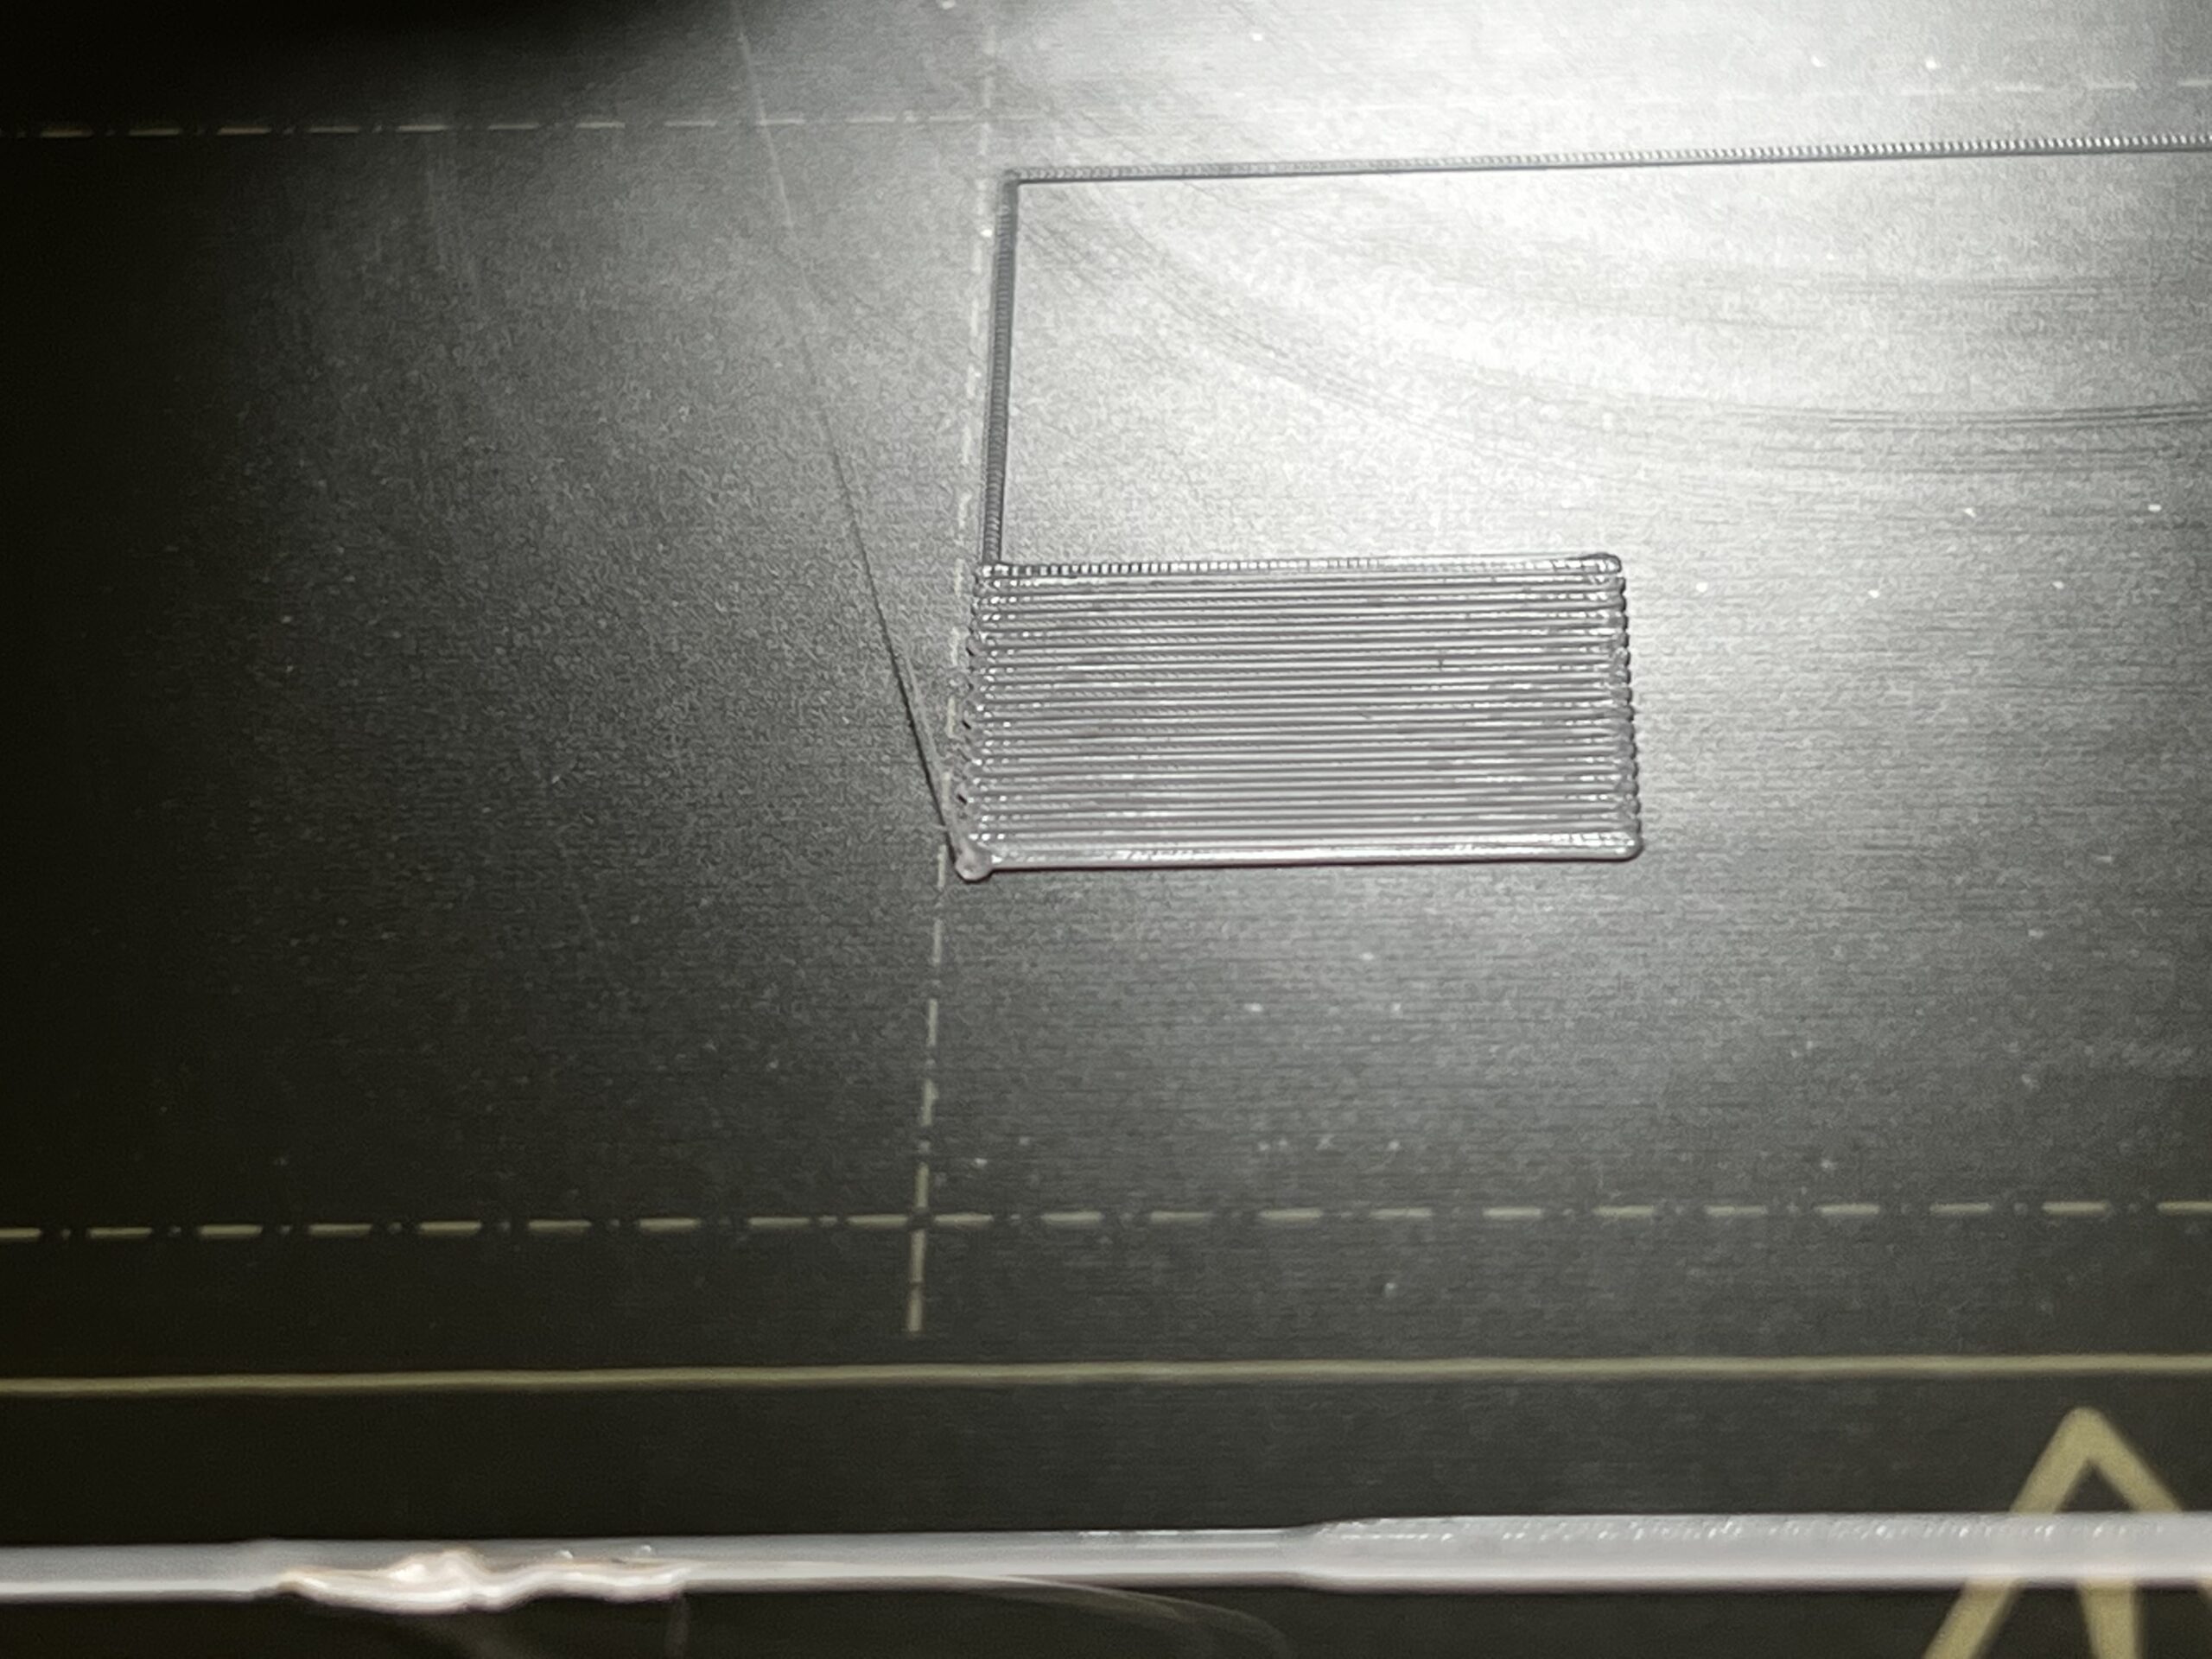
The first layer of the print below started OK, although I didn't watch the entire time. When I returned I saw the rough spots at the lower right. There are brown specs in that area that you can't see in the picture. When that big brown blob dropped at mid-right I stopped the print.
For chuckles I'll try heat soaking for a while then print the same file.
RE: When a print goes really bad
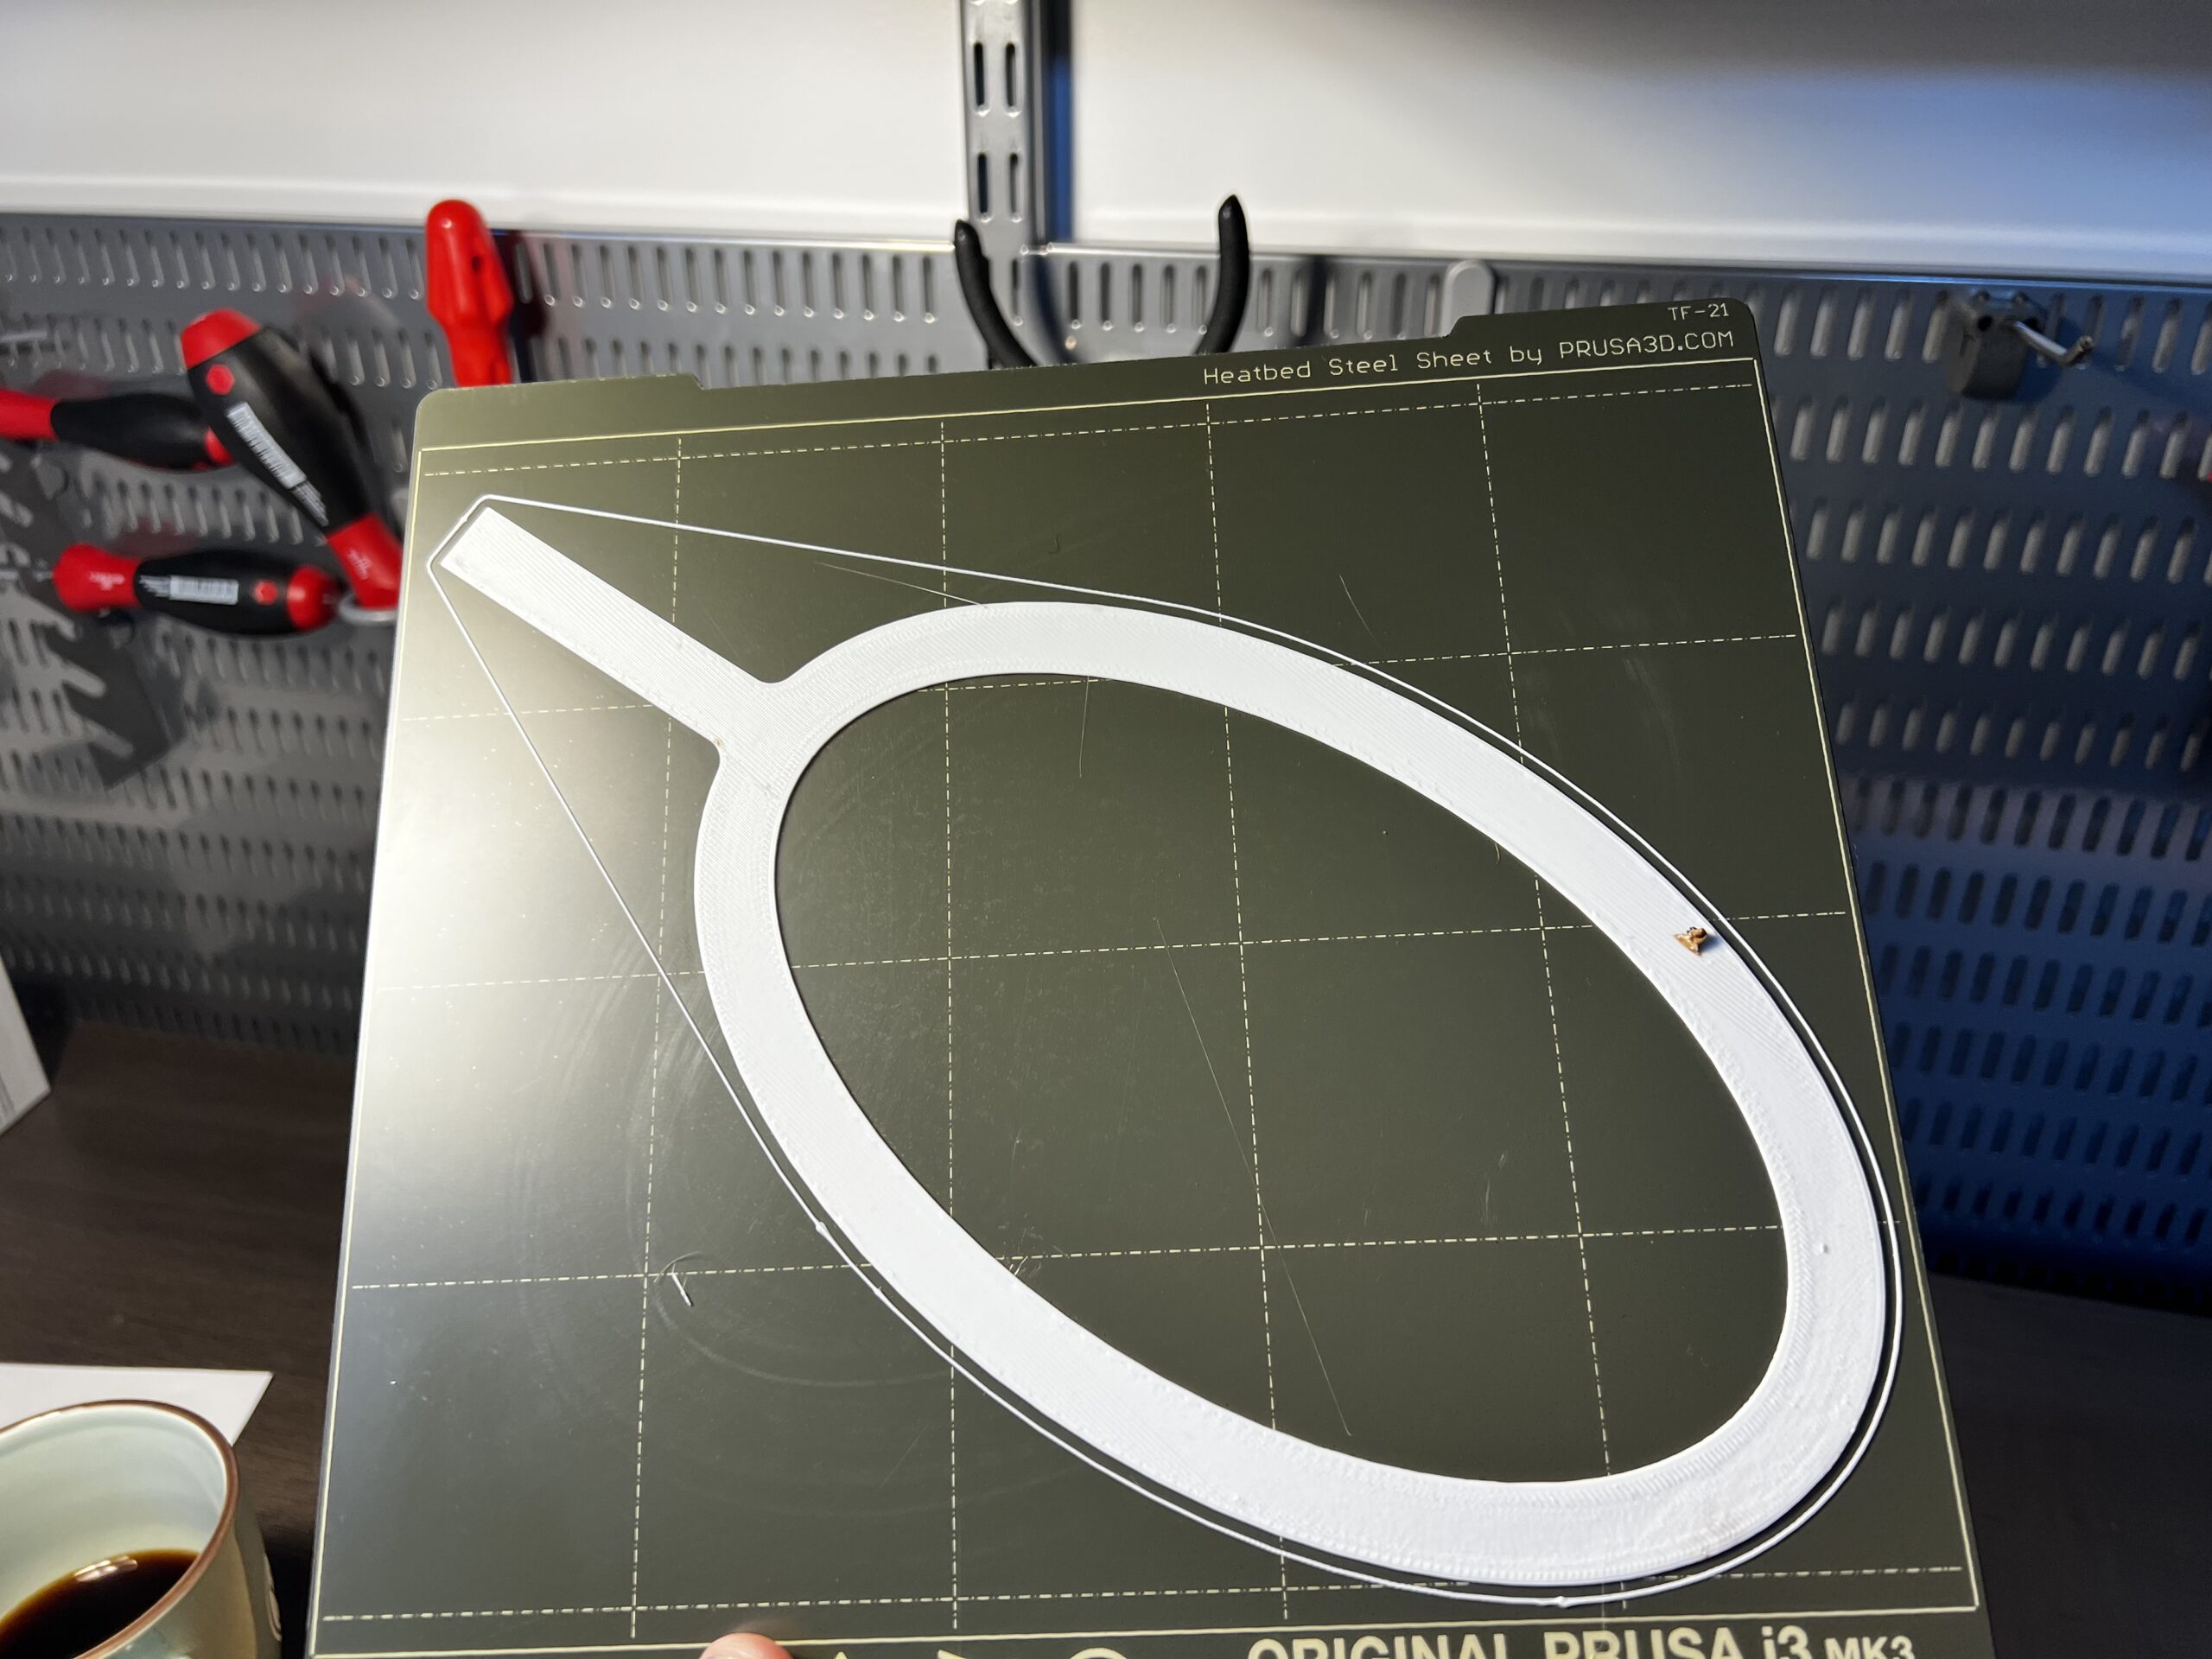
I didn't get any more burnt blob, but the same rough spots appeared. I watched the entire first layer and it was obvious the corners were too squished (see below). I live adjusted to a compromise and once the second layer went down it appears to be going well. So the bed corners are high, even after XYZ calibration and live Z adjustment (on a centered pattern). Sounds like a PEI problem.
The printer claims it has extruded 1.7km of filament and I've never changed the bed cover. I'll search the forum for preventative maintenance and start a new thread if I've got questions.
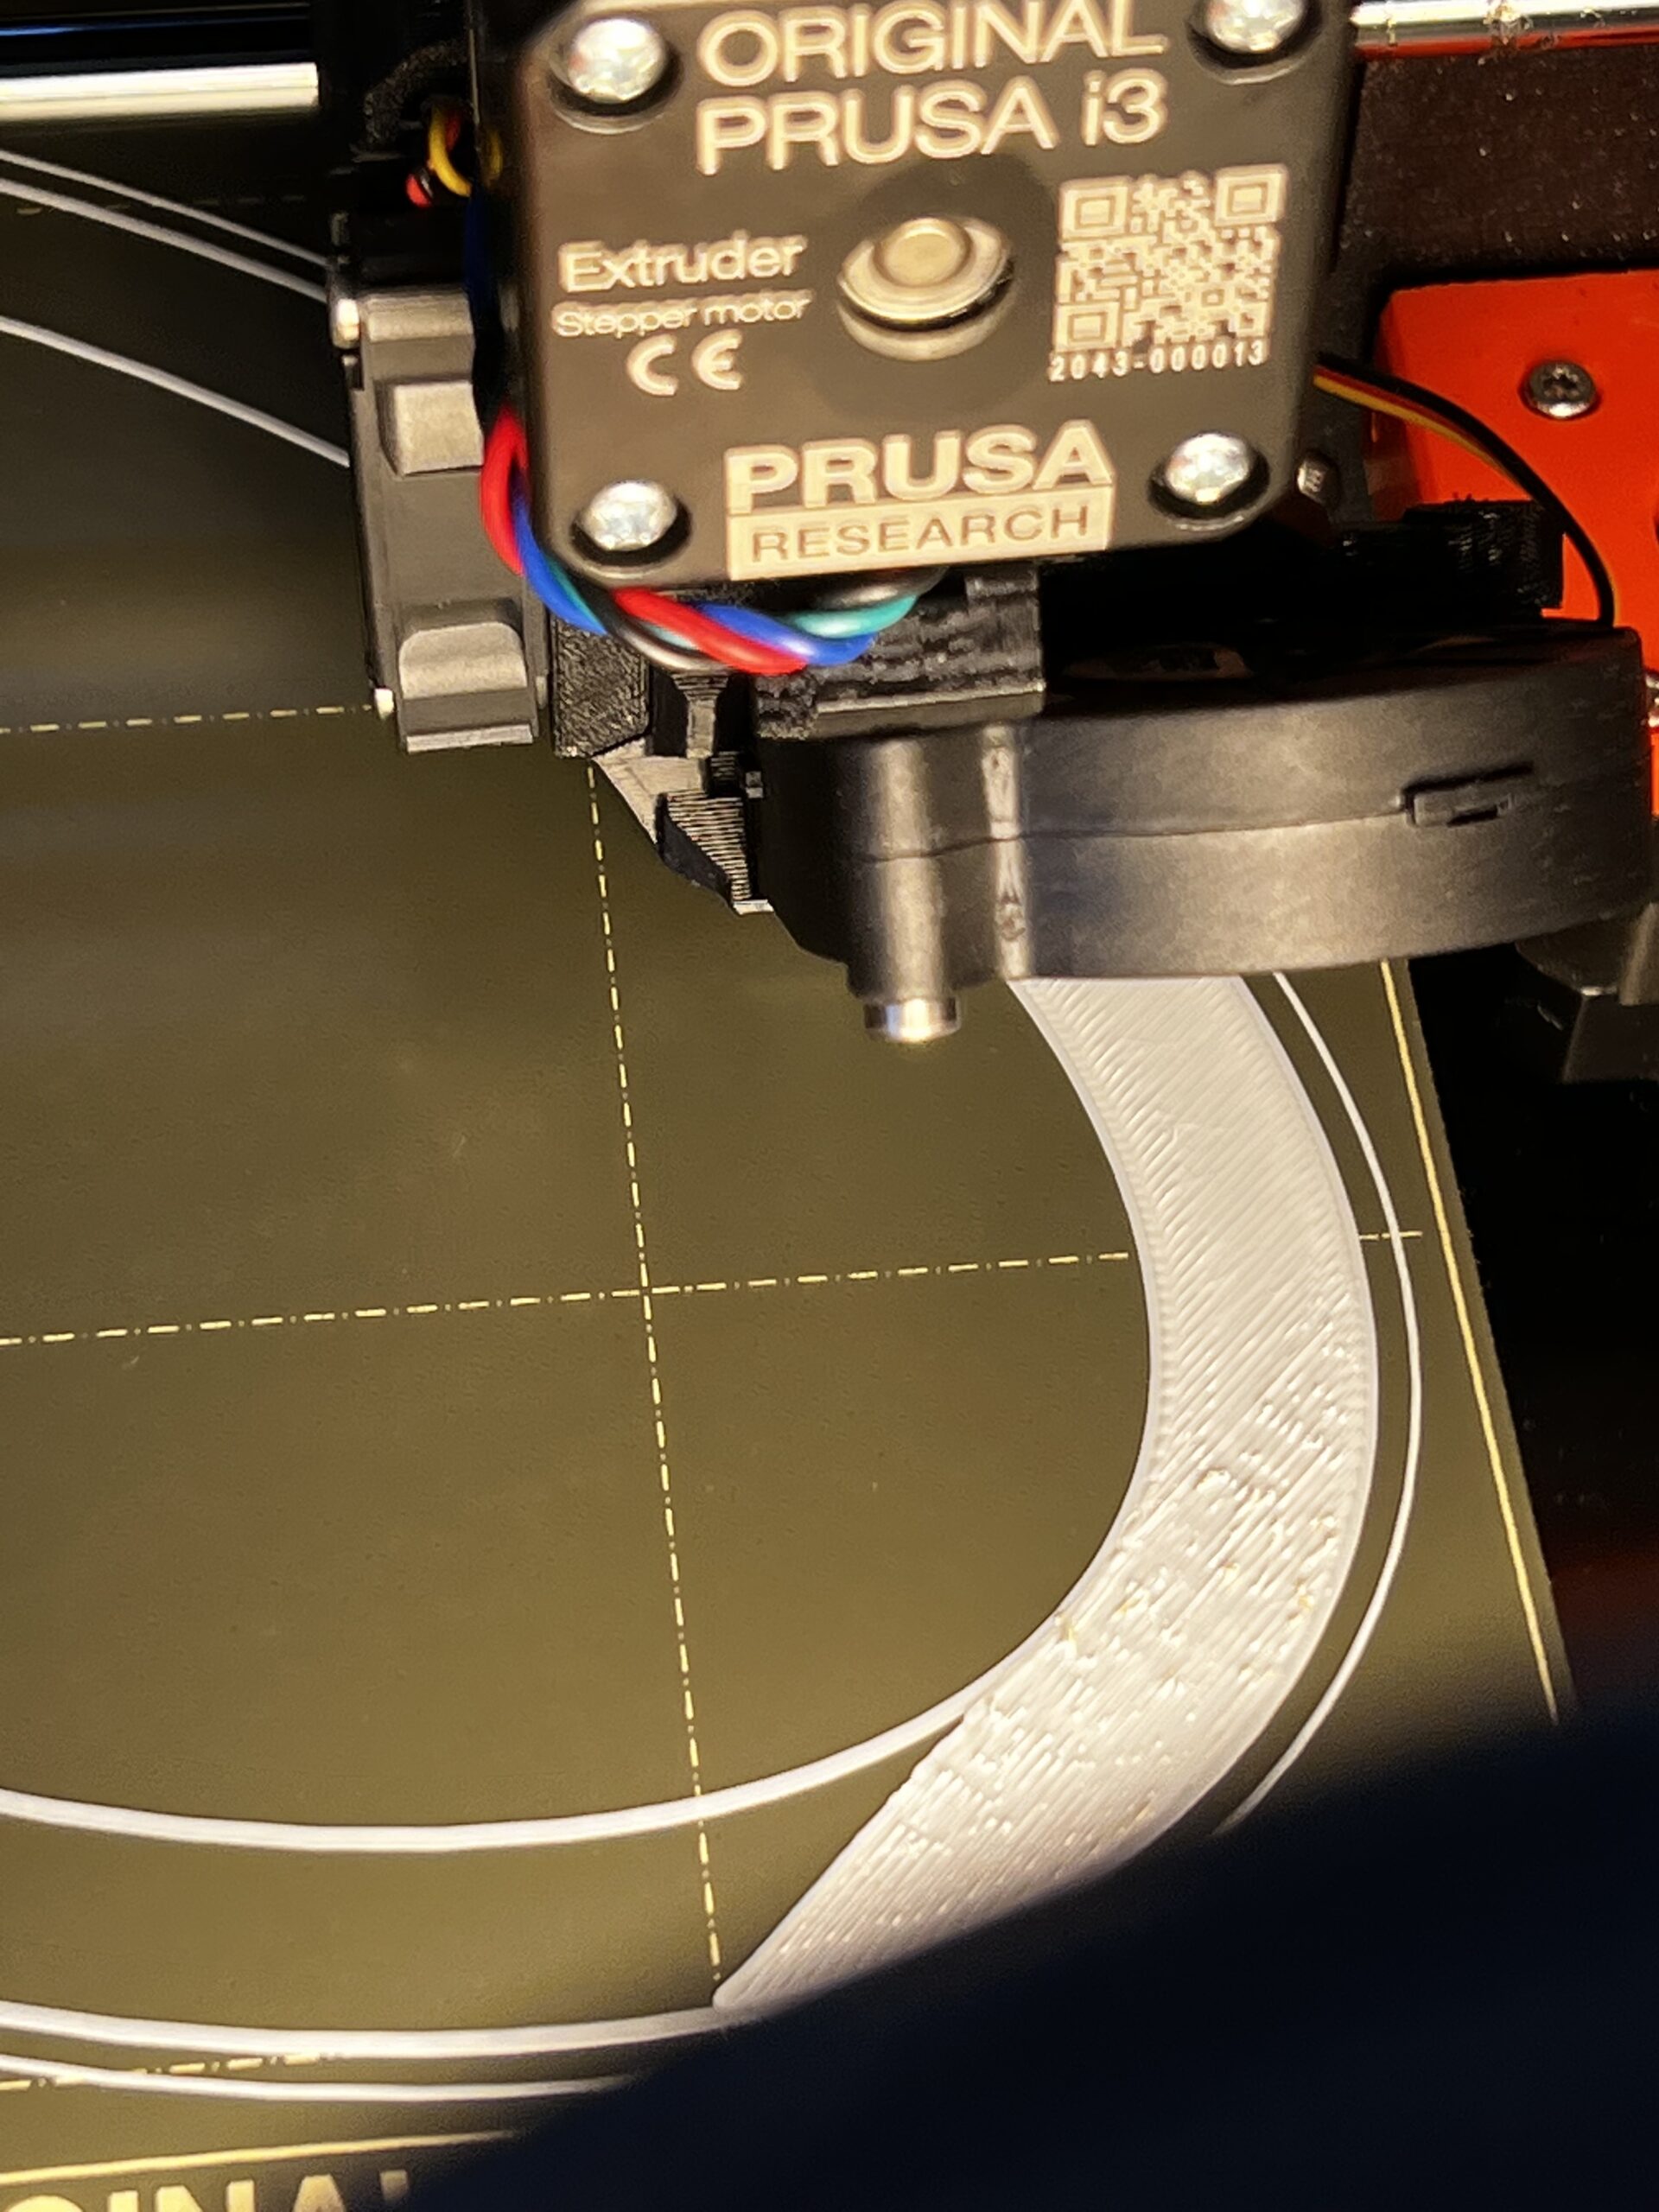
The print is going from bottom to top, and I tweaked live z a little about half way through. It's still a bit low, but it got smoother as it went further. Then rougher at the far corner.
RE: When a print goes really bad
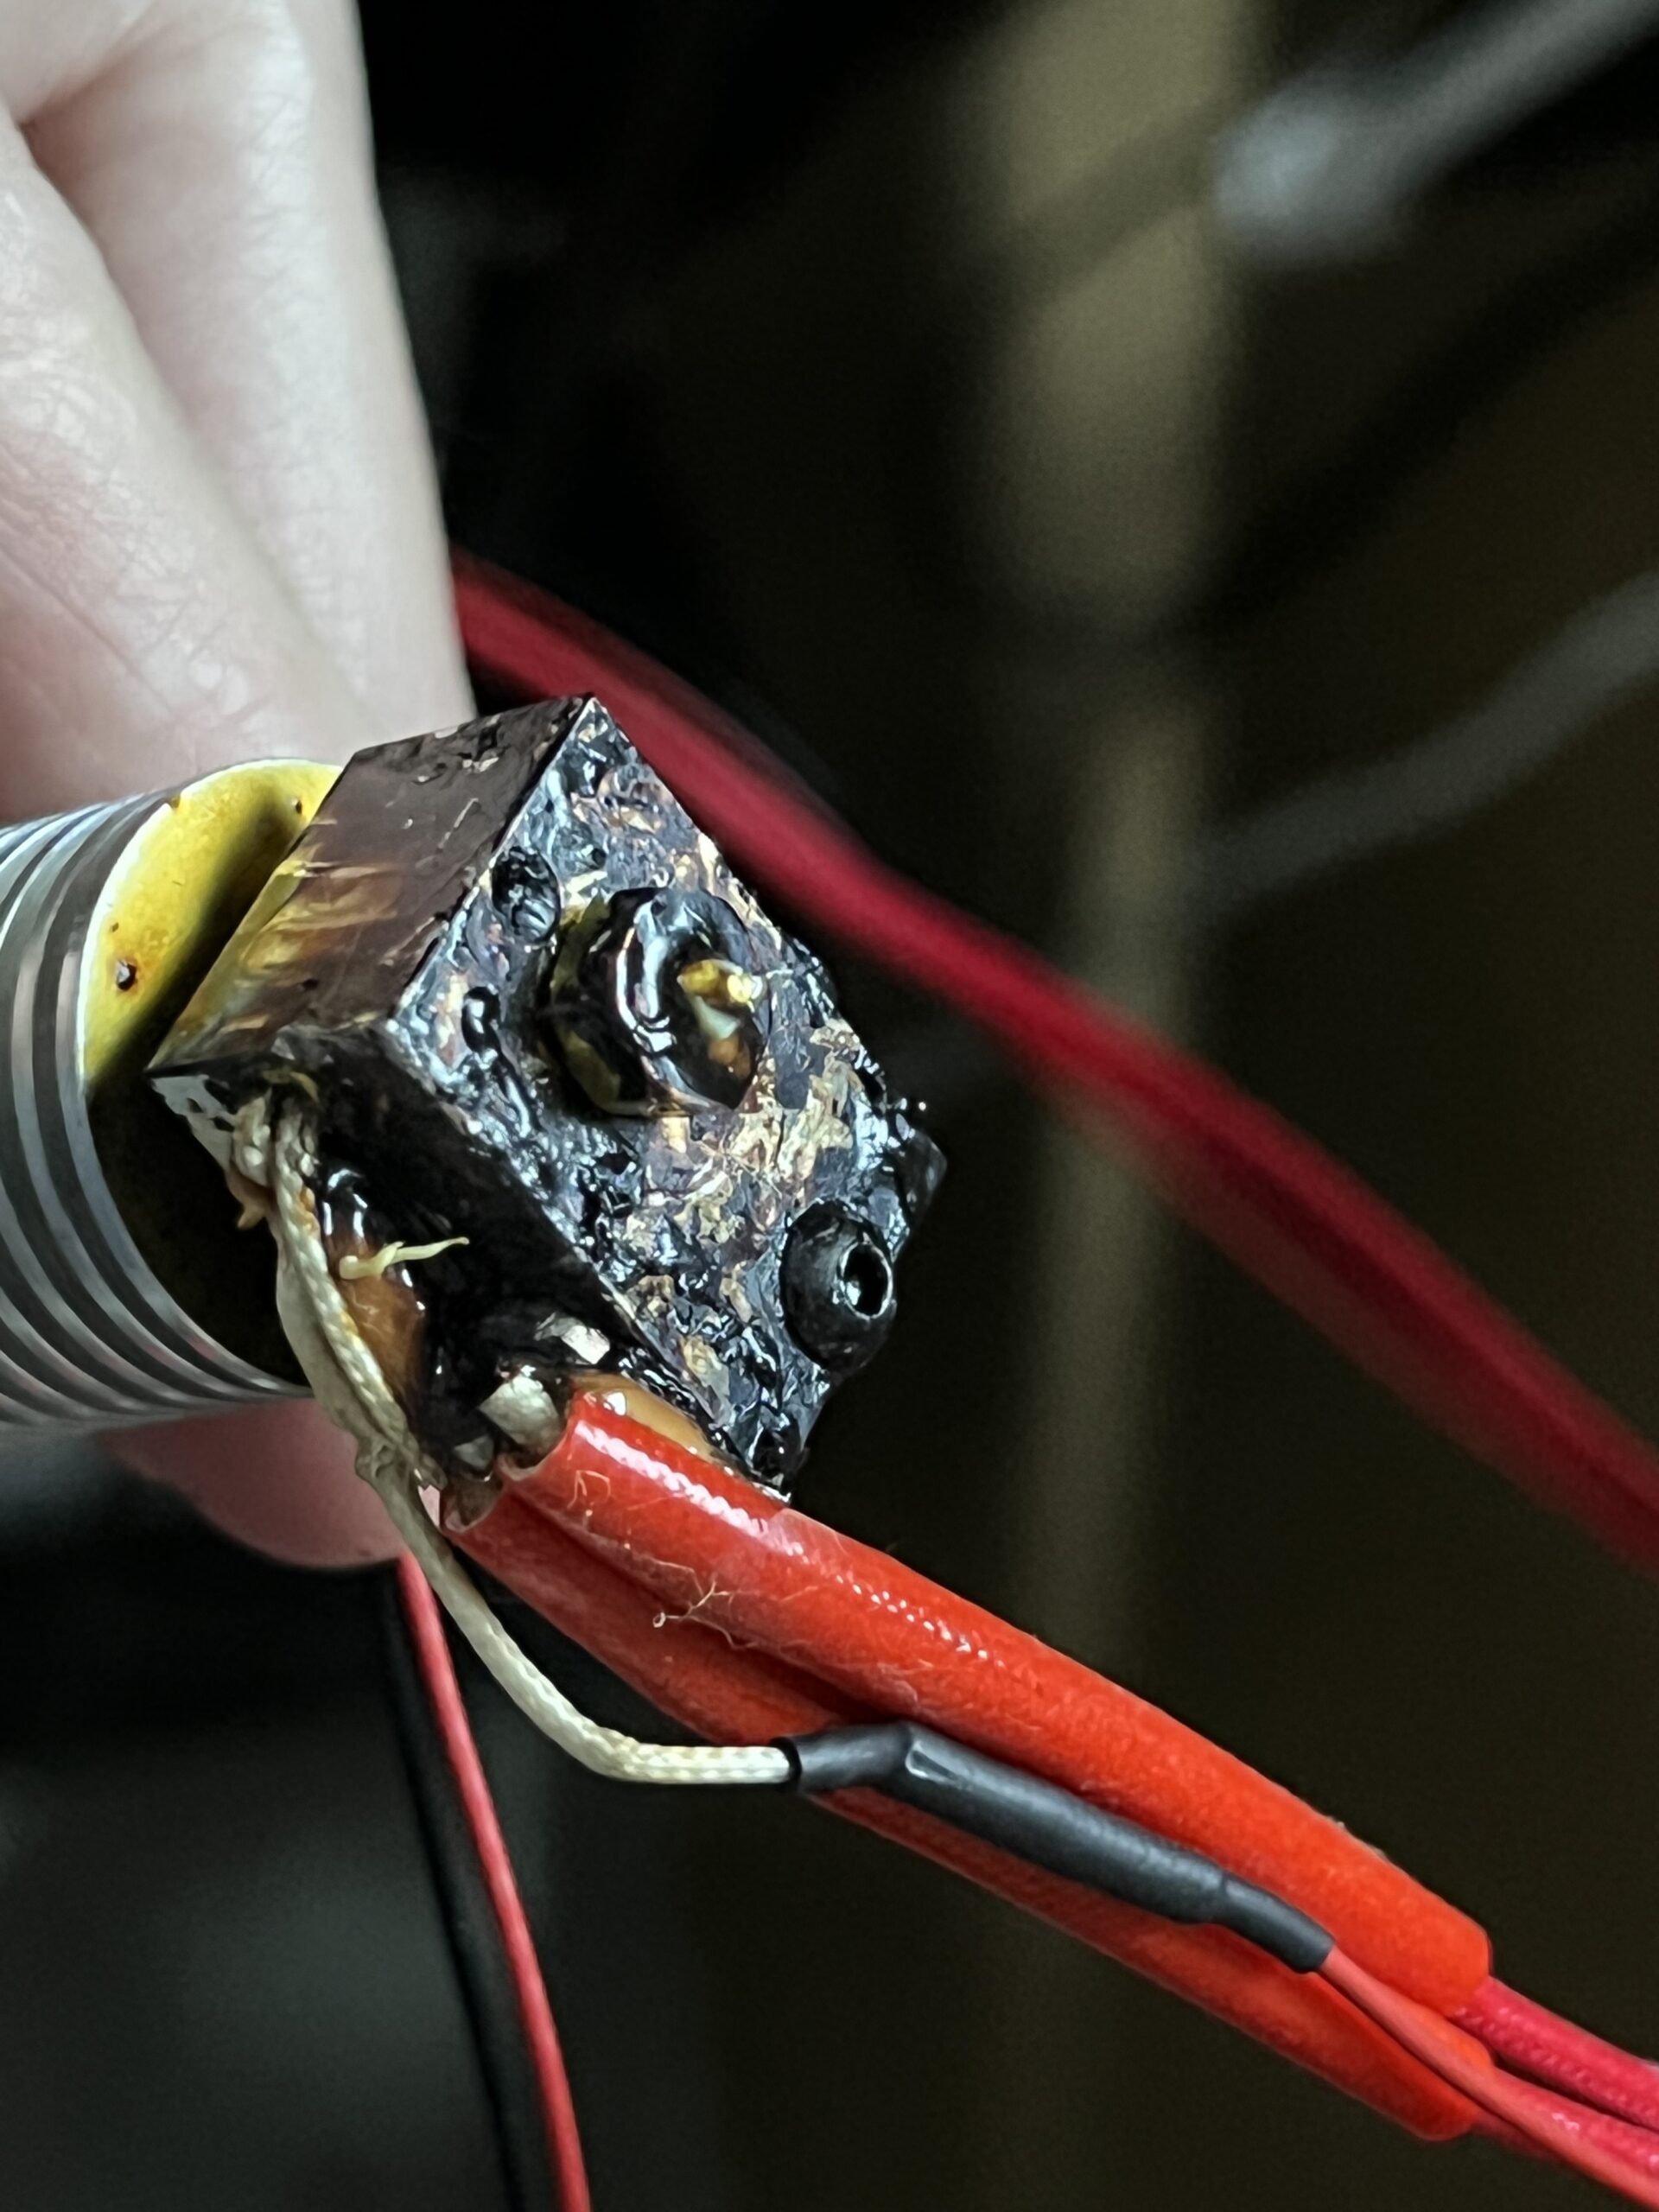
Hopefully you do not have a leak. 'Boogers' dropping on the print can be due to a leak around the nozzle or heatbreak.
RE: When a print goes really bad
Thinking back, I've seen a few curly strings when reloading filament, so it could be there was a leak. I ended up ordering an assembled hot end so that should fix it. I also got a smooth PEI sheet. I swapped the sheet first, and recalibrated, and that cleared up most of my problems.
Then I swapped the hot end, which was easier than I thought it would be. I didn't see any obvious leaks on the old one, but there's still a few bits that could melt and drip.
Post-swap, I'm still getting some burnt bits near layers that have marginal overhangs (46.5 degrees) and curvy perimeters. I've gotten those ever since I started printing ABS, I'll work on them as a separate issue.
I'm getting good quality ABS prints now, including the 12 hour print that started the whole mess. Thanks for all the help.
RE:
Up front, this next post is about printing overhangs in ABS. Towards the bottom I list the specific print configuration parameters that I changed.
The burnt bits mentioned in my last post were definitely a leak. The leak was reduced significantly by actually following the nozzle replacement procedure, specifically setting the correct temperature (280C):
https://help.prusa3d.com/article/changing-or-replacing-the-nozzle-mk2-5s-mk3s-mk3s_2069
I still had a few burnt bits in models with moderate (<45 degree) overhangs at tight corners. I think that was related to additional back pressure during curls, like this example:
Besides the burnt bits, the quality of my 46.5 degree overhangs wasn't good:
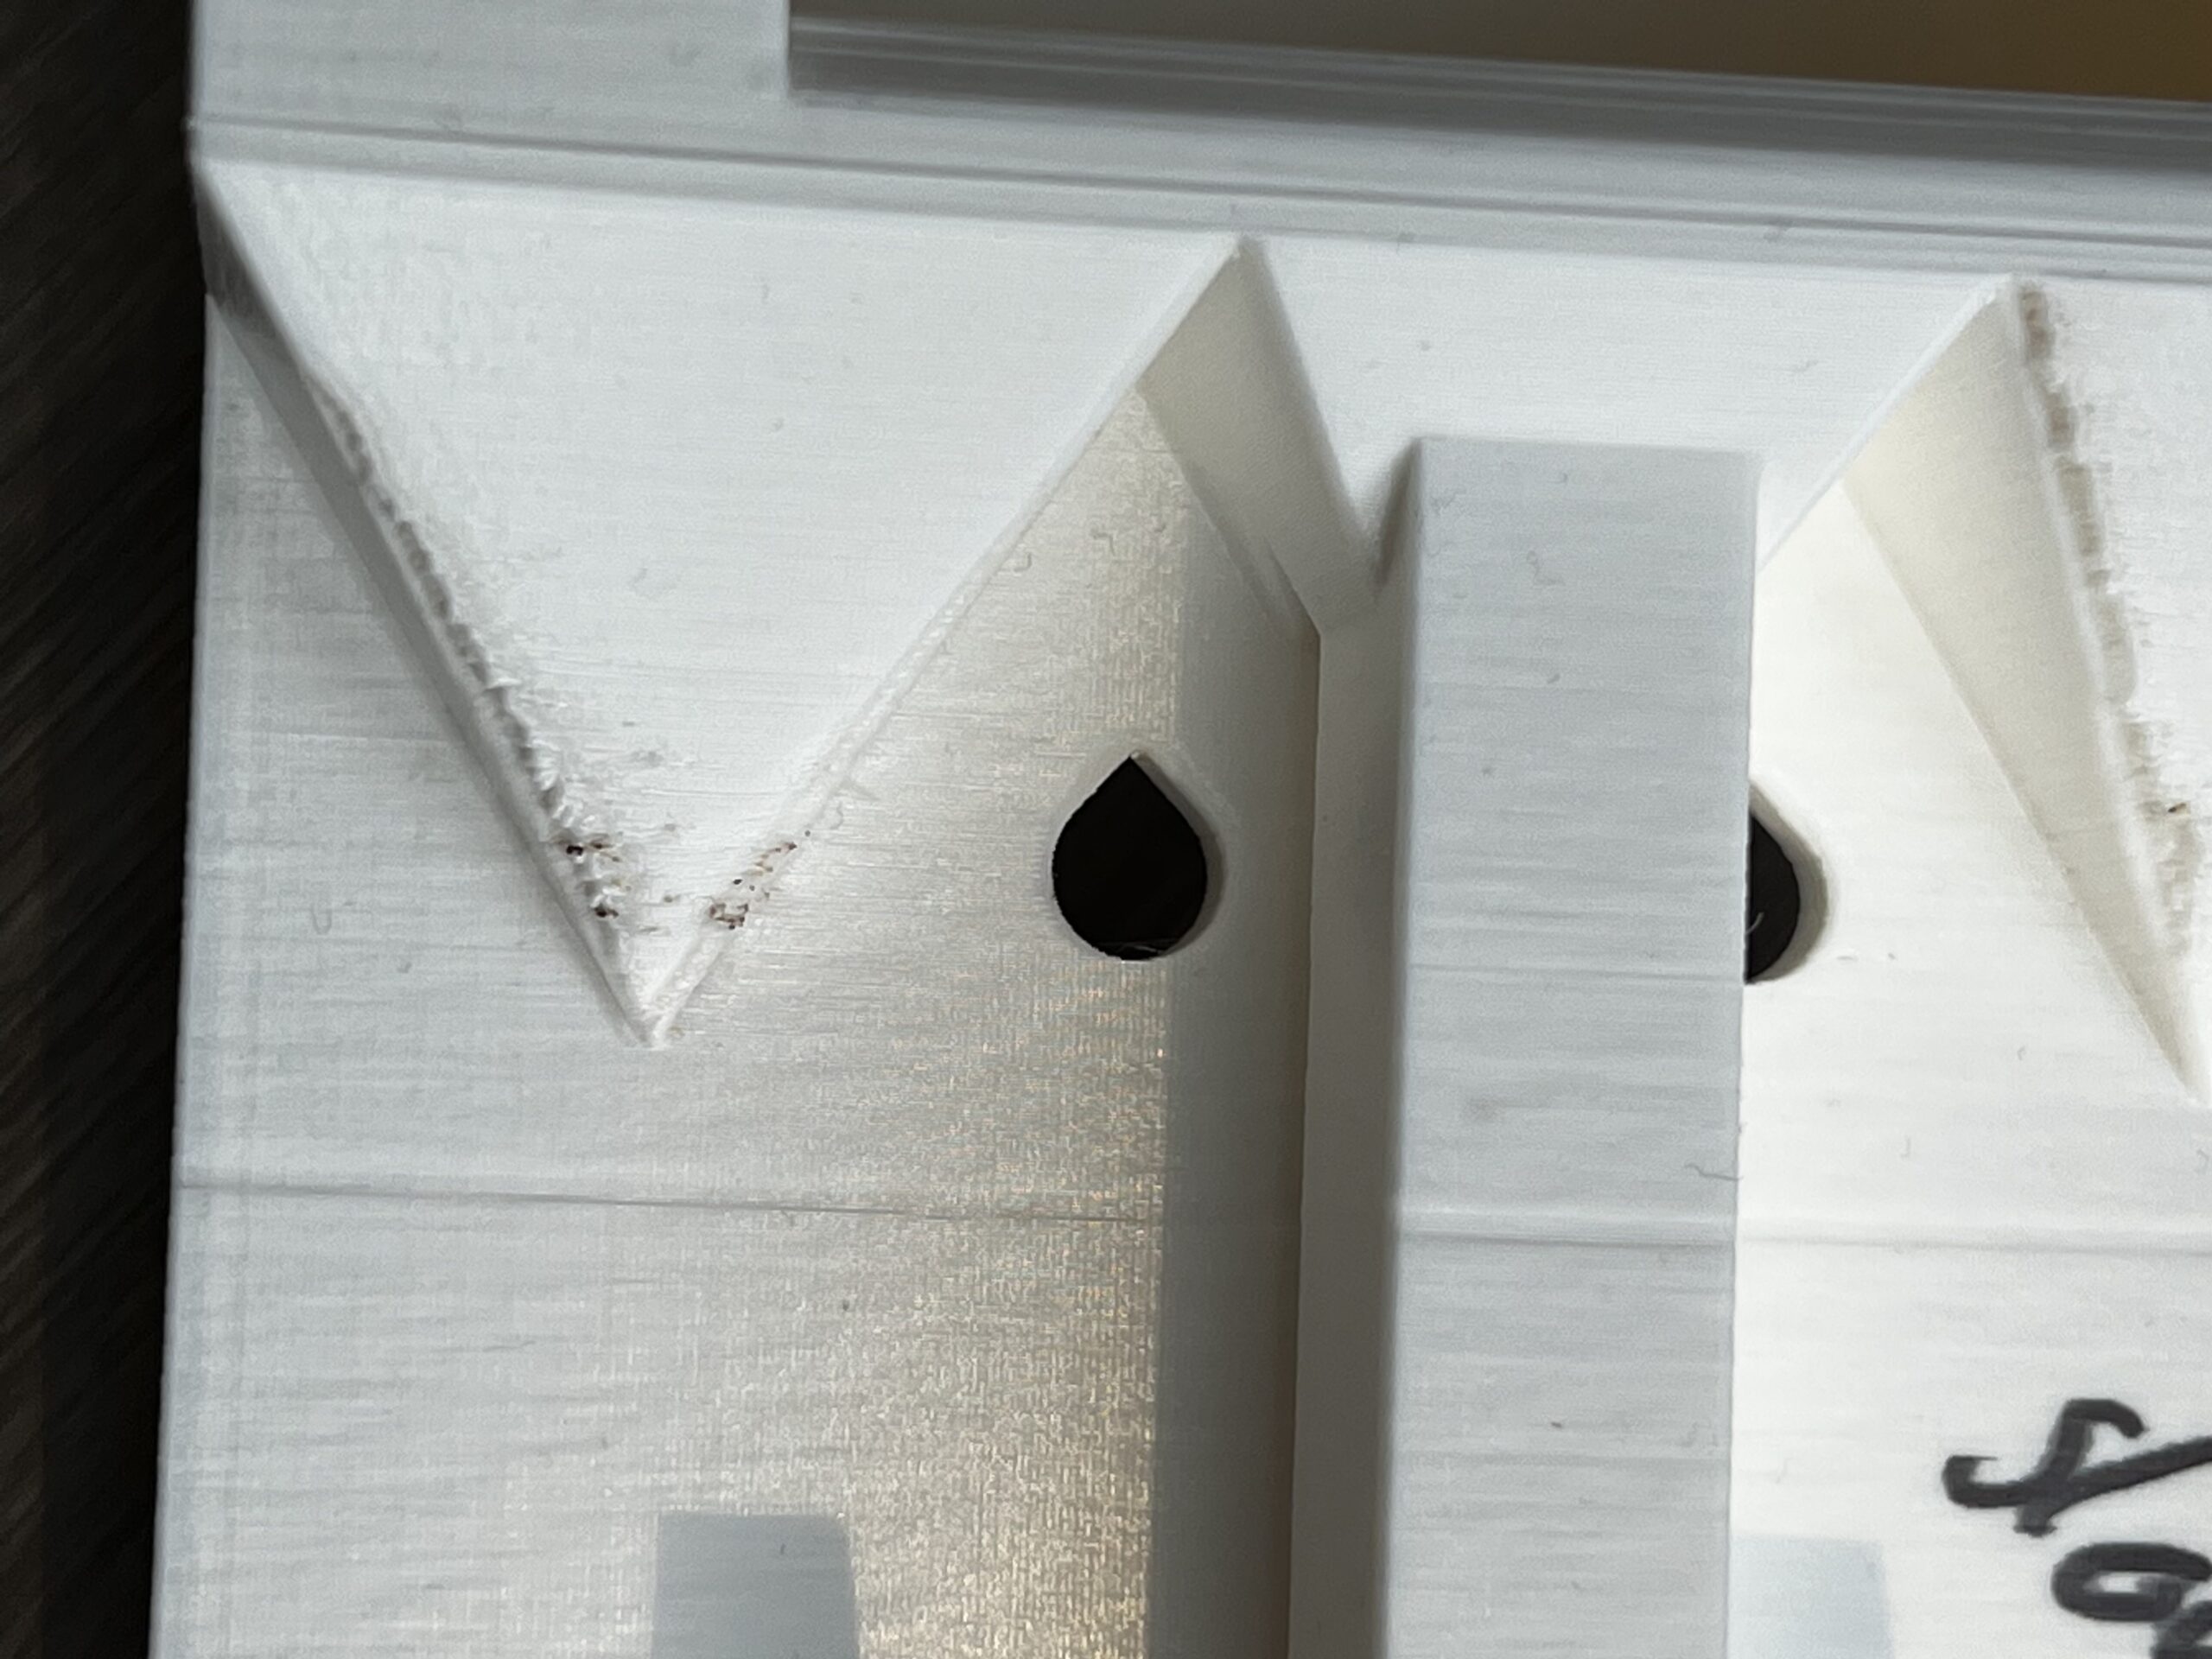
There are a plethora of threads on printing overhangs, I when through a lot of them and made some changes to my print configuration. I'm printing that same part now (I think the little divots are seams, I've got them set to random).
Here are the changes I ended up making:
        Old Config                      |               New Config
ensure_vertical_shell_thickness = 1     |       ensure_vertical_shell_thickness = 0
external_perimeters_first = 0           |       external_perimeters_first = 1
layer_height = 0.15                     |       layer_height = 0.2
overhangs = 1                           |       overhangs = 0
thick_bridges = 1                       |       thick_bridges = 0
I made these changes as a group, so I'm not sure how sensitive print quality is to the individual parameters.
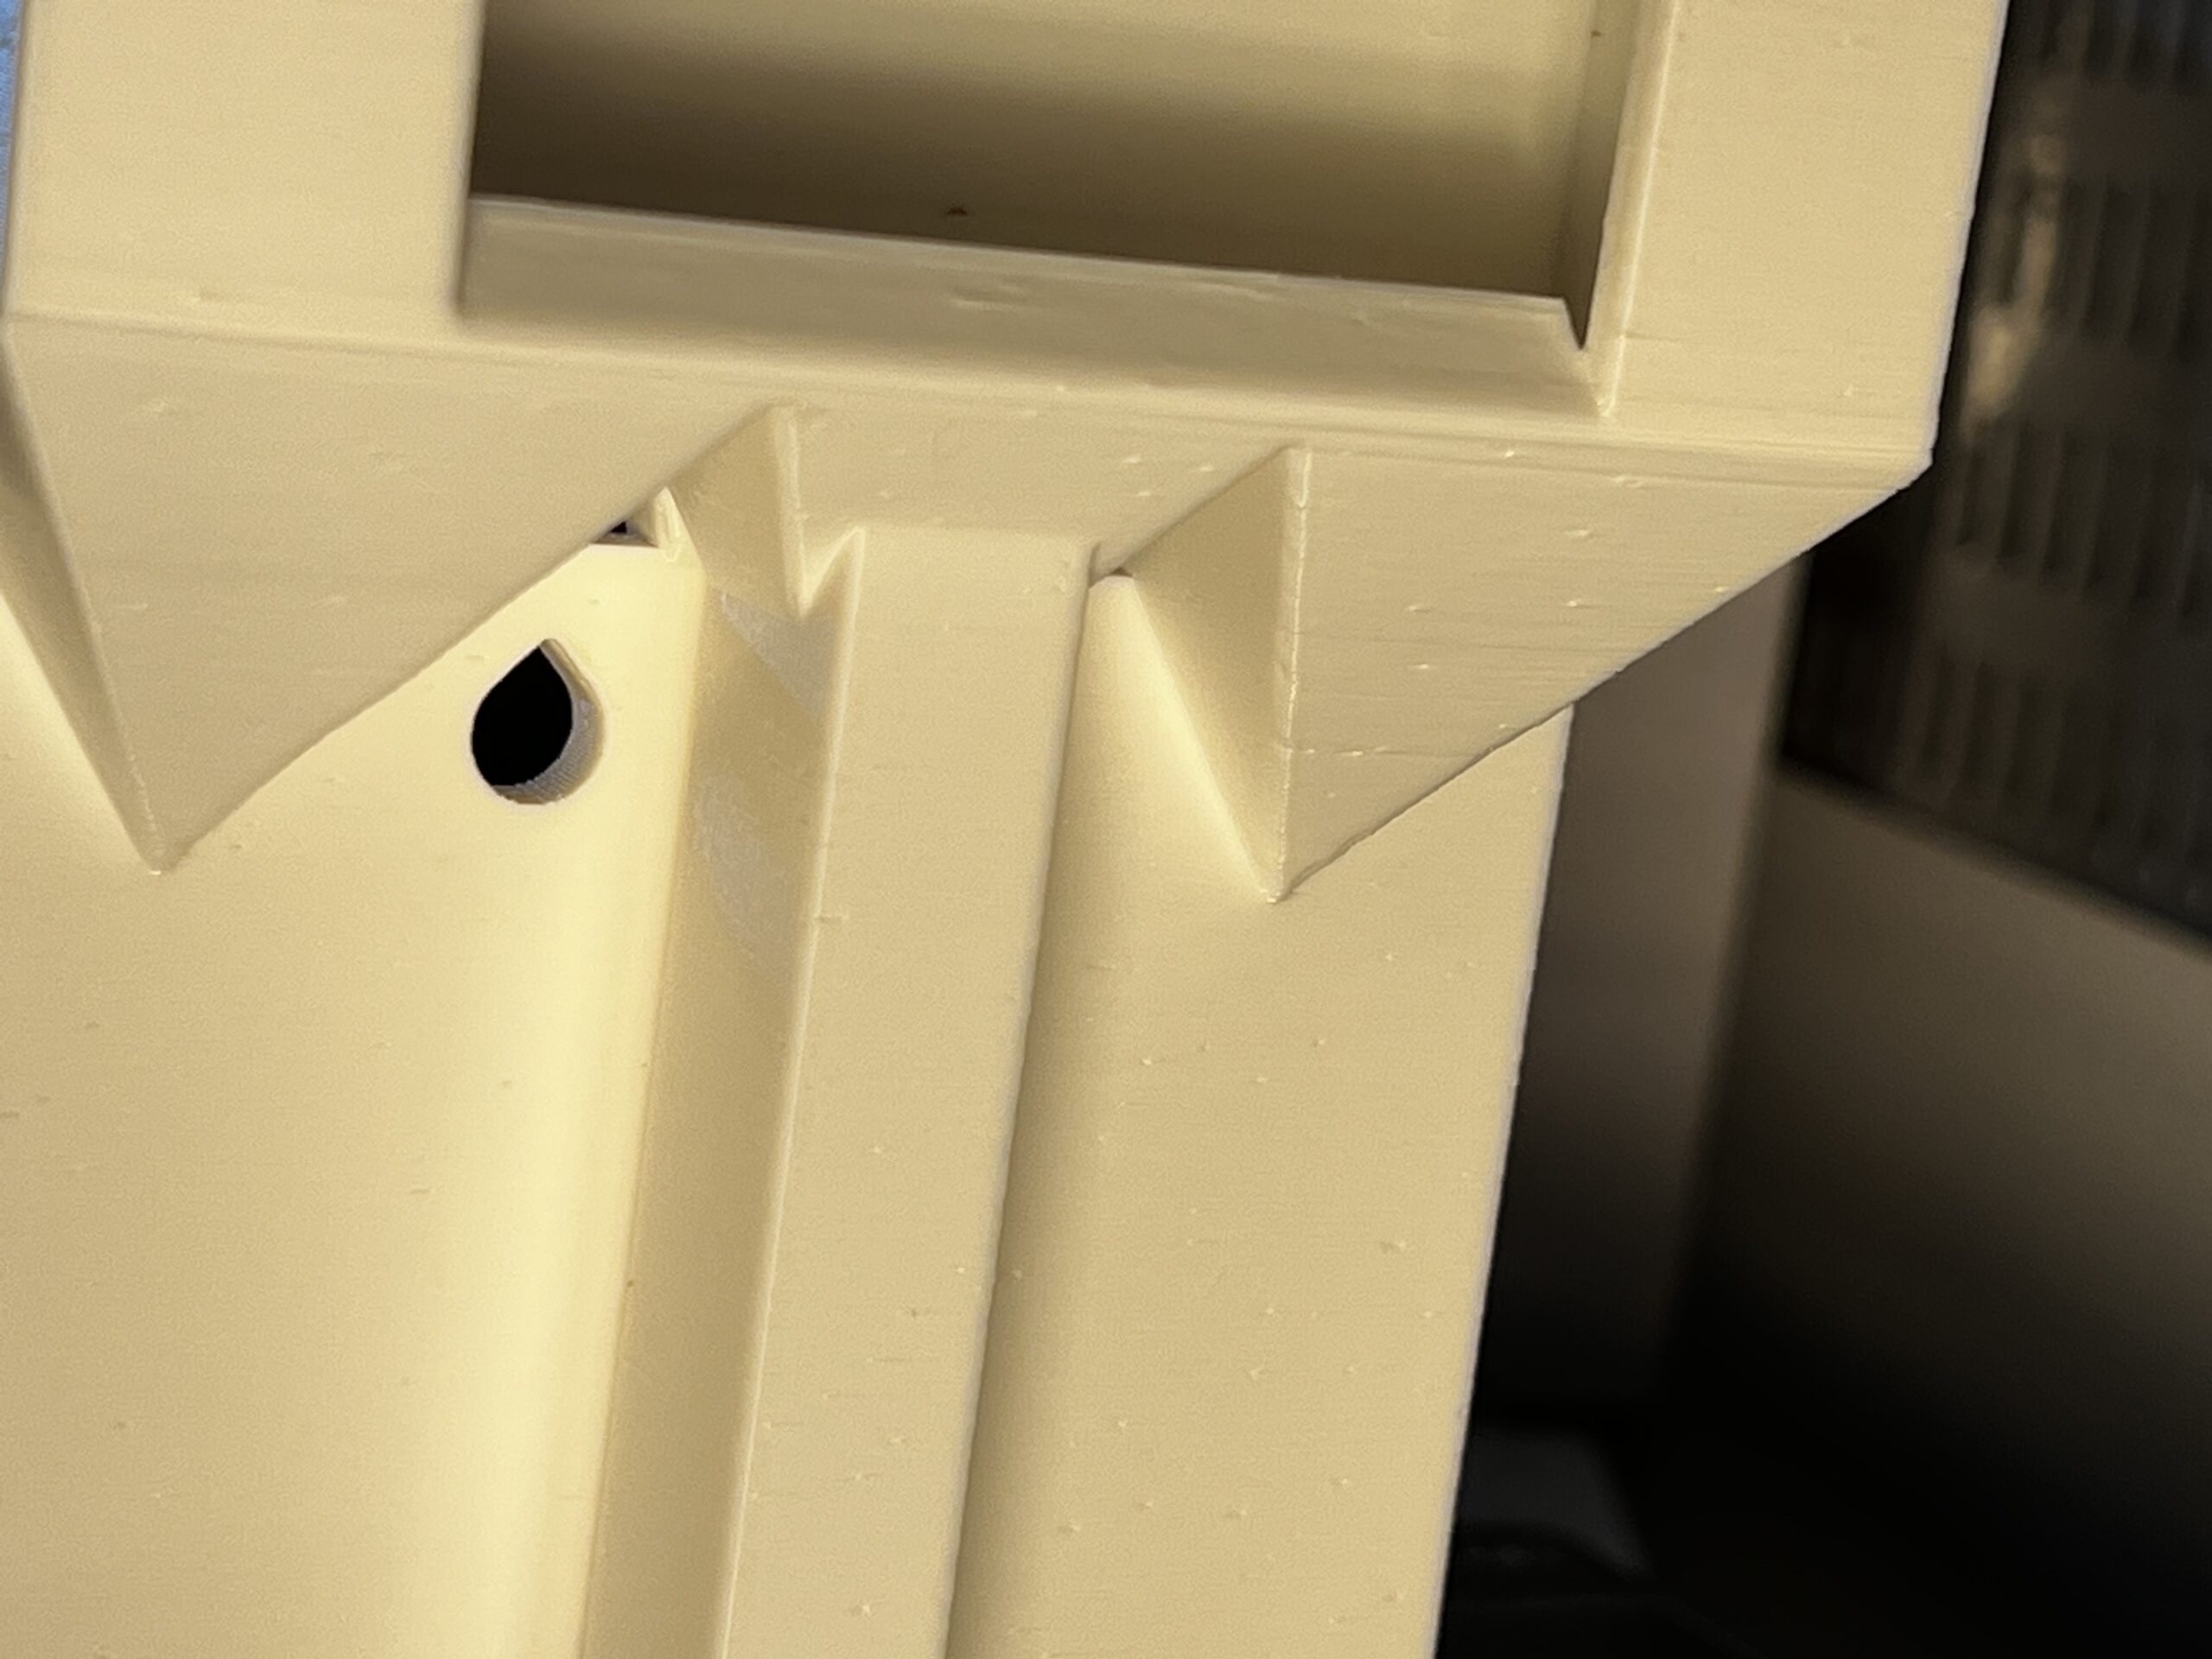
Along the way, I printed the Prusa Temperature Tower ( https://www.printables.com/model/20652-temp-tower-pla-petg-absasa-for-prusa-mini-mk3s-and/files). The 65 degree overhangs printed just fine, proving it wasn't the printer:
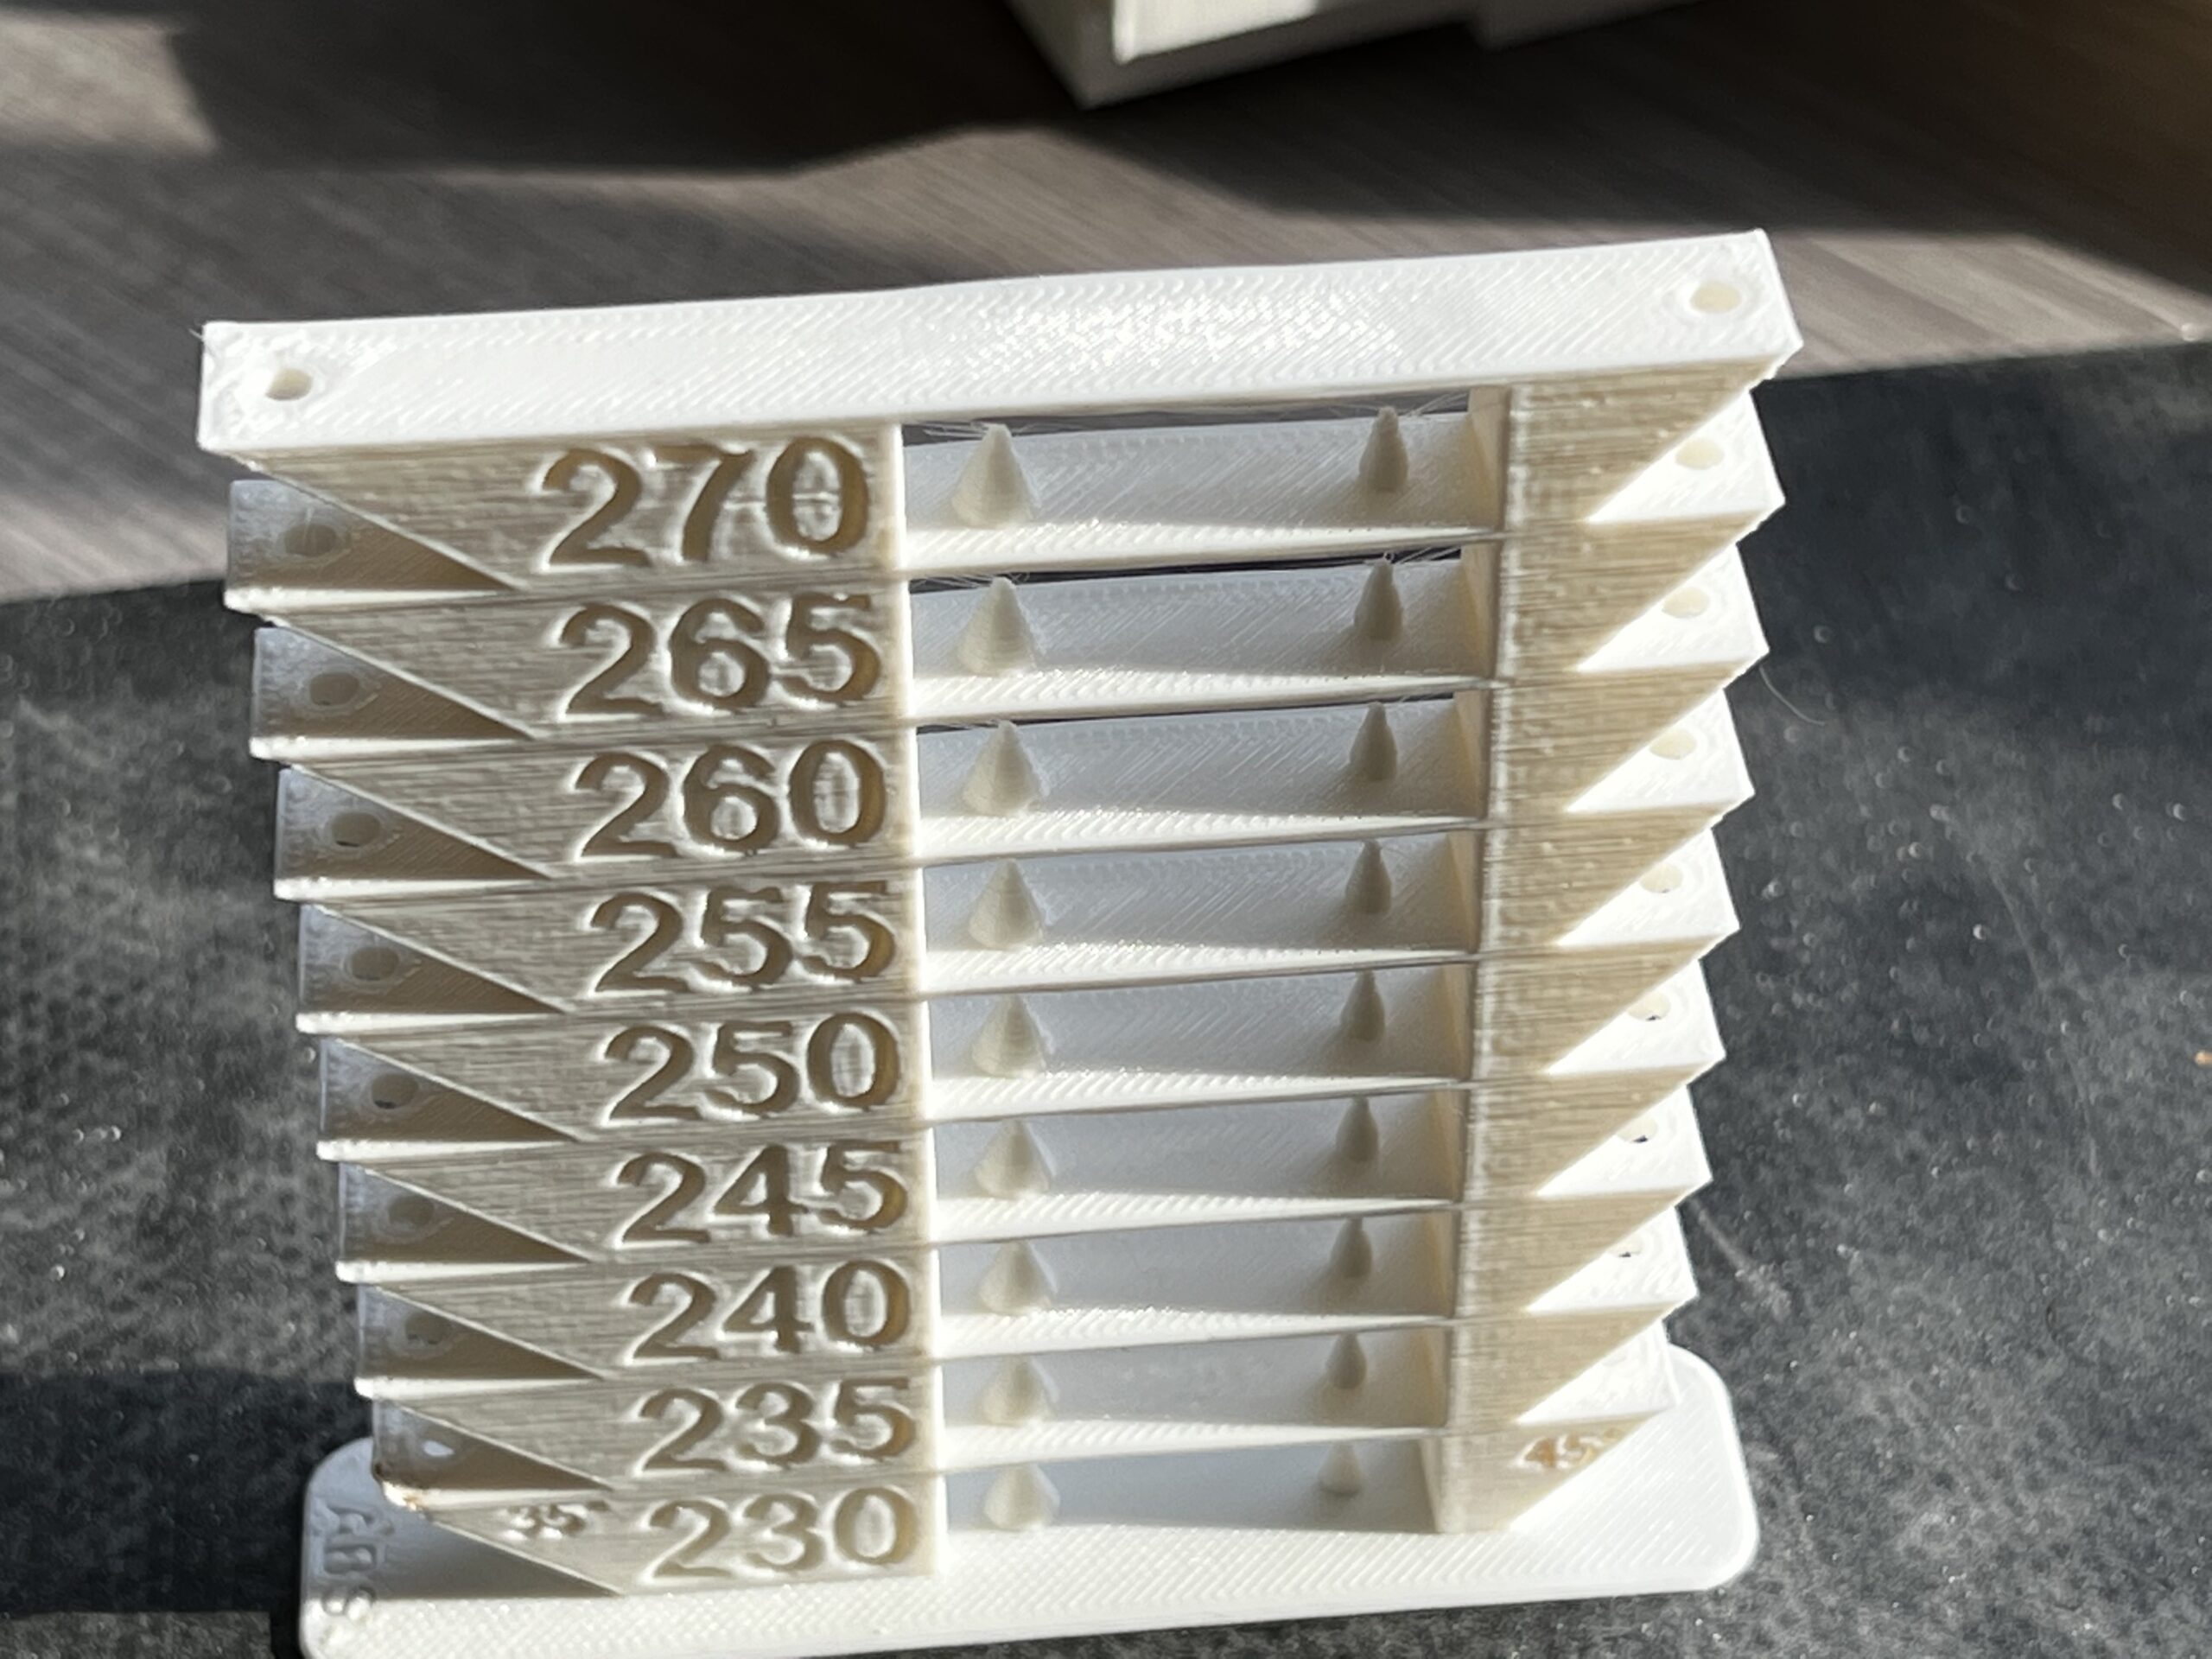
I've always wondered about the 255C extruder setting in the Prusa config, and wondered if it was wrong for non-Prusament ABS filament. Turns out 255C is the best for Hatchbox white ABS.
RE: When a print goes really bad
Overhangs can be ugly with any filament, depending on circumstances and the phase of the moon.
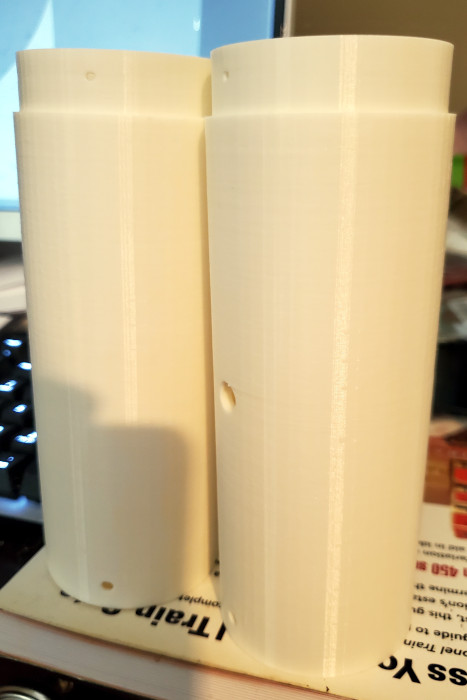
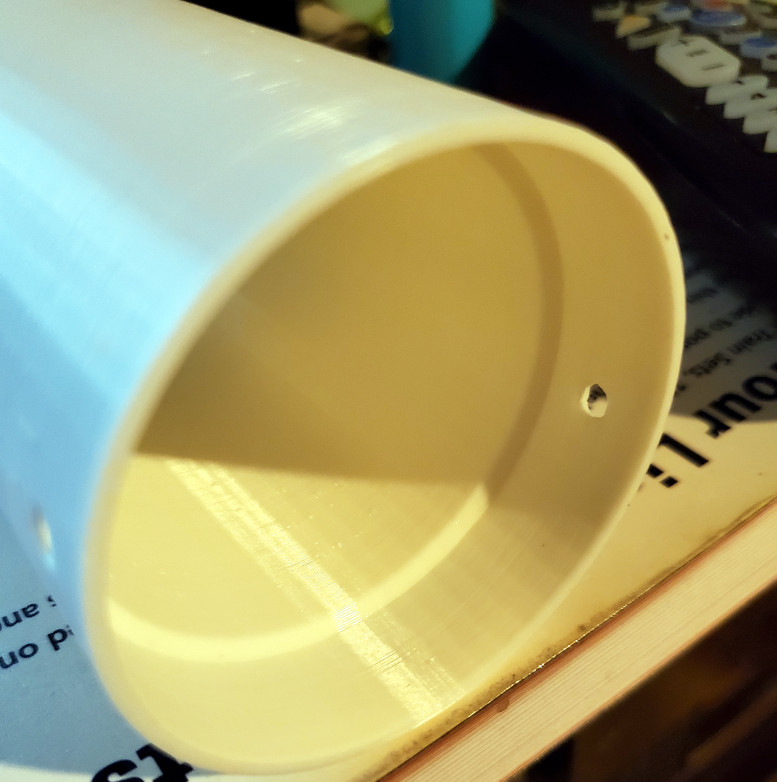
In the photo below I have a 45 degree chamfer on the inside of the tube. The photo makes it look almost horizontal to the tube, but it is 45 degrees and printed fine using RepRappers ABS.
I've found that the default of 255C for ABS printing, which I believe is the default for generic, Hatchbox, and Prusa ABS is about right.
The only time I recall having to tweak the nozzle temperature from defaults is when printing Mika3D metallic filaments, as they need a 5-10 degree bump to prevent occasional jamming.
RE: When a print goes really bad
I just noticed the two holes in your pipe, did they have support? I usually cut a wedge above holes to allow printing without support. See the second and third photos in my last post. Life would be simpler if my holes could be round.
RE: When a print goes really bad
I just noticed the two holes in your pipe, did they have support? I usually cut a wedge above holes to allow printing without support. See the second and third photos in my last post. Life would be simpler if my holes could be round.
No, those are for machine screws to join the sections together, and things like that normally print just fine without support, in any type of filament.
One section has a larger hole for fluid flow, and it printed fine in the RepRapper ABS as you see here.
Holes can be tricky in 3d printing, particularly when they are printed on a vertical surface. Things like this have quite a bit of tolerance and don't have to be of any exact size, but for several of the models I've printed, such as model railroad buildings, the pieces fit together using registration pegs and holes into which those fit. Some holes need to be printed vertically and others horizontally.
Things like that require trial and error and test prints, using the exact filament and settings and model positioning.