I don't know where to begin...
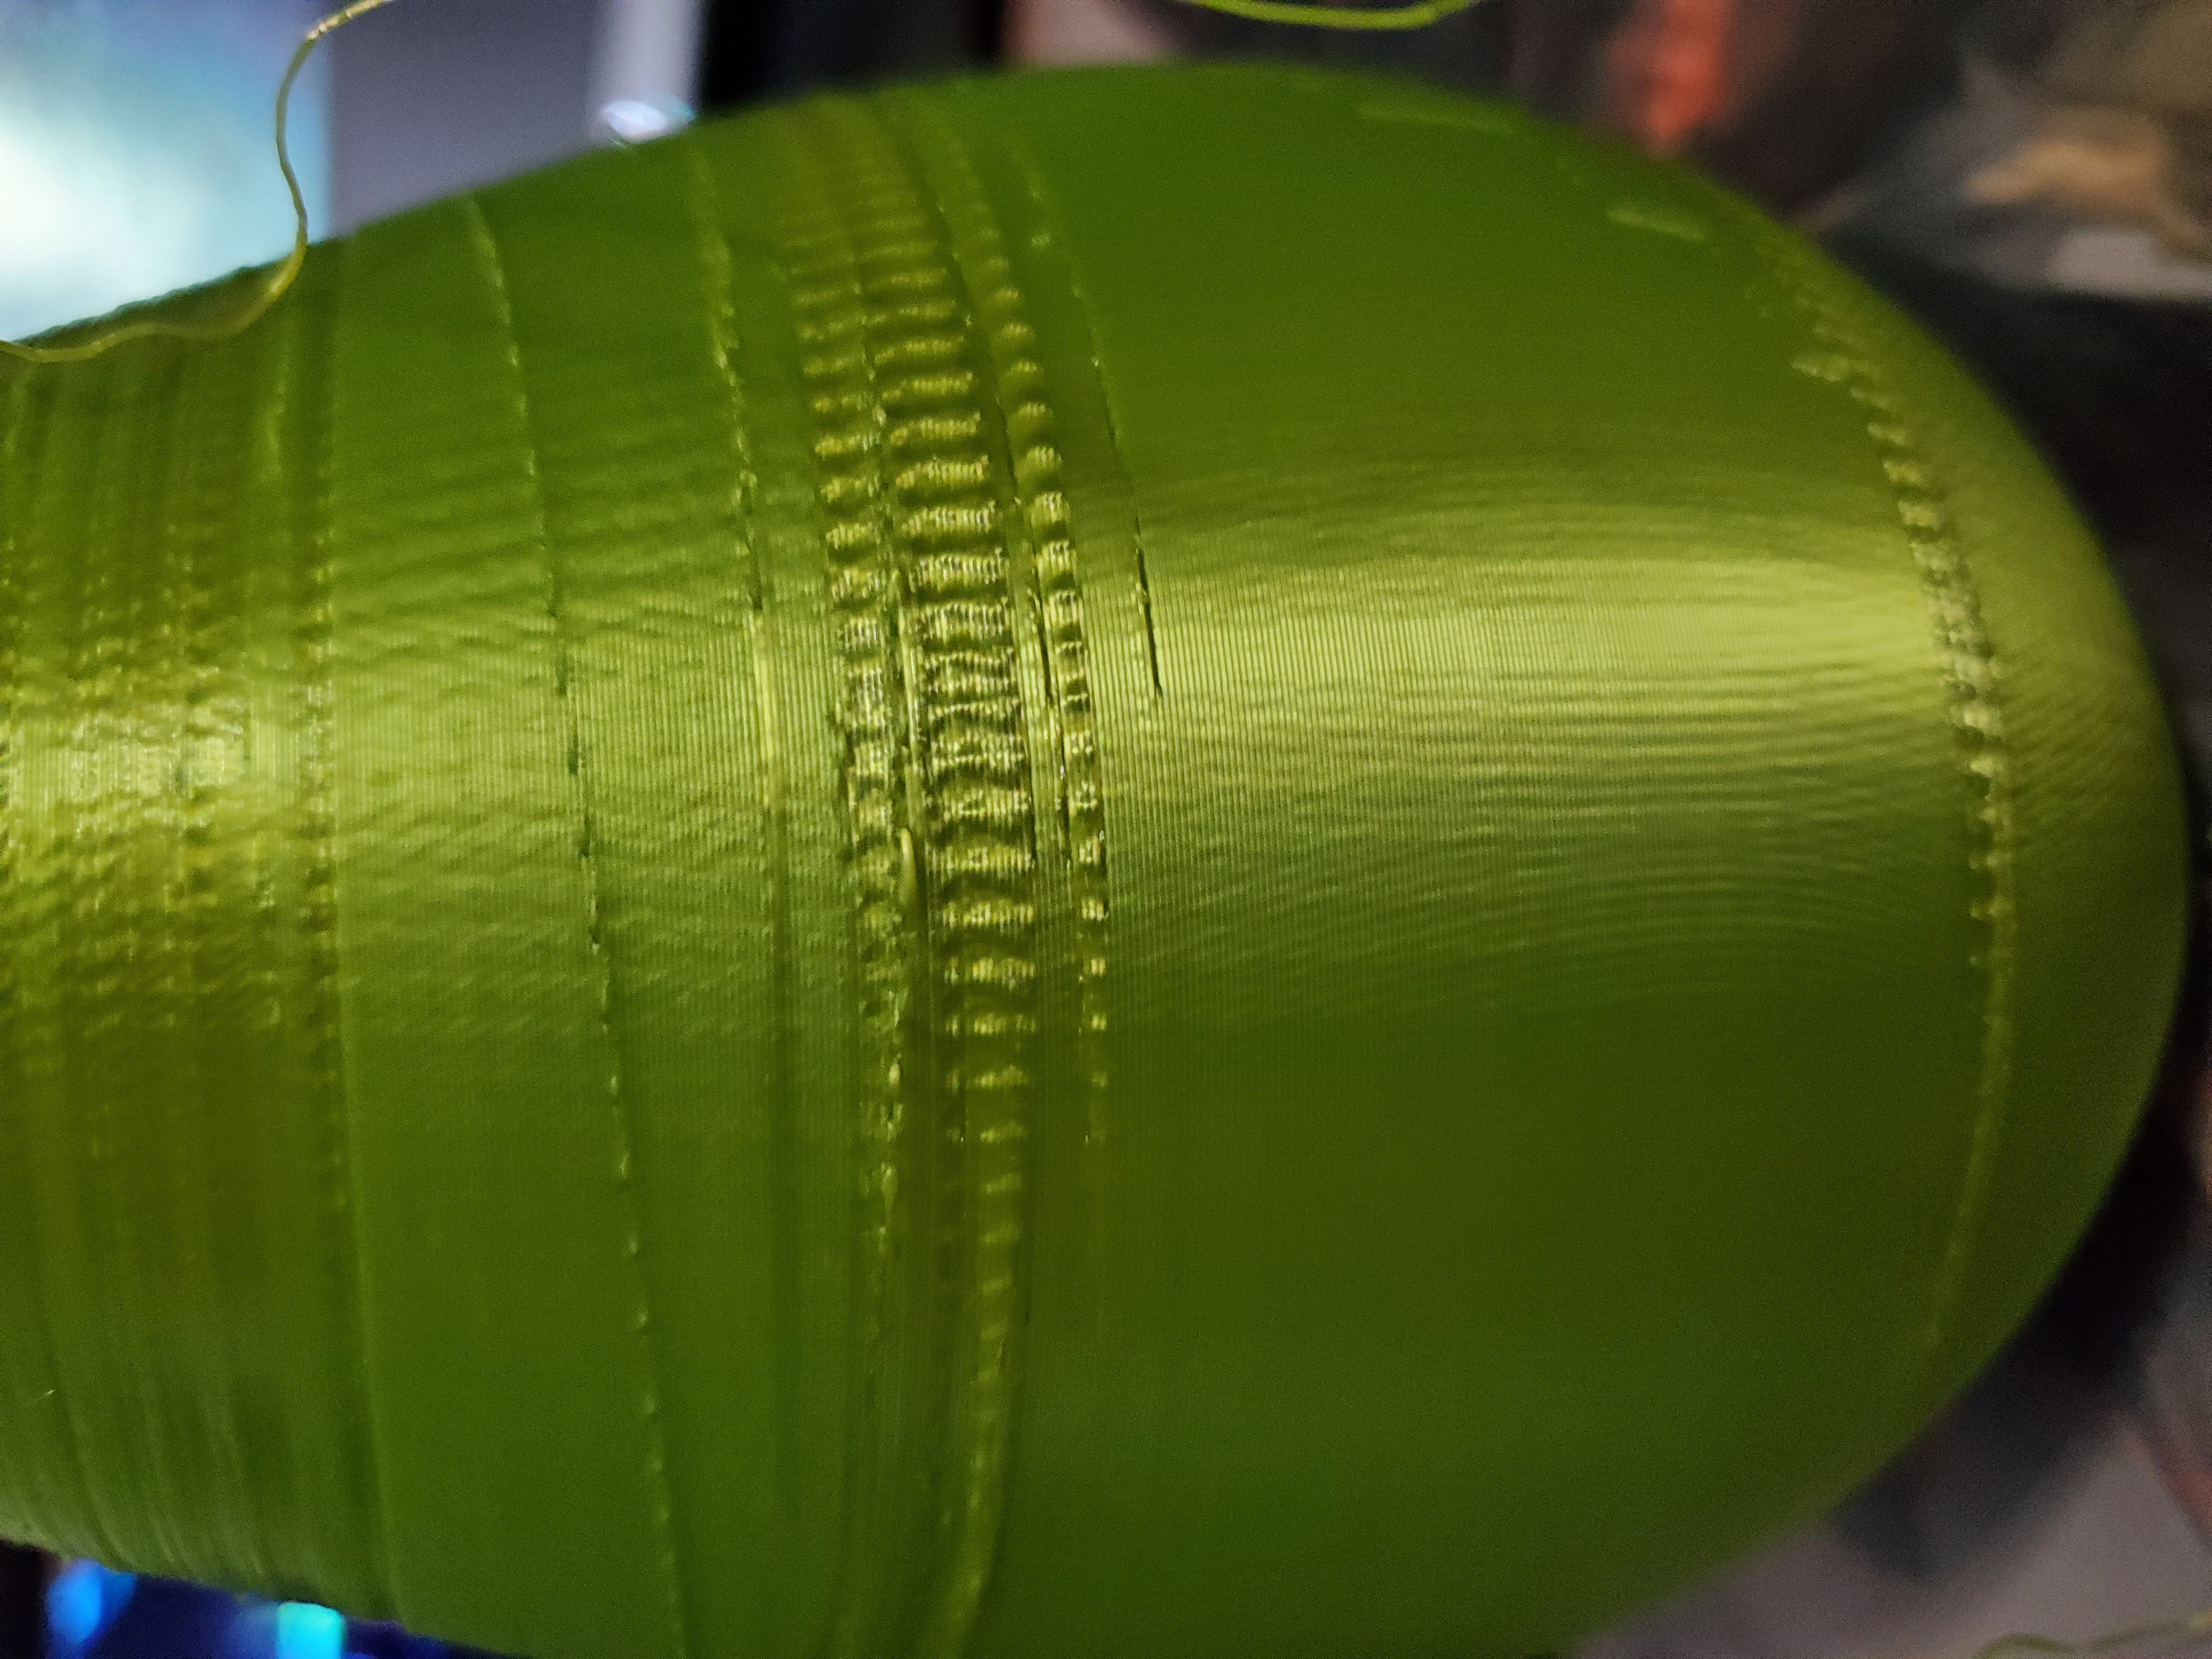
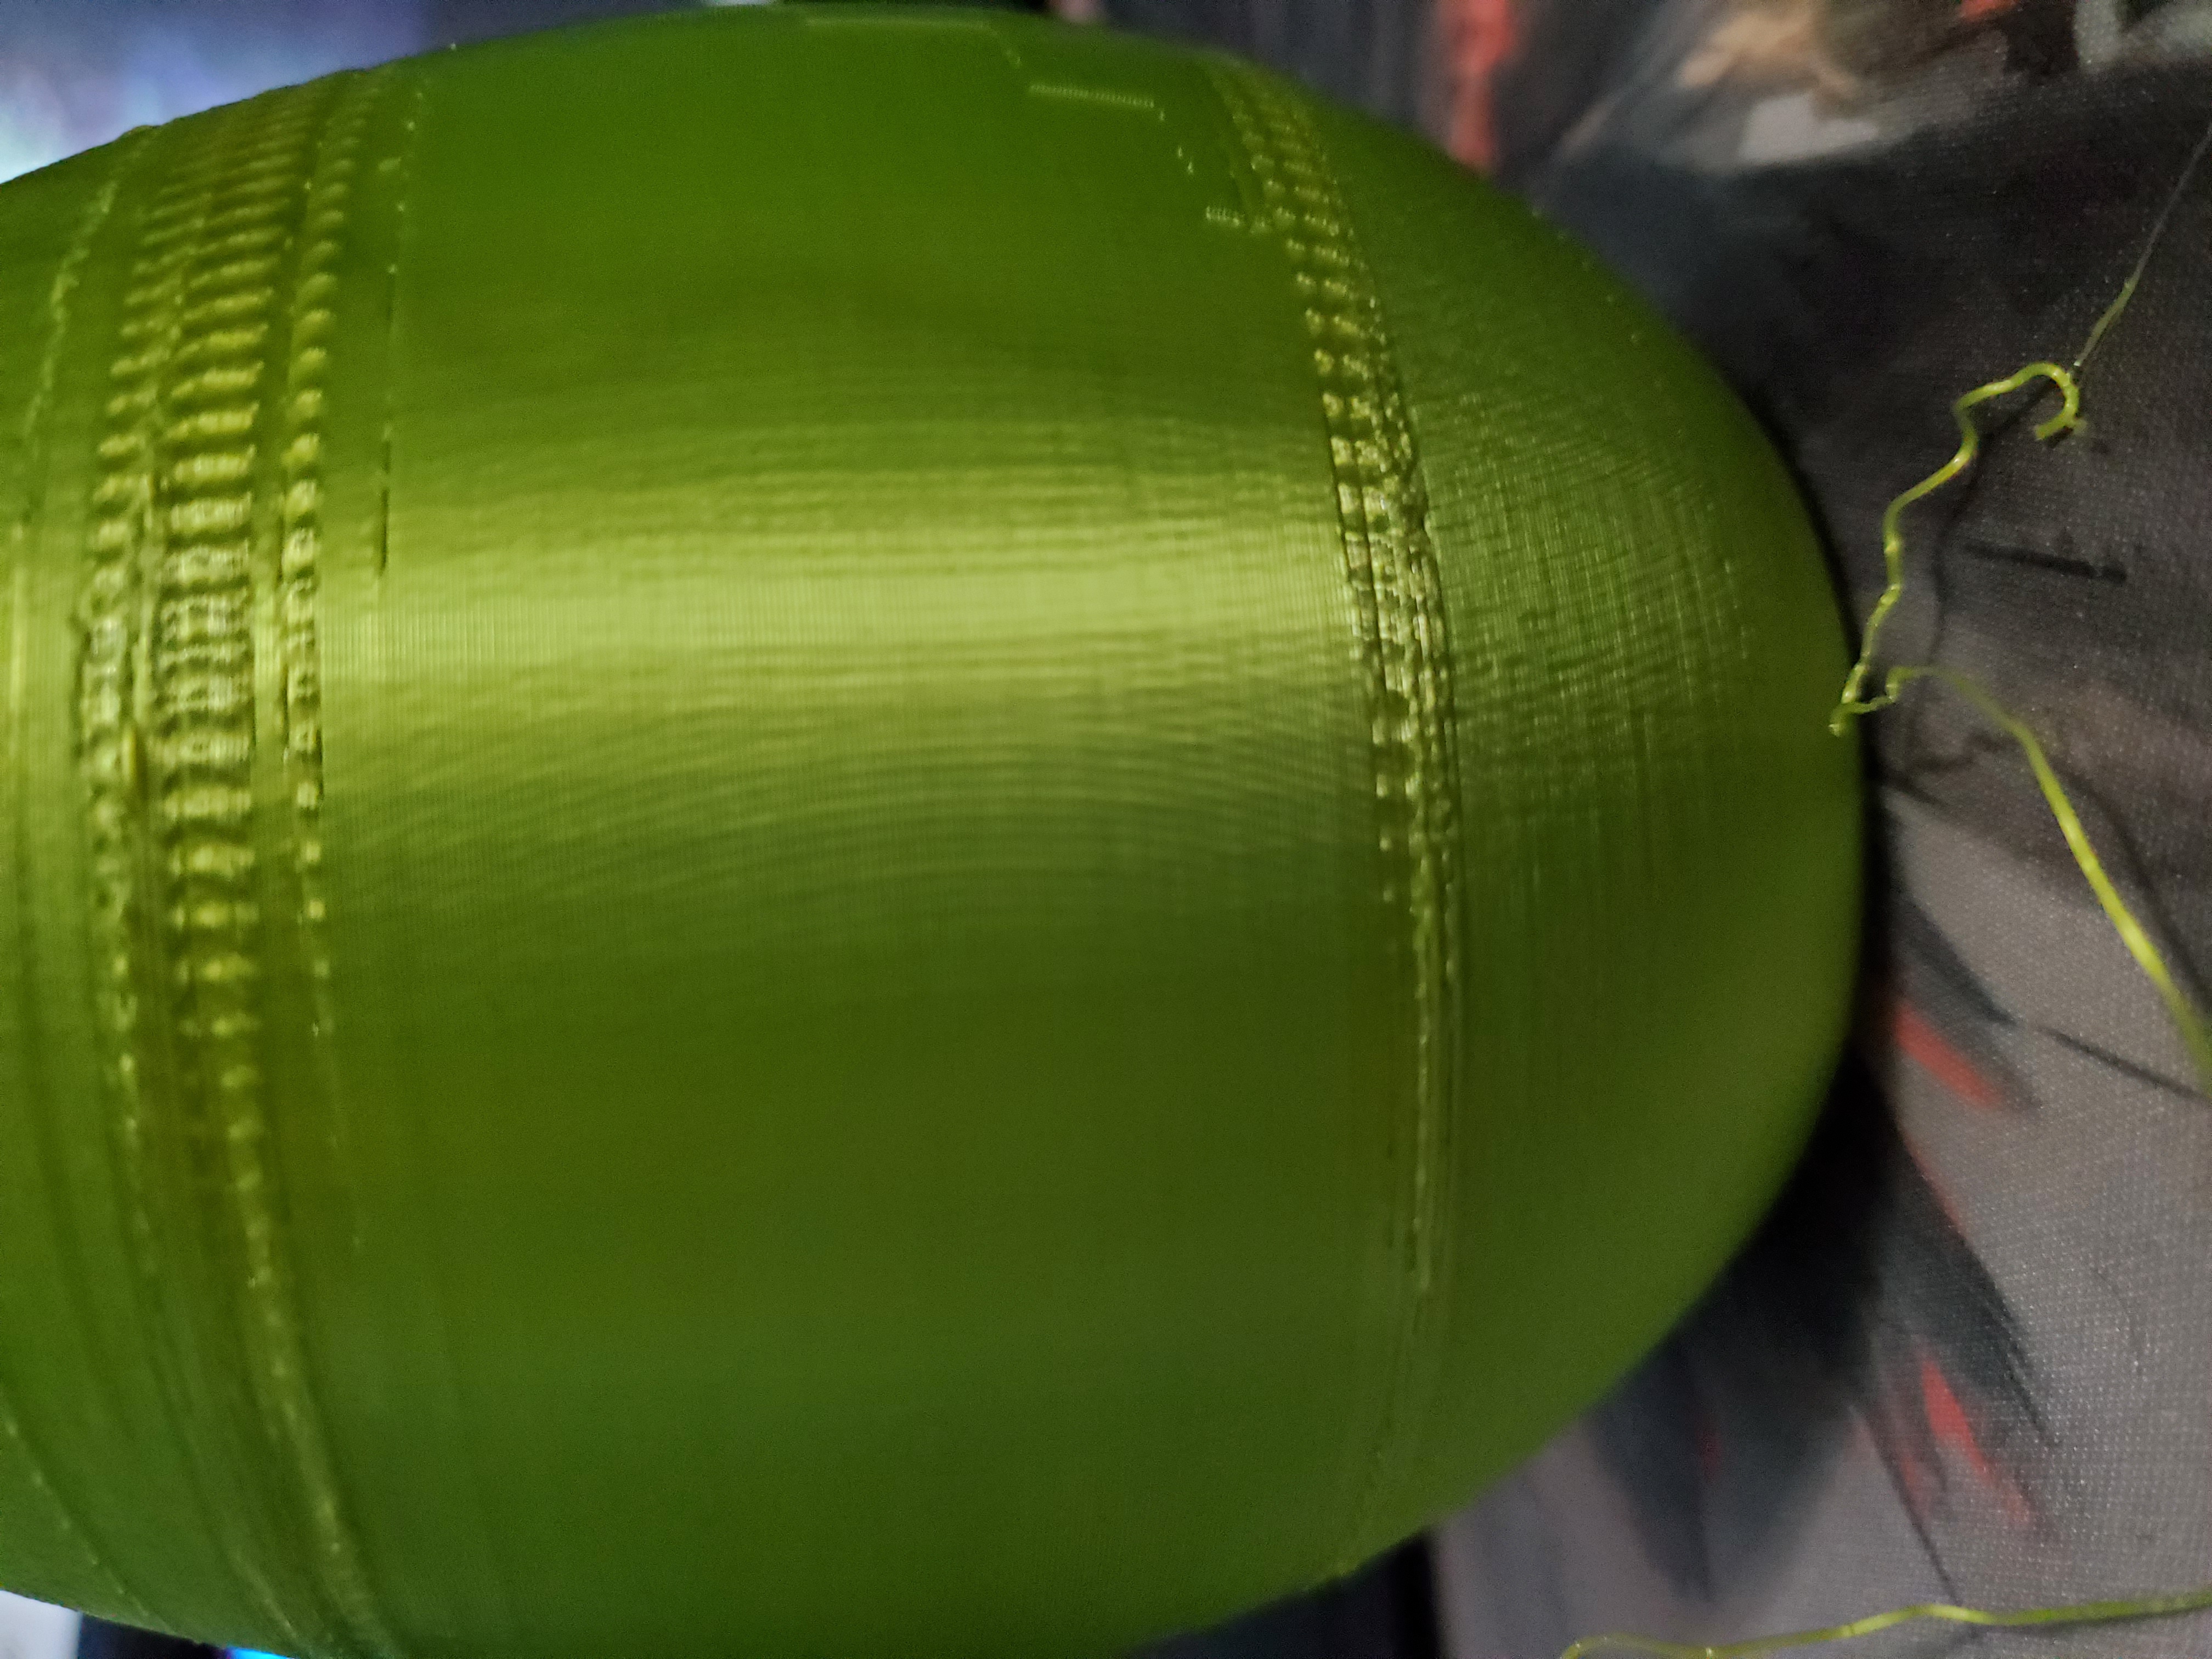
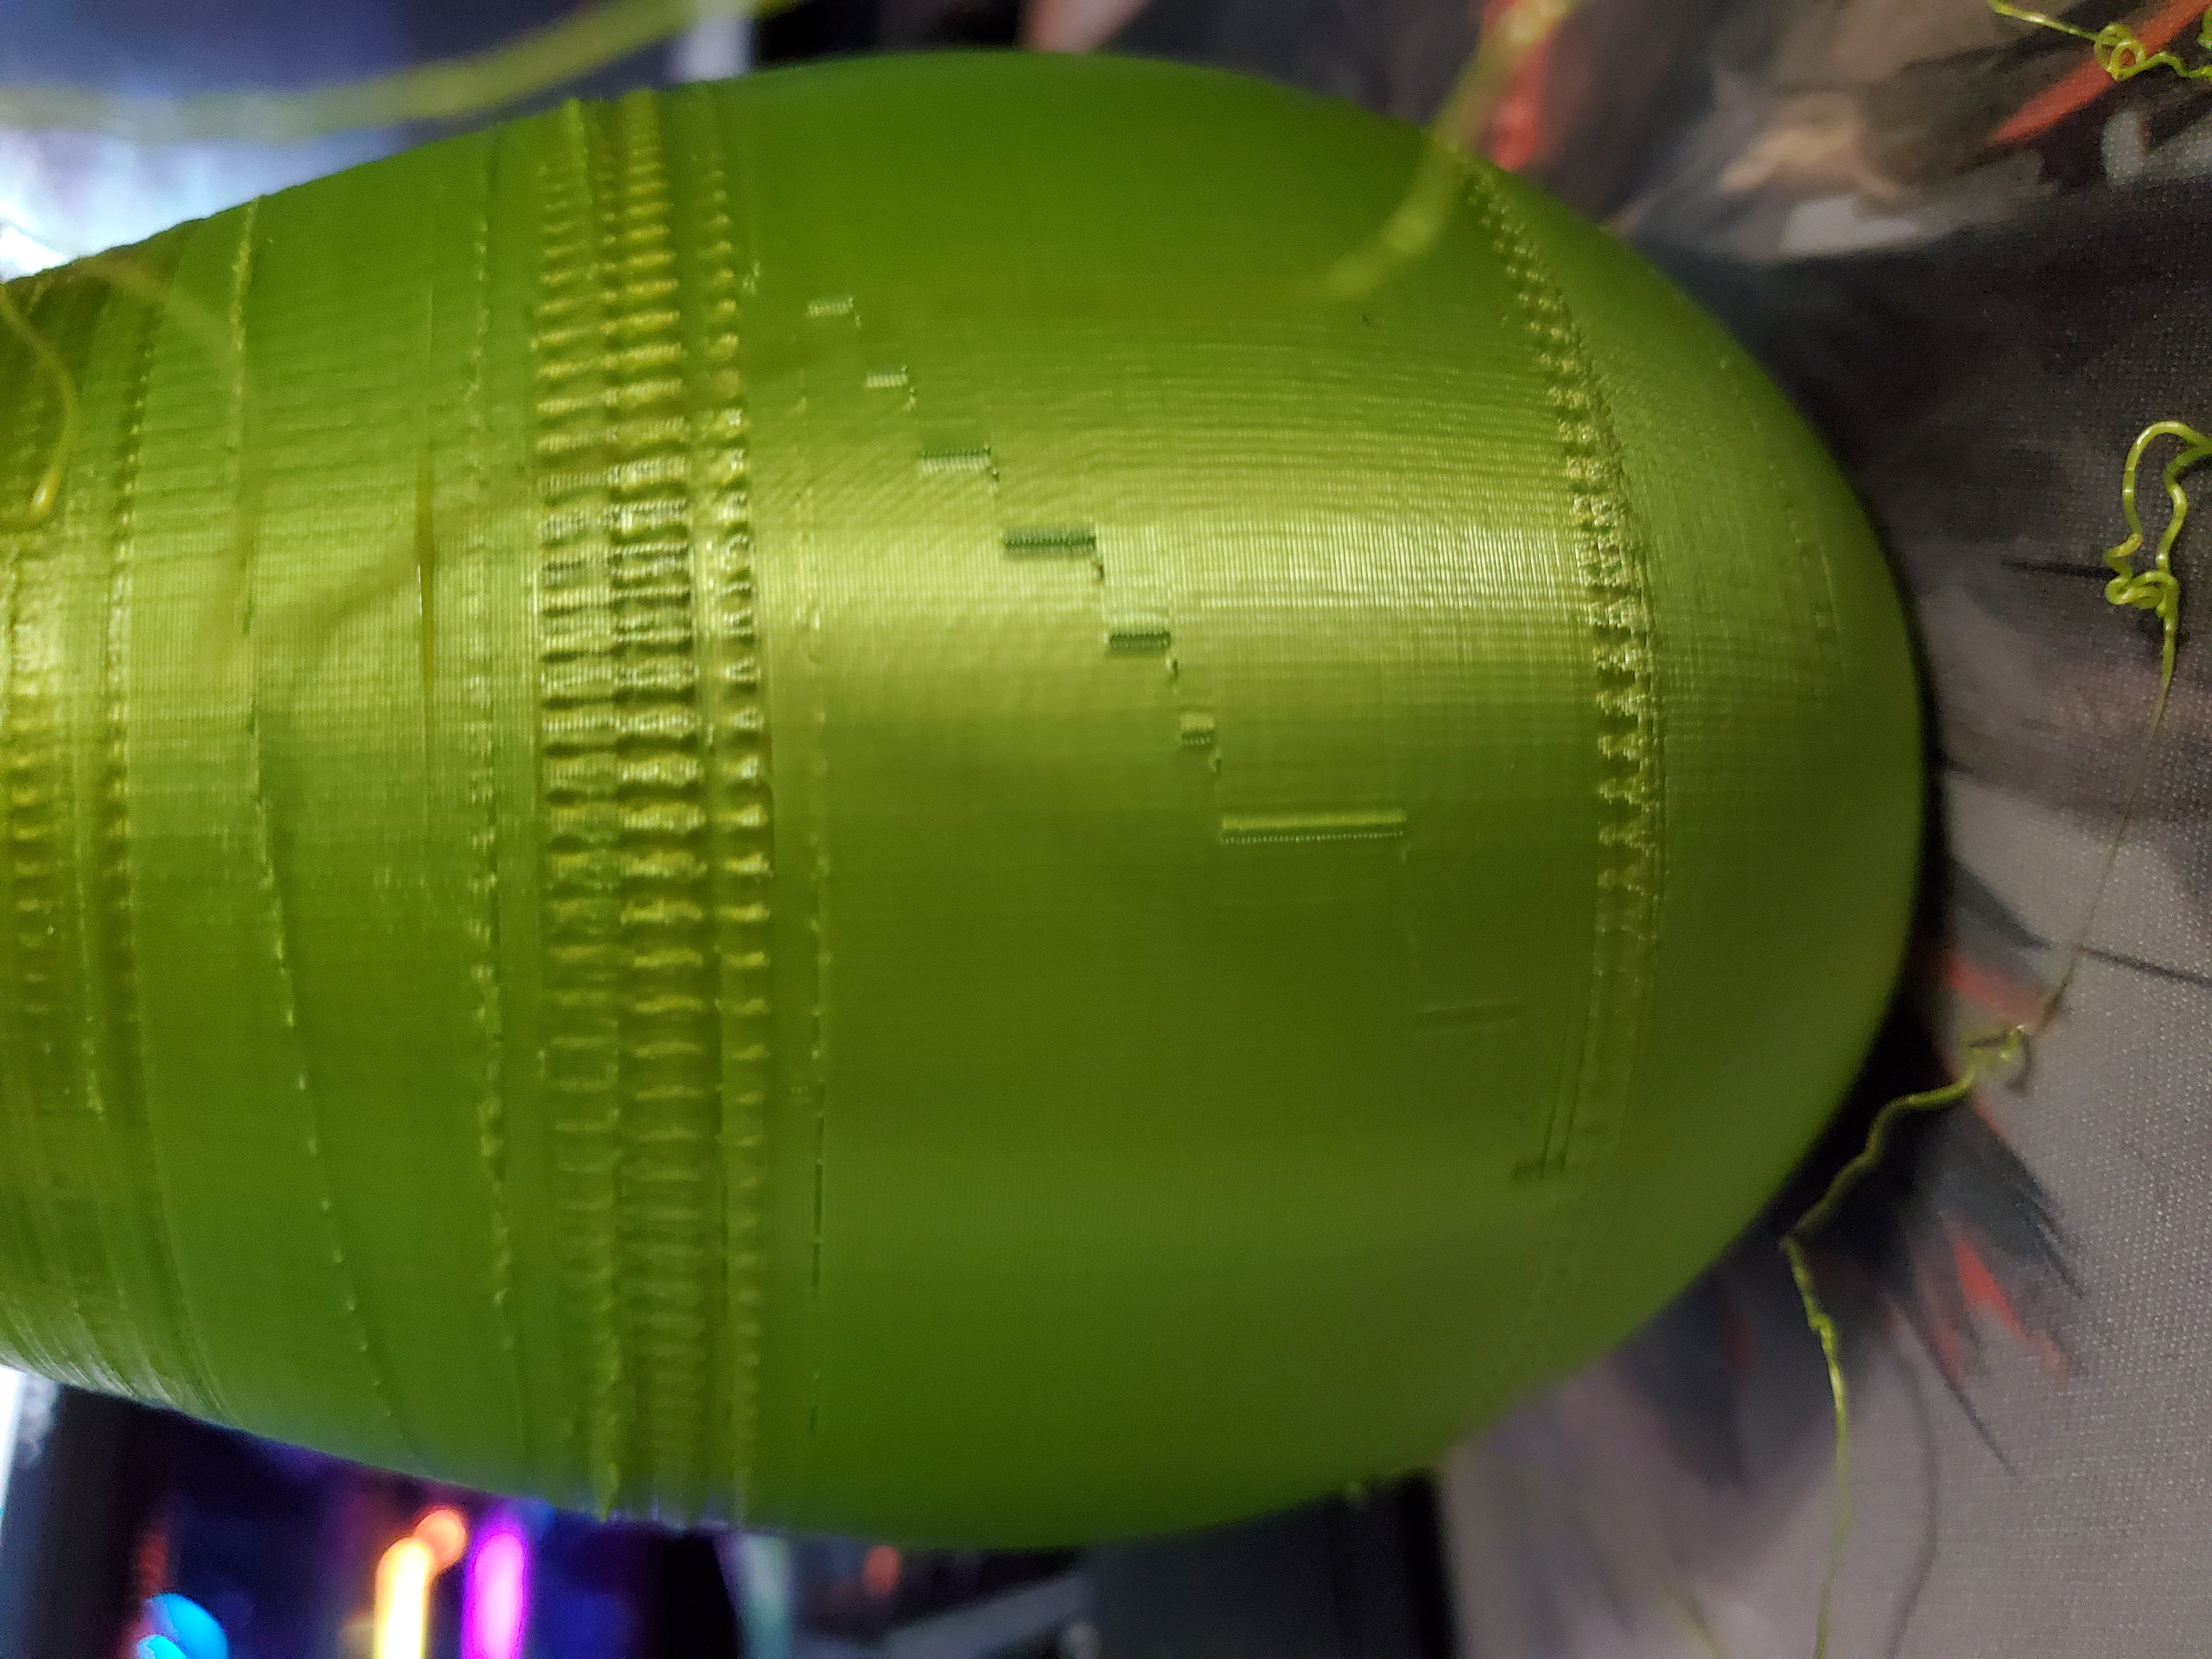
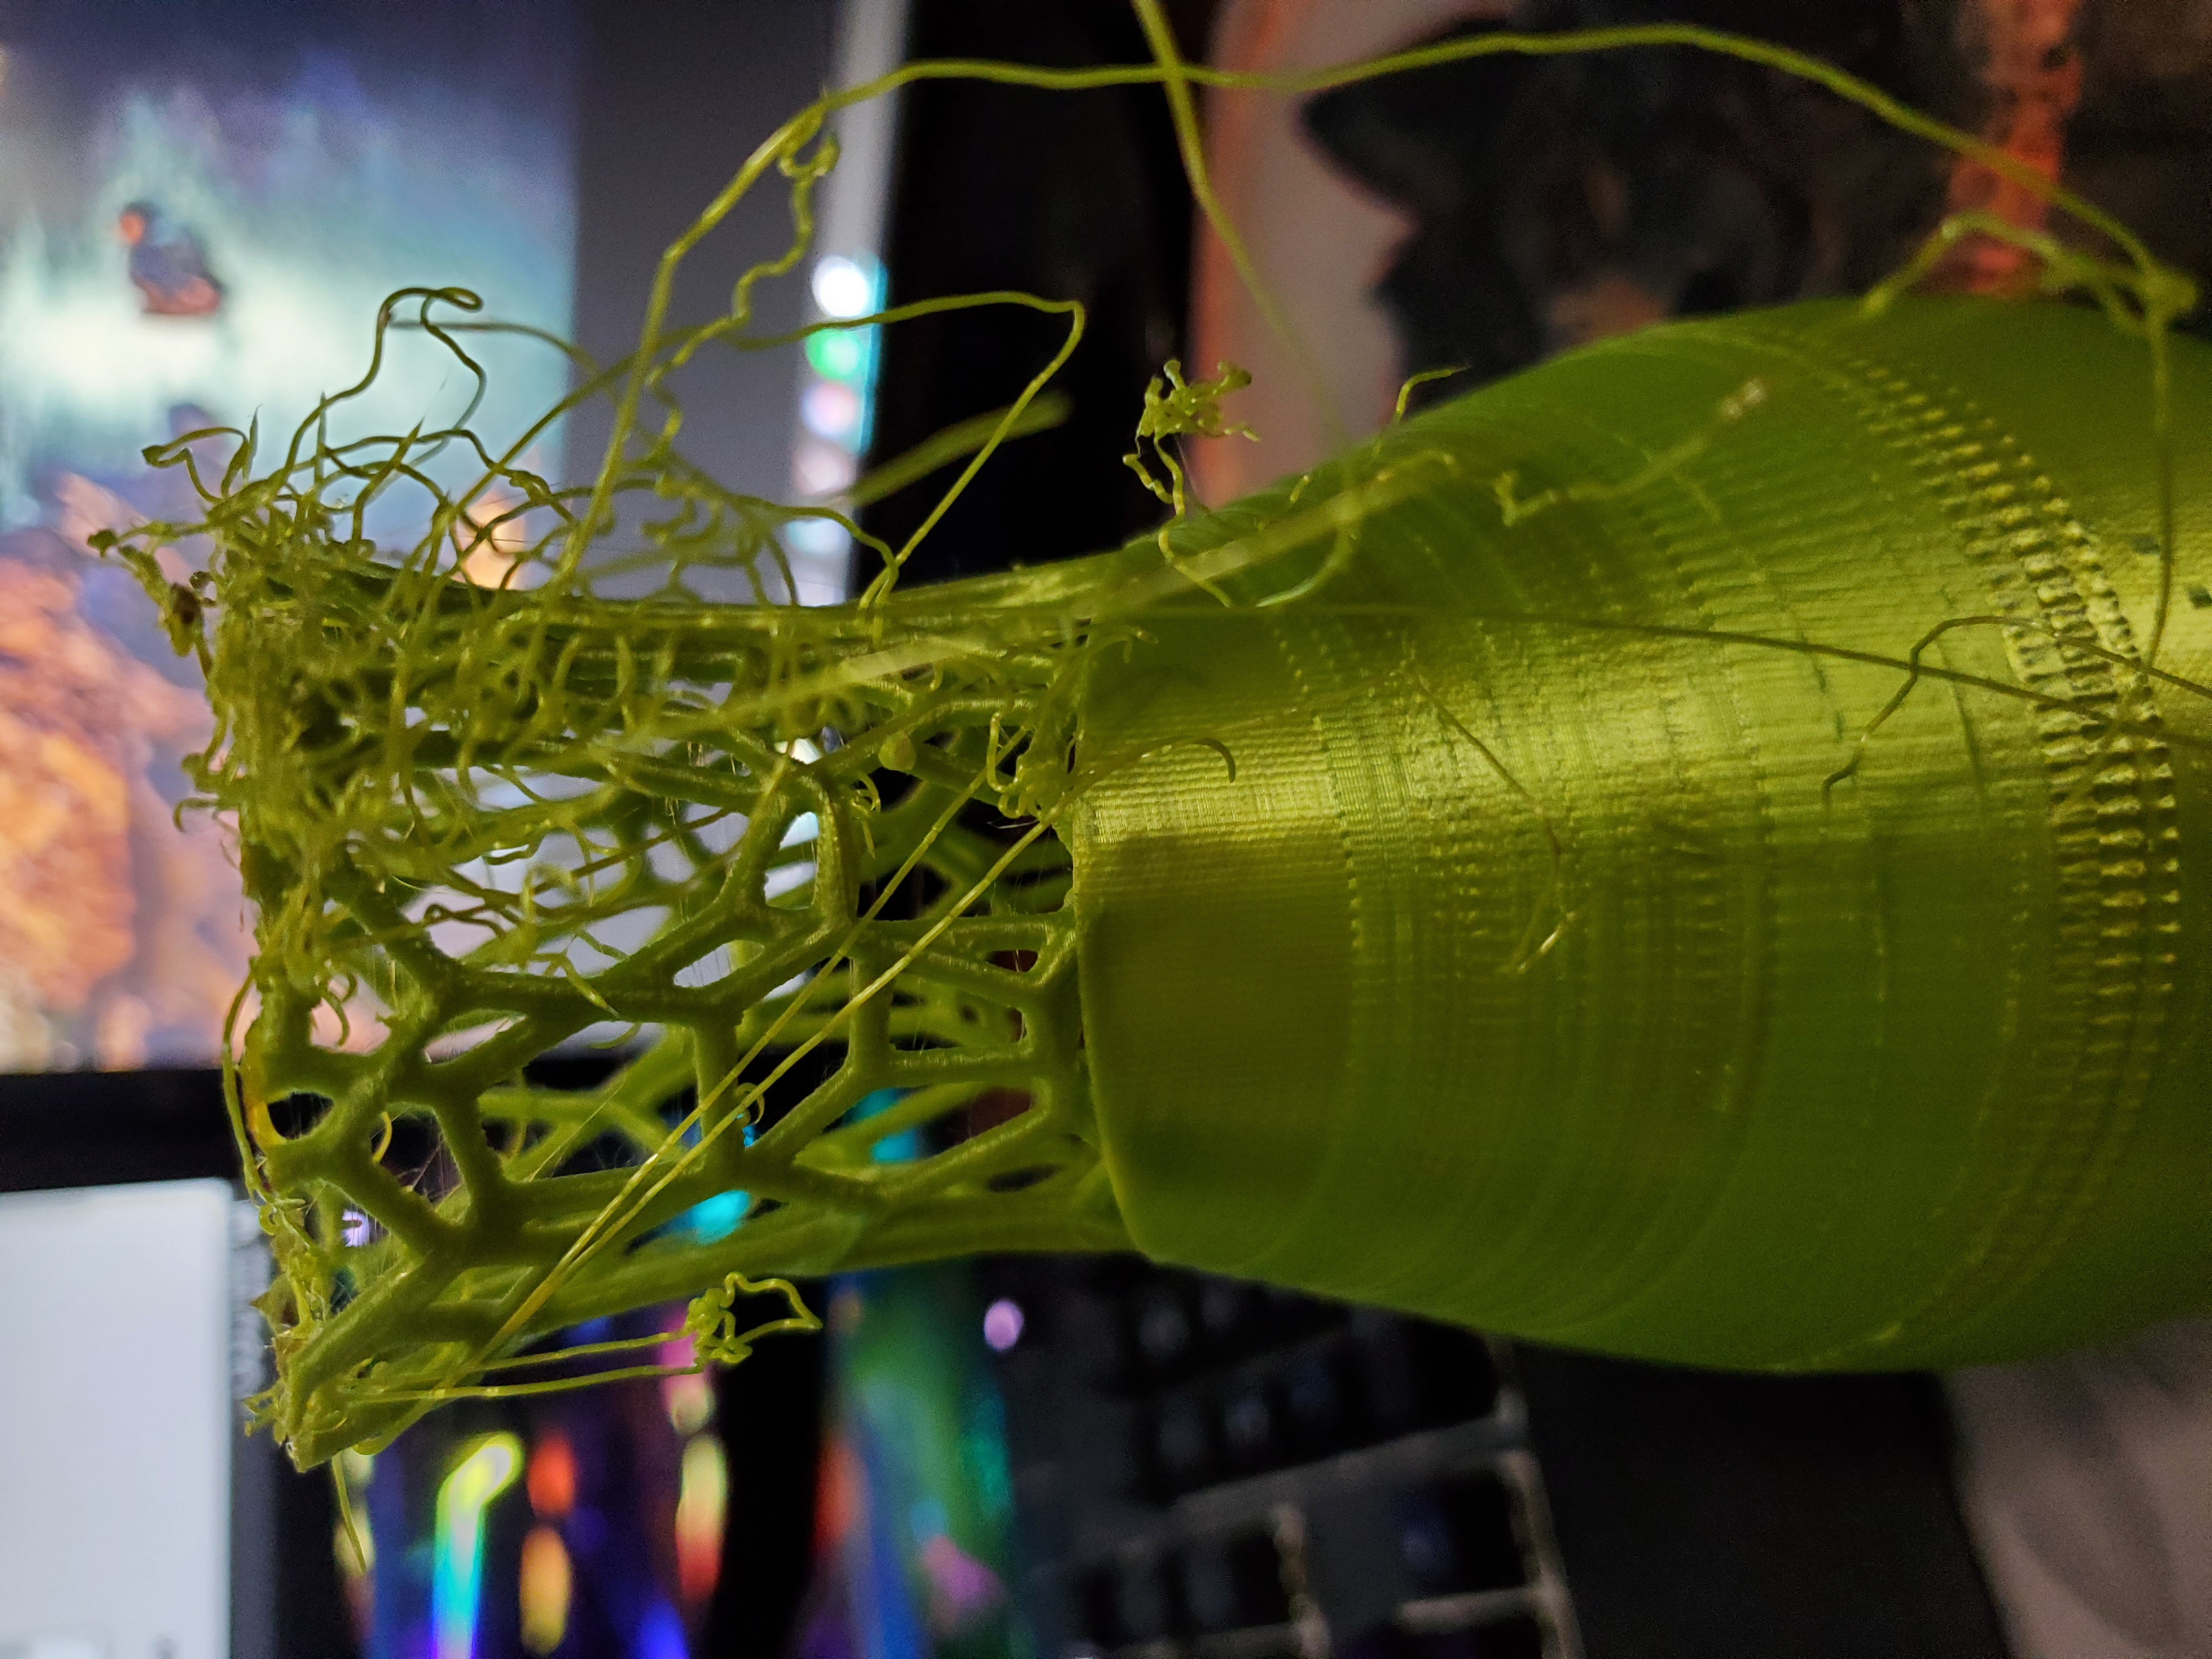
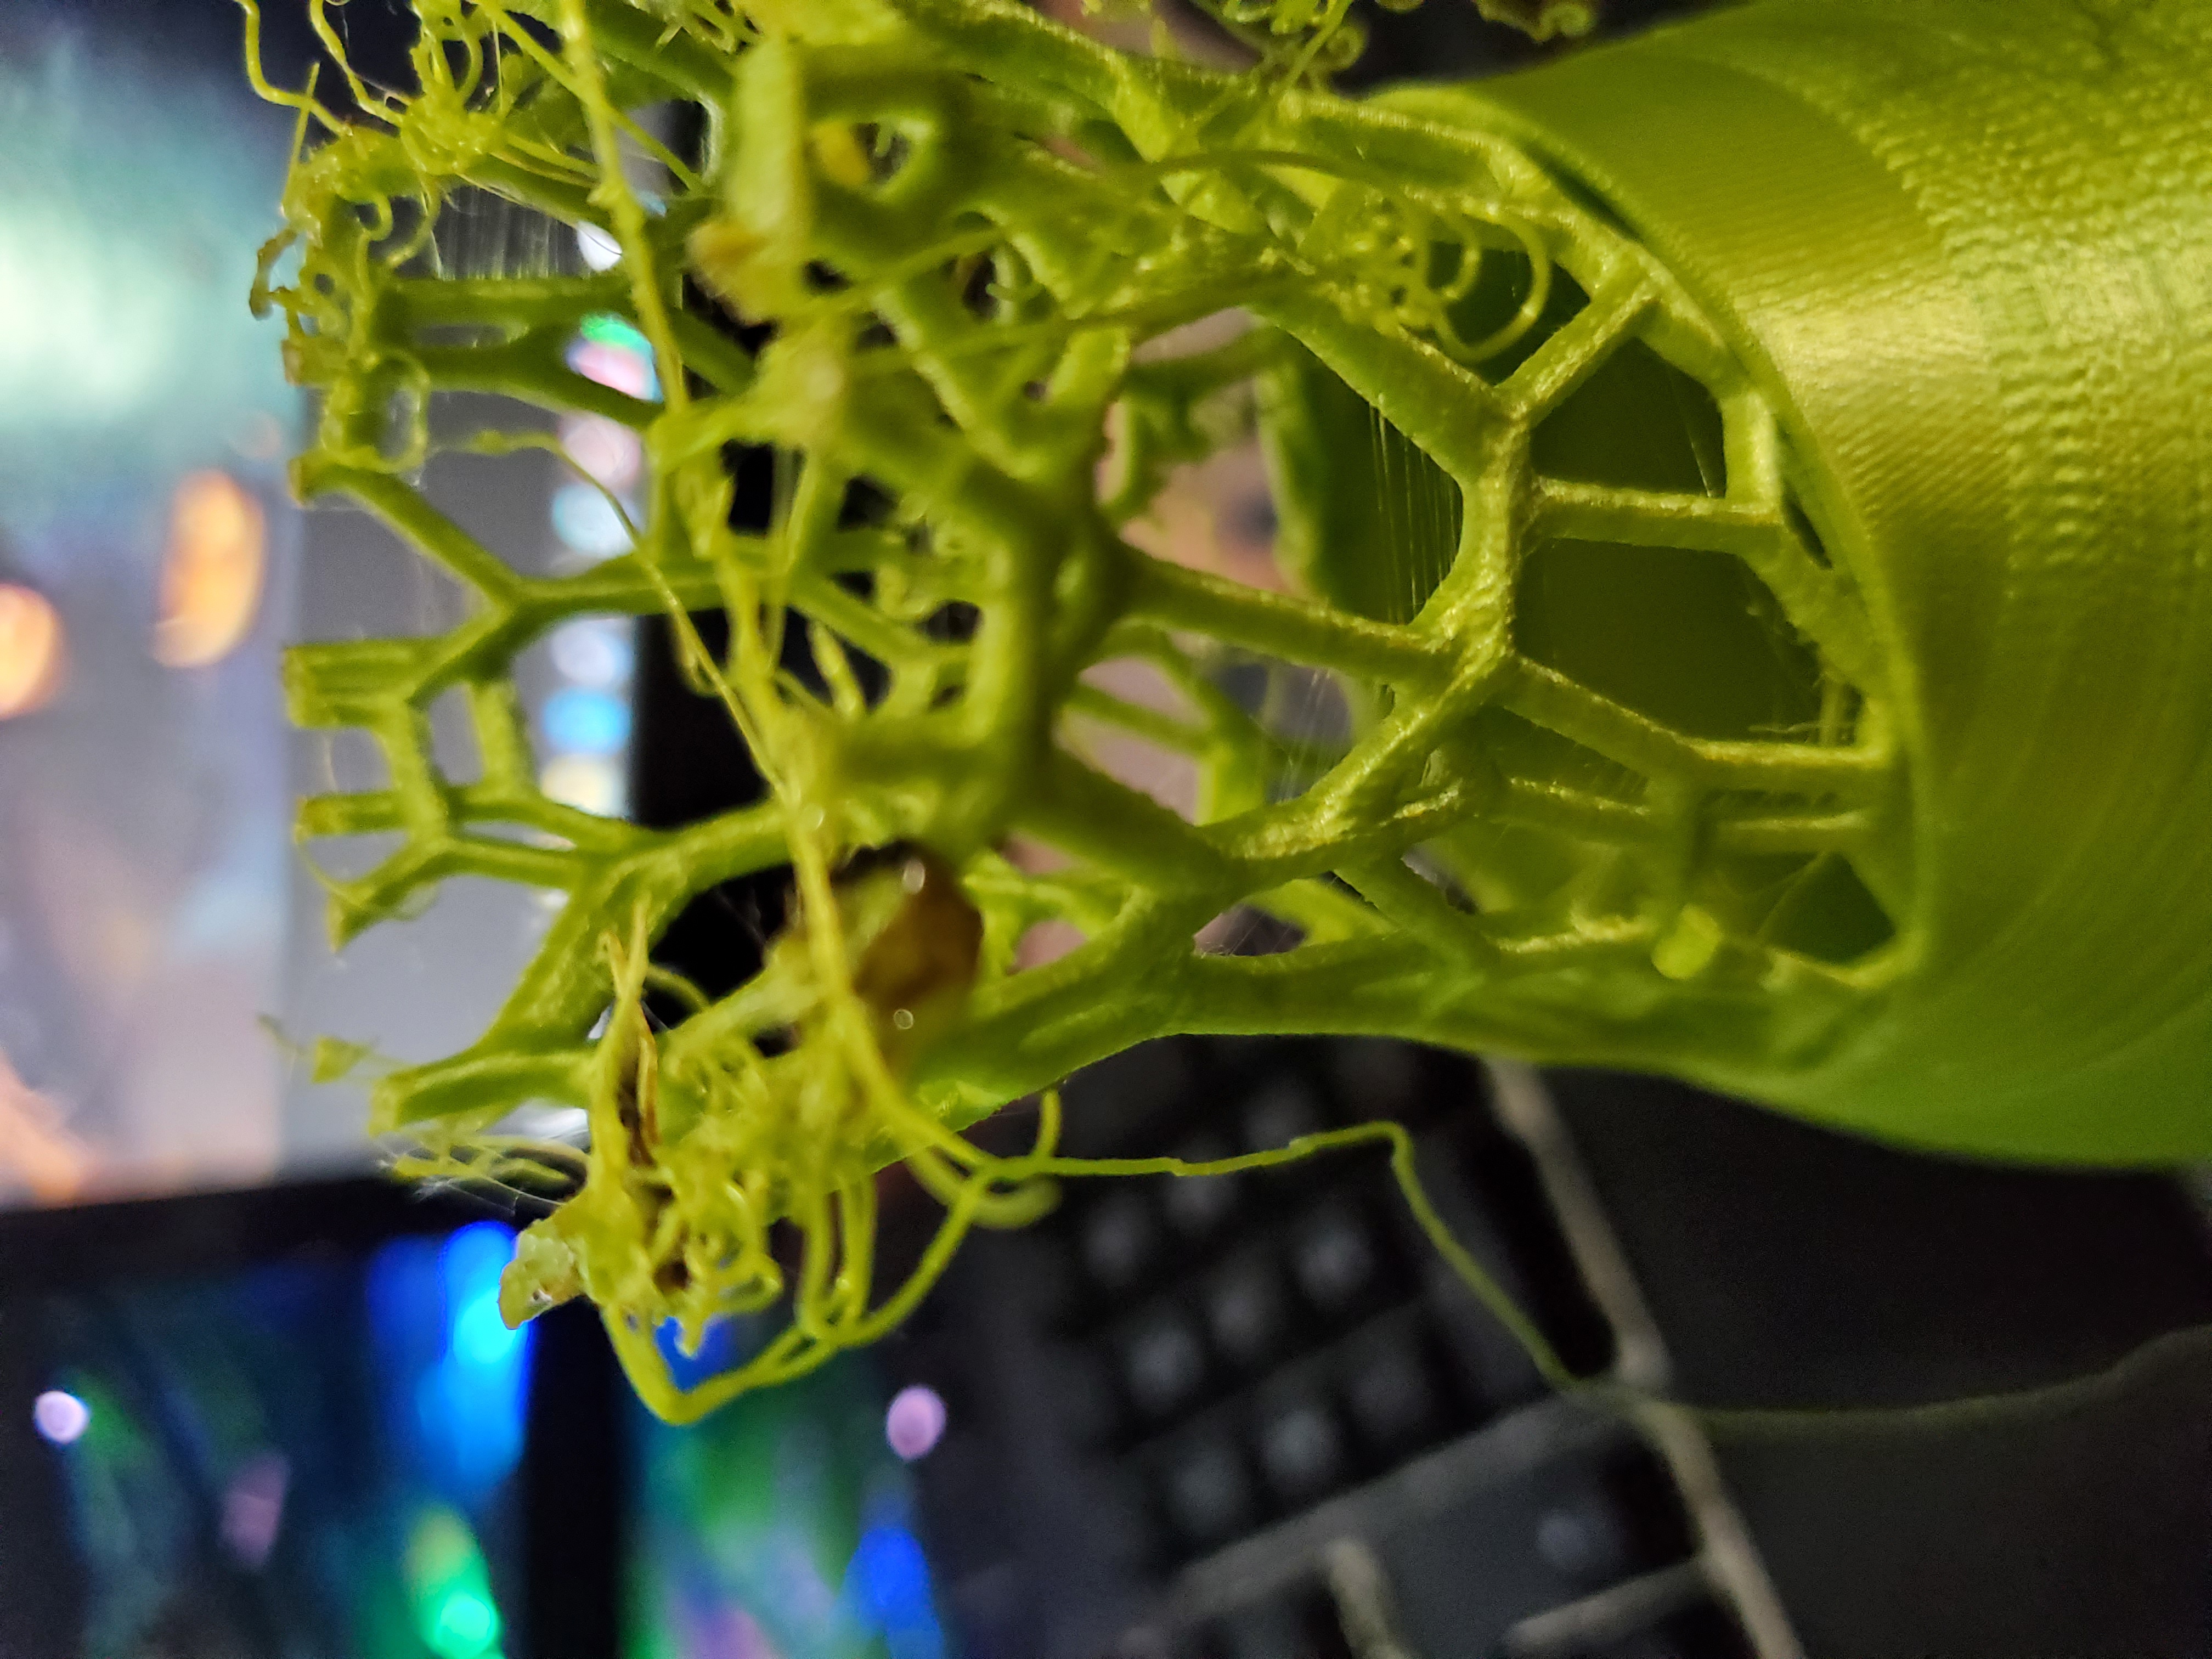
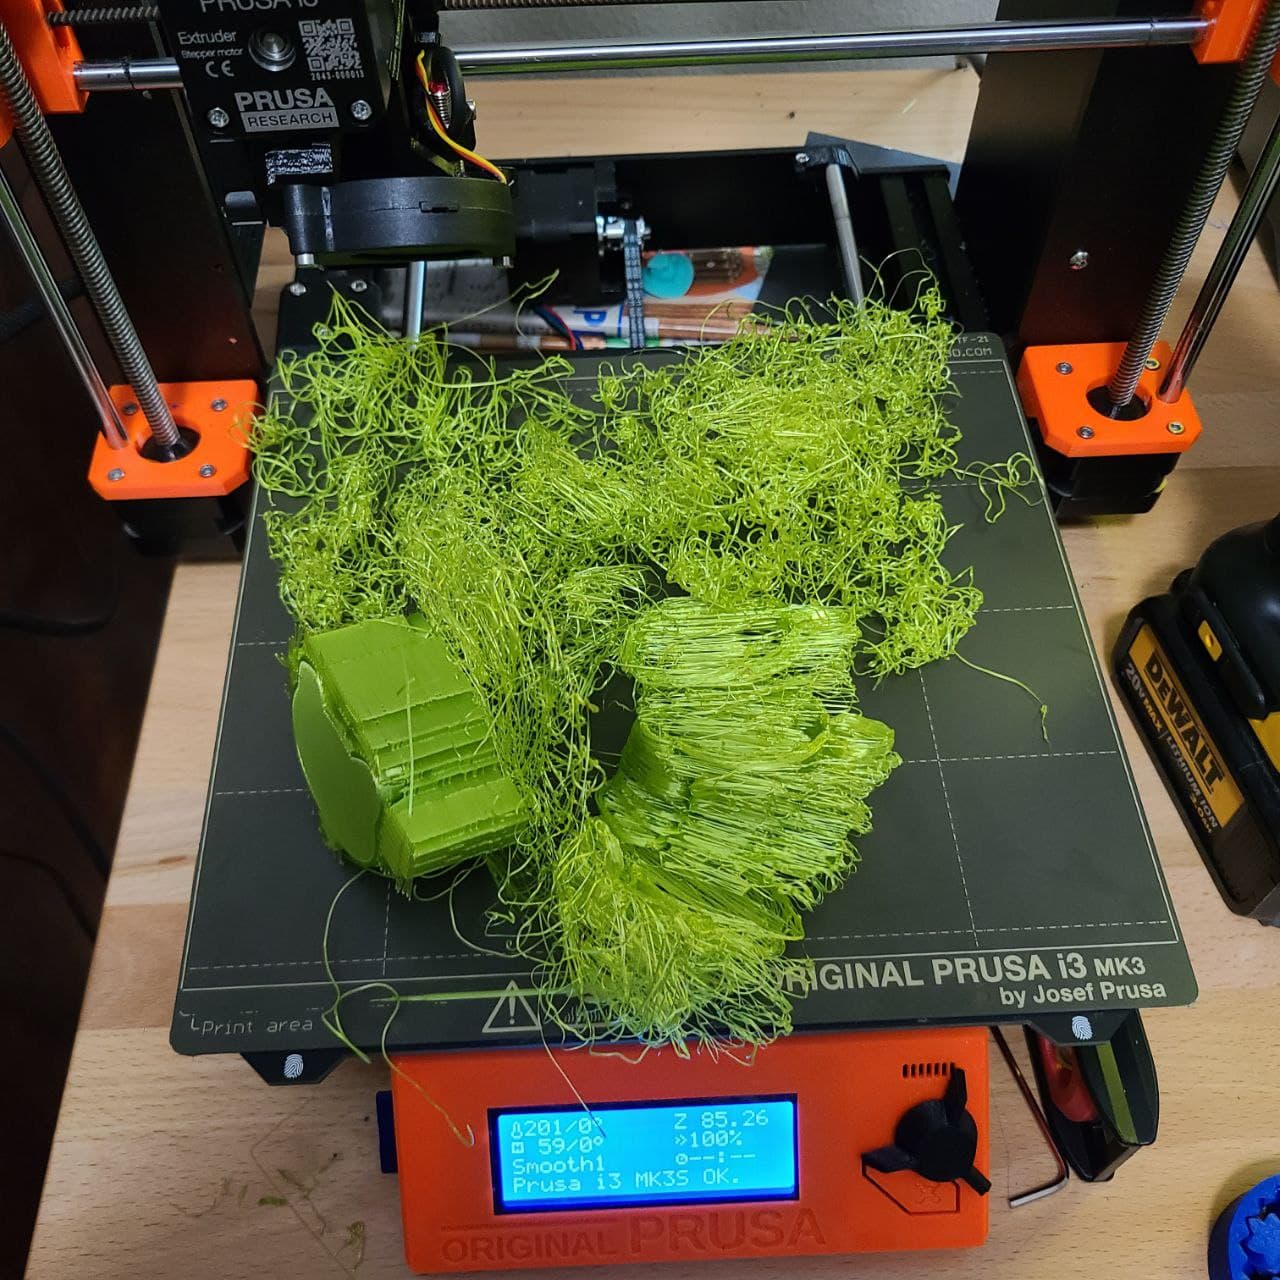
Good evening, and thank you for stopping in. My wife and I are at our wits end with our (relatively) new MK3S+. We received our MK3S+ at the end of February and had it built and setup rather quickly. From the start we had a problem with the thermistor having a connection issue and kept shorting. I found that the short was at the thermistor, and it needed some slack in the line and it would read just fine. The printer worked great and had no issues for 3 weeks, but then something happened and the slack caught (?) on something (?) that was being built (I cannot figure out how) and got cut in half. There was copper wire everywhere and melted, black ABS all over my build plate. It was... bad. I ordered a new thermistor, new extruder, new build plate and some filament and we got everything set back up after we had to re-adjust the z (old build plate was a textured one and went to a smooth... old z was around -1.95 or so, and current z is around -1.295), but we have not had a good print since. Something is always wrong... I tried making adjustments for the stringing, and it didn't do anything. Tried multiple easy prints, and one looked like Cousin It (just a ball of filament), another had wavy sides and a complete shift in a couple of layers (where others didn't), 2 had missing /incomplete layers... so I stopped and said I would print one thing and see how it comes out. And I give you (in the below images) the unholy abomination that my printer spit out onto the floor of my office when it was done (yes, when it was done printing, it rolled off the bed onto the floor). The settings for this were the basic 0.20 mm quality print settings in Prusa slicer; this is Prusa lime green PLA and was run using Prusa Slicer 'Prusa PLA' settings (215 / 60, with a temp change to 210 / 60 after first layers).
I really don't know what all of these mistakes are and what is causing them... there is the weird jitter issues at random heights, the odd stair step pattern (?!), the head of hair, the burned looking PLA blob at the top... this is 100% typical of every print I get after the thermistor issue and replacing the thermistor and the extruder. Does anyone have input that can help? We are at our wits end and I want to make this thing work...
RE: I don't know where to begin...
We need to seperate the issues.
A part falling off the bed before the print finished suggests a bed adhesion problem as does the progressively worse printing at higher layers. Give the print bed a really thorough clean and double check your first layer Z setting.
Since the repair have you tried printing one of the gcodes provided with the printer Did it print OK?
Where did you get the file for the vase you are printing? Is it your own design? If downloaded from the net was there a picture of a successful print? Some of those irregularities suggest the walls may be too thin. You can try modifying extrusion and retraction rates to print something like this but it's easier to redesign with walls at least 2.5 mm thick.
If you want to persist with this print try adding a vertical perimeter and allowing 'Extra perimeters if needed', both settings in Print Settings > Layers and perimeters. But this is not going to be an easy print and I would suggest deferring it until you have everything working well.
Cheerio,
RE: I don't know where to begin...
@diem
Thank you for the reply!
My wife printed a couple of the items that came with it; first was the triceratops head, which does not feel as smooth as one that we printed shortly after we first built it. The head is a bit rough, but does seem to have better detail than the older one. One thing that seemed weird is that after starting the print, the printer updated the display and said it would take 9 hours for this to print vs the original 4. The other print was the tree frog, which came out perfect (sans a small blob of melt that came off in the middle of its head between the eye; this came off with fingernail scratch).
The plate had been thoroughly clean before the run and I had applied the purple glue stick to it before printing. I will try to re-adjust the Z tonight and go through the leveling procedure again, just in case. The print was a vase from thingiverse, and there were some pictures of successful prints on there (link will follow after I post here). I decided to attempt the whole print vs the pieces print as I felt it would help check the stringing adjustments I made. Also, as a note, the parts I mentioned that had wavy sides and layer shifts were fully adhered to the base... but as you said, one problem at a time.
Thank you for the help!
ETA : https://www.thingiverse.com/thing:4800105
Sorry, had to finish my post before I could go grab the website or I would have lost what I typed.
RE: I don't know where to begin...
Let's take one thing at a time.
Your vase - you seem to be printing the whole vase. From the thingiverse link you posted, there is a picture of how to slice that vase into two parts, and then bed the spongy part so it prints at an angle. Those sponge prints are very hard to print, so not bedding it the way it was intended may be part of your issue.
RE: I don't know where to begin...
My wife printed a couple of the items that came with it; first was the triceratops head, which does not feel as smooth as one that we printed shortly after we first built it. The head is a bit rough, but does seem to have better detail than the older one.
So the printer is running reasonably well with known quality gcodes; good.
One thing that seemed weird is that after starting the print, the printer updated the display and said it would take 9 hours for this to print vs the original 4.
Have you been tweaking the speed settings on the LCD?
The plate had been thoroughly clean before the run and I had applied the purple glue stick to it before printing. I will try to re-adjust the Z tonight and go through the leveling procedure again, just in case.
Do so. PLA should stick well without glue stick.
The print was a vase from thingiverse, and there were some pictures of successful prints on there (link will follow after I post here). I decided to attempt the whole print vs the pieces print as I felt it would help check the stringing adjustments I made. Also, as a note, the parts I mentioned that had wavy sides and layer shifts were fully adhered to the base... but as you said, one problem at a time.
Thats a two-part print designed for a particular, difficult, filament and needing particular settings to succeed. There is no picture of a print of the one-piece vase, nor of the one-piece remix, this is a red flag for experienced users. Thingiverse (and other on line repositories) is full of untested designs and unfinished work. This is a showpiece for a technically advanced user who has also supplied the single part file for those who might rework it.
To print in one you need a multi material unit or a dual head printer and some seriously careful setting up; I'm not surprised your print failed. I would expect to find it tricky AND I'd probably modify it to help the parts stick together
Put this file on one side and revisit it in a couple of years when you have a few hundred decent prints under your belt.
In the meanwhile check your calibration and tune the machine to print as it did before, the smooth plate is thicker so the z setting will be different. Now start designing and printing your own orignal designs...
Cheerio,
RE: I don't know where to begin...
One thing that seemed weird is that after starting the print, the printer updated the display and said it would take 9 hours for this to print vs the original 4.
Have you been tweaking the speed settings on the LCD?
The plate had been thoroughly clean before the run and I had applied the purple glue stick to it before printing. I will try to re-adjust the Z tonight and go through the leveling procedure again, just in case.
Do so. PLA should stick well without glue stick.
The print was a vase from thingiverse, and there were some pictures of successful prints on there (link will follow after I post here). I decided to attempt the whole print vs the pieces print as I felt it would help check the stringing adjustments I made. Also, as a note, the parts I mentioned that had wavy sides and layer shifts were fully adhered to the base... but as you said, one problem at a time.
Thats a two-part print designed for a particular, difficult, filament and needing particular settings to succeed. There is no picture of a print of the one-piece vase, nor of the one-piece remix, this is a red flag for experienced users. Thingiverse (and other on line repositories) is full of untested designs and unfinished work. This is a showpiece for a technically advanced user who has also supplied the single part file for those who might rework it.
To print in one you need a multi material unit or a dual head printer and some seriously careful setting up; I'm not surprised your print failed. I would expect to find it tricky AND I'd probably modify it to help the parts stick together
Put this file on one side and revisit it in a couple of years when you have a few hundred decent prints under your belt.
In the meanwhile check your calibration and tune the machine to print as it did before, the smooth plate is thicker so the z setting will be different. Now start designing and printing your own orignal designs...
Cheerio,
No i have not been tweaking the speed settings; I have not had a lot of success with the PLA sticking without glue, but that could be the z height. I will go through a couple of easier prints that I have and see if they work out. Thank you for the help and input, I really appreciate it.
Let's take one thing at a time.
Your vase - you seem to be printing the whole vase. From the thingiverse link you posted, there is a picture of how to slice that vase into two parts, and then bed the spongy part so it prints at an angle. Those sponge prints are very hard to print, so not bedding it the way it was intended may be part of your issue.
I wanted to try the whole vase as a way to also test the stringing; I will be attempting them separately. Thank you very much for your input!
RE: I don't know where to begin...
No i have not been tweaking the speed settings; I have not had a lot of success with the PLA sticking without glue, but that could be the z height. I will go through a couple of easier prints that I have and see if they work out. Thank you for the help and input, I really appreciate it..
I believe these are your two issues.
- clean the plate with dishwashing liquid
- Calibrate the live z value
also print speed is not the only way a print can sped up. You may have inadvertently changed the print profile to a different nozzle. There are many other ways to speed a print up too it these probably wouldn’t cause an issue.
i3 Mk3 [aug 2018] upgrade>>> i3MK3/S+[Dec 2023]
RE: I don't know where to begin...
PLA does not stick to a powder coated bed, buy a pei sheet for pla, this will make your live easier.
To get a good print: (after a crash do a z-calibration first).
1. Clean bed with dish soap, the you can use a few times alcohol , the use dish soap again. If more sticking is needed use glue stick.
2. First layer needs to 100%, if not good, sticking will get bad.
Both setting are needed to get good sticking, to get a model not releasing during printing, avoiding spaghetti and a big ball sticking to nozzle.
Pei sheet and petg, use window cleaner on the pei sheet, petg will stick to good and destroy the pei sheet.
RE: I don't know where to begin...
@demensfolf
I looked at this model last night and Diem is correct this model is not ready for prime time, and you are not ready to handle the challenges it presents, printing it as a whole it has no less then 14 areas that will not print properly without supports and 10 of them are floating in mid-air. the model will need to be reworked in order to be printed properly on an FDM/FFF printer, even as two pieces. furthermore, the person who setup the .3mf file that is bundled with the vase had no clue what they were doing, for example they used a raft to support the lattice, then added a brim to the raft, left the skirt on and didn't remove the elephant foot comp.
my suggestion will be for you to take some time look for easier prints, as well spend some time learning one of the free CADD software's out there, it will really help you the most in the long run. the folks in those communities are very helpful as well.
If you want to test stringing of your materials use one of the stringing test prints.
Know that with time you will gain the experience you need to repair and print items such as these.
Good Luck,
Swiss_Cheese
The Filament Whisperer
RE: I don't know where to begin...
No i have not been tweaking the speed settings; I have not had a lot of success with the PLA sticking without glue, but that could be the z height. I will go through a couple of easier prints that I have and see if they work out. Thank you for the help and input, I really appreciate it..
I believe these are your two issues.
- clean the plate with dishwashing liquid
- Calibrate the live z value
also print speed is not the only way a print can sped up. You may have inadvertently changed the print profile to a different nozzle. There are many other ways to speed a print up too it these probably wouldn’t cause an issue.
Hi, I have done both and neither seems to be doing much good. I am currently printing the Nefertiti bust that comes with it after cleaning the bed with dish soap, followed by IPA and the supports do not stick. On had a build up, like a ball, on top of it. Not sure where or why it is doing that.
RE: I don't know where to begin...
PLA does not stick to a powder coated bed, buy a pei sheet for pla, this will make your live easier.
To get a good print: (after a crash do a z-calibration first).
1. Clean bed with dish soap, the you can use a few times alcohol , the use dish soap again. If more sticking is needed use glue stick.
2. First layer needs to 100%, if not good, sticking will get bad.
Both setting are needed to get good sticking, to get a model not releasing during printing, avoiding spaghetti and a big ball sticking to nozzle.
Pei sheet and petg, use window cleaner on the pei sheet, petg will stick to good and destroy the pei sheet.
I am using "Spring Steel Sheet With Smooth Double-sided PEI" for my PLA prints... I also have the "Double-sided Textured PEI Powder-coated Spring Steel Sheet" that i originally got with the instrument for PETG/ABS...
No amount of cleaning seems to get the prints to be stable on the smooth bed... I could lower the Z, but it starts to look... weird... when I am down lower than it is now.
RE: I don't know where to begin...
@demensfolf
I looked at this model last night and Diem is correct this model is not ready for prime time, and you are not ready to handle the challenges it presents, printing it as a whole it has no less then 14 areas that will not print properly without supports and 10 of them are floating in mid-air. the model will need to be reworked in order to be printed properly on an FDM/FFF printer, even as two pieces. furthermore, the person who setup the .3mf file that is bundled with the vase had no clue what they were doing, for example they used a raft to support the lattice, then added a brim to the raft, left the skirt on and didn't remove the elephant foot comp.
my suggestion will be for you to take some time look for easier prints, as well spend some time learning one of the free CADD software's out there, it will really help you the most in the long run. the folks in those communities are very helpful as well.
If you want to test stringing of your materials use one of the stringing test prints.
Know that with time you will gain the experience you need to repair and print items such as these.
Good Luck,
Swiss_Cheese
Yea... I think my wife and I will be giving up on this Prusa... we got it to print scenery / buildings for D&D and wargaming, but it just... hasn't worked properly since we got it. Between the faulty initial temp sensor and the current printing issues, I think we'll probably just stick with our two resin printers, and use the Prusa for... i don't know, small things. I tried printing a verified print from a friend and this happened (while I was at work)
I hate to give up on it after spending so much money on it, but I don't have the time away from work to spend on something that is this.. finicky. Sadly, I am thinking something else got damaged when the thermistor had its melt down... it got hot enough to warp the nozzle and I had thought to order a new one just in case it was heavily clogged. Anyways, thank you for the help.
RE: I don't know where to begin...
I am sorry you are having such a problem but you seem to not be going back to the basics and test on a known good model - a square box even. Yet you are insisting on printing something large and complex. Then leaving it its own devices while you go out and wonder why it is all so hard.
Print a test square say 75mm x 75m one level high and show it. This is to prove your adhesion and live z is correct.
i3 Mk3 [aug 2018] upgrade>>> i3MK3/S+[Dec 2023]
RE: I don't know where to begin...
Yea... I think my wife and I will be giving up on this Prusa... we got it to print scenery / buildings for D&D and wargaming, but it just... hasn't worked properly since we got it. Between the faulty initial temp sensor and the current printing issues, I think we'll probably just stick with our two resin printers, and use the Prusa for... i don't know, small things. I tried printing a verified print from a friend and this happened (while I was at work)
Don't give up too quickly. You just went straight for an ambitious print -- and a possibly faulty one to boot -- which would be challenging for anybody. That last looks like a simple case of poor bed adhesion combined with being left alone. I suggest getting some smaller prints that focus on one specific issue and mastering those before going for multi-hour prints. The Mk3 is a great printer, but we're not at toaster-level simplicity yet. Give yourself some time.
I've been doing some large D&D scenery pieces (PrintableScenery, Dragon's Rest) and there's a lot you can to do optimize prints to speed up production. If you want larger pieces, FFF printing may still be your best option.
RE: I don't know where to begin...
To get a good print:
1. Clean bed, use dish soap. Alcohol does not clean all dirt.
2. First layer calibration, this needs to be 100%(check youtube for examples).
Both settings are needed to stick to the plate, and to prevent spaghetti and a big ball of filament sticking to the nozzle.
And this you need to learn, and printing a model is not important.
Make a picture of your first layer, and let us see.
Check your first layer, lines should be sticking together, no holes, but also do not go to low, then it sticking will get bad again.
This is what I do if first layer is not working:
1. Clean bed.
2. Print a few cubes spread over the bed, start printing, adjust the first layer, start at a to high point, then lower it in steps, then you will find the good setting for this. I was often to low without knowing, and sticking got bad.
After a crash or hitting the model with extruder , do a z-calbration(or moving the printer).
Printing will never be without learning and time, read forum for 5 minutes very day, you will learn.
And printing will never be , I have a model, start printing, and I am ready, and yes some model will work like this, if model is made for 3d printing. Most models you will need to adjust settings, and every filament it is possible you need to adjust, buy only one brand then this is more easy to tune it for yourself(temp tower, string test, etc).
RE: I don't know where to begin...
@demensfolf
I tried printing a verified print from a friend and this happened
Thank you for the picture. The bottom (first layer) is not quite clear enough for diagnosis but there are signs of poor adhesion.
Also there are visible smears on the steel sheet, you really do need to get it completely clean for the filament to stick properly.
Go to the kitchen sink and clean the sheet with dishwashing detergent (Dawn/Fairy) and plenty of HOT water, rinse well and dry with a fresh paper towel. Handle by the edges only.
DO NOT use glue stick with PLA on a smooth PEI sheet.
Also, I suspect your first layer is not quite there so recalibrate; it's not far off, your print worked for a while until it grew tall enough for the leverage to tear it off.
At the end of the calibration you are aiming to print a single layer *sheet*. It should be possible to peel it off in one and fold it without the threads seperating. If it breaks into lines it is too high, not squished enough. If it is a single sheet but with wavy lines or drag marks on it you are too low.
For most people it pays to use 7x7 mesh bed levelling.
Many beginners have problems with the built-in first layer calibration routine. There are alternatives, see this page by a regular poster here:
http://projects.ttlexceeded.com/3dprinting_mk3_live_z_calibration.html
and look at this thread:
https://forum.prusa3d.com/forum/original-prusa-i3-mk3s-mk3-assembly-and-first-prints-troubleshooting/life-adjust-z-my-way/
Don't give up just yet; you really are close. If that model had been less than 10cm tall, say a dungeon floor, some walls laid flat for printing or even a 25mm scale cottage - it would probably have been a succesful print...
Cheerio,